RV 1 - Binoculars MINOX - Free user manual and instructions
Find the device manual for free RV 1 MINOX in PDF.


| Product type | Red dot sight |
| Brand | Minox |
| Model | RV 1 |
| Magnification | 1x |
| Aperture (mm) | 18 |
| Adjustment range | 100 MOA |
| Click adjustments | 1 MOA |
| Red dot size | 2 MOA |
| Waterproof rating | IPX7 |
| Brightness settings | 12 levels (0 off, 1-3 night, 4-10 day, 11 bright) |
| Power supply | 1 CR2032 battery, 3V |
| Weight (without mount) | 96 g |
| Dimensions (L x W x H) | 64 x 43 x 37 mm |
| Mounting | Picatinny MIL-STD 1913 or Weaver rail |
| Included accessories | Mounting tool, neoprene cover, cleaning cloth, CR2032 battery |
| Serial number | On the left side of the device |
| Warranty | 10 years optical, 5 years electronic (under conditions) |
| Maintenance | Clean with a soft cloth, do not disassemble |
| Article reference | 80224005 |
| Manufacturer | Minox GmbH, Walter-Zapp-Str. 4, Germany |
Frequently Asked Questions - RV 1 MINOX
User questions about RV 1 MINOX
0 question about this device. Answer the ones you know or ask your own.
Ask a new question about this device
Download the instructions for your Binoculars in PDF format for free! Find your manual RV 1 - MINOX and take your electronic device back in hand. On this page are published all the documents necessary for the use of your device. RV 1 by MINOX.
USER MANUAL RV 1 MINOX
natural_image
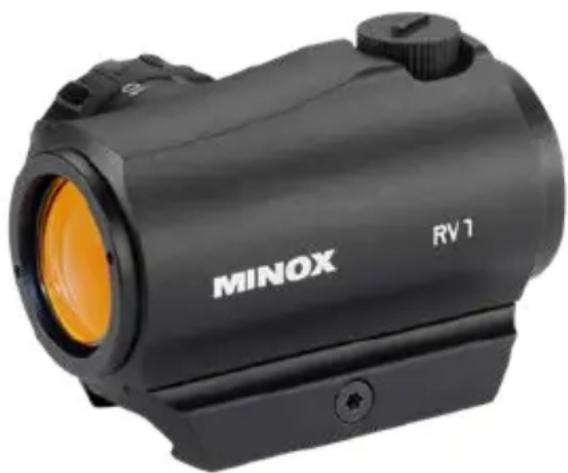
Black MINOX RV1 target optical device with orange lens (no text or symbols on body)natural_image
Black MINOX RV 1 target optical device with orange lens and control knob (no text or symbols on body)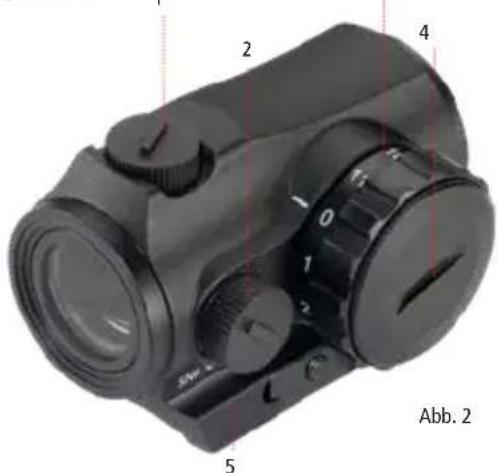
2. Lieferumfang
www.minox.com/service
natural_image
Black MINOX RV1 target optical device with orange lens (no text or symbols on body)Welcome to MINOX!
Dear customer,
With your well-considered purchase, you have chosen a MINOX product of the highest mechanical and optical precision.
These operating instructions are intended to help you get the most out of your MINOX RV 1 reflex sight. Please read these instructions thoroughly before using your MINOX product.
We hope you enjoy using your reflex sight and that you achieve a perfect aim at all times.
If you have any questions regarding this product, please contact your local MINOX dealer or our customer service team at:
Note: We have done our best to produce a complete and accurate instruction manual. However, we cannot ensure that there are no errors or omissions during the printing process.
Contents
Page
- Get to know your reflex sight 23
- Scope of delivery 24
3.Mounting24 - Red dot 25
- Inserting the battery 25
- Adjusting the red dot 26
- Zeroing your sight (centering) 28
- Care and maintenance 29
- Troubleshooting 29
- Problems with accuracy 29
- Internal fogging 30
- Serial number 31
-
Other advice and information 31
-
Servicing 32
-
Product warranty 34
- Technical data 36
1. Get to know your reflex sight
- Elevation adjustment
- Windage adjustment
- Red dot adjustment dial
- Battery compartment with screw cap
- Mount base
- Torx T-10 tightening screw
natural_image
Black MINOX RV 1 target optical device with orange lens and labeled parts (no text beyond labels)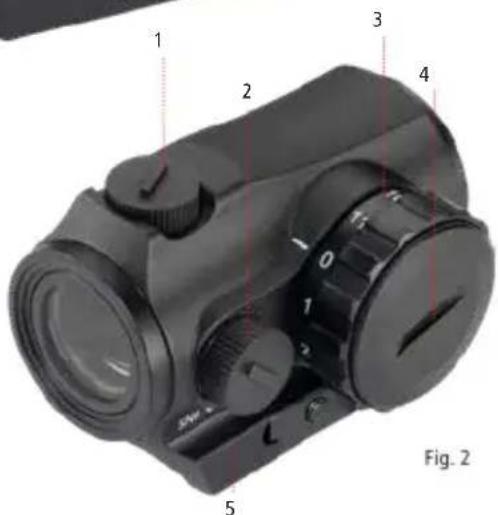
2. Scope of delivery
- MINOX RV 1 reflex sight
- Mounting and adjustment tool
- Neoprene cover
- Optical cleaning cloth
- 1x CR 2032, 3 Volt battery
- Operating instructions
Note: When adjusting your reflex sight, please adhere to the standard safety precautions that apply when using any kind of weapons.
3. Mounting
We strongly recommend that you refer to a specialist workshop or gunsmith to attach the reflex sight to your gun. This will ensure that the sight is appropriately mounted on your gun.
This reflex sight has been designed to fit most weapons with MIL-STD 1913 Picatinny rails and Weaver-style rails. Thanks to its unlimited eye relief, the sight can be mounted at any position along the rail to suit the user's preferences.
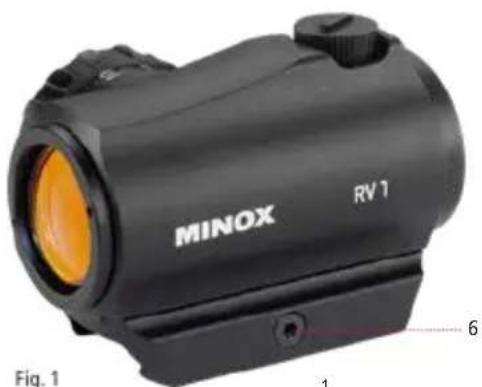
The red dot sight is designed to enable direct mounting onto a gun. Using a Torx T-10 key, turn the screw counter clockwise to loosen it (Fig. 1/6).
Position the sight on the rail at the desired location and turn the screw clockwise (at approx. 2.25 Nm) to tighten it in place.
4. Red dot
Inserting the battery
Your MINOX RV 1 reflex sight has a red dot powered by a CR 2032 battery. The battery is included with the sight. The battery compartment is positioned on the MINOX RV 1 to the right of the line of sight (Fig. 2/3).
The compartment is covered by a screw cap (Fig. 3/1). To replace the battery, use a coin or other suitable object to turn the screw cap (Fig. 3/1) counter clockwise. To remove the battery, press a fingernail against the side of battery to release it from the holder.
When inserting the new battery, ensure that the negative pole is towards the sight. Now firmly screw the cap (Fig. 3/1) back into place. Please always use new and undamaged CR 2032 batteries from a quality manufacturer.
Note: As this sight uses a disposable battery, it must be disposed of appropriately after removal. For more information about the proper disposal of batteries, please contact your local authority, your waste disposal provider or the outlet from which you purchased your product.
Adjusting the red dot
The adjustment dial (Fig. 3/3) is used to switch the red dot on and off. When the '0' on the dial is aligned with the white dot, the red dot has been deactivated. Turn the dial to '1' to activate the red dot of your reflex sight. The dial can also be used to adjust the dot's brightness. To simplify setting the dot to your preferred brightness without having to look through the sight, the dial is numbered from 1 to 11.
Note: Settings 1 to 3 are designed to be used at night. In daylight, only brightness settings from 4 to 11 will be visible. Please turn the dial to '0' after use to turn the red dot off.
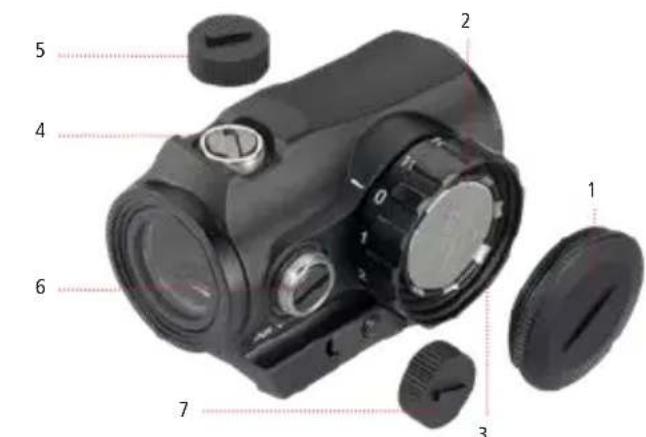
Fig. 3
- Battery compartment cap
- Battery
- Red dot illumination adjustment dial
- Elevation adjustment
- Elevation adjustment cap
- Windage adjustment
- Windage adjustment cap
Note: If your reflex sight has been correctly mounted on your weapon, only minor adjustments will be necessary. If there are major deviations during aiming, the sight has not been correctly mounted.
5. Zeroing your sight (centering)
To prepare your sight before shooting, activate the red dot and remove the caps from the elevation and windage adjustments (Fig. 3/5 and Fig. 3/7). You will find the elevation (Fig. 3/4) and windage (Fig. 3/6) adjustment screws. One click of the screws will change the point of impact by 1 MOA (2.91 cm at 100 m).
Adjustments can be made by placing the caps in the inverted position onto the screws, or by using a suitable screwdriver.
Turning the screws clockwise will adjust the point of impact downwards or to the left.
Turning the screws counter clockwise will adjust the point of impact upwards or to the right.
When the required zero settings have been selected, replace and tighten the screw caps and deactivate the red dot.
6. Care and maintenance
MINOX reflex sights are characterized by their exceptional robustness. At the same time, they are precision optical devices and need to be treated with the appropriate care if they are to provide their best performance. For this reason, it is not advisable to disassemble the reflex sight – gaskets and seals designed to prevent moisture penetration and fogging may be damaged. When in use, protect your reflex sight against severe impact. When cleaning your gun, ensure that the lenses of the reflex sight are carefully covered so that they do not come into contact with cleaning agents. Wipe the housing of the reflex sight regularly with a soft, clean cloth.
7. Troubleshooting
Problems with accuracy
One of the most common causes of problems with accuracy (e.g. excessive impact deviations, point of impact inconsistencies) is due to incorrect mounting of the reflex sight. Ensure that the sight has been correctly and tightly mounted onto the rail. Also, make sure that the sight is not fouled by oil, cleaning agents or excessive soiling caused by the accumulation of smoke and powder residues. Use only ammunition with the appropriate lot numbers and use a solid shooting support (e.g. sandbags). If you continue to experience problems with accuracy,
please bring your gun and sight to a specialist workshop to be checked.
Internal fogging
Fogging of internal optical components may occur if gaskets or seals have been damaged, allowing moisture to penetrate the sight. This can often be caused by inappropriate disassembly of the reflex sight. Please note that any damage resulting from inappropriate disassembly of this product is not covered by our warranty. If you encounter fogging of internal optical components, take your reflex sight to an authorized MINOX dealer or send it to the MINOX customer service team for repair.
Fogging of external optical components can often occur if the sight has been exposed to extreme temperature variations and high levels of humidity. Use of an anti-fogging agent can be very helpful in such cases. However, please bear in mind that using an inappropriate anti-fogging agent can impair the optical characteristics of the reflex sight, including its light transmission. The simplest and safest remedy is to remove the fog by using a soft, clean cloth. Avoid breathing on the lenses during cold weather.
8. Serial number
The individual serial number of your MINOX RV 1 reflex sight is printed on the left side of the product. Please enter this number when registering your product online for the extended warranty at www.minox.com/service.
9. Other notes and information
Storage
If you will not be using your MINOX RV 1 reflex sight for a longer period of time, please first remove the battery from its compartment and store the reflex sight in a dry place.
Disposal
The packaging should be disposed of in a clean and environmentally safe manner. Batteries must not be disposed of in the household waste. The consumer is legally obliged to return dead batteries to designated collection points or at the retailer where the batteries were purchased.
Correct disposal of this product
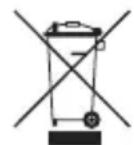
This symbol indicates that within the EU, electronic devices are not allowed to be disposed of in the household waste. Please use the designated collection the recycling of electrical and electronic
equipment in your community or ask your dealer where your device can be properly disposed of. This prevents possible harmful effects on the environment and health through improper disposal. Further information can be obtained from municipal services near you.
Declaration of conformity
The manufacturer hereby declares that this CE marking has been affixed to this device in accordance with the essential requirements and other relevant provisions of the following European Directives:
- 2011/65/EG RoHs Directive
- 2014/30/EN EMV Directive
The EC Declaration of Conformity can be obtained from the address provided at the end of this manual.
10. Servicing
To avoid unnecessary costs and lost time, please carefully read these instructions, including the troubleshooting suggestions, before sending your MINOX reflex sight in for repair. If you are unable to resolve the problem yourself and wish to send the product in for repair by our MINOX customer service or your local authorized MINOX dealer, please follow the instructions below:
- Ensure to use sufficient padding material to make sure that your reflex sight is not damaged during transport.
- Send your reflex sight to:
In Germany:
MINOX GmbH (Werk 2)
Technischer Service
Wilhelm-Loh-Str. 1
35578 Wetzlar
In the UK:
Blaser Sporting Limited
Unit 12
The Pines
Broad Street
Guildford
Surrey
GU3 3BH
In the USA:
Blaser USA
403 East Ramsey, Suite 301
San Antonio, Texas 78216
In all other countries, please send your MINOX reflex sight to your local MINOX distributor. You will find the corresponding address at:
www.minox.com/service
- Provide a detailed description of the problem together with a copy of your original proof of purchase.
11. Product warranty
MINOX GmbH („Manufacturer“ in the following) guarantees the end customer („Customer“ in the following) that the MINOX sight („Product“ in the following) supplied to the customer will be free of material and manufacturing defects for 10 years and electronic defects for five years from the date of sale (warranty period) for hunting purposes in accordance with the following provisions. This warranty only applies if the Customer registers the Product within 30 calendar days from the date of sale under www.minox.com/registration. Moreover, the warranty only applies to the original buyer. Should the Customer sell the Product to a third party within the warranty period, this voluntarily granted warranty no longer applies.
Verified defects will be remedied at the Manufacturer's own discretion and expense, either through repair (material and labour time) or the supply of new or refurbished parts. Any removed defective parts become the property of the Manufacturer. To have warranty work performed, the Customer must submit the Product, including the original proof of purchase, to an authorised specialist dealer (www.minox.com - „Dealer Search“). Any claims based on this warranty are explicitly excluded if:
- the Product exhibits damage or signs of wear due to use outside the normal intended application and the specifications of the Manufacturer (as per the instruction manual),
- the Product exhibits signs of having been repaired or otherwise processed by a workshop not authorised by the Manufacturer,
- accessories not authorised by the Manufacturer have been installed in the Product,
- the serial number has been removed or made illegible.
The costs of sending in and returning the Product are covered by the Manufacturer. Should the responsible specialist dealer have indicated a specific freight company for sending in the Product, yet the Customer uses a different freight company instead, the Manufacturer will not cover the costs of sending in the Product. This warranty is subject to the laws of the Federal Republic of Germany.
12. Technical Data
MINOX RV 1
| Magnification 1x | |
| Aperture (mm) 18 | |
| Adjustment travel (MOA) | 100 |
| Adjustment per click (MOA) | 1 |
| Red dot size (MOA) 2 | |
| Waterproofing IPX7 | |
| Red dot settings | 12 settings0 = off1-3 = night settings4-10 = daylight settings11 = extra bright daylight setting |
| Battery CR2032, 3V | |
| Weight (g) 96 (without mount base) | |
| Dimensions LxWxH (mm) | 64x43x37 |
| Order number 80224005 |
MINOX GmbH
Walter-Zapp-Str. 4
D-35578 Wetzlar
Tel.: +49 (0) 6441 / 917-0
Fax: +49 (0) 6441 / 917-612
info@minox.com
www.minox.com
RV 1
Deutsch Seite 3
English Page 20
Français Page 38
Español Página 56
Italiano Pagina 74
natural_image
Black MINOX RV1 target optical device with orange lens (no text or symbols on body)natural_image
Black MINOX RV 1 target optical device with orange lens and labeled parts (no text beyond labels)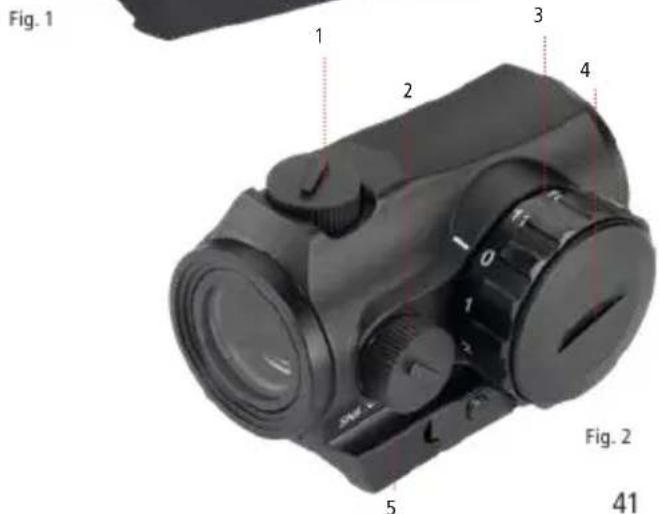
2. Contenu
- Directive ROHS 2011/65/CE
- Directive CEM 2014/30/UE
www.minox.com/service
D-35578 Wetzlar/Germany
Tel.: +49 (0) 6441 / 917-0
Fax: +49 (0) 6441 / 917-612
info@minox.com
www.minox.com
RV 1
Deutsch Seite 3
English Page 20
Français Page 38
Español Página 56
Italiano Pagina 74
natural_image
Black MINOX RV1 target optical device with orange lens (no text or symbols on body)natural_image
Black MINOX RV 1 target optical device with orange lens and labeled parts (no text beyond labels)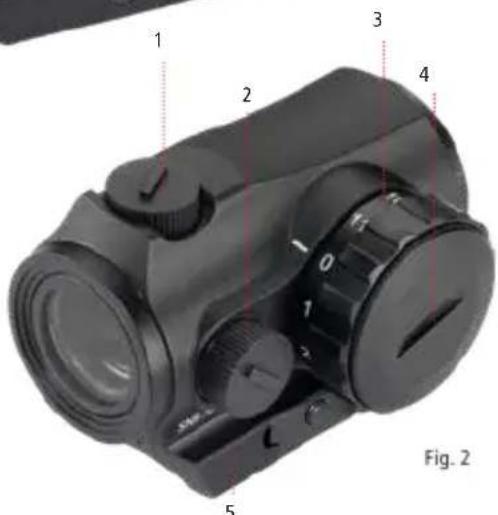
Fig. 3
- Tapa roscada del compartimento de la pila
- Pila
- Rueda de ajuste intensidad punto luminoso
- Ajuste vertical
- Tapa del ajuste vertical
- Ajuste lateral
- Tapa del ajuste lateral
www.minox.com/service.
www.minox.com/service
natural_image
Black MINOX RV1 target optical device with orange lens (no text or symbols on body)Benvenuti in MINOX!
Gentili clienti MINOX,
natural_image
Black MINOX RV 1 target optical device with labeled components (no text beyond labels)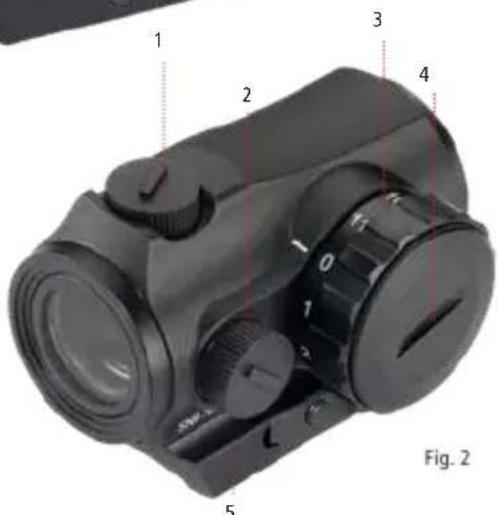
2. Dotazione
www.minox.com/service.
www.minox.com/service
Design subject to alterations without notice. MINOX is a registered trademark of MINOX GmbH, Wetzlar.
www.youtube.com/minoxwebcasts

YouTube
07/2019
- Lieferumfang
- Welcome to MINOX!
- Contents
- Get to know your reflex sight
- Scope of delivery
- Mounting
- Red dot
- Inserting the battery
- Adjusting the red dot
- Zeroing your sight (centering)
- Care and maintenance
- Troubleshooting
- Problems with accuracy
- Internal fogging
- Serial number
- Other notes and information
- Storage
- Disposal
- Correct disposal of this product
- Declaration of conformity
- Servicing
- In Germany:
- In the UK:
- In the USA:
- Product warranty
- Technical Data
- MINOX GmbH
- RV 1
- Contenu
- Benvenuti in MINOX!
- Dotazione
Brand : MINOX
Model : RV 1
Category : Binoculars