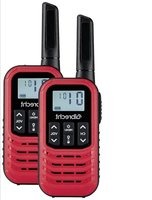
Tectalk Go - Walkie-talkie ALBRECHT - Free user manual and instructions
Find the device manual for free Tectalk Go ALBRECHT in PDF.


| Product Type | PMR446 Walkie-Talkie |
| Brand | ALBRECHT |
| Model | Tectalk Go |
| Frequency Range | 446,00625 - 446,19375 MHz (16 channels) |
| Number of Channels | 16 PMR446 channels |
| Transmit Power (ERP) | ≤ 500 mW |
| Power Supply | 3 AAA batteries (alkaline or rechargeable) |
| Charging | USB-C port for rechargeable batteries |
| Dimensions (L x W x H) | 50 x 33 x 144 mm |
| Weight | 115 g |
| Operating Temperature | -20 °C to +50 °C |
| Display | LCD with indicators (channel, battery, VOX, etc.) |
| CTCSS / DCS Tones | Yes, configurable |
| VOX Function | Yes, 3 sensitivity levels |
| Dual Channel Monitoring | Yes |
| Channel Scan | Yes, with skip and exclude |
| LED Flashlight | Yes, controlled by dedicated button |
| Key Lock | Yes, by long press on flashlight button |
| Call Tones | 5 variants + deactivation |
| Roger Beep | Yes, enable/disable |
| Warranty | Statutory 2-year warranty |
Frequently Asked Questions - Tectalk Go ALBRECHT
User questions about Tectalk Go ALBRECHT
0 question about this device. Answer the ones you know or ask your own.
Ask a new question about this device
Download the instructions for your Walkie-talkie in PDF format for free! Find your manual Tectalk Go - ALBRECHT and take your electronic device back in hand. On this page are published all the documents necessary for the use of your device. Tectalk Go by ALBRECHT.
USER MANUAL Tectalk Go ALBRECHT
1. Table of Contents
- Table of Contents 12
- Overview 13
2.1. Keys and functions 13
2.2. Keys and functions 13
- Operating the radio 14
3.1.First use 14
3.2. Charging the unit 14
3.3. Channel selection 14
- Transmitting and receiving 14
- Additional functions 15
5.1. Main menu 15
5.2.CTCSS/DCS tones 15
5.3.Call tones 15
5.4. Voice Operated Exchange (VOX) 15
5.5. Dual channel monitoring 16
5.6.Monitor 16
5.7. Channel Scan 16
5.8.Key lock 16
5.9.Key tones 16
5.10. Confirmation tone (Roger Beep) 16
5.11. Flashlight. 16
- Technical specifications 17
- Safety instructions 17
8.Troubleshooting 17 - Warranty information 18
- E-waste law and recycling 18
- Declaration of conformity 18
- Service address and technical hotline 18
2. Overview
2.1. Keys and functions
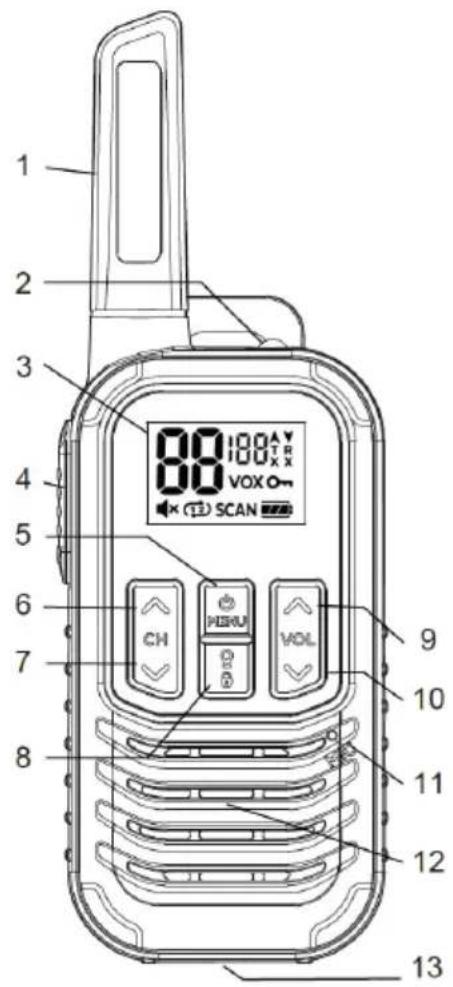
| No. Description | |
| 1 Antenna | |
| 2 LED Torch | |
| 3 LCD display | |
| 4 PTT: Transmit key | |
| 5 | MENU / Key Long press to switch on/off |
| 6 CH▲: Channel / selection up | |
| 7 CH▼: Channel / selection down | |
| 8 Flashlight key Long press for key lock | |
| 9 VOL▲: Volume up Long press for SCAN function | |
| 10 VOL▼: Volume down Long press for call tone | |
| 11 Microphone | |
| 12 Speaker | |
| 13 Charge port USB-C | |
2.2. Keys and functions
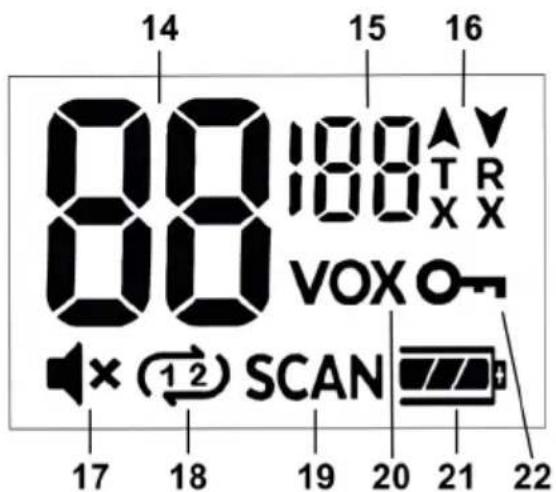
| 14 Channel |
| 15 CTGSS / DCS tones |
| 16 RX and TX indicator |
| 17 Mute |
| 18 Dual channel watch |
| 19 SCAN function |
| 20 VOX function |
| 21 Battery level indicator |
| 22 Keylock |
3. Operating the radio
3.1. First use
Before using the radio for the first time, 3 AAA batteries must be inserted. To do this, open the battery compartment on the back of the unit by pressing the lid into the unit and then down. Insert 3 AAA batteries into the unit according to the polarity shown inside.
If you want to use the belt clip, you can now slide it from top to bottom into the holder on the unit until it clicks into place. To remove the belt clip, pull the release tab and slide the clip out upwards.
Switch the unit on and off by pressing and holding the MENU button.
3.2. Charging the unit
If you are using rechargeable batteries (NiCd 1.2 Volt), you can charge them via the USB-C charging port on the bottom of the radio.
The current charge level is shown in the display. Avoid transmitting with the radio while it is charging.
Remove rechargeable and non-rechargeable batteries from the device when not in use for a long period of time to avoid damage due to battery corrosion. Charge stored batteries every 3 months to keep them ready for use and to avoid damage to the batteries.
CAUTION: You can also operate the unit with alkaline batteries. Never attempt to recharge alkaline, other disposable batteries or lithium-ion (with only 1.5 Volt).
3.2.1. Low Battery Warning:
When the battery level drops to a low level, it is no longer possible to send further radio messages. When the PTT button is pressed, two warning tones will sound instead.
3.3. Channel selection
The radios have 16 true PMR446 channels. Select the desired channel using the CH▲ and CH▼ buttons. The expansion to 16 channels was approved by the authorities in November 2018. Older radios only support 8 PMR446 channels. If you want to use the Albrecht Tectalk Go with an older 8 channel radio, you can only use the first 8 channels of the Tectalk Go.
| Channel Frequency (MHz) Channel Frequency (MHz) |
| 1 446.00625 9 446.10625 |
| 2 446.01875 10 446.11875 |
| 3 446.03125 11 446.13125 |
| 4 446.04375 12 446.14375 |
| 5 446.05625 13 446.15625 |
| 6 446.06875 14 446.16875 |
| 7 446.08125 15 446.18125 |
| 8 446.09375 16 446.19375 |
4. Transmitting and receiving
When the radio is switched on, it is automatically in receive mode as long as you are not transmitting. When a radio message is received, the message RX appears in the display. Adjust the desired volume
with the VOL and VOL buttons. After 10 seconds of inactivity, the backlight turns off to save power. The unit can still receive radio transmissions.
To transmit, press and hold the PTT (transmit) button and speak into the microphone at normal volume and about 5 cm away. The message TX appears in the display. Release the PTT button at the end of your transmission. To avoid accidental continuous transmission, the unit interrupts transmissions after one minute and emits a warning tone instead. To continue transmitting, release the PTT button briefly and then start another transmission.
Before transmitting, make sure the channel is clear by waiting a few seconds for any radio calls from other participants. If you are using a CTCSS or DCS tone (see .5.2. CTCSS / DCS tones" on page 15), use the monitor function (see .5.6. Monitor" on page 16) to listen to the channel. If you only receive noise here, the channel is free.
5. Additional functions
The Tectalk Go has additional functions that you can use in the following way.
5.1. Main menu
Open the main menu by pressing the MENU button. Press the button again to move through the menu items. To exit the menu, press the PTT key. The menu items are:
CTCSS/DCS tones
Call tones
- VOX (hands-free function)
- Dual channel monitoring
Monitor function
- SCAN
5.2. CTCSS / DCS tones
CTCSS and DCS tones are used to select specific receivers so that other participants on the same channel cannot hear the radio message. A unit with CTCSS / DCS tones activated will only respond to transmissions from transmitters with the same settings. CTCSS / DCS tones are a feature for advanced users and we do not recommend using this feature unless you are already fully familiar with it. Accidental misconfiguration may result in the inability to receive radio transmissions.
To configure CTCSS / DCS tones, first select the desired channel (see „3.3. Channel selection" on page 14). Then open the main menu and select the desired tone with the VOL▲ and VOL▼ buttons. The display shows ct for CTCSS and dc for DCS tones. Save the setting by pressing the PTT button.
5.3. Call tones
You can send call tones to attract the attention of other participants or to announce a transmission. The type of call tone can be selected from 5 variants in the main menu item CA (Call announcement). To do this, press the MENU button twice and select the desired tone with the VOL▲ and VOL▼ buttons. The setting 0 completely deactivates the call tone function. Save the setting with the PTT button.
To send the selected call tone, press and hold the VOL▼ button during normal operation. The call tone is transmitted as long as you keep the key pressed.
5.4. Voice Operated Exchange (VOX)
The VOX function allows you to send radio messages without pressing the PTT button. The unit automatically goes into transmission mode when the VOX function detects that someone is speaking into the microphone.
The VOX sensitivity can be selected in 3 different levels: Level 3 means that VOX is activated at very low noise levels. Level 1 means that you have to speak very loudly into the microphone to activate VOX. Level 0 deactivates the VOX function. Press the MENU button three times until the VOX symbol is displayed and then select the desired level with the VOL▲ and VOL▼ buttons. Save the setting with the PTT button.
5.5. Dual channel monitoring
This function allows you to listen to a second channel in addition to the channel you are currently listening to. If a radio message is received on one of the two monitored channels, it will be played back. Note that you nevertheless always transmit on your set main channel. To answer on the secondary channel, you must therefore change the main channel to it.
Configure the dual channel monitoring by pressing the MENU button four times until the dual channel monitoring symbol is displayed. Now select the desired second channel with the VOL▲ and VOL▼ buttons and save the setting with the PTT button. The dual-channel monitoring is now active until you deactivate it in this menu with the OF setting.
5.6.Monitor
The monitor function allows you to disable the squelch function and listen to all signals including noise. The monitor function is very useful when you want to adjust the volume or receive weak signals (which would be suppressed by the squelch).
Press the MENU key five times until M is displayed. Now you can activate and deactivate the monitor function with the VOL▲ and VOL▼ keys.
5.7. Channel Scan
The channel scan function allows you to scan all available channels for radio activity. Activate the channel scan by pressing and holding the VOL▲ button. The unit will now scan all channels and stop when a radio transmission is found on a channel so you can listen to it. After the end of the received transmission, the search continues. If you want to answer a call, press the PTT button within 5 seconds. To deactivate the scan, press and hold the VOL▲ key again.
If the scan has found a channel that you do not wish to continue listening to, briefly press the CH▲ or CH▼ button to skip the channel. If you want to temporarily exclude a channel completely from the search, press and hold the CH▲ or CH▼ key for 3 seconds. You can exclude several channels in this way. This setting is retained until the next time the unit is restarted.
5.8.Key lock
The key lock prevents unintentional operation of the unit. To activate and deactivate the key lock, press and hold the key.
5.9. Key tones
To turn the key tones on or off, press and hold the VOL key while turning the unit on.
5.10. Confirmation tone (Roger Beep)
The confirmation tone is sent automatically whenever you release the PTT key. This signals the end of your transmission to the other party or can be used as a short confirmation by briefly pressing the PTT key.
To turn the confirmation tone on and off, press and hold the VOL key while turning the unit on.
5.11. Flashlight
The flashlight on the bottom of the unit can be turned on and off by pressing the button. This works even if the unit itself is switched off.
6. Technical specifications
| Frequency range PMR446: 446.00625 - 446.19375 MHz |
| Channels 16 |
| Transmitting power (ERP) ≤ 500 mW |
| Operating temperature -20 °C to +50 °C |
| Dimensions (unit) 50 x 33 x 144 mm |
| Weight 115 g |
7. Safety instructions
- Repairs may only be carried out by specialist dealers or authorised service partners.
- Do not open the radio or make any modifications to the radio.
- Keep the radio at least 5cm away from your body.
- Do not expose the radio to direct sunlight or extreme heat for a long period of time.
- Do not operate the radio or charge the battery in potentially explosive atmospheres.
- Do not mix disposable batteries and rechargeable batteries. Only use a complete set of identical and fresh batteries. Do not attempt to charge disposable batteries.
8. Troubleshooting
| The unit does not switch on or switches off automatically. | 1. charge the batteries or insert fresh batteries. 2. are the batteries inserted correctly? 3. clean the battery contacts before charging. |
| I cannot communicate with other members. 1. make sure you are on the same channel and sub-channel (CTCSS/DCS). 2. you are outside the transmission range of the other radios. | |
| You can hear the other participant, but they cannot hear you. | Check that you are using the same channel as the person you are talking to. If the person you are talking to uses a CTCSS or DCS code, you must also use this code to be heard. |
| Other participants will only hear you interrupted. | 1. the signal is too weak - they are too far apart. 2. ils the microphone defective? Please contact a specialist dealer. |
| I hear radio calls from other groups. Other users are using the same channel as you - change the channel. |
9. Warranty information
We are obliged to enclose with each appliance information on disposal, on the statutory warranty provisions and the EU declarations of conformity with instructions on the use of the appliances in the various countries.
You will therefore find this information in the following text.
Statutory warranty of 2 years from date of purchase
The seller of this device grants you a statutory warranty of two years from the date of purchase of the device. This warranty covers all faults that should occur due to defective components or faulty functions within the warranty period, but not faults that are based on normal wear and tear, such as used batteries, scratches in the display, housing defects, broken antennas, as well as defects due to external influences, such as corrosion, overvoltage due to improper external power supply or use of unsuitable accessories. Defects caused by improper use of the unit are also excluded from the warranty.
If you have a warranty claim, please contact the dealer from whom you purchased the unit or our service partner directly. The dealer will either repair or replace your unit, or he will provide you with a service address specialised for the unit.
If you send in your unit, do not forget your purchase receipt as proof of the date of purchase and please describe the fault that has occurred as precisely as possible.
10. E-waste law and recycling

European laws prohibit the disposal of defective or no longer usable appliances in household waste. Should you one day wish to dispose of your appliance, please only hand it in for recycling at the municipal collection points set up everywhere. This collection system is financed by the industry and also ensures environmentally sound disposal and recycling of valuable raw materials.
11. Declaration of conformity


Hereby, Alan Electronics GmbH declares that the radio equipment Tectalk Go is in compliance with Directive 2014/53/EU. The full text of the EU Declaration of Conformity is available at the following internet address: http://service.alan-electronics.de/CE-Papiere/
12. Service address and technical hotline
(for devices purchased in Germany)
You can reach our service hotline by telephone at
+49 (0) 6103 9481 66 (at the price of a connection to the German landline network)
or by e-mail at service@albrecht-midland.de
Subject to printing errors.
The information in this manual is subject to change without notice.
albrecht
Tectalk Go




- TABLE OF CONTENTS
- OVERVIEW
- KEYS AND FUNCTIONS
- OPERATING THE RADIO
- FIRST USE
- CHARGING THE UNIT
- LOW BATTERY WARNING
- CHANNEL SELECTION
- TRANSMITTING AND RECEIVING
- ADDITIONAL FUNCTIONS
- MAIN MENU
- CTCSS / DCS TONES
- CALL TONES
- VOICE OPERATED EXCHANGE (VOX)
- DUAL CHANNEL MONITORING
- 5.6.MONITOR
- CHANNEL SCAN
- 5.8.KEY LOCK
- KEY TONES
- CONFIRMATION TONE (ROGER BEEP)
- FLASHLIGHT
- TECHNICAL SPECIFICATIONS
- SAFETY INSTRUCTIONS
- TROUBLESHOOTING
- WARRANTY INFORMATION
- STATUTORY WARRANTY OF 2 YEARS FROM DATE OF PURCHASE
- E-WASTE LAW AND RECYCLING
- DECLARATION OF CONFORMITY
- SERVICE ADDRESS AND TECHNICAL HOTLINE
- ALBRECHT
- TECTALK GO
Brand : ALBRECHT
Model : Tectalk Go
Category : Walkie-talkie