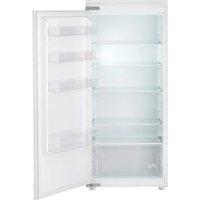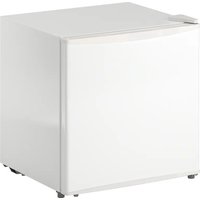
TILLREDA 605.787.29 - Fridge IKEA - Free user manual and instructions
Find the device manual for free TILLREDA 605.787.29 IKEA in PDF.


User questions about TILLREDA 605.787.29 IKEA
0 question about this device. Answer the ones you know or ask your own.
Ask a new question about this device
Download the instructions for your Fridge in PDF format for free! Find your manual TILLREDA 605.787.29 - IKEA and take your electronic device back in hand. On this page are published all the documents necessary for the use of your device. TILLREDA 605.787.29 by IKEA.
USER MANUAL TILLREDA 605.787.29 IKEA
You can find phone numbers of the IKEA appointed After Sales Service Providers at the end of this manual.
The electronic user manual is available at www.ikea.com.
For more information on energy consumption and other technical data of this product, access the following web link: https://eprel.ec.europa.eu
DEUTSCH
Safety instructions 8
Installation....10
First use 11
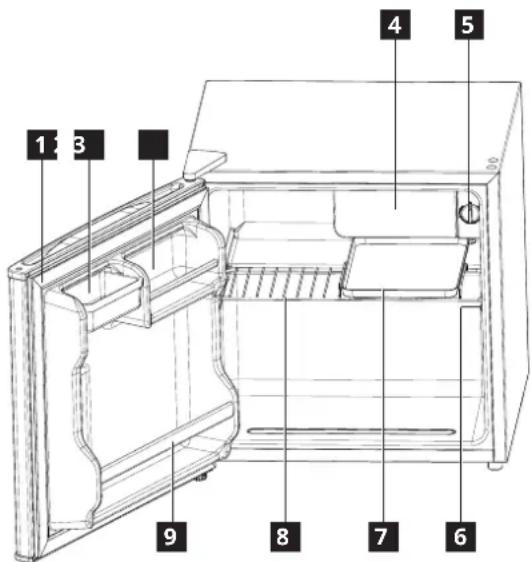
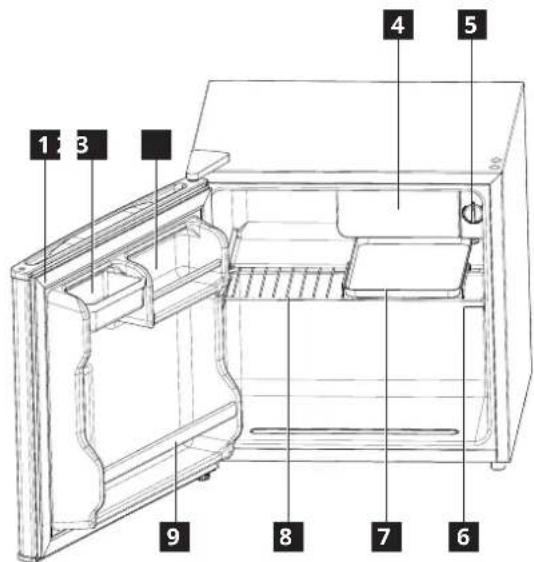
Product description ....11
Operation 11
Daily use....12
Cleaning and maintenance 12
Troubleshooting 13
Technical information 15
Environmental concerns.... 15
IKEA guarantee 16
Safety information
Before the installation and use of the appliance, carefully read the supplied instructions. The manufacturer is not responsible if an incorrect installation or use causes injuries or damages. Always keep the instructions with the appliance for future reference.
Children and vulnerable people safety

WARNING: Risk of fire/
Flammable materials
- This appliance can be used by children aged from 8 years and above and persons with reduced physical, sensory or mental capabilities or lack of experience and knowledge if they have been given supervision or instruction concerning the use of the appliance in a safe way and understand the hazards involved. Children shall not play with the appliance. Cleaning and user maintenance shall not be made by children without supervision. Children should be supervised to ensure that they do not play with the appliance.
- This appliance may be used by children between 3 and 8 years of age and persons with very extensive and complex disabilities, if they have been properly instructed.
• Children of less than 3 years of age should be kept away unless continuously supervised.
- Do not let children play with the appliance.
• Children shall not carry out cleaning and user maintenance of the appliance without supervision.
• Children aged from 3 to 8 years are allowed to load and unload refrigerating appliances.
- Keep all packaging away from children and dispose of it appropriately.
General Safety
- This appliance is intended to be used in household and similar applications such as:
- staff kitchen areas in shops, offices and other working environments;
- farm houses and by clients in hotels, motels and other residential type environments;
- bed and breakfast type environments;
- catering and similar non-retail applications.
- WARNING: Keep ventilation openings, in the appliance enclosure or in the built-in structure, clear of obstruction.
- WARNING: Do not use mechanical devices or other means to accelerate the defrosting process, other than those recommended by the manufacturer.
- WARNING: Do not damage the refrigerant circuit.
- WARNING: Do not use electrical appliances inside the food storage compartments of the appliance, unless they are of the type recommended by the manufacturer.
- WARNING: Do not use water spray and steam to clean the appliance.
- WARNING: Clean the appliance with a moist soft cloth. Only use neutral detergents. Do not use abrasive products, abrasive cleaning pads, solvents or metal objects.
- WARNING: Do not store explosive substances such as aerosol cans with a flammable propellant in this appliance.
- WARNING: If the supply cord is damaged, it must be replaced by the manufacturer, its service agent or similarly qualified persons in order to avoid a hazard.
- WARNING: When positioning the appliance, ensure the supply cord is not trapped or damaged.
- WARNING: Do not locate multiple portable socket-outlets or portable power supplies at the rear of the appliance.
- Opening the door for long periods can cause a significant increase of the temperature in the compartments of the appliance.
-
Clean regularly surfaces that can come in contact with food and accessible drainage systems.
-
Clean water tanks if they have not been used for 48 hours; flush the water system connected to a water supply if water has not been drawn for 5 days.
- Store raw meat and fish in suitable containers in the refrigerator, so that it is not in contact with or drip onto other food.
- If the refrigerating appliance is left empty for long periods, switch off, defrost, clean, dry, and leave the door open to prevent mould developing within the appliance.
- This refrigerating appliance is not suitable for freezing foodstuffs.
- This refrigerating appliance is not intended to be used as a built-in appliance.
- Two-star frozen-food compartments are suitable for storing pre-frozen food, storing or making ice-cream and making ice cubes.
- One-, two- and three-star compartments are not suitable for the freezing of fresh food.
- WARNING: To avoid a hazard due to instability of the appliance, it must be fixed in accordance with the instructions.
Safety instructions
Installation
⚠ WARNING! Only a qualified person can install this appliance.
- Remove all the packaging.
- Do not install or use a damaged appliance.
- Follow the installation instructions supplied with the appliance.
- Always take care when moving the appliance as it is heavy. Always use safety gloves and enclosed footwear.
- Be careful not to damage the floors (e.g. parquet) when moving the appliance.
- Make sure the appliance is not near a heat source.
• Install and level the appliance on a floor strong enough to take its weight and in a place suitable for its size and use. - Make sure the air can circulate around the appliance.
-
At first installation or after reversing the door wait at least 4 hours before connecting the appliance to the power supply. This is to allow the oil to flow back into the compressor.
-
Before carrying out any operations on the appliance (e.g. reversing the door), remove the plug from the power socket.
- The rear of the appliance must stand against the wall.
- Do not install the appliance where there is direct sunlight.
- Do not install this appliance in areas that are too humid or too cold such as wine cellars.
Electrical connection
⚠ WARNING! Risk of fire and electrical shock.
⚠ WARNING! When positioning the appliance, ensure the supply cord is not trapped or damaged.
⚠ WARNING! Do not use multi-plug adapters or extension cables.
• The appliance must be earthed.
ENGLISH 9
- Make sure that the parameters on the rating plate are compatible with the electrical ratings of the mains power supply.
• Always use a correctly installed shockproof socket. - Make sure not to cause damage to the electrical components (e.g. mains plug, mains cable, compressor). Contact an Authorised Service Centre or an electrician to change the electrical components.
- The mains cable must stay below the level of the mains plug.
- Connect the mains plug to the mains socket only at the end of the installation. Make sure that there is access to the mains plug after the installation.
- Do not pull the mains cable to disconnect the appliance. Always pull the mains plug.
- UK and Ireland only: This appliance is fitted with a 13 A mains plug. If it is necessary to change the mains plug fuse, use only a 13 A ASTA (BS 1362) fuse.
Use
⚠ WARNING! Risk of injury, burns, electrical shock or fire.

The tubes of the refrigeration circuit contain a small quantity of the environmentally friendly but flammable refrigerant R600a. It does not damage the ozone layer and does not increase the greenhouse effect. If refrigerant escapes, it may injure your eyes or ignite. Do not damage the tubes.
- The surface of the compressor may become hot under normal operation. Do not touch it with hands.
- Do not change the specifications of this appliance.
- Do not put electrical appliances (e.g. ice cream makers) in the appliance unless they are stated applicable by the manufacturer.
- If damage occurs to the refrigerant circuit, make sure that there are no flames and sources of ignition in the room. Ventilate the room.
- Do not let hot items touch the plastic parts of the appliance.
- Do not store bottled drinks in the freezer compartment to prevent burst or other losses.
- Do not store flammable gases or liquids in the appliance.
- Do not put flammable products or items that are wet with flammable products in, near or on the appliance.
- Do not touch the compressor or the condenser. They are hot.
- Do not remove or touch items from the frozen-food compartment if your hands are wet or damp.
-
Do not swallow the contents (non-toxic) of the ice packs.
-
Do not eat ice cubes or ice lollies immediately after taking them out of the freezer since they may cause cold burns.
- Thawed food should not be put back in the frozen-food compartment.
- Follow the storage instructions on the packaging of food products.
Internal lighting
⚠ WARNING! Risk of electric shock.
- The bulb used inside the appliance is specifically designed for domestic appliances and is not suitable for general room lighting within the home ((EU) 2019/2020).
Care and cleaning
⚠ WARNING! Risk of injury or damage to the appliance.
- Before maintenance, deactivate the appliance and disconnect the mains plug from the mains socket.
- This appliance contains hydrocarbons in the cooling unit. Only a qualified person can do the maintenance and the recharging of the unit.
- Regularly examine the drain of the appliance and if necessary, clean it. If the drain is blocked, defrosted water collects at the bottom of the appliance.
Service
• To repair the appliance contact an Authorised Service Centre listed at the end of this manual.
- Use original spare parts only.
Disposal
⚠ WARNING! Risk of injury or suffocation.
- Disconnect the appliance from the mains supply.
- Cut off the mains cable and discard it.
- Remove the doors to prevent children and pets to be closed inside the appliance.
- The refrigerant circuit and the insulation materials of this appliance are ozone-friendly.
- The insulation foam contains flammable gas. Contact your municipal authority for information on how to discard the appliance correctly.
- Do not cause damage to the part of the cooling unit that is near the heat exchanger.
The manufacturer declines any liability for injury to persons or animals or damage to property if the above advice and precautions are not respected.
Installation
⚠ WARNING! Before installing the appliance, carefully read the safety information in this booklet.
Installation checklist
Door
☐ Door seals completely to cabinet on all sides
☐ Door is level
Levelling
☐ Refrigerator is level
Electrical power
□ Wait 4 hours
House power turned on
☐ Refrigerator plugged in
Final checks
□ Packing materials removed
☐ Refrigerator temperature set
Positioning
- Follow the separate Assembly Instructions to install this appliance.
• Install this appliance at a location where the ambient temperature corresponds to the climate class indicated on the rating plate of the appliance. This ensures the correct operation of the appliance. Explanation of climate classes is as follows:
| Climate class Ambient temperature range | |
| SN +10°C to +32°C | |
| N +16°C to +32°C | |
| ST +16°C to +38°C | |
| T +16°C to +43°C | |
- "SN" indicates that this refrigerating appliance is intended to be used at ambient temperatures ranging from 10°C to 32°C.
- "N" indicates that this refrigerating appliance is intended to be used at ambient temperatures ranging from 16°C to 32°C.
- "ST" indicates that this refrigerating appliance is intended to be used at ambient temperatures ranging from 16°C to 38°C.
- "T" indicates that this refrigerating appliance is intended to be used at ambient temperatures ranging from 16°C to 43°C.
For some models of appliances, some functional problems can occur when they operate outside the specified temperature ranges. The correct operation can only be guaranteed within the specified temperature ranges.
If you have any doubts regarding installation, please turn to the vendor, our customer service or the nearest Authorised Service Centre.
Location
To ensure best performance, install the appliance well away from sources of heat such as radiators, boilers, and direct sunlight. Make sure that air can circulate freely around the back of the cabinet.
Levelling the appliance
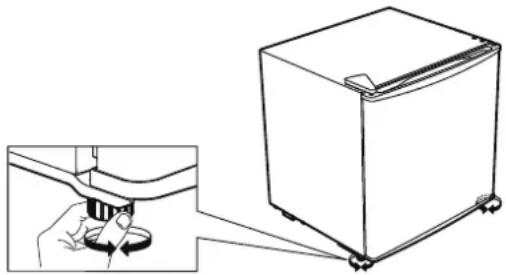
If the appliance tilts in some way, adjust the two feet at the front of the appliance to level the appliance. Refer to the separate Assembly Instructions for detailed instructions.
- Disconnect the mains plug of the appliance from the power socket.
- Turn the foot clockwise to raise the appliance. Turn the foot anticlockwise to lower the appliance.
natural_image
Line drawing of a refrigerator with a hand inserting a screwdriver into the seat (no text or symbols)Cleaning the appliance
Before using the appliance for the first time, clean the appliance to remove the typical smell of a brand-new product.
- Make sure the appliance is disconnected from the power supply.
- Wipe the interior with a soft, moistened cloth.
- Wash the internal accessories with lukewarm water and some neutral soap, then dry thoroughly.
CAUTION!
Do not use abrasive, chloride or acidic cleaning agents or solvents.
- Do not use scouring or abrasive sponges. The metallic surfaces may corrode.
- Never clean the accessories using a dishwasher. They may become deformed.
Electrical connection
⚠️ CAUTION! Any electrical work required to install this appliance should be carried out by a qualified electrician or competent person.
⚠ WARNING! This appliance must be earthed. Failure to follow these instructions can result in death, fire or electrical shock.
The manufacturer declines any liability should these safety measures not be observed. This appliance complies with the E.E.C. Directives.
First use
Connect the appliance to the power supply. The ideal food storage temperatures are already factory-set (intermediate).
Note: After being switched on, the appliance needs 4-5 hours in order to reach the correct temperature to store a typical volume of food.
Important!
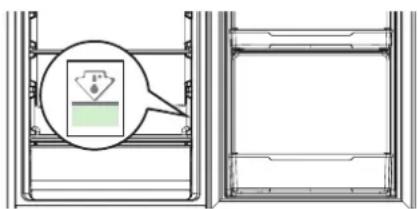
In accordance with regulations in some countries, it must be provided with a special device (see the figure below) placed in the lower refrigerator compartment of the appliance to indicate the coldest zone of it.
text_image
Technical diagram showing a component with a magnified view of a green indicator symbol inside a frame structure.Product description
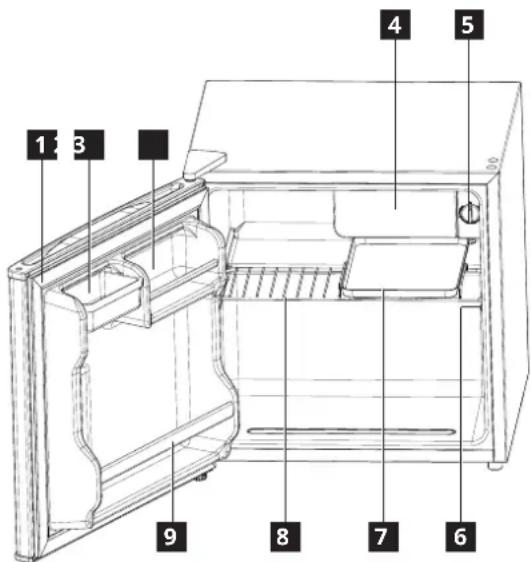
text_image
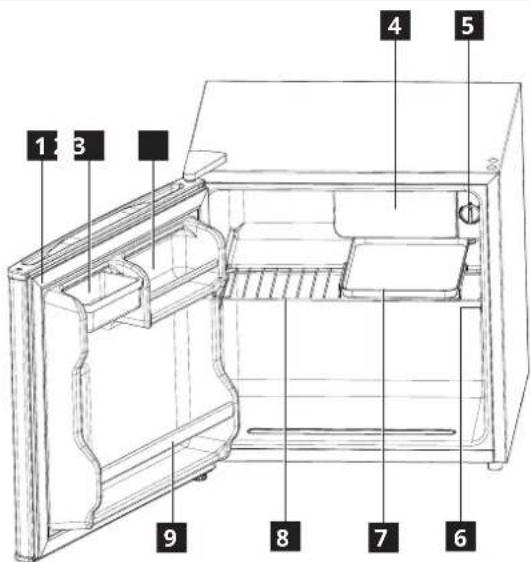
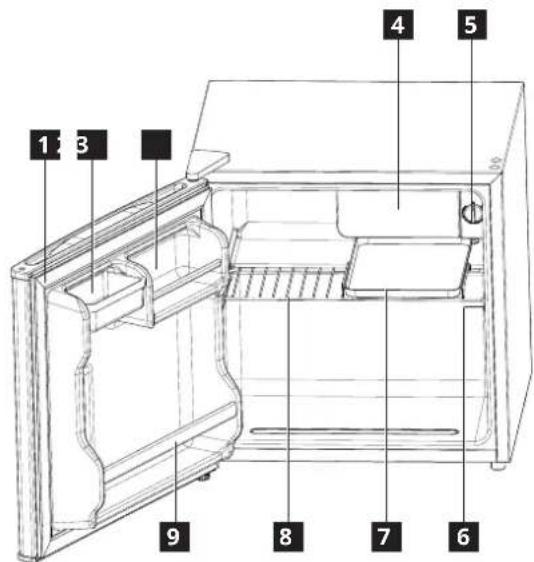
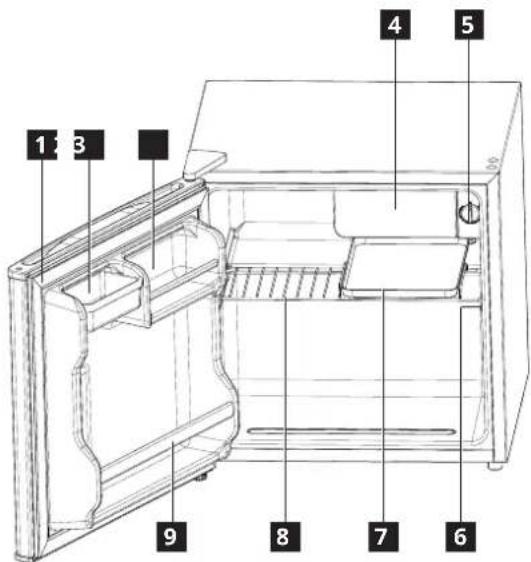
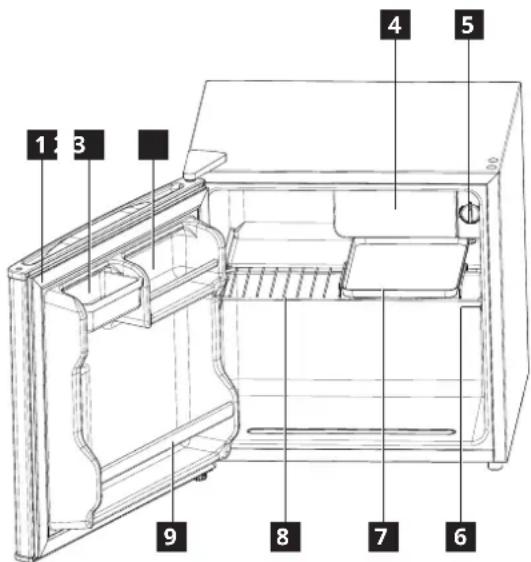
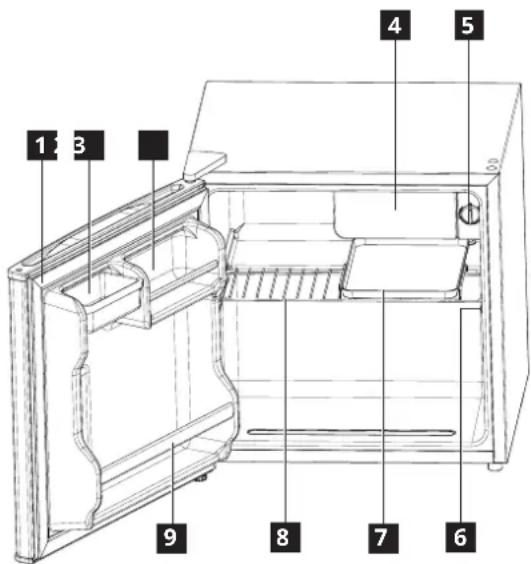
1 2 3 4 5 6 7 8 91 Door gasket
2 Storage box Rating plate
3 Can holder
4 Chill compartment Shelf
■ Temperature regulator

7 Defrosting tray

9 Bottle holder
Operation
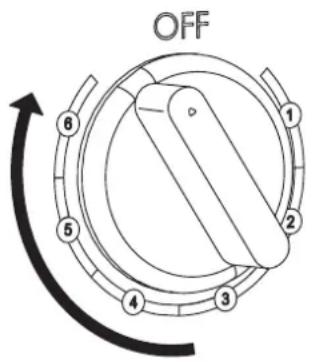
text_image
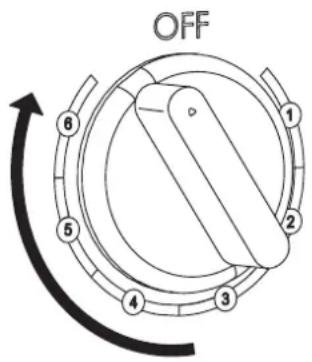
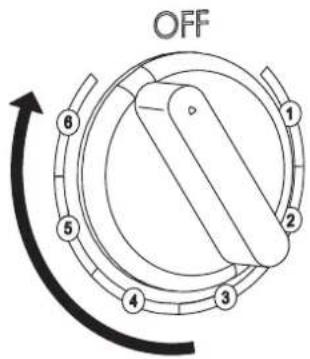
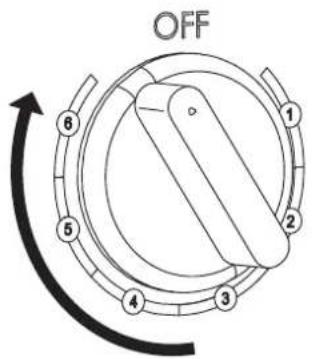
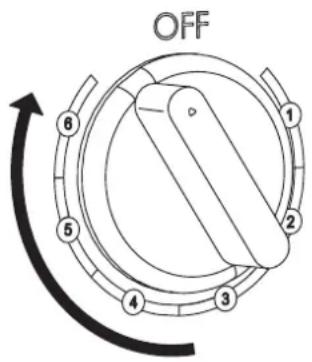
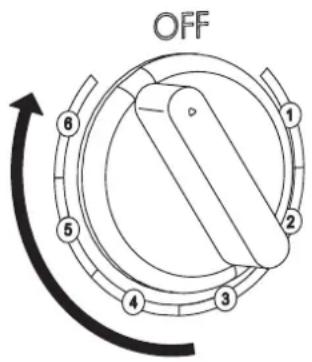
OFF 1 2 3 4 5 6Switching on
Connect the mains plug to a power socket and adjust the temperature. The appliance switches on and starts operating.
Adjusting the temperature
The temperature is automatically regulated.
To adjust the temperature:
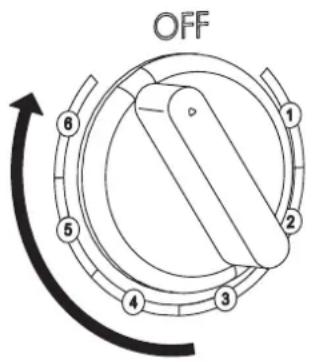
- Turn the temperature regulator toward a lower setting to decrease the coldness.
- Turn the temperature regulator toward a higher setting to increase the coldness.
i A medium setting is generally the most suitable.
Adjust the temperature setting by keeping in mind that the temperature inside the appliance depends on:
- room temperature
• how often the door is opened
• the quantity of food stored
• the location of the appliance
Important! If the ambient temperature is high or the appliance is fully loaded, and the appliance is set to the lowest temperatures, it may run continuously causing frost to form on the rear wall. In this case a higher temperature must be set to allow
automatic defrosting and therefore reduced energy consumption.
Tips:
- The lower the temperature, the longer you can safely store your food and the more electricity the appliance consumes.
- The higher the temperature, the quicker your stored food decays and the less electricity the appliance consumes.
Switching off
To switch off the appliance, turn the temperature regulator knob to point to the "OFF" position and then disconnect the mains plug from the power socket.
Daily use
Hints for fresh food refrigeration
- Cover or wrap the food, particularly if it has a strong flavour.
- Position the food so that air can circulate freely around it.
- For best performance, leave enough space in the refrigerator compartment for air to circulate around the packages. Also leave enough room at the front so the door can close tightly.
- Do not store warm food or evaporating liquids in the refrigerator.
- Cooked foods and cold dishes: cover and place on any shelf.
- Fruit and vegetables: clean thoroughly and place in the vegetable drawer. Bananas, potatoes, onions and garlic must not be kept in the refrigerator if not packed.
- Butter and cheese: place in special airtight containers or wrap in aluminium foil or polythene bags to exclude as much air as possible.
- Bottles: close with caps and place on the door balconies.
Energy saving tips
• Install the appliance in a dry, well ventilated room far away from any heat source (e.g. radiator, cooker, etc.) and in a place not exposed directly to the sun. If required, use an insulating plate.
- To guarantee adequate ventilation follow installation instructions.
- Insufficient ventilation on back of the product increases energy consumption and decreases cooling efficiency.
- The internal temperatures of the appliance may be affected by the ambient temperature, frequency of door opening, as well as location of the appliance. Temperature setting should take into consideration these factors.
- Allow warm food and drinks to cool down before placing in the appliance.
- Do not obstruct the fan (if available) with food items.
• After placing or removing food, ensure you close the door properly, especially the freezer door. - Reduce to a minimum door opening.
- When thawing frozen food, place them in the refrigerator. The low temperature of the frozen products cools the food in the refrigerator.
- Positioning of the shelves in the refrigerator has no impact on the efficient usage of energy. Food should be placed on the shelves in such way to ensure proper air circulation (food should not touch each other and distance between food and rear wall should be kept).
- Damaged gaskets must be replaced as soon as possible.
Cleaning and maintenance
General tips
- Regularly clean the appliance with a cloth and a solution of warm water and neutral detergent specifically formulated for refrigerator interiors. Do not use abrasive cleaners or tools.
- Before servicing or cleaning the appliance, unplug it from the mains or disconnect the power supply.
CAUTION! The refrigerator accessories must not be placed in a dishwasher.
Defrosting the appliance
- Defrost the appliance whenever the layer of frost on the surface of the evaporator becomes 3 to 4 mm thick.
ENGLISH 13
- Before defrosting, remove all food and switch off the appliance. Put the defrosting tray under the evaporator to collect the melted water.
- After all frost has melted, pour away the melted water, dry the interior of the appliance with a dry cloth and switch the appliance back on.
If you do not use the appliance for a prolonged period
- Switch off the appliance.
-
Disconnect the appliance from the power supply.
-
Remove all food.
- Defrost and clean the appliance.
- Leave the doors open just enough to allow air to circulate inside the compartments. This will prevent the formation of mould and unpleasant odours.
In the event of a power cut
- Keep the doors of the appliance closed. This will allow the food to stay cold as long as possible.
Troubleshooting
| Problem Possible Cause Solution | ||
| The appliance does not operate. | The appliance is switched off. Switch on | the appliance. |
| The mains plug is not connected to the mains socket correctly. | Connect the mains plug to the mains socket correctly. | |
| There is no voltage in the mains socket. | To find out if the mains socket is working, connect a different electrical appliance to it. Contact a qualified electrician to repair the socket. | |
| The appliance is noisy. The | appliance is not placed stably. | Level the appliance. Refer to “Levelling the appliance”, or the separate Assembly Instructions. |
| The compressor runs continuously. | The set temperature is too low. | Set a higher temperature. Refer to “Operation”. |
| Many food products were inserted at the same time. | Wait some hours and then check the temperature again. | |
| The room temperature is too high. | Reposition the appliance if possible. Refer to “Positioning”. | |
| Food products placed in the appliance were too warm. | Allow food products to cool to room temperature before storing. | |
| The door is not closed correctly. Refer to “Closing the door”. | ||
| The temperature in the appliance is too low/too high. | The temperature was not set correctly. | Set a higher/lower temperature. |
| The door is not closed correctly. Refer to “Closing the door”. | ||
| Food products placed in the appliance were too warm. | Allow food products to cool to room temperature before storing. | |
| Many food products were inserted at the same time. | Insert less food products at the same time. | |
| The thickness of the frost is greater than 4-5 mm. | Defrost the appliance. | |
| Door was opened too frequently. Open | the door only when necessary. | |
| There is not enough cold air circulation in the appliance. | Reposition the food so that air can circulate freely in the appliance. | |
| The door does not close completely. | Refer to “Closing the door”. Refer to “Closing the door”. | |
Normal noises
It is normal for the refrigeration system to produce some noises, such as gurgling and hissing.
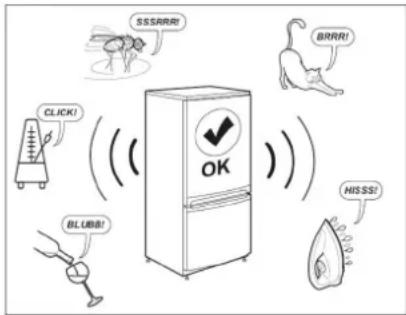
text_image
SSARRI! BRRR! CLICK! OK BLUBB! NISSS!Closing the door
| If Do | |
| Door gaskets are dirty. Clean them. | |
| Door gaskets are damaged. | Contact the After Sales Service to replace them. |
| The door is blocked by shelves, drawers, food items, etc. | Position correctly or remove the objects that block the door. |
| The appliance is not level. | Level the appliance. Refer to “Levelling the appliance”, or the separate Assembly Instructions. |
| The door is not aligned with the cabinet. | Adjust the door. Refer to the separate Assembly Instructions. |
Before contacting the After-sales Service:
Restart the appliance to see if the fault has been remedied. If it persists, switch the appliance off again and repeat the operation after an hour. If your appliance still does not work properly after carrying out the checks listed in the troubleshooting guide and switching the appliance on again, contact the After-sales Service, clearly explaining the problem and specifying: • the nature of the problem • the date of purchase • the model and serial number of the appliance
The article number and serial number are shown on the rating plate on the internal right side of the appliance.
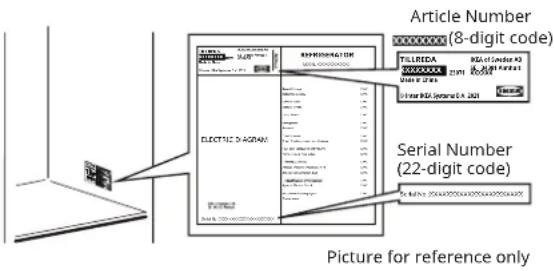
text_image
Article Number (8-digit code) ELECTRIC DIAGNAT RECOMMUNICATION TITLEDA BAS of Receiver ID 0101-27-03 Serial Number (22-digit code) Picture for reference onlyTechnical information
| Product category | |
| Product type Refrigerator | |
| Installation type Freestanding | |
| Product dimensions | |
| Height | 492 mm |
| Width | 472 mm |
| Depth | 450 mm |
| Net volume | |
| Fridge | 43.0 L |
| Defrost system | |
| Fridge Manual | |
| Other specifications | |
| Star rating N/A | |
| Temperature rising time N/A | |
| Energy consumption 80 kWh/year | |
| Noise level 41 dB(A) | |
| Energy class E | |
| Rated voltage 220 - 240 V~ | |
| Rated frequency 50 Hz | |
| Light source of energy efficiency class N/A | |
Note: Information about the product in the product database can be accessed by scanning the QR code on the EPREL label.
Environmental concerns
1. Packing materials
Recyclable materials are marked with the symbol ⚙️ Put the packing materials in relevant containers to recycle them.
Keep the packing materials (plastic bags, polystyrene parts, etc.) out of the reach of children, as they are a potential source of danger.
2. Scrapping/Disposal
The appliance is manufactured using recyclable material.
This appliance is marked in compliance with European Directive 2002/96/EC on Waste Electrical and Electronic Equipment (WEEE). By ensuring the correct disposal of this appliance, you can help prevent potentially negative consequences for the environment and human health.
The symbol 📄 on the appliance, or on the
accompanying documents, indicates that this appliance should not be treated as domestic waste but must be taken to a special collection centre for the recycling of electrical and electronic equipment. When scrapping the appliance, make it unusable by cutting off the power cable and removing the doors and shelves so that children cannot easily climb inside and become trapped.
Scrap the appliance in compliance with local regulations on waste disposal, taking it to a special collection centre; do not leave the appliance unattended even for a few days, since it is a potential source of danger for children.
For further information on the treatment, recovery and recycling of this product, contact your competent local office, the household waste collection service or the shop where you purchased the appliance.
Declaration of conformity
- This appliance has been designed for preserving food and is manufactured in compliance with Regulation (EC) No 1935/2004.
CE
- This appliance has been designed, manufactured and marketed in compliance with:
- safety objectives of the "Low Voltage" Directive 2014/35/EU (which replaces 2006/95/CE and subsequent amendments);
- the protection requirements of Directive "EMC" 2014/30/EU.
- This appliance has been designed, manufactured and marketed in compliance with:
- Electromagnetic Compatibility Regulations 2016
- Electrical Equipment (Safety) Regulations 2016
UK CA
IKEA guarantee
How long is the IKEA guarantee valid?
The guarantee is valid for 2 years from the purchase date unless otherwise specified in national legislation. In Norway, Portugal and Spain the guarantee is valid for 3 years from the delivery date to the customer unless otherwise specified in national legislation. The original sales receipt, is required as proof of purchase. If service work is carried out under guarantee, this will not extend the guarantee period for the appliance.
Who will execute the service?
IKEA service provider will provide the service through its own service operations or authorized service partner network.
What does this guarantee cover?
The guarantee covers faults of the appliance, which have been caused by faulty construction or material faults from the date of purchase from IKEA. This guarantee applies to domestic use only. The exceptions are specified under the headline "What is not covered under this guarantee?" Within the guarantee period, the costs to remedy the fault e.g. repairs, parts, labour and travel will be covered, provided that the appliance is accessible for repair without special expenditure. On these conditions the EU guidelines (Nr. 99/44/EG) and the respective local regulations are applicable. Replaced parts become the property of IKEA.
What will IKEA do to correct the problem?
IKEA appointed Service Provider will examine the product and decide, at its sole discretion, if it is covered under this guarantee. If considered covered, IKEA Service Provider or its authorized service partner through its own service operations, will then, at its sole discretion, either repair the defective product or replace it with the same or a comparable product.
What is not covered under this guarantee?
• Normal wear and tear.
- Deliberate or negligent damage, damage caused by failure to observe operating instructions, incorrect installation or by connection to the wrong voltage, damage caused by chemical or electrochemical reaction, rust, corrosion or water damage including but not limited to damage caused by excessive lime in the water supply, damage caused by abnormal environmental conditions.
- Consumable parts including batteries and lamps.
- Non-functional and decorative parts which do not affect normal use of the appliance, including any scratches and possible color differences.
- Accidental damage caused by foreign objects or substances and cleaning or unblocking of filters, drainage systems or soap drawers.
- Damage to the following parts: ceramic glass, accessories, crockery and cutlery baskets, feed and drainage pipes, seals, lamps and lamp covers, screens, knobs, casings and parts of casings. Unless such damages can be proved to have been caused by production faults.
- Cases where no fault could be found during a technician's visit.
- Repairs not carried out by our appointed service providers and/or an authorized service contractual partner or where non-original parts have been used.
- Repairs caused by installation which is faulty or not according to specification.
- The use of the appliance in a non-domestic environment i.e. professional use.
- Transportation damages. If a customer transports the product to his home or another address, IKEA is not liable for any damage that may occur during transport. However, if IKEA delivers the product to the customer's delivery address, then damage to the product that occurs during this delivery will be covered by IKEA.
- Cost for carrying out the initial installation of the IKEA appliance. However, if an IKEA appointed Service Provider or its authorized service partner repairs or replaces the appliance under the terms of this guarantee, the appointed Service Provider or its authorized service partner will reinstall the repaired appliance or install the replacement, if necessary.
These restrictions do not apply to fault-free work carried out by a qualified specialist using our original parts in order to adapt the appliance to the technical safety specifications of another EU country.
How country law applies
The IKEA guarantee gives you specific legal rights, which cover or exceed all the local legal demands. However these conditions do not limit in any way consumer rights described in the local legislation.
Area of validity
For appliances which are purchased in one EU country and taken to another EU country, the services will be provided in the framework of the guarantee conditions normal in the new country.
An obligation to carry out services in the framework of the guarantee exists only if the appliance complies and is installed in accordance with:
- the technical specifications of the country in which the guarantee claim is made;
- the Assembly Instructions and User Manual Safety Information.
The dedicated AFTER SALES for IKEA appliances
Please don't hesitate to contact IKEA appointed After Sales Service Provider to:
• make a service request under this guarantee;
- ask for clarifications on installation of the IKEA appliance in the dedicated IKEA kitchen furniture;
- ask for clarification on functions of IKEA appliances.
To ensure that we provide you with the best assistance, please read carefully the Assembly Instructions and/or the User Manual before contacting us.
How to reach us if you need our service
You can find phone numbers of the IKEA appointed After Sales Service Providers at the end of this manual.
In order to provide you with a quicker service, we recommend that you use the specific phone numbers listed in this manual. Always use the phone numbers listed in the user manual for the specific appliance you need an assistance for. Please remember to provide the 8-digit article number and 22-digit serial number shown on the rating plate of your appliance.
i SAVE THE SALES RECEIPT!
It is your proof of purchase and required for the guarantee to apply. The sales receipt also reports the IKEA name and article number (8 digit code) for each of the appliances you have purchased.
Do you need extra help?
For any additional questions not related to After Sales of your appliances please contact your nearest IKEA store call centre. We recommend you read the appliance documentation carefully before contacting us.
Spare parts information
- The following spare parts: thermostats, temperature sensors, printed circuit boards and light sources, will be available to professional repairers for a minimum period of seven years, after placing the last unit of the model on the market.
- The following spare parts: door handles, door hinges, trays and baskets will be available to professional repairers and end users for a minimum period of seven years, and door gaskets for a minimum period of 10 years, after placing the last unit of the model on the market.
The spare parts can be found: www.ikea.com
Inhalt
natural_image
Line drawing of a refrigerator with a hand inserting a screwdriver into the seat (no text or symbols)text_image
Technical diagram showing a component with a green arrow and label, alongside a side view of a rectangular frame.Produktbeschreibung
text_image
1 2 3 4 5 6 7 8 9natural_image
Line drawing of a refrigerator with a hand inserting a spring into it, showing the interior and side view (no text or symbols)text_image
Technical diagram showing a component with a green checkmark and an arrow pointing to it, alongside a side view of a mechanical frame.natural_image
Line drawing of a refrigerator with a hand operating the door (no text or symbols)text_image
Technical diagram showing a component with a green checkmark and an arrow pointing to it, alongside a blank panel.natural_image
Line drawing of a refrigerator with a hand operating the door (no text or symbols)Rengør apparatet
text_image
Technical diagram showing a component with a magnified inset highlighting a green component, likely indicating a measurement or inspection.natural_image
Line drawing of a refrigerator with a hand inserting a button to the side panel (no text or symbols)text_image
Technical diagram showing a component with a magnified inset highlighting a green component, likely indicating a measurement or inspection.Produktbeskrivelse
text_image
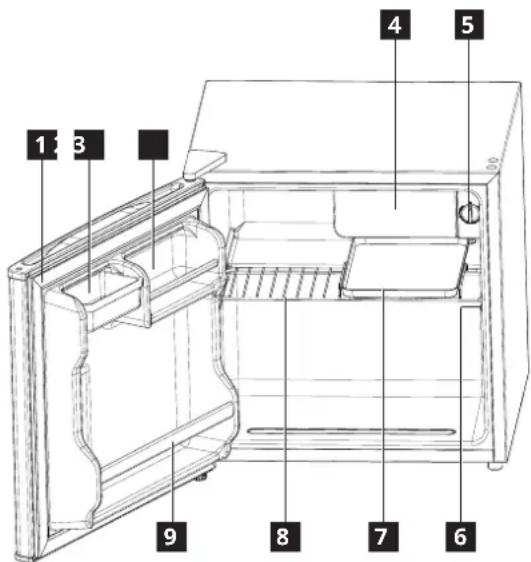
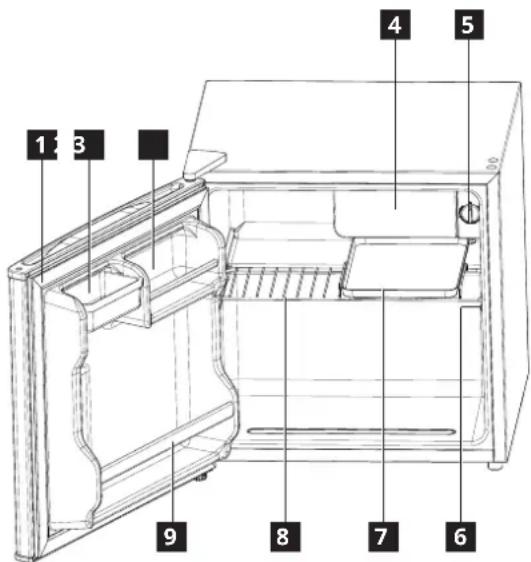
1 2 3 4 5 6 7 8 91 Dørpakning
2 Lagringsboks Strømetikett
3 Bokseholder
4 Nedkjølingsrom Hylle
■ Temperaturregulering

7 Avisingsbrett

9 Flaskeholder
Drift
text_image
OFF 1 2 3 4 5 6Slå på apparatet
2. Kassering/avhending
natural_image
Diagram showing a hand holding a small object next to a refrigerator with wheels, connected by a cable (no text or symbols present)text_image
Technical diagram showing a component with a magnified view of a green indicator symbol inside a frame structure.Tuotteen kuvaus
text_image
1 2 3 4 5 6 7 8 9natural_image
Line drawing of a refrigerator with a hand inserting a small object into the seat (no text or symbols)Rengöra apparaten
natural_image
Technical line drawing of a mechanical assembly with a magnified inset showing a component detail (no text or symbols)natural_image
Line drawing of a refrigerator with a hand inserting a spring into it, showing the interior and exterior view (no text or symbols)text_image
Technical diagram showing a component with a green indicator symbol and an arrow pointing to it, enclosed in a frame.natural_image
Line drawing of a refrigerator with a hand inserting a spring into it, showing the interior and exterior view (no text or symbols)text_image
Technical diagram showing a component with a green checkmark and an arrow pointing to it, alongside a side view of a mechanical frame.The Ground Truth image displays a single, solid horizontal line. According to Rule 2 (UNDERSCORE & LINE RULES), if the GT contains lines used for stylistic emphasis or as background elements (like a ruled line on paper), the OCR result must ignore them. The line in the GT is clearly a stylistic or background line, not a placeholder for text. Therefore, the OCR should not have output any underscores. Outputting `____` constitutes an error under Rule 2, as it hallucinates placeholder symbols where none are semantically intended. Hence, the OCR result is inconsistent with the Ground Truth.
7 Bandeja para descongelación
■
9 Portabotellas
Funcionamiento
text_image
OFF 1 2 3 4 5 6Encendido
natural_image
Line drawing of a refrigerator with a hand inserting a small component into it, showing the interior and exterior view (no text or symbols)text_image
Technical diagram showing a component with a green indicator box and an arrow pointing to it, alongside a separate view of a rectangular frame.Περιγραφή προϊόντος
text_image
1 2 3 4 5 6 7 8 9⚠ WAARSCHUWING! Risico op letsel of verstikking.
natural_image
Line drawing of a refrigerator with a hand inserting a button to its side, showing the interior and exterior view (no text or symbols)text_image
Technical diagram showing a component with a green warning symbol and an arrow pointing to it, alongside a side view of a mechanical frame.Productbeschrijving
text_image
1 2 3 4 5 6 7 8 9BEWAAR HET AANKOOPBEWIJS!
natural_image
Diagram showing a hand inserting a small circular component into a refrigerator (no text or symbols present)Čištění spotřebiče
text_image
Technical diagram showing a component with a magnified inset highlighting a green component, likely indicating a measurement or inspection.Popis spotřebiče
text_image
1 2 3 4 5 6 7 8 9natural_image
Line drawing of a refrigerator with a hand inserting a screwdriver into the seat (no text or symbols)natural_image
Technical line drawing of a mechanical assembly with a magnified inset showing a component detail (no text or symbols)Opis urządzenia
text_image
1 2 3 4 5 6 7 8 95 Regulator temperature
Tabliczka z mionowa
natural_image
Line drawing of a refrigerator with a hand inserting a screwdriver into the seat (no text or symbols)Очистка прибора
natural_image
Diagram showing a device with a green indicator light inside a frame, no text or symbols presentОписание изделия
text_image
1 2 3 4 5 6 7 8 9natural_image
Line drawing of a refrigerator with a hand inserting a small object into the seat (no text or symbols)Čistenie spotrebiča
text_image
Technical diagram showing a component with a magnified view highlighting a green indicator symbol within a frame.Popis výrobku
text_image
1 2 3 4 5 6 7 8 9Regulátor teploty
The Ground Truth image displays a single, solid horizontal line. According to Rule 2 (UNDERSCORE & LINE RULES), this is a stylistic or background line, not a placeholder underscore. Therefore, the OCR result must ignore it. The provided OCR content is "____", which consists of four underscores. This is an incorrect interpretation of the line as a placeholder, violating the rule that stylistic lines must be ignored. The OCR has hallucinated text (underscores) where none should exist, violating the rule to ignore such lines. Hence, the OCR result is inconsistent with the Ground Truth.
7 Podnos na odmrazovanie
(1) = ( ,) + ·s + ( ,) = 0
9 Držiak na fl'aše
Prevádzka
text_image
OFF 1 2 3 4 5 6Zapnutie
Pripojte sietovú zástrčku do elektrickej zásuvky a nastavte teplotu. Spotrebič sa zapne a začne fungovat.
Nastavenie teploty
Teplota sa reguluje automaticky.
Nastavenie teploty:
natural_image
Line drawing of a refrigerator with a hand inserting a button to its side, showing the interior and exterior view (no text or symbols)Aparato valymas
natural_image
Diagram showing a device inside a storage unit with an inset magnified view (no text or symbols)Gaminio aprašymas
text_image
1 2 3 4 5 6 7 8 9natural_image
Line drawing of a refrigerator with a hand inserting a button to its side, showing the interior and exterior view (no text or symbols)Ierīces tīrīšana
text_image
Technical diagram showing a component with a magnified inset highlighting a green component, likely indicating a measurement or inspection.natural_image
Line drawing of a refrigerator with a hand inserting a button to its side, showing the interior and exterior view (no text or symbols)Очищення приладу
text_image
Technical diagram showing a component with a downward arrow and green fill, labeled with dimension '50' and reference lines.Опис виробу
text_image
1 2 3 4 5 6 7 8 9natural_image
Line drawing of a refrigerator with a hand inserting a button to the side panel (no text or symbols)Seadme puhastamine
text_image
Technical diagram showing a component with a magnified inset highlighting a green component, likely indicating a measurement or inspection.Toote kirjeldus
text_image
1 2 3 4 5 6 7 8 9natural_image
Line drawing of a refrigerator with a hand inserting a button to its side, showing the interior and exterior view (no text or symbols)Čišćenje uređaja
Prije prve uporabe aparata, očistite ga kako biste uklonili tipičan miris potpuno novog proizvoda.
- Iskopčajte uređaj iz električne mreže.
- Obrišite unutrašnjost mekom, navlaženom krpom.
- Operite unutarnje dodatke mlakom vodom i malo neutralnog sapuna, zatim temeljito osušite.
OPREZ!
text_image
Technical diagram showing a component with a magnified view highlighting a green indicator symbol inside a container or enclosure.Opis proizvoda

text_image
1 2 3 4 5 6 7 8 9■ Regulator temperature

7 Pladanj za odmrzavanje

9 Držač za boce
Rukovanje
text_image
OFF 1 2 3 4 5 6Uključivanje
Uključite utikač u strujnu utičnicu i namjestite temperaturu. Aparat se uključuje i počinje s radom.
Podešavanje temperature
Temperatura se regulira automatski.
Kako biste podesili temperaturu:
natural_image
Line drawing of a refrigerator with a hand operating the door (no text or symbols)Čišćenje uređaja
Pre prve upotrebe uređaja, očistite uređaj da biste uklonili tipičan miris potpuno novog proizvoda.
- Uverite se da je uređaj isključen iz napajanja.
- Obrišite unutrašnjost mekom, navlaženom krpom.
- Operite unutrašnje dodatke mlakom vodom i neutralnim sapunom, a zatim ih dobro osušite.
OPREZ!
text_image
Technical diagram showing a component with a magnified view of its internal structure, including a green indicator symbol.Opis proizvoda
text_image
1 2 3 4 5 6 7 8 91 Zaptivka vrata
2Korpica Pločica
3 Držač za limenke
4 Rashladni odeljak Polica
■ Regulator temperature
7 Tacna za odmrzavanje
9 Držač za flaše
Rad uređaja
text_image
OFF 1 2 3 4 5 6Uključivanje
natural_image
Line drawing of a refrigerator with a hand inserting a screwdriver into the seat (no text or symbols)Čiščenje aparata
text_image
Technical diagram showing a component with a green indicator symbol and an arrow pointing to it, enclosed in a structural frame.Opis izdelka
text_image
1 2 3 4 5 6 7 8 9natural_image
Line drawing of a refrigerator with a hand inserting a screwdriver into the seat (no text or symbols)text_image
Technical diagram showing a component with a magnified view of its internal structure, including a green indicator symbol.Ürün açıklaması
text_image
1 2 3 4 5 6 7 8 9natural_image
Diagram showing a hand holding a small object connected to a refrigerator, with an inset close-up of the handle (no text or symbols present)Почистване на уреда
text_image
Technical diagram showing a component with a green arrow and label, alongside a side view of a mechanical or architectural frame.natural_image
Line drawing of a refrigerator with a hand inserting a screwdriver into the seat (no text or symbols)text_image
Technical diagram showing a component with a green indicator box and an arrow pointing to it, enclosed in a frame.natural_image
Line drawing of a refrigerator with a hand inserting a button to its side, showing the interior and exterior view (no text or symbols)text_image
Technical diagram showing a component with a magnified inset highlighting a green component, likely indicating a measurement or inspection.Termékleírás
text_image
1 2 3 4 5 6 7 8 9natural_image
Line drawing of a refrigerator with a hand inserting a screwdriver into the seat (no text or symbols)Prif á heimilistækinu
text_image
Technical diagram showing a component with a magnified inset highlighting a green component, likely indicating a measurement or inspection.Vörulýsing
text_image
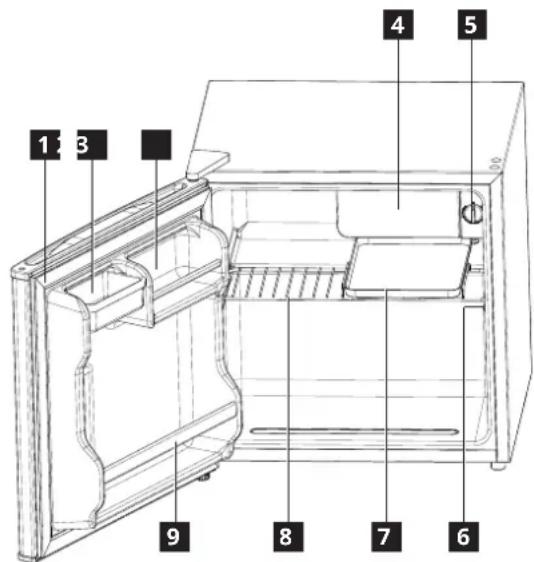
1 2 3 4 5 6 7 8 91 Hurðapétting
2Geymslubox Merkispjald
3 Könnuhaldari
4 Kælihólf Hilla
Hitastýring

7 Afpíðingarbakki

9 Flöskurekki
Meðferð