
LUMNÄS 305.728.56 - Fridge IKEA - Free user manual and instructions
Find the device manual for free LUMNÄS 305.728.56 IKEA in PDF.

| Product type | Built-in refrigerator |
| Brand | IKEA |
| Model | LUMNÄS 305.728.56 |
| Dimensions (H x W x D) | 1255 x 540 x 550 mm |
| Net volume | 205 L |
| Energy class | E |
| Annual energy consumption | 101 kWh/year |
| Noise level | 35 dB(A) – category B |
| Voltage / Frequency | 220-240 V~ / 50 Hz |
| Refrigerant | R600a (flammable) |
| Defrost | Manual |
| Interior lighting | LED, efficiency class F |
| Climate class | SN (10 °C to 32 °C), N (16 °C to 32 °C), ST (16 °C to 38 °C), T (16 °C to 43 °C) |
| Weight (estimated) | 40 kg |
| Warranty | 5 years IKEA |
| Included accessories | Glass shelf, vegetable drawer, door bin, drain filter |
| Special features | Super cool mode (6 h), electronic temperature control |
| Maintenance | Clean with soft cloth and mild detergent; automatic defrost |
| Safety | Child lock (supervision recommended), flammable materials |
| Spare parts | Available 7 to 10 years after end of production |
Frequently Asked Questions - LUMNÄS 305.728.56 IKEA
User questions about LUMNÄS 305.728.56 IKEA
0 question about this device. Answer the ones you know or ask your own.
Ask a new question about this device
Download the instructions for your Fridge in PDF format for free! Find your manual LUMNÄS 305.728.56 - IKEA and take your electronic device back in hand. On this page are published all the documents necessary for the use of your device. LUMNÄS 305.728.56 by IKEA.
USER MANUAL LUMNÄS 305.728.56 IKEA
natural_image
Simple line drawing of a bird sitting next to a laptop (no text or symbols)www.ikea.com


Table of contents
Safety information 4
Safety instructions 5
Product description 7
First use 7
Operation
Hints and tips 9
Cleaning and maintenance 10
Troubleshooting
Technical data 12
Environmental concerns 13
8 IKEA GUARANTEE 14
11
Safety information
Before the installation and use of the appliance, carefully read the supplied instructions. The manufacturer is not responsible if an incorrect installation or use causes injuries or damages. Always keep the instructions with the appliance for future reference.
Children and vulnerable people safety
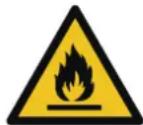
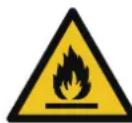
WARNING: Risk of fire/
Flammable materials
- This appliance can be used by children aged from 8 years and above and persons with reduced physical, sensory or mental capabilities or lack of experience and knowledge if they have been given supervision or instruction concerning use of the appliance in a safe way and understand the hazards involved. Children shall not play with the appliance.
- Cleaning and user maintenance shall not be made by children without supervision. Children should be supervised to ensure that they do not play with the appliance. Children aged from 3 to 8 years are allowed to load and unload refrigerating appliances.
- Very young children (0-3 years) should be kept away from the appliance.
- Young children (3-8 years) should be kept away from the appliance unless continuously supervised.
- Keep all packaging away from children and dispose of it appropriately.
General Safety
- This appliance is intended to be used in household and similar applications such as:
- staff kitchen areas in shops, offices and other working environments;
- farm houses and by clients in hotels, motels and other residential type environments;
- bed and breakfast type environments;
- catering and similar non-retail applications.
- WARNING: Keep ventilation openings, in the appliance enclosure or in the built-in structure, clear of obstruction.
- WARNING: Do not use mechanical devices or other means to accelerate the defrosting process, other than those recommended by the manufacturer.
- WARNING: Do not damage the refrigerant circuit.
- WARNING: Do not use electrical appliances inside the food storage compartments of the appliance, unless they are of the type recommended by the manufacturer.
- WARNING: Do not use water spray and steam to clean the appliance.
- WARNING: Clean the appliance with a moist soft cloth. Only use neutral detergents. Do not use abrasive products, abrasive cleaning pads, solvents or metal objects.
- WARNING: Do not store explosive substances such as aerosol cans with a flammable propellant in this appliance.
- WARNING: If the supply cord is damaged, it must be replaced by the manufacturer, its service agent or similarly qualified persons in order to avoid a hazard.
- WARNING: When positioning the appliance, ensure the supply cord is not trapped or damaged.
- WARNING: Do not locate multiple portable socket-outlets or portable power supplies at the rear of the appliance.
- Opening the door for long periods can cause a significant increase of the temperature in the compartments of the appliance.
- Clean regularly surfaces that can come in contact with food and accessible drainage systems.
-
Clean water tanks if they have not been used for 48 hours; flush the water system connected to a water supply if water has not been drawn for 5 days.
-
Store raw meat and fish in suitable containers in the refrigerator, so that it is not in contact with or drip onto other food.
- If the refrigerating appliance is left empty for long periods, switch off, defrost, clean, dry, and leave the door open to prevent mould developing within the appliance.
- This refrigerating appliance is not suitable for freezing foodstuffs.
- Two-star frozen-food compartments are suitable for storing pre-frozen food, storing or making ice-cream and making ice cubes.
- One-, two- and three-star compartments are not suitable for the freezing of fresh food.
- WARNING: To avoid a hazard due to instability of the appliance, it must be fixed in accordance with the instructions.
Safety instructions
Installation
- The appliance must be handled and installed by two or more persons.
- Installation and maintenance including replacement of the supply cord must be carried out by the manufacturer or a qualified technician, in compliance with the manufacturer's instructions and the local safety regulations in force. In order to avoid a hazard, do not repair or replace any part of the appliance including the supply cord, unless specifically stated in the user manual.
- Remove all the packaging.
- Do not install or use a damaged appliance.
- Follow the installation instructions supplied with the appliance.
- Always take care when moving the appliance as it is heavy. Always use safety gloves and enclosed footwear.
- Be careful not to damage the floors (e.g. parquet) when moving the appliance.
• Make sure the appliance is not near a heat source. - Install and level the appliance on a floor strong enough to take its weight and in a place suitable for its size and use.
-
Make sure the air can circulate around the appliance.
-
At first installation or after reversing the door wait at least 4 hours before connecting the appliance to the power supply. This is to allow the oil to flow back into the compressor.
- Before carrying out any operations on the appliance (e.g. reversing the door), remove the plug from the power socket.
- Do not install the appliance where there is direct sunlight.
- Do not install this appliance in areas that are too humid or too cold such as wine cellars.
- Install this appliance at a location where the ambient temperature corresponds to the climate class indicated on the rating plate of the appliance. This ensures the correct operation of the appliance. Explanation of climate classes is as follows:
“SN” indicates that this refrigerating appliance is intended to be used at ambient temperatures ranging from 10^ C to 32^ C.
“N” indicates that this refrigerating appliance is intended to be used at ambient temperatures ranging from 16^ C to 32^ C.
“ST” indicates that this refrigerating appliance is intended to be used at ambient temperatures ranging from 16^ C to 38^ C.
“T” indicates that this refrigerating appliance is intended to be used at ambient temperatures ranging from 16°C to 43°C.
Electrical connection
⚠ WARNING! Risk of fire and electrical shock.
⚠ WARNING! When positioning the appliance, ensure the supply cord is not trapped or damaged.
⚠ WARNING! Do not use multi-plug adapters or extension cables.
• The appliance must be earthed.
- Make sure that the parameters on the rating plate are compatible with the electrical ratings of the mains power supply.
• Always use a correctly installed shockproof socket.
- Make sure not to cause damage to the electrical components (e.g. mains plug, mains cable, compressor). Contact an Authorised Service Centre or an electrician to change the electrical components.
- The mains cable must stay below the level of the mains plug.
- Connect the mains plug to the mains socket only at the end of the installation. Make sure that there is access to the mains plug after the installation.
- Do not pull the mains cable to disconnect the appliance. Always pull the mains plug.
- UK and Ireland only:
This appliance is fitted with a 13 A mains plug. If it is necessary to change the mains plug fuse, use only a 13 A ASTA (BS 1362) fuse.
Use
⚠ WARNING! Risk of injury, burns, electrical shock or fire.
The tubes of the refrigeration circuit contain a small quantity of the environmentally friendly but flammable refrigerant R600a. It does not damage the ozone layer and does not increase
the greenhouse effect. If refrigerant escapes, it may injure your eyes or ignite. Do not damage the tubes.
- The surface of the compressor may become hot under normal operation. Do not touch it with hands.
- Do not change the specifications of this appliance.
- Do not put electrical appliances (e.g. ice cream makers) in the appliance unless they are stated applicable by the manufacturer.
- If damage occurs to the refrigerant circuit, make sure that there are no flames and sources of ignition in the room. Ventilate the room.
- Do not let hot items touch the plastic parts of the appliance.
-
Do not store flammable gases or liquids in the appliance.
-
Do not put flammable products or items that are wet with flammable products in, near or on the appliance.
- Do not touch the compressor or the condenser. They are hot.
- Follow the storage instructions on the packaging of food products.
Internal lighting
⚠ WARNING! Risk of electric shock.
- The bulb used inside the appliance is specifically designed for domestic appliances and is not suitable for general room lighting within the home ((EU) 2019/2020).
Care and cleaning
⚠ WARNING! Risk of injury or damage to the appliance.
- Before maintenance, deactivate the appliance and disconnect the mains plug from the mains socket.
- This appliance contains hydrocarbons in the cooling unit. Only a qualified person can do the maintenance and the recharging of the unit.
- Regularly examine the drain of the appliance and if necessary, clean it. If the drain is blocked, defrosted water collects at the bottom of the appliance.
Service
- To repair the appliance, contact an Authorised Service Centre listed at the end of this manual.
• Use original spare parts only.
Disposal
⚠ WARNING! Risk of injury or suffocation.
- Disconnect the appliance from the mains supply.
- Cut off the mains cable and discard it.
- Remove the doors to prevent children and pets to be closed inside the appliance.
- The refrigerant circuit and the insulation materials of this appliance are ozone-friendly.
- The insulation foam contains flammable gas. Contact your municipal authority for information on how to discard the appliance correctly.
- Do not cause damage to the part of the cooling unit that is near the heat exchanger.
The manufacturer declines any liability for injury to persons or animals or damage to property if the above advice and precautions are not respected.
Product description
Product overview

1 Temperature control box & LED lighting
2 Glass shelf
3 Fruits and vegetables drawer
4 Door balcony
5 Door gasket
6 Rating plate
Accessories
Drain filter

1x
First use
Connect the appliance to the power supply. The ideal food storage temperatures are already factory-set (intermediate).
Note: After being switched on, the appliance needs 4-5 hours in order to reach the correct temperature to store a typical volume of food.
Important!
This appliance is sold in France. In accordance with regulations valid in this country it must be provided with a special device (see figure) placed in the lower compartment of the fridge to indicate the coldest zone of it.
Operation
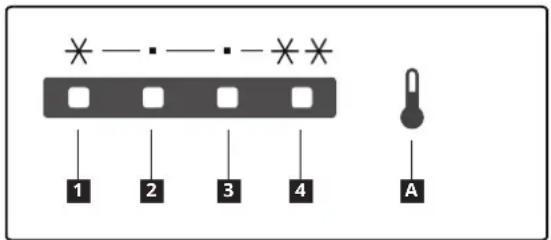
Control panel

A Temperature setting button
1 - 4 Set temperature indicators
Note: Do not use sharp objects to operate the control panel. They can scratch or damage the control panel.
Switching on
When you connect the mains plug to a power socket, the appliance switches on and starts operating.
Display
Once initially powered on, the display screen is on full display for 3 seconds.
Then the refrigerator runs at setting 3 which is the factory default setting.
In case of a temperature sensor failure, the corresponding indicators will blink.
| Indicator status Fault | |
| Indicators 1 and 4 are blinking. | Ambient temperature sensor failure |
| Indicators 1 and 2 are blinking. | Refrigerator temperature sensor failure |
| Indicators 1 and 3 are blinking. | Refrigerator defrosting temperature sensor failure |
Note: If there is a flashing failure, please call the service center.
Setting the temperature
Recommended temperature: setting 3.
- You can set the temperature of the refrigerator compartment via the control panel.
- When the appliance is plugged in for the first time, it sets the temperature to setting 3.
To set the temperature, press the temperature setting button A one or more times until the indicator for the desired set temperature lights up. The appliance will operate according to the new set temperature in 15 seconds.
The temperature changes in this order:

Tips:
- The lower the set temperature, the longer you can safely store your food and the more electricity the appliance consumes.
- The higher the set temperature, the quicker your stored food decays and the less electricity the appliance consumes.
Super cooling mode
Note: The Super cooling function is specifically designed to rapidly cool down newly placed food in the fridge compartment. If you have a significant amount of warm food, such as after grocery shopping, it is recommended to activate the Super cooling function. By doing so, you can ensure quick cooling of the products and reduce the temperature rise, thereby effectively prolonging the preservation of all the other food items inside.
- To put the appliance into super cooling mode, press and hold the temperature setting button A for 3 seconds. Both indicators 1 and 2 light up and the appliance enters super cooling mode in 15 seconds.
- The appliance will automatically exit super cooling mode after 6 hours. To exit this mode earlier, press the temperature setting button A once.
Switching off
- To switch off the appliance, press and hold the temperature setting button A for 10 seconds. All indicators turn off and the appliance stops operating in 15 seconds.
- To switch the appliance back on, press the temperature setting button A. The appliance resumes its operation.
- To disconnect the appliance from the power supply, disconnect the mains plug from the power socket.
Hints and tips
Hints for fresh food refrigeration
- Cover or wrap the food, particularly if it has a strong flavour.
- Position the food so that air can circulate freely around it.
- For best performance, leave enough space in the refrigerator compartment for air to circulate around the packages. Also leave enough room at the front so the door can close tightly.
- Do not store warm food or evaporating liquids in the refrigerator.
- Meat (all types): wrap in suitable packaging and place on the glass shelf above the vegetable drawer. Store meat for at most 1-2 days.
- Cooked foods and cold dishes: cover and place on any shelf.
- Fruit and vegetables: clean thoroughly and place in the vegetable drawer. Bananas, potatoes, onions and garlic must not be kept in the refrigerator if not packed.
- Butter and cheese: place in special airtight containers or wrap in aluminium foil or polythene bags to exclude as much air as possible.
- Bottles: close with caps and place on the door balconies.
Energy-saving tips
- Install the appliance in a dry, well ventilated room far away from any heat source (e.g. radiator, cooker, etc.) and in a place not exposed directly to the sun. If required, use an insulating plate.
- To guarantee adequate ventilation follow installation instructions.
- Insufficient ventilation on back of the product increases energy consumption and decreases cooling efficiency.
- The internal temperatures of the appliance may be affected by the ambient temperature, frequency of door opening, as well as location of the appliance. Temperature setting should take into consideration these factors.
- Allow warm food and drinks to cool down before placing in the appliance.
• After placing the food check if the door of compartments closes properly. - Reduce to a minimum door opening.
- Positioning of the shelves in the refrigerator has no impact on the efficient usage of energy. Food should be placed on the shelves in such way to ensure proper air circulation (food should not touch each other and distance between food and rear wall should be kept).
- Damaged gaskets must be replaced as soon as possible.
Cleaning and maintenance
General tips
- Regularly clean the appliance with a cloth and a solution of warm water and neutral detergent specifically formulated for refrigerator interiors. Do not use abrasive cleaners or tools.
- To ensure proper drainage of defrost water, regularly utilize the drain filter from the fitting bag to clean the defrost water drain outlet. This outlet is situated on the rear wall of the refrigerator compartment (see Fig. 1). Always keep the drain filter inserted into the drain outlet to prevent any blockages caused by dirt.
- Before servicing or cleaning the appliance, unplug it from the mains or disconnect the power supply.
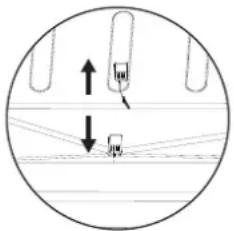
Fig. 1
Defrosting the refrigerator compartment
Food moisture evaporating inside the refrigerator or the entry of air moisture into the refrigeration compartment during daily use can both lead to frost formation in the refrigeration compartment. In such cases, manually raising the temperature setting of the refrigerator can facilitate automated defrosting. The formation of water droplets on the rear wall of the refrigerator compartment indicates that the automatic defrosting is underway.
The defrost water automatically runs into the drain outlet and then into a container where it evaporates.
CAUTION! The refrigerator accessories must not be placed in a dishwasher.
If you do not use the appliance for a prolonged period
- Switch off the appliance.
- Disconnect the appliance from the power supply.
- Remove all food.
- Defrost and clean the appliance.
- Leave the doors open just enough to allow air to circulate inside the compartments. This will prevent the formation of mould and unpleasant odours.
In the event of a power cut
- Keep the doors of the appliance closed. This will allow the food to stay cold as long as possible.
- Do not re-cool food if it has returned to room temperature. Consume within 24 hours.
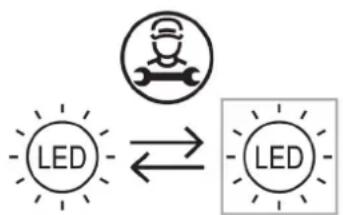
Replacing the lighting
The appliance is equipped with a LED for interior lighting.
Only an authorized technician is allowed to replace the lighting device. Please contact your Authorised Service Centre. For a quicker service, always refer to the full list of Authorised Service Centres located at the end of this manual and call the corresponding phone numbers.
flowchart
graph LR
    A["User Icon"] --> B["LED"]
    B --> C["LED"]
    C --> D["Output"]
Troubleshooting
| Problem Possible causes Solutions | ||
| The control panel is switched off and/or the appliance does not work. | There may be a problem with the power supply to the appliance. | Ensure that:There is no power cut.The power plug is properly inserted in the socket and the bipolar power switch, if present, is set to the correct position (on).The household electrical system protection devices are in good working order.The power supply cable is not damaged.Switch the appliance on with the temperature setting button. |
| The inside light does not work. | The light is broken.Failure of a component | Refer to "replacing the lighting" |
| Temperature inside the compartments is not low enough. | There could be various causes (see the solutions in the next column). | Ensure that:The doors are closed properly.The appliance is not installed near a heat source.The temperature is set appropriately.Air circulation inside the appliance is not obstructed in any way (see the installation instructions). |
| Water collects at the bottom of the refrigerator compartment. | The defrost water drain outlet is blocked. | Clean the defrost water drain outlet (see “Cleaning and maintenance”) |
| The front edge of the refrigerator next to the seal is hot. | This is not a problem.It prevents condensation from forming. | No solution is required. |
| The temperature inside the refrigerator compartment is too low. | The set temperature is too low.Refrigerator temperature sensor malfunctions. | If no food in the compartment is frozen, set a higher temperature.If some or all food in the compartment has become frozen, contact an authorized Service Centre. |
| One or more lights blink continuously. | Refer to "Display" in operation section. | Contact an authorized Service Centre. |
Note:
It is normal for the refrigeration system to produce some noises, such as gurgling and hissing.
Before contacting the After-sales Service:
Restart the appliance to see if the fault has been remedied. If it persists, switch the appliance off again and repeat the operation after an hour.
If your appliance still does not work properly after carrying out the checks listed in the troubleshooting guide and switching the appliance on again, contact the After-sales Service, clearly explaining the problem and specifying:
• the nature of the problem
• the date of purchase
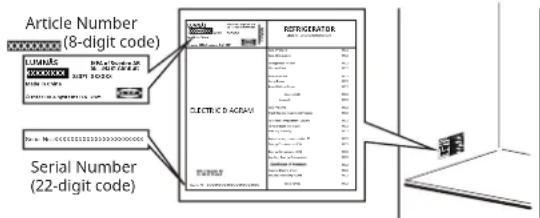
- the model and serial number of the appliance
The article number and serial number are shown on the rating plate on the internal left side of the appliance.
Picture for reference only
Technical data
| Product category | |
| Product type Refrigerator | |
| Installation type Built-in | |
| Product dimensions | |
| Height 1255 mm | |
| Width 540 mm | |
| Depth 550 mm | |
| Net volume | |
| Fridge 205.0 L | |
| Defrost system | |
| Fridge Manual | |
| Other specifications | |
| Energy consumption 101 kWh/y | |
| Noise level 35 dB(A), Class B | |
| Energy class E | |
| Rated voltage | 220 - 240 V~ |
| Rated frequency | 50 Hz |
| Light source of energy efficiency class | F |
Note: Information about the product in the product database can be accessed by scanning the QR code on the EPREL label.
Environmental concerns
1. Packing materials
Recyclable materials are marked with the symbol ⚙️ Put the packing materials in relevant containers to recycle them.
Keep the packing materials (plastic bags, polystyrene parts, etc.) out of the reach of children, as they are a potential source of danger.
2. Scrapping/Disposal
The appliance is manufactured using recyclable material.
This appliance is marked in compliance with European Directive 2002/96/EC on Waste Electrical and Electronic Equipment (WEEE). By ensuring the correct disposal of this appliance, you can help prevent potentially negative consequences for the environment and human health.
The symbol on the appliance, or on the
accompanying documents, indicates that this appliance should not be treated as domestic waste but must be taken to a special collection centre for the recycling of electrical and electronic equipment. When scrapping the appliance, make it unusable by cutting off the power cable and removing the doors and shelves so that children cannot easily climb inside and become trapped.
Scrap the appliance in compliance with local regulations on waste disposal, taking it to a special collection centre; do not leave the appliance unattended even for a few days, since it is a potential source of danger for children.
For further information on the treatment, recovery and recycling of this product, contact your competent local office, the household waste collection service or the shop where you purchased the appliance.
Declaration of conformity
- This appliance has been designed for preserving food and is manufactured in compliance with Regulation (EC) No 1935/2004.
CE
- This appliance has been designed, manufactured and marketed in compliance with:
- safety objectives of the "Low Voltage" Directive 2014/35/EU (which replaces 2006/95/CE and subsequent amendments);
- the protection requirements of Directive "EMC" 2014/30/EU.
- This appliance has been designed, manufactured and marketed in compliance with:
- Electromagnetic Compatibility Regulations 2016
- Electrical Equipment (Safety) Regulations 2016
UK CA
IKEA GUARANTEE
How long is the IKEA guarantee valid?
This guarantee is valid for five (5) years from the original date of purchase of your appliance at IKEA, unless the appliance is named LAGAN in which case two (2) years of guarantee apply. The original sales receipt, is required as proof of purchase. If service work is carried out under guarantee, this will not extend the guarantee period for the appliance.
Which appliances are not covered by the IKEA five (5) years guarantee?
The range of appliances named LAGAN and all appliances purchased in IKEA before 1st of August 2007.
Who will execute the service?
IKEA service provider will provide the service through its own service operations or authorized service partner network.
What does this guarantee cover?
The guarantee covers faults of the appliance, which have been caused by faulty construction or material faults from the date of purchase from IKEA. This guarantee applies to domestic use only. The exceptions are specified under the headline "What is not covered under this guarantee?" Within the guarantee period, the costs to remedy the fault e.g. repairs, parts, labour and travel will be covered, provided that the appliance is accessible for repair without special expenditure. On these conditions the EU guidelines (Nr. 99/44/EG) and the respective local regulations are applicable. Replaced parts become the property of IKEA.
What will IKEA do to correct the problem?
IKEA appointed Service Provider will examine the product and decide, at its sole discretion, if it is covered under this guarantee. If considered covered, IKEA Service Provider or its authorized service partner through its own service operations, will then, at its sole discretion, either repair the defective product or replace it with the same or a comparable product.
What is not covered under this guarantee?
• Normal wear and tear.
- Deliberate or negligent damage, damage caused by failure to observe operating instructions, incorrect installation or by connection to the wrong voltage, damage caused by chemical or electrochemical reaction, rust, corrosion or water damage including but not limited to damage caused by excessive lime in the water supply, damage caused by abnormal environmental conditions.
- Consumable parts including batteries and lamps.
- Non-functional and decorative parts which do not affect normal use of the appliance, including any scratches and possible color differences.
- Accidental damage caused by foreign objects or substances and cleaning or unblocking of filters, drainage systems or soap drawers.
- Damage to the following parts: ceramic glass, accessories, crockery and cutlery baskets, feed and drainage pipes, seals, lamps and lamp covers, screens, knobs, casings and parts of casings. Unless such damages can be proved to have been caused by production faults.
- Cases where no fault could be found during a technician's visit.
- Repairs not carried out by our appointed service providers and/or an authorized service contractual partner or where non-original parts have been used.
- Repairs caused by installation which is faulty or not according to specification.
- The use of the appliance in a non-domestic environment i.e. professional use.
- Transportation damages. If a customer transports the product to his home or another address, IKEA is not liable for any damage that may occur during transport. However, if IKEA delivers the product to the customer's delivery address, then damage to the product that occurs during this delivery will be covered by IKEA.
- Cost for carrying out the initial installation of the IKEA appliance. However, if an IKEA appointed Service Provider or its authorized service partner repairs or replaces the appliance under the terms of this guarantee, the appointed Service Provider or its authorized service partner will reinstall the repaired appliance or install the replacement, if necessary.
These restrictions do not apply to fault-free work carried out by a qualified specialist using our original parts in order to adapt the appliance to the technical safety specifications of another EU country.
How country law applies
The IKEA guarantee gives you specific legal rights, which cover or exceed all the local legal demands. However these conditions do not limit in any way consumer rights described in the local legislation.
Area of validity
For appliances which are purchased in one EU country and taken to another EU country, the services will be provided in the framework of the guarantee conditions normal in the new country.
An obligation to carry out services in the framework of the guarantee exists only if the appliance complies and is installed in accordance with:
ENGLISH 15
- the technical specifications of the country in which the guarantee claim is made;
- the Assembly Instructions and User Manual Safety Information.
The dedicated AFTER SALES for IKEA appliances
Please don't hesitate to contact IKEA appointed After Sales Service Provider to:
• make a service request under this guarantee;
- ask for clarifications on installation of the IKEA appliance in the dedicated IKEA kitchen furniture;
- ask for clarification on functions of IKEA appliances.
To ensure that we provide you with the best assistance, please read carefully the Assembly Instructions and/or the User Manual before contacting us.
How to reach us if you need our service
You can find phone numbers of the IKEA appointed After Sales Service Providers at the end of this manual.
In order to provide you with a quicker service, we recommend that you use the specific phone numbers listed in this manual. Always use the phone numbers listed in the user manual for the specific appliance you need an assistance for. Please remember to provide the 8-digit article number and 22-digit serial number shown on the rating plate of your appliance.
SAVE THE SALES RECEIPT!
It is your proof of purchase and required for the guarantee to apply. The sales receipt also reports the IKEA name and article number (8 digit code) for each of the appliances you have purchased.
Do you need extra help?
For any additional questions not related to After Sales of your appliances please contact your nearest IKEA store call centre. We recommend you read the appliance documentation carefully before contacting us.
Spare parts information
- The following spare parts: thermostats, temperature sensors, printed circuit boards and light sources, will be available to professional repairers for a minimum period of seven years, after placing the last unit of the model on the market.
- The following spare parts: door handles, door hinges, trays and baskets will be available to professional repairers and end users for a minimum period of seven years, and door gaskets for a minimum period of 10 years, after placing the last unit of the model on the market.
The spare parts can be found:
www.ikea.com
Inhaltsverzeichnis
Bedienung
Bedienfeld

Abb. 1
flowchart
graph TD
    A["User Icon"] --> B["LED"]
    B --> C["Second LED Output"]
Problembehebung
Fonctionnement
Bandeau de commande

natural_image
Diagram showing two mechanical components with upward and downward arrows, enclosed in a circle (no text or symbols)Fig. 1
flowchart
graph LR
    A["User Icon"] --> B["LED"]
    B --> C["Second LED Output"]
Dépannage
Funzionamento
natural_image
Diagram showing two vertical structures with arrows indicating direction, no text or symbols presentFig. 1
flowchart
graph TD
    A["Robot Icon"] --> B["LED"]
    B --> C["LED"]
    C --> A
Betjening
Kontrolpanel

A Knap til indstilling af temperatur
1 - 4 Kontrollamper for indstillet temperatur
Fig. 1
flowchart
graph LR
    A["Robot Icon"] --> B["LED"]
    B --> C["LED"]
    C --> A
Fejlfinding
1 Temperaturkontrollboks og LED-belysning
2 Glasshyller
3 Frukt- og grønnsaksskuff
4 Dørhylle
5 Dørpakning
6 Strømetikett
Tilbehør
Dreneringsfilter

1x
Første bruk
Kople apparatet til strømforsyningen. De ideelle matlagringstemperaturene er allerede fabrikkinnstilt (mellomliggende).
Drift
Kontrollpanel
A Temperaturinnstillingsknapp
1 - 4 Angi temperaturindikatorer
Fig. 1
flowchart
graph TD
    A["User Icon"] --> B["LED"]
    B --> C["Second LED Output"]
Feilsøking
2. Kassering/avhending
Käyttö
Käyttöpaneeli

Kuva 1
flowchart
graph TD
    A["Robot Icon"] --> B["LED"]
    B --> C["LED"]
    C --> A
Vianmääritys
Drift
Kontrollpanel

Fig. 1
Frosta av kylskåpet
flowchart
graph LR
    A["Robot Icon"] --> B["LED"]
    B --> C["LED"]
    C --> A
Felsökning
Funcionamento
Painel de controlo
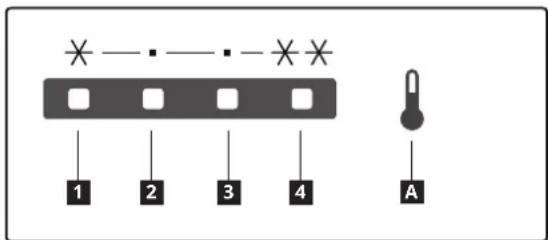
Fig. 1
flowchart
graph LR
    A["User Icon"] --> B["LED"]
    B --> C["Second LED Output"]
Funcionamiento
Panel de control

natural_image
Diagram showing two mechanical components with upward and downward arrows, enclosed in a circle (no text or symbols)Fig. 1
Λειτουργία
Πίνακας ελέγχου

natural_image
Diagram showing two vertical arrows pointing upward and downward on a horizontal line, with no text or symbols present.Elk. 1
flowchart
graph TD
    A["Robot Icon"] --> B["LED"]
    B --> C["LED"]
    C --> A
WAARSCHUWING: Risico op
brand / Ontvlambare materialen
⚠ WAARSCHUWING! Risico op letsel of verstikking.
natural_image
Diagram showing two mechanical components with upward and downward arrows, enclosed in a circle (no text or symbols)Afb. 1
flowchart
graph TD
    A["Robot Icon"] --> B["LED"]
    B --> C["LED"]
    C --> A
Probleemoplossing
BEWAAR HET AANKOOPBEWIJS!
Ovládání
Ovládací panel

Obr. 1
flowchart
graph LR
    A["Robot Icon"] --> B["LED"]
    B --> C["LED"]
    C --> A
Řešení potíží
Obstuga
Panel sterowania

Rys. 1
flowchart
graph LR
    A["User Icon"] --> B["LED"]
    B --> C["LED"]
    C --> D["Output Unit"]
Эксплуатация
Панель управления
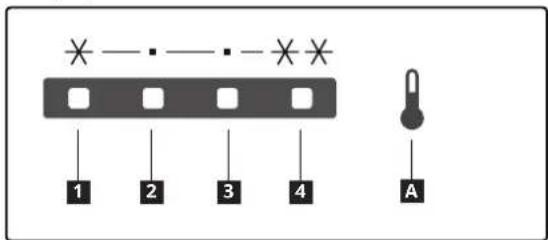
Рис. 1
flowchart
graph LR
    A["User Icon"] --> B["LED"]
    B --> C["Second LED Output"]
1 Skrinka na reguláciu teploty a osvetlenie LED
2 Sklenená polica
3 Zásuvka na ovocie a zeleninu
4 Panel dverí
5 Tesnenie dverí
6 Typový štítok
Príslušenstvo
Odtokový filter
1x
Prvé použitie
Prevádzka
Ovládací panel

A Tlačidlo nastavenia teploty
1 – 4 Nastavenie indikátorov teploty
Obr. 1
Odmrazovanie chladiaceho priestoru
flowchart
graph LR
    A["LED"] --> B["Robot Icon"]
    B --> C["LED"]
Riešenie problémov
Naudojimas
Valdymo skydelis

1 pav.
flowchart
graph LR
    A["Robot Icon"] --> B["LED"]
    B --> C["LED"]
    C --> A
Trikčių šalinimas
Lietošana
Vadības panelis

- zīm.
flowchart
graph LR
    A["LED"] --> B["Robot Icon"]
    B --> C["LED"]
Problēmu novēršana
Робота
Панель керування
Рис. 1
flowchart
graph TD
    A["Worker Icon"] --> B["LED"]
    B --> C["LED"]
    C --> A
Kasutamine
Juhtpaneel

Joonis 1
Külmikuosa sulatamine
flowchart
graph TD
    A["User Icon"] --> B["LED"]
    B --> C["Second LED Output"]
Törkeotsing
Rukovanje
Upravljačka ploča

A Gumb za podešavanje temperature
1 - 4 Postavite indikatore temperature
Napomena: Ne koristite oštre predmete za rukovanje upravljačkom pločom. Mogu izgrebati ili oštetiti upravljačku ploču.
Uključivanje
Sl. 1
flowchart
graph TD
    A["Robot Icon"] --> B["LED"]
    B --> C["LED"]
    C --> A
Prije nego kontaktirate postprodajni servis:
1 Kutija za kontrolu temperature i LED osvetljenje
2 Staklena polica
3 Fioka za voće i povrće
4 Korpica na vratima
5 Zaptivka vrata
6 Pločica
Pribor
Odvodni filter
1x
Prva upotreba
Priključite uređaj u strujnu utičnicu. Idealne temperature čuvanja namirnica su već fabrički podešene (srednje).
Napomena: Nakon uključivanja, aparatu je potrebno 4-5 sati da bi dostigao odgovarajuću temperaturu za skladištenje tipične količine hrane.
Važno!
Rad uređaja
Komandna tabla

A Dugme za podešavanje temperature
1 - 4 Podesite indikatore temperature
Slika 1
Odmrzavanje odeljka frižidera
Vlaga od namirnica koja isparava unutar frižidera i ulazak vlage iz vazduha u odeljak frižidera tokom svakodnevne upotrebe mogu dovesti do nastanka leda u odeljku frižidera. Ako se to desi, ručno podignite podešavanje temperature u frižideru da bi se automatsko odmrzavanje lakše obavilo.
flowchart
graph LR
    A["LED"] --> B["Robot Icon"]
    B --> C["LED"]
Rešavanje problema
1 Predel za upravljanje temperature in LED-osvetlitve
2 Steklena polica
3 Predal za sadje in zelenjavo
4 Vratna polica
5 Tesnilo vrat
6 Ploščica za tehnične navedbe
Pripomočki
Delovanje
Nadzorna plošča

Sl. 1
flowchart
graph LR
    A["Robot Icon"] --> B["LED"]
    B --> C["LED"]
    C --> A
Odpravljanje napak
Preden se obrnete na poprodajno službo:
Çalışma
Kontrol paneli

Şek. 1
flowchart
graph LR
    A["User Icon"] --> B["LED"]
    B --> C["Second LED Output"]
Sorun Giderme
Начин на работа
Панел за управление

A Бутон за настройка на температурата
1 - 4 Индикатори за зададена температура
Фиг. 1
flowchart
graph TD
    A["Robot Icon"] --> B["LED"]
    B --> C["LED"]
    C --> A
Functionarea
Panou de comandă
A Buton de setare a temperaturii
1-4 Indicatoare de setare a temperaturii
natural_image
Diagram showing two directional arrows pointing to a circular outline, with no visible text or symbols.Fig. 1
Kezelés
Kezelőpanel

- ábra
flowchart
graph LR
    A["Robot Icon"] --> B["LED"]
    B --> C["LED"]
    C --> A
Hibaelhárítás
1 Hitastýribox og LED-Iýsing
2 Glerhilla
3 Ávaxta- og grænmetisskúffa
4 Hurðarhilla
5 Hurðapétting
6 Merkispjald
Fylgibúnaður
Drensía
1x
Fyrsta notkun
Meðferð
Stjórnborð

Mynd 1
flowchart
graph TD
    A["User Icon"] --> B["LED"]
    B --> C["LED"]
    C --> A
Bilanaleit
- Table of contents
- Safety information
- Children and vulnerable people safety
- General Safety
- Safety instructions
- Installation
- Electrical connection
- Use
- Internal lighting
- Care and cleaning
- Service
- Disposal
- Product description
- First use
- Important!
- Operation
- Switching on
- Display
- Setting the temperature
- Tips:
- Super cooling mode
- Switching off
- Hints and tips
- Hints for fresh food refrigeration
- Energy-saving tips
- Cleaning and maintenance
- General tips
- Defrosting the refrigerator compartment
- If you do not use the appliance for a prolonged period
- In the event of a power cut
- Replacing the lighting
- Note:
- Before contacting the After-sales Service:
- Environmental concerns
- Packing materials
- Scrapping/Disposal
- Declaration of conformity
- CE
- UK CA
- IKEA GUARANTEE
- How long is the IKEA guarantee valid?
- Which appliances are not covered by the IKEA five (5) years guarantee?
- Who will execute the service?
- What does this guarantee cover?
- What will IKEA do to correct the problem?
- What is not covered under this guarantee?
- How country law applies
- Area of validity
- ENGLISH 15
- The dedicated AFTER SALES for IKEA appliances
- How to reach us if you need our service
- Do you need extra help?
- Spare parts information
- Inhaltsverzeichnis
- Bedienung
- Fonctionnement
- Funzionamento
- Betjening
- Tilbehør
- Første bruk
- Drift
- Kassering/avhending
- Käyttö
- Frosta av kylskåpet
- Funcionamento
- Funcionamiento
- Λειτουργία
- WAARSCHUWING: Risico op
- ⚠ WAARSCHUWING! Risico op letsel of verstikking.
- BEWAAR HET AANKOOPBEWIJS!
- Ovládání
- Obstuga
- Эксплуатация
- Príslušenstvo
- Prvé použitie
- Prevádzka
- Odmrazovanie chladiaceho priestoru
- Naudojimas
- Lietošana
- Робота
- Kasutamine
- Külmikuosa sulatamine
- Rukovanje
- Uključivanje
- Prije nego kontaktirate postprodajni servis:
- Pribor
- Prva upotreba
- Važno!
- Rad uređaja
- Odmrzavanje odeljka frižidera
- Pripomočki
- Delovanje
- Preden se obrnete na poprodajno službo:
- Çalışma
- Начин на работа
- Functionarea
- Kezelés
- Fyrsta notkun
- Meðferð
Brand : IKEA
Model : LUMNÄS 305.728.56
Category : Fridge