Endura Max XL - Vacuum Cleaner DIRT DEVIL - Free user manual and instructions
Find the device manual for free Endura Max XL DIRT DEVIL in PDF.

User questions about Endura Max XL DIRT DEVIL
0 question about this device. Answer the ones you know or ask your own.
Ask a new question about this device
Download the instructions for your Vacuum Cleaner in PDF format for free! Find your manual Endura Max XL - DIRT DEVIL and take your electronic device back in hand. On this page are published all the documents necessary for the use of your device. Endura Max XL by DIRT DEVIL.
USER MANUAL Endura Max XL DIRT DEVIL
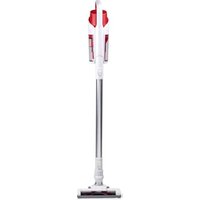
Dirt Devil® Compact Upright
Model # UD20120 / UD20121

1·2·3...
USER MANUAL
961152120 / R4
©2020 All rights reserved
Français - page 21
Español - página 41
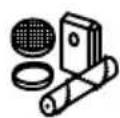
REPLACEMENT PARTS
· BELT STYLE 15
- FILTER TYPE F112
natural_image
Exterior view of a black vacuum cleaner with coiled tubing and control panel (no visible text or symbols)HI. WELCOME.
Congrats on purchasing your new Dirt Devil® Compact Upright Vacuum. Inside, you'll find everything you'll need to know about your latest purchase.
So what are you waiting for? LET'S GO.™

PRODUCT REGISTRATION
Warranty Registration
Be sure to register your product online at www.DirtDevil.com or call 1-800-321-1134 to register by phone.
Hint: Attach your sales receipt to this Owner's manual. Verification of date of purchase may be required for warranty service of your Dirt Devil® product.
For quick reference, please record your product information below.
Model #: ____
Mfg. Code: ____
(Mfg. code located on the back or bottom of product)
Find GENUINE Replacement Parts at www.dirtdevil.com
natural_image
Illustration of cleaning tools including a filter, plate, and rolled paper (no text or symbols)This product uses the following parts:
BELT STYLE 15
FILTER TYPE ____ F112
TABLE OF CONTENTS

1·2·3...
Quick Start Assembly 6-7

natural_image
Simple line drawing of a funnel, a pencil, and a mechanical component (no text or symbols)Tool 17
How to 12-17

Troubleshooting 18

Limited Warranty 19
IMPORTANT SAFETY INSTRUCTIONS SAVE THESE INSTRUCTIONS!
When you use an appliance, basic precautions should always be followed, including the following:
- READ ALL INSTRUCTIONS BEFORE USING THE APPLIANCE.
• ALWAYS FOLLOW THESE SAFETY INSTRUCTIONS. - BRING VACUUM CLEANER TO UPRIGHT POSITION WHEN USING THE HOSE AND ATTACHMENTS.
• DO NOT LEAVE VACUUM CLEANER UNATTENDED WHEN PLUGGED IN. - REGULARLY CHECK THE FILTER TO CLEAN OR REPLACE.
- WARNING: FULLY ASSEMBLE CLEANER BEFORE OPERATING.
- WARNING: DO NOT USE SHARP OBJECTS TO CLEAN OUT THE HOSE SINCE THEY COULD CAUSE DAMAGE.
- OCCASIONALLY REMOVE BRUSH AND CLEAN DEBRIS FROM END CAPS TO KEEP BRUSH ROTATING SMOOTHLY.
WARNING: TO REDUCE THE RISK OF FIRE, ELECTRIC SHOCK OR INJURY:
- Fully assemble product prior to use.
- Do not leave appliance when plugged in. Unplug from outlet when not in use and before cleaning or servicing.
- Do not use outdoors or on wet surfaces. Electrical shock could occur.
- Do not allow to be used as a toy. Not intended for use by children age 12 and under. Close supervision is necessary when used by or near children. To avoid injury or damage, keep children away from product, and do not allow children to place fingers or other objects into any openings.
- Use only as described in this manual. Use only manufacturer's recommended attachments and products.
- Do not use charger with damaged cord or plug. If product or charger is not working as it should, has been dropped, damaged, left outdoors, or dropped into water, call customer service at 1-800-321-1134 prior to continuing use.
- Do not pull or carry by cord, use cord as handle, close a door on cord, or pull cord around sharp edges or corners. Do not place product on cord. Do not run appliance over cord. Keep cord away from heated surfaces.
- Do not unplug by pulling on cord. To unplug, grasp the plug, not the cord.
- Do not handle plug or appliance with wet hands.
- Do not put any objects into openings. Do not use with any opening blocked; keep free of dust, lint, hair, and anything that may reduce air flow.
- Do not use sharp objects to clean out hose as they can cause damage.
- Keep hair, loose clothing, fingers, and all parts of body away from openings and moving parts.
- Do not pick up anything that is burning or smoking, such as cigarettes, matches, or hot ashes.
- Do not use without dirt cup and filters in place.
- Turn off all controls before unplugging.
- Look on your vacuum cleaner and follow all label and marking instructions.
- Use extra care when cleaning on stairs. To avoid personal injury or damage, and to prevent the cleaner from falling, always place cleaner at bottom of stairs or on floor. Do not place cleaner on stairs or furniture, as it may result in injury or damage.
- Do not use to pick up flammable or combustible liquids, such as gasoline, or fine wood sandings, or use in areas where they may be present.
-
Keep the vacuum cleaner on the floor. Only the hand-held vacuum cleaners may be set on furniture.
-
Vacuum cleaner must be in the upright position to lift the rotating brush off the carpet when doing above floor cleaning.
- Brushroll continues to turn while product is turned on and handle is in the upright position. To avoid damage to carpet, rugs, and flooring, avoid tipping cleaner or setting it on furniture, fringed area rugs, or carpeted stairs during tool use.
- Do not use an extension cord with this vacuum cleaner.
- Store the vacuum cleaner indoors. Put the vacuum cleaner away after use to prevent tripping accidents.
- Operate cleaner only at voltage specified on date plate on back of cleaner.

CAUTION: TO REDUCE THE RISK OF DAMAGE:
- Avoid picking up hard, sharp objects with this product, as they may cause damage.
- Store appropriately indoors in a dry place. Do not expose machine to freezing temperatures.
- Do not use sharp objects to clean out hose as they can cause damage.
SAVE THESE INSTRUCTIONS

WARNING:
To reduce the risk of electric shock, this appliance has a polarized plug (one blade is wider than the other). This plug will fit in a polarized outlet only one way. If the plug does not fit fully in the outlet, reverse the plug. If it still does not fit, contact a qualified electrician to install the proper outlet. Do not change the plug in any way.

NOTICE
AN INTERNAL THERMAL PROTECTOR HAS BEEN DESIGNED INTO YOUR CLEANER TO PROTECT IT FROM OVERHEATING. WHEN THE THERMAL PROTECTOR ACTIVATES THE CLEANER WILL STOP RUNNING. IF THIS HAPPENS PROCEED AS FOLLOWS:
If this happens proceed as follows:
- Turn cleaner OFF and unplug it from the electrical outlet.
- Empty dirt cup.
- Inspect the nozzle and bag inlet openings for any obstructions. Clear obstructions if present.
- When cleaner is unplugged and motor cools for 30 minutes, the thermal protector will deactivate and cleaning may continue.
If the thermal protector continues to activate after following the above steps, your cleaner needs servicing.
QUICK START
*Not all models have this feature.
TOOL REQUIRED:
PHILLIPS OR FLAT HEAD
SCREWDRIVER
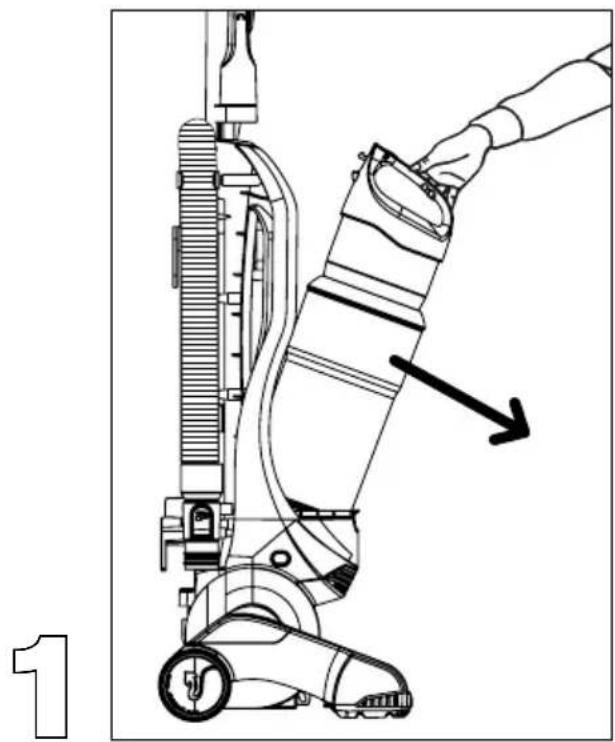
ATTACH FIXED HANDLE\*
natural_image
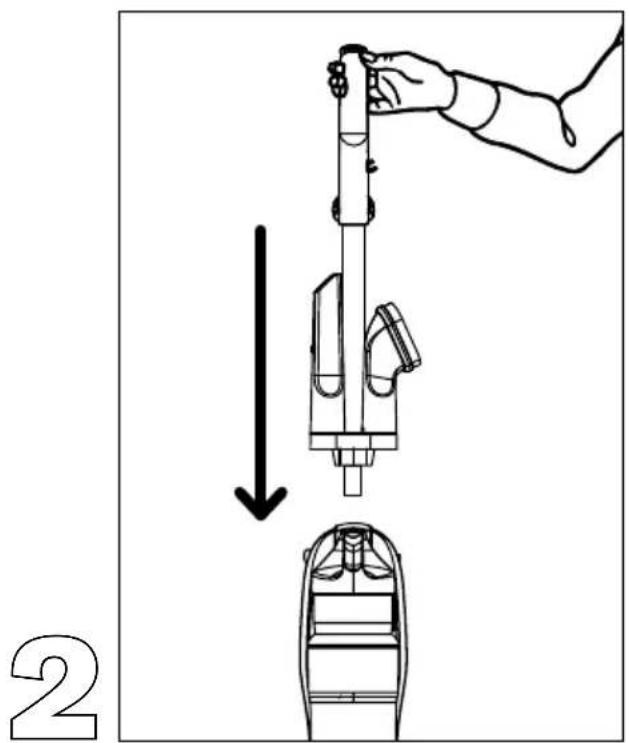
Line drawing of a vacuum cleaner with a hand adjusting the component (no text or symbols)REMOVE DIRT CUP FROM BODY OF CLEANER.

text_image
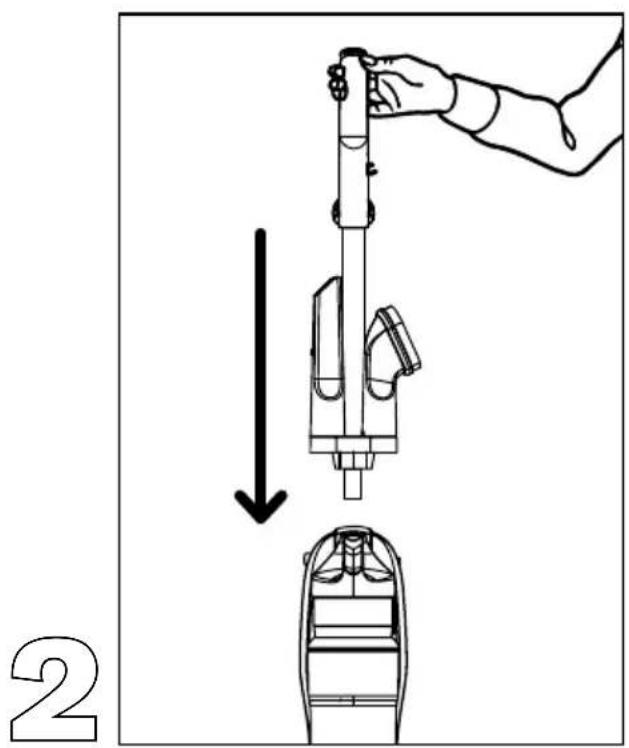
2SLIDE HANDLE INTO HOLE ON TOP OF CLEANER.
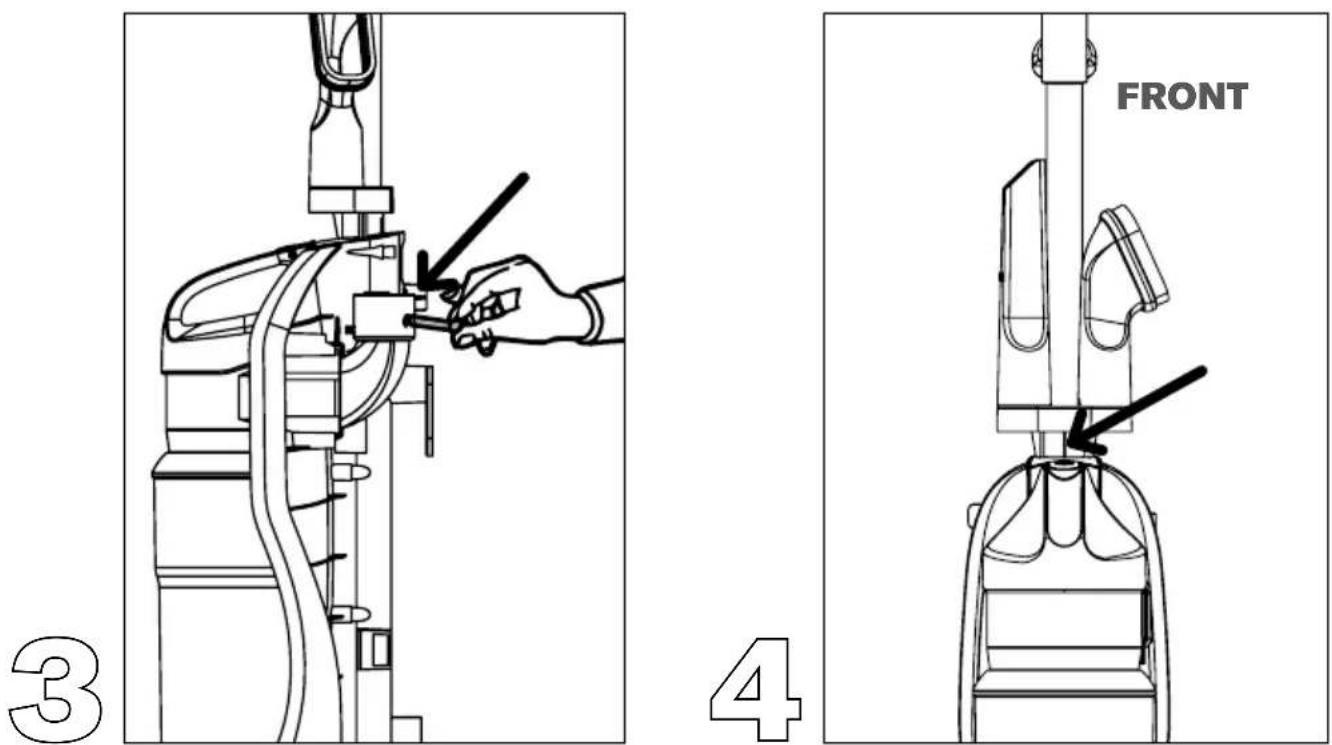
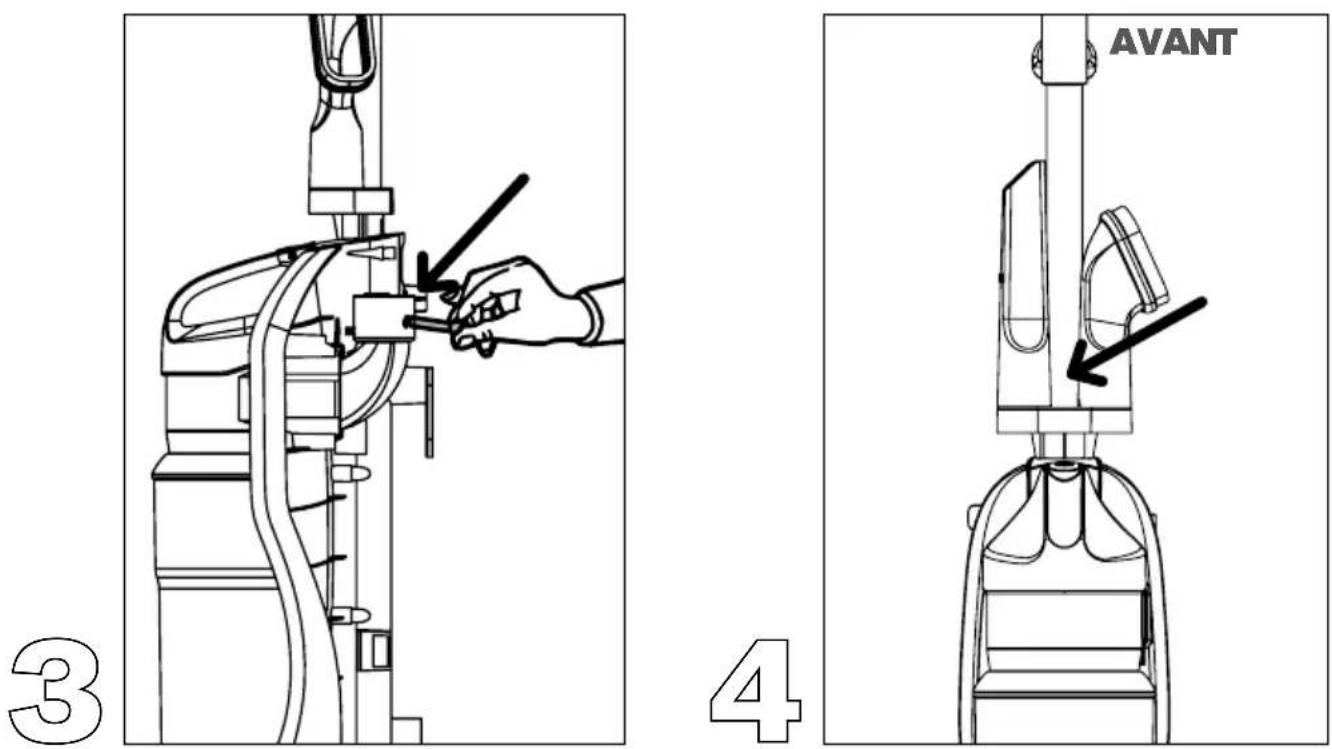
INSERT SCREW THROUGH HOLE (LOCATED UNDER TOOL CADDY) ON BACK OF CLEANER (DIAGRAM 3). PLACE BOLT ONTO END OF SCREW COMING THROUGH BACK PANEL AND TIGHTEN TO SECURE HANDLE (DIAGRAM 4).
Go to dirtdevil.com/support or contact our Customer Service Department at 1 (800) 321-1134
9:00 a.m. - 6:00 p.m. EST Mon. - Fri. Pick up the conversation on...

Facebook.com/DirtDevil

Twitter@DirtDevil
ASSEMBLE
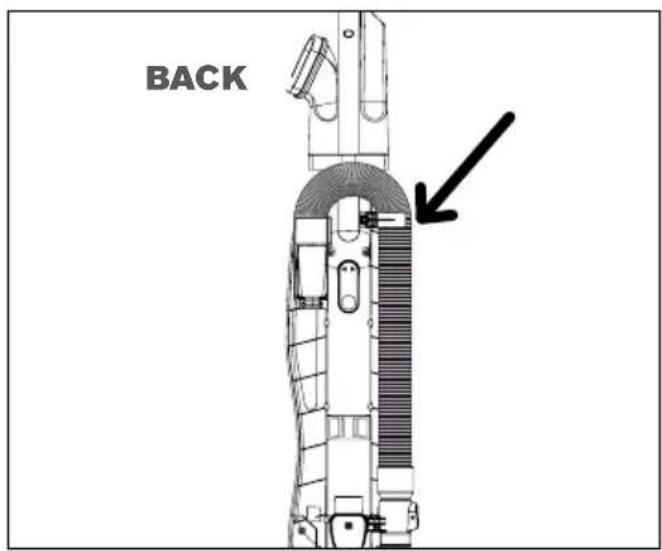
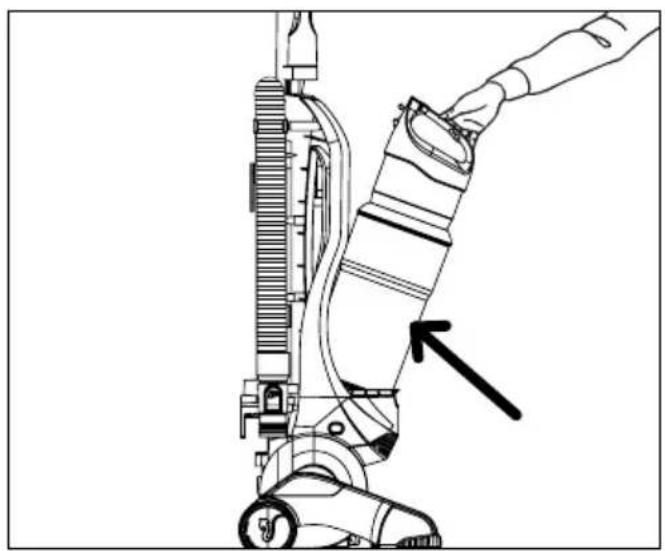
SECURE BACK HOSE: Wrap hose around back of hose caddy. Push hose wand down into the right side of cleaner.
text_image
BACK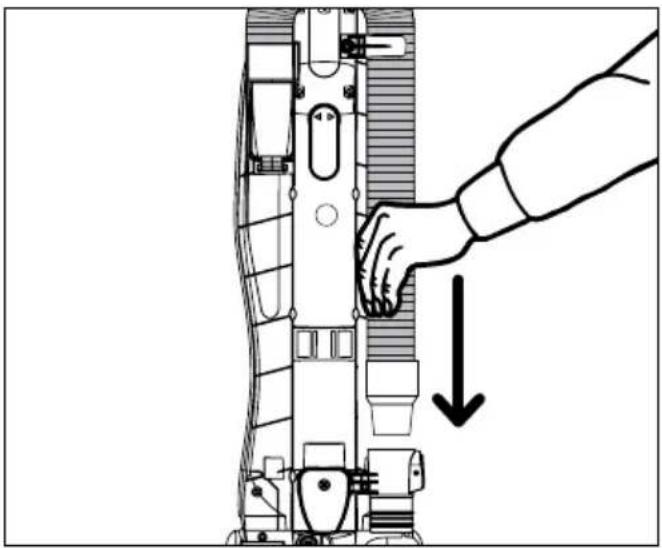
natural_image
Diagram of a robotic device with a hand adjusting the internal components, showing a downward arrow indicating motion (no text or symbols present)ASSEMBLE
TOOL STORAGE: Attach crevice tool and dust brush to tool caddy.
natural_image
Technical line drawing of a rocket or spacecraft assembly with no visible text or symbolsINSTALL DIRT CUP: Replace dirt cup by tilting back until it snaps into place.
natural_image
Line drawing of a hand operating a vacuum cleaner with a black arrow pointing to the component (no text or symbols present)HOW TO
OPE RATE
CORD RELEASE: Turn quick cord release for easy cord removal. To Use: Plug into electrical outlet. For convenient storage: Wrap cord on cord hooks. Attach the plug end to the cord.
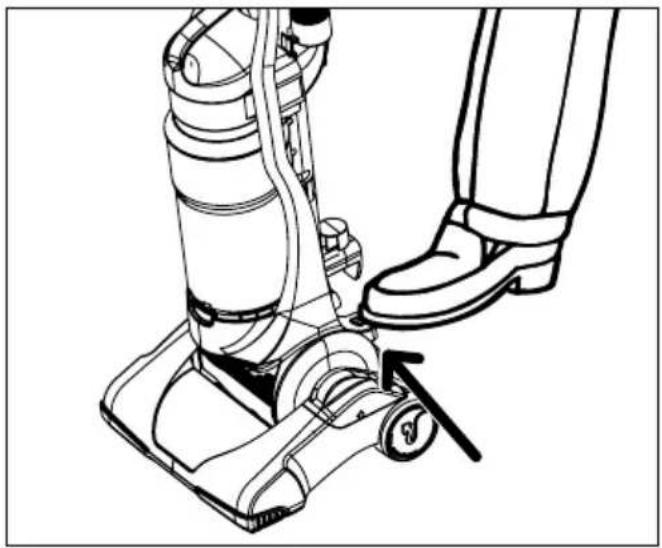
ON/OFF PEDAL: Plug cord into electrical outlet. Turn cleaner on by depressing foot pedal located on the back left side of the cleaner.
natural_image
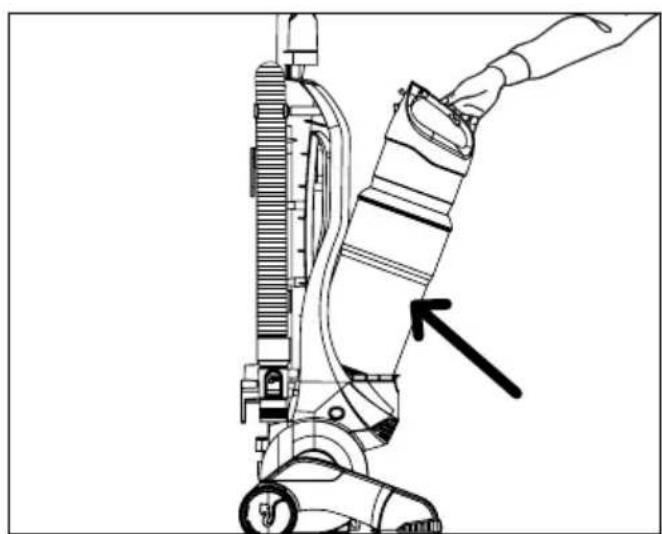
Technical line drawing of a mechanical assembly with curved components and a directional arrow (no text or symbols)HANDLE RELEASE: Pull back handle to tilt back. Press on the front of nozzle if needed.
natural_image
Line drawing of a person using a vacuum cleaner to lift a wheel, showing the foot and legs (no text or symbols)FLOOR/CARPET CLEANING: Move the handle and adjust it to the desired position for (A) operating the cleaner, and (B) lowering handle to clean under furniture.
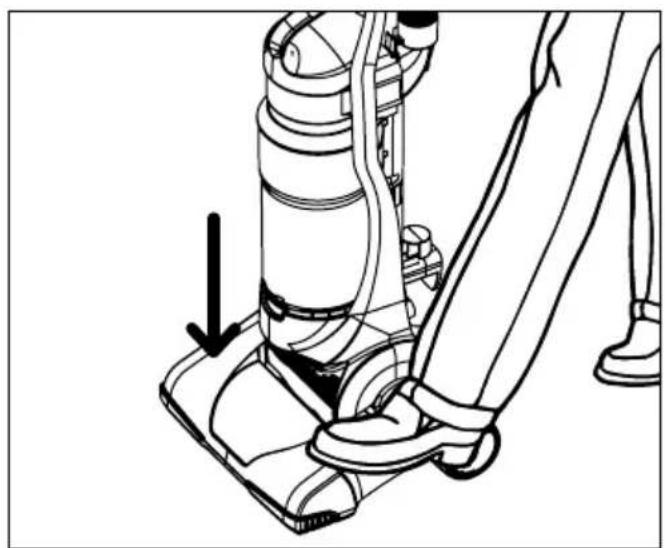
natural_image
Line drawing of a person using a vacuum cleaner with a downward arrow indicating motion (no text or symbols)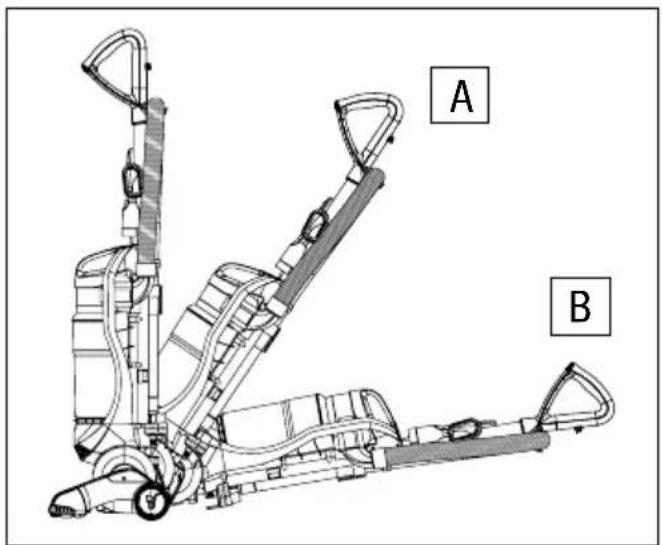
text_image
A BHOW TO
OPE RATE
CARRY HANDLE: Use the carry handle to move the cleaner from room to room.
natural_image
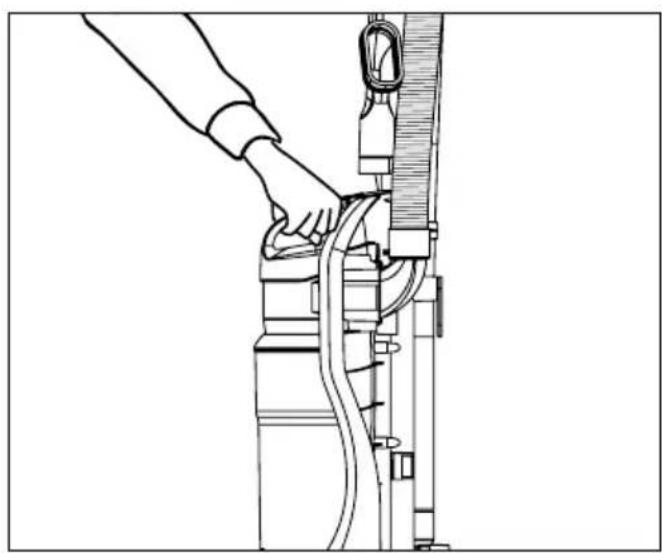
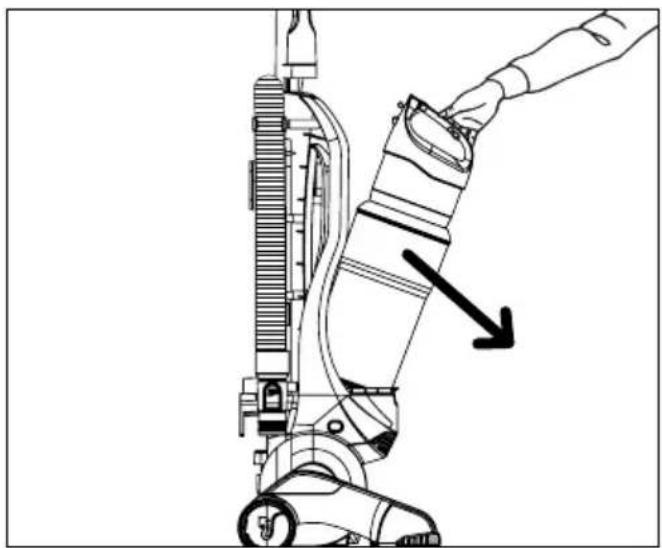
Line drawing of a hand operating a mechanical device with hoses and tubing (no text or symbols)DIRT CUP & FILTER: REMOVAL & REPLACEMENT
-
EMPTY DIRT CUP: Press dirt cup release button on top of dirt cup to remove dirt cup.
-
Hold dirt cup over garbage can and press dirt cup bottom release button to empty.
natural_image
Line drawing of a hand operating a vacuum cleaner with a downward arrow indicating motion (no text or symbols present)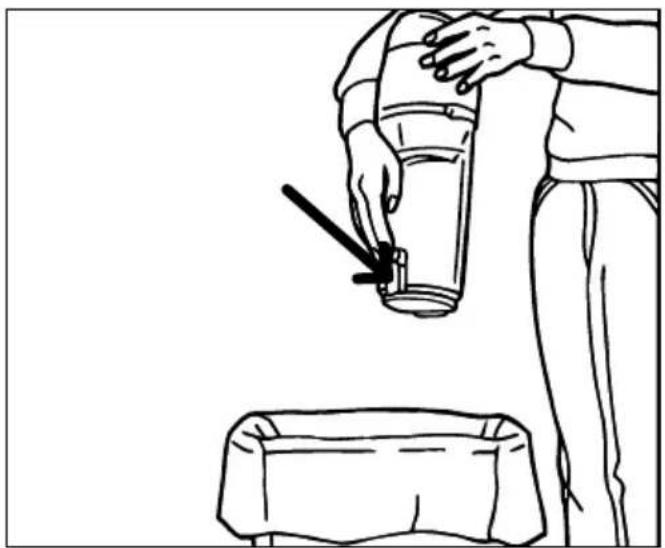
natural_image
Line drawing of a person using a fire extinguisher to lift a seatbelt (no text or symbols)
NOTE: For best performance, replace filter every 6 months. Please use reminder label located on filter cap to record replacement date.
-
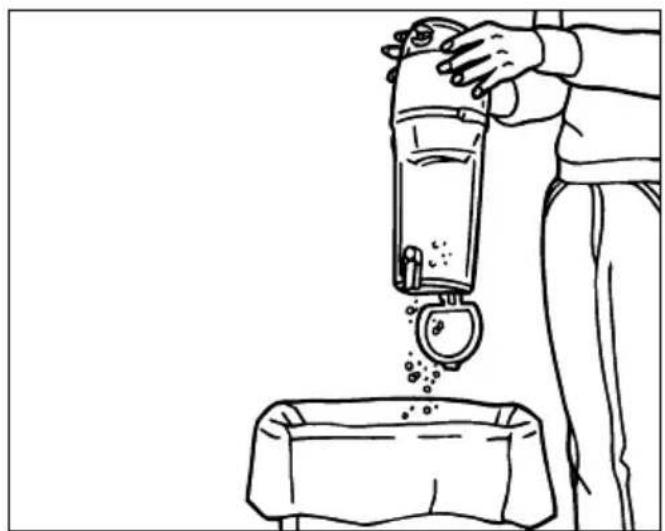
Makesurecontainerbottom center opening is clear of debris. Snap dirt cup bottom back into place after emptying.
-
REMOVE FILTER CARTRIDGE: Twist dirt cup assembly clockwise to access filter assembly.
natural_image
Line drawing of a person pouring liquid from a bottle into a container (no text or symbols)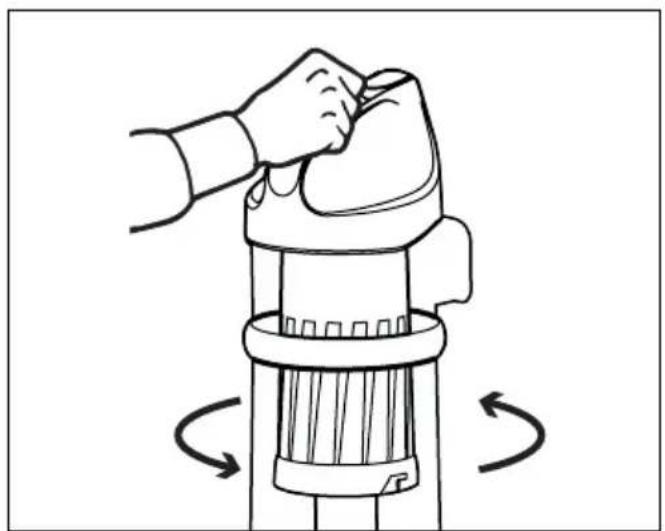
natural_image
Illustration of a hand using a tool to lift a cylindrical device, with rotational arrows indicating motion (no text or symbols)DIRT CUP & FILTER: REMOVAL & REPLACEMENT
- REMOVE FOAM FILTER: Twist separator counter clockwise to access filter.

text_image
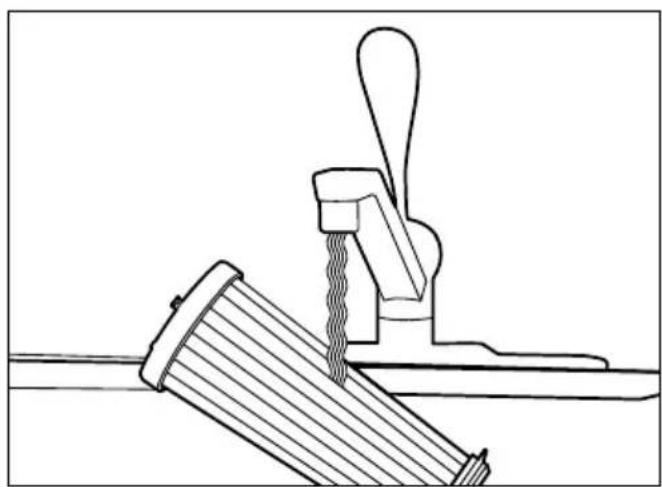
FILTER- CLEAN PLEATED FILTER: Rinse filter under under running water. Allow to dry at last 24 hours before replacing in dirt cup.
natural_image
Technical line drawing of a mechanical assembly with a lever and wooden component (no text or symbols)
REGULAR MAINTENANCE: Each time the dirt cup is emptied, the filter should be cleaned. Tap the filter firmly against the inside of a trash can until the dirt stops falling from the filter. (Filter will be discolored after use, this will not affect the filter's performance.) The cleaning instructions may vary depending on the dirt conditions. In some cases, more or less cleaning of the filter may be required.
- Re-installfilterassembly by reversing steps 3-4 and return dirt cup to cleaner.
natural_image
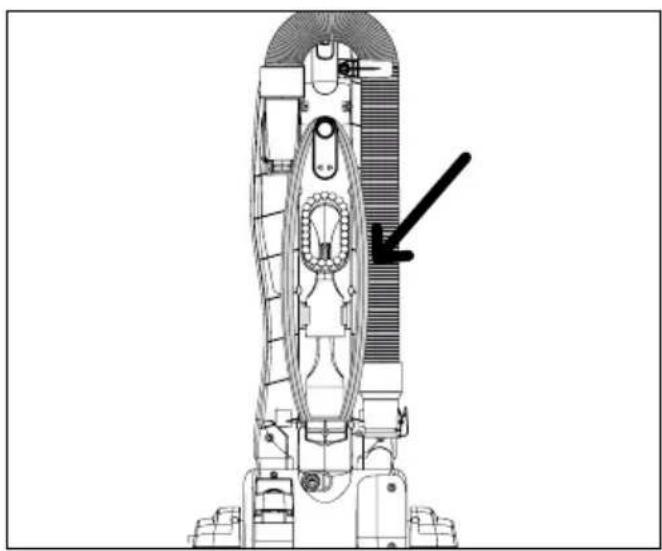
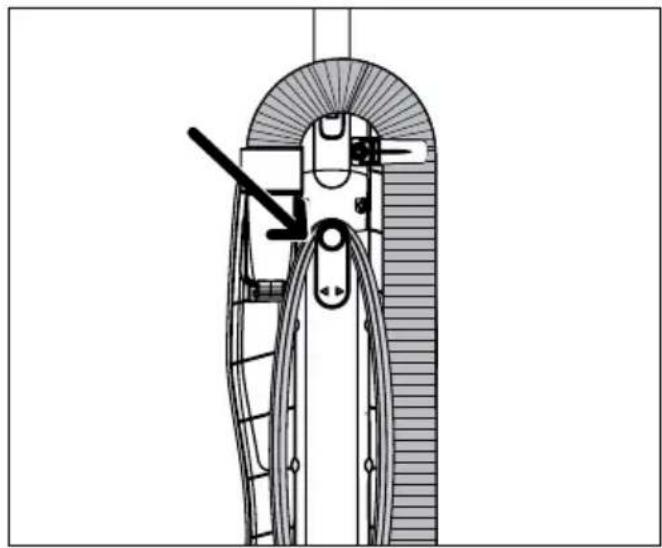
Line drawing of a hand operating a vacuum cleaner with a black arrow pointing to the component (no text or symbols present)FiILTER TYPE F112: For filter replacement, please visit our website at www.dirtdevil.com to buy online or call customer service at 1-800-321-1134.
BELT OR BRUSHROLL: REMOVAL & REPLACEMENT
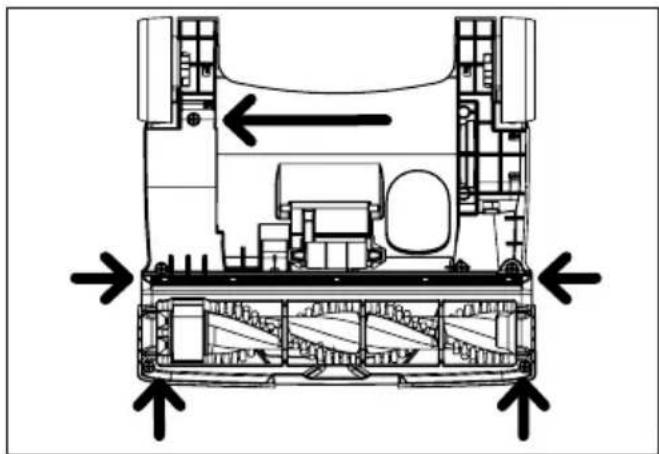
- TO REMOVE BELT: Lay the cleaner flat and flip it to expose the nozzle base. The base should lay flat and face up. Remove the five (5) screws.
natural_image
Technical diagram of a vehicle chassis showing structural components and directional arrows (no text or labels)- Pull and lift the nozzle guard off.

natural_image
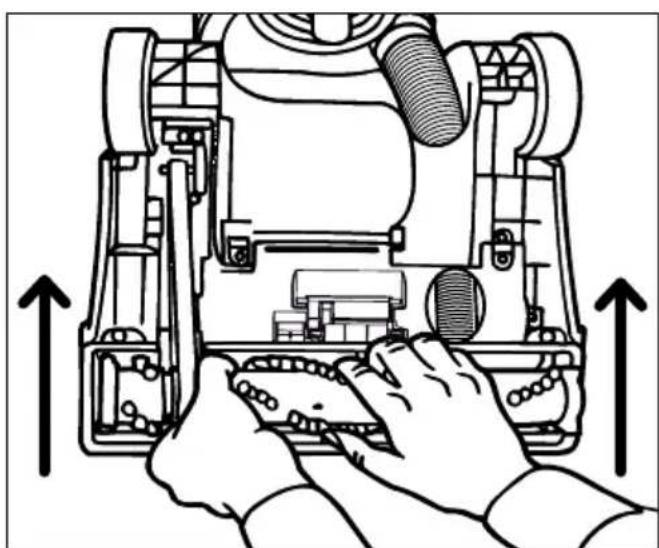
Mechanical assembly diagram showing a hand operating a robotic arm with a tool, no text or symbols present- Lift and remove the brushroll. Dispose of the old belt.
natural_image
Technical line drawing of a robotic device with hands operating the internal components (no text or symbols)BELT STYLE 15: For filter replacement, please visit our website at www.dirtdevil.com to buy online or call customer service at 1-800-321-1134.
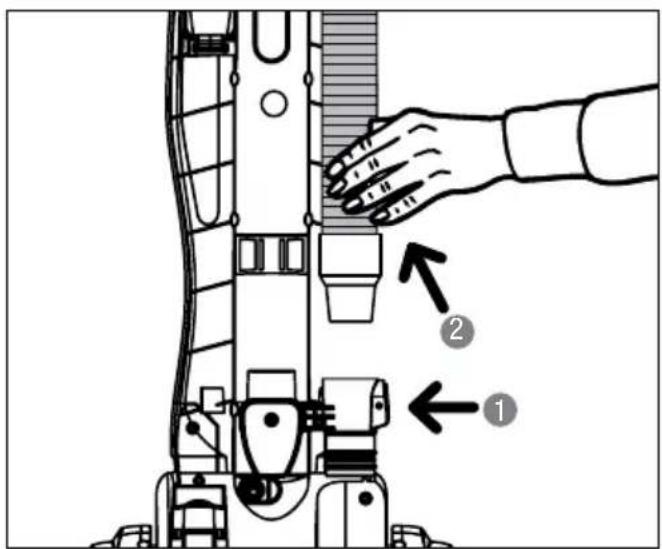
BELT OR BRUSHROLL: REMOVAL & REPLACEMENT
-
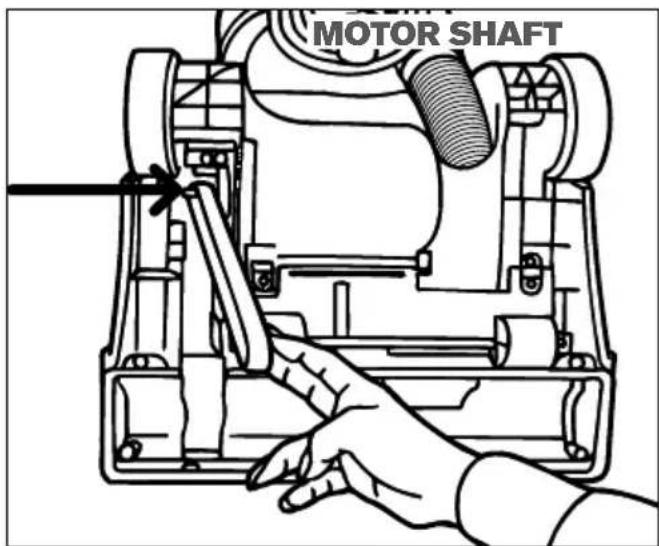
TO REPLACE BELT OR BRUSHROLL: Slide belt onto motorshaft.
-
Place new belt in area of brushroll without bristles
text_image
MOTOR SHAFT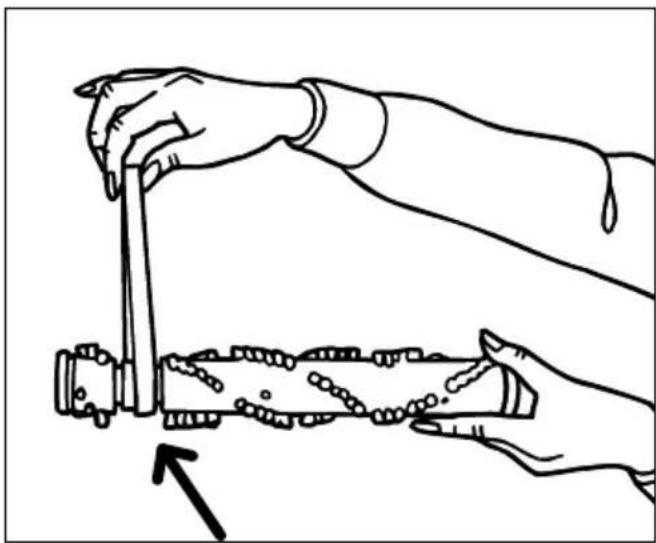
natural_image
Line drawing of two hands using a tool to interact with a cylindrical object, no text or symbols present-
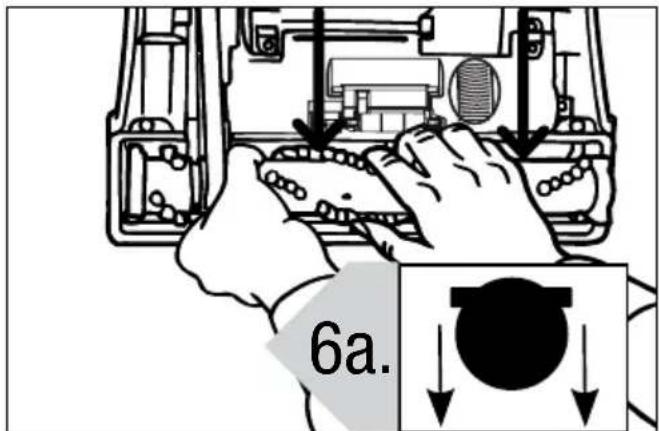
With new belt in place, pull and slide brushroll into nozzle making sure that the brushroll end caps are in the correct orientation (6a inset). Rotate brushroll manually to make sure belt is properly aligned.
-
Reattach nozzle guard.
text_image
6a.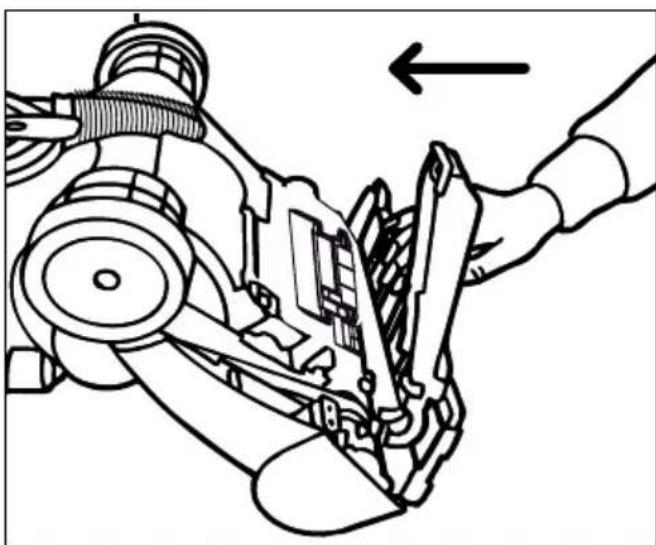
natural_image
Mechanical assembly diagram showing a hand operating a gear mechanism with an arrow indicating motion (no text or symbols present)BELT OR BRUSHROLL: REMOVAL & REPLACEMENT
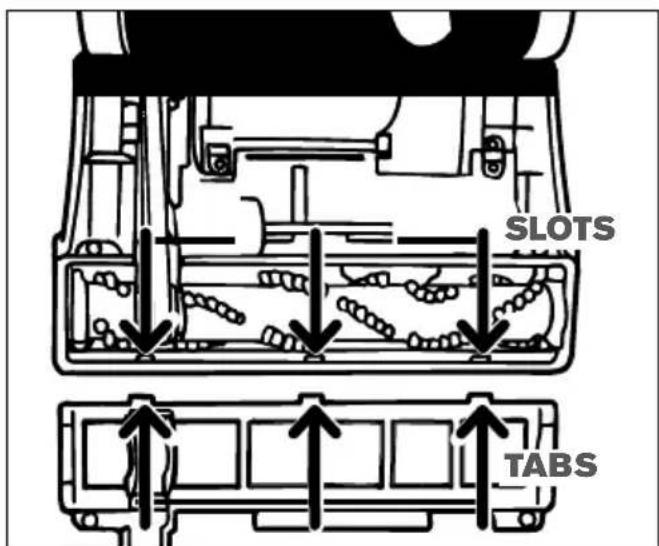
-
Secure by aligning the three (3) tabs in the base slots.
-
Replace all five (5) screws to secure nozzle guard.
text_image
SLOTS TABS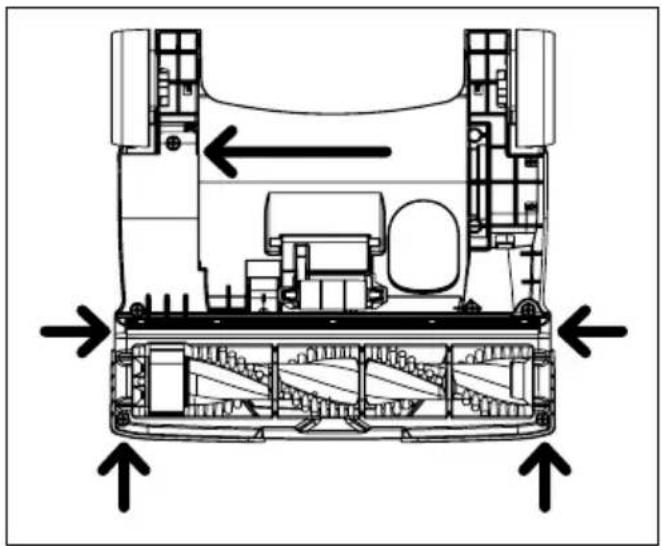
natural_image
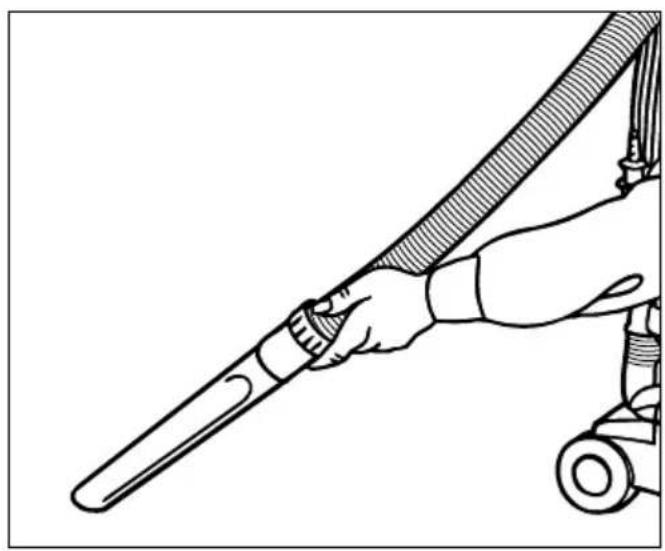
Technical diagram of a vehicle chassis showing internal components and directional arrows (no text or labels)HOSE AND TOOL USAGE
1. TO USE HOSE AND
ATTACHMENTS:
Remove the hose from hose caddy.
2. Choose any of the handy
accessories or use the hose alone.
text_image
Technical diagram showing a hand operating a device with labeled parts 1 and 2, likely illustrating a mechanical or industrial process.
natural_image
Line drawing of a hand holding a hose connected to a vacuum cleaner (no text or symbols present)- Simply push the attachment firmly onto the hose end. To remove tool, twist and pull apart gently.
natural_image
Line drawing of a hand holding a tool with a hose, no text or symbols present
WARNING
To reduce the risk of personal injury - Unplug before cleaning or servicing.
If a minor problem occurs, it usually can be solved quite easily when the cause is found by using the checklist below.
This product contains no serviceable parts.
If appliance is not working as it should, has been dropped, damaged, left outdoors, or dropped into water, call customer service at
1-800-321-1134 prior to continuing use.
PROBLEM POSSIBLE REASON POSSIBLE SOLUTION
| Cleaner won't run | 1. Power cord not firmly plugged into outlet. | 1. Plug unit in firmly. |
| 2. Blown fuse or tripped breaker. | 2. Check fuse or breaker in home. Replace fuse/reset breaker. | |
| 3. Needs service. 3. Call Customer Service: 1-800-321-1134. | ||
| 4. Thermal Protector activated. 4. Allow cleaner to cool for 30 min. | ||
| Cleaner won't pick up or low suction | 1. Dirt cup not installed correctly. | 1. Review dirt cup removal & replacement. |
| 2. Dirt cup full. 2. Empty dirt cup. | ||
| 3. Brushroll worn. 3. Replace brushroll. | ||
| 4. Broken or worn belt. 4. Replace belt. | ||
| 5. Clogged filter. 5. Remove filter and clean. | ||
| 6. Nozzle/brushroll clogged. 6. Check nozzle/brushroll; remove obstruction/clog. | ||
| 7. Hose clogged 7. Remove hose and tools; remove obstruction. | ||
| Dust escaping from cleaner | 1. Dirt cup full 1. Empty dirt cup. | |
| 2. Dirt cup not installed correctly. | 2. Review dirt cup removal & replacement. | |
| 3. Hose not installed correctly. 3. Review hose installation. | ||
| 4. Filter not installed completely. | 4. Review filter removal & replacement. | |
LIMITED WARRANTY FOR DIRT DEVIL® PRODUCT
ONE YEAR LIMITED WARRANTY (DOMESTIC USE)
If this product is not as warranted, contact TTI Floor Care North America Customer Service at 1-800-321-1134.
Please have available the proof of purchase and model number for the warranted product.
WHAT THIS LIMITED WARRANTY COVERS:
This limited warranty provided by Royal Appliance Mfg. Co., doing business as TTI Floor Care North America (referred to hereafter as “Warrantor”) applies only to products purchased in the U.S. (including its territories and possessions), a U.S. Military Exchange, or Canada. When used and maintained in normal household use and in accordance with the Owner’s Guide, this product is warranted against original defects in material and workmanship for ONE year from the date of original purchase (the “Warranty Period”). If Warrantor determines that the issue you are experiencing is covered under the terms of this warranty (a “covered warranty claim”), we will, at our sole discretion and free of charge (subject to the cost of shipping), either (i) repair your product; (ii) ship you a replacement product, subject to availability; or (iii) in the event that the applicable parts or replacement are not reasonably available, ship you a similar product of equal or greater value. In the unlikely event that we are unable to repair your product or ship a replacement or similar product, we reserve the right, at our sole discretion, to issue you a refund or store credit (if applicable) of the actual purchase price at the time of the original purchase as reflected on the original sales receipt. Parts and replacements may be new, refurbished, lightly used, or remanufactured, in Warrantor’s sole discretion.
WHO THIS LIMITED WARRANTY COVERS:
This limited warranty extends only to the original retail purchaser, with original proof of purchase from Warrantor or an authorized dealer of Warrantor products, in the U.S., U.S. Military Exchanges, and Canada.
WHAT THIS LIMITED WARRANTY DOES NOT COVER:
This warranty does not cover use of the product in a commercial operation (such as maid, janitorial, and equipment rental services, or any other income-generating activity); improper maintenance of the product; the product if it has been subject to misuse, negligence, neglect, vandalism, or the use of voltages other than that on the data plate of this product. This warranty does not cover damage resulting from an act of God, accident, owner's acts or omissions, service of this product by other than Warrantor or a Warrantor authorized service provider (if applicable), or other acts beyond the control of Warrantor. This warranty also does not cover use outside the country in which the product was initially purchased, or resale of the product by the original owner. Pick-up, delivery, transportation, and house calls are not covered by this warranty. In addition, this warranty does not cover any product that has been altered or modified, or repairs made necessary by normal wear or the use of other products, parts, or accessories which are either incompatible with this product or adversely affect this product's operation, performance, or durability. Normal wear items are not covered under this warranty. Depending on the product, normal wear items may include, but are not limited to, belts, filters, brush rolls, blower fans, blower and vacuum tubes, and vacuum bags and straps.
OTHER IMPORTANT TERMS:
This warranty is not transferable and may not be assigned; any assignment made in contravention of this prohibition is void. This warranty shall be governed and construed under the laws of the state of North Carolina. The Warranty Period will not be extended by any replacement of batteries, parts, or products or by virtue of any repair performed under this warranty.
THIS LIMITED WARRANTY IS THE EXCLUSIVE WARRANTY AND REMEDY, AND ALL EXPRESS AND IMPLIED WARRANTIES OTHER THAN THE LIMITED WARRANTY SET FORTH ABOVE, INCLUDING IMPLIED WARRANTIES OF MERCHANTABILITY AND FITNESS FOR A PARTICULAR PURPOSE, ARE EXPRESSLY DISCLAIMED. IN NO EVENT WILL WARRANTOR BE LIABLE FOR ANY SPECIAL, INDIRECT, INCIDENTAL OR CONSEQUENTIAL DAMAGES OF ANY KIND OR NATURE TO OWNER OR ANY PARTY CLAIMING THROUGH OWNER, WHETHER BASED IN CONTRACT, NEGLIGENCE, TORT, OR STRICT PRODUCTS LIABILITY OR ARISING FROM ANY CAUSE WHATSOEVER, EVEN IF THIS WARRANTY FAILS OF ITS ESSENTIAL PURPOSE. TO THE EXTENT PERMITTED BY APPLICABLE LAW, NO WARRANTIES THAT ARISE BY OPERATION OF LAW, IF APPLICABLE, SHALL EXCEED THE DURATION OF THE LIMITED WARRANTY PROVIDED HEREIN. Warrantor's liability for damages to you for any costs whatsoever arising out of this statement of limited warranty shall be limited to the amount paid for this product at the time of original purchase.
Some states do not allow the exclusion or limitation of incidental or consequential damages, disclaimers of implied warranties, or limitations on the duration of implied warranties, so the above exclusions, disclaimers, and/or limitations may not apply to you. This warranty gives you specific legal rights, and you may also have other rights, which vary from state to state.
natural_image
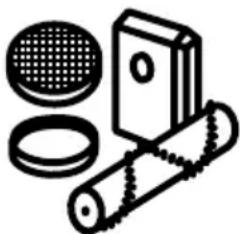
Illustration of industrial components including a perforated plate, circular filter, and rolled document (no text or symbols)Find GENUINE Replacement Parts at www.dirtdevil.com
This product uses the following parts: BELT STYLE ____ 15 FILTER TYPE ____ F112

Call our Customer Service Department at 1-(800) 321-1134 9:00 a.m. - 6:00 p.m. EST Mon. - Fri. www.dirtdevil.com
OUR VACS SPEAK VOLUMES
Pick Up the Conversation On...

Facebookcom/DirtDevil

Twitter@DirtDevil
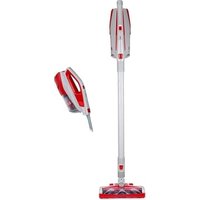
Dirt Devil® Compact Upright
natural_image
Exterior view of a modern vacuum cleaner with attached hose and control panel (no visible text or symbols)LET'S GO.™
BONJOUR! BIENVENUE
natural_image
Illustration of cleaning tools including a filter, circular components, and rolled paper (no text or symbols)natural_image
Simple line drawing of a funnel, a pencil, and a mechanical component (no text or symbols)Accessoires 29
Comment faire 28-37

Dépannage 38

Limitée garantie 39
CONSIGNES DE SÉCURITÉ IMPORTANTES VEUILLEZ CONSERVER CES INSTRUCTIONS
natural_image
Line drawing of a vacuum cleaner with a hand adjusting the component (no text or symbols)RETIREZ LE LE GODET À POUSSIÈRE DU CORPS DE L'ASPIRATEUR.
text_image
2GLISSEZ LA POIGNÉE DANS LE TROU SITUÉ EN HAUT DE L'ASPIRATEUR.
INSÉREZ LE BOULON DANS LE TROU (SITUÉ SOUS LE SUPPORT À ACCESSOIRES) À L'ARRIÈRE DE L'ASPIRATEUR (ILLUSTRATION 3). PLACEZ L'ÉCROU À L'EXTRÉMITÉ DU BOULON SORTANT DU PANNEAU ARRIÈRE PUIS SERREZ POUR FIXER LA POIGNÉE. (ILLUSTRATION 4).
VOTRE DIRT DEVIL EST PRÊT À NETTOYER!
LET'S GO.™

DÉPANNAGE
natural_image
Diagram of a robotic arm with a hand adjusting the base panel, showing a downward arrow (no text or symbols present)COMMENT FAIRE
ASSEMBLAGE
natural_image
Technical line drawing of a rocket or missile assembly with no visible text or symbols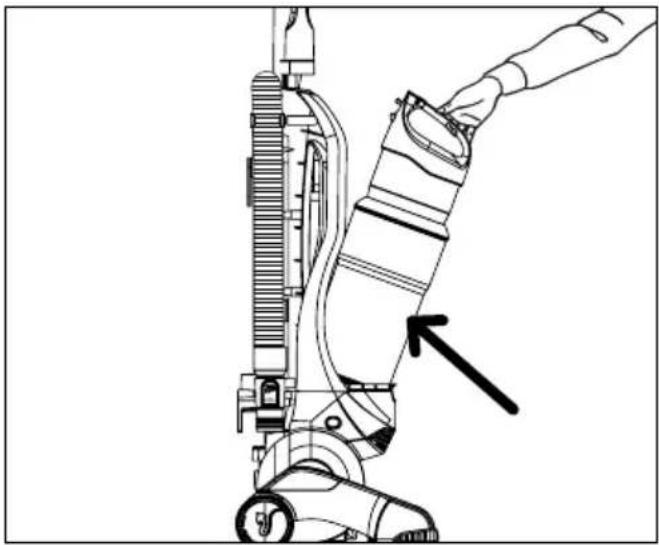
natural_image
Line drawing of a hand operating a vacuum cleaner with a black arrow pointing to the component (no text or symbols present)COMMENT FAIRE
FONCTIONNEMENT
natural_image
Technical diagram of a mechanical assembly with curved components and a directional arrow (no text or labels)natural_image
Line drawing of a person using a vacuum cleaner on a lift, showing mechanical components and foot (no text or symbols)NETTOYAGE DU SOL/DES
natural_image
Line drawing of a person using a vacuum cleaner with a downward arrow indicating motion (no text or symbols)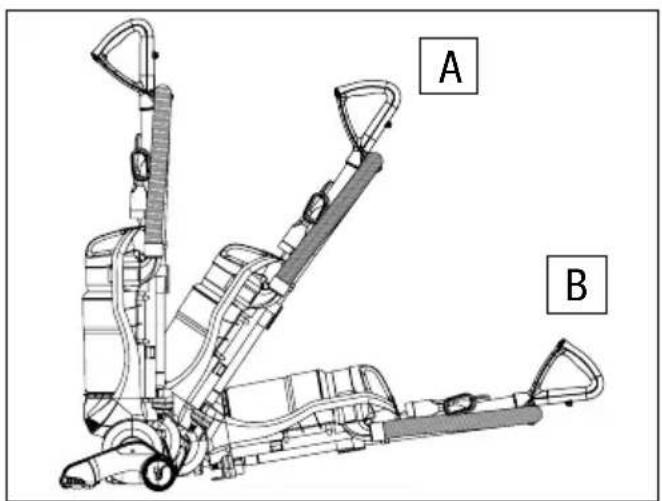
text_image
A BCOMMENT FAIRE
FONCTIONNEMENT
natural_image
Line drawing of a hand operating a mechanical device with hoses and tubing (no text or symbols)COMMENT FAIRE
⚠ AVERTISSEMENT POUR ÉVITER DE VOUS BLESSER AVEC LES PIÈCES EN MOUVEMENT, DÉBRANCHEZ L'APPAREIL AVANT D'ENLEVER OU DE RÉINSTALLER LE FILTRE.
VIDE- POUSSIÈRE ET FILTRE : RETRAIT ET RÉINSTALLATION
1. VIDER LE VIDE-POUSSIÈRE :
natural_image
Line drawing of a vacuum cleaner with a hand adjusting the component (no text or symbols)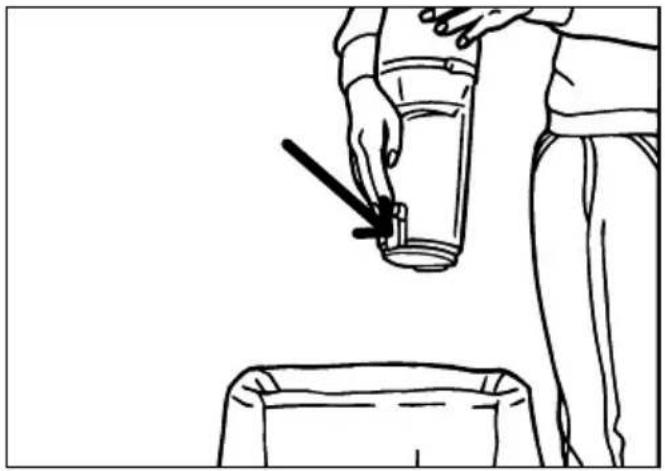
natural_image
Line drawing of a person using a tool to lift a cylindrical object from a container (no text or symbols)
natural_image
Line drawing of a person pouring liquid from a container into a trash bin (no text or symbols)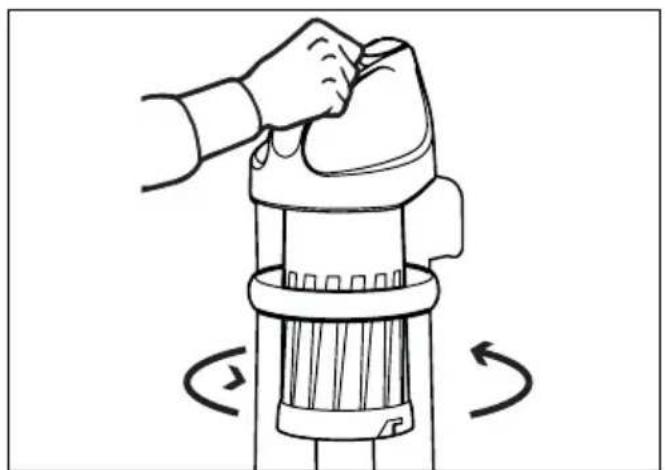
natural_image
Illustration of a hand using a brush to lift or press a cylindrical device, with rotational arrows indicating motion (no text or symbols)COMMENT FAIRE
RETIRER ET REPLACER LE VIDE-POUSSIÈRE
natural_image
Line drawing of a mechanical device with a lever and wooden base, no text or symbols present
natural_image
Line drawing of a hand operating a vacuum cleaner with a hand pointing to the component (no text or symbols present)natural_image
Technical line drawing of a mechanical assembly with internal components and directional arrows (no text or labels)natural_image
Mechanical assembly diagram showing a hand operating a bracket with an arrow indicating direction (no text or symbols present)natural_image
Technical line drawing of a robotic device with hands operating the internal components (no text or symbols)COMMENT FAIRE
COURROIE ET ROULEAU-BROSSE : RETRAIT ET RÉINSTALLATION
natural_image
Line drawing of two hands using a tool to interact with a mechanical device (no text or symbols present)natural_image
Mechanical assembly diagram showing a hand operating a robotic device with a tool, no text or symbols presentCOMMENT FAIRE
COURROIE ET ROULEAU-BROSSE : RETRAIT ET RÉINSTALLATION
natural_image
Cross-sectional diagram of a mechanical device showing internal components and directional arrows (no text or labels)ACCESSOIRES
UTILISATION DU TUYAU ET DES ACCESSOIRES
text_image
Technical diagram showing a hand operating a mechanical device with labeled parts 1 and 2natural_image
Line drawing of a hand holding a tool with a hose, no text or symbols present
ATTENTION
natural_image
Line drawing of a hand holding a hose next to a vacuum cleaner (no text or symbols present)
AVERTISSEMENT POUR RÉDUIRE LE RISQUE DE SE BLESSER, DÉBRANCHER L'ASPIRATEUR AVANT LE SERVICE.
natural_image
Illustration of mechanical components including a circular filter, ring, and rolled paper (no text or symbols)natural_image
Exterior view of a black vacuum cleaner with coiled tubing and control panel (no visible text or symbols)LET'S GO.™
HOLA.
BIENVENIDO.
natural_image
Illustration of industrial components including a filter, plate, and rolled document (no text or symbols)natural_image
Simple line drawing of a funnel with a pencil and a gear base (no text or symbols)Herramientas 57
natural_image
Line drawing of a vacuum cleaner with a hand adjusting the component (no text or symbols)RETIRE EL RECIPIENTE DE POLVO DEL CUERPO DE LA ASPIRADORA.
text_image
2natural_image
Diagram of a robotic device with a hand adjusting the handle, showing mechanical components and a downward arrow (no text or symbols present)INSTRUCCIONES DE USO
CÓMO ENSAMBLAR
natural_image
Technical line drawing of a mechanical device with no visible text or symbolsnatural_image
Line drawing of a hand holding a vacuum cleaner's arm, showing mechanical components and a pointer indicating the handle (no text or symbols present)INSTRUCCIONES DE USO
FUNCIONAMIENTO
natural_image
Technical diagram of a mechanical assembly with curved components and a directional arrow (no text or labels)natural_image
Line drawing of a person using a vacuum cleaner to lift a foot, with a downward arrow indicating motion (no text or symbols present)PEDAL DE ENCENDIDO/APAGADO:
natural_image
Line drawing of a person using a vacuum cleaner on a lift, showing mechanical components and foot (no text or symbols)INSTRUCCIONES DE USO
FUNCIONAMIENTO
natural_image
Line drawing of a hand operating a mechanical device with hoses and tubing (no text or symbols)INSTRUCCIONES DE USO
ADVERTENCIA
PARA REDUCIR EL RIESGO DE LESIONES CAUSADAS POR LAS PARTES MÓVILES, DESCONECTE LA ASPIRADORA ANTES DE RETIRAR O COLOOCAR EL FILTRO.
RECIPIENTE DE POLVO Y FILTRO: RETIRO Y REEMPLAZO 2. Soste
natural_image
Technical line drawing of a vacuum cleaner with a hand adjusting the component (no text or symbols present)natural_image
Line drawing of a person using a fire extinguisher to lift a cup, with an arrow indicating the motion (no text or symbols present)
natural_image
Line drawing of a person pouring liquid from a container into a container (no text or symbols)natural_image
Illustration of a hand using a handheld device to lift a cylindrical component, with rotational arrows indicating motion (no text or symbols)INSTRUCCIONES DE USO
RETIRAR Y VOLVER A COLOCAR EL CONTENEDOR PARA POLVO
natural_image
Technical line drawing of a mechanical assembly with a tool and component (no text or symbols)
natural_image
Line drawing of a hand operating a vacuum cleaner with a hand pointing to the component (no text or symbols present)natural_image
Technical diagram of a mechanical assembly with directional arrows indicating components (no text or labels)natural_image
Mechanical assembly diagram showing a hand operating a robotic arm with a tool, no text or symbols presentnatural_image
Technical line drawing of a mechanical device with hands operating it, showing internal components and directional arrows (no text or symbols)natural_image
Line drawing of two hands using a tool to interact with a cylindrical object, no text or symbols presentnatural_image
Mechanical assembly diagram showing a hand operating a robotic device with a tool, no text or symbols presentINSTRUCCIONES DE USO
BANDA Y CEPILLO: QUITAR Y REEMPLAZAR
natural_image
Technical cross-section diagram of a vehicle chassis showing internal components and directional arrows (no text or labels)HERRAMIENTAS

PRECAUCIÓN
text_image
Technical diagram showing a hand operating a mechanical device with labeled parts 1 and 2
natural_image
Line drawing of a hand holding a hose to a vacuum cleaner's side arm (no text or symbols)natural_image
Line drawing of a hand holding a long, flexible hose with a roller (no text or symbols)
ADVERTENCIA
PARA REDUCIR EL RIESGO DE LESIONES PERSONALES, DESCONECTE ANTES DE DAR SERVICIO.
PROBLEMA POSIBLES CAUSAS SOLUCIONES POSIBLES