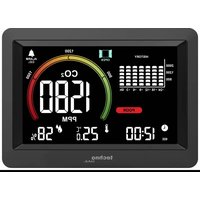
WL1028 - Weather Station Techno Line - Free user manual and instructions
Find the device manual for free WL1028 Techno Line in PDF.


| Product Type | Indoor weather station with CO₂ detector |
| Brand | Techno Line |
| Model | WL1028 |
| Power Supply | USB 5V cable (included) and built-in lithium battery |
| Battery Life | Approximately 20 hours of continuous use |
| CO₂ Measurement | Range 400–5000 ppm, resolution 1 ppm, accuracy ±8% + 80 ppm (400–2000 ppm) |
| Temperature Measurement | Range -9.9°C to 49.9°C / 14°F to 122°F, accuracy ±1.5°C / 2.7°F |
| Humidity Measurement | Range 1–99%, accuracy ±5% (40–80% RH), ±8% outside range |
| Display | Multicolor with adjustable backlight (4 levels: high, medium, low, off) |
| Clock and Alarm Functions | 12/24h clock, alarm with snooze, adjustable CO₂ alarm |
| Air Quality Indication | Color icons (Excellent, Good, Moderate, Poor) with ventilation recommendation |
| CO₂ History | 24h bar graph (interval averages) |
| MIN/MAX Value Recording | Temperature, humidity, CO₂ – resettable manually or automatically at midnight |
| CO₂ Sensor Calibration | Automatic (minimum 7 days) and manual (requires 400 ppm environment) |
| Wall/Table Mount | Suspension holes on back and removable stand |
| Operating Temperature | 0°C to 50°C / 32°F to 122°F, humidity < 95% non-condensing |
| Maintenance and Cleaning | Soft cloth dampened with water and mild soap; unplug the device beforehand |
| Safety and Compliance | CE, RoHS (Directives 2014/30/EU and 2011/65/EU); indoor use only |
Frequently Asked Questions - WL1028 Techno Line
User questions about WL1028 Techno Line
0 question about this device. Answer the ones you know or ask your own.
Ask a new question about this device
Download the instructions for your Weather Station in PDF format for free! Find your manual WL1028 - Techno Line and take your electronic device back in hand. On this page are published all the documents necessary for the use of your device. WL1028 by Techno Line.
USER MANUAL WL1028 Techno Line
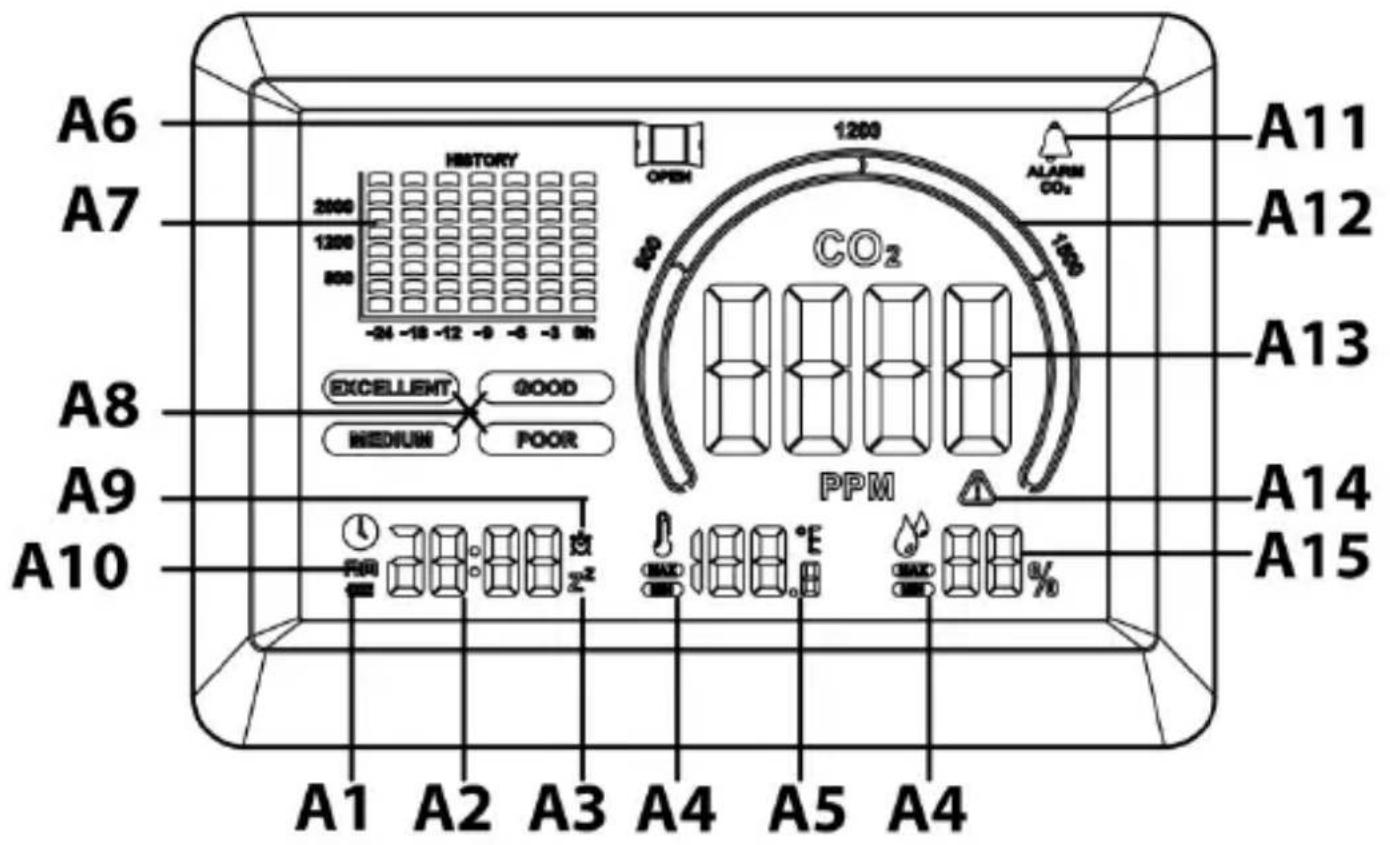
A1 – Low battery indicator
A2 – Time display
A3 – Snooze icon
A4 – MIN/MAX icons
A5 – Temperature display
A6 – Ventilation recommendation icon
A7 - CO _2 history bar chart
A8 – Colored air quality icons
A9 – Alarm icon
A10 - AM icon
A11 - CO₂ alarm icon
A12 – Air quality chart
A13 - CO _2 display
A14 – Alert icon
A15 – Humidity display
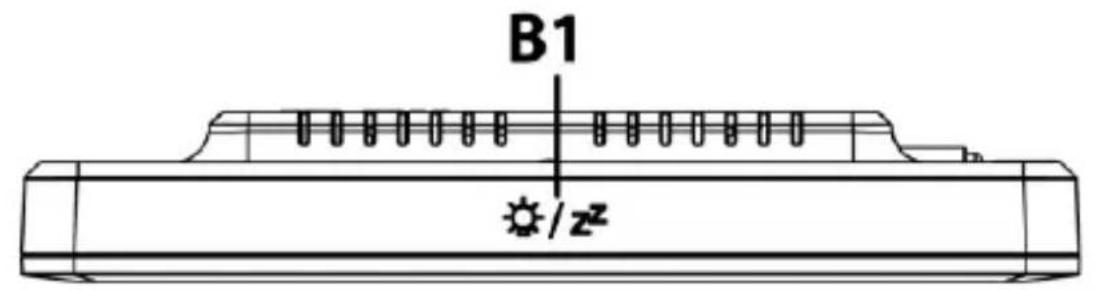
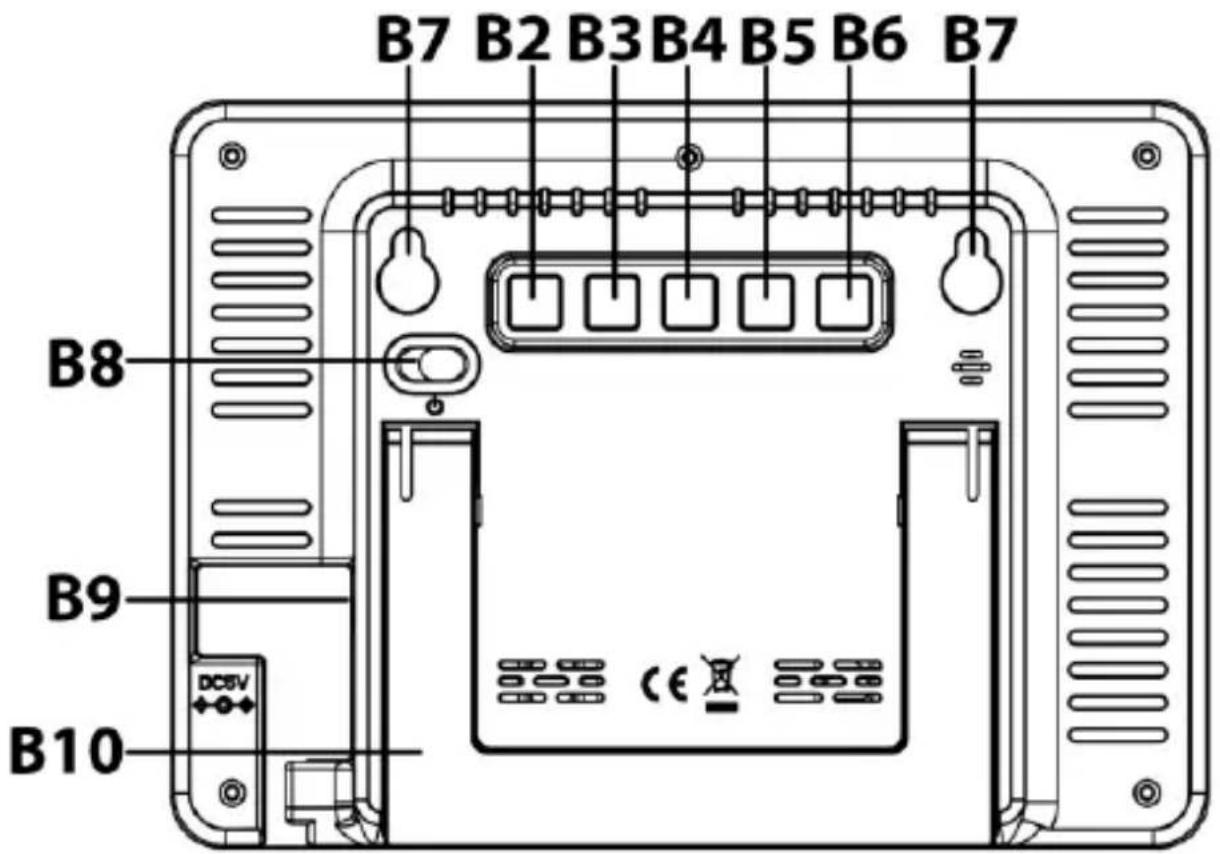
B – Buttons and case
B1 – SNOOZE/LIGHT touch field
B2 – SET button
B3 – UP button
B4 - DOWN button
B5 - MEM button
B6 – ALARM CO2 button
B7 – Hanging holes
B8 – Power ON/OFF switch
B9 – Power cable connection socket
B10 – Stand
Functions
- Time, CO _2 concentration, temperature and humidity display
- Multi-colored air quality display
- The 24-hour histogram of CO _2 concentration measured
- Backlight function with 4 brightness levels (high – medium – low - off)
- Power indication and charging indication of lithium battery
• 12/24 hours display - °C /°F temperature unit display
• CO _2 concentration alarm function - Manual baseline calibration and Automatic Baseline Calibration for CO _2 concentration
- Maximum and minimum values of temperature, humidity and CO _2 concentration recorded
• Table standing or wall mounting
Installation
- Push the power switch "⏻" to "ON" to start the monitor, all monitor elements will be displayed and a signal sound is made. The monitor enters the normal working mode and 60-second countdown appears on the screen, indicating that the CO_2 sensor is warming up.
- When using the USB cable as DC power supply, the lithium battery inside the monitor will be charging. When the DC power is disconnected, the monitor will switch to the lithium battery as power source, or it can be start directly with the lithium battery as power supply. A fully charged lithium battery can last for about 20 hours of uninterrupted operation.
Note: It is recommended to use DC power supply mostly and to only use the built-in lithium battery as back-up if needed.
Manual setting
- In normal display mode, press and hold the "SET" button for 2 seconds to enter the time setting and the 12/24 hour time display flashes. Press the "UP" or the "DOWN" button to set the 12 or 24 hour time display.
- Press the "SET" button to confirm the setting and the hour flashes. Press the "UP" or the "DOWN" button to set the hour.
- Press the "SET" button to confirm the setting and the minute flashes. Press the "UP" or the "DOWN" button to set the minute.
- Press the "SET" button to confirm the setting and the alarm hour flashes. Press the "UP" or the "DOWN" button to set the alarm hour.
- Press the "SET" button to confirm the setting and the alarm minute flashes. Press the "UP" or the "DOWN" button to set the alarm minute.
- Press the "SET" button to confirm and exit the setting and to return to the normal display mode.
Notes:
- You can also save the setting and exit the setting mode any time by not pressing any button for 30 seconds.
- Press and hold the "UP" or the "DOWN" button for more than 2 seconds to speed up the setting process.
Alarm and snooze function
- In normal display mode, press the "SET" button to activate or deactivate the alarm function.
- The alarm clock sounds for 1 minute, if no button is used. You can touch the “SNOOZE/LIGHT” touch field to enter the snooze function for 5 minutes or press any other button to exit the alarm sound directly. The alarm will sound again at the same time of the next day until the alarm function gets deactivated.
Maximum and minimum values
- In normal display mode, press the "MEM" button to view the temperature, humidity and CO_2 concentration data in the following
order: maximum recorded values (MAX icon is displayed) → minimum recorded values (MIN icon is displayed) → currently measured values (no icon is displayed).
- Press and hold the "MEM" button for 2 seconds while viewing the maximum or minimum values to clear the recorded MIN/MAX data and start recording again.
- The maximum and minimum records will be automatically cleared and re-recorded daily at 0:00.
Temperature display
In normal display mode, press the "DOWN" button to change between °C (Celsius) or °F (Fahrenheit) as temperature unit.
CO _2 concentration alarm
- Press the "ALARM CO2" button to activate or deactivate the CO_2 alarm function.
- Press and hold the "ALARM CO2" button for 2 seconds to enter the CO2 concentration alarm setting and the CO2 concentration value flashes. Press the "UP" or the "DOWN" button to set the desired alarm value.
- Press the "ALARM CO2" button to confirm and exit the setting and to return to the normal display mode.
Notes:
- You can also save the setting and exit the setting mode any time by not pressing any button for 30 seconds.
- Press and hold the "UP" or the "DOWN" button for more than 2 seconds to speed up the setting process.
Air quality and ventilation recommendation on the basis of CO_2 concentration in the air
- Your CO 2 monitor measures and displays the CO 2 in PPM with color
ventilation recommendations.
- In normal display mode, press and hold the "DOWN" button for 2 seconds and the air quality icon parameters flashes. Press the "UP" or the "DOWN" button to adjust the parameter of the different colored air quality icons. Press the "SET" button to confirm your changes in the following order: EXCELLENT→GOOD→MEDIUM→POOR→POOR flashing→confirm and exit the setting mode and return to normal display mode.
- EXCELLENT : 400\~ (500, 600 as options), the default value is 600
- GOOD to EXCELLENT+1\~ (700, 800, 900, 1000 as options), the default value is 1000
- MEDIUM to GOOD +1\~ ( 1100 , 1200 , 1300 , 1400 , 1500 as options), the default value is 1500
- POOR to MEDIUM+1\~ ( 1600 , 1700 , 1800 , 1900 , 2000 as options), the default value is 2000
• POOR flashing : POOR+1 and above
Notes:
- You can also save the setting and exit the setting mode any time by not pressing any button for 30 seconds.
- The setting of the air quality icon parameters is stored in the internal EEPROM of the chip and will not be lost due to power loss.
- During CO _2 detection, avoid product vibration and direct blowing of the sensor by strong winds, which may cause deviation of the carbon dioxide detection value.
- When the CO _2 concentration reaches MEDIUM or worse, the ventilation recommendation icon will be displayed to remind of the need to open the window for ventilation.
- When the CO 2 concentration is greater than 2000PPM, the screen will display to remind users to pay attention because of high CO 2
levels.
CO _2 history bar chart
The average CO_2 concentration over 24 hours will be briefly shown in a bar chart as: -24h, -18h, -12h, -9h, -6h, -3h, 0h.
| 8. Grid bar | 3501 ~ 5000 ppm value measured |
| 7. Grid bar | 2001 ~ 3500 ppm value measured |
| 6. Grid bar | 1501 ~ 2000 ppm value measured |
| 5. Grid bar | 1201 ~ 1500 ppm value measured |
| 4. Grid bar | 1001 ~ 1200 ppm value measured |
| 3. Grid bar | 801 ~ 1000 ppm value measured |
| 2. Grid bar | 601 ~ 800 ppm value measured |
| 1. Grid bar | 400 ~ 600 ppm value measured |
Calibrate the CO_2 sensor
This monitor is factory calibrated to a 400 PPM CO 2 standard concentration. Due to transportation, vibration, aging and other reasons, the CO 2 sensor may get a zero drift and the detection accuracy may be reduced. In order to restore the accuracy of the sensor, the automatic or manual baseline calibration can be used to correct the drift.
Caution:
Do not calibrate the monitor in an environment of unknown CO_2 concentration.
Automatic baseline calibration
Your monitor is equipped with a smart chip so that it will automatically calibrate itself to reduce the drift of the CO_2 sensor for long time usage, starting after a minimum of 2 days. It will calibrate itself automatically at the minimum CO_2 reading detected during 7 days of continuous monitoring.
Notes:
- Make sure the place you put your monitor at is well ventilated (with a CO_2 level near 400 PPM) for at least an hour or so everyday, or you move the monitor to such a well ventilated room for an hour or so everyday to perform the automatic baseline calibration.
- Automatic baseline calibration function is suitable for office, home and other good ventilation environments.
Manual calibration of the CO_2 sensor
It is recommended to undergo manual calibration performed by a qualified laboratory every 12 months.
- Place your CO _2 monitor in a 400 PPM calibration chamber or a room with as close to 400 PPM as possible.
- In normal display mode, press and hold the "UP" button for 2 seconds to enter manual baseline calibration preparation mode. At this time, you can press the "SET" button to confirm the entry, or press the "UP" button or do not press any button for 30 seconds to exit manual baseline calibration preparation mode.
- The operation time of manual baseline calibration mode is 20 minutes. During the operation, you can press "UP" to exit the calibration in advance.
Backlight
Touch the “SNOOZE/LIGHT” touch field to change the backlight level. Four levels (high - medium - low - off) of backlight brightness are selectable.
Low battery indicator and battery loading
- The battery indicator "■■■" displays the remaining charge of the built-in lithium battery. When the built-in lithium battery voltage is low, there will be a low battery indicator "-" flashing on the screen At the
same time, the product will turn off the backlight function, carbon dioxide detection function, etc. to ensure the continuous operation of the time display function, until the battery is charged up again.
- In the process of lithium battery charging, the battery indicator " " is displayed filling up. The battery symbol is hidden once the battery is fully charged.
Troubleshooting
No display or functions
Check if the USB cable is properly connected to a power source.
Response time
Ensure the air flow channels at the back of the monitor are not blocked or covered.
CO _2 reading shows “Err”
The CO_2 sensor is not working properly. Push the power switch " " to "OFF" and wait for 10 seconds before pushing it back to "ON" again.
Care and maintenance
- Place your monitor on a stable surface, away from sources of direct sunlight or excessive heat or moisture.
- Clean your monitor with a soft cloth moistened only with mild soap and water. Stronger agents such as Benzine, thinner or similar materials can damage the surface of the item. Make sure the monitor is unplugged before cleaning.
- Do not open the back case or tamper with any components of this monitor.
- Do not plug in any other USB cables with incorrect specifications or voltage.
CO _2 levels and guidelines
Below are some CO_2 reference levels in general:
400\~600 ppm Background (normal) outdoor air level.
600\~1,000 ppm Typical level for occupied spaces with good air exchange.
1,000 \~1,500 ppm Start ventilation of the room.
1,500\~2,000 ppm Level associated with complaints of drowsiness and poor air. Ventilation recommended!
2,000\~5,000 ppm Level associated with headaches, sleepiness, and stagnant, stale, stuffy air. Poor concentration, loss of attention, increased heart rate and slight nausea may also be present. Ventilation strongly recommended!
5,000 ppm Exposure may lead to serious oxygen deprivation resulting in permanent brain damage, coma, and death. Requires immediate ventilation!
Declaration of conformity
Hereby, Technotrade declares that this product WL 1028 is in compliance with the essential requirements and other relevant provisions of Directive 2014/30/EU and ROHS 2011/65/EC. The original EU declaration of conformity may be found at: www.technoline.de/doc/4029665110288
Specifications
CO _2
Measurement range : 400 – 5000 PPM
Resolution : 1 PPM
Accuracy : +/- 8% + 80 PPM (for 400 to 2000 PPM)
Warm up time : 60 seconds
Detection frequency : 5 seconds
Temperature
Measuring range : -9,9°C to 49,9°C / 14°F to 122°F
Resolution : 0.1°C / 0.1°F
Accuracy : +/- 1.5°C / 2.7°F
Detection frequency : 5 seconds
Relative humidity
Measuring range : 1% - 99%
Resolution : 1%
Accuracy : +/-5% for 40% \~ 80%; +/-8% RH outside this range
Detection frequency : 5 seconds
Operating temperature : 0°C to 50°C / 32°F to 122°F,
< 95% RH non-condensing
Out of range display
CO_2 : 400 (below 400 PPM) / HI (over 5000 PPM)
Temperature : LO (below -10°C / 32°F) /
HI (above 50°C / 122°F)
RH% : 20% (below 20%) / 95% (over 95%)
Power Supply : USB cable (included) that supports
DC 5.0V
600mA loading
(adapter not included).
Precautions
- The item is intended to be used only indoors.
- Do not subject the item to excessive force or shock.
- Do not expose the item to extreme temperatures, direct sunlight, dust or humidity.
- Do not immerse in water.
- Avoid contact with any corrosive materials.
- Do not dispose this item in a fire as it may explode.
- Do not open the inner back case or tamper with any components of this item.
Use the product only for its intended purpose!
Consideration of duty according to the law of electrical devices

This symbol means that you must dispose of electrical devices separated from the General household waste when it reaches the end of its useful life. Take your item to your local waste collection point or recycling centre. This applies to all
countries of the European Union, and to other European countries with a separate waste collection system.
Vue d'ensemble
A - Affichage
charge CC 5,0 V 600 mA.
(adaptateur non inclus).
Précautions
natural_image
Abstract black-and-white icon of a person moving with arrows, enclosed in a circle (no text or symbols)FR
B8 – Interruptor ON/OFF
carichi da CC 5,0 V = 600 mA
- Functions
- Installation
- Manual setting
- Notes:
- Alarm and snooze function
- Maximum and minimum values
- Temperature display
- CO _2 concentration alarm
- Air quality and ventilation recommendation on the basis of CO_2 concentration in the air
- CO _2 history bar chart
- Calibrate the CO_2 sensor
- Caution:
- Automatic baseline calibration
- Manual calibration of the CO_2 sensor
- Backlight
- Low battery indicator and battery loading
- Troubleshooting
- No display or functions
- Response time
- CO _2 reading shows “Err”
- Care and maintenance
- CO _2 levels and guidelines
- Declaration of conformity
- Specifications
- Temperature
- Relative humidity
- Out of range display
- Precautions
- A - Affichage
- Précautions
- FR
Brand : Techno Line
Model : WL1028
Category : Weather Station