KTD 9322 A3 - Dryer Koenic - Free user manual and instructions
Find the device manual for free KTD 9322 A3 Koenic in PDF.


User questions about KTD 9322 A3 Koenic
0 question about this device. Answer the ones you know or ask your own.
Ask a new question about this device
Download the instructions for your Dryer in PDF format for free! Find your manual KTD 9322 A3 - Koenic and take your electronic device back in hand. On this page are published all the documents necessary for the use of your device. KTD 9322 A3 by Koenic.
USER MANUAL KTD 9322 A3 Koenic
Polo - Satoon-Silvass
0.4.342-819
02-14-05
无法识别
H. KU 932251 230203 Y11
CE
KOENIC
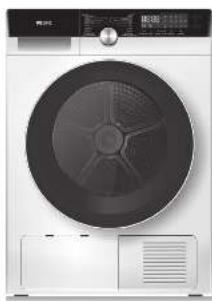
Heat Pump Dryer
KTD 9322 A
(八) 本公告
(1) ( x - 2) ( x + 3) = ( x - 4)
Gebuchstweisung
图 1.2.1
Lfd. "Hindi" (1)
图 05-16-200
西门国际(上海)
In Marusie del.
-
Санескин
-
Instruktja obstagi
[Unreadable]
图 1-20.3(16:74)
图4.25不成立
natural_image
Front view of a white washing machine with a circular vent and control panel (no visible text or symbols)Deutsch 320
E-mail: 01-37
Lavafal 27-5
15.07.00 20 - 34
E### 35-21
17540 72-69
Notes: 30, 1PS
C. 10-12
1560 107-121
adonies 124 140
(b) _1 (A) = 26
(1) 207-371
cm 25 130 174
Source 125-191
132-200
text_image
Technical diagram of a washing machine with labeled components and control panel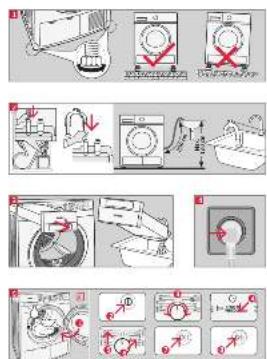
text_image
Diagram illustrating a washing machine operation sequence with labeled steps and directional arrows indicating process flow.Sicherheitshinweise

text_image
Warning sign depicting a flame symbol in a triangular shape, indicating hazardous risk.text_image
Warning sign depicting a flame symbol inside a triangle, indicating hazardous risk.Caution: Risk of fire/ flammable materials.
This symbol indicates that ignoring instructions may cause death or serious injury.
WARNING: To prevent death or injury to the user or other people and property damage, the following instructions must be followed. Incorrect operation due to ignoring of instructions may cause death, harm or damage.
IMPORTANT NOTE: Read this manual carefully before installing or operating your new product. Make sure to save this manual for future reference.
Safety instructions
- This product can be used by children aged from 8 years and above and persons with reduced physical, sensory or mental capabilities or lack of experience and knowledge if they are supervised or have received instructions concerning use of the appliance in a safe way and understand the hazards involved.
• Children shall not play with the product. - Cleaning and user maintenance shall not be carried out by children unless they are older than 8 years and supervised.
- Keep the product and its cord out of reach of children aged less than 8 years.
- A damaged power cord may only be replaced by the authorised service agent in order to avoid hazards.
- The maximum mass of dry textile material to be used in the product is 9 kilograms.
- The tumble dryer is not to be used if industrial chemicals have been used for cleaning.
- The lint trap has to be cleaned after every use.
- Lint must not to be allowed to accumulate around the tumble dryer.
- Adequate ventilation has to be provided to avoid the back flow of gases into the room from products burning other fuels, including open fires.
- Do not dry unwashed items in the tumble dryer.
Safety instructions
- Items that have been soiled with substance such as cooking oil, acetone, alcohol, petrol, kerosene, spot removers, turpentine, waxes and wax removers should be washed in hot water with an extra amount of detergent before being dried in the tumble dryer.
- Items such as foam rubber (latex form), shower caps, waterproof textiles, rubber backed articles and clothes or pillows fitted with foam rubber pads should not be dried in the tumble dryer.
- Fabric softeners, or similar products, should be used as specified by the fabric softener instructions.
- The final part of a tumble dryer cycle occurs without heat (cool down cycle) to ensure that the items are left at a temperature, which ensures that the items will not be damaged.
- Remove all objects from pockets such as lighters, coins and keys.
- Warning: never stop a tumble dryer before the end of the drying cycle unless all items are quickly removed and spread out so that the heat is dissipated.
- Children of less than 3 years should be kept away unless continuously supervised.
- The exhaust air must not be discharged into a flue which is used for exhausting fumes from appliances burning gas or other fuels.
English
Safety instructions
- The appliance must not be installed behind a lockable door, a sliding door or a door with a hinge on the opposite side to that of the tumble dryer. In such a way that a full opening of the tumble dryer door is restricted.
- For appliances with ventilation openings in the base, a carpet must not obstruct the openings.
- Follow the instructions in the chapter Cleaning and care.
- The LED bulb is not replaceable. Contact the authorized service technician for repair or maintenance of this unit.
Safety instructions
Warnings (concerning the R290 refrigerant)
- Do not use means for cleaning, other than those recommended by the manufacturer.
- The appliance shall be stored in a room without continuously operating ignition sources (for example: open flames, an operating gas appliance or an operating electric heater).
- Do not pierce or burn the appliance.
- Compliance with national gas regulations shall be observed.
- Keep ventilation openings clear of obstruction.
- The appliance shall be stored so as to prevent mechanical damage from occurring.
- The appliance shall be stored in a well-ventilated area where the room size corresponds to the room area as specified for operation.
- Any person who is involved with working on or breaking into a refrigerant circuit should hold a current valid certificate from an industry-accredited assessment authority, which authorises their competence to handle refrigerants safely in accordance with an industry recognised assessment specification.
- Servicing shall only be performed as recommended by the equipment manufacturer. Maintenance and repair requiring the assistance of other skilled personnel shall be carried out under the supervision of the person competent in the use of flammable refrigerants.
English
Safety instructions
- Transport of equipment containing flammable refrigerants. See transport regulations.
- Marking of equipment using signs. See local regulations.
- Disposal of equipment using flammable refrigerants. See national regulations.
- Storage of equipment/appliances.
The storage of equipment should be in accordance with the manufacturer's instructions.
• Cabling
Check that cabling will not be subject to wear, corrosion, excessive pressure, vibration, sharp edges or any other adverse environmental effects. The check shall also take into account the effects of aging or continual vibration from sources such as compressors or fans.
• Detection of flammable refrigerants
Under no circumstances shall potential sources of ignition be used in the searching for or detection of refrigerant leaks. A halide torch (or any other detector using a naked flame) shall not be used. - Attention: Ensure that the drainage hose is properly attached and sealed. Periodically check the connection to avoid leakages.
Safety instructions
- Read this user manual thoroughly before first use and pass it on with the product. Pay attention to the warnings on the product and in this user manual. It contains important information for your safety as well as for the use and maintenance of the equipment.
- Use the product only for its intended purpose and with recommended accessories and components. Improper use or wrong operation may lead to hazards.
- Never leave the product unsupervised while it is switched on.
- Never immerse electrical parts of the product in water or any other fluids during cleaning or operation. Never hold the product under running water.
- Do not under any circumstances attempt to repair the product yourself. For servicing and repairs, please consult an authorised service agent (e.g. damaged power cord, product has been dropped, e.g. during installation etc.).
- The mains voltage must match the information on the rating label of the product.
- Avoid damages to the power cord that may be caused by kinks or contact with sharp corners.
- Keep this product including power cord and power plug away from all heat sources such as ovens, hot plates and other heat-producing products/objects.
- Only unplug from the power socket by the plug itself. Do not pull on the cord.
-
Unplug the product ...
-
when the product is not being used,
- in case of malfunctions,
- before attaching / detaching accessories and
- before cleaning the product.
- Use this product in dry indoor areas only and never outdoors.
- Never use, expose or put the product near to: - direct sunlight and dust;
- fire (fireplace, grill, candles), water (water splashes, vases, bath tube) or heavy moisture.
- This product is not intended for commercial use. It is designed for household use only.
- Important! Check to ensure that the product is in a serviceable condition before use. The product shall not be used if it shows any signs of damage or it's suspected to be defect.
English
Congratulations!
Thank you for your purchase of a KOENIC product. Please read this manual carefully and keep it for future reference.
Intended use
This product is designed for drying clothes and textiles. Any other use may result in damage to the product or injuries. This product is designed for household use only and not intended for commercial use.
The Imtron GmbH assumes no liability for damage to the product, for property damage or for personal injury due to careless or improper usage of the product, or usage of the product which does not meet the manufacturer's specified purpose.
Before first time use
Remove the product and accessories carefully from the original packaging. It is recommended to keep the original packaging for storage. If you wish to dispose of the original packaging, please observe applicable legal provisions.
Should you have any questions regarding proper disposal, contact your local waste management center.
Inspect the delivery contents for completeness and damages. Should the delivery contents be incomplete or damaged, contact your sales outlet immediately.
After unpacking, please refer to chapter
Cleaning and care.
Dispose

Do not dispose of this product as unsorted municipal waste. Return it to a designated collection point for the
recycling of WEEE. By doing so, you will help to conserve resources and protect the environment. Contact your retailer or local authorities for more information.
Refrigerants must be evacuated and disposed of by a qualified specialist in accordance with federal and local regulations before the appliance is scraped.
The wild disposal of waste in forests and landscapes endangers your health, when dangerous substances escape and get into the groundwater and thus make their way into the food chain.
Note:
- This product contains non-fluorinated greenhouse gas (hermetically sealed) which is dangerous for the environment and contributes to global warming if released to the atmosphere.
- Refrigerant type: R290
• Global warming potential (GWP): 3 - Refrigerant leakage contributes to climate change. Refrigerant with lower global warming potential (GWP) would contribute less to global warming than a refrigerant with higher GWP, if leaked to the atmosphere.
- This product contains a refrigerant fluid with a GWP equal to 3. This means that if 1 kg of this refrigerant fluid would be leaked to the atmosphere, the impact on global warming would be 3 times higher than 1 kg of CO₂, over a period of 100 years. Never try to interfere with the refrigerant circuit yourself or disassemble the product yourself and always ask a professional.
- Energy consumption 1.2 kWh per 60 minutes, based on standard test results. Actual energy consumption will depend on how the product is used and where it is located.
Content
1 x Heat Pump Dryer
1 x User manual
1 x Warranty card
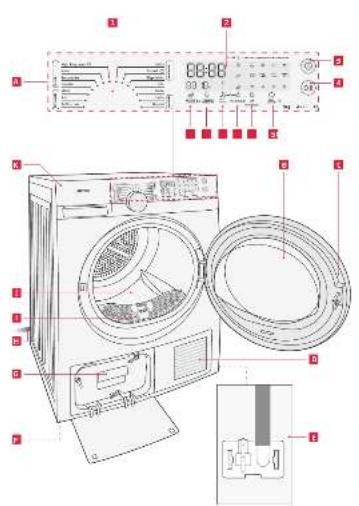
Controls and Components
A Operation panel
1 Program dial
2 Display
3 On / off button ①
4 Start/Pause button▶II
5 BABYWÄSCHE
6 ZEITVORWAHL (Time) button
7 TROCKENGRAD (Dry Level) button
8 NACHTMODUS (Silence) button
9 STARTVERZÖGERT (Delay) button
10 KNITTERSCHUTZ
(Anti-Crease) button
B Door with window
c Recessed grip
D Air inlet
€ Condensation water drainage connection
F Adjustable feet
G Air condenser filter with service flap
H Power cord with plug
Lint filter
J Drum
K Condensation water tank
Technical data
Rated Voltage : 220 - 240 V\~, 50 Hz
Rated power : 750 W
Protection class : I
Rated drying capacity: 9 kg
Dimensions : 595 x 640 x 845 mm
Protection degree : IPX4
Refrigerant : R290/120 g
Ambient temperature : 5°C - 35°C
• This is a Heat Pump Dryer.
- Erp-testing was done according to EN 61121:2013.
• See website below for detailed technical information or ask your vendor for specification sheet.
www.koenic-online.com
Installation
Note:
The heat pump dryer is equipped with power cord and plug. Before installation, make sure, that a suitable wall outlet is at the desired place of installation.
Consider the dimension of the product for placing and installation.
Fig. 1 Place the tumble dryer on an even, horizontal and steady surface. For levelling the feet are adjustable and can be screwed in or out. Use a spirit level for correct levelling.
Option 1
Fig. 2 The dryer can be connected to drainage.
- Remove the cover of the condensation water drainage connection at the backside of the product.
- Pull down the smaller hose.
- Connect a drainage hose to the fitting.
- Place the other end into a sink. Observe the max. height of the outlet of the drainage hose.
Note:
If an external drainage hose is used, the condensation water tank does not have to be emptied anymore.
A suitable hose holder and drainage hose are available as optional accessories.

Caution
Ensure that the drainage hose is properly attached and sealed. Periodically check the connection to avoid leakages.
English
Option 2
Fig. 3 If no drainage hose for condensation water is used, the condensation water tank must be emptied after each use.
- Pull out the tank and empty it into a sink.
- Push the tank back into the dryer.
Fig. 4 Connect the power plug to the mains.
Preparation
- Before drying, thoroughly spin the laundry in a washing machine. High spin speed can reduce the drying time and save energy consumption.
- For a more uniform drying result, sort the laundry according to fabric type and desired drying program.
- Before drying, close zips, hooks and eyelets, button up, tie fabric belts, etc.
- Do not over dry the clothes, because over dried clothes can easily get creases or might shrink.
- Do not dry articles containing rubber or similar elastic materials such as raincoats, bicycle covers and feather products.
- The door may be opened only after the program of the dryer is completed. Do not open the door before the program has finished, as skin may be scalded by steam or hot surfaces.
- Clean the lint filter and empty the condensation water tank after each use to avoid extension of drying time and energy consumption.
-
Do not dry clothes after chemical dry-cleaning.
-
Consider below weight references:
 | Blended Coats:about 800 g |
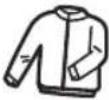 | Jackets:about 800 g in cotton |
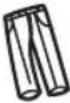 | Jeans:about 800 g |
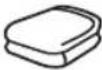 | Towel Quilts:about 900 g in cotton |
 | Bed Sheets:about 600 g in cotton |
 | Work Clothes, upper and lower:about 1120 g in cotton |
 | Pajamas:about 200 g |
 | Shirts:about 300 g in cotton |
 | Undershirts:about 180 g in cotton |
 | Underpants:about 70 g in cotton |
 | Socks:about 30 g in blended material |
Operation
Drying clothes
Fig. 5 For drying clothes follow below instructions:
- Open the door, fill the drum with your clothes and close the door.
Note:
The drum is illuminated if the door is opened. This function eases filling and emptying the drum.
- Switch on the appliance with the on/off button ⓘ.
- Chose your program, referring to the Program table.
- Chose an additional function if needed or set the time delay (Startzeitverzögerung).
- In the Mein Programm Program, you can define an individual program with the desired special functions. Turn the program selector to your desired program, e.g. standard, Jeans etc. and set the desired special functions. Then press the Anti-Crease button for 3 seconds to save the settings.
The program remains saved and can be changed at any time as described above.
- The drying time can only be set manually with the ZEITVORWAHL key in the and in the ZEITVORWAHL modes Warm, Kalt, Auffrischen (adjustable times can be found in the Program table).
-
Push the start / pause button ▷II The dryer starts the drying process at the preset conditions.
-
By pushing the start / pause button ▷ II again the dryer stops and the operation control LED is continuously on. To continue the drying process push the start / pause button ▷ II again.
Fig. 6 When the drying program has finished an acoustical signal beeps 3 times and 0:00 is shown in the display. Open the door and remove all clothes.

Caution
The door may only be opened if the appliance is not running, e.g. after a drying process is finished. Do not try to open the door when the appliance is running to avoid burns or scalding caused by hot steam or hot surfaces. There is also a mechanical danger due to the rotating drum.
Indicator lights
| Extra dry | |
| Child lock | |
| Clean filters (warning) | |
| Empty water container (warning) | |
| Standard dry | |
| Cycle phase status | |
| Iron/damp dry | |
| Time mode | |
| Anti crease mode | |
| Hygienic sterilization | |
| Drum lamp on |
English
Program table
Fig. 7 Chose a suitable drying program.
| Program Weight (max) Application/Properties Delay Time | |||||
| Baumwolle/Mix | For cottons and coloureds made of cotton or linen. | ||||
| Extra | 8.0 kg | To dry cotton pieces of clothing.Drying level: extra dry. | Yes No | ||
| Standard | To dry cotton pieces of clothing.Drying level: cupboard dry. | ||||
| Bügelleicht | To dry cotton pieces of clothing.Drying level: applicable to iron. | ||||
| Mix 3.5 kg | If one cannot determine the clothing's materials choose this program | ||||
| Synthetics/Wolle | For non-iron washing made of synthetic and blended fabrics, cotton. | ||||
| Extra | 3.5 kg | To dry thick or multi-layered synthetic fabrics.Drying level: extra dry. | Yes No Standard | ||
| To dry thin synthetic fabrics which are not ironed,such as easy-care shirts, table linen, baby clothes,socks. | |||||
| Wolle 1.0 kg | For a fluffy and fresh wool clothing(no drying program) | ||||
| Spezial | Jeans 4.0 kg | To dry jeans or leisure clothes that are spun at high speeds in the washing machine. | Yes No | ||
| Bettwäsche 4.0 kg To dry sheets or other large sized textiles. | |||||
| Hemden 1.0 kg | For easy care clothes such shirts and blouses with anti-crease mechanism for minimum ironing effort.Place clothes loosely in the dryer. Once dried, hang it on a clothes hanger. | ||||
| Mein Zyklus | - | Define and safe your favorite program. | Yes | - | |
| Zeitvorwahl | Warm | - | To warm clothes from minimum 10 min. to maximum 180 min. (in 10 min. steps). | Yes | Yes |
| Kalt | - | To air clothes without heating from minimum 10 min. to maximum 30 min. (in 10 min. steps). | |||
| Auffrischen | 1.0 kg | To refresh the clothes that have been kept at closed environments for a long time from minimum 20 min. to maximum 150 min. (in 10 min. steps). | |||
Note:
- The appliance is equipped with a humidity sensor to measure the moisture in the drum or appliance. The residual time for drying is determined by the weight of the inserted clothes and measured moisture.
- This function is not active during Warm (Warm), Cool (Kalt) and Refresh (Auffrischen) modes and in the program Wool (Wolle) if the Time (ZEITVORWAHL) mode was activated.
Additional functions
Fig. 8 If you wish to postpone the drying process, a time delay can be set. Use the delay button (Startzeitverzögerung) to set a postponed start between 1-12 hours. The dryer starts the drying process after the preset time has elapsed.
- Fill the drum with your clothes and close the door.
- Switch on the appliance with the on/off switch.
- Chose your program and an additional function if needed (e.g. Anti-Crease).
- Push the button Delay (Startzeitverzögerung) for as many times as needed to set the time delay in hours (H) which is indicated in the display.
- Push the start / pause button ▷II The dryer is activated and will start the drying process once the preset time has elapsed.
- Push the start / pause button ▷II to pause the timer. For cancellation push on / off Ⓐ switch.
Fig. 9 Once the child protection is activated, the setting cannot be changed. In that case the dryer can only be switched off by pushing the on / off button! The child protection can only be activated if the dryer operation was started or is running either directly or by time delay.
-
Activation: Press the NACHTMODUS and TROCKENGRAD buttons at once and for approx. 3 seconds. The corresponding LED of the display indicates the child protection.
-
De-activation: Press again the NACHTMODUS and TROCKENGRAD buttons at once and for approx. 3 seconds. The corresponding LED in the display turns off.
Anti-crease function
Fig. 10 This function is used to minimize the appearance of crease after the drying process has finished. The anti crease function is set by default and for 60 minutes but not available for the programs ZEITVORWAHL (Auffrischen, Kalt) and Wolle. The drum rotates intermittently in order to minimize formation of crease.
- Press the anti-crease (KNITTERSCHUTZ) button to set the anti crease time to 30, 60 or 90 minutes for the corresponding programs.
Cleaning and care

Warning
- When cleaning, never use solvents or abrasive materials, hard brushes, metallic or sharp objects. Solvents are harmful to human health and can attack plastic parts, while abrasive cleaning mechanisms and tools may scratch the surface(s).
- Switch off the tumble dryer and let it cool down completely before cleaning.
- Clean the exterior surfaces of the product with a slightly damp cloth and dry them well. Make sure that no water enters the product interior (e.g. at the switches).
Cleaning the lint filter
Fig. 1.1 Pull out the filter and open it. Remove lint and fibers by hand. Wash the filter with tap water in order to remove remaining lint or particles. Dry it well afterwards.
Reassembling is done in reverse order.
English
Cleaning the main filter

Warning
Before opening the service flap, place a big cloth in front and below the flap. Large amounts of water may leak when opening the flap.
Fig. 12 Reach into the opening of the service flap and open it. Pull the levers of the main filter into the correct direction to unlock and pull it out. Clean the filter and rinse if necessary.

Warning
During reassembling make sure the sealing of the filter fits correctly and make sure the filter is locked properly in order to avoid water leakage.
Cleaning the heat exchanger
If necessary, remove the fluff from the heat exchanger approx. once every 2 months using a vacuum cleaner and a brush nozzle. To do so, open the service flap and remove the main filter as described above.
Carefully clean the heat exchanger without pressure, otherwise it can be damaged. Always clean in the same directions as the lamella, otherwise they will be damaged.

Warning
Do not touch the heat exchanger with your hands as this can cause injuries.
Cleaning air inlet
Fig. 13 The LED Filter on the control panel will indicate when the lint filter needs to be cleaned. Check the air inlet opening on the front side on a regular basis and make sure it is free from residues and not blocked. Take of the service flap. Make sure the air inlet grill and foam filter are clean. Remove any residues and particles. Install the service flap.
Error indication and troubleshooting
Follow below table to understand error messages and how to remedy. Error messages are shown in display during use.
| Error message Possible reason Remedy | ||
| LED light is on | Water tank full or pump error | Empty condensation water tank.If the error code is sill shown there, contact your service agent. |
| E64 BLDC motor communication error | Contact your service agent | |
| E82 PCB communication error | ||
| E32 Error of humidity sensor | ||
| E33 Error of temperature sensor | ||
Troubleshooting
If there are any problems during operation, please refer to the following table. If problems cannot be solved as indicated under Solution, please contact your manufacturer.
| Problem Solution | |
| Display doesn't light on • Check power supply• Check preset program• Check fuses of you electric supply | |
| Dryer doesn't start • Make sure the door is closed• Chose correct program and push start / pause | |
| Water leakage • Align dryer horizontally.• Check air condenser, sealing cap and drainage and make sure it is installed correctly.• If the problem persists contact your service agent. | |
| Door opens by itself or cannot be closed | • Close door slowly until it clicks. Do not slam the door.• Remove clothes if overloaded |
| Humidity in the room increasing significantly | • Ventilate room adequately.• Clean the air inlet grille.• Ensure that the air condenser has been inserted. |
| Degree of dryness not reached or drying time too long | • Clean lint filter and wash condenser.• Empty condensation water tank.• Clean the moisture sensors.• Use next higher drying program or use Timer program. |
English
EU Product fiche | 1/2
KTD 9322 A3
The information in this product data sheet is given in accordance with article 3 letter b) in conjunction with Annex II of the Commission delegated Regulation (EU) No 392/2012 supplementing Directive 2010/30/EU of the European Parliament and of the Council with regard to energy labelling of household tumble driers.
| a Supplier's name Imtron GmbH | |
| b Model identifier KTD 9322 A3 |
| Symbol | Value Unit | |||
| c | Rated capacity of cotton laundry for the standard cotton program at full load | 9 | kg | |
| d | Type of the household tumble drier: | |||
| Air-vented household tumble drier No | ||||
| Condenser household tumble drier Yes | ||||
| Gas-fired household tumble drier No | ||||
| e Energy efficiency class A+++ | ||||
| Symbol | Value Unit | ||
| f W | Weighted Annual Energy Consumption1 | AEc | 193.7 kWh/year |
| g | Automatism of the household tumble drier: | ||
| Automatic tumble drier YES | |||
| Non-automatic tumble drier NO | |||
| h | EU Ecolabel award under Regulation (EC) No 66/2010 | ||
| n/a | |||
| Symbol | Value Unit | |||
| i | Energy consumption of the standard cotton program at full and partial load | E_dry | 1.62 | kWh |
| E_dry 1/2 | 0.89 | kWh | ||
| j | Power consumption for the standard cotton program at full mode: | |||
| In the off-mode | Po | 0.2 | W | |
| In the left-on mode | P | 0.8 | W | |
| k Duration of the "left-on mode" | t L | 10 | min | |
| 1 | Indication:The 'standard cotton programme' used at full and partial load is the standard drying program to which the information in the label and this fiche relates. This program is suitable for drying normal wet cotton laundry and is the most efficient program in terms of energy consumption for cotton. |
EU Product fiche 2/2
KTD 9322 A3
| Symbol | Value Unit | ||
| m | Weighted program time of the standard cotton program at full and partial load | T_t | 137 min |
| Program time of the standard cotton program at full load T | dry | 180 min | |
| Program time of the standard cotton program at partial load T | dry 1/2 | 104 min | |
| n Condensation efficiency class 'B' on a scale from G (least efficient) to A (most efficient) | |||
| Symbol | Value Unit | |||
| 0 | Average condensation efficiency of the standard cotton program | |||
| At full load C | dry | 81 | % | |
| At partial load C | dry 1/2 | 81 | % | |
| Weighted condensation efficiency for the standard cotton program at full and partial load | Ct | 81 | % | |
| p Sound power level (weighted average value) L | WA | 66 dB | ||