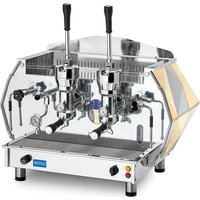
Diamante Lever 2 Groups - Coffee machine LA PAVONI - Free user manual and instructions
Find the device manual for free Diamante Lever 2 Groups LA PAVONI in PDF.


| Product Type | Professional espresso machine |
| Brand | La Pavoni |
| Model | Diamante Lever 2 Groups |
| Number of groups | 2 |
| Group type | Manual lever (L model) |
| Dimensions (length) | 890 mm |
| Weight | 90 kg (L model) |
| Boiler capacity | 13 liters |
| Boiler service pressure | 1.1 - 1.3 bar |
| Pump pressure | 8 - 9 bar |
| Power supply | 220-240 V ~ 50/60 Hz, 4500 W (single-phase) or 380-415 V 3N~ 50/60 Hz, 4500 W |
| Gas supply (optional) | 1700 kcal/h (methane G20, LPG G30 or town gas G110) |
| Main functions | Espresso preparation, hot water dispensing, steam production for milk and other beverages |
| Body material | Stainless steel |
| Maintenance and cleaning | Daily cleaning of filters and portafilters; weekly cleaning of groups and shower screens; draining and replacing water every 15-20 days; periodic regeneration of water softener |
| Safety | Safety switch, pressure switch, gas safety thermocouple, safety valve, automatic shutdown in case of overheating |
| Spare parts and repairability | Group gaskets, filters, portafilters, shower screens, heating elements, solenoid valves, pump; original parts recommended; intervention by qualified technician mandatory |
| General information | Italian manufacturing, professional use, compliant with CE and WEEE standards |
Frequently Asked Questions - Diamante Lever 2 Groups LA PAVONI
User questions about Diamante Lever 2 Groups LA PAVONI
0 question about this device. Answer the ones you know or ask your own.
Ask a new question about this device
Download the instructions for your Coffee machine in PDF format for free! Find your manual Diamante Lever 2 Groups - LA PAVONI and take your electronic device back in hand. On this page are published all the documents necessary for the use of your device. Diamante Lever 2 Groups by LA PAVONI.
USER MANUAL Diamante Lever 2 Groups LA PAVONI
Use of the machine is only allowed to adults who have carefully read and properly understood this guide and any safety directions herein contained.
The user is liable towards any third party within the operating area. The installer, user and maintenance man are to notify the builder as to any defects or deterioration that may affect the original safety features of the plant.
The installer is to ensure that environmental conditions are acceptable (temperature has to be included between the 5irc and the 35ircC ), avoiding to install the machine in locations where the water jets are commonly used, so as to guarantee user safety and consumer hygiene.
Installation must be effected only by an authorized staff, with the due technical knowledge, following the builder instructions according to the rules in force.
The machine has to be installed in premises where the use and the maintenance are entrusted to qualified people.
For safety reasons, worn or damaged parts are to be promptly replaced with original spare parts.
Check regularly that the power cord is in perfect condition. Don't repair the damaged cable with tape or terminal blocks.
The power cord can be replaced by the manufacturer or an authorized service center only.
Do not expose to atmospheric agents (sun, rain, etc.).
Prolonged machine standstill at temperatures of under 5ircC (five degrees centigrade), may cause serious damage or breakage to the boiler piping: it is therefore necessary to completely empty the water circuit before every prolonged standstill.
It is forbidden to remove the protections and/or safety devices existing on the machine.
Packaging components are to be delivered to the specially designed disposal centres and under no circumstances are they to be left unattended or within children's, animals' or unauthorised people's reach. The builder declines all responsibility for damages to things, people or animals, caused by any intervention on the machine by people who are not qualified or authorised to carry out such functions.
Should any unauthorised repairs be performed on the machine or should non-original spare parts be used, all the guarantee conditions will lapse, in which case the builder reserves the right to no longer acknowledge their validity.
The user is to comply with the safety standards in force in the country in which the equipment is installed, in addition to the rules dictated by common sense, as well as ensuring that regular maintenance operations are properly carried out.
The user is not to touch the machine with damp or wet feet, nor is he to use it barefooted. Besides earthing the machine, it is advisable to use a wooden footboard and cut-out box, in compliance with local regulations, to maximise the prevention of electric shocks.
Do not touch with your hands, or other parts of your body, the boiler, the brewing units, the filter-holder spouts and the hot water and steam nozzles, since the liquids or steam supplied are overheated and may cause scalds.
Ensure you do not operate the machine without water.
Any occlusions may cause sudden liquid or steam jets, with serious consequences. Keep the water as clean as possible, by employing filters and softeners.
In the event of equipment failure or of defective operation, switch off the machine without attempting any action, and refer to the authorised Assistance Centre.
Prior to any cleaning or maintenance operation, disconnect the machine from the mains by operating the main switch, turn off the general mains switch and remove the plug from the socket (without pulling the supply cable); do not use water jets or detergents.
Cups need to be accurately dried prior to being placed on the surface provided.
This appliance is not intended for use by young children or infirm persons unless they have been adequately supervised by a responsible person to ensure that they can use the appliance safely.
Young children should be supervised to ensure that they do not play with the appliance.
It complies with the following norms:
Before starting the machine, please read carefully the instruction manual.
Attention! Disconnect the machine from main power before taking off the protections.
Attention! Hot surfaces.
Attention! Surfaces chaudes.
Attention! Particularly important and/or dangerous operations.
Important! Interventions required for proper operation.
Operations that may be carried out by the user.
Operations that can only be carried out by a qualified technician.
We thank you for buying one of our products, made in accordance with the most up-to date technological innovations. Following carefully the simple operations of use contained in this manual, which comply with essential safety regulations, you will get the best performances and notice the remarkable reliability of this product along the years. In case of running troubles, our network of Service Centres is at your complete disposal from now on.
Français
Cher client,
AND MOVE THE MACHINE USING EXCLUSIVELY
THE SUITABLE DISAPPEARING HANDLESS
ENLEVER COMPLETEMENT L'INVOLUcre EXTERIEUR
ET DEPLACER LA MACHINE EMPLOYANT EXCLUSIVEMENT
LES POIGNEES APPROPIEES
VOLLSTANDING ABNEHMEN DIE AUESSE SCHUTZHULLE
UND BEWEGEN DIE MACHINE
MIT DIE PASSEND HANDGRIF
PARAMOVERLA MAQUINA UTILIZAR EXCLUSIVAMENTE
LAS EMPUNADURAS PREVISTAS PARA TALE EFFECTO
ITALIANO 11-22
ENGLISH 23-34
FRANCAIS 35-46
DEUTsCH 47-58
INDICE
14- WEEKLY CLEANING OPERATIONS 31
14.1-BREWING UNIT AND JET CLEANING 31
14.2 - FILTER AND FILTER-HOLDER CLEANING 31
14.3 - DRAIN TRAY CLEANING 31
14.4-CASING CLEANING 31
15 - REPLACING THE GROUP GASKET 32
15.1 - DIAMANTE S - SV MODEL 32
15.2-CREMA L MODEL 32
16-BOILER WATER REPLACEMENT 32
17-USE OF THE SOFTENER 32
18-MACHINE DEMOLITION 32
19-CAUSE DI MANCATO FUNZIONAMENTO OD ANOMALIE 33
1 - EMPLOYMENT AND STORAGE OF THE INSTALLER/ USER GUIDE
This guide is designed for the user of the machine, for the owner and for the engineer in charge of installation, and must always be available for consultation.
The installer/user guide is aimed at illustrating machine employment as provided for by the design assumptions, as well as the machine technical specifications, and at providing indications for proper use, cleaning and regulation; furthermore, it provides important indications in connection with maintenance, any residual risks and any operations that need to be carried out with special attention.
This manual should be regarded as part of the machine itself, and has to be STORED FOR FUTURE REFERENCE up to final demolition of the equipment.
In the event of loss or damage, the user may request a replacement guide from the builder or the reseller, by indicating the machine model and serial numbers shown on the identification plate.
This manual reflects the state of technology at the time it was compiled; the builder reserves the right to update products as well as subsequent guides with no obligation to also update its previous versions.
LA PAVONI S.p.A. declines all responsibility for any damage to people or things that may directly or indirectly result from:
-failure to comply with all the prescriptions of the safety regulations in force;
- incorrect installation;
supply faults;
- illegitimate or incorrect use of the coffee machine;
- use that does not comply with the indications explicitly provided in this publication;
- serious shortcomings in terms of prescribed or advised maintenance;
- any unauthorised modification or intervention on the machine;
- use of non-original spare parts or of spare parts that are not specifically designed for the model concerned;
- total or partial failure to comply with instructions;
- exceptional events.
2-MACHINE FUNCTION
This machine is designed for the professional preparation of Espresso coffee by means of a blend of coffee, for the withdrawal and delivery of water and/or steam, or of hot milk.
Its components are manufactured in non-toxic and durable materials, and are easily accessible for cleaning and maintenance purposes.
In order to properly operate the machine, the user in charge is to have read and carefully understood the instructions contained in this booklet.
3 - DISPOSAL
This product complies with EU Directive 2002/96/EC.
The symbol on the product or on its packaging indicates that this product may not be treated as household waste. Instead it shall be handed over to the applicable collection point for the recycling of electrical and electronic equipment. By ensuring this product is disposed of correctly, you will help prevent potential negative consequences for the environment and human health, which could otherwise be caused by inappropriate waste handling of this product. For more detailed information about recycling of this product, please contact your local city office, your household waste disposal service or the shop where you purchased the product.
4 - TECHNICAL DIAGRAM AND SPECIFICATIONS
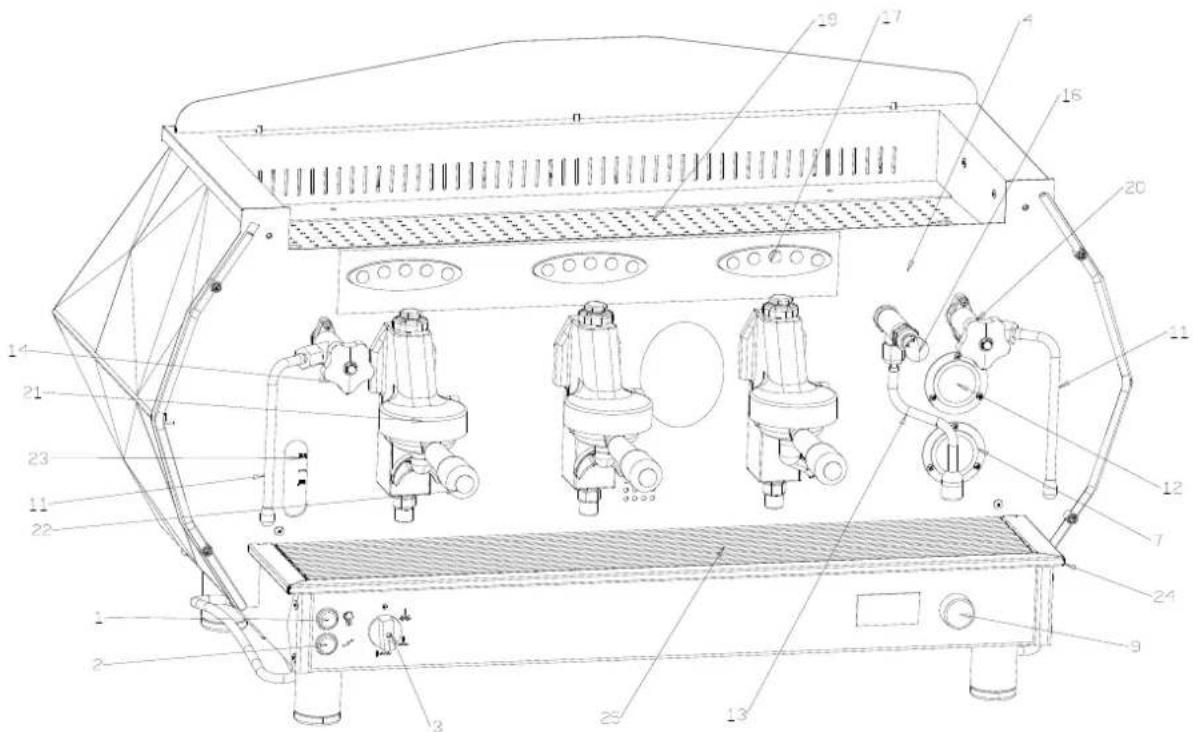
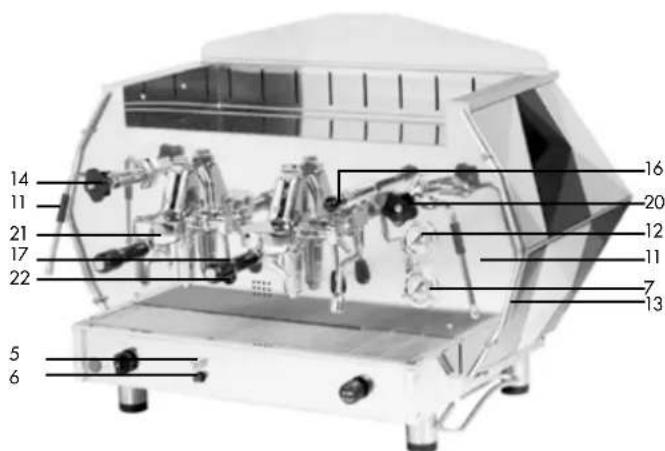
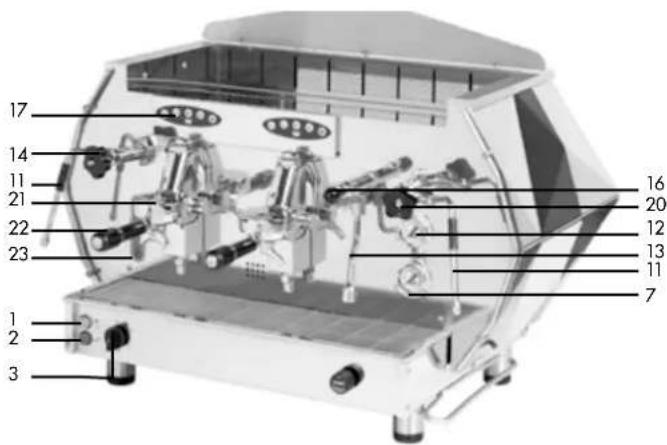
- ON/OFF switch
- Live machine warning light
- Position general selector
- Front panel
- Gas detection button
- Piezoelectric igniter
- Boiler pressure control manometer
8.Data plate - Manual boiler water filling button
- Lever group endowment
- Steam nozzle
- Pump pressure control manometer
- Hot water supply nozzle / tap
-
Steam tap knob
-
Hot water supply jointed handle
- Unit control
- Cup holde
- Steam tap knob
- Brewing unit
- Filter-holder
- Water level indicator
- Drain tray
- Drain tray grid
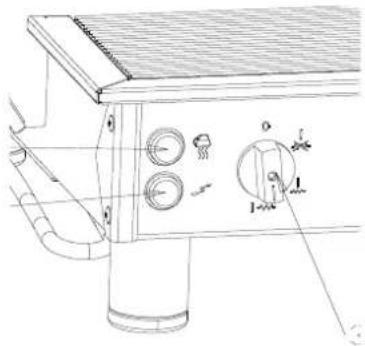
Electric circuit activation, heating element excepted
Heating element normal power connection
Heating element maximum power connection
| MODEL 2 GR 2 GR 3 GR 3 GR | ||||
| S-SV L S-SV L | ||||
| Width in mm 890 890 1110 1110 | ||||
| Boiler Capacity lt 14 13 22,5 21 | ||||
| Weight in kg 83 90 98 105 | ||||
| Rated electric heating | 2 GR 3 GR | ||
| DIAMANTE S DIAMANTE SV | 220-240V~ 50-60Hz | 4670W | |
| 380-415V 3N~ 50-60Hz | 4670W | 5650W | |
| DIAMANTE L | 220-240V~ 50-60HZ | 4500W | |
| 380-415V 3N~ 50-60HZ | 4500W | 5400W |
| ECO max electric heating | 2 GR 3 GR | ||
| DIAMANTE S | 220-240V~ 50-60Hz | 3150W | |
| DIAMANTE SV | 380-415V 3N~ 50-60Hz | 3150W | 3980W |
| DIAMANTE L | 220-240V~ 50-60HZ | 3000W | |
| 380-415V 3N~ 50-60HZ | 3000W | 3600W |
| Pump Motor | 100 W 165 W | ||
| Gas heating | 1700 kcal/h | 2500 kcal/h | |
5-INSTALLATION
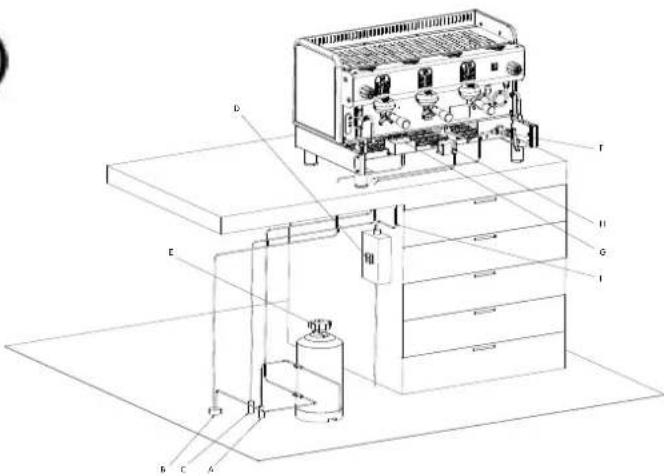
A. Water system.
B. Drain conduit.
C. Gas conduit
D. Protection switch.
E. Softener.
F. Boiler supply tap.
G. Drain basin.
H. Gas valve.
I. Supply cable.
Before starting installation, you need to ensure that:
- no dents, bumps or buckling exist;
- no wet areas or other signs exist that may lead to the conclusion that the packaging has been exposed to bad weather conditions;
- no tampering signs exist.
Once you have ensured that transport has been carried out correctly, proceed with installation.
Check that the machine is installed on a flat surface to a minimum height of 90 cm fitted to support the weight, leaving a clear area of at least 30 cm around the coffee machine.
Hence proceed with installation operations, in compliance with the following steps.
5.1-WATER SYSTEM

Caution! The machine must be supplied with water having a hardness above 8ircF degrees.

Caution! It is not possible to use pipes and gaskets already used.
It is advisable to install a water softener for the machine water system.
Ensure that you will be connecting the machine to drinkable water mains.
The connection to the water supply of the machine must be in accordance with the country of destination.
The pressure of water entering the machine must not exceed 0,65Mpa Connect the softener (E) to the water system (A).

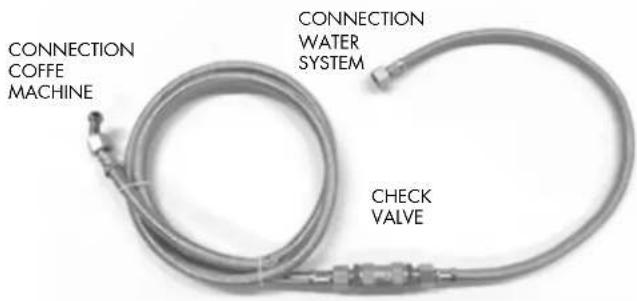
N.B. Before connecting the softener to the machine, carry out a washing cycle until the water is absolutely clear, after which you may connect the softener to the machine.
- Connect the drain tray (G) to the drain conduit (B).
- As far as the mains pressure is concerned, if this exceeds 0.5Mpa (5bar), it is advisable to install a balanced pressure reducer for high pressure (a device whereby any mains increase does not affect the output pressure).
Caution! Before proceeding with electric connection, you need to ensure that voltage meets the specifications shown in the EC plate.
Ensure that the electric supply line can bear the machine load (see chapter 4 - Technical Specifications Table).
Provide for an earth connection in compliance with the regulations in force.
In this regard, ensure that the supply cable is efficient, and that it meets the national and European safety standards.
The user is to arrange for machine power supply and protect the line by means of a safety switch (cut-out box) meeting the regulations in force in the country in question.
Connect the supply cable (I) to the electric line by a multipolar switch (D) will have to be arranged for network separation, with a distance between contacts of at least 3 mm.
For voltage change, please refer to the diagram shown on the main switch box.
The yellow/green coloured cable should be COMPULSORILY connected to the premises earthing system.
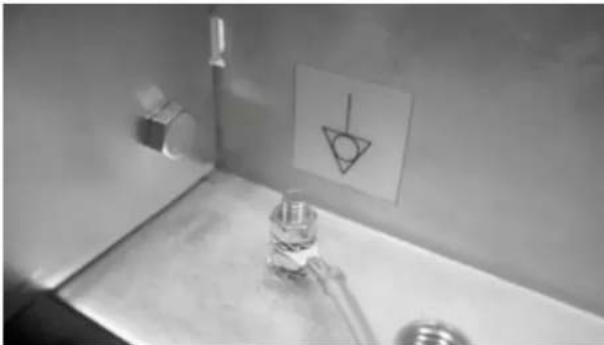
The machine is equipped with a terminal block under the drain pan
supported by the following symbol
The terminal block is capable of connecting power cables from 2,5mm to 6mm, with ring terminals for screw M6.

≥100A
IMPORTANT
The single phase connection of espresso coffee machine in granted only in a place having an electric system with an impedance conformed to the assorbed current of the appliance.
5.3-GAS CONNECTION
Connect the gas valve (H) to the conduit (C) by means of the hose (in compliance with the standards in force) and adequate hose clamps, or, in the event you are using a stainless steel hose, use the specially designed connection supplied (as shown in the picture under chapter 5.4 "Gas Regulation").


5.4-GAS REGULATION
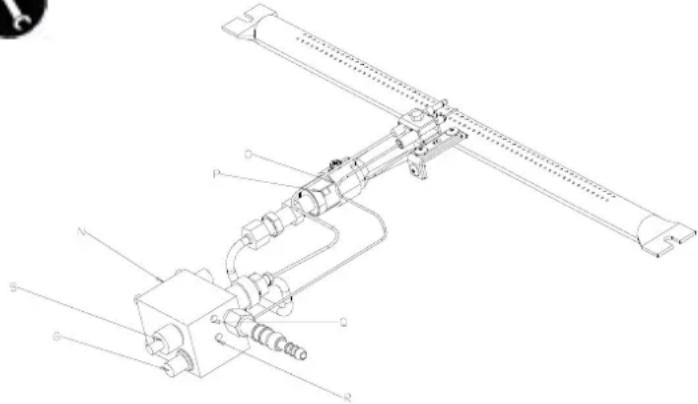
- Gas detection valve.
- Piezoelectric ignition.
N. Gas regulation.
Gas injector.
P. Regulation nut.
Q. Minimum regulation screw.
R. Pressure regulation screw.
Category III 1a 2H3+
Machine 2 GR Machine 3 GR Machine 4 GR
G20
(methane)


G30
(liquefied gas)


G110
(town gas)


The machine is designed to be supplied by methane gas (G20), which means that the gas injector (O) and the gas regulator (N) are set for methane gas.
For GPL gas (G30 liquefied gas) or town gas operation, the gas injector (O) needs to be replaced with the corresponding one attached to the machine (see gas injector table).
Gas burner ignition must be carried out by holding the gas detection valve button pressed (5), to allow inflow of gas into the burner, and by then operating the piezoelectric ignition button (6).
N.B. The detection valve button must remain pressed for a few seconds in order for the thermocouple to start.
Adjust the airflow by means of the specially provided air regulation nut (P); by turning it clockwise the flow decreases, by turning it anticlockwise the flow increases, so as to achieve a blue-coloured flame (avoid high or too oxidising flames, which may damage the boiler).
Wait for the boiler to reach a 1.1 ÷ 1.3 bar operating pressure and for the flame to be reduced to a minimum.
Should you need to set the gas regulator (N), proceed as follows: turn the minimum regulation screw (Q) clockwise to lower the flame and turn it anticlockwise to increase the flame.
When water temperature drops below the minimum set values with the machine running, the flame automatically switches back to the maximum value.
To increase or decrease maximum boiler pressure, operate the pressure regulation screw (R) clockwise to decrease the pressure and anticlockwise to increase it.

The machine is provided with a gas supply tap complying with the safety standards that, in the event of accidental flame extinction, resulting from whatever reason, produces the automatic interruption of gas outflow. In this case, you need to repeat the ignition operation as described above.
The machine may provide both for electrical and gas heating, or else it can be independently heated either electrically or by gas.
When the machine is exclusively gas operated, act on the switches (2-3) to stop the heating element.
6-STARTINGUP
Once the hydraulic, electrical and gas connections have been completed, the machine can be started up.
Open the water system tap (A).
Close the protection switch (D).
Place the main switch (3) on the position: the live machine warning light will switch on (2).
The automatic level indicator will start filling the boiler with water until it automatically reaches an intermediate position between the MIN and the MAX level of the level indicator (23).
Once the automatic water filling operation has been completed, place the main switch (3) on the position for normal power operation, and on the position for maximum power operation, thus supplying voltage to the water-heating element.
Then wait for the machine to reach the 1.1 ÷ 1.3 bar operating pressure, by checking the boiler pressure on the manometer [7].
Should the machine not settle on the indicated values, you will need to set the pressure switch as explained in section 6.1.
When the machine is provided with a gas heating system, after operating the main switch (3), you will need to switch on the gas, by operating the gas valve (5) and pressing the piezoelectric igniter (6) until the gas remains on.
Now check the pressure on the pump manometer (12), by starting a unit with inserted filter-holder, filled with properly ground, dosed and pressed coffee, so as to obtain the actual 8/9 bar operating pressure.
Should you need to reset the pump pressure, you will need to follow the directions listed under section 6.2.
The machine is now ready for use.
If the machine is not provided with an automatic level indicator, after having placed the main switch (3) on the position, press the manual boiler water filling button (9) to fill the boiler with water, and keep it pressed until the water level will have reached an intermediate position between the MIN and the MAX level of the level indicator (23).
Once the water filling operation has been completed, place the main switch (3) on the position for normal power operation or on the position for maximum power operation, thus conveying voltage to the water heating element.
Caution! Absence of water in the boiler while the machine is running causes interruption of the resistance, which will have to be restored by an authorised Assistance Centre.
During start up:
When the boiler pressure control manometer (7) displays a pressure of approximately 0.5 bar, slowly open the steam tap (14-20), by turning it anticlockwise, to discharge the air contained in the boiler, and wait for the steam supply nozzle (11) to start producing steam, before you close it again. Wait for the machine to reach the operating pressure and the correct thermal balance, within 35-45 minutes.
Important! Do not press the hot water supply switch or turn the tap before reaching the correct 1.1 bar operating pressure, indicated by the boiler pressure control manometer (12).
6.1 - PRESSURE SWITCH REGULATION
The pressure switch shown in the picture is designed to maintain the boiler pressure constant, by connecting or disconnecting the electric heating element.
This pressure switch is adjusted during the final testing of the machine on a 1.1÷ 1.3 bar value; however, should the specific case require a different operating pressure, the pressure switch operating range can be changed by operating the regulation screw


(U): by reducing the pressure, you obtain a temperature reduction, whereas by increasing the pressure, the water temperature also increases. The regulation sense is shown in the picture and also on the pressure switch itself.
Pressure varies by approximately 0.1 atm for each complete turn of the screw.

Caution! Disconnect power supply before carrying out this operation.
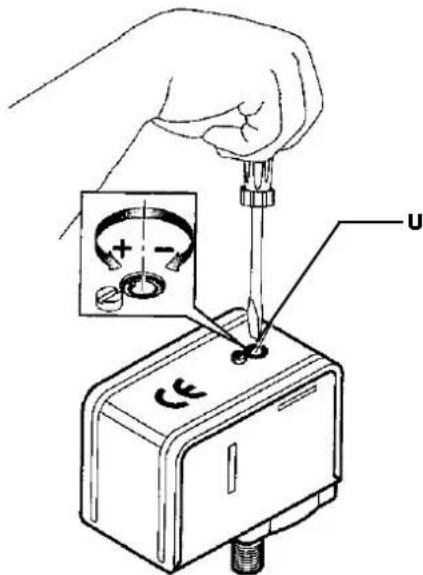
6.2 - PUMP PRESSURE SETTING
Insert in the brewing unit the filter-holder filled with properly ground, dosed and pressed coffee. Activate the switch or the unit control keyboard (17) and read the pressure on the pump manometer (12).
N.B. The correct pressure is 8/9 bar.
If the pressure displayed by the manometer should not prove correct, operate the pump pressure regulation screw (Z), by turning it clockwise to increase pump pressure or anticlockwise to reduce pressure.
Once regulation is complete, check the pump setting by delivering one or more coffee servings.


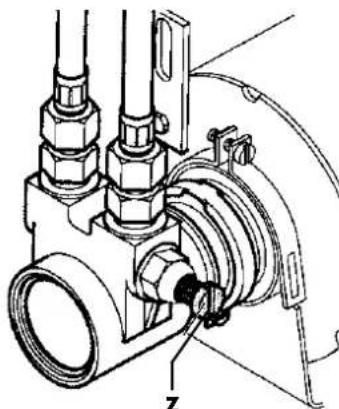
Z = Pump pressure regulation screw
Caution! When the machine is new, the filter-holder may not prove aligned (perpendicular to the machine itself) as shown in the picture; this however does not affect proper operation of the machine itself.
After a brief period of use the filter-holder will gradually settle on the correct position
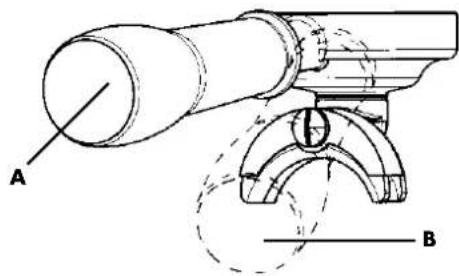
A. Position of the closed filter-holder when the machine is new.
B. Position of the closed filter-holder after the machine has been in use for a brief period.

7-COFFEE PREPARATION
In order to obtain an excellent Espresso coffee, it is important to use a top quality coffee blend, properly roasted and ground; grinding is correct when the coffee delivery time is of 15-18 seconds for one serving and of 30-35 seconds for two servings. Grinding must take place at time of use, in that, once ground, coffee loses its fragrance within a short time; if grinding is too coarse you will obtain light-coloured and week coffee, without froth; if grinding its too fine you will obtain dark coloured and strong coffee, with little froth.
Warm cups contribute to maintaining freshly delivered coffee at the right temperature; it is therefore advisable to place the cups on the spacious cup-holder grid before use (19), which will make it possible to take advantage of the heat emanating from the boiler.
On machines provided with an electric cup-warmer, cups are preheated by pressing the yellow button (1): the button warning light will switch on to signal that the cup-warmer is on. To switch off the cup-warmer, pressed the yellow button (1) again.
Caution! Do not place cloths, felt covers or the like on the cup holder. Once you have placed the filter into the filter-holder (22), fill the filter with the amount of coffee required for 1 or 2 cups (7 gr. - 14 gr.), level off, and press the coffee down with the presser, manually clean the filter edge from any coffee residues and fit the filter-holder into the brewing unit (21) moving it rightward until it is tightly in place.
Place the cups under the spouts and start the brewing by means of the unit control (17).
Once you have obtained the desired amount of coffee, stop delivery by means of the unit control (17), whilst leaving the filter-holder in place.
To prepare additional cups of coffee, remove the filter-holder (22) from the unit, by moving it leftward, empty the coffee grounds into the drawer provided and once again follow the steps listed above.
Caution! We recommend that you do not touch the brewing units or the steam and hot-water nozzles when the machine is running, and that you pay the utmost attention not to place your hands under the units or nozzles during delivery, to avoid possible scalds.
It is advisable to leave the filter-holders, with their own filters and coffee grounds, fitted into the unit throughout your days' work, to ensure the filter-holder always preserves an optimal temperature.


8-BREWING UNIT CONTROL
8.1 - DIAMANTE L MODEL
Machine with lever-operated brewing units.
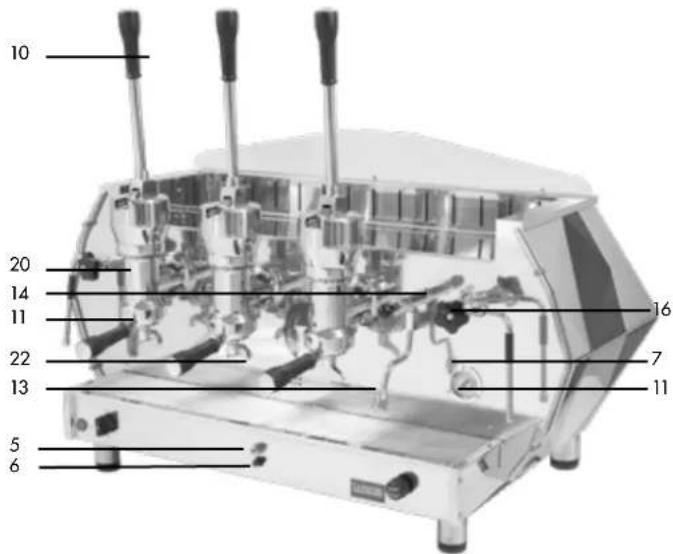
Coffee is brewed by manually operating the unit lever (10) downwards, up to the point in which it stays in place; as soon as coffee starts pouring out of the filter-holder spouts (22), manually move the lever upwards until it is half-way up, and then release it. The machine does not employ a motor-driven pump and is not equipped with an automatic level indicator for automatic boiler control; this can however be provided for on request.
8.2 - DIAMANTE S MODEL
This is a microswitch-operated model equipped with semiautomatic, continuous delivery brewing units.
Coffee delivery is obtained by operating the brewing unit control handle (17) placed on the panel (4); by moving the handle downwards, the connected microswitch activates the motor-driven pump, which conveys water under pressure to the unit, which, thanks to its internal devices, will allow pre-infusion first and subsequently coffee brewing in a number of different modalities.
Once the desired amount of coffee has been obtained, move the handle (17) upwards, until it reaches its stop position, and press the luminous switch again to stop delivery.
8.3-DIAMANTE SV MODEL
These models are equipped with automatic, continuous delivery.
brewing units with solenoid valve and programmable coffee dosing,
microprocessor-aided sealed digital brewing control, control board
with 4 different coffee-dose selection positions, a stop button for each
brewing unit and a timer-aided hot-water delivery system.
9-COFFEE DOSE PROGRAMMING DIRECTIONS FOR THE DIAMANTE SV MODEL
17. UNIT CONTROL:
Key function:
A. 1 normal cup of coffee.
B. 2 normal cups of coffee.
C. 1 "large" cup of coffee.
D. 2 "large" cups of coffee.
E. Brewing unit stop/continuous delivery.
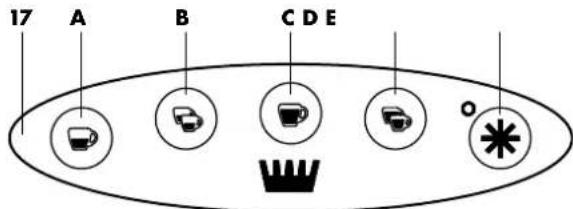
The ** (E) button is designed for continuous delivery and delivery stop. The machine therefore has a double function:
By pressing the ** (E) button, the equipment is run as a semi-automatic machine.
By pressing the 4 selection buttons, the machine is operated through electronic dosing.
By holding the (E) button pressed for over 10 seconds, the machine will enter the programming phase, as signalled by the low frequency flashing of the LED belonging to the unit on which programming is being carried out.
Release the programming button (the LED will continue to flash) and press the button relating to the unit on which you wish to programme coffee dosing; at this stage delivery will start; once the desired dose has been reached, press any button of the unit concerned to interrupt delivery; the dose will be stored in the memory and the machine will exit the programming phase (the LED will stop flashing and switch off).
- This operation should be repeated on the remaining selection buttons for the various groups.
- The same operation needs to be repeated if you wish to increase or decrease the set dose.
- By programming the first unit to the left, the programming operation will be also accomplished on the various groups.
N.B. The programming phase is signalled by the flashing LED of the unit on which programming is being carried out.
10-COFFEE DELIVERY
To obtain coffee delivery, press the selected button on the brewing unit (17); the LED in the "P" (E) button will switch on, after which coffee delivery will start and will be automatically interrupted once the previously set amount has been reached. Delivery stop will be signalled by the related LED switching off.
Delivery or selection deletion may be interrupted by pressing any key on the brewing unit (17).

The "P" (E) button, besides interrupting supply or aborting selection, is also designed for continuous delivery, which means that the dose is not previously set, but the unit will continue to deliver coffee until the button is pressed again to interrupt delivery from that unit.

If the coffee is too finely ground or too much coffee is placed in the filter, when you press one of the 4 control selectors (A, B, C, D) coffee delivery will not start; after 45 seconds the machine will be automatically blocked and the LED will switch from a fixed to a flashing light state.
To restart the machine, remove the filter-holder and replace the coffee contained in the filter, tpress the ON/OFF switch (1), in order to turn off the machine and subsequently restart it.
N.B. We recommend a maximum delivery of 60 seconds.

N.B. To avoid the automatic block of the machine, if within 10 seconds coffee delivery has not yet started, press one of the selector buttons to cancel the command, replace the coffee contained in the filter and repeat the delivery operation.
10.1 - PRE-INFUSION

Important! The settings made on unit 1 (operating on the first keyboard) will be automatically copied on to all the other units.
Our software permits measure configuration so that the relative delivery of the COFFEE measures through volumetric control is preceded by preinfusion.
Delivery of the coffee measure after time 1 (ON) is suspended for a time 2 (OFF) and is then resumed for the completion of selection. On pressing one of the volumetric control measure keys, the normal delivery cycle is preceded by a short timed water jet in order to dampen the coffee pellets before actual delivery stage.
This function ensures the optimum use of the coffee pellets.

ENGAGEMENT
Start the machine by pressing the main switch keeping key (A) of unit 1 pressed and wait for the led relative to key (E) to begin flashing. Turn off the machine and then switch it on.
The pre-infusions has been started up.
DEACTIVATION: Start the machine by pressing the main switch keeping key (C) of unit 1 pressed and wait for the led relative to key (E) to begin flashing. Turn off the machine and then switch it on. The pre-infusions has been deactivated.

11 - HOT WATER WITHDRAWAL
Place a container under the hot water delivery nozzle (13), press the jointed handle (16) downwards to allow water delivery; once the desired amount of water has been obtained, the handle will resume the stop position thus interrupting delivery.
N.B. We recommend a maximum delivery of 60 seconds.
12 - PREPARATION OF OTHER DRINKS
12.1 - MILK, CAPPUCCINO AND OTHER HOT DRINKS
Before you heat any drink, carefully let a small amount of steam out of the steam tube (11), by operating the steam tap knob (20) anticlockwise, to eliminate any condensation that may have formed inside the boiler.
Pour the liquid to be prepared into a container, immerse the steam delivery nozzle (11) into the liquid and slowly turn the steam tap knob (14-20) anticlockwise; subsequently open the tap completely, so as to produce a great outflow of steam and bring the liquid to the boil. To obtain a thick milk froth for cappuccino, we recommend you use a high and narrow container, only half-filled with milk.
Immerse the steam delivery nozzle (11) until you touch the bottom of the container and then bring the milk almost to the boil.
Alternatively lift and lower the container with the tap open, until you touch the surface of the milk for a few seconds, until the froth has formed. To make a cappuccino, add the hot whipped milk to hot coffee in the specially designed cup.
12.2-TEA, CAMOMILE
Place a container under the hot water delivery tap (13), press the jointed handle (16) downwards to allow water delivery; once the desired amount of water has been obtained, the handle will resume the stop position thus interrupting delivery. Now add the tea bag or drink sachet required for preparation.
For hygiene purposes, we recommend that in any case you use water from the water system, heated by means of the steam delivery nozzle (11).
13 - MAINTENANCE AND CLEANING OPERATIONS
13.1 - STEAM DELIVERY NOZZLE CLEANING
To avoid altering the taste of the drinks to be heated and to prevent the holes of the end part of the steam delivery nozzles getting clogged, carefully clean the nozzles after each use.
13.2 - DAILY CLEANING OPERATIONS
Rinse the filters and filter-holders in boiling water to avoid scale formation or coffee deposits, and clean the jets of the delivery units.
14 - WEEKLY CLEANING OPERATIONS
14.1-BREWING UNIT AND JET CLEANING
Remove the filter-holder from the brewing unit.
Position the provided seal inside the filter, pour a spoonful of coffee-machine detergent powder and fit the filter holder (22) into the brewing unit to be cleaned (21).
Operate the brewing unit by means of the unit control (17) and interrupt delivery after approximately 4-5 seconds.
Alternatively operate and interrupt delivery for approximately one minute, so as to allow removal of coffee and scale deposits.
Remove the seal and operate the delivery system several times to rinse the unit. Deliver a few servings of coffee so as to eliminate any unpleasant taste from the jets and from the brewing unit.
After a long period of hot water stagnation within the conduits, let water briefly flow vertically so as to remove any deposits.
14.2 - FILTER AND FILTER-HOLDER CLEANING
Frequently check the filter holes to remove any coffee deposits. Prepare about a litre of boiling water with four teaspoons of coffeemachine detergent in a suitable container, and immerse in this solution the filters and filter-holders for 20-30 minutes; then rinse thoroughly under running water.
14.3 - DRAIN TRAY CLEANING
Remove the drain try grid (25) and pull out the drain tray (24) in order to clean it from coffee powder residues.
14.4-CASING CLEANING
Use a damp, non abrasive cloth, without alcohol or solvents, to avoid damaging the sides, the base and any painted parts.
Important! The machine can not be immerse in water and can not be cleaned with jets' water.


If, during delivery, the coffee drips out of the edges of the filter-holder (G), this may be caused by the obstruction of the filter-holder delivery hole, in which case the hole needs to be cleaned; if the problem persists or, if when fitting the filter-holder into the brewing unit it significantly moves beyond the unit centre, the group gasket needs replacing (D).
15.1 - DIAMANTE S - SV MODEL
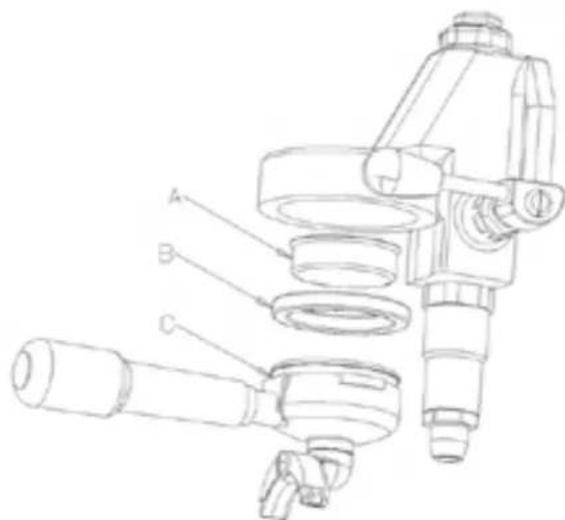
For the replacement, it is necessary to lever with a screwdriver for the removal of the seal (B) and the shower (A). After removing the seal and hand shower, properly clean the seat before reassembling the new parts.
15.2-CREMA L MODEL
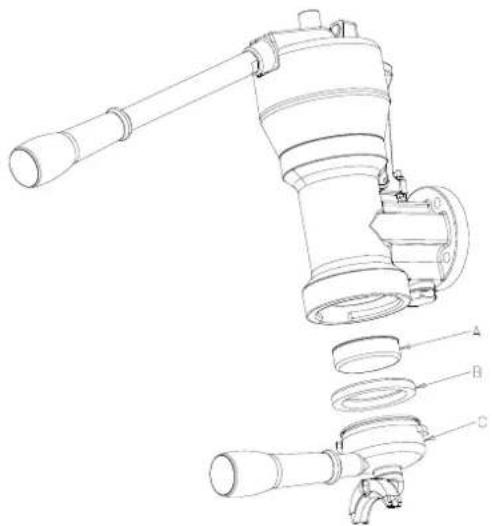
For the replacement, it is necessary to lever with a screwdriver for the removal of the seal (B) and the shower (A). After removing the seal and hand shower, properly clean the seat before reassembling the new parts.
16 - BOILER WATER REPLACEMENT
It is essential to replace the water contained in the boiler every 15-20 days, in order to eliminate the iron bacteria and the build-up of various residues due to water stagnation.
Turn off the main switch (1), remove the drain basin grid (25) and pull out the lower drain basin (24).
Open the drain tap placed under the level glass (with the boiler under pressure) and let the water flow out of the boiler comple
tely. Close the tap again and repeat the start-up procedures by following the steps outlined in the related section of this manual.
17 - USE OF THE SOFTENER
Calcium and magnesium contained in the water circulating inside the boiler and brewing unit circuits damage the machine. The softener dissolves the calcium and magnesium, which settle on the resins therein contained.
To prevent the build-up of deposits from saturating the resins, thus limiting their functions, these need to be regenerated at regular intervals according to the following criteria:
-
8 litre softener for 40 French degree HARDness water
-
up to 400 cups of coffee/day, every 10 days
- up to 800 cups of coffee/day, every 5 days
-
up to 1000 cups of coffee/day, every 3 days
-
12 litre softener, for 40 French degree HARDness water
-
up to 500 cups of coffee/day, every 15 days
- up to 1000 cups of coffee/day, every 7 days
up to 1500 cups of coffee/day, every 5 days - up to 2000 cups of coffee/day, every 3 days.
Failure to comply with the above regeneration timings will prejudice the thermal and mechanical functions of the machine and the taste of the coffee, owing to the formation of scale.
For regeneration, proceed as follows:
Place an empty container, having a capacity of at least two litres, under pipe (e), turn the (c) and (d) handles to the right, unscrew the (g) lid and wait for the water to fully flow out of pipe (e). Introduce 1.5 Kg. of cooking salt for the 8 litre model or 2 Kg. of salt for the 12 litre model, place the lid back in place and move the (c) handle from right to left; let the salted water flow out of the (f) pipe and wait until the water has become fresh again (the cycle takes approximately 90 minutes).
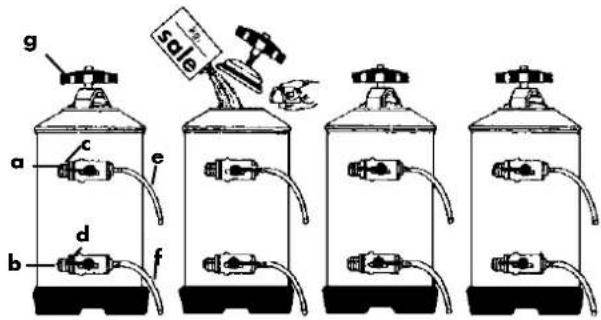
a - Water inlet.
b - Water outlet.
c - Inlet tap.
d- Outlet tap.
e -Vacuum pipe.
f - Regeneration pipe.
g-Lidknob.
Now move the (d) handle from right to left.
During regeneration, do not use the machine; for machines equipped with automatic level indicator it is advisable to cut off the pump power supply, to prevent no-load operation.
Before connecting the softener to the machine, wash the resins, by establishing a connection to the water mains and letting water run for five minutes.
N.B. The above mentioned directions relate to the softener shown in the pictures; if your equipment differs, follows the directions attached to softener in question.
18 - MACHINE DEMOLITION
Should you decide to no longer employ the machine, owing to wear or to other reasons, we recommend that, once you have removed the plug from the socket, you deactivate it by cutting off the supply cable. As regards the demolition procedure, we recommend you separate the various parts of the machine, depending on their nature (pla-stic, metal, etc.). Hence employ specialised firms for the disposal of the various parts.


| PROBLEM CAUSE SOLUTION | ||
| The machine does not switch on | 1. Mains switched off2. Machine selector off3. Defective connection to electric mains | 1. Place the main switch on the ON position2. Place the machine selector on the \( \text{水} \) position3. Refer to qualified staff for connection evaluation |
| Water missing the boiler | 1. Network tap closed2. Pump filter clogged3. Motor pump not working | 1. Open the network tap2. Replace filter3. Refer to qualified staff |
| Coffee not being supplied | 1. Network tap closed2. Motor pump not working3. Control unit fuse burnt out4. Unit solenoid valve not working5. Unit control not working | 1. Open the network tap2. Refer to qualified staff3. Refer to qualified staff4. Refer to qualified staff5. Refer to qualified staff |
| The nozzles do not supply steam | 1. Too much water in the boiler2. Damaged heating element3. Clogged sprayer4. Heating element protecting thermostat disconnected | 1. Refer to specific issue2. Refer to qualified staff3. Clean the sprayer4. Refer to qualified staff |
| Too much water in the boiler | 1. The pump motor remains connected2. Perforated exchanger3. Automatic filling solenoid valve blocked | 1. Refer to qualified staff2. Refer to qualified staff3. Refer to qualified staff |
| Water leakage on the counter | 1. Drain tray dirty2. Drain tube clogged or disconnected3. Other leakage | 1. Clean drain tray2. Replace drain tube3. Refer to qualified staff |
| Wet coffee grounds | 1. Too fine grinding regulation2. The unit has not warmed up yet3. Not unloaded solenoid valve | 1. Regulate grinding2. Wait for the machine to reach the required temperature level3. Refer to qualified staff |
| Boffee supply is too slow | 1. Too fine grinding regulation2. Dirty filter-holder3. Clogged unit4. Partially clogged solenoid valve | 1. Regulate grinding2. Replace the filter and clean the filter-holder more often3. Refer to qualified staff4. Refer to qualified staff |
| The coffee supply is too fast | 1. Too coarse grinding regulation | 1. Regulate grinding |
| The coffee supplied is cold | 1. Limestone on the exchangers or on the heating element2. Oxidised pressure switch contacts3. Defective electric connection4. Heating element partially burnt out5. Heating element protecting thermostat disconnected | 1. Refer to qualified staff2. Refer to qualified staff3. Refer to qualified staff4. Replace heating element5. Refer to qualified staff |
| The coffee supplied is too hot | 1. Pressure switch incorrectly set | 1. Regulate pressure switch by means of the screw provided (cap. 6.1) |
ITALIANO 11-22
ENGLISH 23-34
FRANCAIS 35 - 46
DEUTsCH 47-58
SOMMAIRE
1 - EMPLOI ET CONSERVATION DU MANUEL D'INSTRUCTIONS 37
2-FONCTIONS DE LA MACHINE 37
3-ELIMINATION 37
4-SCHEMAETCARACTERISTIQUESTECHNIQUES38
5- INSTALLATION 39
5.1 - BRANCHEMENT AU RÉSEAU PRINCIPAL DE L'EAU 39
5.2-BRANCHEMENT ELECTRIQUE 39
5.3-BRANCHEMENT DU GAZ 39
5.4-REGLAGE DU GAZ 40
6-MISE EN SERVICE 40
6.1 - REGLAGE DU PRESSOSTAT 41
6.2-TARAGE DE LA PRESSION DE LA POMPE 41
7- PREPARATION DU CAFÉ 41
8-COMMANDE DES GROUPES 42
8.1-MODELE DIAMANTE L 42
8.2-MODELE DIAMANTE S 42
8.4-MODELE DIAMANTE SV 42
9 - INSTRUCTIONS POUR LA PROGRAMMATION DU DOSAGE CAFÉ MODELE DIAMANTE SV 42
10-DEBIT DU CAFE 43
10.1 - PRE-INFUSION 43
10.1 - VERIFICATION DU PROFIL DE PRESSION DE LIVRAISON 43
11- PRELEVEMENT D'EAU CHAUBE 43
12- PREPARATION D'AUTRES BOISSONS 43
12.1 - LAIT, CAPPUCCINO ET D'AUTRES BOISSONS CHAUSES 43
12.2- THE, CAMOMILE 43
13-ENTRETIEN ET NETTOYAGE 43
13.1 - NETTOYAGE DES LANCES DE DISTRIBUTION DE LA VAPEUR 43
13.2-NETTOYAGE JOURNALIER 43
14-OPERATIONS DE NETTOYAGE HEBDOMADAIRE 43
14.1 - NETTOYAGE DU GROUPE ET DES DOUCHETTES 43
14.2-NETTOYAGE DES FILTRES ET DES PORTEFILTRES 43
14.3-NETTOYAGE DU BASSIN INFERIEUR DE DECHARGE 44
14.4-NETTOYAGE DE LA CARROSSEIRE 44
15-REMPLACEMENT DU JOINT DU GROUPE 44
15.1-MODELES DIAMANTE S-SV 44
15.2-MODELE DIAMANTE L 44
16-REMPLACEMENT DE L'EAU EN CHAUDIERE 44
17 - EMPLOI DE L'ADOUCISSEUR 44
18 - DEMANTELEMENT DE LA MACHINE 45
19-CAUSES DE MAL FONCTIONNEMENT OU ANOMALIES 46
1 - EMPLOYI ET CONSERVATION DU MANUEL D'INSTRUCTIONS
2-FONCTIONS DE LA MACHINE
La pre-infusion a ete activee.
DEACTIVATION


- Français
- INDICE
- - EMPLOYMENT AND STORAGE OF THE INSTALLER/ USER GUIDE
- 2-MACHINE FUNCTION
- - DISPOSAL
- - TECHNICAL DIAGRAM AND SPECIFICATIONS
- 5-INSTALLATION
- 5.1-WATER SYSTEM
- Caution! The machine must be supplied with water having a hardness above 8ircF degrees.
- Caution! It is not possible to use pipes and gaskets already used.
- Caution! Before proceeding with electric connection, you need to ensure that voltage meets the specifications shown in the EC plate.
- The yellow/green coloured cable should be COMPULSORILY connected to the premises earthing system.
- IMPORTANT
- 5.3-GAS CONNECTION
- 5.4-GAS REGULATION
- Machine 2 GR Machine 3 GR Machine 4 GR
- 6-STARTINGUP
- - PRESSURE SWITCH REGULATION
- Caution! Disconnect power supply before carrying out this operation.
- - PUMP PRESSURE SETTING
- 7-COFFEE PREPARATION
- 8-BREWING UNIT CONTROL
- - DIAMANTE L MODEL
- - DIAMANTE S MODEL
- 8.3-DIAMANTE SV MODEL
- 9-COFFEE DOSE PROGRAMMING DIRECTIONS FOR THE DIAMANTE SV MODEL
- UNIT CONTROL:
- 10-COFFEE DELIVERY
- - PRE-INFUSION
- ENGAGEMENT
- - HOT WATER WITHDRAWAL
- - PREPARATION OF OTHER DRINKS
- - MILK, CAPPUCCINO AND OTHER HOT DRINKS
- 12.2-TEA, CAMOMILE
- - MAINTENANCE AND CLEANING OPERATIONS
- - STEAM DELIVERY NOZZLE CLEANING
- - DAILY CLEANING OPERATIONS
- - WEEKLY CLEANING OPERATIONS
- 14.1-BREWING UNIT AND JET CLEANING
- - FILTER AND FILTER-HOLDER CLEANING
- - DRAIN TRAY CLEANING
- 14.4-CASING CLEANING
- - DIAMANTE S - SV MODEL
- 15.2-CREMA L MODEL
- - BOILER WATER REPLACEMENT
- - USE OF THE SOFTENER
- - MACHINE DEMOLITION
- SOMMAIRE
- - EMPLOYI ET CONSERVATION DU MANUEL D'INSTRUCTIONS
- 2-FONCTIONS DE LA MACHINE
- DEACTIVATION
Brand : LA PAVONI
Model : Diamante Lever 2 Groups
Category : Coffee machine