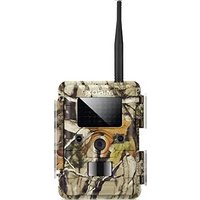
DTC 1100 - Camera MINOX - Free user manual and instructions
Find the device manual for free DTC 1100 MINOX in PDF.


| Product type | Trail camera (game camera) |
| Brand | Minox |
| Model | DTC 1100 |
| Image sensor | CMOS 5.0 MP (hardware) |
| Photo resolution | Adjustable: (4:3) 8 MP, 5 MP, 3 MP; (16:9) 6 MP, 4 MP, 2 MP |
| Video resolution | HD 1280 x 720 or VGA 640 x 480 |
| Video length | 5 to 30 seconds (adjustable) |
| IR flash | Powerful, range 18 m |
| PIR motion sensor | Adjustable to 3 levels (low, normal, high) |
| Display | 2-inch color LCD |
| External memory | SD/SDHC card up to 32 GB |
| Power supply | 12 AA 1.5 V batteries (alkaline, lithium or NiMH) |
| Connections | USB port, external power jack 6V/9V DC (min. 2000 mA) |
| Mobile network | 4G (HSPA+) / GSM, with SIM card |
| Burst mode | 1 to 5 images per trigger (adjustable) |
| Trigger speed | Less than 1 second |
| Special functions | Image sending via MMS/email, remote control via SMS, daily report, time lapse mode, password protection, date/time/temperature/moon phase stamping |
| Dimensions (H x W x D) | 101 x 149 x 55 mm |
| Weight (without batteries) | 406 g |
| Included accessories | USB cable, mounting strap, SD card, user manual |
| Mounting | By strap or tripod (no 1/4-inch screw) |
| Warranty | Legal 2 years, subject to presentation of proof of purchase |
Frequently Asked Questions - DTC 1100 MINOX
User questions about DTC 1100 MINOX
0 question about this device. Answer the ones you know or ask your own.
Ask a new question about this device
Download the instructions for your Camera in PDF format for free! Find your manual DTC 1100 - MINOX and take your electronic device back in hand. On this page are published all the documents necessary for the use of your device. DTC 1100 by MINOX.
USER MANUAL DTC 1100 MINOX
mpfanger (Recipients) 16
URL: http://10.81.0.7:8002
GateWay:195.182.114.052
APN:Wap.viaginterkom.de
Port:8080
Account loss
Account: Jeer
Password: Jeer
GPRS
APN: internet
Account:leer
Password: leer
HH =Stunde
MM =Minute
Congratulations on the purchase of your MINOX DTC 1100 trail camera. Like all other MINOX products, this MINOX DTC 1100 trail camera boasts of the traditional values fostered by MINOX. It combines functionality and best optical quality in the smallest possible space. Simple and fast operation makes the MINOX DTC 1100 ideal for digital photos and videos in the intended fields of use.
These instructions are to help you make the most of the full range of functions offered by your MINOX DTC 1100 trail camera.
Note:
We have done our best to produce a complete and accurate manual. However, we cannot ensure that there are no errors or omissions during the printing process.
- We cannot take responsibility for any damages caused by unauthorized attempts to upgrade software or for any data corruption while the product is being repaired.
Please Back Up Your Files! We cannot be held liable for the loss of data caused by damaged products or damage due to unreadable memories or drives.
Included in the purchased Package
Trail Camera MINOX DTC 1100
Mounting Strap
USB Cable
Instruction Manual
SD Memory Card
Note: The actual items may be different from the list. Package is subject to change without prior notice.
Note: Please format the SD Memory Card before you use it as described on page 27. Files on the card from other devices can affect the functionality of the camera.
Accessories (available optionally)
Adapter (EU-Version), Order no. 65016
Cable for external Battery Connection, order no.65017
Security Lock Box, Order no. 65023
For further information on the DTC 1100 accessories, go to the MINOX website: www.minox.com
Contents
Introduction
Included in the purchased Package 24
Accessories (available optionally) 24
Get to know your MINOX DTC 1100 26
Controls
Preparing your Camera 27
Explanation of the Controls 27
Inserting the Batteries 27
Checking the Battery Status 27
Inserting the Memory Card
Inserting the SIM Card 28
Mounting the Camera 28
Language Setting 28
Setup and Operating Mode 28
- Setup Mode
- Operating Mode
Menu Functions and Settings
Manual Controls
Camera
Video
Day and Night Mode
Playing Back Picture/Video
Delete Pictures or Video Clips
Replaying Video Clips
Main Menu
Camera Settings
Camera Mode
Image Resolution 30
Multiple Frames per Trigger
Video Resolution
Video Length
Shutter Lag
Illumination
PIR [Passive Infrared] Sensor:
Setting the responsivity of the IR-Sensor
Power-on Time
Time Lapse
General Settings
Language Selection
Time Stamp
Date Format / Time
Temperature Unit
Power Source
Formatting the Memory Card
24 Password
- Entering the Password 33
-Deactivating the Password 33
Default Factory Setting 33
26 Camera Data 33
Saved Files
Memory Space
Firmware Version 33
Camera Name
Software Updates 34
Mobile Service Settings
Mobile Service Settings using
the Download Tool Software 34
Send Mode 34
Send Via 35
Send To 36
Operator Parameter 36
Recipients 37
Remote Control 37
Photo Quality 39
Camera Name 39
Path 39
Testing the Mobile Phone Network
using the "Manual send" Function 40
Mobile Service Settings
using the Camera Menu 40
Send Mode 40
Send Via 41
Send To 41
Network Setup 41
Recipient Phone 41
Recipient Email 41
Network Provider 41
2G/3G Mode 42
Download Tool 42
Photo Quality 42
Remote Control 42
Connecting the Camera
to a Computer 42
Connect using the USB Cable 42
Transferring Pictures and Videos via SD Card 42
MPEG-4 Visual Patent
Portfolio License 42
Technical Data 43
Warranty Terms 43
Get to know your MINOX DTC 1100
Please take a few moments to read these instructions carefully. We wish you much enjoyment with your MINOXproduct!
- Sends images to your cell phone or per e-mail instantly
-4G/GSM Cellular Module
Built in microphone for audio on video mode - Daily report (total picture/video number get captured during the past 24 hours, the battery level and remaining storage space)
IR-flash with black filter - Adjustable motion sensor
High range IR-flash of 59 feet (18 m) - 8 megapixel resolution
Convenient 2.0" color monitor
Simple and intuitive operation,
6-button control panel
Short shutter release delay of just 1 second
Picture series and short videos
Multilingual menu navigation - SD/SDHC card up to 32 GB
Small and discreet
Low power consumption - Password protected
- Padlock lockable
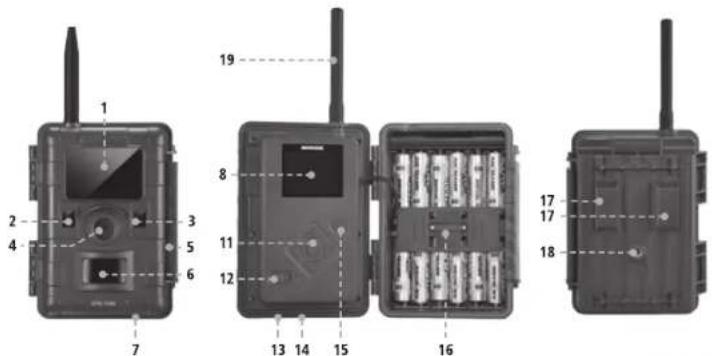
Controls
- IR LEDs with a black filter for night recordings
- Twilight sensor
- Blue activation LED
- Camera lens
- Lockable latch
- Motion sensor
- Rubber plug for external power supply
8.2"LCD color display - Memory card slot
- SIM card slot
- Control buttons, OK button
- Main switch with three positions:
Off/Setupmode/Operationalmode - Port for external power supply (6V/9VDC)
- USB cable port
- Menu button
- Battery compartment for 12 x 1.5 Volt AA batteries
- Mounting brackets
- 1/4 " tripod thread
19.Antenna
Preparing Your Camera
Explanation of the Controls
Proceed as follows to prepare the camera for use:
1. Place your DTC 1100 on a flat surface.
2. Push the latch (5) up on the right of the camera body.
3. Fold the latch (5) over to the right.
4. Open the front of the camera to the left.
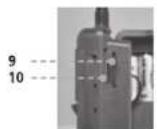
On the left of the opened camera body you will see the controls (11, 12, 15) and on the right the battery compartment (16). On the left outer edge of the camera body you can find the memory card and SIM card slots (9/10). At the top of the inner surface is the 2 LCD display (8). Below the display you will see the four directional buttons to make selections in the menu (11). In the center of these buttons you will find the OK button (11) used to confirm the selected menu settings; the oval-shaped ENTER button to the upper right (15) is to switch back to the main menu while in Setup Mode.
On the bottom left is the main switch (12) with
three positions for the following settings:
- OFF = main switch to the left
- SET = Setup Mode; main switch in the middle
- ON = Operational Mode; main switch to the right
On the bottom of the camera there are additional ports for:
external power supply (13)
USB cable (14) for attaching the camera to a computer (read more under "Attaching the camera to a computer")
To close the camera body, proceed as follows:
- Place your DTC 1100 on a flat surface in front of you.
- Fold the camera body to the right.
- Fold up the latch (5) on the right.
- Slide the latch (5) down until firmly in place.
Inserting the Batteries
Inserting the Batteries
Your DTC 1100 camera is designed for AA alkaline, lithium-ion (Li-Ion) or nickel metal hydride (NIMH) batteries. To insert the batteries, open your camera and insert twelve 1.5 Volt AA batteries into the battery compartment (16), making sure that the (+/-) poles are in the right direction.
Note: The external power source can be accessed with 6V or 9V. The batteries are bridged when the camera is connected to an externalpower source. In other words, the battery cannot be charged inside the camera, not even using a solar panel. Please do not use a 12V power source as that would damage the camera. In such a case, you have no claim under guarantee.
Checking the Battery Status
Switch the DTC 1100 into SET mode (main switch (12) to the middle). You can find the battery status symbol in the bottom left of the LCD display (8).
Note: For best results, we recommend using high quality batteries. The battery life can be prolonged by producing shorter video segments, short photo bursts or longer "quiet times" - see "Quiet Time" under "Camera Settings".
Inserting the Memory Card
Your DTC 1100 camera supports (SD/SDHC) memory cards with a capacity of up to 32 GB. Insert the memory card into the memory card slot (9) with the brass colored contacts toward the inside of the camera. Make sure that the camera is off and that the SD card is not locked.
Note: Format your SD card using your PC before every use - we suggest not to format the card with the DTC 1100 (see also "Format" under "Camera Setting"). This procedure deletes older data from the SD card and prepares your card for an error-free operation in your camera. It is recommended to record some images directly after inserting the SD card to verify the camera's functionality.
Please make sure that the camera is turned off before inserting or removing the SD card. Switch your DTC 1100 to SET (12) to continue with your camera settings.
Inserting the SIM Card
To send photos with your DTC 1100, you will need an activated SIM card from a mobile phone provider of choice. You can use a prepaid card or a phone plan card. Make sure that the card used for the DTC 1100 is activated to send MMS messages. It is also important that this card is not locked with a PIN. Insert the SIM card into the correct slot (10) with the chip towards the front of the camera. A schematic imprint of the proper card position is indicated next to the card slot.
Note: MINOX assumes no responsibility for any costs that may arise in connection with the use of mobile telephone networks.
Note: Please make the sure the camera is turned off before inserting or removing the card.
Mounting the Camera
1. Mounting strap
On the back of the camera are two mounting brackets (17) for fixing the camera to a tree or post with a strap or mounting harness. Pass the mounting strap (included in the scope of delivery) through the two brackets, around a tree or post and fasten tightly with the buckle.
2. Tripod
On the back of the camera is a 1/4 tripod thread (18) for mounting the camera on a tripod.
Language Setting
Since the Trail Camera DTC 1100 comes with default factory settings with an English menu, follow these steps to make the right language selection:
- Bring the main switch (12) to the switch setting "SETUP" mode.
- You will directly be brought to "manual Activation" option in the camera.
- Now press the menu key (15). You will be directed to the main menu of the camera.
- Now press the arrow key to the right (11) to change the tab in the "Main Menu".
- Then press the arrow key (11) facing downward.
- Now it shows the highlighted menu option "Language".
- Press the OK button (11).
- Using the down arrow key (11) select "German" (highlighted).
- Press the OK button (11).
- The camera will return to the "Main Menu". The language has been set to "German".
Setup and Operating Mode
Your Camera has two Main Modes:
1. Setup Mode
Switch your DTC 1100 camera to the "Setup Mode" (SETUP = setup mode, main switch (12) in centre position). You will be directed to the "Manual controls" of the camera. Press the menu button (15) to get to the main menu of the camera. You can alternate between three tabs in the main menu by activating the right and left arrow keys (11). The tab currently selected is highlighted in green. Under the first tab displaying the "Camera Icon" you can adjust the settings directly relevant to the functioning of the camera. This tab will hereinafter be referred to as "Camera Settings". The second tab showing the "Hammer and Wrench icon" allows you to adjust all the other settings. This will hereinafter be referred to as "General Settings". This mode allows you to program the camera and undertake all display settings such as date, time, temperature, etc. that are supposed to be displayed later on the pictures or video clips. The third tab showing the letter "N" for network (mobile phone network) allows you to specify all settings for the mobile phone connection and the send parameters for pictures. This will hereinafter be referred to as "Mobile Service Settings". Use the Up/Down arrow keys (11) to access the individual menu options of the tabs. To change the tabs once a menu option has been selected (highlighted), press the left arrow key (11) once. The camera will return to the previous selection menu. Only that option is now highlighted in green. Now you can use the Right/Left arrow key (11) to move between the tabs "Camera Settings", "General Settings" and "Mobile Service Settings", and select the desired menu options with the Up/Down arrow keys (11).
2. Operating Mode
Switch your DTC 1100 camera to the "operation mode" (ON = operation mode, main on/off switch (11) right hand side). In this mode, your DTC 1100 camera automatically accepts the new settings you previously programmed in the "SETUP" mode.
Note: The blue activating LED (3) will blink for a few seconds before the camera is ready for use.
Menu Functions and Settings
Manual Controls
This setting offers you the possibility of using your DTC 1100 like a normal digital camera. As in any other normal digital camera, you can view the digital stills and video clips on the display monitor and accept them at the same time. Once your DTC 1100 is in the "SETUP" mode (see the section on Setup and Operation mode), it is immediately in the "Manual Controls" mode. You can use the right (photo) and left (video) arrow keys (11) to move between the "photo" and "Video" mode. You can change the image resolution of the picture by repeatedly activating the respective arrow key. Pressing the menu key (15) again will allow you to get to the "Manual Controls" mode.
Camera
The LCD monitor (8) displays the following information: The camera icon and the current screen resolution appear at the top left edge and the top right edge displays the image capacity (0000/0000). The battery level is shown at the bottom left edge. By pressing the OK button (11), you can manually take a picture in the camera mode.
Video
To switch to the "Video Mode", press the left arrow key (11). The LCD monitor (8) displays the following features: The video icon and the current screen resolution appear at the top left edge and the top right edge displays the remainder of the recording time in [00:00:00]. The lower left edge displays the battery level. By pressing the OK button (11), you can start recording in the "Video Mode". By pressing the OK button (11) again, you stop recording.
Day and Night Mode
In the "Manual Control" mode, you can use the Upkey (11) to activate the day or night mode. The default setting on your DTC 1100 is the "Day Mode" (colour mode). Photos or video clips are displayed in colour. To switch to the "Night-IR Mode", press the top arrow key (11). The setting changes from colour mode during the day to the Night IR mode and the image displayed on the LCD monitor (8) changes from colour image to a blackwhite image.
Note: In the operation mode (main switch (12) right), the camera uses the twilight sensor to automatically select the appropriate mode corresponding to the time of the day.
Playing back Picture/Video
In the "Manual Control" mode, press the lower arrow key (11) or select "Playback Picture/Video" in the selection menu for the "Camera Mode", which is located in the "Main Menu" under the first tab "Camera Settings". The pictures are displayed on the LCD monitor (8). The picture format (photo/video) is displayed at the bottom left edge of the image as the camera icon. In addition, the top right edge of the LCD monitor (8) shows the number of photos and video recordings.
Press the left or right arrow key (11) to view the pictures and video clips in the chronological or reverse order. Press the menu button (15) to access "Main Menu". By repeating that action, you will be able to return to "Replay photo/video". You can return to the "Manual Controls" mode by again pressing the lower arrow key (11).
Delete the Picture or Video Clips
Press the lower arrow key (11) in the "Manual Controls" mode or select "Playback Photo/Video" option in the "Camera Mode", which is located under the "Camera Settings" tab in the "Main Menu".
Select the picture to be deleted. By pressing the upper arrow key (11), you access the lower menu option "File Management". You can use the Up and Down keys (11) to choose between "1 Delete the picture" and "Delete all". Confirm with OK (11). Select "Yes" and confirm with OK (11) to delete the picture (pictures) or the video (videos). If you select "No" and confirm, you will brought back to the submenu "File Management". Using the left arrow key (11) you can return to the Yes/No menu selection in the previous menu option "File Management" and from "File Management" back to "Manual Control". Using the left arrow key (11) you can return to the previous menu selection "File Management" or "Manual Control". By pressing the menu button (15), you can directly return to replay photo/video option in the menu from anywhere without deleting the file.
Replaying Video Clips
Press the lower arrow key (11) in the "Manual Control" mode or select "Playback Photo/Video" in the "Camera mode" menu option that is located in the "Main Menu" under the first tab "Camera Settings". In case of video files, you can see a "Camera Icon" at the lower left edge of the LCD monitor (8). Press the OK button (11) to play the video. Pressing the Up arrow key (11) to stop the video. The image freezes.
You can restart the video by again pressing the Up row key (11). In the playback mode, the video can be forwarded using the right arrow key (11) or rewind with the left arrow key (11). The playback speed can be adjusted by pressing the arrow keys several times. By pressing the Up arrow key (11), you can continue to play the video clip at regular speed. By pressing the menu buttons (15) while playing the video clip, you can return to "Playback Picture/Video". By pressing the menu buttons (15) in the "Playback Picture/Video" mode, you can return to the main menu selection, by repeating the action, you return to "Playback Picture/Video". You can access the "Manual Control" mode by again pressing the lower arrow key (11).
Main Menu
Camera Settings
Camera Mode
You can set your DTC 1100 to record either still image or video clips. Go to the "Main Menu" by pressing the menu button (15) and from the menu options select the "Camera Mode". It is located under the first tab "Camera Settings". You can access the submenu options by pressing the OK button (11) or the right arrow key (11).
Here you can select the desired recording format (Photo/Video) using the Up/Down arrow keys (11). You can save the setting by continuing to press the OK button. To return to the previous menu options without changing the settings, press the left arrow key (11).
Note: Alternatively, you can select the camera mode in the "Manual Control" mode by pressing the right (Photo) or left (Video) arrow key (11).
Image Resolution
Go to "Main Menu" by pressing the menu button (15) and select the menu option "Image Resolution". This is located under the first tab "Camera Settings". You can access the submenu by pressing the OK button (11) or the right arrow key (11). This setting allows you to set the image resolution at 8 MP, 6 MP, 5 MP, 4 MP, 3 MP, 2MP by using the Up/Down arrow keys (11). Press the OK button (11), to save the setting and to return to the menu option "Camera Setting". Press the left arrow key (11) to return to the previous set of menu options without changing the settings.
Note: Alternately, you can change the image resolution of the pictures in the "Manual Control" mode by continuing to press the right arrow key (11).
Note: For resolutions measuring 8 MP, 5 MP, 3 MP, the picture format is 4:3; for resolutions 6 MP, 4 MP, 2 MP, the picture format is 16:9.
Multiple Frames per Trigger
Using this function, the camera can capture up to five frames per activation in quick succession. Go to the "MainMenu" by pressing the menu buttons (15) and select the menu option "Multiple Frames". This is located under the first tab "Camera Settings". You can access the submenu options by pressing the OK button (11) or the right arrow key (11). The submenu offers the option of selecting the desired number of frames to be captured per trigger by pressing the Up/Down arrow keys (11). Press the OK button (11) to save the settings and to return to the menu option "Camera Settings". Press the left arrow key (11) to return to the previous menu selection without changing the settings.
Video Resolution
Go to "Main Menu" by pressing the menu button (15) and select the menu option "Video Resolution". This is located under the first tab "Camera Settings". You can access the submenu by pressing the OK button (11) or the right arrow key (11). You can choose between video resolution in HD (1280x720) and VGA (640x480) using the On/Off arrow keys (11). Press the OK button (11) to save the setting and to return to the menu selection "Camera Settings". By pressing the left arrow key (11), you can return to the previous menu selection without changing the settings.
Note: Alternatively, you can choose video resolution by continuously pressing the left arrow key (11) in the "Manual Control" mode.
Video Length
Go to the "Main Menu" by pressing the menu button (15) and select the menu option "Video Length". This is located under the first tab "Camera Settings". You can access the submenu by pressing the OK button (11) or the right arrow key (11). Enter the desired video length (5 - 30s.) using the Up/Down arrow key (11) and press the OK button (11) to save the settings. The camera will automatically return to the menu option "Camera Settings". You can return to the previous menu option without changing the settings by pressing the left arrow key (11).
Shutter Lag
This function allows you to specify the length of the time between two pictures when your camera does not respond to movement. The options for programming the sequential shooting intervals extend from 1 second to 60 minutes. Go to "Main Menu" by pressing the menu button (15) and select the menu option "Shutter Lag". This can be found under the tab "Camera Settings". You can return to the submenu by pressing the OK button (11) or the right arrow key (11). In the submenu, choose the desired time interval using the On/Off arrow keys (11). Press the OK button (11) to save the setting and to return to the menu option "Camera Settings". By pressing the left arrow key (11), you can return to the previous menu selection without changing the settings.
Illumination
Your DTC 1100 cannot access external illumination; please always select "Internal". Should you nevertheless select "External", the flash will remain deactivated even in the dark and you will get only black pictures at night.
PIR [Passive Infrared] Sensor: Setting the responsivity of the IR Sensor
Your MINOX DTC 1100 allows you the possibility of adjusting the responsivity of the IR sensor at three levels—low, normal, and high. This function is effective, for instance, for reducing the possibility of an inadvertent activation of the camera through movements of non-relevant objects, such as the branches and grass. In order to set the responsivity of the IR sensor to your DRC 1100, please go to the "Main Menu" by pressing menu button (15) and select the menu option "PIR-Sensor". This is located under "Camera Settings". You can access the submenu by pressing the OK button (11) or the right arrow key (11). Here you can choose between the "low", "normal", and "high" by pressing the Up/Down arrow keys (11). To save the settings press the OK button (11) and you will return to the menu option "Camera Settings". You can return to the previous menu selection without changing the settings by pressing the left arrow key (11).
Note: The detection range of the IR sensor depends on external factors, such as the temperature in the camera environment. For rough orientation to attain optimal setting, we recommend the following adjustments for the IR sensor:
High (high responsivity): generally in summer time or when the ambient air temperature is close to the body temperature of the detected object.
Normal (mid-level responsivity): generally at average spring or fall temperatures
Low (low-level responsivity): generally during winter or at average winter temperatures
Power-on Time
This setting allows you to program your DTC 1100 to enable it to switch on and off at intervals desired by you. During these time intervals, the camera takes pictures only if the movement sensor is activated through movement. Go to "Main Menu" by pressing the menu button (15) and select the menu option "Power-on time". This is located under "Camera Settings". Press the OK button (11) or the right arrow key (11) to access the menuAs the menu gradually opens, you can choose "Deactivate" or "Activate" using the Up/Down arrow keys. Confirm your choice with OK (11). Select "activate" to set the switch-on and switch-off time with the Up/Down arrow keys (11) and press OK to confirm. Such a window requires individual settings to be undertaken using the Up/Down arrow keys (11). To continue to the next step, press the left or right arrow key (11). Press the OK button (11) to save the settings. The camera will automatically return to the Start Menu. Pressing the Menu button (15) will have the same effect as saving by pressing the Ok button (11). Even here, the last saved setting will be accepted and you will return to the Start Menu "Activate", "Deactivate". You can access the menu option "Activate" without changing the settings by using the left arrow key (11). When you select "Deactivate" and confirm using the OK button (11) your camera remains active and you will be returned to the main menu.
Time Lapse
This setting allows you to take pictures at set periods at predetermined intervals without having to activate the movement sensor Go to the "Main Menu" by pressing menu button (15) and select the menu option "Time Lapse". This is located under "Camera Settings". You can access the submenu by pressing the OK button (11) or the right arrow key (11). As the submenu opens, select between "activate" and "deactivate" using the Up/Down arrow keys (11). Confirm your selection with OK (11). If you select "activate" you have the possibility of choosing "Switch-on Time", "Switch-off Time", or "Delayed Interval". Confirm your selection with OK (11). The switch on and off time can be programmed using the Up/Down arrow keys (11) and confirmed with OK (11). To continue, use the left or right arrow key (11). In order to save the setting, press the OK button (11). The camera will automatically be returned to the Start Menu.
Press the menu button (15) and you can have the same effect as saving with OK (11). Even here, the last saved setting will apply and you will be returned to the Start menu. Using the menu option "Delayed interval" under the option "Activate", you can specify the time period between the pictures. This period can range between 10 seconds and 12 hours. By pressing the OK button (11), the setting will be saved and the camera will return to the previous menu selection by pressing the left arrow key (11) without changing the settings. The time-lapse function remains inactive if you select "Deactivate" and confirm that selection with OK (11).
Note: DTC 1100 will continue to respond to movement if the time lapse is activated.
General Settings
Language Selection
Please proceed as follows to change the language settings on your DTC 1100:
1. Bring the main switch (12) in the switch setting to the "SETUP" mode.
2. You will be immediately directed to "Manual Control" of the camera,
3. Now press the menu button (15). You will get to the "Main Menu" of the camera.
4. Then press the arrow key to the right (10) to change over to the "General Settings"
5. Now press the arrow key (11) pointing downwards.
6. You are now in the highlighted menu option "Language".
7. Press the OK Button (11)
8. Using the Up and Down arrow keys (11), choose the language (highlighted) of your choice
9. Press the OK button (11).
10. The camera will now have saved the language you select and you will again be led to the "MainMenu". You will return to the previous menu selection by pressing the left arrow key (11) without affecting the settings.
Time Stamp
This setting allows you to archive and display details like date, time, and temperature as "time Stamp". Go to the "Main Menu" by pressing the menu button (15) and select the menu option "time Stamp". It is located under the second tab "General Settings". You can access the submenu by pressing the OK button (11) or the right arrow key (11). Under this menu option you can choose between "On" (Display time stamp) or "Off" (Do not display the time stamp). Pres the OK button (11) to save the setting and return to
32
the menu option "General Settings". You can access the previous menu option by pressing the left arrow key (11) without changing the settings.
Date format / Time
Menu option "Settings") This function allows you to set up the display format for date and time. Go to "MainMenu" by pressing the menu button (15) and select the menu option Settings". It is located under the second tab "General Settings". You can access the submenu by pressing the OK button (11) or the right arrow key (11). You can program the settings for date, time, date and time format (12 or 24 hours) using the Up/Down arrow key (11). Use the left and right arrow key (11) to access the option you would like to activate. Press the OK button (11) to save the setting and you will return to the menu option "General Settings". Press the menu button (15) to have the same effect as saving with OK (11). Even here, the settings last saved will be accepted and you will be returned to the menu option "General Settings".
Note: Activate the moon phase calendar by entering precise information. The image of the moon phase will appear on every picture or video clip.
Temperature Unit
This function allows you to set either Fahrenheit or Celsius as the unit of temperature. Go to the "Main Menu" by pressing the menu button (15) and select the menu option Temperature Unit. It is located under the second tab "General Settings". You can access the submenu by pressing the OK button (11) or the right arrow key (11). Press the Up/Down arrow key (11) in the submenu to select either the Celsius or Fahrenheit option. Press the OK button (11) to save the settings to return to the menu option "General Settings". You can return to the previous menu option without changing the settings by pressing the left arrow key (11).
Power Source
Your DTC 1100 trail camera is a high precision device of premium technical quality. It is strongly recommended that you use premium quality alkaline, lithium or NiMH batteries. In order to select the battery type, go to the "Main Menu" by pressing the menu button (15) and select the menu option "Power Source". This is located under the second tab "General settings". You can access the submenu by pressing the OK button (11) or the right arrow key (11). Now select your battery type by choosing between lithium, alkaline and NiMH batteries by pressing the Up/Down arrow key (11). In addition, you can select an external power source. For that, select DC 6V.
Note: Choose alkaline if using lithium batteries.
Press the OK button (11) to save the settings. The camera will automatically return to the Start menu. You will return to the previous menu without any changes to the settings by pressing the left arrow key (11).
Formatting the Memory Card
Formattting the memory card will delete all data on the memory card and will prepare the memory card for use in the camera. It is recommended that you format the memory card before each use. Go to the "Main Menu" by pressing the menu button (15) and select the option "Format SD Card". This is located under the second tab "General Settings". You can access the submenu by pressing the OK button (11) or the right arrow key (11). Select "Yes" if you would like to format the SD card or "No" and the memory card will not be formatted. Press the OK button (11) to save the settings. The camera will automatically revert to the Start Menu. By pressing the left arrow key (11), you will be returned to the previous menu option and no formatting will be undertaken.
Password
This function allows you to enter a 4-digit number combination in order to prevent the theft of your DTC 1100 camera. You will not be able to access the "SETUP" option (Main Switch (12) centre) for the camera without entering the number combination. Go to the "Main Menu" by pressing the menu button (15) and select "Password". This is located under the second tab "General Settings". You can access the submenu by pressing the OK button (11) or the right arrow key (11). You can choose a number combination in the submenu after selecting "Enter password". For that, confirm this menu option with OK (11).
- Entering the Password
Enter the desired number combination (0-9) in each field using the Up/Down arrow keys, and using the right/left arrow keys you can control the individual fields of the number combination. Once you enter the entire combination, press the OK button (11) to save.
- Deactivating the Password
Select the menu option "Password" in the "Main Menu", which you can retrieve by pressing the menu button (15). This is located under the second tab "General Settings". You can access the submenu by pressing the OK button (11) or the right arrow key (11). You can delete your number combination under "Deactivate" in the submenu. Use the Up/Down arrow keys (11) to navigate in the submenu. Press
OK (11) to delete your number combination. You can return to the previous menu selection by pressing the left arrow key (11) without changing the password.
Default Factory Setting
With this, you can restore your DTC 1100 settings to factory settings. Go to the "Main Menu" by pressing the menu button (15) and select the menu option "Default Settings". This is located under the second tab "General Settings". Press the OK button (11) or the right arrow button (11) to access the submenu. You can select "Yes" or "No" using the Up/Down arrow keys (11) and confirm with OK (11). Select "No" to retain the existing settings and the camera will return to the previous menu selection. If you choose "Yes", your DTC 1100 shall be restored to the factory settings and revert to the second tab "General Settings" in the "Main Menu".
Camera Data
Go to the "Main Menu" by pressing the menu button (15) and select the menu option "Camera info". This is located under the second tab "General Settings". You can access the submenu by pressing the OK button (11) or the right arrow key (11). In the submenu, you can use the Up/Down arrow key (11) and select from the following data stored in your camera; Saved files, memory space, firmware version and camera name.
-SavedFiles
Go to the submenu on the menu option "Saved files" and press the OK button (11) or the right arrow key (11). After that, the actual number of photo and video files will be displayed. Confirm using the OK button (11) or the left arrow key (11) to return to the Start Menu.
-MemorySpace
Go to the menu option "Memory" in the submenu and press the OK button (11) or the right arrow key (11). Subsequently, "Used Memory Space" and "free memory space" will be indicated. Press the OK button (11) or the left arrow key (11) to confirm and return to the Start menu.
-Firmware Version
Go to the menu option "Firmware Version" in the submenu and press the OK button (11) or the right arrow key (11). You will then be shown the current Firmware Version. Confirm with OK (11) or using the left arrow key (11) to return to the Start menu.
-CameraName
Go to "Camera Name" in the menu option "Camera Data" and press the OK button (11). Here you can select between "Activate" and "Deactivate". Confirm your selection with OK (11). If you select "Deactivate", the "Camera name function" is switched off. If you select "Activate", this will take you to the input field. Here you can select the camera name settings using the Up/Down arrow keys (11). Use the left and right arrow key (11) to access the option you would like to activate. The camera name consists of four digits. Confirm with OK (11) to save the input. You will be brought back to the previous menu. Select "Deactivate" to deactivate the camera name function.
Software Updates
If an update is available for your DTC 1100, please proceed as follows: Make sure your DTC 1100 is switched off ("OFF" function: Main Switch (12), left). Copy all the files needed for updating to your PC into the root list of a formatted SD card. Insert the SD card into your DTC 1100 as described in the section "Using the Memory Card". Bring your camera into the "SETUP" mode (Main Switch (12), centre). Go to the Main Menu by pressing the menu button (15) and select the menu option "Updates". This is located under the tab "General Settings". Press the OK button (11) to access the submenu. Using the Up/Down arrow keys, you can select "Yes" or "No" and confirm with OK. (11). Select "No" to retain the existing software version and the camera will return to the previous menu selection. If you select "Yes", your DTC 1100 will begin installing the updates. The update installation is completed once your camera screen turns black. Please switch your DTC 1100 now to "OFF" function: Main Switch, left. When you switch on the camera the next time in the "SETUP" mode, Main Switch (12), centre, the new software is ready for use. Press the left arrow key (11) to return to the previous menu without installing the updates.
Note: Please note that the process described above must be followed precisely. Any deviation or infringement may cause the update configuration to fail. You may not be able to use the camera. In that case, all warranty claims will be void.
Mobile Service Settings
Mobile Service Settings using the Download Tool Software
With the Download Tool, you can set your DTC 1100 to send photos via a mobile phone network. For a quick and basic configuration, most settings can also be made directly on the camera (see next point "Mobile Service Settings (Camera Menu)").
How to use the Download Tool:
- To configure the camera via the Download Tool, insert an SD card and a SIM card into the camera and use the main switch (12) to select the "Setup Mode".
- In the main menu of the camera, which you can reach by pressing the menu button (15), select the third tab "Mobile service settings". In the tab menu select "Download Tool" (highlighted) and confirm with OK (11).
- As the submenu opens, select "Yes" and confirm with OK (11). The Download Tool will then be saved onto the SD card as a ZIP file.
- Turn the camera off, remove the SD card and read it on a computer (either by using an SD card reader or directly in the SD card slot on your computer).
- Unzip the "DTC_TOOL.zip" file directly from the SD card and run the "DTC_TOOL.exe" file.
Note: Please make sure the camera is turned off before inserting or removing the SD card.
Send Mode
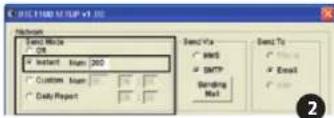
If "Send Mode" is off [Fig. 1], the mobile service function is deactivated and you cannot send photos via your mobile phone network card. If "Instant" has been selected, you can have the photos sent immediately to predefined telephone numbers or email addresses. When choosing "Instant" [Fig. 2], you must define the maximum number of photos that can be sent within the following 24 hours. If for example you define 10, the first 10 photos made with the DTC 1100 will be sent. Photos made in the ensuing 24 hours after the tenth photo will be saved on the SD card and not be sent.
Note: It is not possible to send more than 200 photos per 24 hours.
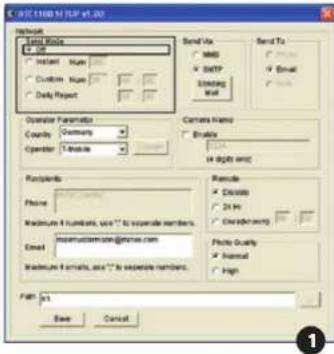
If you have chosen "Custom" [Fig. 3], you can define a specific time when the photos should be sent. Here too, you must define the maximum number of photos that should be sent at the set time. As in this example, the first 10 photos made with the DTC 1100 will be sent at 09:30 to the predefined phone numbers or email addresses.
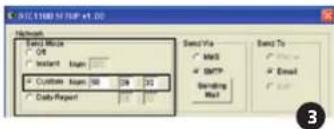
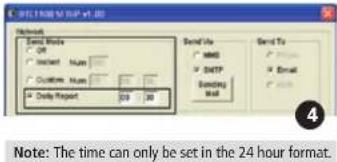
Note: The time can only be set in the 24 hour format and the maximum number of photos that can be sent cannot exceed 50.
With "Daily Report" [Fig. 4], you can have a daily report of the most important data sent to your mobile phone per text message (SMS) at the predefined time. The report contains for example the number of photos that have been made during the previous 24 hours, battery status and remaining memory space on the SD card.
Send Via
Your DTC 1100 offers you two options to send your photos - either as an MMS or via SMTP. Depending on the phone card plan and options, each MMS might be charged to your "normal" phone bill, whereas files sent via SMTP will require a data plan from your provider. For both options however, you can specify multiple destinations. If you have chosen to send your photos per MMS, the images will be sent to the predefined telephone numbers and/or email addresses. You can define up to four telephone numbers as well as up to four email addresses. If you have chosen to send your files via SMTP, your photos will be sent only to a maximum of four predefined email addresses - your phone card must include a data plan before you can use this option. If you have selected to have your files sent via SMTP, a reminder will appear requesting you to set up the sender's email address (Sending Email) [Fig. 5].
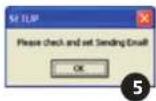
Click on OK and click on "Sending Email". Please enter the access data for the sending email address [Fig. 6]. Please make sure that the correct SMTP server is entered as these types of servers require authenrication via a username.
We suggest using the following log-in data:
Email: smtp@minox-dtc.de
Account: smtp@minox-dtc.de
Password: MinoX-DTC
SMTP Server: Smtp.strato.de
SMTP Port: 25
Use SSL: No
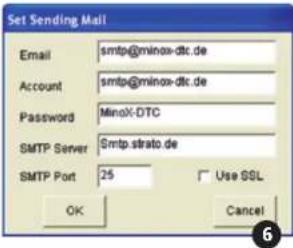
Note 1: Please enter the complete email address in the "Email" and "Account" fields - the account name is the same as the email address.
Email: smtp@minox-dtc.de Account: smtp@minox-dtc.de
Please make sure to enter the password using the upper and lower case letters (MinoX-DTC).
Note 2: If you use a different email address and it uses an SSL security protocol, you must tick the box "Use SSL". If you do not do this, the camera will not be able to send pictures. For more information, please contact your email provider.
When you have entered all the information, confirm with "OK" to save the data.
Send To
Here you can define whether the DTC 1100 should send your photos to a telephone number, an email address or to both. If you have chosen "Phone", your DTC 1100 will send the images to a maximum of 4 telephone numbers. If you have chosen "Email", your DTC 1100 will send the images to a maximum of 4 email addresses. If you have chosen "Both", your DTC 1100 will send the images to a maximum of 4 telephone numbers and up to 4 email addresses simultaneously.
Note: If you choose the SMTP option, you can send images only to email addresses and not to telephone numbers—the options "Phone" and "Both" are not possible.
Operator Parameter
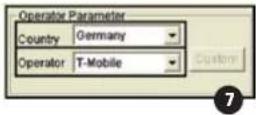
Your DTC 1100 has been pre-configured to selected mobile phone providers around the world. You can select the pre-configured settings for your country [Fig. 7] or manually configure your camera if your provider is not listed. First select your country and then your provider in the drop-down lists.
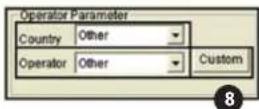
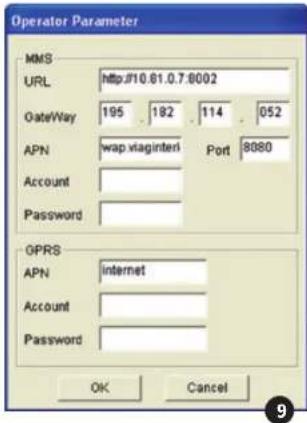
If your provider is not listed, select "Other" in both the "Country" and "Operator" dropdown lists [Fig. 8]. Next, click on "Custom" to open the "Operator Param" window [Fig. 9].
Enter the required parameters and click on "OK". You can get the necessary parameters from your provider. Here is an example of parameters for O2 in Germany:
MMS
URL: http://10.81.0.7:8002
GateWay:195.182.114.052
APN: wap.viaginterkom.de
Port:8080
Account: blank
Password: blank
GPRS
APN: internet
Account: blank
Password: blank
Recipients
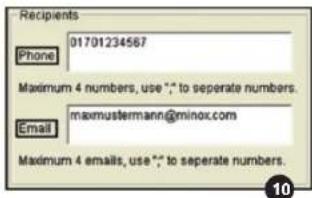
"Recipients" are the telephone numbers and/or email addresses that are to receive your photos [Fig. 10]. You can enter a maximum of 4 numbers and 4 email addresses. Please use only a semicolon ( ; ) to separate the recipients from one another and no other symbols or blank spaces.
Remote Control
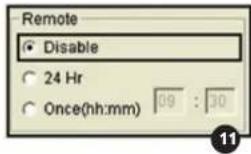
This function allows you to change certain settings of the DTC 1100 via an SMS text message [Fig. 11]. You can program the camera so that the message is read every day at a defined time (once) or accepted by the camera 24 hours (24 hrs). If you do not want to activate the remote control, select "Disable".
Note: if you select the 24 hour mode, the camera consumes more energy and the batteries will run out more quickly.
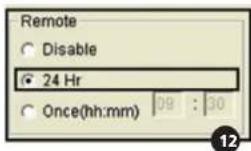
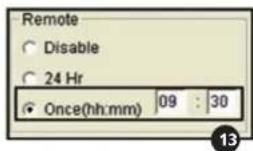
As soon as the commands have been carried out by the DTC 1100, you will receive a confirmation SMS to the recipient telephone number.
Note: If you have sent multiple SMS commands in one day, in 24 hour mode, only the most recent command will be carried out should a conflict occur. If no conflict occurs, all commands will be carried out. For example, you can change the image resolution and the time lapse settings in parallel (no conflict). If you change the send mode to "Off" and also change the time lapse settings, only the last command will be carried out (conflict).
Note: Avoid sending more than one SMS command to the DTC 1100 per day. The time can only be set in the 24 hour format.
The SMS commands you send to DTC 1100 must be formulated in the following pattern:
| Text Message Command Protocol Example | ||
| Send Mode | ||
| Off #SMOFF# #SMOFF# | ||
| Instant #SMMINNN# #SMIO50# | ||
| Customized #SMCHHMMNN# #SMC093030# | ||
| Daily Report #SMDHHMM# #SMD1930# | ||
| Change Remote Control Mode | ||
| Disable #RTOFF# #RTOFF# | ||
| 24 Hour #RT24# | #RT24# | |
| Once | #RT1HHMM# | #RT11130# |
| Change Time Lapse Setting | ||
| Disable #TLD# | #TLD# | |
| Change interval time | #TLNNNN# | #TL060M# |
| Reset time lapse setting | #TLSHHMMEHHMMINNN# | #TLS0530E2130I120# |
| Change Sending Photo Resolution | ||
| To normal | #PQN# | #PQN# |
| To high #PQH# | #PQH# | |
| Featured command | ||
| Snapshot | #SNAP# | #SNAP# |
Send Mode
= Begin of SMS command
SMOFF = Send mode "Off"
SMI = Send mode "Instant"
SMC = Send mode "Custom"
SMD = Send mode "Daily report"
End of SMS command
HH=Hour
MM = Minute
NN or NNN = maximum number
Change Remote Control Mode
= Begin of SMS command
RTOFF = Remote control "Off"
RT24 = Remote control "24 hours"
RT1 = Send mode "Once"
End of SMS command
HH=Hour
MM = Minute
Change Time Lapse Setting
Begin of SMS command
TLD = Time lapse "Off"
TL***M=Change interval time (M = minutes)
TLS****E****I*** = New configuration of time lapse
settings (S = start; E = end; I = interval)
End of SMS command
HH=Hour
MM = Minute
NNN = Interval time (unit in minutes)
Change Sending Photo Resolution
= Begin of SMS command
PQN = Photo quality normal
PQH = Photo quality high
End of SMS command
Featured Command
= Begin of SMS command
SNAP = Snapshot resolution
End of SMS command
For example, the command "#SMC093030#" will change the send mode to "Custom" which should be implemented at 09:30 to send a maximum number of 30 images. The command #TL060Mtf changes the time interval size to 60 minutes. The maximum time interval size is 720 minutes (12 hours).
Note 1: You must keep to the exact formula when sending text message commands to your DTC 1100, otherwise they will not be carried out. All letters must be in uppercase.
Note 2: If you have changed the send mode to "Off" via Remote Control, you will not be able to change the send mode per text message again unless you change the send mode manually.
Note 3: If you have changed the mode of the remote control to "Off", it will not be possible to operate the DTC 1100 using the remote control function. If you want to do so, you must manually change the camera to another mode.
Note 4: The snapshot command "SNAP" takes a picture which is then sent to the registered phone number or email address.
Photo Quality
Your DTC 1100 allows you to change the quality of the sent images. For everyday use, the "Normal" quality setting is sufficient [Fig. 14]. If you select "High", the camera will require longer to send the images, and also therefore consume more energy [Fig. 15].
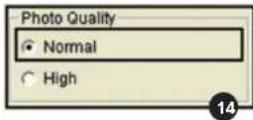
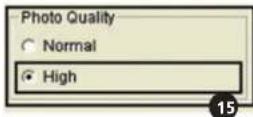
Photo Quality: Normal
Photo Quality: High
| Original Photo Resolution | Photo Size | Estimated file Size | Photo Size | Estimated file Size |
| 8 MP | 800 x 600 | 40 - 60K | 1600 x 1200 | ~150-300K |
| 5 MP | 640 x 480 | 30 - 50K | 1280 x 960 | ~120-250K |
| TL (4:3) | 640 x 480 | 30 - 50K | 1280 x 960 | ~120-250K |
| 6 MP | 768 x 432 | 30 - 50K | 1536 x 864 | ~120-200K |
| 4 MP | 640 x 360 | 30 - 50K | 1280 x 720 | ~120-200K |
| TL (16:9) | 640 x 360 | 30 - 50K | 1280 x 720 | ~120-200K |
Note: Some mobile providers may not support sending pictures via MMS function in high quality.
Camera Name
You can give the camera a name that will appear in the info bar of each picture on the right next to temperature [Fig. 16].
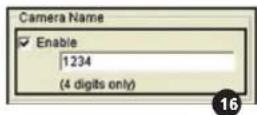
Note: Only the digits 0-9 are permitted. Please do not use blank spaces between the digits.
Path
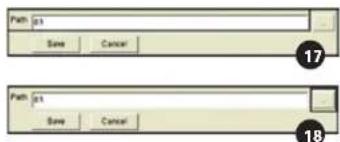
When you have finished entering the desired data, click on "Save". A file named "SETUP.bin" will be created. You can specify the location to save the file by directly entering it in the "Path" [Fig. 17] field, or by clicking on the "... button [Fig. 18]. As the location to save the "SETUPbin" file, select the root directory of the SD card (not DCIM). Insert the SD card into your DTC 1100 as described in the section "Inserting the Memory Card". When you switch on the camera in "Setup" mode (main switch (12) in centre position), the message "Update Success" appears in the display (8) after a few seconds. Your DTC 1100 has now accepted the settings.
Testing the Mobile Phone Network
-
Push the main switch (12) to "SET".
-
The DTC 1100 is now in the Manual Release mode. If a SIM card has been inserted, the camera will begin searching for available mobile phone networks. If the "Send Mode" has been switched to "Off", during the "Mobile Service Setup" procedure, the camera will not search for a network. If "Instant" or "Custom" has been activated, you will see "Searching for Network" in the display (8). As soon as the DTC 1100 has found a network, you will see the network's name in the bottom of the display (8). If a network could be found, you will see "Network Not Found" and then "Login Failed".
Note: If the camera is unable to find a network after several attempts, either the network signal is too weak or the SIM card you are using is not compatible with the DTC 1100.
- Press the lower arrow key (11) in the "Manual Control" mode or select "Playback Video" in the "Camera Mode" menu option that is located under the first tab "Camera Settings". Use the LEFT/RIGHT arrow buttons (11) to select the photo you would like to send and push OK (11). You will see "Sending" in the display (8). The photo will now be sent to the predefined recipients. After the photo has been successfully sent, you will see "Send Over" in the display (8) or "Send Fails" if the photo could not be delivered.
Note: Depending on signal strength, the delivery of the photo can take from 5 to 60 seconds. Sending photos via SMTP always takes more time than via MMS.
Mobile Service Settings using the Camera Menu
As an alternative to the Download Tool, you can make the basic SMTP settings directly with your DTC 1100 under the third tab.
Send Mode
Go to "Main Menu" by pressing the menu button (15) and select the menu option "Send Mode". This is located under the third tab "Mobile Service Settings".
Press the OK button (11) or the right arrow key (11) to access the submenu. Here you can choose between four modes:
- Off
- Instant
3.Customized - Daily Report
Use the UP/DOWN arrow buttons (11) to select the mode you wish to use and push OK (11).
- If "Send Mode" is off (see "Off"), the SMTP function is deactivated and you cannot send photos via your mobile phone network. The DTC 1100 will return to the menu "Mobile service settings".
- Select "Instant" and verify with OK (11) to have the photos sent immediately to the predefined recipients after they have been taken. Use the UP/DOWN arrow buttons (11) to define the maximum number of photos that can be sent within the following 24 hours. Use the UP/DOWN arrow keys (11) to define the number and confirm with OK (11). Press the left arrow key (11) to return to the Start menu without changing the settings. Press the menu button (15) to return to "Manual Controls" without changing the settings. If for example you have defined 10, the first 10 photos made with the DTC 1100 will be sent. Photos made in the following 24 hours after the tenth photo will be saved on the SD card and not be sent.
Note: It is not possible to send more than 200 photos per 24 hours.
3. Select "Customized" with OK (11) to define a specific time when the photos should be sent and the maximum number of photos to be sent during the following 24 hours. To do this, push the UP/DOWN arrow buttons (11) to set the desired unit and the RIGHT and LEFT arrow buttons (11) to change positions from hour to minutes. When you have finished making your settings, push OK (11) to save your setting or MENU (15) to exit without saving. If for example you have set the time to 09:30 and "Daily Max" to 10, the first 10 photos made with the DTC 1100 will be sent to the predefined recipients at 09:30.
Note: The time can only be set in the 24 hour format and the maximum number of photos that can be sent cannot exceed 50.
4. Select "Daily Report" with OK (11) to have the most important data sent to your mobile phone per text message (SMS) at the set time. The report contains for example the number of photos that have been made during the previous 24 hours,
battery status and remaining memory space on the SD card. To set the time at which the Daily Report should be sent, push the UP/DOWN arrow buttons (11) to set the desired unit and the RIGHT and LEFT arrow buttons (11) to change positions from hour to minutes. When you have finished making your settings, push OK (11) to save your setting or MENU (15) to exit without saving.
Note: The time can only be set in the 24 hour format.
Send Via
Your DTC 1100 offers you two options to send your photos - either as an MMS or via SMTP. Go to "Main Menu" by pressing the menu key (15) and select the menu option "Send Via". This is located under the third tab "Mobile Service Settings". Confirm with OK (11). Depending on the phone card plan and options, each MMS might be charged to your "normal" phone bill, whereas files sent via SMTP will require a data plan from your provider. For both options however, you can specify multiple destinations. You can choose between "MMS" or "SMTP". Make your selection and push OK (11). If you have not defined the SMTP parameters using the "Download Tool" software, you cannot select "SMTP" in this menu. Push the LEFT arrow button (11) to go back to the previous menu.
Send To
Go to "Main Menu" by pressing the menu button (15) and select the menu option "Send to". This is located under the third tab "Mobile service settings". Press the OK button (11) or the right arrow key (11) to access the submenu.
In the submenu, you can set the DTC 1100 to send your photos to a telephone number, an email address or to both. You can define up to 4 telephone numbers and 4 email addresses. If you choose "Phone", your DTC 1100 will send the images to a maximum of 4 telephone numbers. If you choose "Email", your DTC 1100 will send the images to a maximum of 4 email addresses.
If you choose "Both", your DTC 1100 will send the images to a maximum of 4 telephone numbers and up to 4 email addresses simultaneously. Push the LEFT arrow button (11) to go back to the previous menu.
Note: If you choose the SMTP option, you can send images only to email addresses and not to telephone numbers – the options “Phone” and “Both” are not possible.
Network Setup
Here you can define the telephone numbers and email addresses to receive the photos sent from your DTC 1100. You can also select your mobile phone network provider. Go to "Main Menu" by pressing the menu button (15) and select the menu option "Network Setup". This is located under the third tab "Mobile service settings". Press the OK button (11) or the right arrow key (11) to access the submenu. In the submenu that now opens, you can select between the items "Recipient Phone", "Recipient Email" and "Network Provider". Confirm your selection with OK (11).
Recipient Phone
If you have selected "Recipient Phone", you can enter up to four phone numbers in the submenu. Choose a place holder (e.g. Phone 1) and press OK (11). You can enter the desired telephone numbers using the up/down arrow keys (11). The number is accepted by pressing the right arrow key (11). If you have entered the wrong number, use the left arrow key (11) to delete the number. Press OK (11) to save. To go back to the "Manual Controls" without saving the entries, use the menu button (15).
Recipient Email
If you have selected "Recipient Email", in order to store email addresses, please follow the instructions as described for saving telephone numbers. In this input field, after selecting a placeholder (e.g. Email 1), you can also select letters and characters in addition to numbers.
Network Provider
In the menu option "Network Provider" you can select from a list of preconfigured mobile phone providers for your country. Use the up/down arrow keys (11) to select your country and confirm with OK (11). You will now see a list of preconfigured providers in that country. Select your provider and press OK (11). If you are in the country selection, press the left arrow key (11) to return to the previous menu. To go back to the "Manual Controls" from the list of mobile phone providers and the country selection without saving the entries, press the menu button (15).
Note: If your provider is not highlighted, please follow the "Operator Parameter" instructions given in the section "Mobile Phone Settings using the Download Tool Software".
2G/3G Mode
In the menu option "2G/3G" you can select the speed at which images are sent via a mobile network. Go to "Main Menu" by pressing the menu button (15) and select the menu option "2G/3G mode". This is located under the third tab "Mobile service settings". Press the OK button (11) or the right arrow key (11) to access the submenu. Here you have the option to choose between "Auto", "3G" and "2G". If you select "Auto" the camera decides autonomously whether images are sent via "3G" or "2G". If you select "3G" the images are sent via the fast HPSA+ network. If you select "2G" the camera sends the images via the slower GSM network. Confirm your selection with OK (11). To return to the previous menu option without changing the settings, press the left arrow key (11).
Note: If in your country the mobile network does not support the GSM standard, always select the "3G" setting.
Download Tool
See the instructions under "Mobile Phone Settings using the Download Tool Software".
Photo Quality
Your DTC 1100 allows you to change the quality of the sent images. For everyday use, the "Normal" quality setting is sufficient. If you select "High", the camera will require longer to send the images, and also therefore consume more energy. Go to "Main Menu" by pressing the menu button (15) and select the menu option "Photo Quality". This is located under the third tab "Mobile Service Settings". Press the OK button (11) or the right arrow key (11) to access the submenu. Here you have the option to choose between "Normal" and "High". Confirm your selection with OK (11). To return to the previous menu option without changing the settings, press the left arrow key (11).
Remote Control
This function allows you to change certain settings of the DTC 1100 via an SMS text message (see section "Remote Control", Fig. 11, 12, 13). You can program the camera so that the message is read every day at a defined time (once) or accepted by the camera 24 hours (24 hr). If you do not want to activate the remote control, select "Deactivate". Go to "Main Menu" by pressing the menu button (15) and select the menu option "Remote control". This is located under the third tab "Mobile Service Settings". Press the OK button (11) or the right arrow key (11) to access the submenu. In the submenu, you can select between "Deactivate", "Once" and "24 hr" using the up/down arrow keys (11). If you have selected "Once",
42
you can specify the receiving time by using the up/ down arrow keys (11) and confirming with OK (11). To continue to the next step, press the left or right arrow key (11). Confirm your settings with OK (11). To go back to the "Manual controls" without saving the entries, use the menu button (15).
Connecting the Camera to a Computer
There are two ways of transferring the data to your computer: either you can take out the SD card and read it on the computer or you can connect the DTC 1100 to your computer using a USB cable in cluded in the package.
Connect using the USB Cable
Always ensure that the camera is switched off before you connect it to your computer. Connect your camera to the computer using the included USB cable via the USB cable slot (14). Switch on the camera. The camera will be recognized as a removable medium, pictures or video clips can be directly viewed or transferred to the PC.
Transferring Pictures and Videos via SD Card Always ensure that the camera is switched off before the SD card is removed from the camera slot (9), else the memory could be damaged. Take the memory card from the slot (9) in the camera and insert it in the memory card reader connected to your computer. Some computers also have an internal slot for SD cards. In such a case, the SD card can be directly connected to your computer. The pictures or video clips can now begin to be transferred to the computer.
MPEG-4 Visual Patent Portfolio License
This MINOX DTC 1100 is licensed under the MPEG-4 Visual Patent Portfolio License for personal and non-commercial purposes to
- encode video in compliance with the MPEG-4 standard and/or
- decode MPEG-4 video that was encoded by a consumer engaged in a personal and non-commercial activity and/or was obtained from a video provider licensed to provide MPEG-4 video. For other purposes, no license is granted or implied for the MPEG-4 standard.
Further information can be obtained from MPEG LA, LLC on http://www.mpegl.com
Technical Data
| Image Sensor | . . . . . . . . . . . . . . . . . . . . . . . . . . . . . . . . . . . . . . . . . . . . . . . . . . . . . . . . . . . . . . . . . . . . . . . . . . . . . . . . . . . . . . . . . . . . . . . . . . . . . . Image Resolution | adjustable: (4:3) 8 MP, 5 MP, 3 MP oder (16:9) 6 MP, 4 MP, 2 MP |
| Trigger Release | < 1 sec. | |
| Cellular Module | . . . . . . . . . . . . . . . . . . . . . . . . . . . . . . . . . . . . . . . . . . . . . . . . . . . . . . . . . . . . . . . . . . . . . . . . . . . . . . . . . . . . . . . . . . . . . . . . . . . . . . . . . . . . . . . . . . . . . . . . . . . . . . . . . . . . . . . . . . . . . . . . . . . . . . . . . . . . . . . . . . . . . . . . . . . . . . . . . . . . . . . . . . . . . . . . . . . . . . . 1 - 5 Photos per Shutter Release (adjustable) | |
| Photo Burst. | 1280x720 HD; 640 x 480 VGA | |
| Video Resolution | . . . . . . . . . . . . . . . . . . . . . . . . . . . . . . . . . . . . . . . . . . . . . . . . . . . . . . . . . . . . . . . . . . . . . . . . . . . . . . . . . . . . . . . . . . . . . . . . . . 1280x720 HD; 640 x 480 VGA | |
| Video Length | . . . . . . . . . . . . . . . . . . . . . . . . . . . . . . . . . . . . . . . . . . . . . . . . . . . . . . . . . . . . . . . . . . . . . . . . . . . . . . . . . . . . . . . . . . . . . . . . .. 5 - 30 sec. (adjustable) | |
| High Power IR Flash | Range 18 m / 59 ft. | |
| PIR-Sensor | . 3 Step Multi-Zone PIR | |
| Display | . 2" TFT Color Display | |
| Day Shots | . Color | |
| Night Shots | . Black and White | |
| User friendly Interface | . 6-button Control Panel | |
| Real-time Screen Display | . Photo/video Playback | |
| Settings | Date, Time, Temperature, Lunar Phases on each Image/Video | |
| External Memory. | . SD/SDHC Card with up to 32 GB | |
| Ports | USB Port, 6 Volt/9 Volt for External Power Supply (min. 2000 mA) | |
| Cables. | . USB Cable (included) | |
| Batteries | . 12 x 1.5 V AA Batteries / Alkaline, Li-Ion or NiMH | |
| Password Protection | . 4-digit Combination | |
| Mounting Aid | . Wrap | |
| Dimensions (H x W x D). | . 101 x 149 x 55 mm / 4 x 5.9 x 2.2 in. | |
| Weight (without batteries) | . 406 g / 14.3 oz. | |
| Order Number | 60718 - DTC 1100 brown, 60719 - DTC 1100 camo | |
Warranty Terms
With the purchase of the MINOX DTC 1100, you have purchased a product that has been manufactured and tested in accordance with particularly stringent quality standards. This product is covered by a warranty of
2 years from the date of purchase and is subject to the following conditions:
- During the warranty period, complaints based on manufacturing defects will be corrected at the sole discretion of MINOX GmbH by repair, replacement of defective parts or replaced completely by an equally flawless product. Further claims of any kind and regardless of legal reasons in connection with this warranty are excluded from the warranty terms.
- Warranty claims are invalid if the defects are due to improper treatment caused by use of other accessories, intervention by unauthorized persons or workshops, or if the serial number has been manipulated or destroyed.
-
Warranty claims can only be made upon presentation of the original receipt from an authorized dealer.
-
To make a warranty claim, please return the MINOX DTC 1100 along with the original receipt and a full description of the defects to the MINOX customer service or a local MINOX representative.
- If necessary, tourists may claim the full warranty if the proof of purchase is presented to a MINOX representative in the respective country.
MINOX GmbH
Walter-Zapp-Str.4
D-35578Wetla
Tel.:+49(0)6441/917-0
Fax: +49 (0) 6441 / 917-612
eMail: info@minox.com
Internet: www.minox.com
FRANCAISE
Introduction
Design subject to alterations without notice. MINOX is a registered trademark of MINOX GmbH, Wetzlar.
35578 Wetzlar, Germany
Tel. +49 (0)64 41 / 917-0
Fax +49 (0)64 41 / 917-612
E-Mail: info@minox.com
www.minox.com 99563 08/15
- GPRS
- NOTE
- INCLUDED IN THE PURCHASED PACKAGE
- ACCESSORIES (AVAILABLE OPTIONALLY)
- CONTENTS
- MAIN MENU
- CAMERA SETTINGS
- GENERAL SETTINGS
- MOBILE SERVICE SETTINGS
- MOBILE SERVICE SETTINGS USING
- CONNECTING THE CAMERA
- MPEG-4 VISUAL PATENT
- PORTFOLIO LICENSE 42
- TECHNICAL DATA 43
- GET TO KNOW YOUR MINOX DTC 1100
- CONTROLS
- PREPARING YOUR CAMERA
- EXPLANATION OF THE CONTROLS
- INSERTING THE BATTERIES
- CHECKING THE BATTERY STATUS
- INSERTING THE MEMORY CARD
- INSERTING THE SIM CARD
- MOUNTING THE CAMERA
- MOUNTING STRAP
- TRIPOD
- LANGUAGE SETTING
- SETUP AND OPERATING MODE
- SETUP MODE
- OPERATING MODE
- MENU FUNCTIONS AND SETTINGS
- MANUAL CONTROLS
- CAMERA
- VIDEO
- DAY AND NIGHT MODE
- PLAYING BACK PICTURE/VIDEO
- DELETE THE PICTURE OR VIDEO CLIPS
- REPLAYING VIDEO CLIPS
- CAMERA MODE
- IMAGE RESOLUTION
- MULTIPLE FRAMES PER TRIGGER
- VIDEO RESOLUTION
- VIDEO LENGTH
- SHUTTER LAG
- ILLUMINATION
- PIR [PASSIVE INFRARED] SENSOR: SETTING THE RESPONSIVITY OF THE IR SENSOR
- POWER-ON TIME
- TIME LAPSE
- LANGUAGE SELECTION
- TIME STAMP
- DATE FORMAT / TIME
- TEMPERATURE UNIT
- POWER SOURCE
- NOTE: CHOOSE ALKALINE IF USING LITHIUM BATTERIES
- FORMATTING THE MEMORY CARD
- PASSWORD
- ENTERING THE PASSWORD
- DEACTIVATING THE PASSWORD
- DEFAULT FACTORY SETTING
- CAMERA DATA
- SAVEDFILES
- MEMORYSPACE
- FIRMWARE VERSION
- CAMERANAME
- SOFTWARE UPDATES
- MOBILE SERVICE SETTINGS USING THE DOWNLOAD TOOL SOFTWARE
- SEND MODE
- SEND VIA
- WE SUGGEST USING THE FOLLOWING LOG-IN DATA
- SEND TO
- OPERATOR PARAMETER
- MMS
- RECIPIENTS
- REMOTE CONTROL
- BEGIN OF SMS COMMAND
- CHANGE REMOTE CONTROL MODE
- CHANGE TIME LAPSE SETTING
- CHANGE SENDING PHOTO RESOLUTION
- FEATURED COMMAND
- PHOTO QUALITY
- CAMERA NAME
- PATH
- TESTING THE MOBILE PHONE NETWORK
- MOBILE SERVICE SETTINGS USING THE CAMERA MENU
- NETWORK SETUP
- RECIPIENT PHONE
- RECIPIENT EMAIL
- NETWORK PROVIDER
- 2G/3G MODE
- DOWNLOAD TOOL
- CONNECTING THE CAMERA TO A COMPUTER
- CONNECT USING THE USB CABLE
- MPEG-4 VISUAL PATENT PORTFOLIO LICENSE
- TECHNICAL DATA
- WARRANTY TERMS
- MINOX GMBH
- FRANCAISE
- INTRODUCTION
Brand : MINOX
Model : DTC 1100
Category : Camera