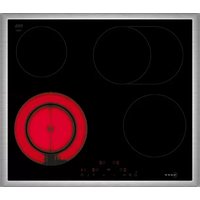
T16FTN1L0 - Cooker NEFF - Free user manual and instructions
Find the device manual for free T16FTN1L0 NEFF in PDF.

User questions about T16FTN1L0 NEFF
0 question about this device. Answer the ones you know or ask your own.
Ask a new question about this device
Download the instructions for your Cooker in PDF format for free! Find your manual T16FTN1L0 - NEFF and take your electronic device back in hand. On this page are published all the documents necessary for the use of your device. T16FTN1L0 by NEFF.
USER MANUAL T16FTN1L0 NEFF
[en] User manual and installation instructions 33
text_image
8.8 ① L Ⓞ 8.8 8.8 ⑦ |→4.2 Anzeigen
text_image
0 0 0.0 0 5.0text_image
8 00 min ↑natural_image
Diagram of a blue rectangular object with black arrows indicating downward motion or force, placed on a flat surface (no text or symbols)text_image
8.8 ① L Ⓞ 8.8 8.8 ⑦ |→| ≡4.2 Affichages
text_image
0 0 0.0 0 0 5.0text_image
00 min 8 ↑text_image
0 c 1 ○ |→ | ▽natural_image
Diagram of a blue rectangular plate with downward arrows indicating force or movement, resting on a flat surface (no text or symbols)Further information and explanations are available online:

Table of contents
INFORMATION FOR USE
1 Safety.... 33
2 Preventing material damage 34
3 Environmental protection and saving energy 35
4 Familiarising yourself with your appliance ..... 36
5 Twist Pad with twist knob.... 37
6 Basic operation ...... 37
7 Childproof lock.... 39
8 Time-setting options.... 39
9 Automatic switch-off.... 40
10 Keep-warm function.... 40
11 Energy consumption display 41
12 Basic settings.... 41
13 Cleaning and servicing.... 42
14 Troubleshooting.... 42
15 Disposal.... 43
16 Customer Service.... 44
17 INSTALLATION INSTRUCTIONS 44
17.1 Safe installation 44

1 Safety
Observe the following safety instructions.
1.1 General information
- Read this instruction manual carefully.
- Keep the instructions, the appliance and the product information safe for future reference or for the next owner.
■ Do not connect the appliance if it has been damaged in transit.
1.2 Intended use
Only a licensed professional may connect appliances without plugs. Damage caused by incorrect connection is not covered under the warranty.
Only use this appliance:
■ To prepare meals and drinks.
■ Under supervision. Never leave the appliance unattended when cooking for short periods.
■ in private households and in enclosed spaces in a domestic environment.
■ up to an altitude of max. 2000 m above sea level.
Do not use the appliance:
- With an external timer or a separate remote control. This does not apply if operation with appliances included in EN 50615 is switched off.
1.3 Restriction on user group
This appliance may be used by children aged 8 or over and by people who have reduced physical, sensory or mental abilities or inadequate experience and/or knowledge, provided that they are supervised or have been instructed on how to use the appliance safely and have understood the resulting dangers.
Do not let children play with the appliance. Children must not perform cleaning or user maintenance unless they are at least 15 years old and are being supervised.
Keep children under the age of 8 years away from the appliance and power cable.
1.4 Safe use
⚠ WARNING – Risk of fire!
Leaving fat or oil cooking on an unattended hob can be dangerous and may lead to fires.
▶ Never leave hot oil or fat unattended.
▶ Never attempt to extinguish a fire using water; instead, switch off the appliance and then cover with a lid or a fire blanket.
The cooking surface becomes very hot.
▶ Never place flammable objects on the cooking surface or in its immediate vicinity.
▶ Never place objects on the cooking surface.
The appliance will become hot.
- Do not keep combustible objects or aerosol cans in drawers directly underneath the hob.
Hob covers can cause accidents, for example due to overheating, catching fire or materials shattering.
▶ Do not use hob covers.
Food may catch fire.
- The cooking process must be monitored. A short process must be monitored continuously.
⚠ WARNING – Risk of burns!
The appliance and its parts that can be touched become hot during use, particularly the hob surround, if fitted.
▶ Caution should be exercised here in order to avoid touching heating elements.
- Young children under 8 years of age must be kept away from the appliance.
Hob protective grilles may cause accidents.
▶ Never use hob protective grilles.
The appliance becomes hot during operation.
- Allow the appliance to cool down before cleaning.
The cookware handles may become hot during operation. If the handles are illuminated by the heating zone, the handles may become particularly hot.
▶ Always cover the entire heating zone with the cookware.
▶ Use oven mitts.
⚠ WARNING – Risk of electric shock!
Improper repairs are dangerous.
▶ Repairs to the appliance should only be carried out by trained specialist staff.
▶ Only use genuine spare parts when repairing the appliance.
▶ If the power cord of this appliance is damaged, it must be replaced by trained specialist staff.
If the appliance or the power cord is damaged, this is dangerous.
▶ Never operate a damaged appliance.
If the surface is cracked, you must switch off the appliance in order to prevent a possible electrical shock. To do this, switch off the appliance via the fuse in the fuse box rather than at the main switch.
- Call customer services. Page 44 An ingress of moisture can cause an electric shock.
- Do not use steam- or high-pressure cleaners to clean the appliance.
The insulation on cables of electrical appliances may melt if it touches hot parts of the appliance.
▶ Never bring electrical appliance cables into contact with hot parts of the appliance.
⚠ WARNING – Risk of injury!
Saucepans may suddenly jump due to liquid between the saucepan base and the hotplate.
▶ Always keep hotplates and saucepan bases dry.
⚠ WARNING – Danger: Magnetism!
The removable control element is magnetic and may affect electronic implants, e.g. heart pacemakers or insulin pumps.
▶ Persons with electronic implants must stand at least 10 cm away from the magnetic control element. Never put the control element in your pockets.
⚠ WARNING – Risk of suffocation!
Children may put packaging material over their heads or wrap themselves up in it and suffocate.
- Keep packaging material away from children.
- Do not let children play with packaging material.
Children may breathe in or swallow small parts, causing them to suffocate.
- Keep small parts away from children.
▶ Do not let children play with small parts.
2 Preventing material damage
ATTENTION!
Rough pot and pan bases will scratch the ceramic.
▶ Check your cookware.
Boiling pans dry may damage cookware or the appliance.
▶ Never place empty pans on a heated hotplate or allow to boil dry.
Incorrectly positioned cookware can cause the appliance to overheat.
▶ Never place hot pots or pans on the controls or the hob surround.
Damage can occur if hard or pointed objects fall onto the hob.
- Do not let hard or pointed objects fall onto the hob. Non heat-resistant materials will melt on heated hot-plates.
▶ Do not use oven protective foil.
- Do not use aluminium foil or plastic containers.
2.1 Overview of the most common damage
Here you can find the most common types of damage and tips on how to avoid them.
| Damage Cause Measure | |
| Stains Food boiling over | Remove boiled-over food immediately with a glass scraper. |
| Damage Cause Measure | ||
| Stains Unsuitable cleaning products | Only use cleaning products that are suitable for glass ceramic. | |
| Scratches | Salt, sugar or sand | Do not use the hob as a work surface or storage space. |
| Scratches | Rough pot or pan bases | Check your cookware. |
| Discolouration | Unsuitable cleaning products | Only use cleaning products that are suitable for glass ceramic. |
| Discolouration | Pan abrasion, e.g. aluminium | Lift pots and pans to move on the hob. |
| Blisters | Sugar or food with a high sugar content | Remove boiled-over food immediately with a glass scraper. |
3 Environmental protection and saving energy
3.1 Disposing of packaging
The packaging materials are environmentally compatible and can be recycled.
- Sort the individual components by type and dispose of them separately.
3.2 Saving energy
If you follow these instructions, your appliance will use less energy.
Select the cooking zone to match the size of your pan. Centre the cookware on the hob.
Use cookware whose base diameter is the same diameter as the hotplate.
Tip: Cookware manufacturers often give the upper diameter of the saucepan. It is often larger than the base diameter.
■ Unsuitable cookware or incompletely covered cooking zones consume a lot of energy.
Cover saucepans with suitable lids.
■ Cooking without a lid consumes considerably more energy.
Lift lids as infrequently as possible.
■ When you lift the lid, a lot of energy escapes.
Use a glass lid.
■ You can see into the pan through a glass lid without having to lift it.
Use pots and pans with flat bases.
■ Uneven bases increase energy consumption.
Use cookware that is suitable for the quantity of food.
■ Large items of cookware containing little food need more energy to heat up.
Cook with only a little water.
■ The more water that is contained in the cookware, the more energy is required to heat it up.
Turn down to a lower power level early on.
■ If you use an ongoing power level that is too high, you will waste energy.
Take advantage of the hob's residual heat. With longer cooking times switch off the hotplate 5-10 minutes before the end of cooking.
■ Unused residual heat increases energy consumption.
Product Information according (EU) 66/2014 can be found on the attached appliance pass and online on the product page for your appliance.
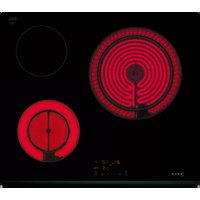
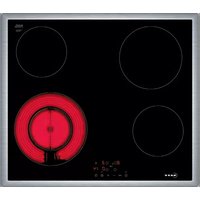
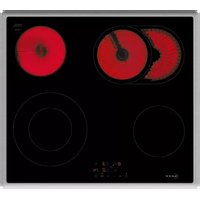
4 Familiarising yourself with your appliance
The instruction manual is the same for various different hobs. You can find the hob dimensions in the overview of models. → Page 2
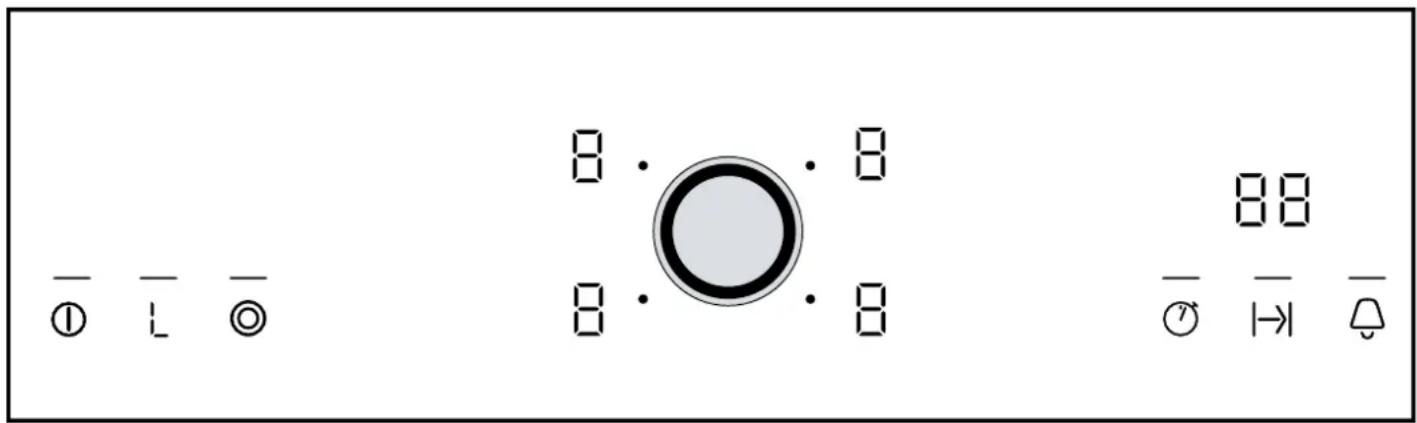
4.1 Control panel
You can use the control panel to configure all functions of your appliance and to obtain information about the operating status.
text_image
8.8 ① L Ⓞ 8.8 8.8 ⑦ |→| ≡4.2 Indicators/symbols
The displays show selected values and functions.
Display Name
| 1 - 9 Heat settings | |
| 0 | Operating status |
| H / H | Residual heat |
| L | Keep-warm function |
| 8 | 8Timer |
4.3 Touch fields
Touch fields are touch-sensitive surfaces. To select a function, touch the relevant field.
| Touch field | Name |
| 1 | Main switch |
| L | Keep-warm function |
| ◎ | Automatic zone control |
| ◎ | Stopwatch function |
| I→I | Timer |
| ♀ | Kitchen timer/Childproof lock |
Notes
■ Always keep the control panel dry. Moisture impairs the function.
- Do not pull pans close to the displays and touch fields. The electronics may overheat.
4.4 Hotplates
You can find an overview of the different activations of the hotplates here.
If you operate the activations, the relevant displays light up.
If you switch on a hotplate, it will switch to the setting last selected.
| Hotplate Activating and deactivating | ||
| ○ | Single-circuit cooking zone | |
| ◎ | Dual-circuit hotplate | Select hotplate. Touch ◎ |
| CO | Extended cooking zone | Select hotplate. Touch ◎ |
Notes
■ Dark areas in the glow pattern of the hotplate are part of the technical design. They do not affect the functionality of the hotplate.
■ The hotplate regulates the temperature by switching the heat on and off. The heat may also switch on and off when at the highest setting.
- With multi-circuit hotplates, the heating of the inner filament circuits and the heating of the activations may switch on and off at different times.
- This protects easily damaged components from overheating.
- The appliance is protected against electrical overload.
– Better cooking results are achieved.
4.5 Residual heat indicator
The hob has a two-stage residual heat indicator for each hotplate. Do not touch the hotplate while the residual heat indicator is lit up.
| Display Meaning | |
| H | The hotplate is so hot that you can keep small dishes warm or melt cooking chocolate. |
| h | The hotplate is hot. |
5 Twist Pad with twist knob
The twist pad is the area in which you can use the twist knob to select the hotplates and heat settings. The twist knob is magnetic. When positioned in the twist pad area, the twist knob automatically centres itself there.
text_image
8 8 8 8Always keep the twist knob clean. Soiling may impair its function.
5.1 Using the twist knob
- To activate a hotplate, touch the twist knob in the area of the marking.
- To select a heat setting, turn the twist knob.
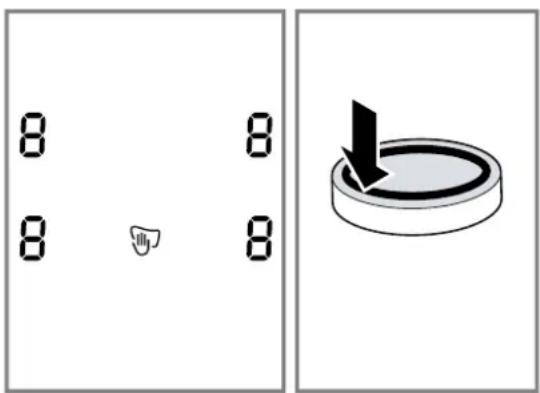
5.2 Removing the twist knob
You can remove the twist knob in order to clean the hob or to avoid activating it accidentally.
If you remove the twist knob when the appliance is switched on, the wipe protection function is activated. The control panel is locked. You can clean the control panel.
Wipe protection is active for 35 seconds. If you do not fit and turn the twist knob during this time, the appliance will switch off.
The main switch is excluded from the wipe protection function. You can switch off the hob at any time.
⚠ WARNING – Risk of burns!
If you place a metal object on the twistpad, the hob can continue heating up.
▶ Always switch off the hob using the main switch.
5.3 Storing the twist knob
Follow these instructions whenever you remove the twist knob from the hob and store it elsewhere.
WARNING – Danger: Magnetism!
The twist knob is magnetic and may affect electronic implants, e.g. heart pacemakers or insulin pumps.
▶ People with electromagnetic implants should never carry this control element around in their pockets.
- The minimum distance from pacemakers should be 10 cm.
ATTENTION!
Metal particles adhering to the magnetic underside can scratch the glass ceramic surface.
▶ Keep the twist knob clean
- Remove all metal particles on the underside.
The magnet in the twist knob can affect other appliances and irreparably damage magnetic data carriers.
- Keep the twist knob away from magnetic data carriers, e.g. video cassettes, diskettes, credit cards or cards with magnetic strips.
- Keep the twist knob away from television sets and monitors.
5.4 Operation without using the twist knob
If you have mislaid the twist knob, you can also operate the hob without it. You can select hotplates and heat settings.
- Switch on the hob using the main switch.
- Simultaneously press and hold and for 4 seconds.
√ An audible signal sounds.
- Repeatedly press 🔒 until the indicator for the required hotplate lights up.
- Use (-) and (→) to select the heat setting required.
√ The hotplate is switched on.
√ You can put the twist knob back on the twistpad at any time.
6 Basic operation
6.1 Switching the hob on or off
The main switch is used to switch the hob on and off.
If you switch the appliance back on again within
4 seconds after switching off, the hob will start up with the previously stored settings.
6.2 Switching on the hob
▶ Touch ①
√ The indicator lamp above ^① lights up.
√ The0 displays light up.
√ The hob is ready for use.
6.3 Switching off the hob
The hob will switch off automatically when all hotplates have been switched off for a while (10-60 seconds).
▶ Touch ①
√ The indicator lamp above ^① goes out.
√ The displays go out.
√ All hotplates are switched off.
√ The residual heat indicator remains on until the hot-plates have cooled down sufficiently.
6.4 Selecting heat settings
Requirement: The hob is switched on.
- To select the hotplate, touch the twist knob in the appropriate area for the hotplate required.
text_image
0 0 0.0 0 0 5.0 0 0 0- Within the next 10 seconds set the required heat setting with the twist knob.
6.5 Setting the hotplates
To set a hotplate, it has to be selected. Use the twist knob to set the required heat setting for each hotplate.
| Heat setting |
| 1 Lowest setting |
| 9 Highest setting |
| . Every heat setting has an intermediate setting, e.g. 4.. |
6.6 Changing heat settings
- Select the hotplate.
- Use the twist knob to select the required heat setting.
6.7 Switching off hotplates
If you have switched off a hotplate, the residual heat indicator appears after approx. 10 seconds.
- Select the hotplate.
- Use the twist knob to set the heat setting to 0.
6.8 Recommended cooking settings
You can find an overview of different foods with appropriate power levels here.
The cooking time varies depending on the type, weight, thickness and quality of the food. The ongoing power level depends on the cookware used.
Cooking tips
■ To bring food to the boil, use heat setting 9.
■ Stir thick liquids occasionally.
- Food that needs to be seared quickly or that initially loses a lot of liquid during frying should be fried in small portions.
■ Tips for saving energy when cooking. → Page 35
Melting
| Food Ongoing | cooking setting | Ongoing cooking time in minutes |
| Chocolate, cooking chocolate 1-1. - | ||
| Butter, honey, gelatine 1-2 - | ||
Heating or keeping warm
| Stew, e.g. lentil stew 1-2 - | |
| Milk^1 | 1.-2. - |
| Sausages in water ^1 | 3-4 - |
| ^1 Prepare the dish without the lid. | |
Defrosting and heating
| Spinach, frozen 2.-3. 10-20 |
| Goulash, frozenGoulash, frozen 2.-3. 20-30 |
Poaching or simmering
| Dumplings^1,2 | 4.-5. 20-30 |
| Fish^1,2 | 4-5 10-15 |
| White sauce, e.g. béchamel 1-2 3-6 | |
| Whisked sauces, e.g. sauce béarnaise or hollandaise | 3-4 8-12 |
| ^1 Bring the water to the boil with the lid on. ^2 Continue to cook the dish without a lid. | |
Boiling, steaming or stewing
| Rice with double the volume of water | 2-3 15-30 |
| Rice pudding 1.-2. 35-45 | |
| Potatoes boiled in their skin | 4-5 25-30 |
| Boiled potatoes | 4-5 15-25 |
| Pasta, noodles^1,2 | 6-7 6-10 |
| Stew, soup | 3.-4. 15-60 |
| Vegetables, fresh | 2.-3. 10-20 |
| Vegetables, frozen | 3.-4. 10-20 |
| Food in a pressure cooker | 4-5 - |
| ^1 Bring the water to the boil with the lid on. ^2 Continue to cook the dish without a lid. | |
Braising
| Roulades 4-5 50-60 |
| Pot roast 4-5 60-100 |
| Goulash 2.-3. 50-60 |
Frying with little oil
| Fry food without a lid. | |
| Escalope, plain or breaded 6-7 6-10 | |
| Escalope, frozen 6-7 8-12 | |
| Chops, plain or breaded ^1 | 6-7 8-12 |
| Steak, 3 cm thick 7-8 8-12 | |
| Patties, 3 cm thick ^1 | 4.-5. 30-40 |
| Hamburgers, 2 cm thick ^1 | 6-7 10-20 |
| Poultry breast, 2 cm thick ^1 | 5-6 10-20 |
| Poultry breast, frozen ^1 | 5-6 10-30 |
| Fish or fish fillet, plain 5-6 8-20 | |
| Fish or fish fillet, breaded 6-7 8-20 | |
| Fish or fish fillet, breaded and frozen, e.g. fish fingers | 6-7 8-12 |
| Scampi, prawns 7-8 4-10 | |
| Vegetables or mushrooms, fresh, sautéing | 7-8 10-20 |
^1 Turn the dish several times.
| Vegetables or meat in strips cooked Asian-style | 7.-8. 15-20 |
| Stir fry, frozen 6-7 6-10 | |
| Pancakes 6-7 one by | one |
| Omelette 3.-4. one by | one |
| Fried eggs 5-6 3-6 | |
| ^1 Turn the dish several times. | |
Deep-frying
Deep-fry food in 1–2 l oil in batches, 150–200 g per batch. Cook food without a lid.
| Frozen products, e.g. chips or chicken nuggets | 8-9 - |
| Croquettes, frozen 7-8 - | |
| Meat, e.g. chicken 6-7 - | |
| Fish, breaded or battered | 5-6 - |
| Vegetables or mushrooms, breaded or battered Tempura | 5-6 - |
| Small pastries, e.g. doughnuts, fruit in batter | 4-5 - |
7 Childproof lock
You can use the childproof lock to prevent children from switching on the hob.
7.1 Activating the childproof lock
Requirement: The hob is switched off.
▶ Press and hold 🔔 for approx. 4 seconds.
√ lights up for approx. 10 seconds.
√ The hob is locked.
7.2 Deactivating the childproof lock
▶ Press and hold 🔔 for approx. 4 seconds.
√ The lock is released.
7.3 Automatic childproof lock
This function automatically activates the childproof lock when you switch off the hob.
The automatic childproof lock can be activated in the basic settings. → Page 41
8 Time-setting options
Your appliance has different time-setting options which can be used to set a cooking time or a kitchen timer.
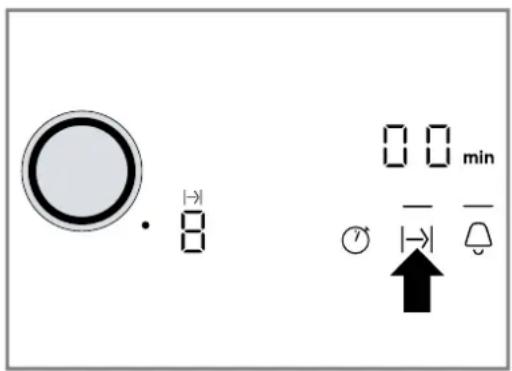
8.1 Cooking time
Enter a cooking time for the relevant hotplate. When the cooking time has elapsed, the hotplate switches off automatically.
You can set a cooking time of up to 99 minutes.
Setting the cooking time
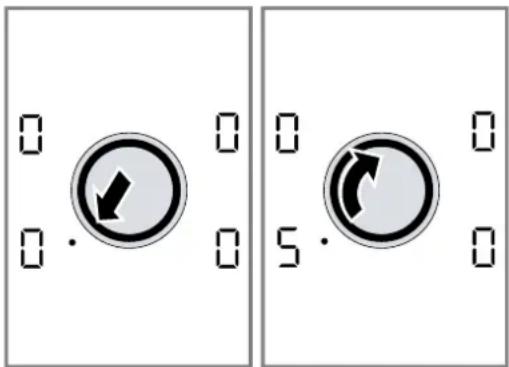
Requirement: The hotplate is switched on.
-
Select the hotplate using the twist knob.
-
Touch the touch field
text_image
Control panel interface with circular dial indicator, time display, and directional arrows-
above the touch field flashes.
√ 00min lights up on the timer display. -
Within the next 10 seconds set the required cooking time with the twist knob.
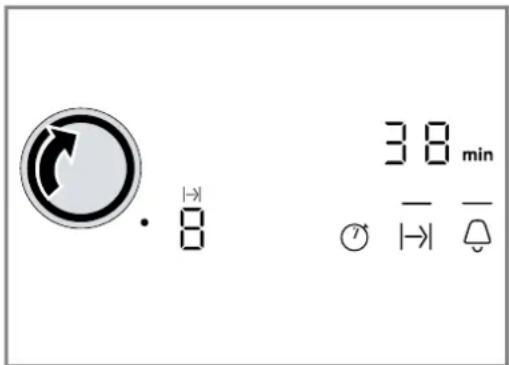
text_image
38 min . 8 ○ |→| ○√ The cooking time counts down. If you have set a cooking time for more than one hotplate, the cooking time of the hotplate selected is displayed.
√ When the cooking time has elapsed, the hotplate switches off. An audible signal sounds and lights up in the hotplate display. Flashes in the timer display for one minute. The I-Display flashes.
Note: If you touch any touch field, the displays go out and the audible signal ceases.
Changing or cancelling the cooking time
- Select the hotplate using the twist knob.
- Touch I and change the cooking time or set to .00
Automatic timer
You can use this function to preselect a cooking time for all hotplates. Each time a hotplate is switched on, the preselected cooking time counts down. When the cooking time has elapsed, the hotplate switches off automatically.
Switch on the automatic timer in the basic settings. → Page 41
Tip: The automatic timer is valid for all hotplates. You can reduce or delete the cooking time for individual hotplates. → Page 39
8.2 Kitchen timer
You can set a time of up to 99 minutes after which a signal will then sound. The kitchen timer runs independently of all other settings.
Setting the kitchen timer
- Touch 🔔
√ —above the touch field flashes.
√ 00grins up on the timer display. - Use the twist knob to set the time.
√ The timer starts counting down after a few seconds.
√ A signal sounds when the time has elapsed.00 flashes in the timer display. —above the touch field lights up brightly.
√ The display switches off after one minute.
Switching off the timer signal
You can switch the signal off manually.
▶ Touch any touch field.
√ The display goes out and the audible signal ceases.
Setting the correct time
- Touch the touch field and use the twist knob to set the time.
8.3 Stopwatch function
The stopwatch function displays the time which has passed since activating the function.
The stopwatch function only works when the hob is switched on. When the hob is switched off, the stopwatch function is switched off as well.
Switching on the stopwatch function
▶ Touch ⏱
√ 08 appears in the timer display.
√ Time measurement begins.
√ Seconds are displayed during the first minute, then minutes.
Switching off the stopwatch function
▶ Touch 📊again.
√ The timer display goes out.
9 Automatic switch-off
If you do not change the settings of a hotplate for a long time, automatic switch-off will be activated. When the hotplate switches off depends on the heat setting selected (1 to 10 hours). The heat to the hotplate is switched off. F and the residual heat indicator H Hlash alternately on the hot-plate display.
9.1 Continuing cooking after automatic switch-off
- Touch any touch field.
√ The display goes out. - Reset.
10 Keep-warm function
The keep-warm function allows you to melt chocolate or butter and to keep food or cookware warm.
10.1 Switching on the keep-warm function
-
Select the hotplate.
-
Touch the L symbol.
√ lights up on the heat setting display.
10.2 Switching off the keep-warm function
- Select the hotplate.
2. Touch the L symbol.
√ lights up on the heat setting display.
11 Energy consumption display
This function indicates the total amount of energy consumed between switching the hob on and switching it off again.
Once switched off, the energy consumption is displayed in kilowatt hours, e.g. 1.08 kWh, for 10 seconds.
The accuracy of the display depends on various factors such as the voltage quality of the power supply.
The display can be activated in the basic settings.
Page 41
12 Basic settings
You can configure the basic settings for your appliance to meet your needs.
12.1 Overview of the basic settings
This is where you can find an overview of the basic settings and the factory preset values.
| Dis-play | Selection |
| c1 | Automatic childproof lock0 - Switched off ^1 1 - Switched on2 - Manual and automatic childproof lock are switched off. |
| c2 | Signal tone0 - Confirmation signal and operating error signal are switched off. The main switch signal remains switched on.1 - Only the operating error signal is switched on.2 - Only the confirmation signal is switched on.3 - Confirmation signal and operating error signal are switched on. ^1 |
| c3 | Energy consumption displayAsk your electricity supplier what the mains voltage is.0 - Consumption display is switched off. ^1 1 - Consumption display at mains voltage of 230 V.2 - Consumption display at mains voltage of 400 V.3 - Consumption display at mains voltage of 220 V.4 - Consumption display at mains voltage of 240 V. |
| c5 | Automatic timer00 - Switched off. ^1 1-99 Cooking time after which the hotplates switch off. |
| c6 | Duration of the timer end signal1 - 10 seconds.2 - 30 seconds.3 - 1 minute. ^1 |
^1 Factory setting
| Dis-play | Selection |
| c7 | Activating the heating elements - Switched off^1 - Switched on - The last setting before switching off the hotplate. |
| c9 | Time for selecting hotplates - Unlimited: The last hotplate selected can always be adjusted without having to select it again.^1 - You can adjust the last hotplate selected within 10 seconds after selecting it. After this time you have to select the hotplate again before adjusting it. |
| c0 | Resetting to the factory settings - Switched off.^1 - Switched on. |
| ^1 Factory setting | |
12.2 Changing basic settings
Requirement: The hob is switched off.
- Switch on the hob.
- Within the next 10 seconds press and hold for approx. 4 seconds.

text_image
0 c l ○ |→| ▽√ c'appears.
√ lights up on the hotplate display.
3. Touch ♩ repeatedly until the required display appears.
- Set the desired value using the twist knob.
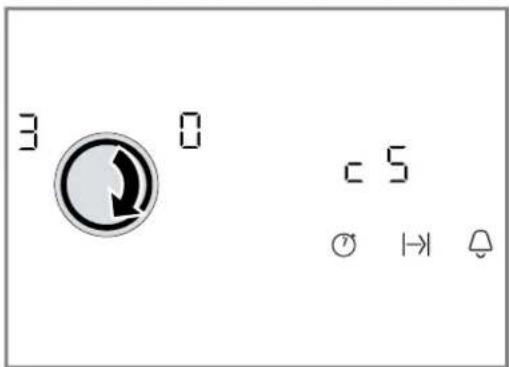
text_image
3 0 c 5 ○ |→| ♡- Press and hold 📄 for 4 seconds.
√ The setting is activated.
Tip: To exit the basic settings, switch off the hob using ①. Switch the hob on again and reset.
13 Cleaning and servicing
To keep your appliance working efficiently for a long time, it is important to clean and maintain it carefully.
13.1 Cleaning products
You can obtain suitable cleaning products and glass scrapers from customer service, the online shop or a retailer.
ATTENTION!
Unsuitable cleaning products may damage the surfaces of the appliance.
▶ Never use unsuitable cleaning products.
Unsuitable cleaning products
■ Undiluted detergent
■ Detergent intended for dishwashers
■ Abrasive cleaners
■ Aggressive cleaning products such as oven spray or stain remover
■ Abrasive sponges
■ High-pressure or steam jet cleaners
13.2 Cleaning the glass ceramic
Clean the hob after every use to stop cooking residues from getting burnt on.
Note: Note the information on unsuitable cleaning products. → Page 42
Requirement: The hob has cooled down.
- Remove heavy soiling using a glass scraper.
- Clean the hob with a cleaning product for glass ceramic.
Follow the cleaning instructions on the product packaging.
Tip: You can achieve good cleaning results using a special sponge for glass ceramic.
13.3 Cleaning the hob surround
Clean the hob frame after use if dirty or stained.
Notes
■ Note the information on unsuitable cleaning products. → Page 42
■ Do not use the glass scraper.
- Clean the hob frame with hot soapy water and a soft cloth.
Wash new sponge cloths thoroughly before use. - Dry with a soft cloth.
13.4 Cleaning the twist knob
Clean the twist knob as necessary.
▶ Wipe the twist knob with lukewarm soapy water.
- Note the information on unsuitable cleaning products. → Page 42
- Do not clean the twist knob in the dishwasher.
- Do not immerse the twist knob in rinsing water.
14 Troubleshooting
You can rectify minor faults on your appliance yourself. Read the troubleshooting information before contacting after-sales service. This will avoid unnecessary costs.
WARNING – Risk of injury!
Improper repairs are dangerous.
- Repairs to the appliance should only be carried out by trained specialist staff.
▶ If the appliance is defective, call Customer Service. → "Customer Service", Page 44
WARNING – Risk of electric shock!
Improper repairs are dangerous.
- Repairs to the appliance should only be carried out by trained specialist staff.
- Only use genuine spare parts when repairing the appliance.
▶ If the power cord of this appliance is damaged, it must be replaced by trained specialist staff.
WARNING – Risk of burns!
The hotplate heats up but the display does not work.
▶ Switch off the fuse in the fuse box.
▶ Call the customer service.
WARNING – Risk of fire!
The hob switches off automatically and can no longer be operated. It may switch on unintentionally at a later point.
▶ Switch off the fuse in the fuse box.
▶ Call the customer service.
14.1 Information on display panel
Fault Cause and troubleshooting
| None There has been a power cut.1. Check the household fuse for the appliance.2. Check whether there has been a power failure by trying other electrical appliances. | |
| All displays flash The control panel is wet or objects are lying on it. ▶ Dry the control panel or remove the object. | |
| F2 | Several hotplates have been used over a prolonged period at high power settings. The hot-plate has been switched off to protect the electronics.1. Wait a while.2. Touch any touch field.√ When the message no longer appears, the electronics have cooled down sufficiently. You can continue to cook. |
| F4 | Despite being switched off by , the electronics have become hot again. All hotplates have therefore been switched off.1. Wait a while.2. Touch any touch field.√ When the message no longer appears, the electronics have cooled down sufficiently. You can continue to cook. |
| FSand the heat set-ting flash alternately.A signal sounds. | Hot pot near the control panel. There is a risk that the electronics will overheat. ▶ Remove the pan.√ The display goes out shortly afterwards. |
| FSand audible signal | Hot pot near the control panel. The hotplate has been switched off to protect the electronics.1. Remove the pot.2. Wait a while.3. Touch any touch field.√ When the message no longer appears, the electronics have cooled down sufficiently. You can continue to cook. |
| F8 | The hotplate was on for too long and has switched off automatically. You can switch the hotplate back on again immediately. |
| dEand hotplates do not heat up | Demo mode is activated.1. Disconnect the appliance from the power supply for 30 seconds by briefly switching off the circuit breaker in the fuse box.2. Touch any touch field within the next three minutes. |
| A message with "E" appears on the dis-play, e.g. E0111. | The electronics have detected a fault.1. Switch the appliance off and on again.√ If the fault was a one-off, the message disappears.2. If the message appears again, call the after-sales service. Please specify the exact error message when calling.→ "Customer Service", Page 44 |
15 Disposal
15.1 Disposing of old appliance
Valuable raw materials can be reused by recycling.
- Dispose of the appliance in an environmentally friendly manner.
Information about current disposal methods are available from your specialist dealer or local authority.
This appliance is labelled in accordance with European Directive 2012/19/EU concerning used electrical and electronic appliances (waste electrical and electronic equipment - WEEE).
The guideline determines the framework for the return and recycling of used appliances as applicable throughout the EU.
16 Customer Service
Function-relevant genuine spare parts according to the corresponding Ecodesign Order can be obtained from Customer Service for a period of at least 10 years from the date on which your appliance was placed on the market within the European Economic Area.
Note: Under the terms of the manufacturer's warranty the use of Customer Service is free of charge.
Detailed information on the warranty period and terms of warranty in your country is available from our after-sales service, your retailer or on our website.
If you contact Customer Service, you will require the product number (E-Nr.) and the production number (FD) of your appliance.
The contact details for Customer Service can be found in the enclosed Customer Service directory or on our website.
16.1 Product number (E-Nr.) and production number (FD)
You can find the product number (E-Nr.) and the production number (FD) on the appliance's rating plate.
The rating plate can be found:
■ on the appliance certificate.
■ on the lower section of the hob.
Make a note of your appliance's details and the Customer Service telephone number to find them again quickly.
17 Installation instructions
Observe this information when installing the appliance.


17.1 Safe installation
Follow these safety instructions when installing the appliance.
■ Electrical connection must only be carried out by licensed specialist staff. Incorrect connection will invalidate the warranty.
■ The safe operation of this appliance can only be guaranteed if it has been installed to a professional standard in accordance with these installation instructions. The installer shall be liable for any damage resulting from incorrect installation.
17.4 Preparing the units
The worktop must be level, horizontal and stable.
■ The fitted units, including wall finishing strips, must be heat-resistant to at least 90 °C.
17.2 Built-under
Do not install refrigerators, dishwashers, non-ventilated ovens or washing machines underneath the appliance.
If you fit an oven below the appliance, the worktop must be at least 20 mm thick, in certain cases even thicker. Observe the information in the oven installation instructions.
■ Make sure that projecting parts such as the mains housing or the mains cable do not collide, e.g. with a drawer.
17.3 Intermediate floor
If the underside of the hob can be touched, an intermediate floor must be fitted.
■ Ask your specialist retailer for an intermediate floor as an accessory.
- If you use your own intermediate floor, the minimum distance to the mains connection of the appliance must be 10 mm.
■ Niche cladding within 50 mm of the back wall must not be combustible (e.g. tiles, stone).
- Seal the cut surfaces to make them heat-resistant. This prevents the worktop from swelling as a result of moisture.
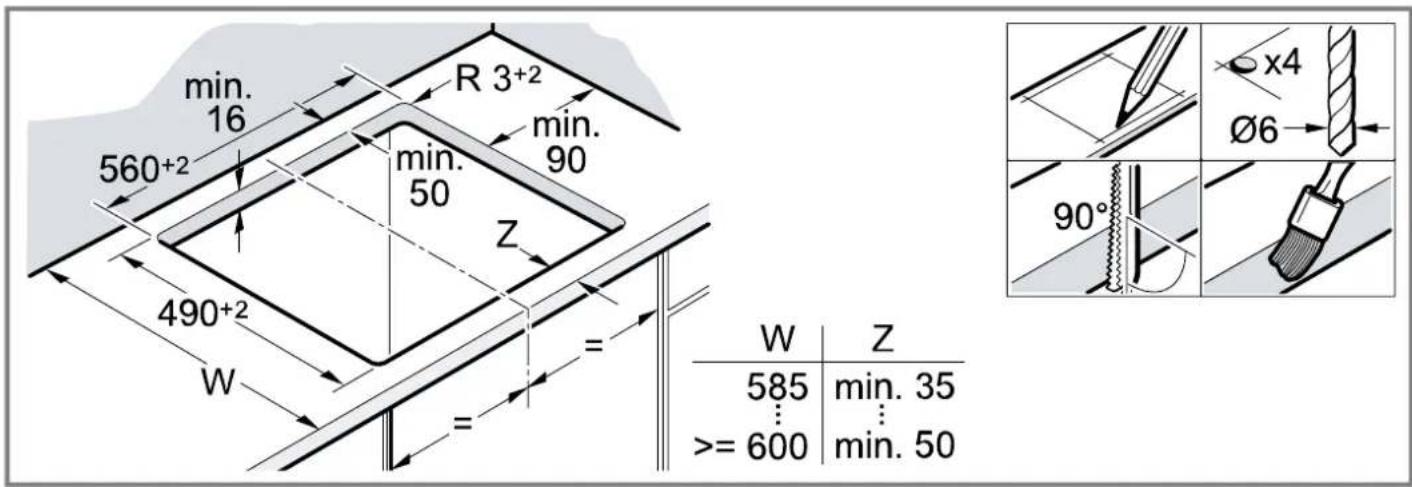
text_image
min. 16 560+2 R 3+2 min. 90 min. 50 Z 490+2 W = = W | Z 585 min. 35 ⋮⋮ >= 600 min. 50 x4 Ø6 90°17.5 Installing fixing rails
For stone work surfaces, bond the fixing rails in place.
■ The hob can also be installed in an existing cut-out that has a depth of 500 mm.

text_image
90° x4 Ø3 490/50017.6 Electrical connection
To protect the device, only remove the device from the styrofoam shells when you press the device into the cut-out. Never place the device upright on one side of the device.
■ Check the household wiring before connecting the appliance.
■ The appliance fulfils the requirements of protection class I and must only be operated in conjunction with an earth conductor.
- In the permanent electrical installation, a partition must be provided in the phases in accordance with the installation regulations.
If it appears on the appliance's display, it has not been connected correctly. Disconnect the appliance from the mains and check the connection.
Connecting without a pre-installed cable
Only connect the hob in accordance with the connection diagram.
■ If required, install the enclosed copper bridges.
■ The power cable must correspond to type H05 VV-F or a higher rating.
- Use the current load to determine which wire cross-section you require. A cross-section of < 1.5 ~mm^2 is not permitted.
Connecting with a pre-installed 5-wire power cable
The power cable must only be replaced by trained customer service personnel.
17.7 Installing the hob
Do not trap the power cable and do not route it over sharp edges.
■ If the oven is a built-under type, route the cable along the rear corners of the oven to the mains socket.
■ Push the hob in until it locks into place.
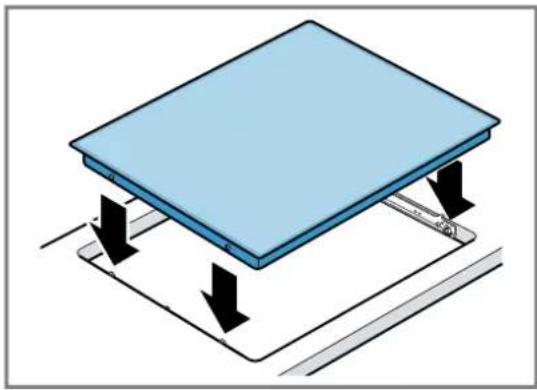
natural_image
Diagram of a blue rectangular object with black arrows indicating downward motion or force, placed on a flat surface (no text or symbols)17.8 Removing the hob
- Disconnect the appliance from the power supply.
- Push out the hob from below.
⚠ WAARSCHUWING – Kans op brand!
⚠ WAARSCHUWING – Kans op letsel!
⚠ WAARSCHUWING – Kans op verstikking!
text_image
8.8 ① L Ⓞ 8.8 8.8 ⑦ |→| ≡4.2 Indicaties
text_image
8 00 min ↑text_image
0 c l ○ |→ | ▽ ↑⚠ WAARSCHUWING – Kans op letsel!
⚠ WAARSCHUWING – Kans op brand!
natural_image
Diagram of a blue rectangular object with downward arrows placed on a flat base, no text or symbols present.Valid within Great Britain:
Imported to Great Britain by
BSH Home Appliances Ltd.
Grand Union House
Old Wolverton Road
Wolverton, Milton Keynes
MK12 5PT
United Kingdom

Register your product online
neff-home.com
BSH Hausgeräte GmbH
Carl-Wery-Straße 34
81739 München,GERMANY

9001864233
040523
de, fr, en, nl