EA24B - Wine cellar DOMETIC - Free user manual and instructions
Find the device manual for free EA24B DOMETIC in PDF.

| Product Type | Wine Cellar |
| Brand | Dometic |
| Model | EA24B |
| Total Volume | 150 L |
| Adjustable Temperature Range | 1 °C to 22 °C (34 °F to 72 °F) |
| Ambient Operating Temperature | 10 °C to 38 °C (50 °F to 100 °F) |
| Power Supply | 110-120 V, 60 Hz |
| Rated Power Consumption | 110 W |
| Noise Level | 45 dB |
| Refrigerant | R600a (flammable) |
| Insulating Agent | Cyclopentane |
| Net Weight | 42 kg |
| Number of Shelves | 2 |
| Interior Lighting | LED |
| Door Lock | Yes (key provided) |
| Adjustable Feet | Yes |
| Door Reversibility | Yes (left/right) |
| Alarm Function | Yes (door open >60 s, temperature deviation) |
| Maintenance | Clean with damp cloth, manual defrosting |
| Safety | Detailed instructions in manual (electric shock, fire) |
| Spare Parts | Available via Dometic authorized service |
| Warranty | Legal warranty (see manual) |
| Certifications | FCC Part 15, ICES-3(B)/NMB-3(B) |
Frequently Asked Questions - EA24B DOMETIC
User questions about EA24B DOMETIC
0 question about this device. Answer the ones you know or ask your own.
Ask a new question about this device
Download the instructions for your Wine cellar in PDF format for free! Find your manual EA24B - DOMETIC and take your electronic device back in hand. On this page are published all the documents necessary for the use of your device. EA24B by DOMETIC.
USER MANUAL EA24B DOMETIC
natural_image
Five identical line drawings of rectangular appliances or refrigerators with no text, numbers, or symbols.DE15F, DE24F, EA15F, EA24B, EA24D, EA24F
EN Refrigerator
Installation and Operating Manual.....19
FR Réfrigérateur
© 2023 Dometic Group. The visual appearance of the contents of this manual is protected by copyright and design law. The underlying technical design and the products contained herein may be protected by design, patent or be patent pending. The trademarks mentioned in this manual belong to Dometic Sweden AB. All rights are reserved.
5
DE15F

6
EA24D
7
DE15F, DE24F
8
EA15F, EA24B, EA24F

11
EA14F, EA24F, EA24B
12
DE15F, DE24F
natural_image
Diagram of a refrigerator interior showing internal cooling rack and ventilation slots (no text or labels)13
EA15F, EA24F
natural_image
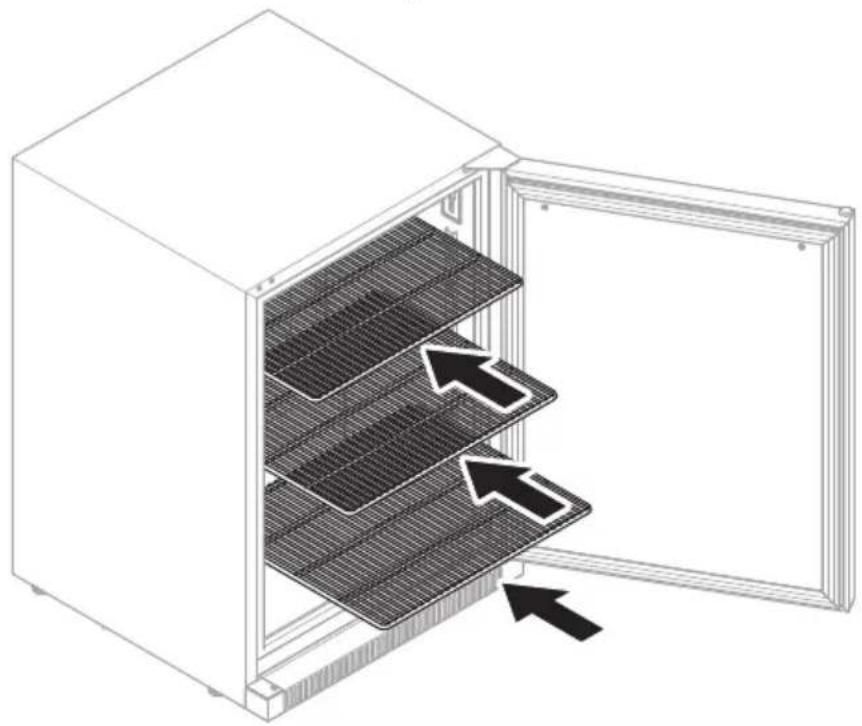
Diagram of a refrigerator interior showing three horizontal panels with arrows indicating flow or placement (no text or symbols present)14
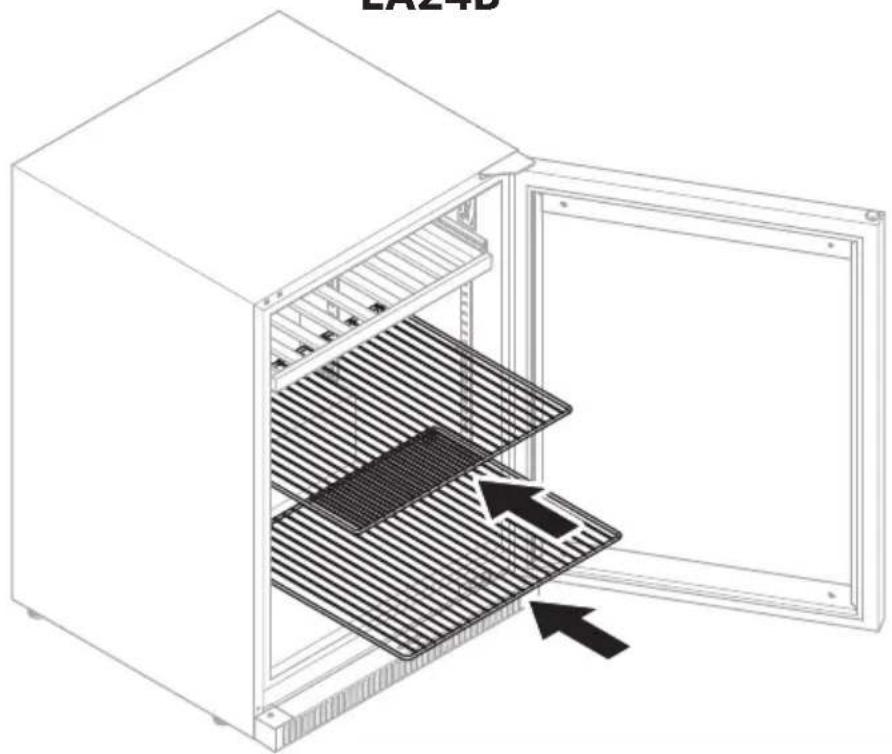
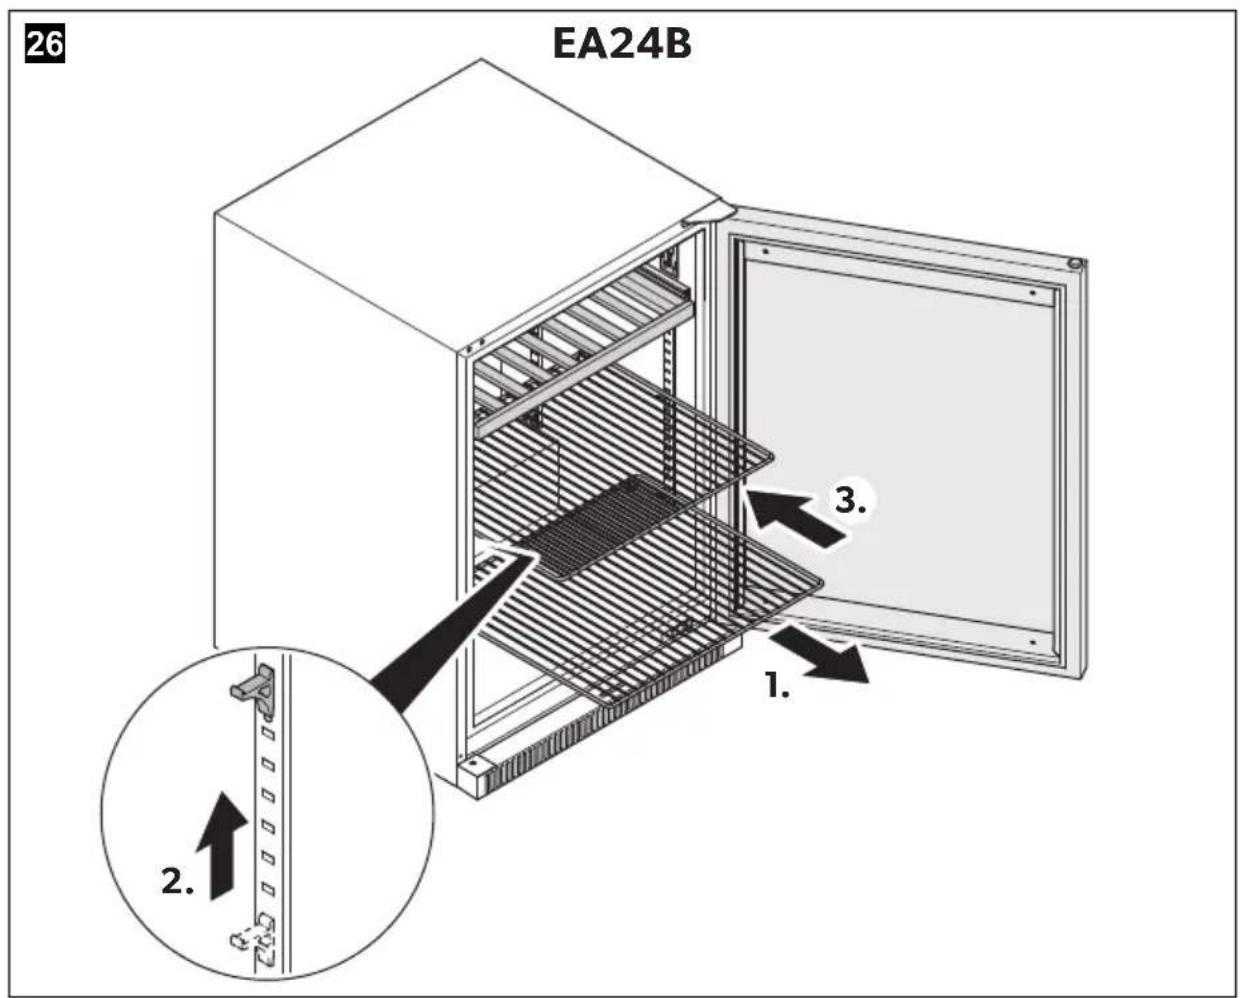
EA24B
natural_image
Technical line drawing of an open refrigerator with internal cooling fins and ventilation slots (no text or symbols)15
DE15F, EA15F

16
DE24F
17
EA24B, EA24D, EA24F

18
21
22
natural_image
Technical line drawing of a U-shaped mechanical component with directional arrows indicating movement or force (no text or symbols present)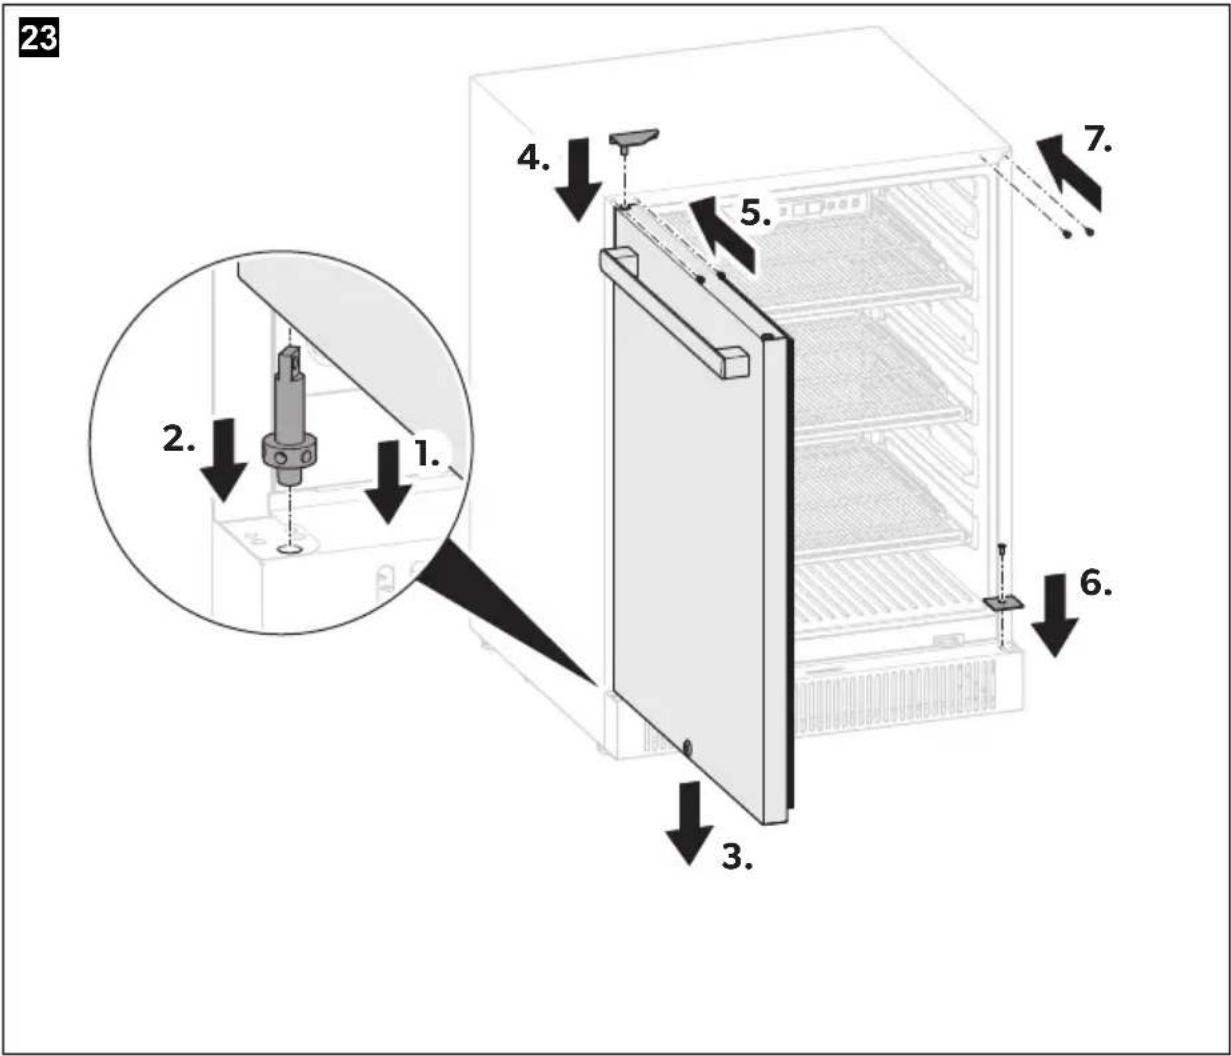
24
DE15F, DE24F
natural_image
Line drawing of an open refrigerator with internal shelves and ventilation slots (no text or symbols)25
EA15F, EA24F
Please read these instructions carefully and follow all instructions, guidelines, and warnings included in this product manual in order to ensure that you install, use, and maintain the product properly at all times. These instructions MUST stay with this product.
By using the product, you hereby confirm that you have read all instructions, guidelines, and warnings carefully and that you understand and agree to abide by the terms and conditions as set forth herein. You agree to use this product only for the intended purpose and application and in accordance with the instructions, guidelines, and warnings as set forth in this product manual as well as in accordance with all applicable laws and regulations. A failure to read and follow the instructions and warnings set forth herein may result in an injury to yourself and others, damage to your product or damage to other property in the vicinity. This product manual, including the instructions, guidelines, and warnings, and related documentation, may be subject to changes and updates. For up-to-date product information, please visit documents.dometic.com.
Contents
1 Explanation of symbols....19
2 Safety instructions.... 20
3 Scope of delivery 23
4 Intended use 24
5 Technical description 24
6 Installation 27
7 Before first use.... 30
8 Operation 30
9 Storing the device.... 33
10 Cleaning and maintenance.... 34
11 Troubleshooting 35
12 Warranty 38
13 Disposal 39
14 Technical data 40
15 Legal 42
1 Explanation of symbols

WARNING!
Safety instruction: Indicates a hazardous situation that, if not avoided, could result in death or serious injury.

CAUTION!
Safety instruction: Indicates a hazardous situation that, if not avoided, could result in minor or moderate injury.

NOTICE!
Indicates a situation that, if not avoided, can result in property damage.

NOTE
Supplementary information for operating the product.
2 Safety instructions
2.1 General safety

WARNING! Failure to obey these warnings could result in death or serious injury.
Electrocution hazard
- The device has to be installed by a qualified technician in accordance with the Dometic installation manual.
- Do not operate the device if it is visibly damaged.
- If this device's power cable is damaged, it must be replaced by the manufacturer, service agent or a similarly qualified person in order to prevent safety hazards.
- This device may only be repaired by qualified personnel. Inadequate repairs may cause serious hazards.
- When positioning the device, ensure the supply cord is not trapped or damaged.
- Do not locate multiple portable socket-outlets or portable power supplies at the rear of the device.
- Plug the device to sockets that ensure proper connection especially when the device needs to be earthed.
- Do not place flammable vapors and liquids near the device.
Fire hazard
- After installation, it must still be possible to disconnect the device from the power supply mains. This may be achieved by having the plug accessible or by incorporating a switch in the fixed wiring according to the wiring rules.
- The refrigerant in the refrigerant circuit is highly flammable. In the event of any damage to the refrigerant circuit:
- Switch off the device.
- Avoid naked flames and sparks.
- Air the room well.
Explosion hazard
- Do not store any explosive substances, such as spray cans with propellants, in the device.
Health hazard
- This device can be used by children aged from 8 years and above and persons with reduced physical, sensory or mental capabilities or lack of experience and knowledge if they have been given supervision or instruction concerning use of the device in a safe way and understand the hazards involved.
- Children aged from 3 to 8 years allowed to load and unload the refrigerating device
• Children shall not play with the device. - Cleaning and user maintenance shall not be made by children without supervision.

CAUTION! Failure to obey these cautions could result in minor or moderate injury.
Risk of crushing
- Do not put fingers into the hinge.
Risk of injury
- Lay the power cable so that no one can trip over it.

NOTICE! Damage hazard
- Check that the voltage specification on the data plate is the same as that of the power supply.
- The device is not suitable for storing substances which are caustic or contain solvents.
- Keep the drainage outlet clean at all times.
- Do not open the refrigerant circuit under any circumstances.
- Only carry the device upright.
- Do not place the device near open flames or other heat sources (heaters, direct sunlight, gas ovens, etc.).
2.2 Operating the device safely

DANGER! Failure to obey these warnings will result in death or serious injury.
Electrocution hazard
- Do not touch exposed cables with your bare hands.

WARNING! Failure to obey these warnings could result in death or serious injury.
Fire hazard
- Keep the ventilation openings in the device enclosure or in the built-in structure clear of obstruction.
- Do not use mechanical objects or other means to accelerate up the defrosting process other than those recommended by the manufacturer.
- Do not damage the refrigerant circuit.
- Do not use electrical devices in the compartments of the device unless they are recommended by the manufacturer for the purpose.

CAUTION! Failure to obey these cautions could result in minor or moderate injury.
Electrocution hazard
- Before starting the device ensure that the power supply line and the plug are dry.
- Disconnect the cooling device from the power supply – before each cleaning and maintenance – after every use
Health hazard
- Check if the cooling capacity of the device is suitable for the storage of the drinks to be cooled.
- Store only closed and still sealed bottles in the device.
- Opening the door for long periods can cause significant increase of the temperature in the compartments of the device. If the device is left empty for long periods:
- Switch off the device.
- Defrost the device.
- Clean and dry the device.
- Leave the door open to prevent mold developing within the device.

NOTICE! Damage hazard
- Never immerse the device in water.
- Protect the device and the cable against heat and moisture.
3 S c o p e o f d
DE15F, DE24F, EA15F, EA24B, EA24F
| Component Quantity | |
| Refrigerator 1 | |
| Handle 1 | |
| Shelf EA15F, EA24F: 3 | EA24B: 2 |
| Hinge exchange kit 1 | |
| Key 2 | |
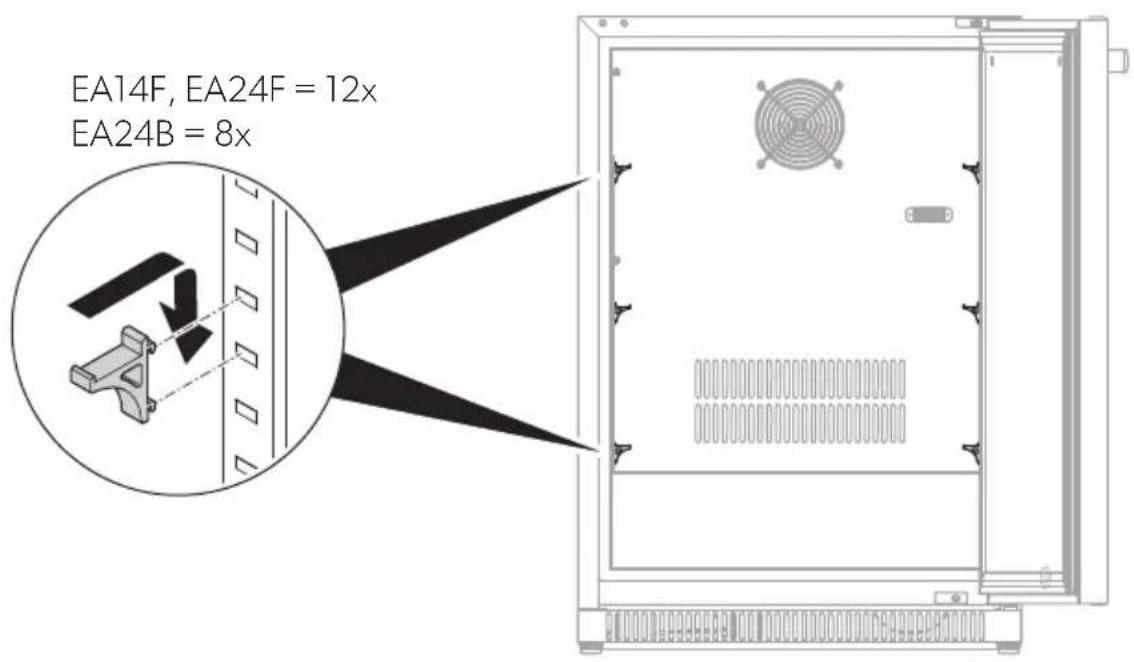
| Shelf support EA15F, EA24F: 12 | EA24B: 8 |
| Short Installation and operating manual 1 | |
EA24D
| Component Quantity | |
| Refrigerator 1 | |
| Handle 2 | |
| Basket | 1 |
| Anti-tip bracket | 1 |
| Fixing kit | 1 |
| Key 2 | |
| Short installation and operating manual 1 | |
4 Intended use
The refrigerator is intended to be used exclusively for the storage and temperature control of beverages. It is suitable as mobile outdoor built-in refrigerator.
This refrigerator is not intended to be used as a freestanding appliance.
The refrigerator is not suitable for:
- Freezing foodstuff
- Storing food
• Medicines and other medical products
• Installation in vehicles
• Installation on boats, yachts or ships - Storing corrosive substances or substances that contain solvents
• Commercial or retail use
This refrigerator is only suitable for the intended purpose and application in accordance with these instructions.
This manual provides information that is necessary for proper installation and/or operation of the refrigerator. Poor installation and/or improper operating or maintenance will result in unsatisfactory performance and a possible failure.
The manufacturer accepts no liability for any injury or damage to the product resulting from:
- Incorrect assembly or connection, including excess voltage
- Incorrect maintenance or use of spare parts other than original spare parts provided by the manufacturer
• Alterations to the product without express permission from the manufacturer - Use for purposes other than those described in this manual
Dometic reserves the right to change product appearance and product specifications.
5 Technical description
The refrigerant circuit is maintenance-free.
The device is available as a built-in version, which is used with outdoor furniture.
During operation at an ambient temperature of 10 °C ( 50 °F ) to 38 °C ( 100 °F ), the device can maintain an inner temperature of 1 °C ( 34 °F ) to 22 °C ( 72 °F ).
The temperature is set using the control panel on the inside of the device.
5.1 Overview
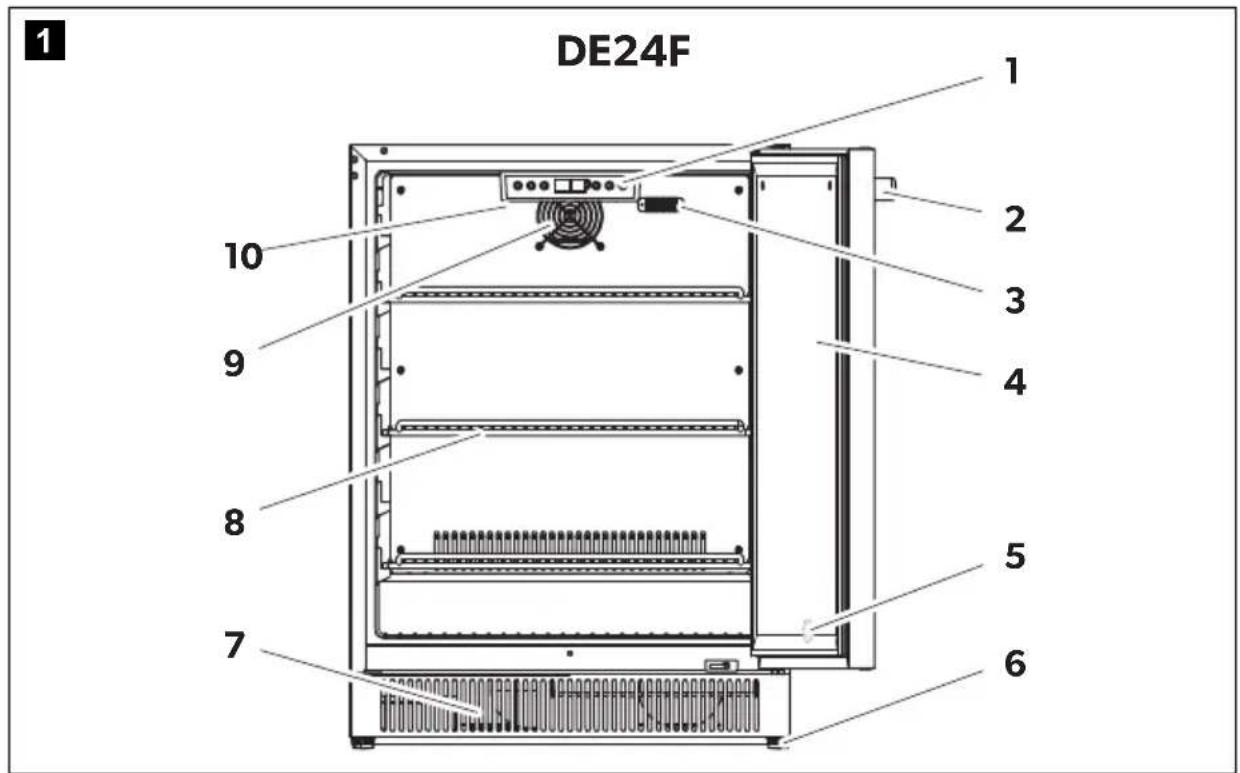
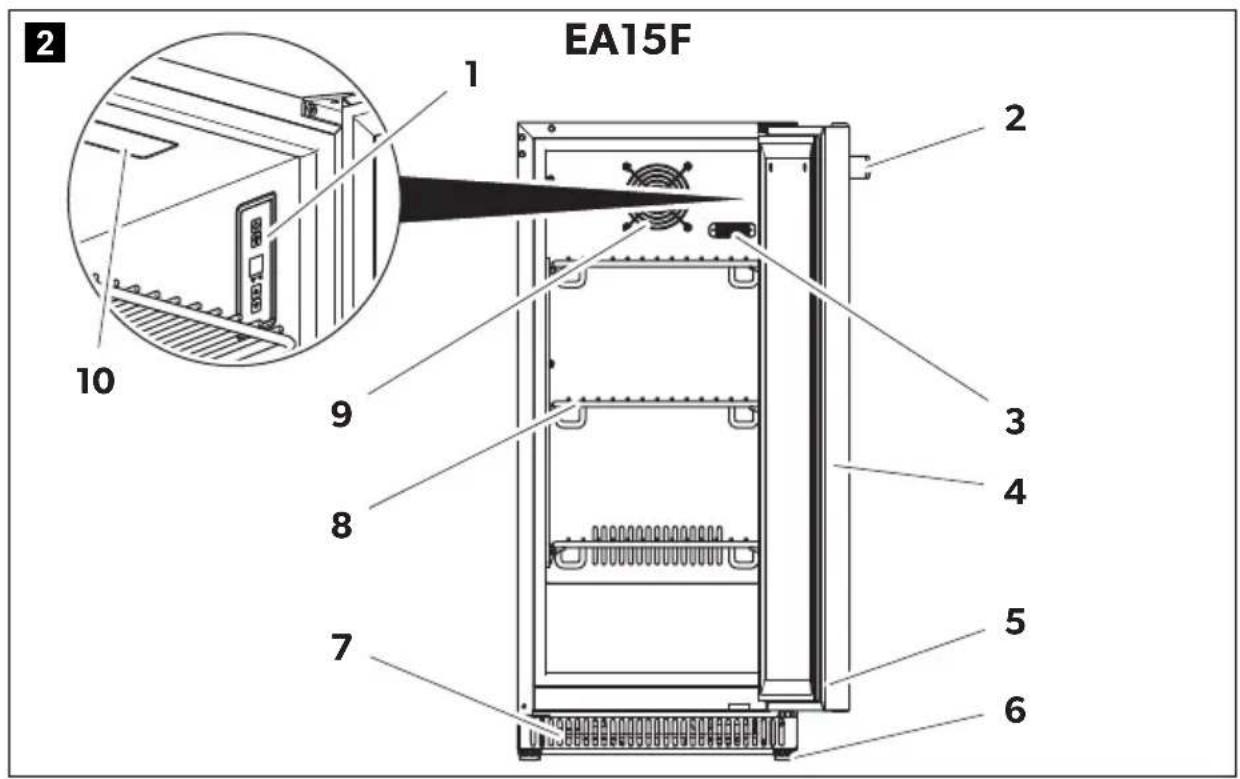
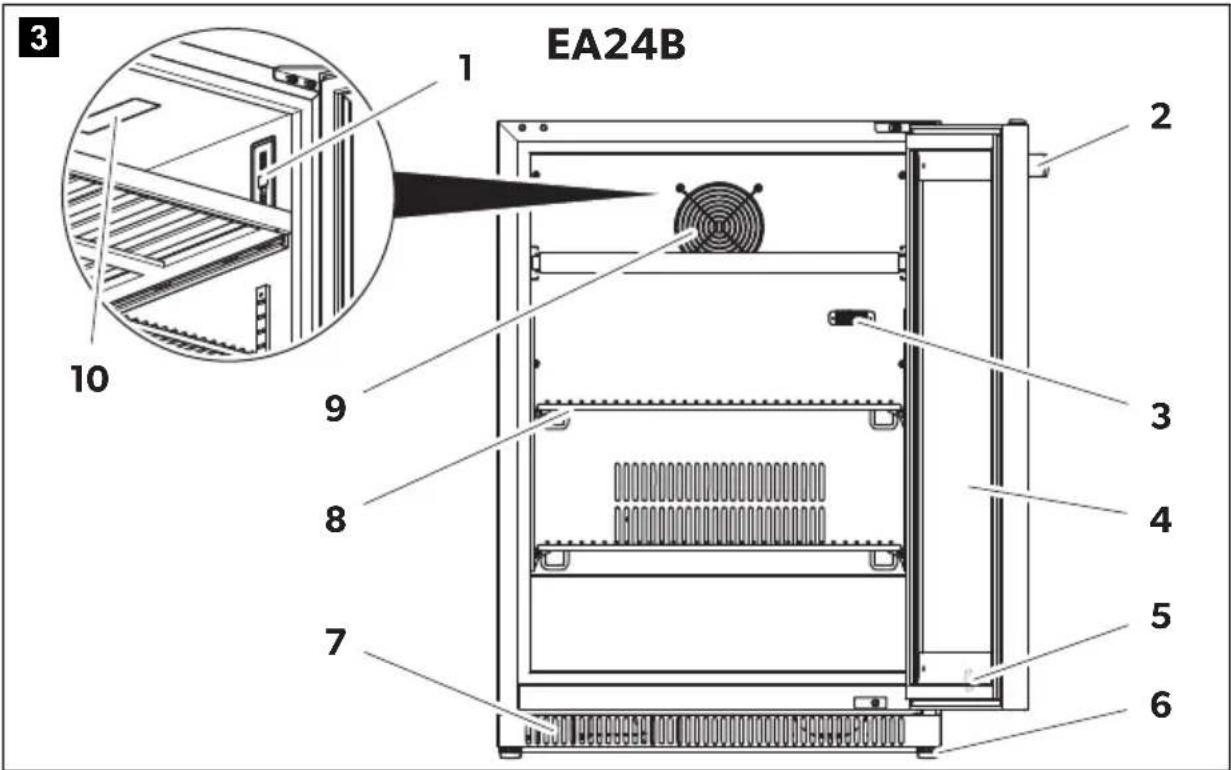
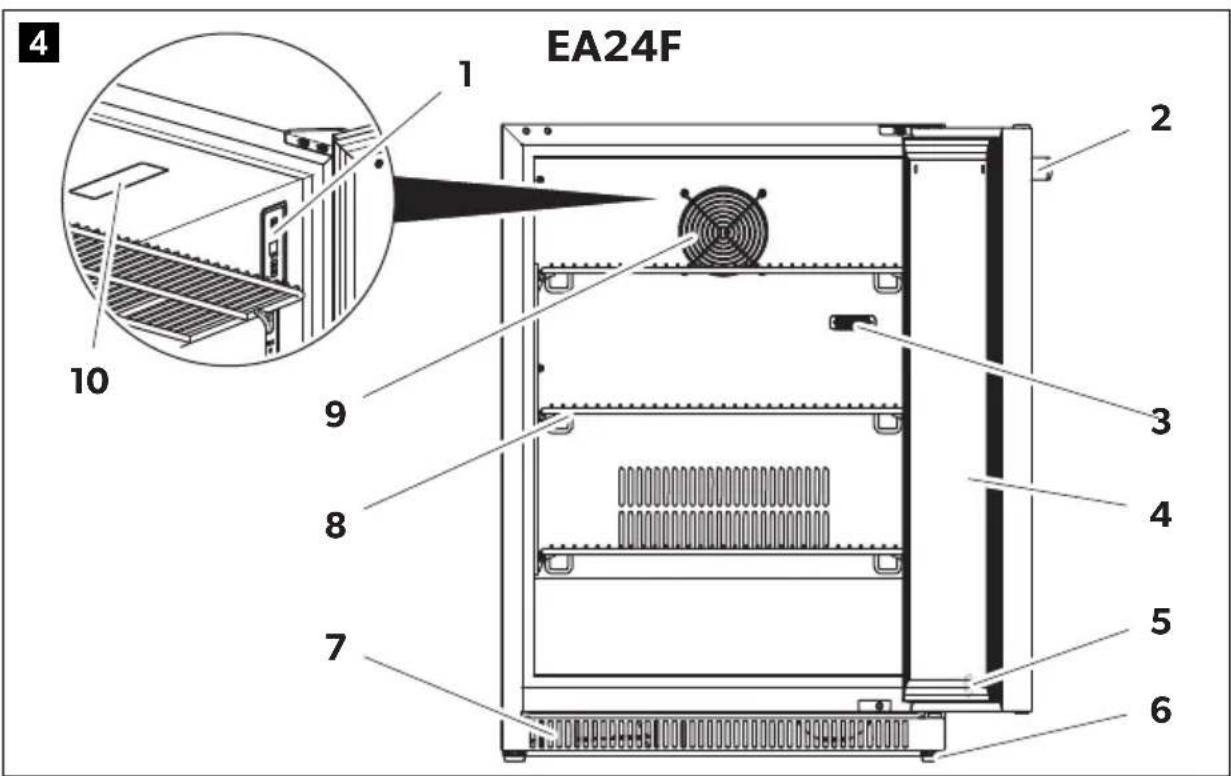
DE24F, EA15F, EA24B, EA24F (fig. 1, page 3 to fig. 4, page 4)
| No. Explanation | ||||||||
| 1 Control panel | ||||||||
| 2 Handle | ||||||||
| 3 Temperature probe | ||||||||
| 4 | D | o | o | r | ||||
| 5 | D | o | o | r | l | o | c | k |
| 6 Adjustable feet | ||||||||
| 7 | G | r | i | l | l | |||
| 8 | S | h | e | l | f | |||
| 9 | Fan | |||||||
| 10 Interior LED | ||||||||
DE15F (fig. 5, page 5)
| No. Explanation | |||||
| 1 Control panel | |||||
| 2 Handle | |||||
| 3 Temperature probe | |||||
| 4 | D | o | o | r | |
| 5 Adjustable feet | |||||
| 6 | G | r | i | l | l |
| 7 | S | h | e | l | f |
| 8 | Fan | ||||
| 9 Interior LED | |||||
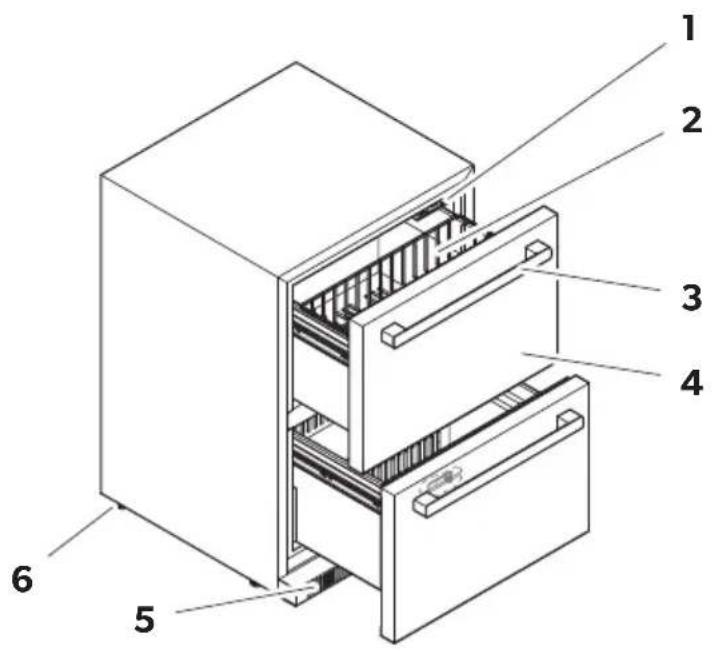
EA24D (fig. 6, page 5)
| No. Explanation | ||||||
| 1 Control panel | ||||||
| 2 | B | a | s | k | e | t |
| 3 Handle | ||||||
| 4 | D | o | o | r | ||
| 5 | G | r | i | l | l | |
| 6 Adjustable feet | ||||||
5.2 Control panel
The device is equipped with a control panel for operation and settings.
DE15F, DE24F (fig. 7, page 6)
| No. Explanation | |||||||
| 1 On/off button | |||||||
| 2 Lock indicator | |||||||
| 3 Light button | |||||||
| 4 | D | i | s | p | l | a | y |
| 5 Setting buttons | |||||||
| 6 Temperature unit indicator | |||||||
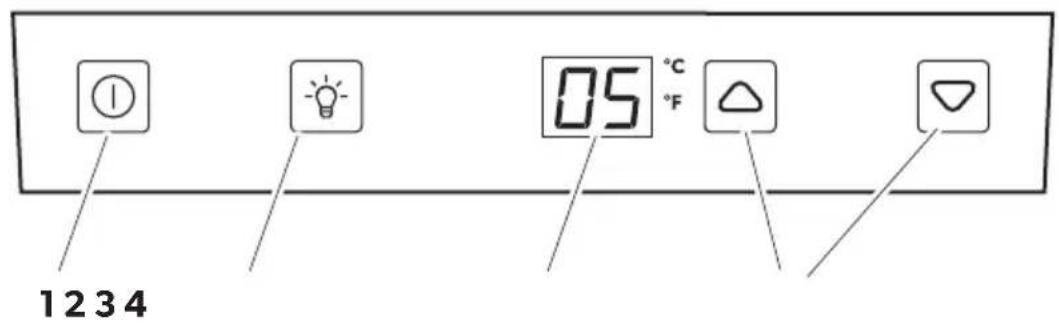
EA15F, EA24B, EA24F (fig. 8, page 6)
| No. Explanation | |||||||
| 1 On/off button | |||||||
| 2 Light button | |||||||
| 3 | D | i | s | p | l | a | y |
| 4 Setting buttons | |||||||
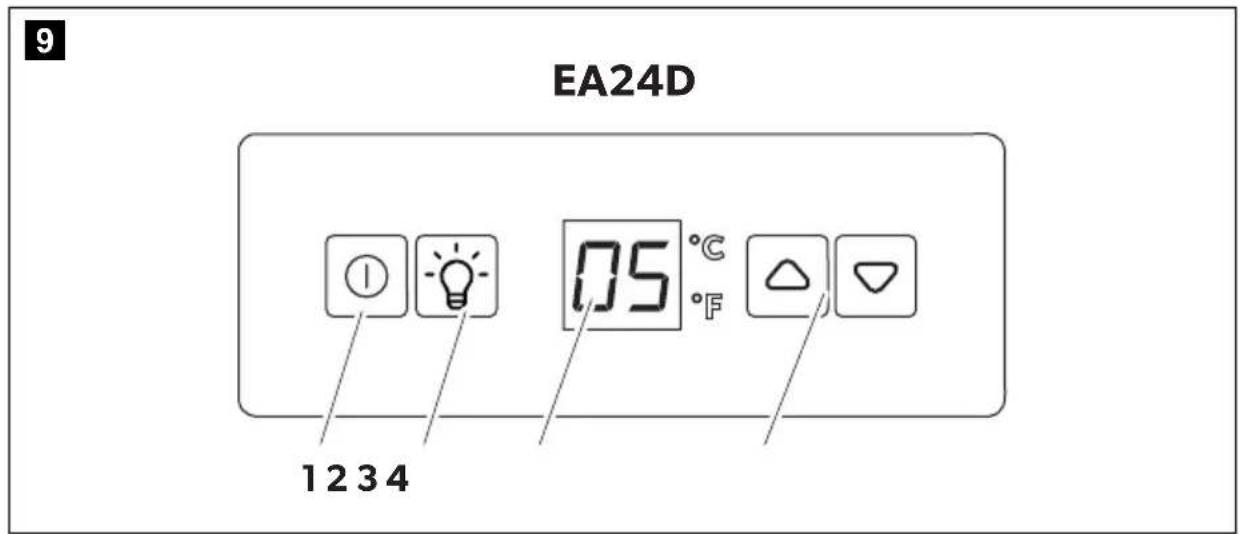
EA24D (fig. 9, page 7)
| No. Explanation | |||||||
| 1 On/off button | |||||||
| 2 Light button | |||||||
| 3 | D | i | s | p | l | a | y |
| 4 Setting buttons | |||||||
5.3 Alarm function
The device is equipped with an alarm function. The alarm sounds when the temperature inside the device has changed significantly from the set temperature or the door of the device has been open for more than 60 seconds or has been opened frequently.
6 Installation

WARNING! Electrocution hazard
Ensure that electrical connections comply with state and local codes.
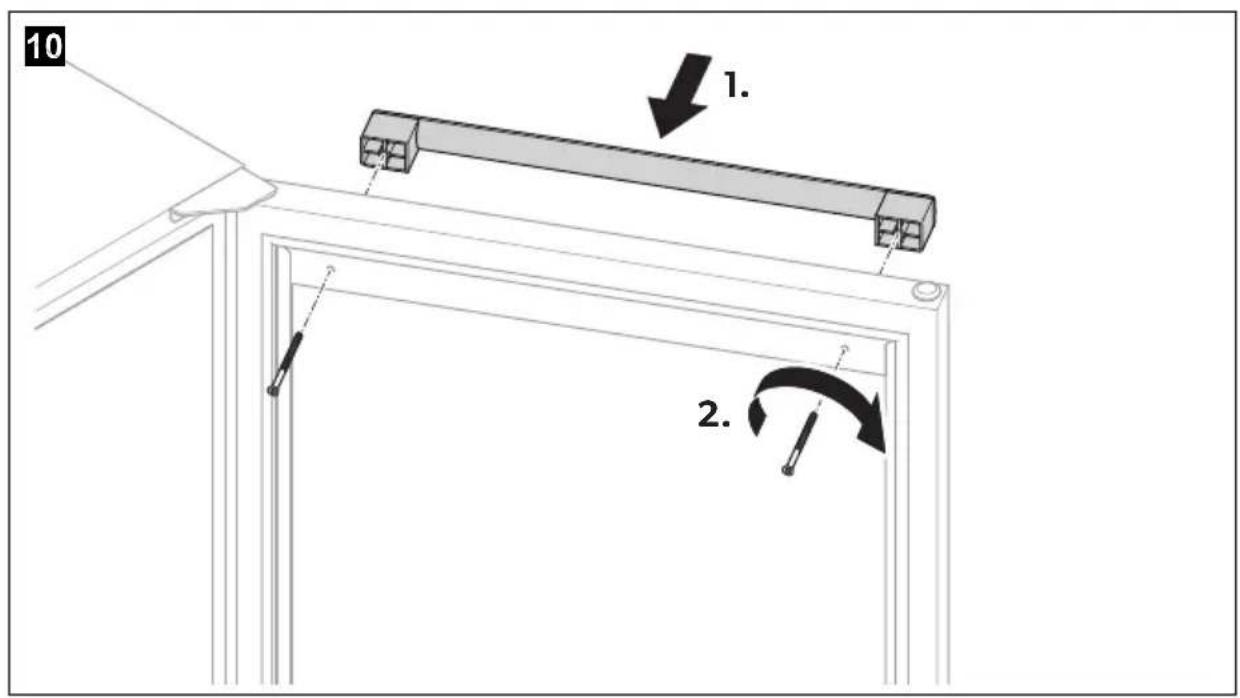
6.1 Mounting the handles
▶ Proceed as shown (fig. 10, page 7).
6.2 Inserting the shelf supports
▶ Proceed as shown (fig. 11, page 8).
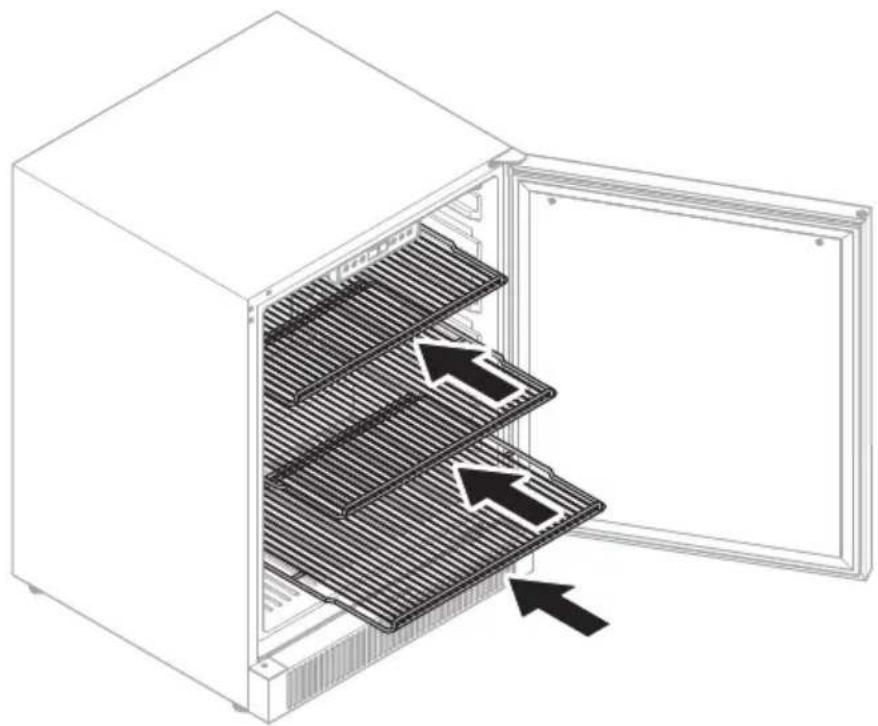
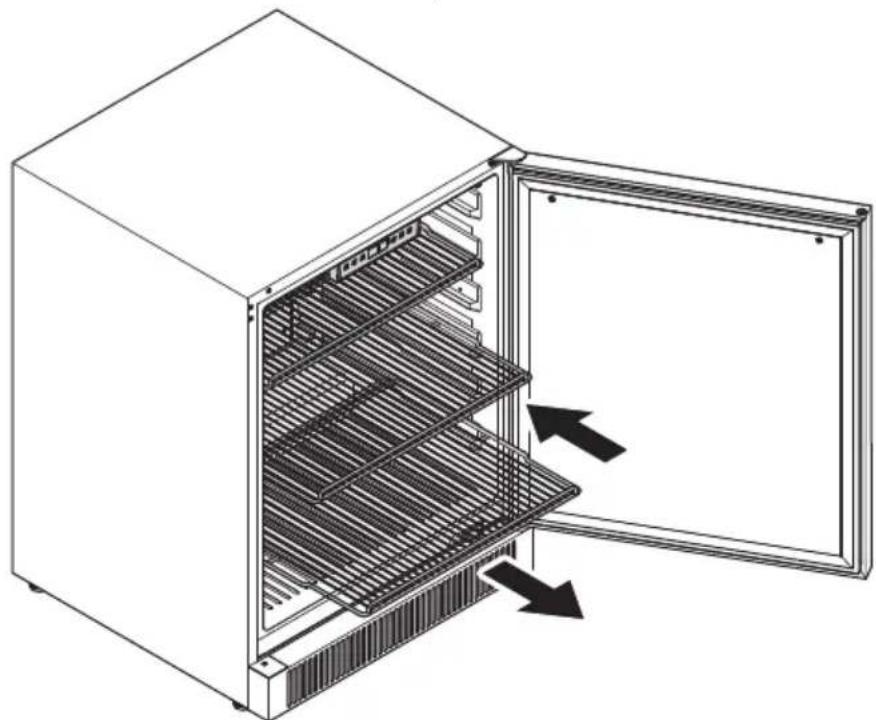
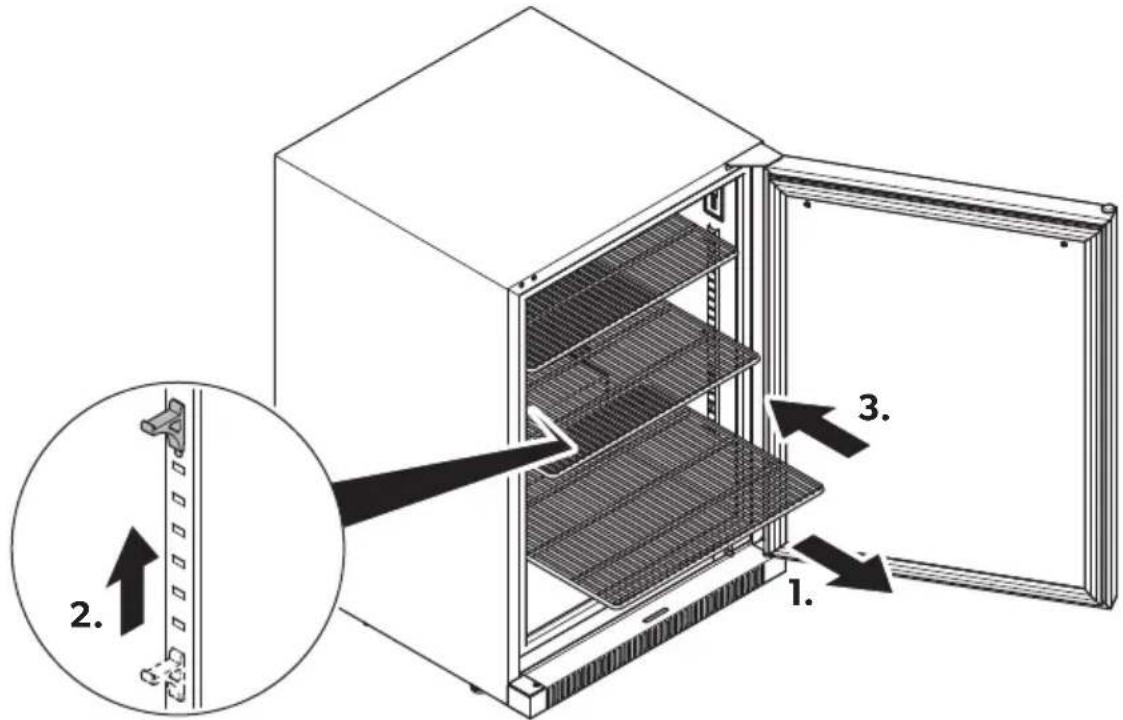
6.3 Inserting the shelves
▶ Proceed as shown:
- DE15F, DE24F: fig. 12, page 8
- EA15F, EA24F: fig. 13, page 9
- EA24B: fig. 14, page 9
6.4 Selecting the installing location

WARNING! Risk of injury
Move the device with at least 2 people.
Observe the following, when selecting the installation location:
- The ambient temperature should be in accordance with the climate class. Otherwise the set internal temperature cannot be reached or maintained. This can also be the case with extreme fluctuations in the ambient temperature.
The intended ambient temperature and the climate class can be found in the technical data (see chapter "Technical data" on page 40) and on the data plate of the device.
- The ground must be level and sufficiently stable to support the device when fully loaded.
- The device must be positioned so that the plug is accessible.
- Note the information on the electrical connection (chapter "Connecting the device to the power supply" on page 29).
- Do not install the device in an area with excessive moisture.
Remove all the inner and outer packaging material before setting up the device.
6.5 Placing the device

NOTE
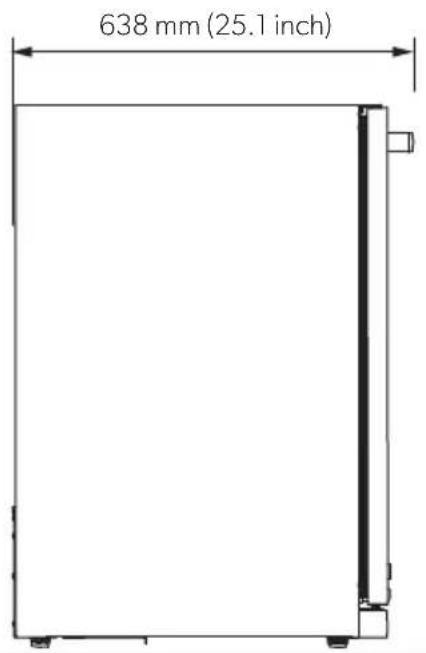
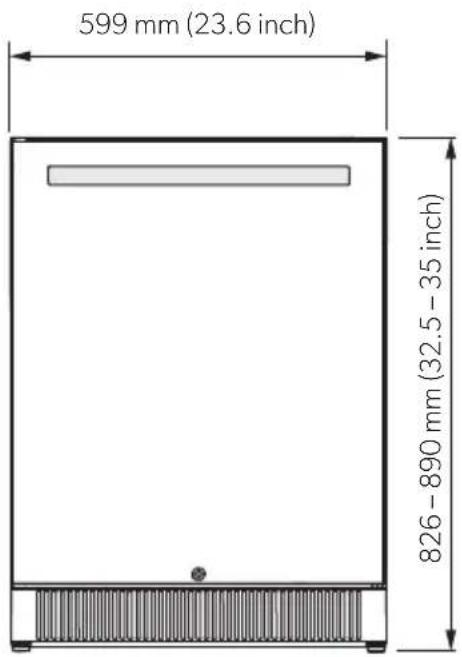
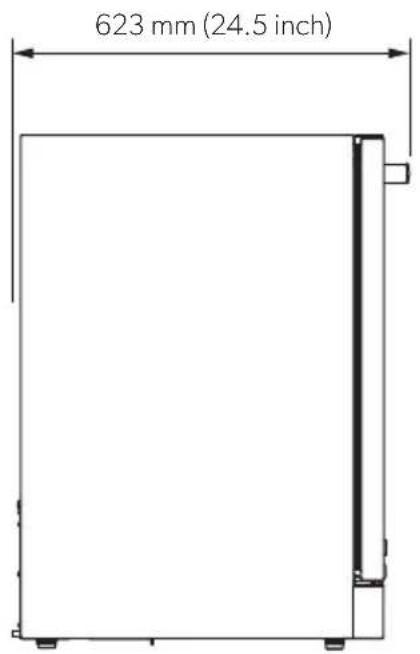
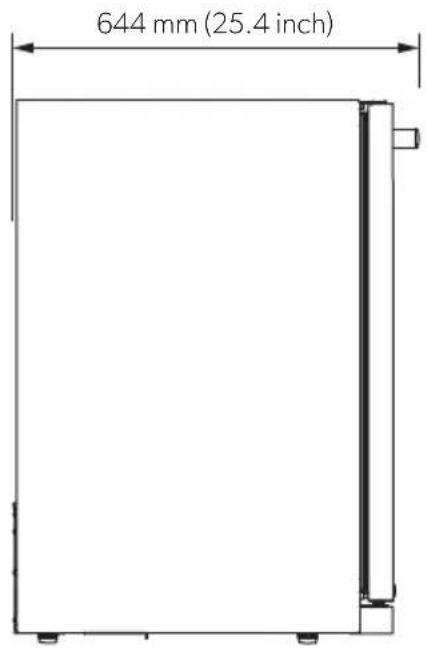
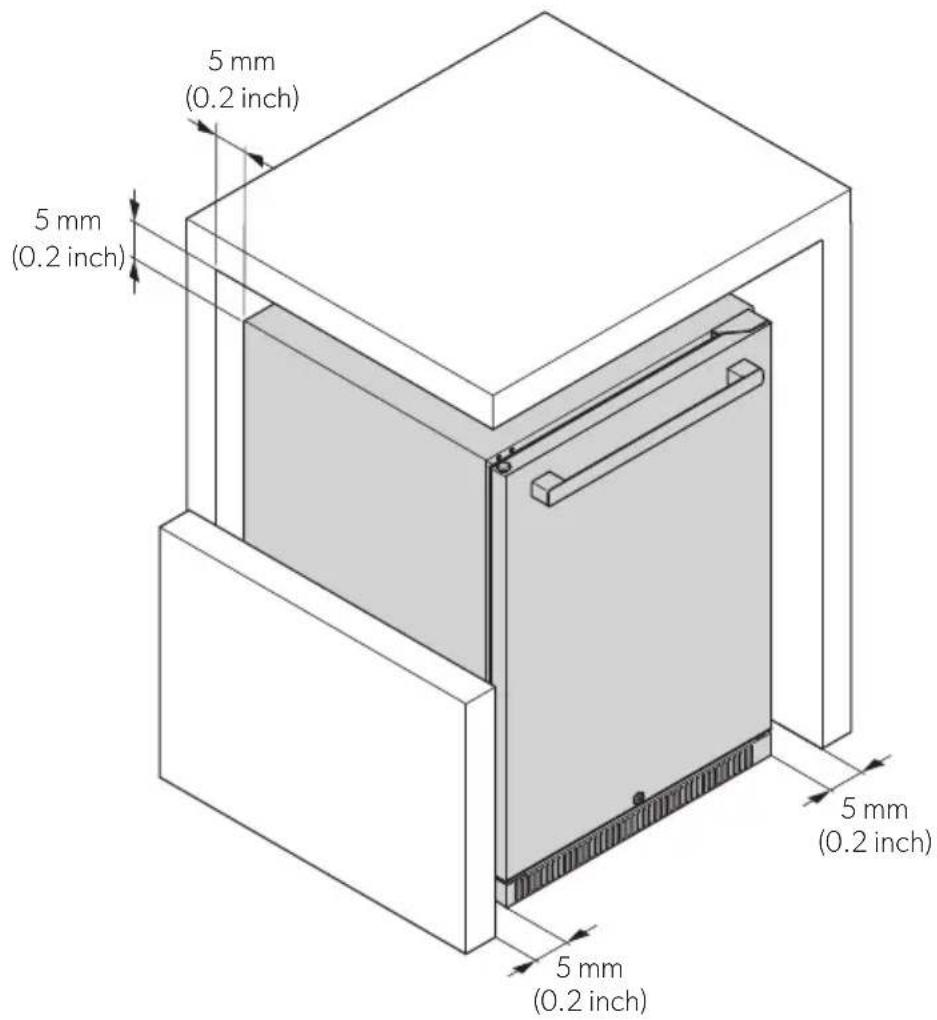
- Observe the device's dimensions and safety distances when installing the device (fig. 15, page 10 to fig. 18, page 11).
- Ensure that the door can be opened completely and is not blocked by other objects.
DE15F, DE24F, EA15F, EA24B, EA24F
- Ensure that the door is locked when moving the device.
- If necessary, tape the door with duct tape.
- Position the device.
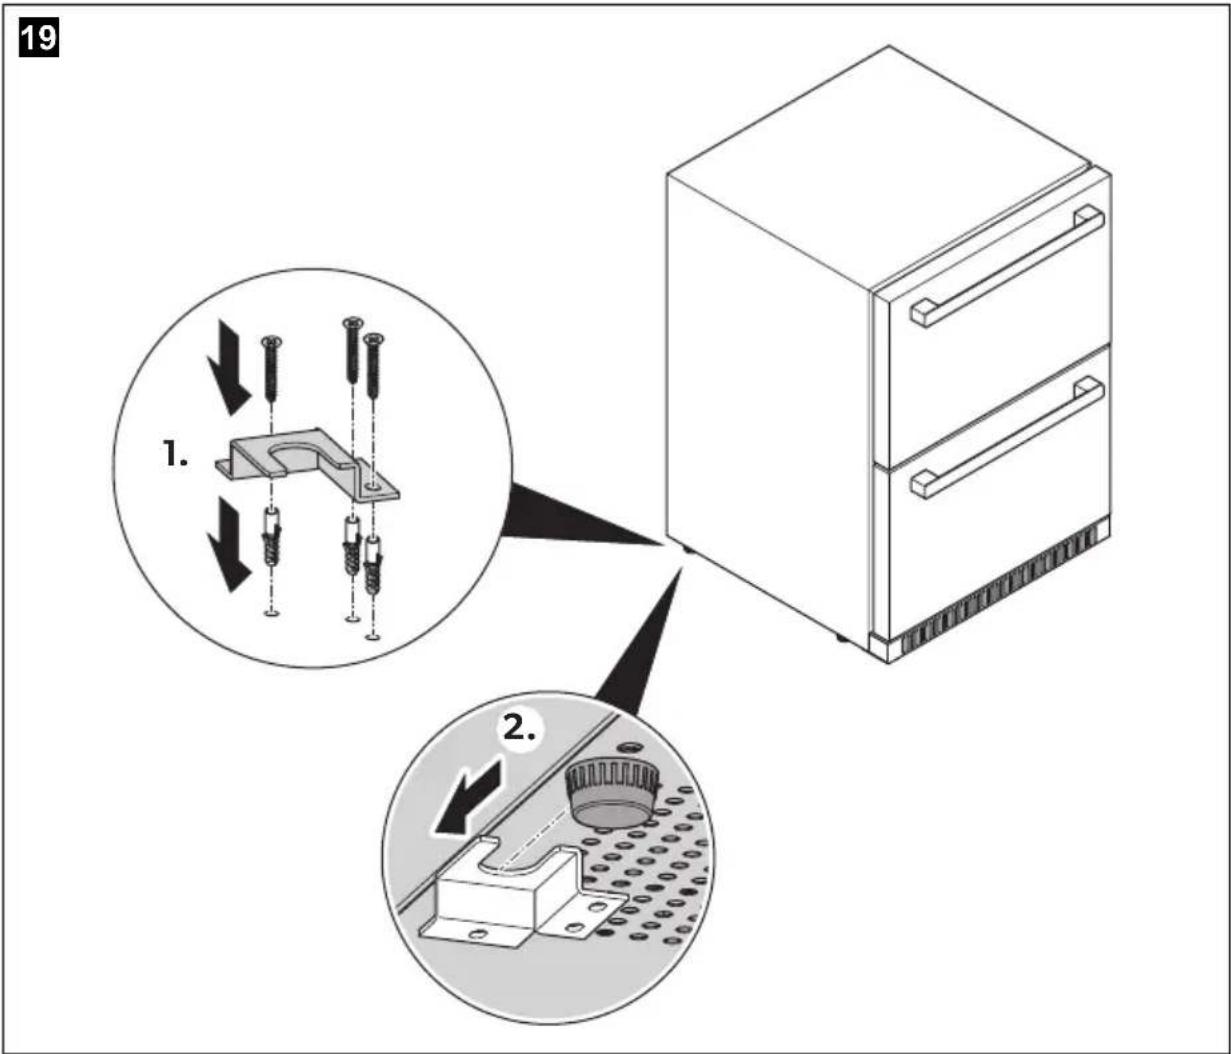
EA24D only
- Fix the drawers with duct tape when moving the device.
- Attach the anti-tip brackets on the floor (fig. 19, page 12).
- Position the device.
6.6 Connecting the device to the power supply

NOTICE! Damage hazard
- Do not modify or damage the plug.
- Do not plug the device in an socket that can be turned off by a switch or pull chain.
- To avoid voltage drops and loss of performance do not use adapters, extension cords, or power strips.
- Ensure that an residual current circuit breaker is installed to the power supply. Seek advice from a trained electrician.
- Observe the input voltage (see chapter "Technical data" on page 40).

NOTE
Let the device stand upright for 24 hours before connecting it to the power supply.
▶ Plug the device into a AC socket.
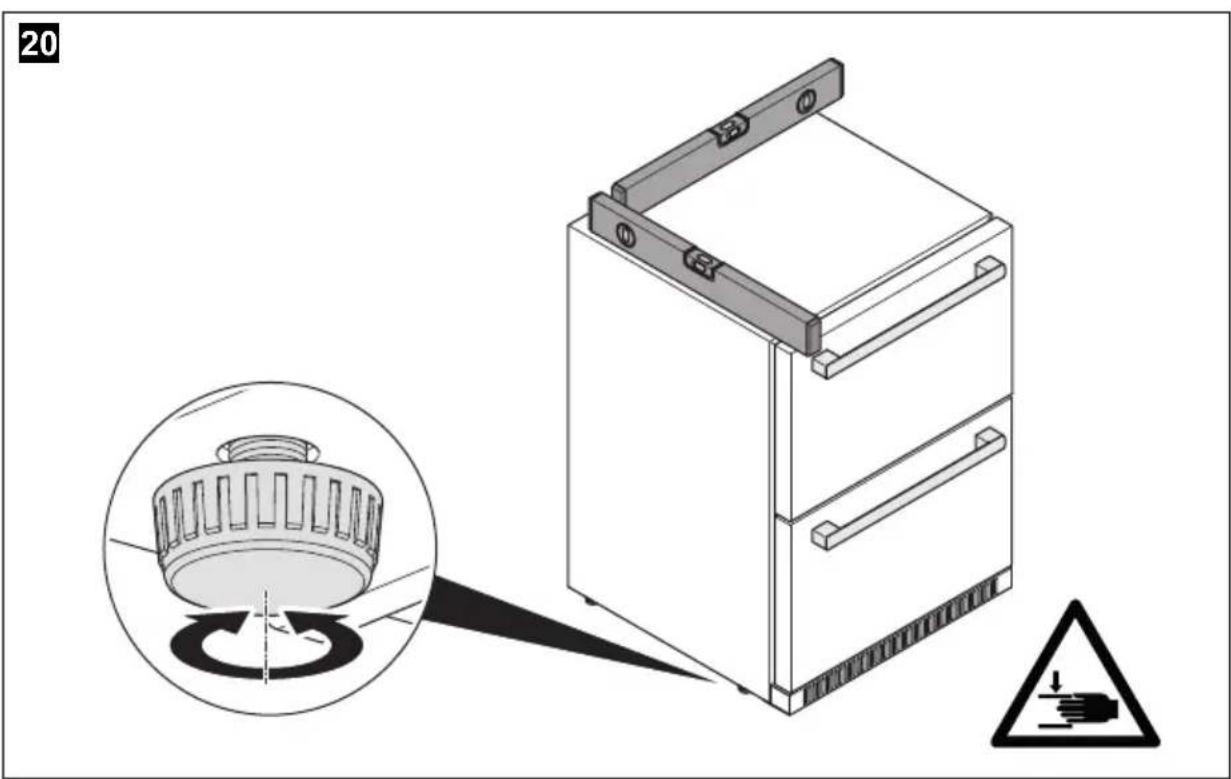
6.7 Adjusting the feet

NOTE
The bottom of the device must be horizontal.
▶ Ensure the device is level by adjusting the feet (fig. 20, page 12).
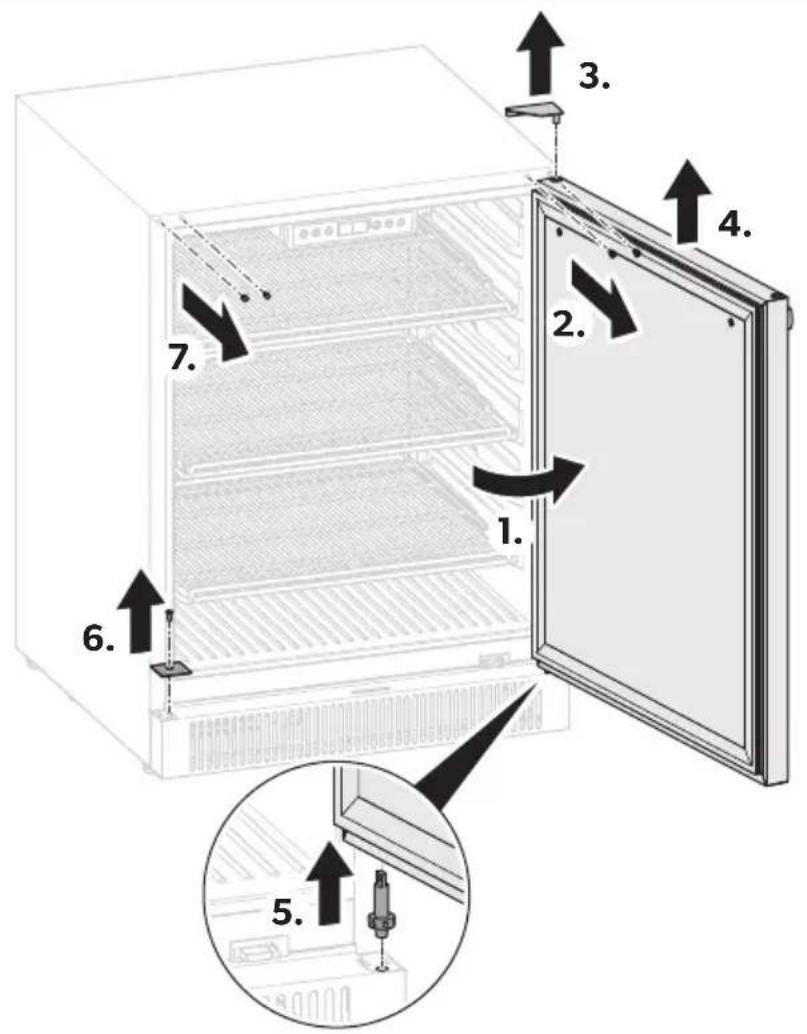
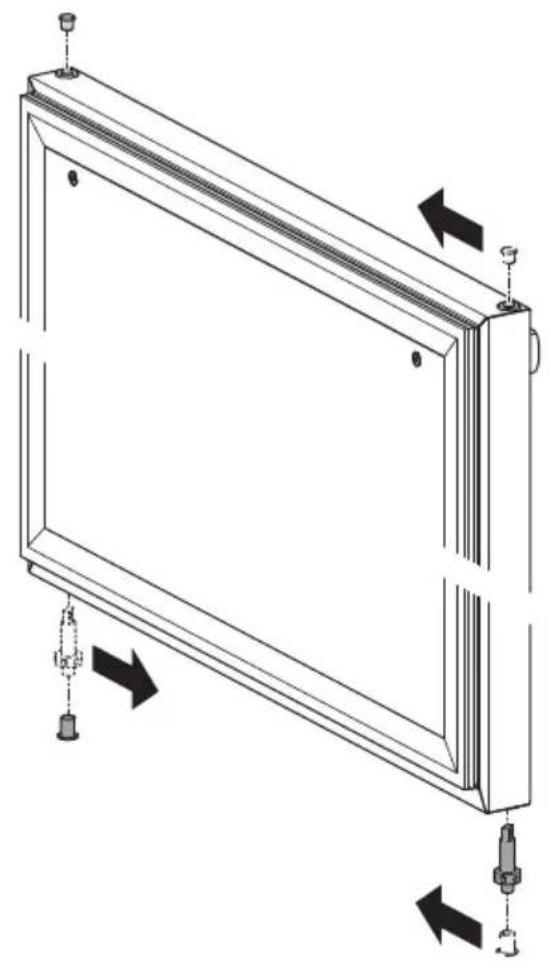
6.8 Changing the door hinge
The hinge of the door can be changed so that it opens to the left instead of to the right.
▶ Change the door hinge (fig. 21, page 13 to fig. 24, page 16).
6.9 Adjusting the shelves
▶ Adjust the shelves (fig. 24, page 16 to fig. 26, page 17).
7 B e f o r e f i r
Before starting the device for the first time, clean the device inside and outside with a damp cloth for hygienic reasons (see chapter "Cleaning and maintenance" on page 34).
8 O p e r a t i o n

NOTE
Do not remove the control panel membrane when operating the device.
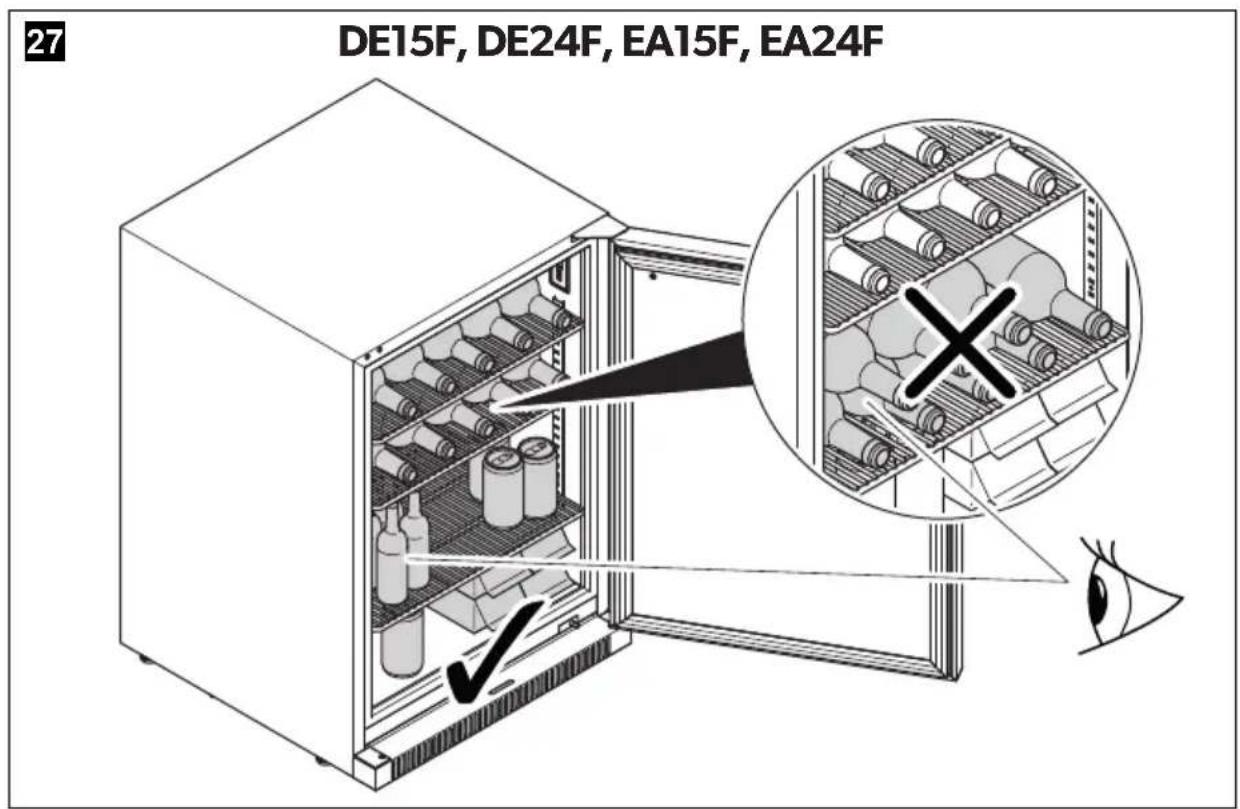
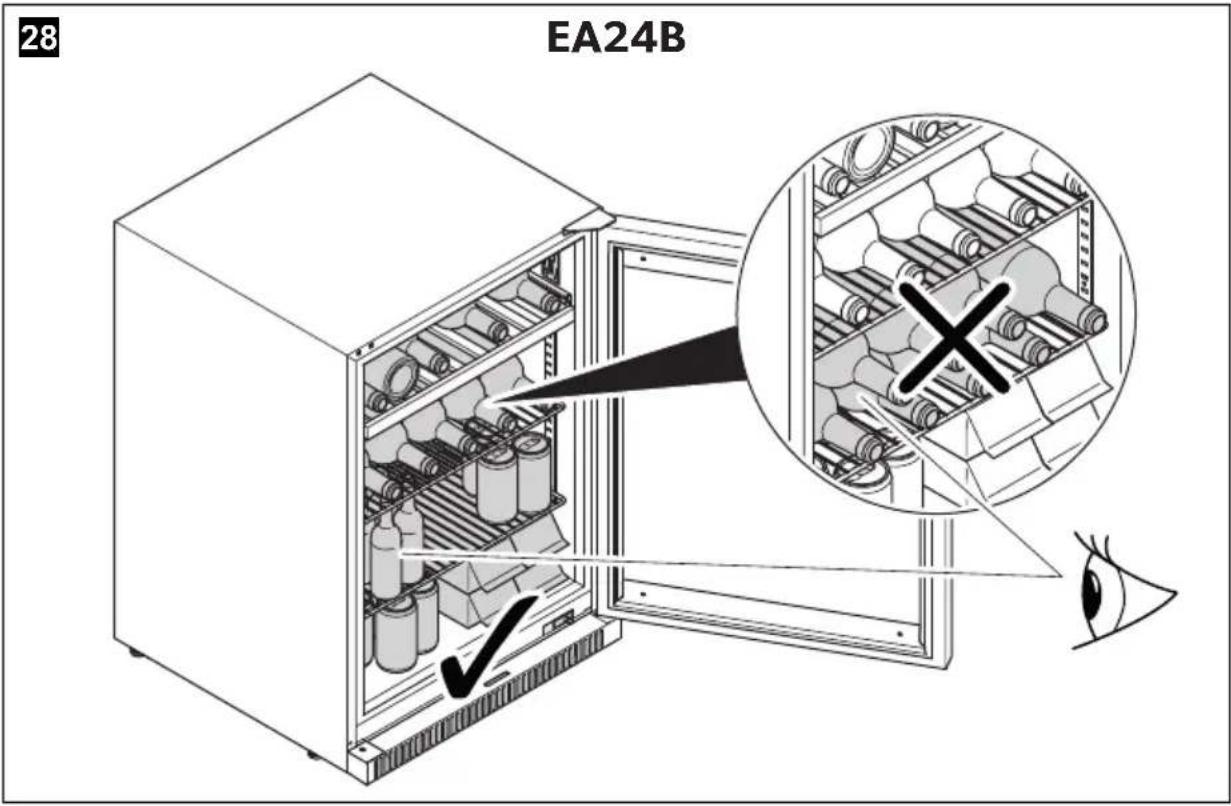
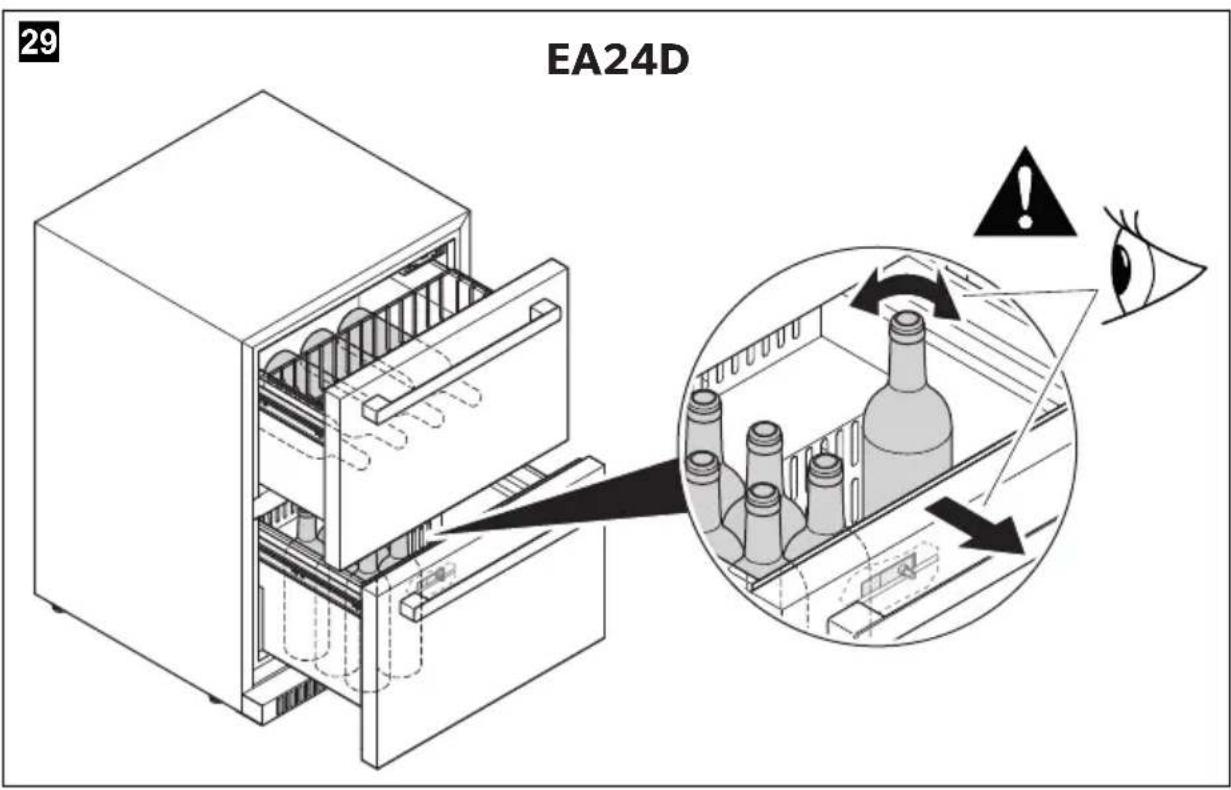
8.1 Storing bottles

CAUTION! Health hazard
Check if the cooling capacity of the device is suitable for the storage of the drinks to be cooled.

NOTICE! Damage hazard
- Ensure that liquids in glass containers are not excessively refrigerated. Liquids expand when they freeze and can therefore destroy glass containers.
- Store only closed and still sealed bottles in the device.
- Ensure that only items that can be stored at the selected temperature are placed in the device.
- If the device has been unplugged, turned off or the power has been disconnected, wait 5 minutes before switching the device back on.
- Do not open the device abruptly.
- DE15F, DE24F, EA24B, EA15F, EA24F only: Do not stack bottles.
▶ Position the beverages as shown in fig. 27, page 17 to fig. 29, page 18.
8.2 Saving energy
- Only open the beverage center as often and for as long as necessary.
- Allow warm drinks to cool down first before placing it in the device to keep cool.
- Defrost the beverage center as soon as a layer of ice forms.
-
Avoid unnecessarily low temperature settings.
-
For optimal energy consumption, position the shelves and drawers according to their position on delivery.
- On a regularly basis, ensure the door seal still fits properly.
- Clean dust and dirt from the condenser at regular intervals.
- Do not line shelves with aluminum foil, wax paper or paper towels, as they prevent proper air circulation.
8.3 Locking/unlocking the device (DE15F, DE24F, EA15F, EA24B, EA24F only)

NOTICE! Damage hazard
Ensure the key is fully inserted into the keyhole before rotating it.
▶ Insert the key into the lock and rotate it as follows:
▶ Clockwise: Lock the device.
▶ Counter-clockwise: Unlock the device.
8.4 Switching the device on/off
▶ Press the on/off button for 6 seconds to switch the device on or off.

NOTE
After switching on the device needs some time before the compressor starts.
▶ Check the device for leaks after switching it on for the first time.
8.5 Locking/unlocking the control panel (DE15F, DE24F only)
The control panel is equipped with a lock function to avoid unintentional settings.
▶ Press the on/off button and the light button simultaneously for 2 seconds to lock or unlock the control panel.
8.6 Switching the light on/off
The interior LED turns on when the device is opened and turns off when it is closed.
▶ To switch on or off the interior LED while you keep the door open, press the light button. The interior LED to switches on when you open the door next time.
EA15F, EA24B, EA24D, EA24F only
▶ To switch on or off the interior LED permanently press the light button for 6 seconds.
√ The manual light setting is activated.
√ The display shows "CL" for a few seconds when the manual light setting is switched on.
√ The display shows "OP" for a few seconds when the manual light setting is switched off.
8.7 Setting the temperature
▶ Press the setting button to adjust the temperature by 1^ C/ 1^ F.
√ The temperature value on the display flashes during the temperature setting. 3 seconds after setting the temperature, the display shows the current temperature in the device. The temperature value changes by increasing or decreasing until the set temperature in the device is reached.
8.8 Changing the temperature unit
▶ Press the setting buttons simultaneously for a 2 seconds to change the temperature unit.
√ The symbol for the corresponding unit lights up.
8.9 Defrost the device
A slight layer of ice or water droplets can form in the interior of the device if it has been cooling for longer periods. This may have several reasons (see chapter "Troubleshooting" on page 35).
- Remove all items from the device.
- Press the on/off button for 6 seconds to switch the device off.
- Leave the door open.
- Wipe the condensate water from the device with a dry cloth when the ice has melted.
- Clean the device with a damp cloth.
8.10 Moving the device

WARNING! Risk of injury
Move the device with at least 2 people.

NOTICE! Damage hazard
Ensure that the device stays in a secure and upright position during transportation.
- Remove all items from the device.
- Fix the legs to the bottom the device.
- DE15F, DE24F, EA15F, EA24B, EA24F only: Lock the door. EA24D only: Tape the drawers with duct tape.
- Protect the outside of the device with a blanket or similar.
9 S t o r i n g t h
If the device is turned off for several weeks, odor or mold can growth inside the device.
- Remove all items from the device.
- Clean and dry the inside of the device (see chapter "Cleaning and maintenance" on page 34).
- Leave the door of the device open.
10 Cleaning and maintenance

WARNING! Fire hazard
- Only a qualified person must do the repair, maintenance or recharging of the appliance.
- This appliance refrigerant circuit contains flammable refrigerant.
- Improper repairs or maintenance can lead to considerable hazards.
- Note that self-repair or nonprofessional repair can have safety consequences and might void the guarantee.

WARNING! Electrocution hazard
Always disconnect the refrigerator from the mains before you clean and service it.

NOTICE! Damage hazard
- Do not use abrasive cleaning agents or hard objects during cleaning as these can damage the refrigerator.
- Never use hard or sharp tools to remove ice or to free objects frozen onto the device.
- Do not use any mechanical tools or any other tools to speed up the defrosting process.
▶ Clean the refrigerator regularly and as soon as it becomes dirty with a damp cloth.
▶ Make sure that no water drips into the seals. This can damage the electronics.
▶ Wipe the refrigerator dry with a cloth after cleaning.
▶ Check the condensate drain regularly.
Clean the condensate drain when necessary. If it is blocked, the condensate collects on the bottom of the refrigerator.

Find additional care instructions for stainless steel and glass surfaces online on
documents.dometic.com/?object_id=69917
11 Troubleshooting
Fault Possible cause Remedy
| The device does not work. | The device is not connected to a power supply. | Connect the device, see chapter "Connecting the device to the power supply" on page 29. |
| The device is switched off. | Switch the device on, see chapter "Switching the device on/off" on page 31. | |
| The circuit breaker tripped. | Switch on the circuit breaker. | |
| The fuse has blown. | Replace the fuse. | |
| The device is not cold enough. | The temperature is not set properly. | Check the set temperature. |
| The ambient temperature could require a higher temperature setting. | Set a higher temperature (see chapter "Setting the temperature" on page 32). | |
| The door was opened frequently. | Do not open the door more often than necessary. | |
| The door was not closed properly. | Close door properly. | |
| The door is not hermetically sealed. | Check the door seal and clean it.If necessary, contact an authorized service agent to replace the seal. | |
| The condenser is too dirty. | Clean the condenser. | |
| The ventilation opening is blocked. | Clean the ventilation openings. |
Fault Possible cause Remedy
| The device switches itself on and off. | The room temperature is higher than specified in the technical data (seechapter "Technical data" on page 40). | ► Put the device in a cooler place (see chapter "Moving the device" on page 33). |
| The device was recently replenished with new food. | ► Allow the device to work for a while until the set temperature has been reached. | |
| The door was opened frequently. | ► Do not open the door more often than necessary. | |
| The door was not closed properly. | ► Close door properly. | |
| The door is not hermetically sealed. | ► Check the door seal and clean it. ► If necessary, contact an authorized service agent to replace the seal. | |
| The interior LED lamp does not work. | The device is not connected to a power supply. | ► Connect the device (see chapter "Connecting the device to the power supply" on page 29). |
| The circuit breaker tripped. | ► Switch on the circuit breaker. | |
| The fuse has blown. ► Replace the fuse. | ||
| The interior LED lamp was switched off via the control panel. | ► Switch on the interior LED lamp (see chapter "Switching the light on/off" on page 32). | |
| The device vibrates. | The device is not properly aligned. | ► Align out the device with the adjustable feet (see chapter "Adjusting the feet" on page 29). |
Fault Possible cause Remedy
| The device make noise. | The noise is probably caused by the refrigerant. At the end of each cycle, you will hear noises made by the flow of refrigerant.If temperature fluctuations occur, the contraction and expansion of the inner walls may cause pop-ping and cracking noises. | This is a normal process. |
| The device is not properly aligned. | ► Align out the device with the adjustable feet (see chapter “Adjusting the feet” on page 29). | |
| The door does not close properly. | The device is not properly aligned. | ► Align out the device with the adjustable feet (see chapter “Adjusting the feet” on page 29). |
| The door hinge was changed incorrectly. | ► Check the door hinge and reassemble correctly. | |
| The door seal is dirty. ► Clean the door seal. | ||
| The shelves are not fitted cor-rectly. | ► Check the shelves and refit correctly (seechapter “Adjust-ing the shelves” on page 29). | |
| The device beeps consistently. | The door has been open for more than 60 seconds. | ► Close the door for at least 15 minutes. |
| The door has been open fre-quently. | ► Do not open the door more often than necessary.► Close the door for at least 15 minutes. | |
| The temperature has changed significantly from the set tempera-ture. | ► Close the door and wait for the device to reach the set temperature.► Let hot food cool down before placing it into the device. | |
| The device is defect. ► Contact an authorized service agent. | ||
Fault Possible cause Remedy
| A layer of ice has formed in the device. | The door was opened frequently. | Do not open the door more often than necessary.Defrost the device if necessary (see chapter “Troubleshooting” on page 35). |
| The set temperature is too low. | Increase the temperature (see chapter “Setting the temperature” on page 32). | |
| The ambient temperature is too warm. | Move the device to a cooler place (see chapter “Moving the device” on page 33). | |
| The device is overfilled. | Remove items from the device. | |
| The door seal is defective. | Contact an authorized service agent. | |
| The door is warped. | Contact an authorized service agent. | |
| The light is switched on permanently. | Switch the light off.Contact an authorized service agent to replace the light button. | |
| The thermal fuses or the defrost thermostat are damaged. | Contact an authorized service agent. | |
| A part of the device or the entire device is defective. | Contact an authorized service agent. |
12 Warranty
Refer to the sections below for information about warranty and warranty support in the US, Canada, and all other regions.
12.1 United States and Canada
LIMITED WARRANTY AVAILABLE AT DOMETIC.COM/WARRANTY.
IF YOU HAVE QUESTIONS, OR WANT TO OBTAIN A COPY OF THE LIMITED WARRANTY FREE OF CHARGE, CONTACT:
DOMETIC CORPORATION
CUSTOMER SERVICE
ATTN: WARRENTY DEPARTMENT
13259 EAST 166TH STREET
CERRITOS, CA 90703
PHONE: 1-800-789-2206
FAX: 562 802-3391
12.2 All Other Regions
The statutory warranty period applies. If the product is defective, please contact the manufacturer's branch in your region (dometic.com/dealer) or your retailer.
For repair and warranty processing, please include the following documents when you send in the device:
• A copy of the receipt with purchasing date
- A reason for the claim or description of the fault
Note that self-repair or nonprofessional repair can have safety consequences and might void the warranty.
13 Disposal
Recycling packaging material

Place the packaging material in the appropriate recycling waste bins wherever possible.
Recycling products with non-replaceable batteries, rechargeable batteries or light sources
▶ Dispose the product in accordance with all applicable regulations.
The product can be disposed free of charge.


WARNING! Fire hazard
- The refrigerant is highly flammable. Do not open or damage the refrigerant circuit.
- The insulation of the device contains an insulating gas (see data plate). Do not damage the insulation.

WARNING! Risk of child entrapment
Before disposing of your old product:
- Remove any doors.
- Leave the shelves in the product so that children cannot climb inside.
14 Technical data
| DE15F DE24F EA15F | |||
| Input voltage 110 – 120 V | 60 Hz | ||
| Total volume 90 | 142 | 90 I | |||
| Rated input power 110 W | |||
| Ambient temperature | 10 °C (50 °F) to 38 °C (100 °F) | ||
| Storage temperature range | 1 °C (34 °F) to 22 °C (72 °F) | ||
| Noise emission 45 dB | |||
| Propellant Cyclopentane | |||
| Refrigerant | R600a | ||
| Dimensions | fig. 15, page 10 | fig. 16, page 10 | fig. 15, page 10 |
| Weight | 31.5 kg | 35 kg | 31.5 kg |
| Certifications |   | ||
Follow EPA use conditions.
| EA24B EA24D EA24F | |||
| Input voltage 110 – 120 V | 60 Hz | ||
| Total volume 150 l | |||
| Rated input power 110 W | |||
| Ambient temperature | 10 °C (50 °F) to 38 °C (100 °F) | ||
| Storage temperature range | 1 °C (34 °F) to 22 °C (72 °F) | ||
| Noise emission 45 dB | |||
| Propellant Cyclopentane | |||
| Refrigerant R600a | |||
| Dimensions | fig. 17, page 11 | ||
| Weight | 42 kg | 49 kg | 36.5 kg |
| Certifications |  | ||
Follow EPA use conditions.
15 Legal
This device complies with Part 15 of the FCC Rules. Operation is subject to the following two conditions:
- This device may not cause harmful interference.
- This device must accept any interference received, including interference that may cause undesired operation.
Changes or modifications not expressly approved by the party responsible for compliance could void the user's authority to operate the equipment.
This equipment has been tested and found to comply with the limits for a Class B digital device, pursuant to part 15 of the FCC Rules. These limits are designed to provide reasonable protection against harmful interference in a residential installation. This equipment generates, uses and can radiate radio frequency energy and, if not installed and used in accordance with the instructions, may cause harmful interference to radio communications. However, there is no guarantee that interference will not occur in a particular installation. If this equipment does cause harmful interference to radio or television reception, which can be determined by turning the equipment off and on, the user is encouraged to try to correct the interference by one or more of the following measures:
- Reorient or relocate the receiving antenna.
- Increase the separation between the equipment and receiver.
- Connect the equipment into an outlet on a circuit different from that to which the receiver is connected.
- Consult the dealer or an experienced radio/TV technician for help.
This device complies with Industry Canada license-exempt RSS standard(s).
Operation is subject to the following two conditions:
- This device may not cause interference.
- This device must accept any interference, including interference that may cause undesired operation of the device. This Class B digital apparatus complies with Canadian ICES-3(B)/NMB-3(B).
DE15F, DE24F, EA15F, EA24B, EA24F
5 Description technique
EA15F, EA24B, EA24F (fig. 8, page 6)
Pos. Explication
DE15F, DE24F, EA15F, EA24B, EA24F
ATTN: WARRENTY DEPARTMENT
13259 EAST 166TH STREET
CERRITOS, CA 90703
PHONE: 1-800-789-2206
FAX: 562 802-3391
DE15F, DE24F, EA15F, EA24B, EA24F
Componente Cantidad
DE15F, DE24F, EA15F, EA24B, EA24F
Solo EA15F, EA24B, EA24D, EA24F
documents.dometic.com/?object_id=69917
dometic.com/sales-offices