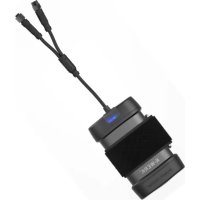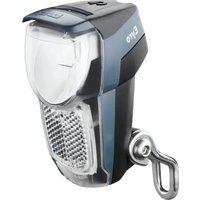
E-WERK - Power bank Busch + Müller - Free user manual and instructions
Find the device manual for free E-WERK Busch + Müller in PDF.


User questions about E-WERK Busch + Müller
0 question about this device. Answer the ones you know or ask your own.
Ask a new question about this device
Download the instructions for your Power bank in PDF format for free! Find your manual E-WERK - Busch + Müller and take your electronic device back in hand. On this page are published all the documents necessary for the use of your device. E-WERK by Busch + Müller.
USER MANUAL E-WERK Busch + Müller
natural_image
Black E-WEIK device with threaded ports and a central hub, no visible text or symbols on the body itself.E-WERK
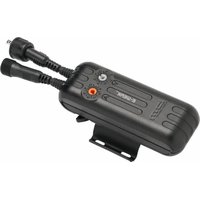
"Bike-mobile" hub dynamo powered supply unit for electronic devices
natural_image
Black E-WERK handheld device with attached sensor and adjustment knobs (no visible text or symbols on body)Instruction manual English 10-15
text_image
Labeled diagram of a medical or electronic device with numbered components and connectorsMade In Germany
busch+müller
Montage am Rad
natural_image
Close-up of two metallic electrical connectors with metal fittings (no visible text or symbols)Abb. 4
natural_image
Close-up of two circular industrial gauges with central holes, no visible text or symbols"Bike-mobile" hub dynamo powered supply unit for electronic devices
Instruction manual. Please study carefully before using E-WERK!
Capable of powering small electronic devices - e.g. mobile phone, MP3 player, GPS (also 12 V models for cars) - or charging batteries - NiCd, NiMH, Li and Pb. Translates energy created by the hub dynamo.
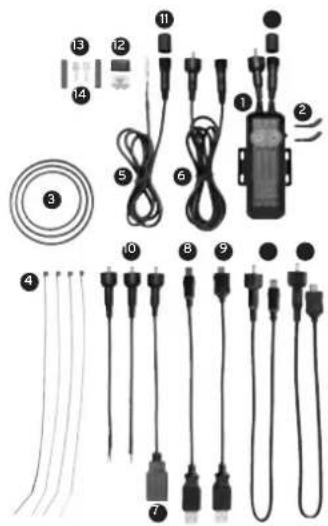
Scope of delivery
- WERK, splash and rain water proof
② plastic pens for control dials
3 rubber bands
④ cable straps
● connection cable for dynamo (80 cm)
6extension cable (100 cm)
⑦ cable, circular plug to USB socket (19 cm)
⑥ cable, USB plug to Mini-USB plug (21 cm)
9 cable, USB plug to Micro-USB plug (21 cm)
102 free cables for connecting custom plugs
caps for plug connections
12 plug (casing and inner part) for Shimano hub dynamo
132 flat connectors for SON hub dynamo
142 heat shrink tubes for SON flat connectors
15 cable, circular plug to Mini-USB plug (40 cm)
16 cable, circular plug to Micro-USB- plug (40 cm
text_image
Labeled diagram of electronic components including wires, connectors, and a walkie-talkie deviceMade In Germany
busch+müller
Mounting on a bike
The E-WERK can be fastened to a large variety of frame tubes in any suitable place by using rubber bands (3) or cable straps (4). The E-WERK is splash and rain water proof!
Mounting with cable straps: Pull one cable strap each through the opposed slots in the fixing bracket, guide them around the frame tube and tighten.
Without mounting: The E-WERK can be carried in any bag that allows a cable connected to the hub dynamo to exit. In this case, the fixing bracket can be removed from the E-WERK.
Connection to a dynamo/power source
The E-WERK works with all hub and tire driven dynamos without electronic voltage limitation. Connected to dynamos with integrated limitation, the E-WERK can give off a maximum of 7 V.
Connect E-WERK to the dynamo with the bared ends of the connection cable (5) (see the following connection options). Connect the other end to the input (IN) of E-WERK (remove cap from plug connection first). By tightening the screw caps, those connections can be made splash and rain water proof!
Connection options
Shimano hub dynamo: Twist together one bared cable end each of the connection cable and the headlight cable. Insert twisted "cable pairs" into each of the apertures of the the Shimano plug's inner part (III. 1). Please mind the polarity of the headlight, the E-WERK has no set polarity. Insert cable ends as far as possible into the casing, bend them and place them in the lateral grooves (III. 2). Cut overlapping cable strands. Click on the Shimano plug casing (III. 3). Insert the finished plug into the Shimano hub dynamo.
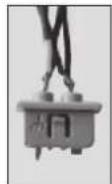
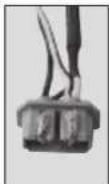
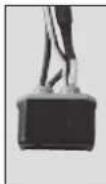
III.1 III.2 III.3
CAUTION:
Busch & Mueller vouches solely for a faultless functioning of the E-WERK. Exempt from liability is any damage to connected devices of all kinds. It cannot be guaranteed that the E-WERK is able to power all connectable devices. For example, some mobile devices cannot be charged while riding due to fluctuating voltages. Other devices have to be switched back manually to be powered by the E-WERK after stopping. Both types of devices can be powered using a suitable cache battery, e.g. our cache battery 461A (not included in scope of delivery).
For battery powered devices that do not accept external power sources and can neither be powered nor charged by the E-WERK or a cache battery, batteries can be removed and charged by the E-WERK using an external charging device. Please contact the device's manufacturer for information regarding powering and charging!
Further information can be found on our website www.bumm.de
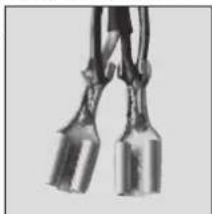
SON hub dynamo: Crimp one connection cable each - shortened if necessary - together with one headlight cable into a flat connector (III. 4). For insulation, shrink one of the included tubes around the connec-
tors, e.g. with a lighter flame. Hook the flat connector up to the SON hub dynamo. Please mind the polarity of the headlight, the E-WERK has no set polarity.
natural_image
Close-up of two metallic electrical connectors with wires (no text or symbols visible)III.4
Other dynamos, also side runners:
Connect the cable of the E-WERK together with the headlight cable (parallel connection).
Other power sources (e.g. E-Bike/car):
The E-WERK (input) can also take continuous current up to 50 V. Therefore, you can also use E-Bike batteries or car cigarette lighters (12 V) as power sources.
Connecting electronic devices and batteries
Connect devices to the output (OUT) of the E-WERK
Connection options:
1 cable, circular plug to USB socket (7) 1 cable, USB plug to Mini-USB plug (8) 1 cable, USB plug to Micro-USB plug (9) 1 cable, circular plug to Mini-USB plug (15) 1 cable, circular plug to Micro-USB-plug (16) If this direct connection (15,16) does not work, please use the cable with the USB
socket (7) to create a functioning Mini- (8) or Micro-USB connection (9).
2 cables (free ends) (10) (if the USB cables do not fit the device to be connected, these cables can be equipped with fitting plugs/sockets - generally available in specialist shops).
Please mind the polarity: plus = white cable; minus = black cable.
CAUTION: The connections to the devices are not splash or rain water proof.
Extension: The extension cable (6) can be used to extend the connection to the dynamo/power source or to the connected device.
Operation
CAUTION: Before connecting a device, always adjust voltage and current according to the device's needs (see box p. 13).
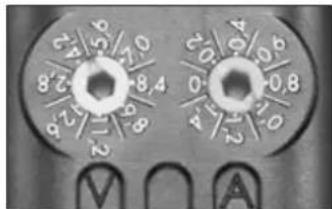
Adjusting with control dials on the E-WERK. Use the special plastic pen (remove from the bottom side of the E-WERK, hexagonal pen 2.5 mm). When reinserting into the bottom holder, the pen should snap in audibly and securely.
Output voltage: Adjustable from 2.8 V to 13.3 V - in steps of 0.7 V (this way, mobile devices can be powered/charged that are run by 1 to 3 serial Li cells or 2 to 9 serial NiCd/NiMH cells). The integrated voltage converter prevents the voltage created by the hub dynamo (depending on speed) from exceeding the set value.
Output current: Adjustable from 0.1 A to 1.5 A - in steps of 0.1 A.
Made In Germany
busch+müller
Markings between the numbered values are steps for intermediate values:
natural_image
Close-up of two circular industrial gauges with central holes, no visible text or symbolsIII. 5: set values 4.9 V and 1 A
3.5 V = marking between 2.8 V and 4.2 V 4.9 V = marking between 4.2 V and 5.6 V etc. 0.1 A = marking between 0 A and 0.2 A 0.3 A = marking between 0.2 A and 0.4 A etc.
CAUTION: Marking between highest and lowest numbered value is the respectively highest value:
13.3 V = marking between 12.6 V and 2.8 V 1.5 A = marking between 1.4 A and 0 A
Since the control dials can be switched seamlessly between the maximum and minimum values, please watch out as not to choose a wrong (too high!) value.
Only if dynamos without integrated electronic overvoltage protection are used (without the adjacent symbol), the E-WERK can give of the
highest possible amount of energy.

CAUTION: Too high voltage and/or current can destroy the connected device. When changing devices, the settings must always be adjusted properly. Mind the polarity of the output voltage when using self tailored cables.
When powering a device, the output voltage of the E-WERK is always to be set to the value that is noted on the input socket of the device, on the power supply unit or in the instruction manual of the device. This value is usually stated in connection with one of the following terms: secondary, SEC, output, OUT, or similar. If this voltage value cannot be set exactly, use the next lowest setting to it. If a current value (Ampere) is noted, the E-WERK should be set to the next lowest possible value accordingly. If no current value is stated, the current can be determined if charging time and battery capacity are known. For this purpose, the battery capacity in ampere hours is divided by the charging time in hours.
An example: A battery with a stated capacity of 3.2 Ah and a charging time of 4 h necessitates the current of the E-WERK to be set to 0.8 A [3.2 Ah / 4 h].
Settings for USB devices:
4.9 V / 0.5 A
Settings for cache battery 461A:
5.6 V / 1.5 A
Powering devices without built in batteries
In general, the E-WERK can power devices without built in batteries. When starting the ride, the output voltage of the E-WERK slowly increases with the velocity. Therefore, the connected device will not operate before the necessary minimum voltage is reached. This can be remedied by a cache battery (as offered by different manufacturers, e.g. our cache battery 461A): Before using the battery, set the output voltage on the E-WERK's control dial according to the cache battery. Set output current to 1.5 A.
Powering and charging devices without built in batteries
Many mobile devices have a low voltage entrance for powering them with an external power supply unit. Connect the E-WERK to this entrance. The way that device and battery act when connecting an external power source has to be differentiated:
a. If the device automatically switches to the external power source upon connecting the E-WERK, the built in battery is neither used nor charged. (If the battery shall be charged after all, connect the E-WERK directly to the battery contacts - if possible).
b. If the connected device's built in battery is charged simultaneously and unavoidably upon connecting the E-WERK, caution must be exercised so that the battery is not overcharged. Many devices feature an automatic charging deactivation that prevents overcharging. If such a deactivation is not present and if the device shows the charge status, the battery must be disconnected from the E-WERK immediately as soon as it is fully charged. If such a deactivation is not present and if the device does not show the charge status, a warming battery is a sign of the onset of overcharging.
Direct charging of batteries
Independently from devices, single batteries can be charged by the E-WERK separately or joined together. Use batteries purchased in specialist shops (or our cache battery 461A*) and connect the E-WERK to + and - of the battery.
Depending on the number of cells and the battery technology, the E-WERK has to be set to the correct value:
| voltage setting of E-WERK for ... | |||
| number of cells | NiCd/NiMH nominal voltage per cell 1.2 V | Li-Ion/Polymer nominal voltage per cell 3.6 V | Pb nominal voltage per cell 2 V |
| 1 4.2 V | |||
| 2 2.8 V | 8.4 V | ||
| 3 4.2 V | 12.6 V 7.0 V | ||
| 4* 5.6 V | |||
| 5 7.0 V | |||
| 6 8.4 V | |||
| 7 9.8 V | |||
| 8 11.2 V | |||
| 9 12.6 V | |||
With these values, overcharging is not possible. CAUTION: These values only apply to batteries without a charging electronic.
Too high voltage can lead to the destruction of the connected battery. If more than one cell is connected serially during charging, all cells must have the same build, capacity and charge state.
Made In Germany
busch+müller
The output current of the E-WERK should not be set higher than the capacity value stated on the battery. The maximum value for the E-WERK is 1.5 A (should be set e.g. for our buffer battery 461A). Li and Pb batteries are charged 100% when using the values stated above. NiCd and NiMH batteries are charged to about 80% (to prevent overcharging, limited voltage is used for charging).
Already at a speed of about 15 km/h the charging time of the E-WERK is on par with standard mains connected charging units.
Powering battery headlights by Busch & Mueller
The E-WERK can be used for charging and - If needed - simultaneous powering of battery headlights by Busch & Mueller. The following values have to be set:
IXON IQ: 6.3 V, 1 A (use charging socket, charge control integrated in the headlight)
IXON IQ Speed: 7 V, 1.5 A (connect E-WERK to one socket of the battery, headlight to the other)
BIG BANG: 8.4 V, 1.5 A (use cache battery)
Fitting adaptor cables for headlights are available upon request. The batteries of IXON IQ Speed and BIG BANG can be charged separately (without using the headlight).
Simultaneous use of dynamo lighting system and E-WERK
A simultaneous use is possible. Please note that a functioning parallel operation until 6.3 V (output voltage E-WERK) can only be guaranteed when using a diode rear light and IQ headlight by Busch & Mueller. The output of the lighting system drops up to 50% depending on the connected device. For other lighting systems, no statements can be made. Simultaneous operation diminishes the output accordingly.
Please note: Depending on national law, you may not be allowed to use the E-WERK and the lighting system at the same time after dark.
Technical details
Ref. no.: 361
IN: 0 to 40 V AC voltage, 0 to 100 kHz. Soft limitation at 50 V peak voltage. 0 to 50 V DC voltage. No polarity has to be considered
OUT: voltage and current limiting, short circuit proof, reverse polarity proof
Output: max. 16 W
Idle output: 0.03 W at 30 km/h
Charge time (non binding): at approx. 15 km/h comparable to charging with standard mains connected chargers.
Never dispose of electronic parts with your domestic waste but discard as hazardous waste!
Technical modifications reserved.
E-WERK
text_image
Labeled diagram of electronic components and connectors, showing numbered parts for identification.Made In Germany
busch+müller
Montage sur la roue
natural_image
Close-up of two metallic electrical connectors with wires (no visible text or symbols)Fig. 4
natural_image
Close-up of two circular industrial dials with central hub and side holes, no visible text or symbolstext_image
Labeled diagram of electrical connectors and wires, showing numbered components for identificationMade In Germany
busch+müller
natural_image
Close-up of two metallic electrical connectors with wires (no text or symbols visible)Afb. 4