Profile PLD621DWBB - Cooker GE - Free user manual and instructions
Find the device manual for free Profile PLD621DWBB GE in PDF.

User questions about Profile PLD621DWBB GE
0 question about this device. Answer the ones you know or ask your own.
Ask a new question about this device
Download the instructions for your Cooker in PDF format for free! Find your manual Profile PLD621DWBB - GE and take your electronic device back in hand. On this page are published all the documents necessary for the use of your device. Profile PLD621DWBB by GE.
USER MANUAL Profile PLD621DWBB GE
SAFETY INFORMATION 3
USING THE RANGE
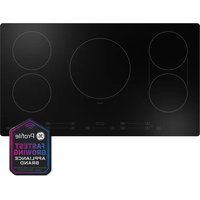
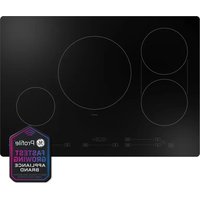
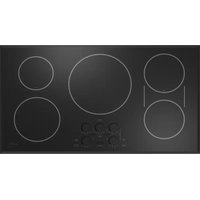
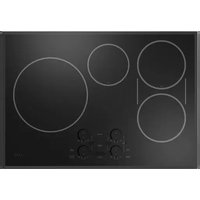
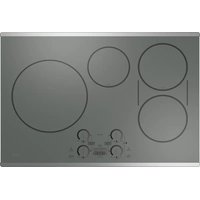
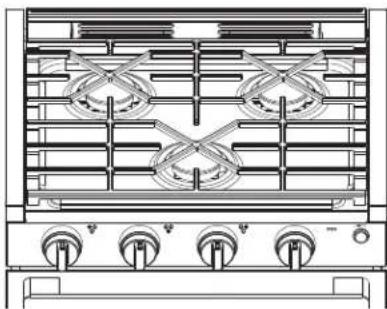
Cooktop 7
Oven 8
Oven and Control Knob Lights 9
Oven Racks 9
Aluminum Foil and Oven Liners 9
Oven Vents 9
Oven Cooking Guide 10
CARE AND CLEANING
Cooktop Surfaces 11
Exterior Surfaces 12
Interior Surfaces 12
Oven Light 14
INSTALLATION INSTRUCTIONS
Before You Begin 15
Cabinet And Counter Cutout Dimensions . .16
Installation Clearances 17
Gas Installation Locations 18
Oven Installation 18
TROUBLESHOOTING TIPS 22
LIMITED WARRANTY 23
CONSUMER SUPPORT 24
Write the model and serial numbers here:
Model #
Serial #
You can find the rating label underneath the cooktop.
OWNER'S MANUAL AND INSTALLATION INSTRUCTIONS
PLD617RW
PLD617DW
PLD617EW
PLD621RW
PLD621DW
PLD621EW
ENGLISH/FRANÇAIS/ ESPÁÑOL
THANK YOU FOR MAKING GE APPLIANCES A PART OF YOUR RV.
Whether you grew up with GE Appliances, or this is your first, we're happy to have you in the family.
We take pride in the craftsmanship, innovation and design that goes into every GE Appliances product, and we think you will too. Among other things, registration of your appliance ensures that we can deliver important product information and warranty details when you need them.
Register your GE appliance now online. Helpful websites and phone numbers are available in the Consumer Support section of this Owner's Manual.

Profile
IMPORTANT SAFETY INFORMATION READ ALL INSTRUCTIONS BEFORE USING THE APPLIANCE
WARNING
Read all safety instructions before using the product. Failure to follow these instructions may result in fire, electrical shock, serious injury or death.
WARNING
If the information in this manual is not followed exactly, a fire or injury result, causing property damage, personal injury or death.
- Do not store or use gasoline or other flammable vapors and liquids in the vicinity of this or any other appliance.
-
WHAT TO DO IF YOU SMELL GAS
-
Do not try to light any appliance.
Do not touch any electrical switch. - Do not use any phone in your recreational vehicle.
Clear the recreational vehicle of all occupants.
Turn off the gas supply tank valve(s) or main gas supply.
- Immediately call your gas supplier for instructions.
If you cannot reach your gas supplier, call the fire department.
- Have the gas system checked and leakage source corrected by a qualified installer, service agency, manufacturer, dealer or the gas supplier.
IMPORTANT SAFETY INFORMATION READ ALL INSTRUCTIONS BEFORE USING THE APPLIANCE
WARNING
GENERAL SAFETY INSTRUCTIONS
WARNING
Carbon Monoxide Poisoning.
Never use this appliance as a space heater to heat or warm the room. Doing so may result in Carbon Monoxide poisoning or overheating of the oven.
A window or air vent should be open slightly while using this appliance. Gas flames consume oxygen which must be replaced to assure proper combustion.
Use this appliance for its intended purpose as described in this owner's manual.
Have your range installed by a qualified installer in accordance with the provided installation instructions.
Any adjustment and service should be performed only by a qualified gas range installer or service technician. Do not attempt to repair or replace any part of your range unless it is specifically recommended in this manual.
- Your range is shipped from the factory set for use with propane gas. It can not be converted to any other gas.
Have the installer show you the location of the range gas shut-off valve and how to turn it off if necessary.
- Be sure all packing materials are removed from the range before operating to prevent ignition of these materials.
- Avoid scratching or impacting glass doors, cooktops, or control panels. Doing so may lead to glass breakage. Do not cook on a product with broken glass. Shock, fire, or cuts may occur.
- Do not leave children alone or unattended in an area where an appliance is in use. They should never be allowed to climb, sit or stand on any part of the appliance.
CAUTION
Do not store items of interest in nets above an oven - children given to reach items could be
- CAUTION Do not store items of interest to children in cabinets above an oven - children climbing on the oven to reach items could be seriously injured.
- Never block the vents (air openings) of the range. They provide the air inlets and outlets that are necessary for the range to operate properly with correct combustion. Air openings are located at the rear of the cooktop, at the top and bottom of the oven door, and at the bottom of the range.
Use only dry pot holders—moist or damp pot holders on hot surfaces may result in burns from steam. Do not let pot holders touch surface burners, burner grate, or oven heating element. Do not use a towel or other bulky cloth in place of pot holders.
- Do not touch the heating elements or the interior surface of the oven. These surfaces may be hot enough to burn even though they are dark in color. During and after use, do not touch, or let clothing or other flammable materials contact any interior area of the oven; allow sufficient time for cooling first. Other surfaces of the appliance may become hot enough to cause burns. Potentially hot surfaces include the burners, grates, oven vent opening, surfaces near the opening, and crevices around the oven door.
- Do not heat unopened food containers. Pressure could build up and the container could burst, causing an injury.
Cook food thoroughly to help protect against foodborne illness. Minimum safe food temperature recommendations can be found at IsItDoneYet.gov and fsis.usda.gov. Use a food thermometer to take food temperatures and check several locations.
- Do not allow anyone to climb, stand or hang on the oven door, drawer or cooktop. They could damage the range or tip it over causing severe injury or death.
READ AND SAVE THESE INSTRUCTIONS
IMPORTANT SAFETY INFORMATION READ ALL INSTRUCTIONS BEFORE USING THE APPLIANCE
WARNING
KEEP FLAMMABLE MATERIALS AWAY FROM THE RANGE
Failure to do so may result in fire or personal injury.
- Do not store or use flammable materials in an oven or near the cooktop, including paper, plastic, pot holders, linens, wall coverings, curtains, drapes and gasoline or other flammable vapors and liquids.
Never wear loose-fitting or hanging garments while
using the appliance. These garments may ignite if they contact hot surfaces causing severe burns.
- Do not let cooking grease or other flammable materials accumulate in or near the range. Grease in the oven or on the cooktop may ignite.
WARNING
IN THE EVENT OF A FIRE, TAKE THE FOLLOWING STEPS TO PREVENT INJURY AND FIRE SPREADING
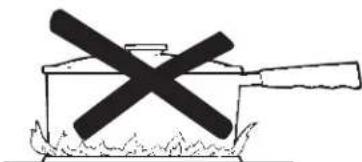
- Do not use water on grease fires. Never pick up a flaming pan. Turn the controls off. Smother a flaming pan on a surface unit by covering the pan completely with a well-fitting lid, cookie sheet or flat tray. Use a multi-purpose dry chemical or foam-type fire extinguisher.
If there is a fire in the oven during baking, smother the fire by closing the oven door and turning the oven off or by using a multi-purpose dry chemical or foam-type fire extinguisher.
WARNING
COOKTOP SAFETY INSTRUCTIONS
- Never leave the surface burners unattended. Foods, especially oily foods, may ignite resulting in fire that could spread to surrounding cabinets.
Never leave oil unattended while frying. If allowed to heat beyond its smoking point, oil may ignite resulting in fire that may spread to surrounding cabinets. Use a deep fat thermometer whenever possible to monitor oil temperature.
To avoid oil spillover and fire, use the minimum amount of oil when using a shallow pan-frying and avoid cooking frozen foods with excessive amounts of ice.
Use proper pan size and avoid pans that are unstable or easily tipped. Select cookware that is matched to the size of the burner. Burner flames should be adjusted so that they do not extend beyond the bottom of the pan. Excessive flame may be hazardous.
Always use the HI position when igniting the top burners and make sure the burners have ignited.
- When using glass/ceramic cookware, make sure it is suitable for cooktop service; others may break because of sudden change in temperature.
To minimize the possibility of burns, ignition of flammable materials and spillage, the handle of a container should be turned toward the center of the range without extending over nearby burners.
- Do not use a wok. Doing so may trap heat and block air to the burner resulting in a carbon monoxide hazard.
- Do not use aluminum foil to cover the grates or line any part of the cooktop. Doing so may result in carbon monoxide poisoning, overheating of the cooktop surfaces, or a potential fire hazard.
IMPORTANT SAFETY INFORMATION READ ALL INSTRUCTIONS BEFORE USING THE APPLIANCE
WARNING
OVEN SAFETY INSTRUCTIONS
WARNING
NEVER cover any slots,
holes, or passages in the oven bottom or cover an entire rack with materials such as aluminum foil or oven liners. Doing so blocks air flow through the oven and may cause carbon monoxide poisoning. Never place foil or oven liners on the oven bottom. They can trap heat causing risk of smoke or fire.
-
Stand away from the range when opening the oven door. Hot air or steam which escapes can cause burns to hands, face and/or eyes.
-
Never place cooking utensils, pizza or baking stones, or any type of foil or liner on any surface other than racks. These items can trap heat or melt, resulting in damage to the product and risk of shock, smoke or fire.
- Place oven racks in desired location while oven is cool. If rack must be moved while oven is hot, be careful to avoid touching hot surfaces.
- Do not leave items such as paper, cooking utensils, or food in the oven when not in use. Items stored in an oven can ignite.
- Do not leave items on the cooktop near the oven vent. Items may overheat resulting in a risk of fire or burns.
WARNING
FIRE OR EXPLOSION HAZARD
If the information in this manual is not followed exactly, a fire or explosion may result causing property damage, personal injury or death.
Installation must be performed by a qualified installer.
Read these instructions completely and carefully.
Installation of this appliance must conform with state and other codes or, in the absence of such codes, with:
In the USA: the Standard for Recreational Vehicles, ANSI/NFPA 1192.
In Canada: CAN/CSA Z-240.4.2-08 Installation
Requirements for Propane Appliances and Equipment in Recreational Vehicles.
This range has been design-certified by CSA
International according to ANSI Z21.57, latest edition and CAN1-1.16-M79, latest edition.
When installing a gas appliance, the use of old flexible connectors can cause gas leaks and personal injury. Always use a NEW flexible connector.
Leak testing of the appliance shall be conducted according to the manufacturer instructions.
If an external electrical source is utilized, the appliance, when installed, must be electrically grounded in accordance with state or, in the absence of such codes, with the National Electrical Code, ANSI/ NFPA 70.
Do not install this product with an air curtain hood or other range hood that operates by blowing air down on the cooktop. This airflow may interfere with operation of the gas burners resulting in fire or explosion hazard.
PROPER DISPOSAL OF YOUR APPLIANCE
Dispos of or recycle your appliance in accordance with Federal and Local Regulations. Contact your local authorities for the environmentally safe disposal or recycling of your appliance.
READ AND SAVE THESE INSTRUCTIONS
Cooktop
Before lighting, confirm all control knobs are in the OFF position. Make sure the main gas tank
Do not operate the burner for an extended period of time without cookware on the grate. The finish may discolor or chip without cookware to absorb the heat.
Cookware should be positioned over the grates and not overhanging the side trim or countertop
- Be sure the burners and grates are cool before you place your hand, a pot holder or cleaning ma
Lighting a Surface Burner
WARNING
Burners should be operated only
when covered by cookware. Burner flames are covered by cookware present a risk of fire clothing ignition. Never let flames extend beyond the sides of the cookware. Failure to comply may in serious injury.
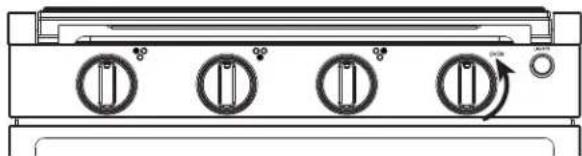
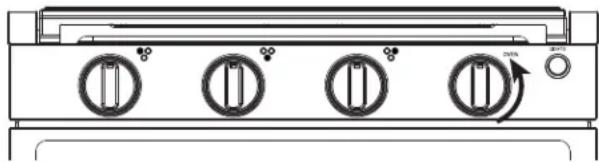
Select a burner and find its control knob. Push and turn the appropriate burner control knob counterclockwise to the HI position. Sparking will continue as long as the knob remains pressed. Once burner is lit, continue
pressing knob for at least 5 seconds until the flame sensor is heated. Release the knob and confirm the burner remains lit. If the burner remains lit, rotate the knob to adjust the flame. If the burner does not remain lit, refer to the Troubleshooting Tips section.

Push the control knob in and turn it to the HI position.
Selecting a Flame Size
Watch the flame, not the knob, as you adjust heat. When rapid heating is desired, the flame size should match the size of the cookware you are using. Flames larger than the bottom of the cookware will not heat faster and may be hazardous.
These flames are too large for the pot
Lighting the Cooktop Manually
If a cooktop burner fails to ignite, you may light the burner manually by following the instructions below:
Push and turn the appropriate burner control knob counterclockwise to the HI position.
Push the control knob in and turn it to the HI position.
While continuing to press the knob, immediately strike and place a burning long wooden match or a gas lighter near the burner to light. Once burner is lit, continue pressing knob for at least 5 seconds until the flame sensor is heated. Release the knob and confirm the burner remains lit. If the burner remains lit, rotate the knob to adjust the flame. If the burner does not remain lit, refer to the Troubleshooting Tips section.
If the Flame Goes Out
Immediately turn the control knob to OFF position. Wait at least 5 minutes and light the burner again.
Turning Off the Cooktop
To turn the cooktop burners off, rotate the control knobs clockwise to the OFF position. Do not touch or place any objects on the grates until the cooktop has cooled.
Cooktop
Cooktop Burner Usage
Use the front burner for large cookware and faster boiling. The rear burners are intended for general cooking and simmering.
- Do not operate the burner for an extended time without cookware on the grate. The finish on the grate may discolor or chip without cookware to absorb the heat.
-
Do not attempt to disassemble any burner while another burner is on. Damage to the product may occur.
-
Be sure the burners and grates are cool before you place you hand, a pot holder or cleaning materials on the cooktop.
Size cookware appropriately to the flames. The rear burners are intended for general cooking and simmering. Use the front burner for larger cookware and faster boiling. Cover your cookware with a lid to bring liquids to a boil faster.
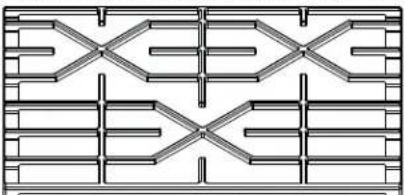
Cooktop Grate Orientation
The proper install orientation for the grate is as shown.
Oven
Lighting the Oven
NOTE: Before lighting, make sure the main gas tank valve is opened.
- Pull the oven handle to open the door.
- Push and turn the oven control knob counterclockwise to the position.
-
Keep the oven control knob pressed for at least 15 seconds until the oven pilot is lit and the pilot sensor is heated. If air is in the supply line, it may take up to a minute for the air to purge and the oven pilot to light.
-
Release oven control knob and visually confirm oven pilot remains lit. If oven pilot goes out, repeat steps 3 and 4.
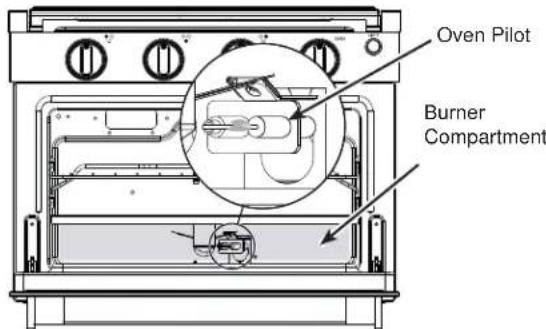
- Rotate the oven control knob to the highest oven temperature and visually confirm that the pilot has ignited the bake burner.
- Rotate the oven control knob to desired temperature. Close oven door
WARNING In the event of an ignition system failure, the oven is inoperable and no attempt should be made to operate it. Do not attempt to light the oven manually.
WARNING Do not store objects in burner compartment.
If the Flame Goes Out
Immediately turn the oven control knob to the OFF position. Wait at least 5 minutes before trying to re-light the oven burner.
Turning Off the Oven
To turn off the oven, rotate the oven control knob clockwise to the OFF position.
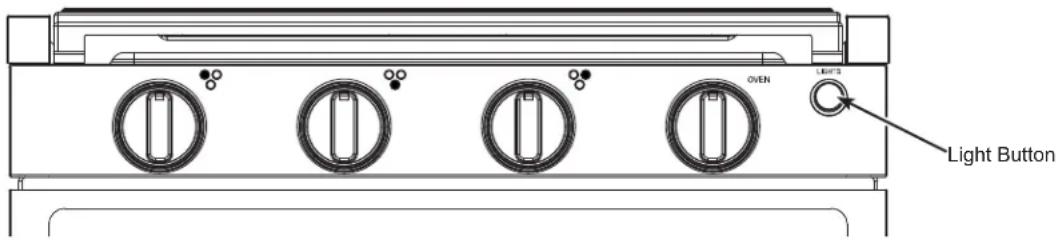
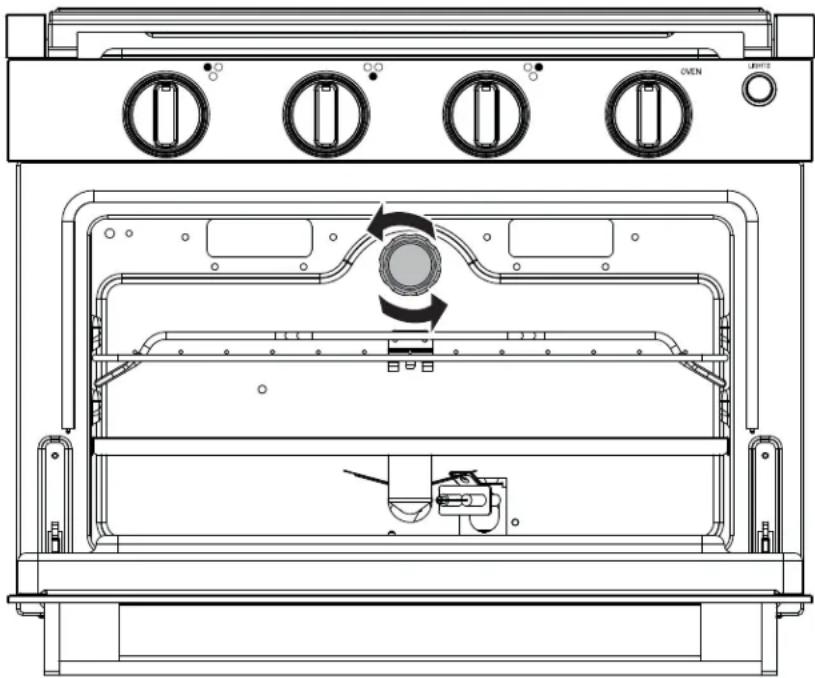
Oven and Control Knob Lights
Press the Light button on the control panel to turn on/off the oven and control knob lights. All lights turn on and off together.
Oven Racks
When placing and removing cookware, pull the rack out to the bump (stop position) on the rack support. To remove a rack, raise the rear of the rack above the rack supports, pull the rack towards you until it is free. To replace a rack, place the rear of the rack above the rack support, then push the rack to the rear of the oven until the rack falls into place.
Aluminum Foil and Oven Liners
CAUTION
Do not use any type of foil or oven
liner to cover any oven surface other than racks. These items can trap heat or melt, resulting in damage to the product and risk of shock, smoke or fire. Damage from improper use of these items is not covered by the product warranty.
Do not use more foil than necessary and never entirely cover an oven rack with aluminum foil. Keep foil at least 1 - 1 / 2 from oven walls to prevent poor heat circulation.
Oven Vents
Never block the vents (air openings) of the range. They provide the air for the inlet and outlet that are necessary for the range to keep cool and operate properly with correct combustion. Never cover the opening with aluminum foil or any other material. Vents are located along the rear of the cooktop.
Oven Cooking Guide
Preheat oven for 10-15 minutes before inserting food. Use rack position 2 for standard baking. Adjust position as needed. Limit door openings as much as possible to retain heat in the oven.
PLD617RW
PLD617DW
PLD617EW

PLD621RW
PLD621DW
PLD621EW
Oven Cookware
The material, finish, and size of cookware affect baking performance. Dark, coated and dull pans absorb heat more readily than light, shiny pans. Pans that absorb heat more readily can result in a browner, crisper and thicker crust. If using dark and coated cookware check food earlier than the minimum cook time.
Cooktop Surfaces
Be sure all controls are off and all surfaces are cool before cleaning any part of the range.
Porcelain Enamel Cooktop
Do not use oven cleaners, abrasive cleansers, strong liquid cleansers, steel wool, plastic scouring pads, or cleaning powders on the cooktop surface. Clean with a mild soap and water or a 50/50 solution of vinegar and water. Rinse with clean water and dry with a soft cloth.
When cleaning surfaces, make sure that they are at room temperature. Spillage of marinades, fruit juices, tomato sauces and basting liquids containing acids may cause discoloration and should be wiped up as soon as hot surfaces cool, then clean and rinse. Use caution to not spill water into cooktop openings.
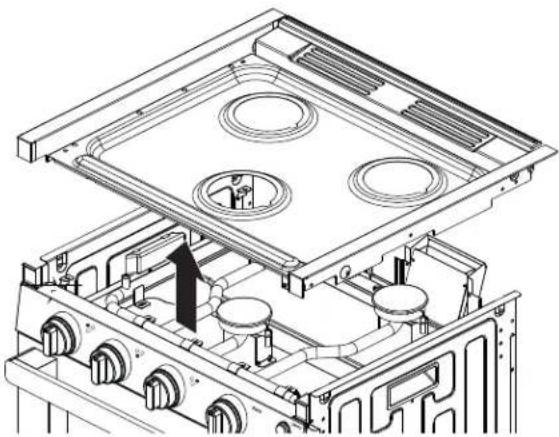
Removing the Cooktop for Cleaning in Case of Spillage
WARNING
Care should be taken to not damage
or modify gas tubing and wiring under cooktop. Doing so may result in fire or explosion hazard.
- Disconnect power at the main fuse or circuit breaker panel before removing cooktop.
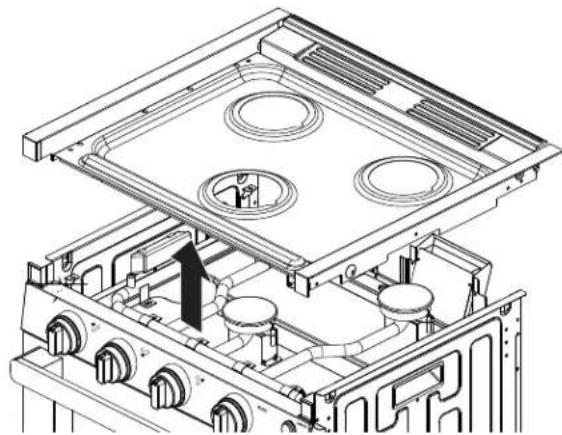
- Lift up and remove grate from cooktop.
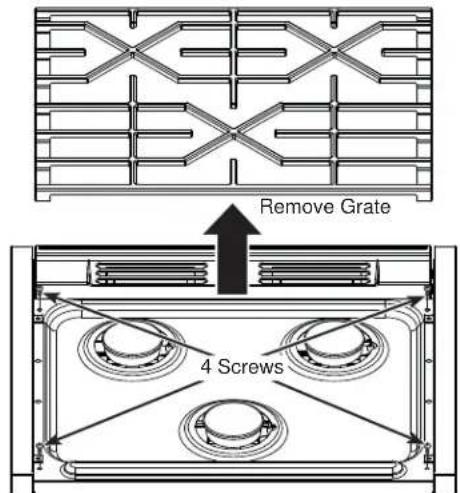
- Remove the 4 screws on the cooktop with a Phillips screwdriver, then lift up on the cooktop to remove.
- Clean with a mild soap and water solution with a damp cloth. Rinse with clean water and dry with soft cloth.
- Place the cooktop back into position and attach with the 4 screws using a Phillips screwdriver.
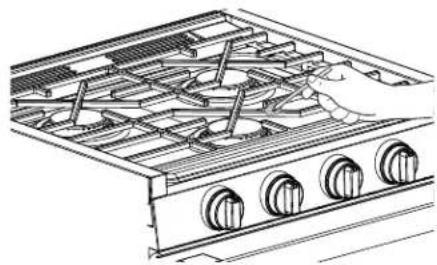
Burner Caps
Wipe burner caps with hot, soapy water and rinse with clean water. You may scour with a plastic scouring pad to remove burned-on food particles.
Burner Heads
Wipe the burner heads routinely, especially after bad spillovers which could clog the burner openings. Wipe with hot, soapy water. Rinse with clean water. For more stubborn stains, use a brush with plastic bristles.
NOTE: Do not use steel wool or scouring pads to clean the burner parts as these may clog the openings. The ports in the burner heads must be kept clean at all times for an even, unhampered flame. Clogged or dirty burner ports or electrodes will not allow the burner to operate properly.
Burner Grates
Grates should be washed in hot, soapy water and rinsed with clean water. To soften burned-on food, place grates in a solution containing 1/4 -cup of household ammonia for several hours. Afterward, scrub grates with a plastic scouring pad soaked in hot, soapy water. Rinse well and dry. DO NOT use bleach or rust removers on the cooktop or burner grates.
Exterior Surfaces
Be sure all controls are off and all surfaces are cool before cleaning any part of the range.
Control Knobs
The control knobs may be removed for easier cleaning. Make sure the knobs are in the OFF positions and pull them straight off the stems for cleaning. The knobs can be washed with soap and water. Make sure the insides of the knobs are dry before replacing. Replace the knobs in the OFF position to ensure proper placement.
Painted Cooktop Trim
Clean cooktop trim with soap and water or a vinegar and water solution. Do not use commercial oven cleaners, cleaning powders, steel wool or harsh abrasives on any painted surface.
Stainless Steel Surfaces
Do not use a steel wool pad; it will scratch the surface. To clean the stainless steel surface, use warm sudsy water or a stainless steel cleaner or polish. Always wipe the surface in the direction of the grain. Follow the cleaner instructions for cleaning the stainless steel surface. Cleaners with oxalic acid such as Bar Keepers Friend Soft Cleanser will remove surface rust, tarnish, and small blemishes. Use only a liquid cleanser free of grit and rub in the direction of the brush lines with a damp, soft sponge.
Interior Surfaces
Oven Interior
Do not use oven cleaners, abrasive cleaners, strong liquid cleansers, steel wool, scouring pads, or cleaning powders on the interior of the oven. Spillage of marinades, fruit juices, tomato sauces and basting liquids containing acids may cause discoloration and should be wiped up immediately. Let hot surfaces cool, then clean and rinse. Clean with a mild soap and water or vinegar and water solution. Rinse with clean water and dry with a soft cloth. When cleaning surfaces, make sure that they are at room temperature. Do not rub or clean the door gasket - it has an extremely low resistance to abrasion. If you notice the gasket becoming worn, frayed or damaged in any way or if it has become displaced on the door, you should have it replaced.
Oven Racks
All racks can be washed with warm, soapy water. Racks may be more difficult to slide over time. Put some vegetable oil on a soft cloth or paper towel and rub onto the left and right edges. NOTE: Using other cooking oils will cause a discoloring or a rust like color residue on the racks and cavity sides. To clean this residue, use a soap and water or a vinegar and water solution. Rinse with clean water and dry with a soft cloth.
Oven Door
Door Interior and Exterior
Do not allow excess water to run into any of the holes or slots in the door. Wipe dish soap over any baked-on spatters on the glass. Use a single sided safety blade to clean it off. Then wipe over the glass with a soapy cloth to remove any residue and dry off.
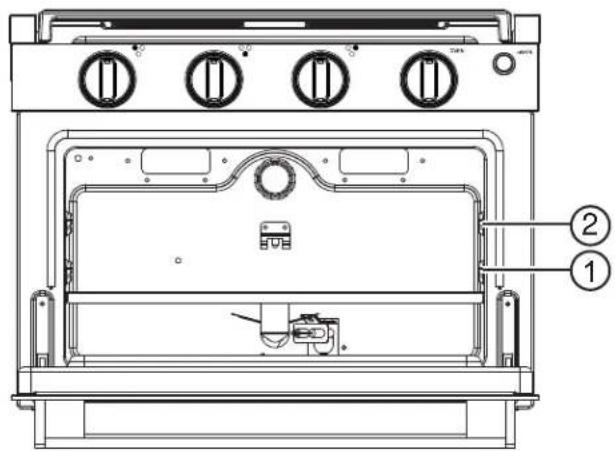
To Remove the Door:
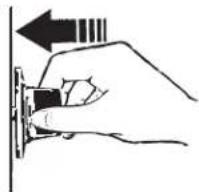
- Fully open the door.
- Pull the hinge locks up and away from the range frame to the unlocked position.
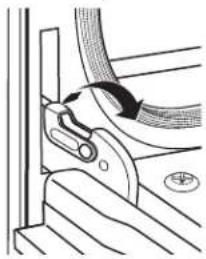
Pull hinge locks up to unlock
- Firmly grasp both sides of the door near the top.
- Close door until the top of the door is from the range frame.
- Lift door up and away from the range until both hinge arms are clear of the slots in the range frame.
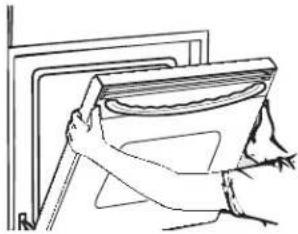
Removal position
To Replace the Door
- Firmly grasp both sides of the door near the
- With the door at the same angle as the removal position, rest the notch on the underside of the left hinge arm on the bottom edge of the left hinge slot. The notch in the hinge arm must be fully seated into the bottom of the slot. Repeat for the right side.
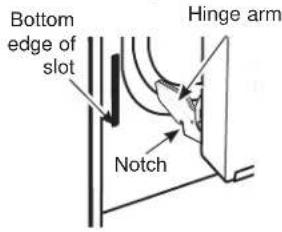
Rest notch on bottom edge of hinge slot
- Fully open the door. If the door will not fully open, the notches in the bottoms of the hinge arms have not seated correctly in the bottom edge of the slot. Lift the door off the range and repeat previous step.
approximate hinge locks toward the range cavity and down to the locked position.

Push hinge locks down to lock
- Close the oven door.
Oven Light
CAUTION
BURN HAZARD: The glass cover and bulb should be removed when cool. Touching hot glass with bare hands or a damp cloth can cause burns.
Before replacing the bulb, disconnect electrical power to the oven. Let the bulb cool completely before removing it. For your safety do not touch a hot bulb with a damp cloth. If you do the bulb may break.
- Disconnect power to oven before changing bulb.
-
Remove the glass cover of the lamp-holder by unscrewing counter-clockwise.
-
Remove the lamp and replace with a lamp resistant to high temperatures (300 C / 572 F) with the following characteristics: - Voltage: 12V - Wattage: 10W - Type: G4 - Lamp Type: Halogen
- Replace the glass cover by screwing the cover clockwise.
- Reconnect the power to the oven.
Installation Instructions
Questions? Visit GEAppliances.com. In Canada, visit GEAppliances.ca.
WARNING
Certain Detection Equipment
is Required in Recreation Vehicles per NFPA 1192. Required equipment shall be UL approved for use in recreational vehicles. Install and use equipment in accordance with the manufacturer's instructions.
Smoke Alarm - Section 6.3.1 identifies that all recreational vehicles shall be equipped with a smoke alarm.
Carbon Monoxide Alarm - Section 6.3.2 identifies that all recreational vehicles shall be equipped with a Carbon Monoxide alarm.
Propane Detector - Section 6.3.3 identifies that all recreational vehicles with a propane appliance shall be equipped with a propane detector.
BEFORE YOU BEGIN
IMPORTANT - Save these instructions for local inspector's use.
IMPORTANT - Observe all governing codes and ordinances.
IMPORTANT - Remove all packing material and literature from oven before connecting gas and electrical supply to range.
IMPORTANT - To avoid damage to your cabinets, check with your builder or cabinet supplier to make sure that the materials used will not discolor, delaminate or sustain other damage. This oven has been designed in accordance with the requirements of CSA International and complies with the maximum allowable wood cabinet temperatures of 194^ (90^) .
Note to Installer - Be sure to leave these instructions with consumer.
Note to consumer - Keep these instructions for future reference.
Proper installation is the responsibility of the installer. Product failure due to improper installation is not covered under warranty.
WHAT'S IN THE BOX
Make sure you have all the following items included in the packaging. If any item is damaged or missing, contact your dealer.
- Range Oven x 1
Cooktop Grate x 1 - Cooking Rack x 1
-
8-15 x 1" wood screw x 4
- Owner's Manual and Installation Instructions x 1
TOOLS YOU WILL NEED
Adjustable wrench (2)
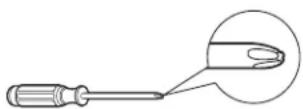
Phillips screwdriver
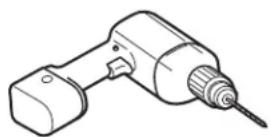
Electric drill with 1/8 drill bit
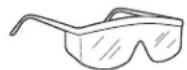
Safety glasses

Gloves
MATERIALS YOU WILL NEED
Pipe joint sealant or UL-approved pipe thread tape with Teflon that resists action of natural and propane gases
Liquid leak detector or soapy water.
Propane supply line with a 3/8" flare female connection
Teflon: Registered trademark of DuPont
CABINET AND COUNTER CUTOUT DIMENSIONS
Ensure cabinets and countertop meet the requirements from the table before installing the range oven.
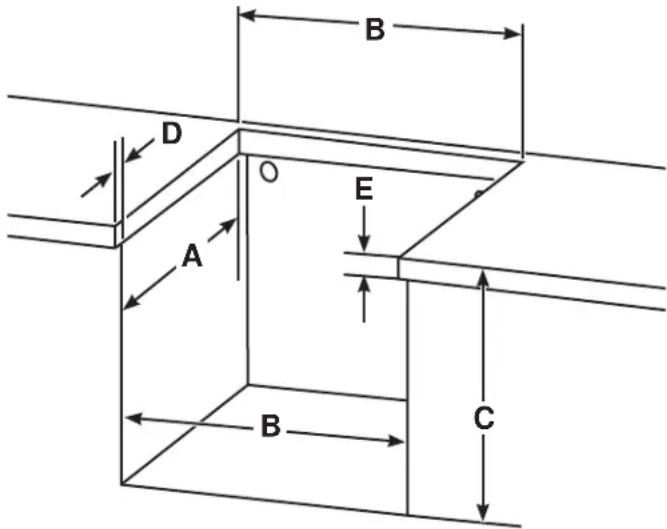
| Model A (depth) | B (width) | C (height) | D (overhang) | E (thickness) | |
| PLD617RT | 17.75" | 20.25" | 16.125" min. | 1" max 1.625" max | |
| PLD621RT | 17.75" | 20.25" | 20" min. | 1" max 1.625" max |
NOTE: The back and sides of the range below the countertop can be flush to the cabinets. Oven to be framed in or guarded to prevent creation of storage space around the recessed portion of the appliance.
INSTALLATION CLEARANCES
Ensure cabinets and countertop meet the requirements from the table before installing the range oven.
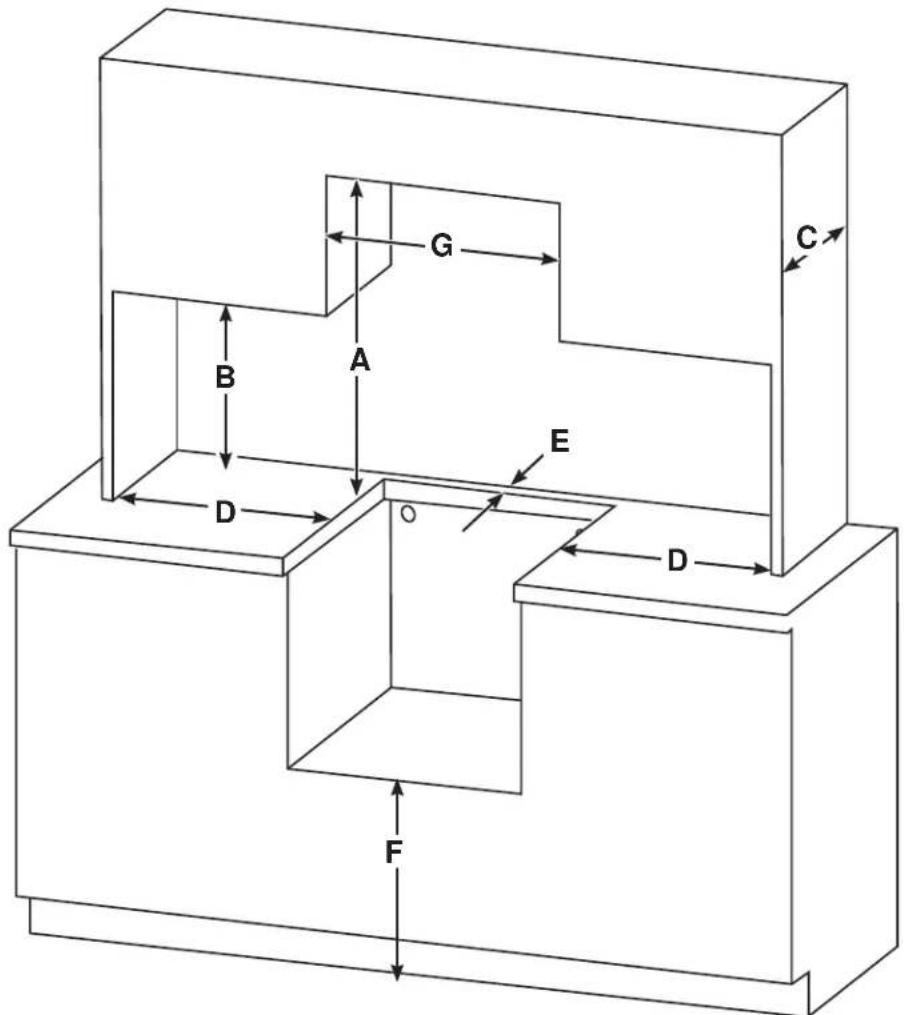
| Models A B | C | D | E | F | G | ||
| All Models 30" | min. 18" | min. 13" | max 2" min | 2" min | 4" min. | 20.25" min. |
A: Allow 30^ minimum vertical clearance between the countertop and combustible construction above the appliance. For alternative vertical clearances, refer to NFPA 1192 Table 5.6.6.5 for hood requirements.
B: Allow 18" minimum vertical clearance between the countertop and combustible construction to the left and right sides of the appliance.
C: The maximum allowable depth of overhead cabinets is 13". For overhead cabinet depths exceeding 13", refer to NFPA 1192 Table 5.6.6.5 for hood requirements.
D: Allow a minimum of 2" of horizontal clearance between the appliance cutout and combustible construction extending from the cooking surface to 18" above the cooking surface.
E: Allow a minimum of 2^ of clearance between adjacent combustible construction and the back of the appliance cutout.
F: The minimum vertical distance between the floor and bottom of the cabinet cutout is 4".
G: The width of Vertical Clearance A shall not be less than 20.25".
Installation Instructions
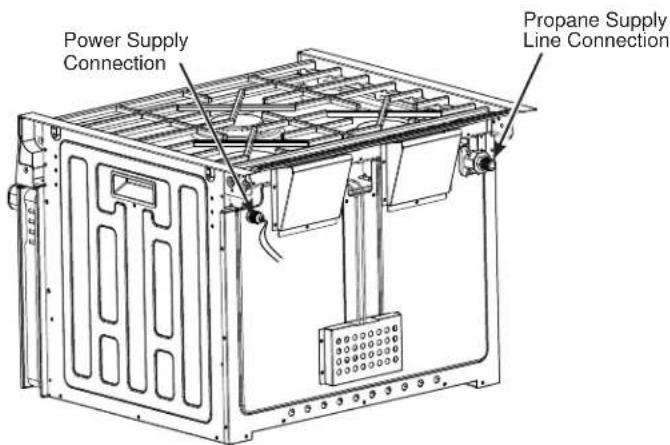
GAS AND POWER SUPPLY INSTALLATION LOCATIONS
OVEN INSTALLATION
NOTE: Prior to performing installation, wear safety gloves and glasses.
Complete the following steps when the cabinet has been prepared according to the dimensions given and the gas line and electrical connections are in place.
1. OVEN PREPARATION
Take your range oven out of the carton and place on a flat surface. Remove the packing materials.
- Lift up and remove grate from cooktop.
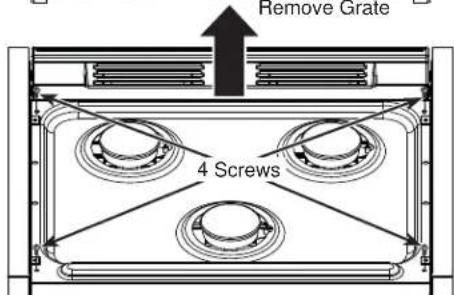
Remove the 4 screws on the cooktop with a Phillips screwdriver, then lift up on the cooktop to remove.
WARNING
Care should be taken to not
damage or modify gas tubing under cooktop. Doing so may result in fire or explosion hazard.
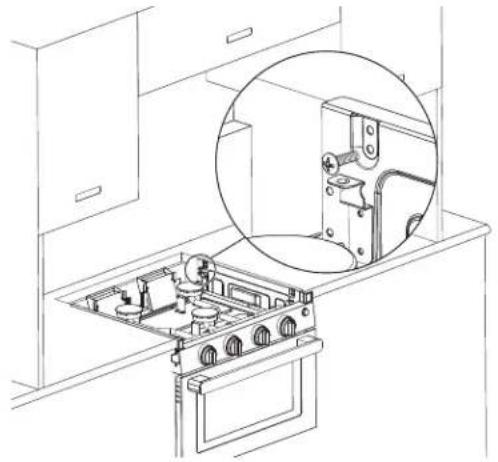
- Lift the range oven by the side handles and set into the cabinet opening. Slide range oven back until the front cavity flanges contact the cabinet face.
Installation Instructions
1. OVEN PREPARATION (Cont.)
- Attach the range oven in the cabinet opening by driving four screws into the countertop. Install 2 screws per side using preferred hole options based on countertop construction. If countertop is wooden, start by drilling pilot holes with a 1/8'' drill bit. Drive the 4 provided screws into the holes to attach.
2. GAS SUPPLY
WARNING
Fire Hazard: Do not use a or gas leaks.
flame to check for gas leaks.
WARNING
Explosion Hazard: Do not
exceed 25 ft-lbs of torque when making gas line connections. Overtightening may crack the pressure regulator resulting in fire or explosion hazard.
WARNING
Gas leaks may not be
detected by smell alone. Gas suppliers recommend your purchase and install an UL approved gas detector. Install and use in accordance with the manufacturer's instructions.
Gas Pressure Regulator
You must use the propane gas pressure regulator supplied with this range. For proper operations the inlet pressure to the regulator should be as follows:
Minimum pressure: 11" of Water Column
Maximum pressure: 13.8" of Water Column
Connect a propane supply line with a 3/8'' Flare Female connection to the regulator in the upper right rear corner of the cabinet
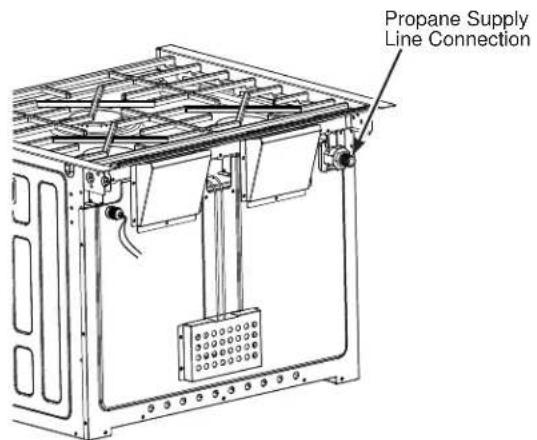
Tighten the gas line to the regulator using 2 wrenches.
IMPORTANT: Leave adequate space around the gas supply pipe in case of bend or damage during installation. Make sure the gas supply pipe cannot contact any moving parts after installed.
When using pressures greater than 1/2 psi (3.5kPa) to test the gas supply system of the RV, disconnect the range and individual shut-off valve from the gas supply piping. When using pressures of 1/2 psi (3.5kPa) or less to pressure test the gas supply system, simply isolate the range from the gas supply system by closing the individual shut-off valve.
Installation Instructions
3. PRESSURE CHECK
- Ensure propane gas is turned off to the appliance.
- Remove the screw with the sealing gasket from the pressure test port on the range.
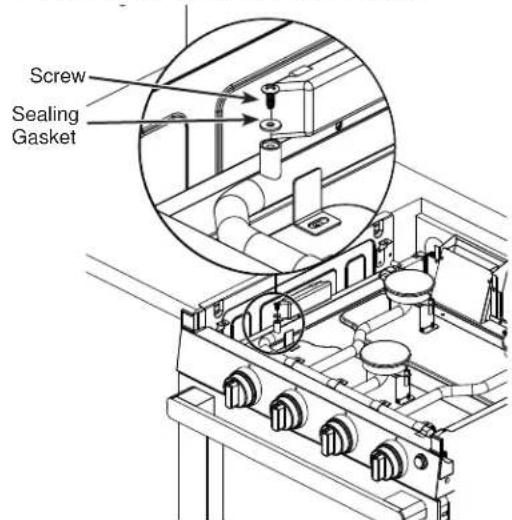
Using the rubber tube from a pressure check measuring device, slide the rubber tube down over the gas pressure test port. The rubber tube should seal around the pressure test port.
Turn on the propane gas to the appliance.
The pressure gauge tester should measure between 10" WC to 13.8" WC.
Turn off the propane gas to the appliance.
Remove the rubber tube of the pressure check measuring device.
- Replace the screw with the gasket removed in the step above. Before replacing the screw, inspect the rubber gasket seal for any signs of damage.
- Hand tighten the screw ensuring not to damage the seal.
NOTE: Ensure the product is gas leak checked after the pressure check test is completed by also testing the pressure check port screw. If any leaks are detected around the pressure test port screw and sealing gasket, a new one can be purchased. Call GE Appliances at 877.959.8688 for a replacement.
4.LEAK CHECK
Make sure all control knobs are in the OFF position.
Apply a gas leak detection liquid to the connections. Any gas leaks will be indicated by bubbles.
If a gas leak is detected, tighten the loose joint, or replace the faulty part with a replacement part recommended by a GE Appliances authorized retailer.
5. ELECTRICAL CONNECTION
CAUTION
PRODUCT DAMAGE HAZARD
- Connect to 12V DC service only.
- Connect only to protected circuit fused for not more than 15 Amps.
The power supply wires are located at the top left corner of the rear of the appliance.
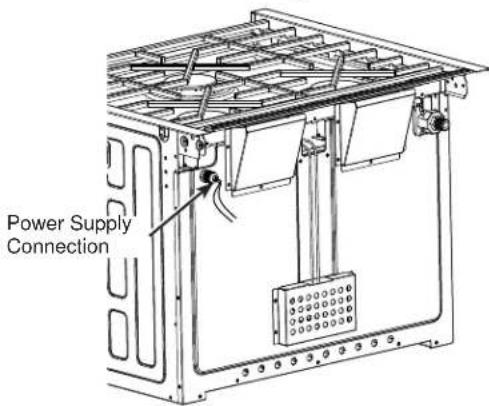
Connect a positive 12V power supply wire to the appliance black 12V wire and a negative 12V power supply wire to the appliance white 12V wire. Maximum current draw is less than 1 amp.
NOTE: Ensure to connect the wires with the correct polarity. Black is "+" and White is "-". Ensure electrical connections are properly secured.
Ensure electrical supply lines are disconnected, or power removed at the main fuse or circuit breaker panel, before servicing the appliance.
6. REPLACE COOKTOP
Place the cooktop back into position and attach with the 4 screws, removed in Step 1, using a Phillips screwdriver.
7. TEST COOKTOP BURNERS
- Push and turn the appropriate burner control knob counterclockwise to the HI position until the burner is lit. If air is in the supply line, it may take up to a minute for the air to purge and the burner to light.
Once burner is lit, continue pressing knob for 5 seconds until the flame sensor is heated.
The flame may burn yellow for a few seconds, then it should turn blue. If the burner continues to burn mostly or completely yellow, see "Troubleshooting" or contact a qualified service technician.
- Rotate the burner control knob to LO. Make sure that the flame completely surrounds the burner. There should be a flame at the burner ports and no air gap between the flame and the burner. If the burner does not meet this criteria, see "Troubleshooting" or contact a qualified service technician.
Repeat these steps to test each burner.
8. TEST OVEN BURNER
Pull the oven handle to open the door.
- Push and turn the oven control knob counterclockwise to the position. Keep the oven control knob pressed until the oven pilot is lit. If air is in the supply line, it may take up to a minute for the air to purge and the oven pilot to light.
Once the pilot is lit, keep the oven control knob pressed for at least 15 seconds until the oven pilot sensor becomes heated.
- Release oven control knob and visually confirm oven pilot remains lit. If oven pilot goes out, repeat bullets 2 and 3.
- Rotate the oven control knob to each temperature and inspect the burner flame. If the flame is completely or mostly yellow, see "Troubleshooting" or contact a qualified service technician.
9. FLAME QUALITY
The burner flames for the cooktop and bake burners should be blue with yellow tips. Long, bright yellow flames are not normal. Normal flames may show signs of an orange tint when well heated or signs of flickering orange due to particles in the gas or air.

Troubleshooting Tips … Before you call for service
| Problem Possible Cause/Solution | |
| Surface burners do not light, do not light fully, or do not stay lit. | Ensure any gas supply valves and propane tank valve are opened. If air is in the supply line, it may take up to a minute for the air to purge and the burner to light. |
| Ensure knob is pressed while set to the HI position. You should hear the clicking of the ignition system when the knob is pressed. Continue pressing for at least 5 seconds until the flame sensor is heated | |
| Gas pressure is either too low or too high. | |
| Burner ports or igniter are dirty. Refer to "Burner Heads" in the Care and Cleaning section. | |
| Moisture is present on the burner. With burner off and cool, dry burner thoroughly. | |
| Bake burner does not light. | Ensure gas supply valves and propane tank valve are opened. If air is in the supply line, it may take up to a minute for the air to purge and the burner to light. |
| Ensure oven control knob is pressed while set to the (flame) position. You should hear the clicking of the ignition system when the knob is pressed. Keep the knob pressed for a least 15 seconds to allow time for the oven pilot to light and for the pilot sensor to become heated. If air is in the gas line, this process may take over a minute. | |
| Gas pressure is either too low or too high. | |
| Flames are completely or mostly yellow or orange. | Normal flames may show signs of an orange tint when well heated or signs of flickering orange due to dust particles in the gas or air. |
| Gas pressure is too low. | |
| Burner ports are dirty. Refer to "Burner Heads" in the Care and Cleaning section. | |
| Knob backlighting does not turn on when light button is pressed. | Ensure unit is connected to 12VDC. See "Electrical Connection" in the Installation Instructions. |
| LED board or switch needs to be replaced. Contact GE Appliances for service. | |
| Oven light does not turn on when light button is pressed. | Ensure unit is connected to 12VDC. Refer to "Electrical Connection" in the Installation Instructions. |
| Oven bulb needs to be replaced. Refer to "Oven Light" in the Care and Cleaning section. |
To schedule service call 866.835.0179.
Have serial number and model number available when calling for service.
| For The Period Of: | GE Appliances Will Replace: |
| Two YearsFrom the date of theoriginal purchase | Any part of the RV range oven which fails due to a defect in materials or workmanship.During this limited two-year warranty, GE Appliances will also cover all labor and related service to replace the defective part. |
What GE Appliances Will Not Cover:
-
Improper installation, delivery or maintenance. If you have an installation problem, contact your dealer or installer. You are responsible for providing adequate electrical connecting facilities.
Failure of the product resulting from modifications to the product or due to unreasonable use including failure to provide reasonable and necessary maintenance.
Labor necessary to move the unit to a location where it is accessible for service by an individual technician. -
Replacement of RV fuses or resetting of circuit breakers.
- Damage to the product caused by improper power supply voltage, accident, fire, floods or acts of God.
Damage caused after delivery.
In-person product education.
EXCLUSION OF IMPLIED WARRANTY--Your sole and exclusive remedy is product repair as provided in this Limited Warranty. Any implied warranties, including the implied warranties of merchantability or fitness for a particular purpose, are limited to two years or the shortest period allowed by law.
This limited warranty is extended to the original purchaser and any succeeding owner for personal recreational vehicle or similar use within the USA and Canada. If the product is located in an area where service by an authorized RV servicer is not available, you may be required to bring the product to an authorized GEA service location for service.
Some states do not allow the exclusion or limitation of incidental or consequential damages. This limited warranty gives you specific legal rights, and you may also have other rights which vary from state to state. To know what your legal rights are, consult your local or state consumer affairs office or your state's Attorney General.
Warrantor: GE Appliances, a Haier company
Louisville, KY 40225
Consumer Support
GE Appliances Website
Have a question or need assistance with your appliance? Try the GE Appliances Website 24 hours a day, any day of the year! You can also shop for more great GE Appliances products and take advantage of all our on-line support services designed for your convenience. In the US: GEAppliances.com In Canada: GEAppliances.ca
Register Your Appliance
Register your new appliance on-line at your convenience! Timely product registration will allow for enhanced communication and prompt service under the terms of your warranty, should the need arise. You may also mail in the pre-printed registration card included in the packing material.
In the US: GEAppliances.com/register
In Canada: geappliances.ca/after-sales-support
Schedule Service
Expert GE Appliances repair service is only one step away from your door. Get on-line and schedule your service at your convenience any day of the year. In the US: GEAppliances.com/service or call 800.432.2737 during normal business hours.
In Canada: geappliances.ca/after-sales-support or call 800.561.3344
Parts and Accessories
Individuals qualified to service their own appliances can have parts or accessories sent directly to their homes (VISA, MasterCard and Discover cards are accepted). Order on-line today 24 hours every day.
In the US: GEApplianceparts.com or by phone at 877.959.8688 during normal business hours.
Instructions contained in this manual cover procedures to be performed by any user. Other servicing generally should be referred to qualified service personnel. Caution must be exercised, since improper servicing may cause unsafe operation.
Customers in Canada should consult the yellow pages for the nearest authorized GE Appliances service parts distributor, visit our website at geappliances.ca/parts-filters-accessories or call 800.661.1616.
Contact Us
If you are not satisfied with the service you receive from GE Appliances, contact us on our Website with all the details including your phone number, or write to:
In the US: General Manager, Customer Relations | GE Appliances, Appliance Park | Louisville, KY 40225
GEAppliances.com/contact
In Canada: Director, Consumer Relations, MC Commercial Inc. | Suite 310, 1 Factory Lane | Moncton, N.B. E1C 9M3
GEAppliances.ca/contact-us
CONSIGNES DE SECURITE RELATIVES AU FOUR
AVERTISSEMENT
Ne recouvre JAMAIS
These flames are too large for the pot
QU'Y A-T-IL DANS LA BOITE?
1. PREPARATION DU FOUR (suite)
RISQUE DE DOMMAGE AU
PRODUIT
Garant: GE Appliances, a Haier company
Louisville, KY 40225
Maximum pressure: 13.8" of Water Column
Garante: GE Appliances, a Haier company
Louisville, KY 40225
Soporte al Cliente
En Canada: Director, Consumer Relations, MC Commercial Inc. | Suite 310, 1 Factory Lane | Moncton, N.B. E1C 9M3
GEAppliances.ca/contact-us