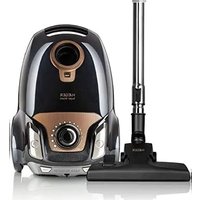
Super Silent VC-75B.039A - Vacuum Cleaner Haeger - Free user manual and instructions
Find the device manual for free Super Silent VC-75B.039A Haeger in PDF.


| Product Type | Vacuum cleaner with bag |
| Brand | Haeger |
| Model | Super Silent VC-75B.039A |
| Dimensions (L x W x H) | 425 x 315 x 225 mm |
| Weight | 4.9 kg |
| Power supply | 220-240 V~ / 50 Hz |
| Maximum power | 750 W |
| Dust bag capacity | 3.5 L |
| Cable length | 5 m |
| Operating radius | 7 m |
| Noise level | 75 dB(A) |
| Filtration levels | 5 levels (including HEPA filter) |
| Suction pressure | > 18.0 kPa |
| Average annual energy consumption | 24.5 kWh/year |
| Main functions | Speed control, floor/carpet switch, floor brush, crevice nozzle, furniture brush, cable storage |
| Maintenance | Clean filters with water, replace bag and filters |
| Safety | Automatic shut-off in case of malfunction, unplug before maintenance |
| Included accessories | Telescopic tube, crevice tool, furniture brush, floor nozzles |
| Warranty | 24 months (EU) |
Frequently Asked Questions - Super Silent VC-75B.039A Haeger
User questions about Super Silent VC-75B.039A Haeger
0 question about this device. Answer the ones you know or ask your own.
Ask a new question about this device
Download the instructions for your Vacuum Cleaner in PDF format for free! Find your manual Super Silent VC-75B.039A - Haeger and take your electronic device back in hand. On this page are published all the documents necessary for the use of your device. Super Silent VC-75B.039A by Haeger.
USER MANUAL Super Silent VC-75B.039A Haeger
User instructions
Instruções de uso
Dear customer
Thank you for having chosen a HÆGER product.
The HÆGER products have been produced to think about the welfare of the consumer privileging the most raised standards of quality, functionality and assign. We are sure you will be happy with this appliance.
We assume that the user is familiar with the common procedures of handling household appliances.
Before using the appliance for the first time please read carefully and thoroughly through these operating instructions and the safety advice, completely familiarising yourself with the appliance. Retain these instructions for future reference and pass them on to whoever might acquire the appliance at a future date.
Intended use
This appliance has been designed exclusively for domestic use. It must only be used in accordance with these instructions. The manufacturer will not be held any responsibility for any damage caused by improper use or incorrect operation.
This vacuum cleaner is intended only for use on dry surfaces. The vacuum cleaner is not intended for use on foam, water, inflammable or explosive materials or other liquids.
ATTENTION: Do not use the vacuum cleaner to suck up building waste (cement, brick dust, rubble, etc.). These types of particles quickly clog up the pores in the dust bag causing the appliance to overheat.
General Safety Instructions
• This equipment is intended exclusively for domestic use.
- Never pull the plug out of the socket to switch off the vacuum cleaner. Always use the on/off switch.
• Do not leave the vacuum beside hot ovens, heaters or radiators.
• Never use the vacuum cleaner if the cable, plug or housing is damaged.
- Do not use the vacuum cleaner without a bag, or if the bag is damaged or full (look at the dust bag filling level indicator).
- If the vacuum stops working properly, pull the plug out of the socket immediately. In addition, make sure that the plug is pulled out of the socket before changing the dust bag or filter, or before cleaning the vacuum cleaner.
- Do not use the vacuum cleaner for sucking up sharp objects or pieces of glass. Never suck up burning matches, glowing ashes or cigarette ends.
- Do not use the vacuum cleaner for sucking up products containing chemicals, dust, plaster, cement, or similar particles.
- This vacuum cleaner is intended only for use on dry surfaces. The vacuum cleaner is not intended for use on foam, water, inflammable or explosive materials or other liquids.
- Always make sure that the vacuum cleaner is not placed near radiators, ovens or other heating equipment or heated surfaces.
- Always make sure that the ventilation slots are kept free from obstruction. Obstructed air circulation can lead to overheating and damage to the vacuum cleaner.
- Always make sure that the vacuum cleaner is only operated with the dust bag and the filter installed.
- This appliance can be used by children aged from 8 years and above and persons with reduced physical, sensory or mental capabilities or lack of experience and knowledge if they have been given supervision or instruction concerning use of the appliance in a safe way and understand the hazards involved.
• Children shall not play with the appliance. - Cleaning and user maintenance shall not be made by children unless they are older 8 years and supervised.
- If your vacuum cleaner is defective, please send it to the appropriate service centre or have it repaired at an electrical equipment repair workshop. Under no circumstances open the vacuum cleaner yourself. Work on your vacuum cleaner carried out by non-authorized service centers could endanger your health.
- Any rights under the guarantee are lost if these operating instructions are not followed. The guarantee does not cover wear parts or damage resulting from improper use (incorrect operation, water, dropping etc.), work on the vacuum cleaner carried out by third parties, or technical modifications to the vacuum cleaner.
- Before you switch on the vacuum cleaner make sure that the mains voltage is the same as that shown in the technical details.
2 Instructions for use
Overview of the components
-
Carrying handle
-
Filter push button
-
Power cord winding button
-
Floor attachment
-
Parking slot
-
Crevice nozzle
-
Power cable
-
Telescopic tube
-
Speed control button
-
Power ON/OFF switch
-
Floor attachment flap
-
Flexible hose
-
Dusting brush
-
Air discharge Filter HEPA
Before using for the first time
- Take the vacuum cleaner out of the packaging.
- Check that the dust bag is correctly fitted.
- Remove the packaging and check that the dust bag and safety filter are correctly fitted.
Operation
- Place the vacuum cleaner in the horizontal position.
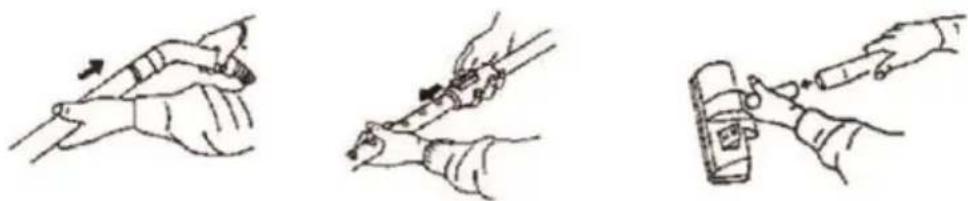
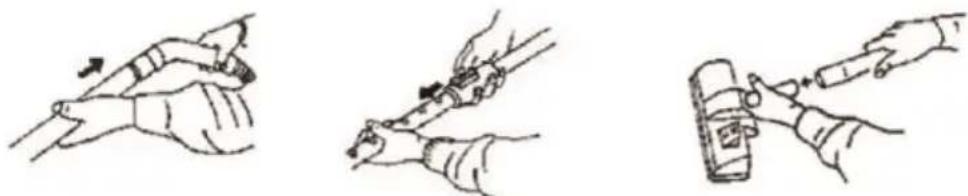
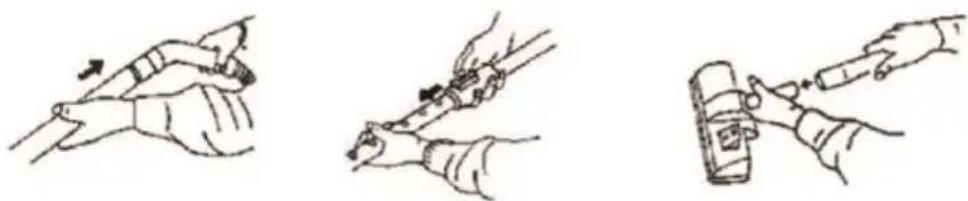
- Insert the connection head of the suction hose into the hose connector until it locks in place. To do so, please press the buttons simultaneously. To release the hose again, please press the buttons once more on the connection head. Keep the buttons pressed down and then pull out the hose.
- Insert the vacuum tube into the handle if required and then assemble the floor nozzle and/or the accessories.
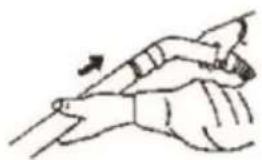
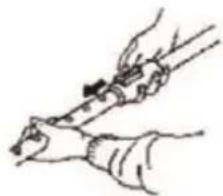
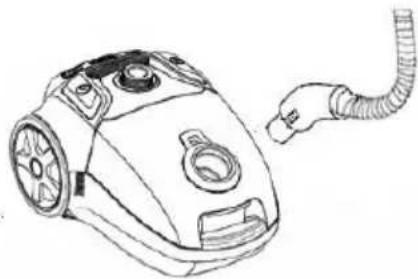
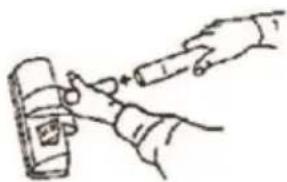
- Unwind the length of cable you require. To rewind the power cable, press the rewind button with one hand, and guide the cable with the other hand to avoid wrapping.
CAUTION: Pull out the cable up to the maximum length indicated with the YELLOW mark. Never pull the cable out up to the RED mark as the cable winding can be damaged.
- Insert the mains plug into a correctly installed power socket. Turn the device on by the on/off switch by pressing down the button.
English
-
Set the "carpet/hard floor" switch, depending on the floor covering.
-
Adjust the suction power with the suction power control.
-
Vacuum at a steady speed. There is no need to exert pressure. Turn the suction power control clockwise if you want to increase the suction power.
Advice on use
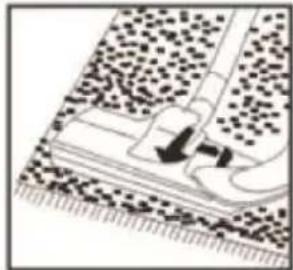
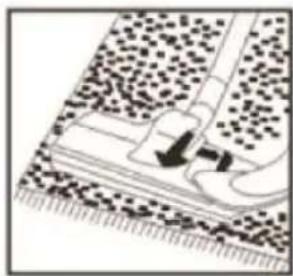
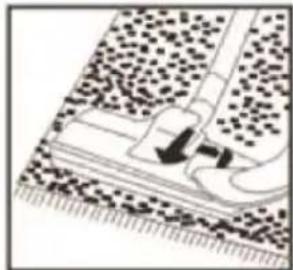
1. Dual position carpet / floor brush
Press the button to set the floor brush for use on floors and smooth or flat surfaces. This is for cleaning PVC, floor-boards, marble, sandstone, parquet etc. Place the button to its original position again when you wish to use the brush for carpets or soft surfaces.
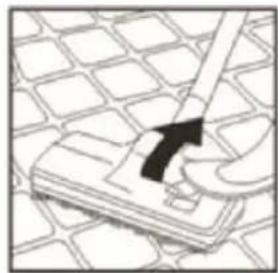
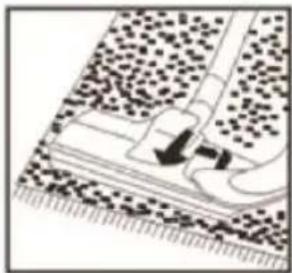
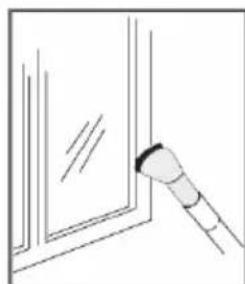
2. Nozzle on hose grip
Remove the suction tube and work just using the nozzle on the hose grip to vacuum curtains, lampshades, shelves or car seats etc. It is particularly useful for cleaning soft materials.
3. Crevice nozzle
Use this accessory to vacuum crevices and deep grooves and nooks, etc.
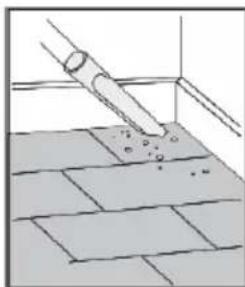
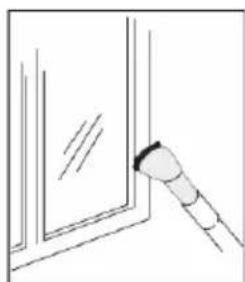
4. Dusting brush
The brush tool is ideal for removing dust from fabric, furniture, books, curtains, frames and clothing.
4 Instructions for use
Replacing dust bag
NOTE: Turn off vacuum and unplug the electrical cord before changing dust bag or cleaning motor filter. Never operate the vacuum cleaner without the dust bag or filter.
- Detach the hose by pressing the two buttons at its end.
- Press the (open/close) button to open the housing cover.
- Remove the full dust bag from the holder.
- Place a new dust bag into the holder.
- Close the housing cover.
- Always check that the dust bag is correctly installed before switching on the vacuum cleaner again.
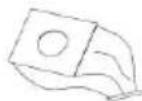
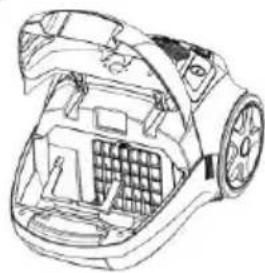
Note: If the dust bag is fitted wrongly, the bag door may not close properly. Do not force the door. Reinsert dust bag in correct position, push bag holder back in to place and close the door.
Replacing the filter
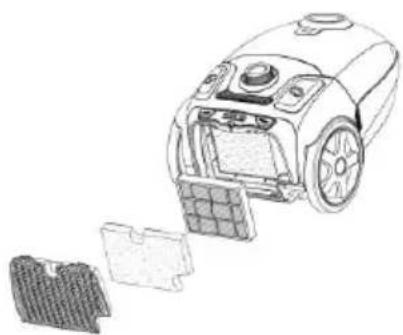
Before you install a new filter, always switch off the vacuum cleaner and pull the plug out of the socket. Your filter should be cleaned at least twice a year or when it becomes visibly solid.
1. Replacing the motor protection filter
- Open the housing cover.
- With no bag in the vacuum cleaner, take the filter out.
- Put a new filter.
Note: Always operate the cleaner with a filter installed. Reduced suction or motor damage may be result of incorrect procedures.
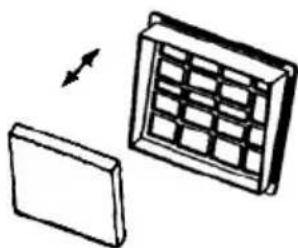
2. Replacing air outlet filter
- Remove the grille by pressing down on the tabs until the grille is detached.
- Remove the outlet filter from its housing to clean it.
- Put the filter back in after it is clean.
- Put the grille back on, and seat it correctly by pressing on the tabs until you hear a click.
Note: Never use the vacuum cleaner without the air outlet filter.
3. Clean the filter
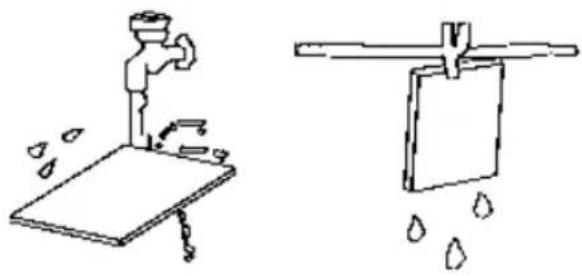
- Clean the motor filter in water and allow them to dry completely before replacing them.
Care and cleaning
- Before you cleaning the vacuum cleaner always switch it off and pull the plug out of the socket.
- To prevent electric shock do not clean the vacuum cleaner with water and never allow the vacuum cleaner to be in contact with water.
- Use a damp or dry cloth to clean the vacuum cleaner. Only clean the housing and the accessories.
- The filter for the ventilation air and the internal air filter should be cleaned regularly.
- Do not use any aggressive cleaning agents or solvents as these may attack the plastic.
Storing
- Rewind the mains cable fully by actuating the foot button on the vacuum cleaner.
- Place the vacuum cleaner in the vertical position.
Trouble Shooting
1. Motor does not start
Cause: No power supply
Remedy: Check cable, plug and socket
2. Insufficient suction power
Cause: Filter, nozzle, suction hose or tube is blocked.
Remedy: Check if the dust bag needs to be replaced.
Check if the filters need to be replaced.
Check if the slide on the handgrip is closed.
Check if the electronic suction power control is in maximum position.
Check if the nozzle, tube or hose is blocked up.
6 Instructions for use
Technical Specifications
| Features | Model VC-75B.039A |
| Voltage(V)/Frequency | 220-240V~ / 50Hz |
| Maximum Power (W) | 750W |
| Average annual energy consumption | 24.5 kWh/annum |
| Sound power level (dB (A)) | 75 dB (A) |
| Operating pressure (kPa) | >18.0 kPa |
| Filtering levels | 5 levels |
| Cable length (m) | 5 m |
| Dust bag capacity (L) | 3,5 L |
| Operating radius (m) | 7 m |
| Weight (kg) | 4.9 kg |
| Dimensions (length × width × height) | ± 425 x 315 x 225 mm |
Conformity CE
This product has been tested and produced according to all relevant current CE guidelines, such as:

- electromagnetic compatibility Directive 2014/30/EU,
- Low voltage Directive (LVD) Directive 2014/35/EU,
- RoHS with its amendments Directive 2011/65/EU,
and has been constructed in accordance with the latest safety regulations.
The CE mark attests this product with all relevant directives.
Disposal – Environment policy
This appliance is marked according to the European directive 2012/19/EU on Waste Electrical and Electronic Equipment (WEEE).
By ensuring this product is disposed of correctly, you will help prevent potential negative consequences for the environment and human health, which could otherwise be caused by inappropriate waste handling of this product.
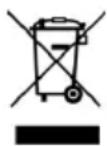
This symbol on the product, or on the documents accompanying the product, indicates that this appliance may not be treated as household waste. Instead it shall be handed over to the applicable collection point for the recycling of electrical and electronic equipment.
Disposal must be carried out in accordance with local environmental regulations for waste disposal. For more detailed information about treatment, recovery and recycling of this product, please contact your local city office, your household waste disposal service or the shop where you purchased the product.
Guarantee
This unit is covered by a 24 months (*) warranty, from the purchase date, and covers the repair free of charges of the damaged due to the manufacturer fault or defected components. The distributor reserves the right to change the unit for an equivalent model.
The warranty does not cover any damaged caused by incorrect use, lightning, incorrect installation, external factors or any intentional damaged. The warranty does not cover damage thus attributable to falls, blows, spill, exposure to extreme environmental conditions or deterioration caused by normal use of plastic parts or keyboards, as well as using batteries other than those specified in this manual.
For the repairing, during the warranty period, the unit shall be sent to the distributor or reseller, or to the address indicated by them, and must be jointed the warranty certificated and the respective original invoice or selling ticket, where the buying date is expressed indicated.
The consumer is protected by the guarantee provided by Directive 1999/44/CE of European Parliament and Council of 25 May.
(*) Only for European Union countries
Estimado Cliente
4. Bocal com escova
Nota: Nunca utilize o aspirador sem o filtro de saída de ar.
4. Boquilla en pincel
3. Limpia el filtro


- DEAR CUSTOMER
- INTENDED USE
- ATTENTION: DO NOT USE THE VACUUM CLEANER TO SUCK UP BUILDING WASTE (CEMENT, BRICK DUST, RUBBLE, ETC.). THESE TYPES OF PARTICLES QUICKLY CLOG UP THE PORES IN THE DUST BAG CAUSING THE APPLIANCE TO OVERHEAT
- GENERAL SAFETY INSTRUCTIONS
- 2 INSTRUCTIONS FOR USE
- OVERVIEW OF THE COMPONENTS
- BEFORE USING FOR THE FIRST TIME
- OPERATION
- ENGLISH
- ADVICE ON USE
- DUAL POSITION CARPET / FLOOR BRUSH
- NOZZLE ON HOSE GRIP
- CREVICE NOZZLE
- DUSTING BRUSH
- 4 INSTRUCTIONS FOR USE
- REPLACING DUST BAG
- REPLACING THE FILTER
- REPLACING THE MOTOR PROTECTION FILTER
- REPLACING AIR OUTLET FILTER
- CLEAN THE FILTER
- CARE AND CLEANING
- STORING
- TROUBLE SHOOTING
- MOTOR DOES NOT START
- INSUFFICIENT SUCTION POWER
- 6 INSTRUCTIONS FOR USE
- CONFORMITY CE
- DISPOSAL – ENVIRONMENT POLICY
- GUARANTEE
- ESTIMADO CLIENTE
- BOCAL COM ESCOVA
- BOQUILLA EN PINCEL
- LIMPIA EL FILTRO
Brand : Haeger
Model : Super Silent VC-75B.039A
Category : Vacuum Cleaner