2214 - Personal protective equipment Klein Tools - Free user manual and instructions
Find the device manual for free 2214 Klein Tools in PDF.

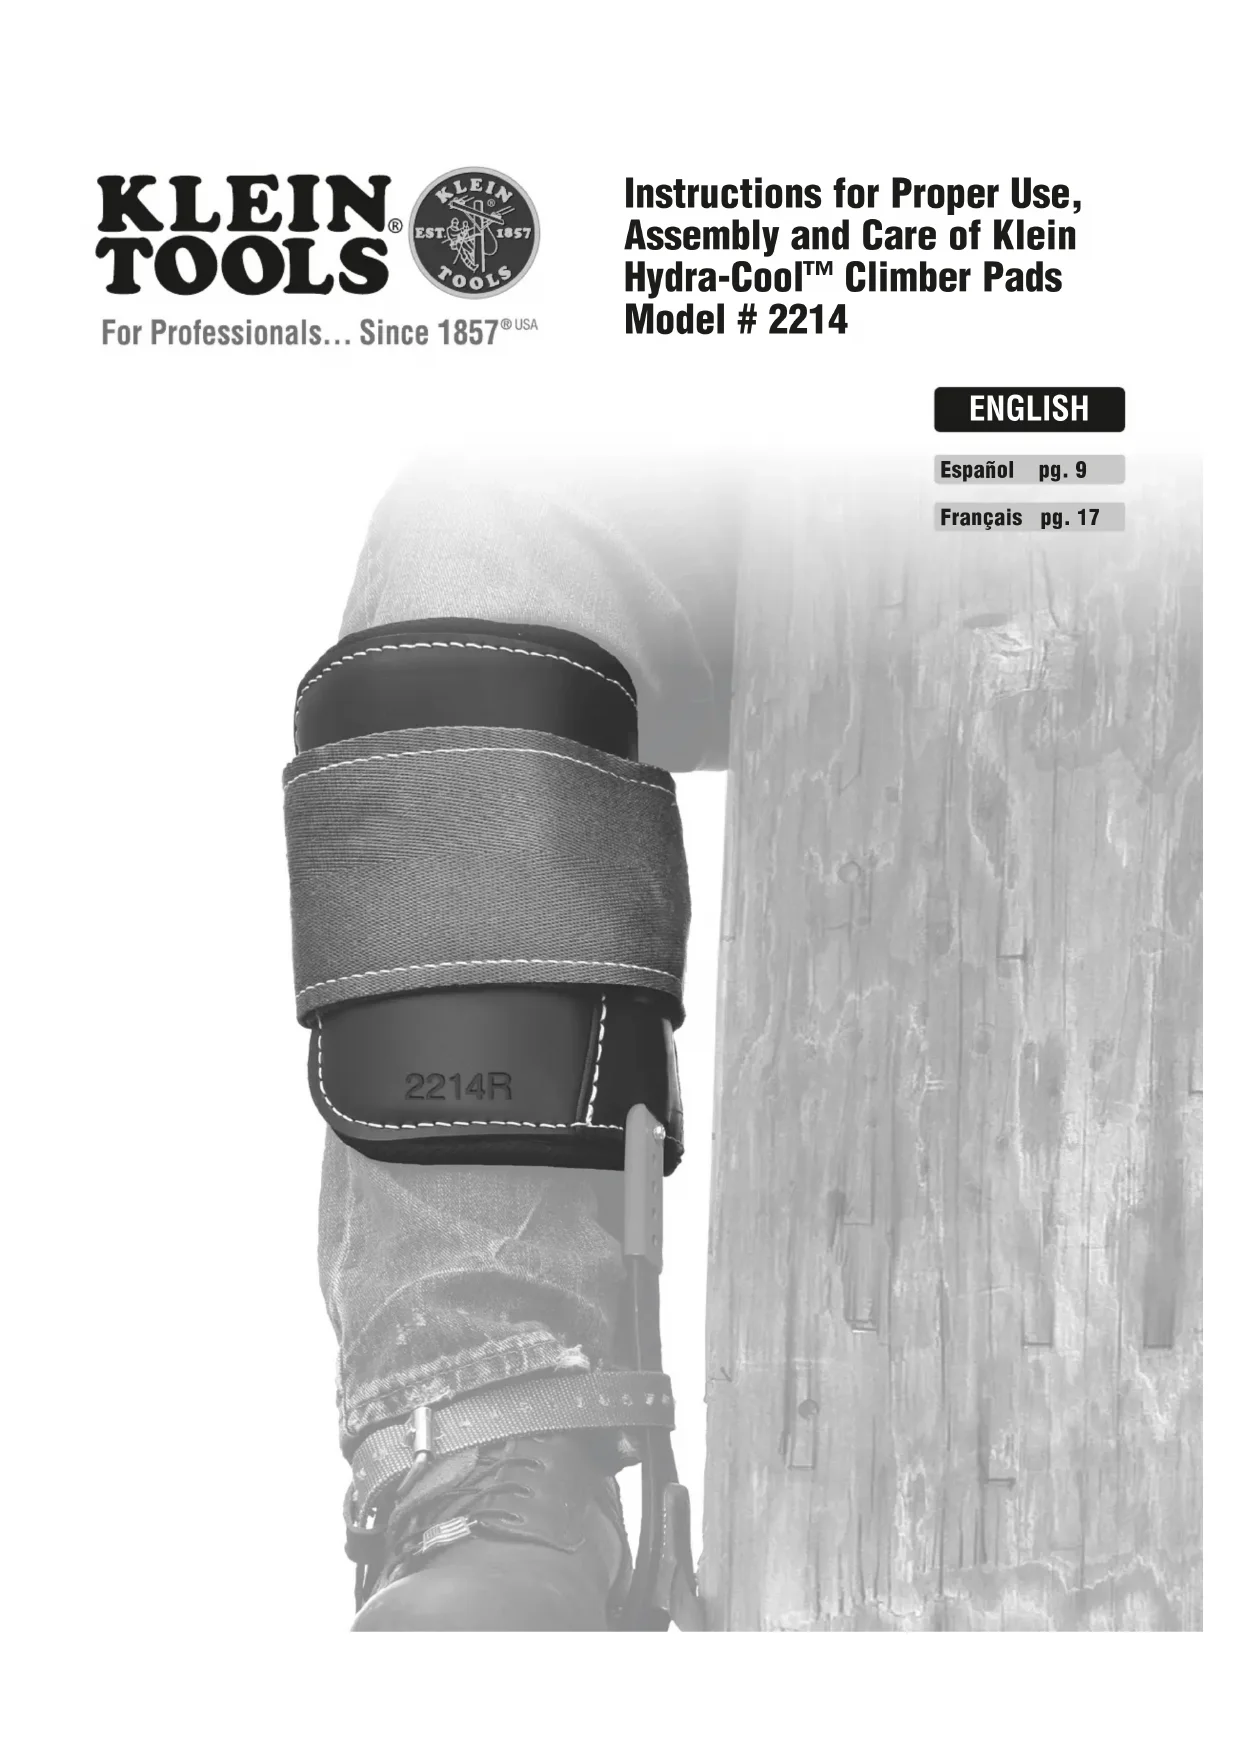


| Product Type | Hydra-Cool™ Claw Protector Pads |
| Brand | Klein Tools |
| Model | 2214 |
| Category | Personal Protective Equipment (PPE) for Climbing |
| Standard | ASTM F887 |
| Main Material | Padded leather with metal inserts |
| Fastening System | Velcro® straps and metal locking buckle |
| Package Contents | 1 left pad, 1 right pad, 2 metal inserts, 1 instruction manual |
| Approximate Weight (pair) | Approximately 1 kg |
| Dimensions (each) | Approximately 30 cm long, 15 cm wide (adjustable) |
| Compatibility | Klein Tools lineman's and tree trimmer's climbers |
| Maximum Recommended Weight Capacity | Body + clothing + tools ≤ 136 kg (300 lb) |
| Care and Cleaning | Clean with a damp cloth and mild detergent; do not immerse; treat leather with neatsfoot oil |
| Storage | Store in a clean, dry place between uses |
| Safety | Inspect before each use; respect minimum Velcro® overlap; remove from service if damaged |
| Repairability | Replacement parts available: metal inserts, Velcro® straps, metal buckles |
| Warranty | See Klein Tools website |
| Intended Use | Leg protection when using climbers to climb poles or trees |
Frequently Asked Questions - 2214 Klein Tools
User questions about 2214 Klein Tools
0 question about this device. Answer the ones you know or ask your own.
Ask a new question about this device
Download the instructions for your Personal protective equipment in PDF format for free! Find your manual 2214 - Klein Tools and take your electronic device back in hand. On this page are published all the documents necessary for the use of your device. 2214 by Klein Tools.
USER MANUAL 2214 Klein Tools
For Professionals... Since 1857® USA
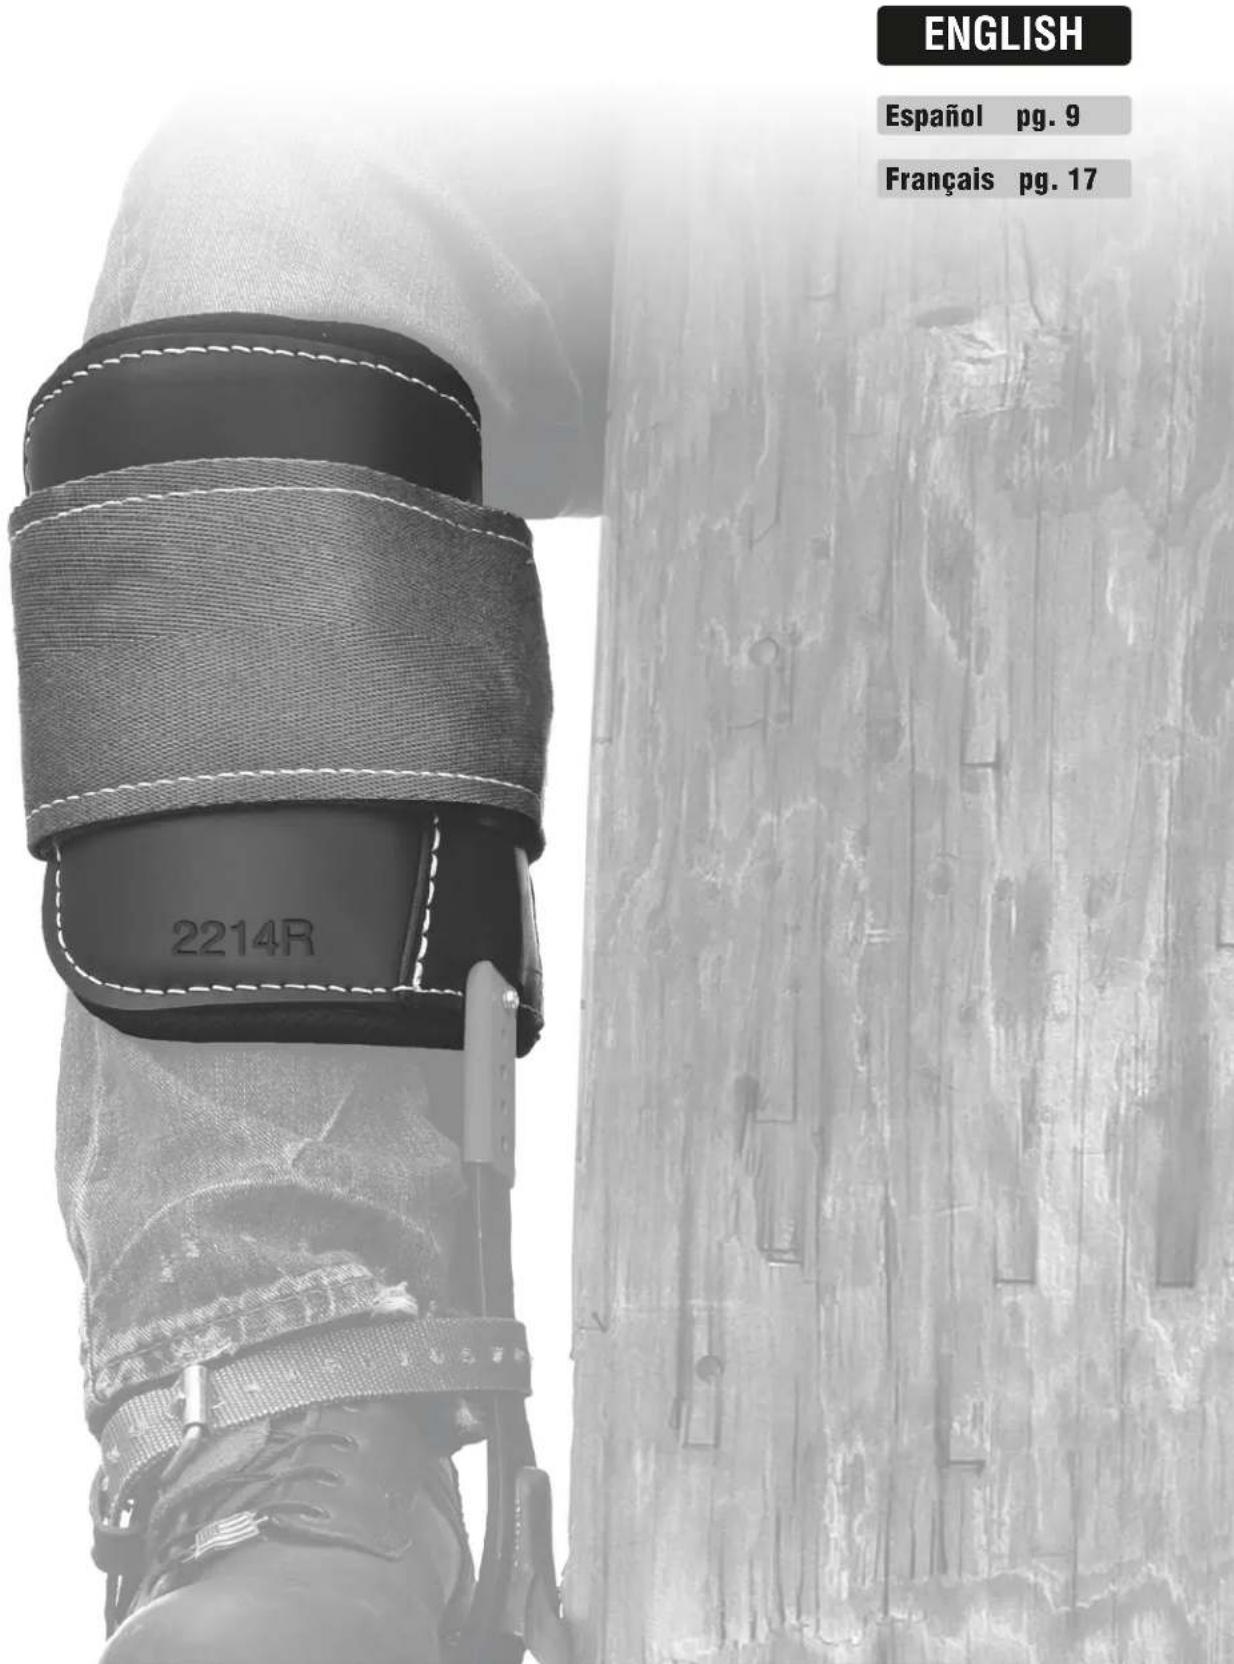
Instructions for Proper Use, Assembly and Care of Klein Hydra-Cool™ Climber Pads Model # 2214
text_image
ENGLISH Español pg. 9 Français pg. 17 2214RINTRODUCTION
This instruction manual explains how to properly use, assemble and maintain Hydra-Cool™ Climber Pads. All individuals who use Pole and Tree Climbers must be instructed in how to use that equipment correctly. Also, they must read, understand and follow all instructions and warnings attached to the products and contained in the instructions packed with the products before use.
See also 'Instructions for Proper Use, Assembly and Care of Klein Pole and Tree Climbers, Including Gaff Sharpening' (#139107).
⚠ WARNING: Save these instructions. This equipment must NOT be used by anyone who has not read, understood and followed the instructions and inspection procedures contained in this booklet. Failure to read, understand and follow all instructions may result in serious injury or death. Training and instruction review should be repeated at regular intervals by the end user and his or her employer.
Hydra-Cool™ Climber Pads meet the requirements of ASTM F887.
TABLE OF CONTENTS
Page
- Hydra-Cool™ Climber Pad Construction Details....3
- Contents of the Hydra-Cool™ Climber Pads....4
- Assembling the Hydra-Cool™ Pads to the Climbers ..... 4-5
- Donning the Assembled Hydra-Cool™ Pad and Climber to your Leg 5-6
- Specific Procedures for Inspecting Hydra-Cool™ Climber Pads 7
- Maintenance Procedures ..... 7
- General Inspection Procedures ..... 7
- Warnings: Klein Climbers and Pads 8
- Warning Label - MINIMUM WRAP WARNING .....8
natural_image
Silhouette of a person falling with arms raised (no text or symbols)WARNING
A fall could result in serious injury or death.
Do not use unless properly trained.
Read and follow all instructions and warnings.
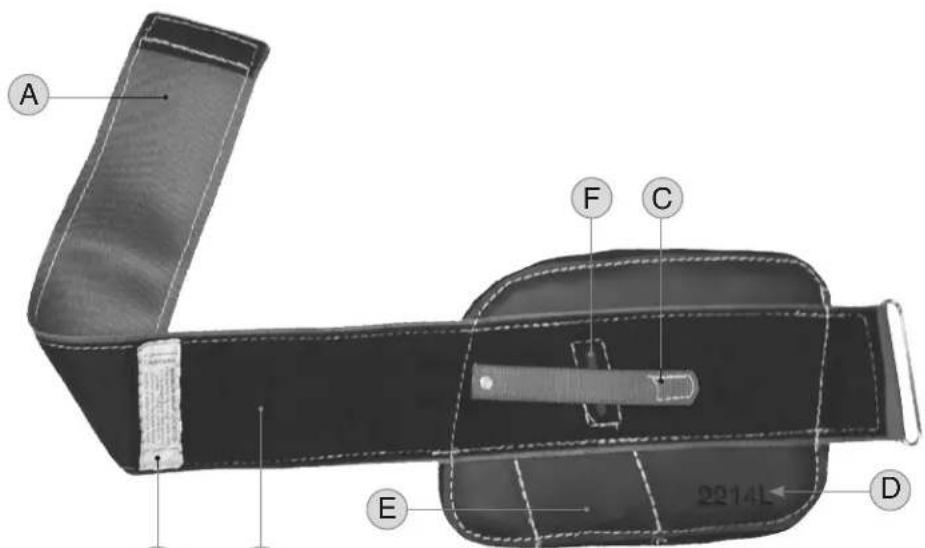
1. HYDRA-COOL™ CLIMBER PAD CONSTRUCTION DETAILS
FIGURE 1
A. Webbing and Velcro® construction
B. Warning Label
C. Klein Kord ^® climber retaining strap with Velcro ^® hook end
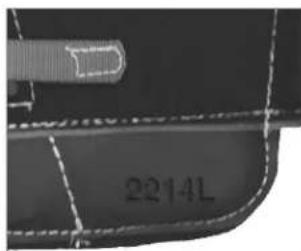
D. Catalog # and "L" for left leg shown on outside surface of pad
E. Tunnel slot for climber shank with sleeve
F. Slotted opening for climber sleeve loop
G. Velcro® loops – (soft side)
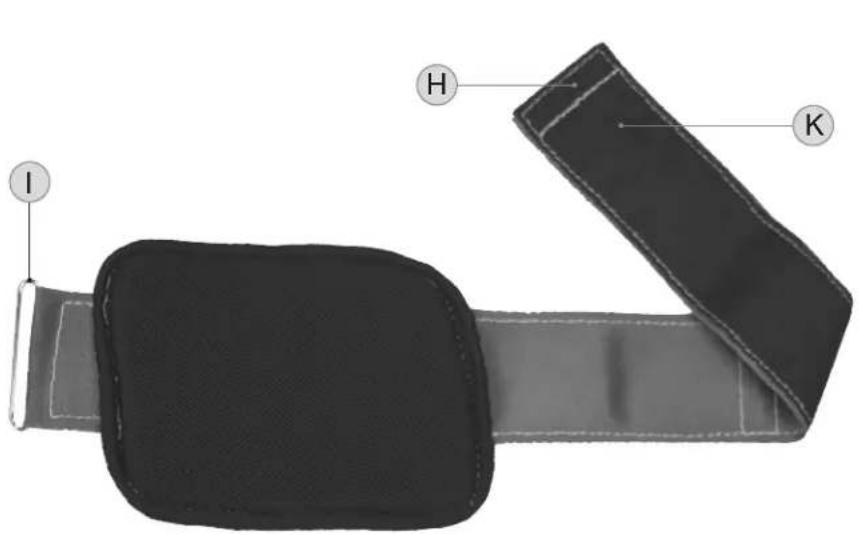
FIGURE 2
H. Free end of pad
I. Metal cinch loop
J. Cushioned leather-inside surface of the pad
K. Velcro ^® hooks – (sharp side)
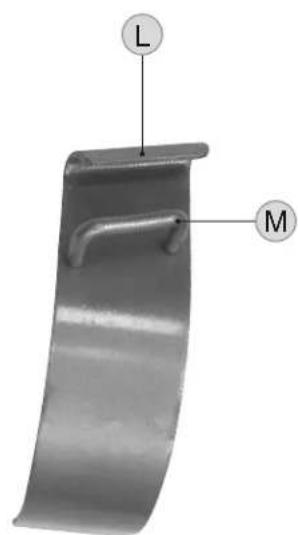
FIGURE 3
L. Metal insert
M. Retaining bar
Velcro® is a registered trademark of Velcro® Industries B.V.
text_image
A F C E 2214L DFIGURE 1 – Left Hydra-Cool™ Pad Construction Details (front)
text_image
I H KFIGURE 2 – Left Hydra-Cool™ Pad Construction Details (back)
text_image
L MFIGURE 3 – Left Metal Insert
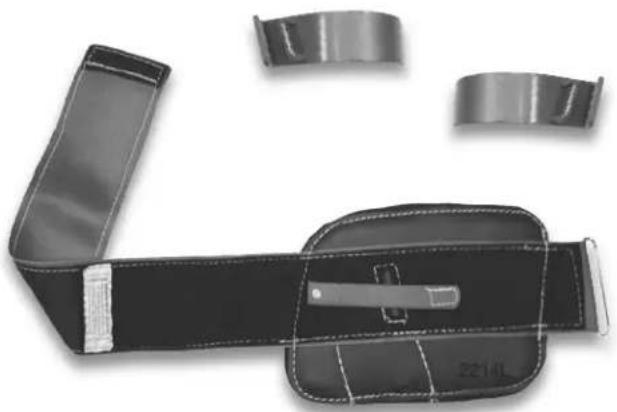
2. CONTENTS OF HydrA-COOL™ CLIMBER PAdS
• Hydra-Cool™ Climber Pads Model No. 2214
• (1 each) Left & Right Pads
• (1 each) Left & Right Metal Inserts
- Instructions for the Proper Use, Assembly, Care and Maintenance
natural_image
Product photo of a black wrist strap with attached clips and a labeled tag (no text or symbols visible)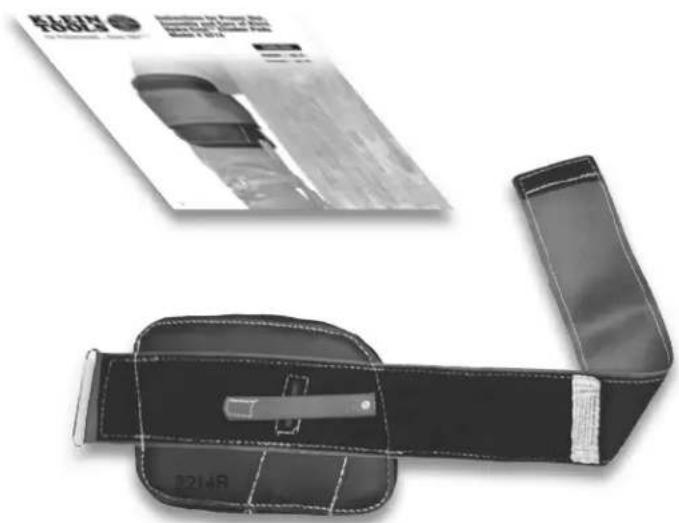
natural_image
Product photo of a black wrist strap with attached arm, shown alongside a printed brochure (no visible text or symbols on the device itself)3. ASSEMBLING THE HydrA-COOL™ PAdS TO THE CLIMBERs
AFTER rEMOVING OLd PAdS Or BEFOrE AddING PAdS TO A NEW SET OF CLIMBERs, FOLLOW THESE STEPS.
natural_image
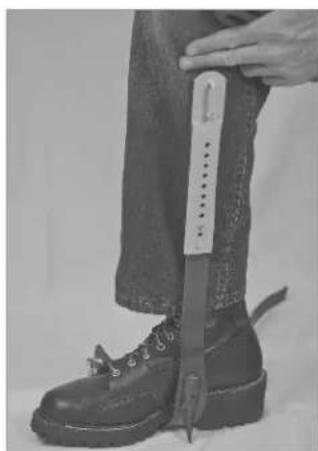
Close-up of a person's lower body wearing a pair of boots, holding a knife (no visible text or symbols)1 Step into the climber, placing the adjustable sleeve to the inside of the leg.
2 Adjust sleeve height for proper fit, about 1" (25 mm) below the knee. Insert screws into the two (2) aligned holes of each climber, and tighten the supplied nuts on the screws to secure the adjustment.
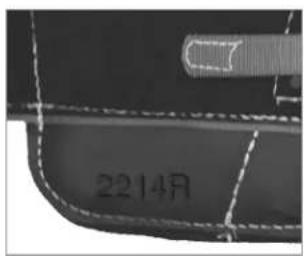
3 Match the Left and Right climbing pads to the Left and Right climbers.
text_image
2214L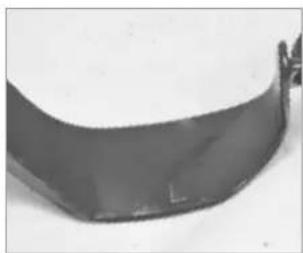
natural_image
Close-up of a dark, curved metallic object with a small protrusion on top (no visible text or symbols)LEFT Climber marked with an "L"
text_image
22148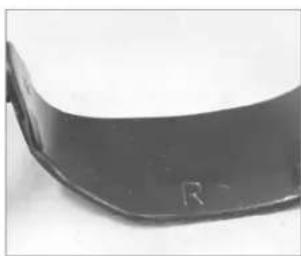
natural_image
Close-up of a black curved object with no visible text or symbolsRIGHT Climber marked with an "R"
natural_image
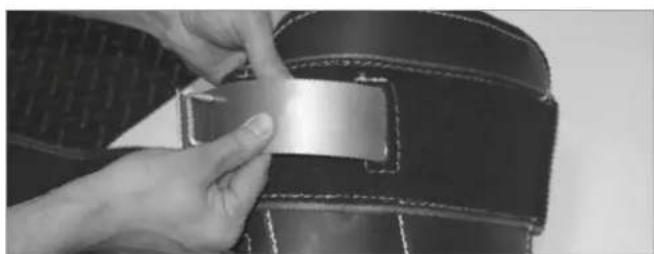
Close-up of hands adjusting a metallic object on a dark leather helmet (no visible text or symbols)4 Install metal insert in climbing pad, assuring the text on the metal insert is right-side up. Assure the metal insert you are installing is on the correct side (left or right, signified by "L" or "R" at the end of the part number) by matching the last character on the metal insert ("L" or "R") with the last character on the leather climbing pad ("L" or "R"). Push the metal insert into the climber pad until the retaining bar is against the slotted opening in the climber pad.
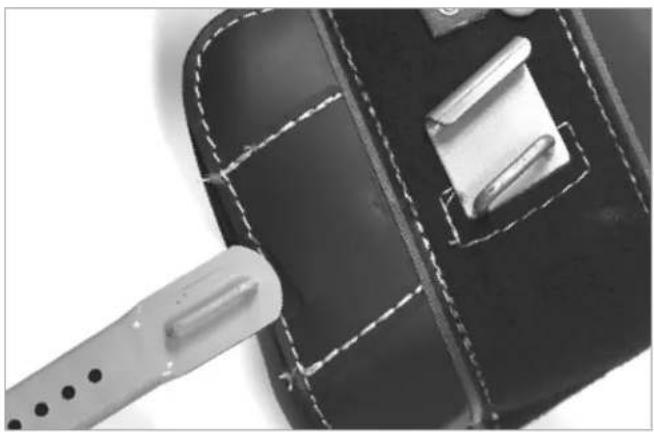
5 Insert top shank of the climber with sleeve into tunnel slot opening at the bottom edge of the pad. NOTE: Squeezing the tunnel from the sides will aid in pushing the climber through the pad.
natural_image
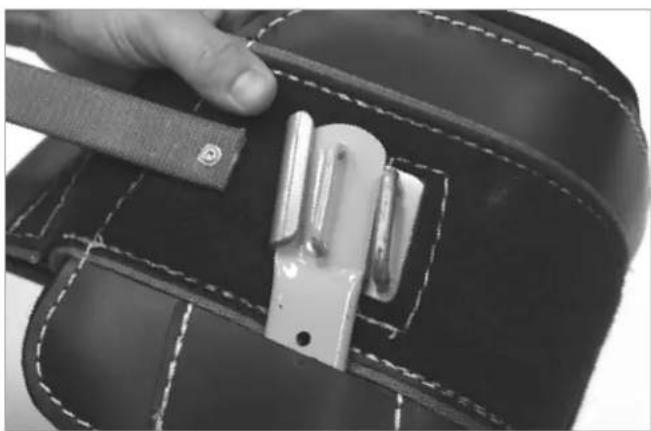
Close-up of a black briefcase with dashed stitching and a metallic clip, being inserted by a metal tool (no text or symbols visible)6 Continue pushing the climber through the tunnel until the metal retaining bar is aligned with the sleeve loop.
natural_image
Close-up of a hand using a metal clip to adjust a black leather wallet (no text or symbols visible)Climber sleeve loop properly aligned with the retaining bar.
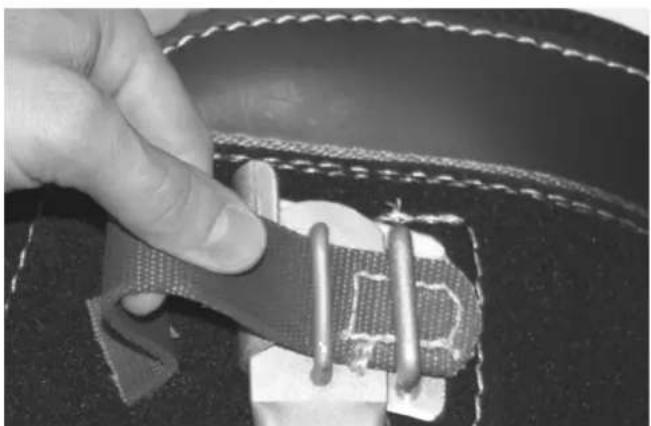
7 Feeding the Klein Kord® retaining strap through the climber sleeve loop.
natural_image
Close-up of a hand adjusting a flexible electronic component with metal pins, against a dark background (no text or symbols visible)Push the retaining strap and retaining bar through the climber sleeve loop.
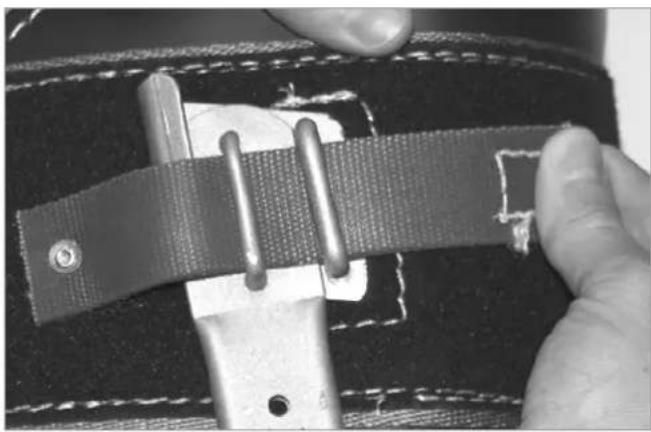
8 Pull the retaining strap completely through the sleeve loop and retaining bar. Secure the Velcro® hook end to the Velcro® loops on the pad.
natural_image
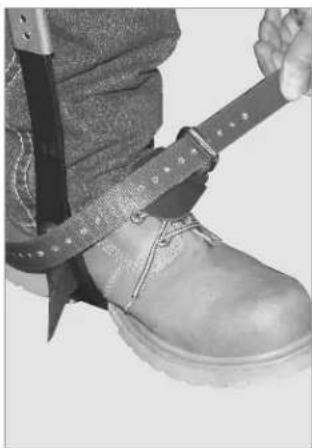
Close-up of a hand adjusting a flexible black-and-white fabric with metal straps (no text or symbols visible)4. dONNING THE ASSEMBLED HydrA-COOL™ PAd AND CLIMBER TO yOur LEG
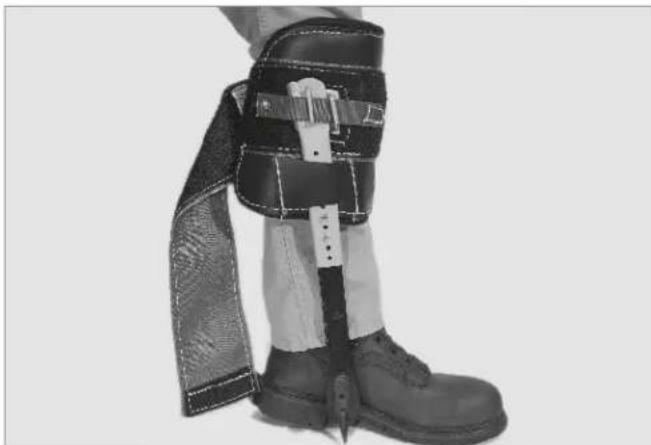
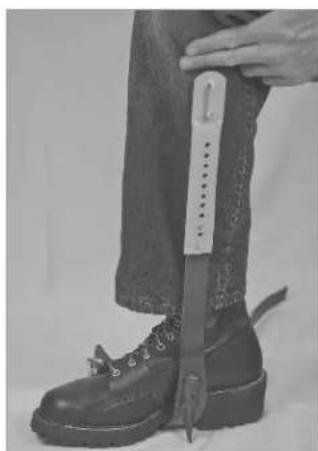
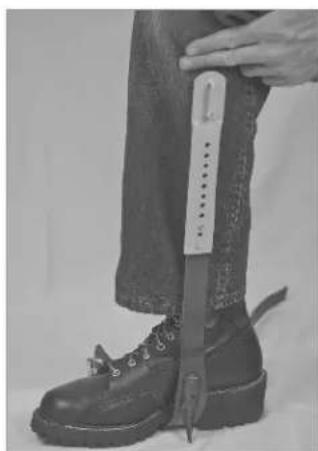
1 Step into the climber and pad assembly.
natural_image
Person wearing a medical prosthetic leg and boots, no visible text or symbols2 Secure the ankle straps.
natural_image
Close-up of a person's foot wearing a hard hat and belt, holding a belt buckle (no text or symbols visible)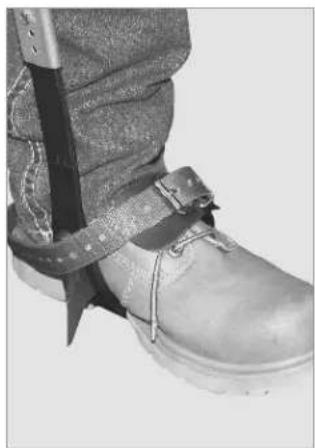
natural_image
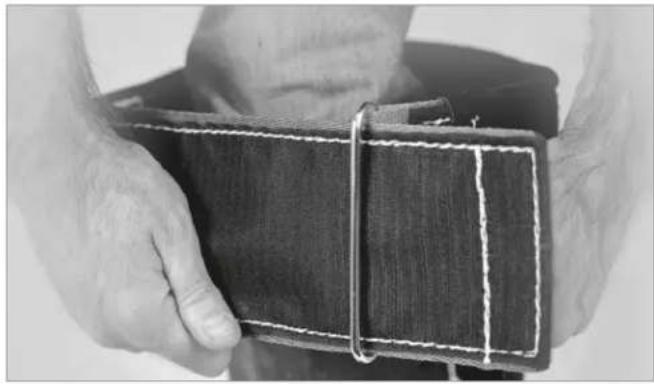
Close-up of a person's foot wearing a hard hat and belt (no visible text or symbols)3 Insert the free end of the pad through the metal cinch loop. Webbing must pass through metal cinch loop.
natural_image
Close-up of hands holding a dark fabric sleeve with white stitching (no text or symbols visible)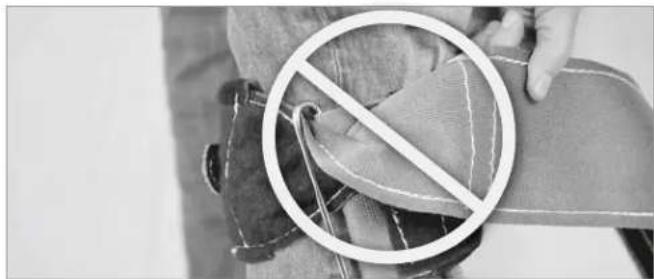
natural_image
Close-up of a hand holding a fabric with a circular overlay showing a crossed-out fabric (no text or symbols)Webbing must not be twisted
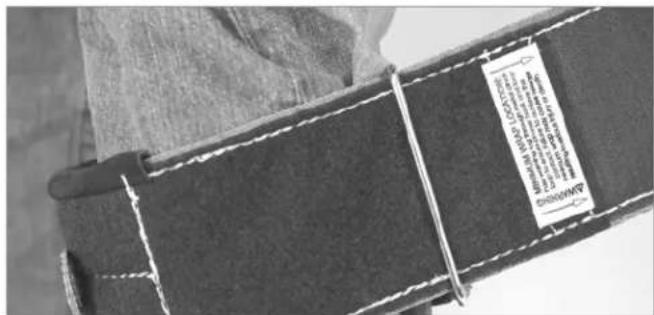
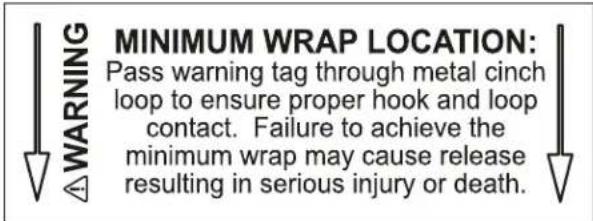
4 Continue to pull the webbing until the MINIMuM WrAP WArNING label is through the metal cinch loop. This will ensure the minimum amount of Velcro® hook and loop adhesion to properly secure the pad to your leg. Failure to do so could cause release resulting in serious injury or death.
text_image
Close-up of a fabric belt with visible text label and stitching details, likely from a technical or mechanical document.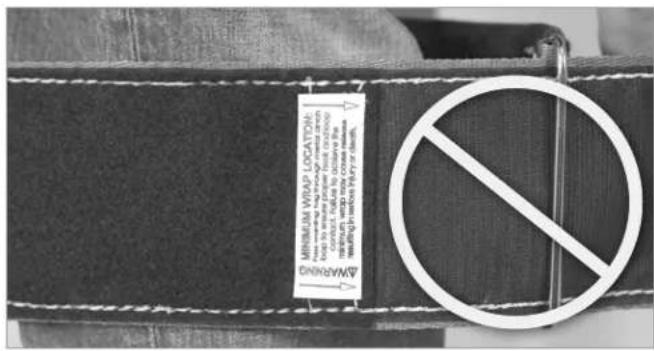
text_image
MINIMUM WRIP LOCATION: MILKING No. 100000000000000000000000000000000000000000000000000000000000000000000000000000000000000000 AMOUNTED NO. 123456789999999999999999999999999999999999999999999999999999999999999999999999999999999999999999999999999999 AMOUNTED No. 1234567899999999999999999999999999999999999999999999999999999999 AMOUNTED No. 123456788888888888888888888888888888888888888888888888888888888888888888888888⚠️ WArNING: MINIMuM WrAP LOCATION: Pass warning tag through metal cinch loop to ensure proper hook and loop contact. Failure to achieve the minimum wrap may cause release resulting in serious injury or death.
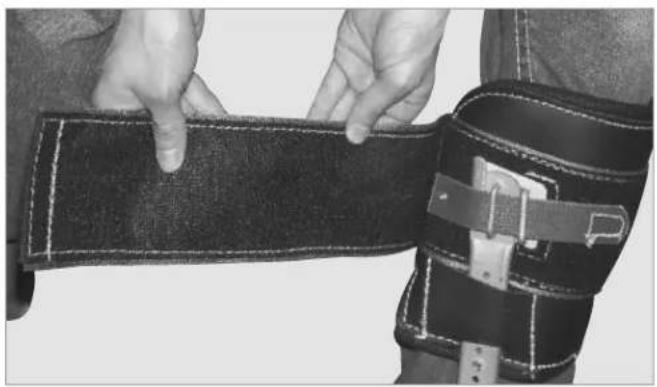
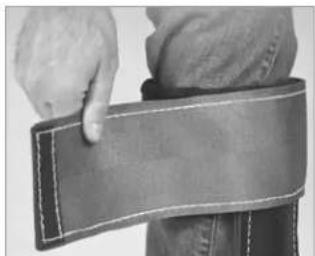
5 Pull the free end of the pad until it is snug and wrap it around your leg.
natural_image
Close-up of hands adjusting a black wristband with a strap (no text or symbols visible)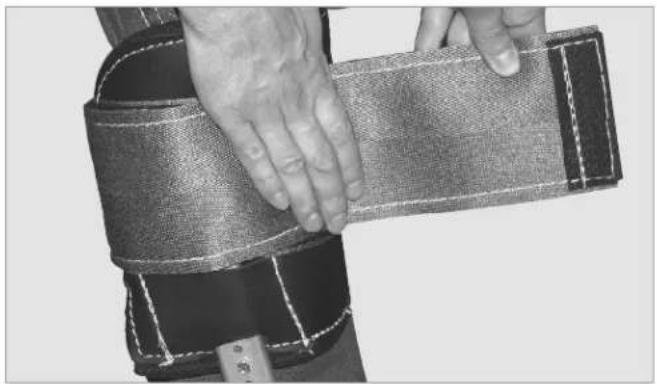
natural_image
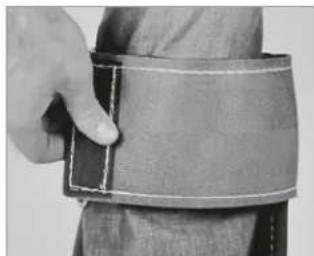
Close-up of a hand holding a textured, sleeveless wrist strap (no text or symbols visible)6 Secure the free end around the pad adhering the Velcro® hooks – (sharp side) to the Velcro® loops – (soft side).
natural_image
Close-up of a hand holding a gray bandage with dashed stitching (no text or symbols visible)Wrap free end around leg.
natural_image
Close-up of a hand holding a wristband with a bandage (no text or symbols visible)Free end secured around leg.
7 Before climbing check the security of the Velcro® climber pad and climber by taking a step or two on the structure you are climbing.
5. SPECIFIC PROCEDURES FOR INSPECTING HYDRA-COOL™ CLIMBER PADS
Carefully inspect the entire climber before each use.
Remove from service if any of the following conditions are found:
- Klein-Kord ^® retaining strap with Velcro ^® hook is damaged or missing
- Velcro® hooks and loops will not adhere
- Stitching is cut or broken
• Metal cinch loop is damaged or not securely attached to the pad.
• Metal insert is cracked or bent. - Retaining bar is missing, cracked or bent.
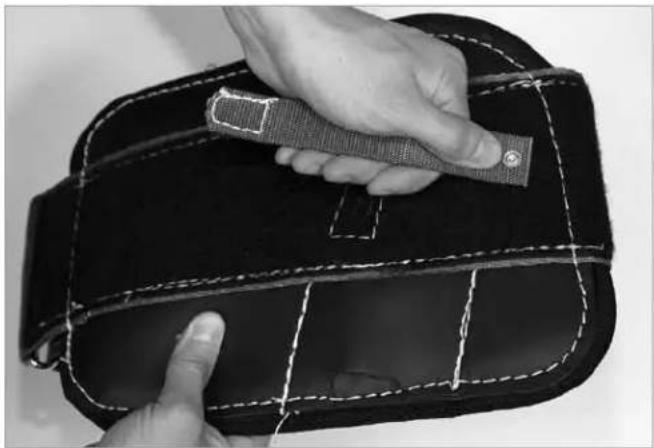
1 Check straps and pads.
Make sure straps are secure and not damaged. Pads are free of tears, burns, broken stitches, or excessive wear. Carefully check leather in tunnel slot area for cracking, wear, tearing, weakening, chemical attack, or other signs of deterioration.
natural_image
Close-up of hands holding a black leather pouch with a metal clip, no visible text or symbols2 Check rivets, metal cinch loop and all other metal components.
Check that rivets and fasteners are not bent, loose, or missing.
natural_image
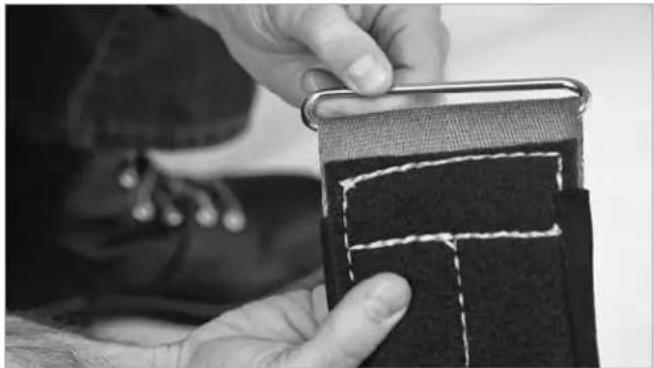
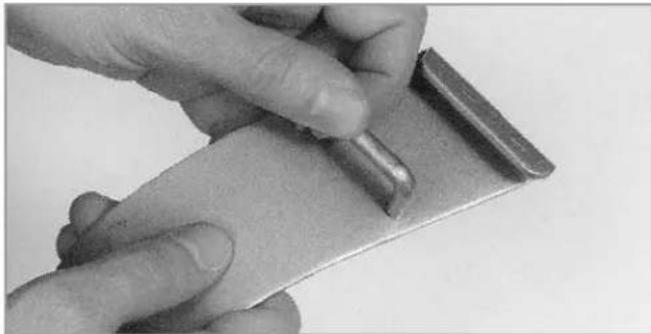
Close-up of hands adjusting a dark fabric with white stitching (no text or symbols visible)3 Check metal insert and retaining bar. Retaining bar should be staked and free of cracks and/or deformation. Metal insert should be free of cracks, sharp edges and/or deformation.
natural_image
Close-up of hands using a metal tool to apply a small metallic component (no text or symbols visible)6. MAINTENANCE PROCEDURES
Clean and maintain equipment as recommended.
1 Webbing.
Clean as needed. Use a damp rag and mild detergent. Avoid immersing in water. Allow pad to air dry.
2 Velcro® components.
Clean clogged Velcro ^® hooks with a stiff brush or another piece of hook material to remove debris.
3 Leather components.
Maintain all leather with Neat's-foot oil or equivalent to prolong life. Clean with saddle soap or other mild soap. Allow leather to dry naturally. Do not use heat to speed up the process.
4 Re-inspect all equipment after maintenance.
It is mandatory to re-inspect the equipment after all maintenance was done properly and effectively. Store in a clean and dry location between uses.
7. GENERAL INSPECTION PROCEDURES
For all other Inspection Procedures refer to Instructions for Proper Use, Assembly and Care of Klein Pole and Tree Climbers, Including Gaff Sharpening (#139107).
8. WARNINGS: KLEIN CLIMBERS AND PADS
Climbing equipment is for use by properly trained professionals only.
- Employers should instruct employees as to proper use and warnings before use of equipment.
- Read, understand and follow all information provided with climber before using.
- Use climbing equipment only for the specific purpose for which it was designed and intended.
- Klein Tools recommends a combined body, clothing and tool weight of 300 pounds or less for use with our pole and/or tree climbers.
• Always visually check that all buckles are properly closed before use.
• Before each use check that:
(1) gaffs are free of dents, gouges, or scratches,
(2) gaffs have proper width, thickness, point profile, and sharpness using Klein Gaff Gauge KG-1.
• Before each use check that:
(1) climber straps and pads are free of burns, cuts, broken stitches, or excessive wear,
(2) rivets are not bent, loose, or missing,
(3) buckles are not distorted or cracked, tongue does not bind on buckle and buckle holes are not damaged.
(4) REMOVE FROM SERVICE, DESTROY AND DISCARD ITEM IF IT FAILS INSPECTION, AND REPLACE IMMEDIATELY.
- Never punch holes in or alter a strap, climber or pad.
⚠ WARNING: OSHA states that any OPE equipment actually subjected to in-service loading, as distinguished from static load testing, shall be immediately removed from service and shall not be used again to safeguard employees. If any equipment has arrested a fall, immediately destroy and discard it so it can never be used again.
⚠ WARNING: The use of occupational protective equipment without proper instructional materials and training could result in serious injury or death. Klein Tools will supply additional instructional materials, warning tags, or will answer questions on any piece of Klein occupational protective equipment free of charge. Call Klein Tools, Inc. at 1-800-553-4676.
9. WARNING LABEL- MINIMUM WRAP WARNING
text_image
MINIMUM WRAP LOCATION: Pass warning tag through metal cinch loop to ensure proper hook and loop contact. Failure to achieve the minimum wrap may cause release resulting in serious injury or death.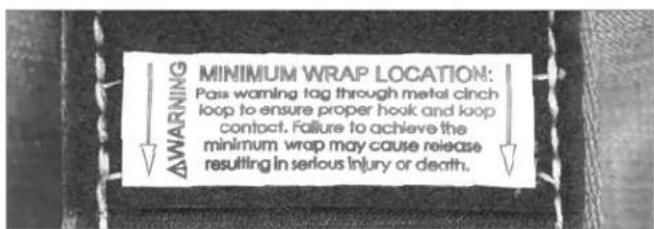
text_image
MINIMUM WRAP LOCATION: Pass warning tag through metal cinch loop to ensure proper hook and loop contact. Failure to achieve the minimum wrap may cause release resulting in serious injury or death.WARRANTY
For Professionals... Since 1857® USA
natural_image
Close-up of a person's leg wearing a black 2214R wrist strap, next to a textured wooden surface (no text or symbols visible)INTRODUCCIÓN
natural_image
Silhouette of a person falling with arms raised (no text or symbols)ADVERTENCIA
natural_image
Product photo of a black arm strap with attached clips and a 2214L label (no text or symbols on the main subject)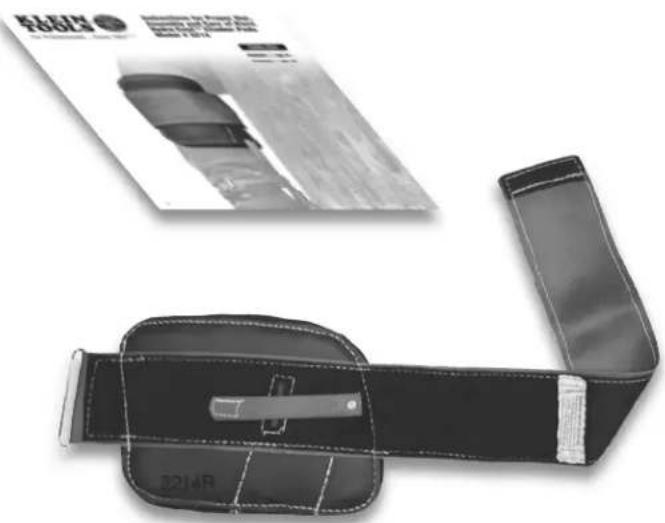
natural_image
Product photo of a black arm strap with attached cable, shown alongside an inset image of a car (no visible text or symbols)3. ENSAMBLE de LAS ALMOHAdILLAS HydrA-COOL™ A LOS ESCALAdOrES
dESPuÉS de QuITAr LAS ALMOHAdILLAS VIEJAS O ANTES dE COLOCAr LAS ALMOHAdILLAS AL CONJuNTO NuEVO dE ESCALAdOrES, SIGA ESTAS INSTruCCIONES.
natural_image
Close-up of a person's lower legs wearing a dark boots and holding a saw, with no visible text or symbols.natural_image
Close-up of a dark, curved object with a small mark and label 'L' on its surface (no readable text or symbols)natural_image
Close-up of a black curved object with no visible text or symbolsnatural_image
Close-up of hands adjusting a black textured object with a rectangular cutout (no visible text or symbols)natural_image
Close-up of a black leather wallet with a metallic clip and dotted screw, no visible text or symbolsnatural_image
Close-up of a hand using a metal clip to cut a black leather wallet (no text or symbols visible)natural_image
Close-up of a hand adjusting a flexible metal strip with a loop, against a dark textured background (no text or symbols visible)natural_image
Close-up of a hand adjusting a flexible band with metal clips, against a dark fabric background (no text or symbols visible)natural_image
Person wearing a black and white prosthetic leg with straps and a small clip, standing on a plain background (no text or symbols visible)natural_image
Close-up of a person's foot wearing a hard hat and belt buckle (no text or symbols visible)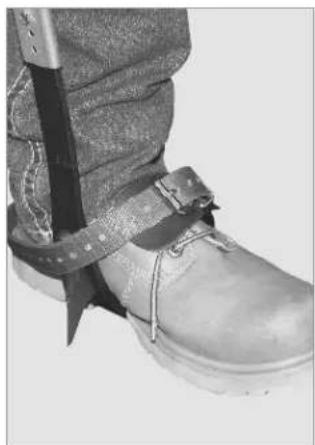
natural_image
Close-up of a person's lower back wearing a hard hat and belt (no text or symbols visible)natural_image
Close-up of hands holding a dark fabric or wristband with white stitching (no text or symbols visible)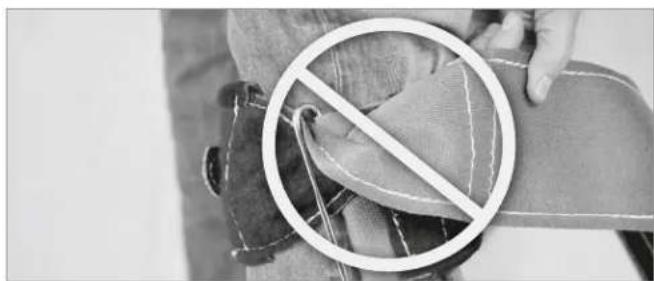
natural_image
Close-up of a hand holding a fabric with a circular overlay showing a crossed-out fabric (no text or symbols)text_image
Close-up of a fabric with visible label and printed text, likely from a technical or mechanical document.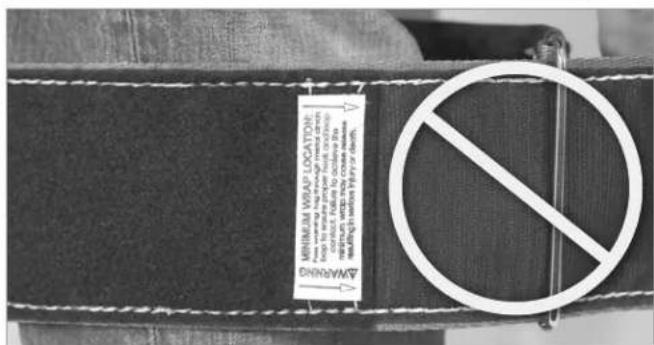
text_image
MINIMUM WRAP LOCATION: from to wear a zipper from the work of the work of the work of the work of the work of the work of the work of the work of the work of the work of the work of the work of the work of the work of the work of the work of the work of the work of the work of the work of the work of the work of the work of the work of the work of the work of the work of the work of the work of the work of the work of the work of the work of the work of the work DEPARTMENTnatural_image
Close-up of hands adjusting a black wrist strap with a bandage (no text or symbols visible)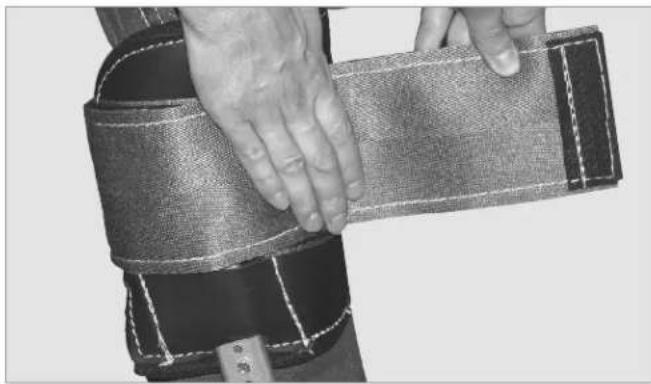
natural_image
Close-up of hands holding a textured sleeve or wrist strap (no visible text or symbols)natural_image
Close-up of a hand holding a gray bandage with dashed stitching (no text or symbols visible)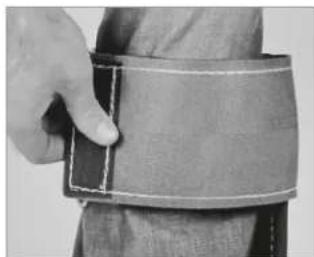
natural_image
Close-up of a hand holding a textured sleeve or wristband, no visible text or symbolsnatural_image
Close-up of a hand holding a black textured bag with white stitching, being pointed at by fingers (no text or symbols visible)natural_image
Close-up of hands stitching dark fabric with white stitching (no text or symbols visible)natural_image
Close-up of a hand using a metal tool to cut a metallic object (no text or symbols visible)6. PROCEDIMIENTOS DE MANTENIMIENTO
text_image
MINIMUM WRAP LOCATION: Pass warning tag through metal cinch loop to ensure proper hook and loop contact. Failure to achieve the minimum wrap may cause release resulting in serious injury or death.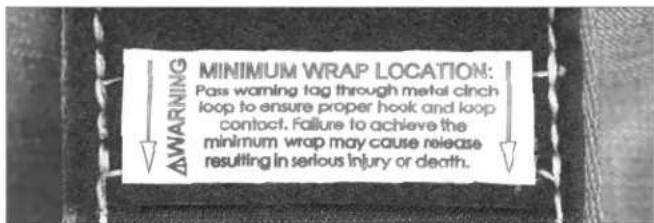
text_image
MINIMUM WRAP LOCATION: Pass warning tag through metal cinch loop to ensure proper hook and loop contact. Failure to achieve the minimum wrap may cause release resulting in serious injury or death.GARANTÍA
For Professionals... Since 1857® USA
natural_image
Close-up of a person's leg wearing a black 2214R wrist strap, next to a textured wooden surface (no text or symbols visible)PRÉSENTATION
natural_image
Simple black silhouette of a person falling (no text or symbols)AVERTISSEMENT
text_image
A F C E 2014L Dnatural_image
Black and white photo of a wrist strap with attached clips, no visible text or symbols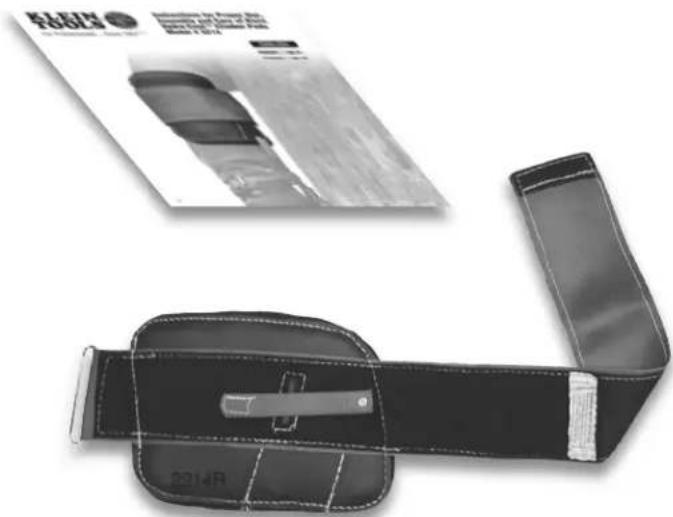
natural_image
Product photo of a black wrist strap with visible branding and a printed package (no text or symbols on the product itself)3. ASSEMBLAGE dES COuSSINETS PROTECTEurS HydrA-COOL™ AuX GrIFFES
APrÈS LA dÉPOSE DES ANCIENS COuSSINETS PrOTECTEurS Ou AVANT L'AJOuT de COuSSINETS À uN ENSEMBLE NEuF de GrIFFES, SulVEZ CES ÉTAPES.
natural_image
Close-up of a person's lower legs wearing boots and holding a knife (no visible text or symbols)natural_image
Close-up of a dark, curved object with no visible text or symbolsnatural_image
Close-up of a black curved object with no visible text or symbolsnatural_image
Close-up of a hand pressing down on a metallic object with a rectangular cutout (no visible text or symbols)natural_image
Close-up of a black leather briefcase with dashed stitching and a metallic clip, being inserted by a white plastic clip (no text or symbols visible)natural_image
Close-up of a hand using a tool to adjust or install a black leather wallet (no text or symbols visible)natural_image
Close-up of a hand adjusting a textured fabric with metal rings, against a dark background (no text or symbols visible)natural_image
Close-up of a hand adjusting a flexible band with metal clips, against a dark fabric background (no text or symbols visible)4. ENFILAGE du COuSSINET PrOTECTEur HydrACOOL™ ET dE LA GrIFFE Sur VOTrE JAMBE
natural_image
Person wearing a medical prosthetic leg and boots, no visible text or symbolsnatural_image
Close-up of a person's foot wearing a hard hat and belt buckle (no text or symbols visible)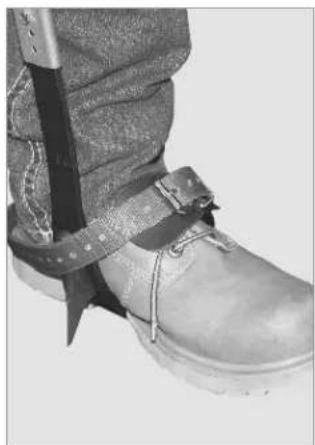
natural_image
Close-up of a person's lower back wearing a hard hat and belt (no visible text or symbols)natural_image
Close-up of hands holding a dark fabric wristband with white stitching (no text or symbols visible)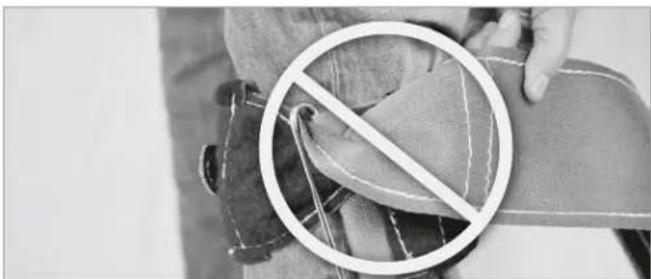
natural_image
Close-up of a hand holding a bandage with a white prohibition symbol overlay (no text or symbols on the diagram itself)text_image
Close-up of a fabric belt with printed label and dashed stitching, showing text about fabric weight and usage.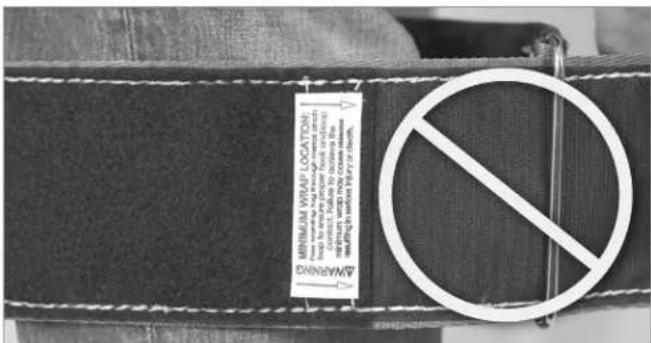
text_image
MINIMUM WRIP LOCATION: from the working material to the minimum wearing, so that is not with a minimum wearing or wear. The wear WIRE WIRE WIRE WIRE WIRE WIRE WIRE WIRE WIRE WIRE WIRE WIRE WIRE WIRE WIRE WIRE WIRE WIRE WIRE WIRE WIRE WIRE WIRE WIRE WIRE WIRE WIRE WIRE WIRE WIRE WIRE WIRE WIRE WIRE WIRE WIRE WIRE WIRE WIRE WIRE WIRE WIRE WIRE WIRE WIRE WIRE WIRE WIRE WIRE WIRE WIRE WAREWINGnatural_image
Close-up of hands adjusting a black wristband with a bandage and buckle (no text or symbols visible)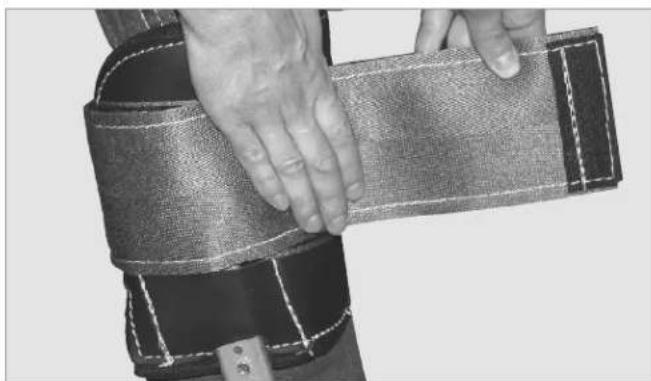
natural_image
Close-up of hands holding a textured sleeve or wrist strap, no visible text or symbolsnatural_image
Close-up of a hand holding a gray fabric arre with white stitching (no text or symbols visible)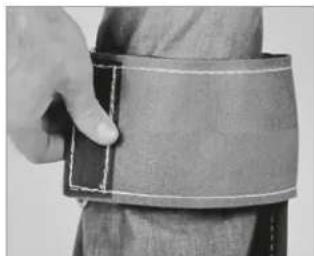
natural_image
Close-up of a hand holding a wristband with a bandage (no text or symbols visible)natural_image
Close-up of a hand holding a black textured bag with a tool, no visible text or symbolsnatural_image
Close-up of hands adjusting a fabric with white stitching, no visible text or symbolsnatural_image
Close-up of a hand using a metal tool to apply a small metallic component (no text or symbols visible)6. PROCÉDURES D'ENTRETIEN
text_image
MINIMUM WRAP LOCATION: Pass warning tag through metal cinch loop to ensure proper hook and loop contact. Failure to achieve the minimum wrap may cause release resulting in serious injury or death.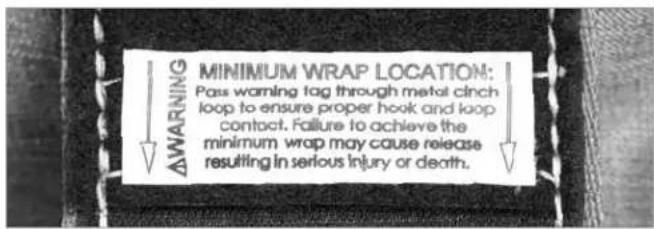
text_image
MINIMUM WRAP LOCATION: Pass warning tag through metal cinch loop to ensure proper hook and loop contact. Failure to achieve the minimum wrap may cause release resulting in serious injury or death.GARANTIE
For Professionals... Since 1857 ^® LON