
the Smoking Gun Pro CSM700 - Cooking appliance BREVILLE - Free user manual and instructions
Find the device manual for free the Smoking Gun Pro CSM700 BREVILLE in PDF.

| Product Type | Cold Smoker (Smoking Gun Pro) |
| Brand | Breville |
| Model | CSM700 |
| Power Supply | 4 AA 1.5V alkaline batteries (non-rechargeable) |
| Fan Speed | Variable (MAX to MIN) |
| Materials | Robust housing, metal barrel, silicone hose, O-ring |
| Combustion Chamber Capacity | Small amount of chips (do not overfill) |
| Usage | Domestic use only |
| Main Functions | Cold smoking, smoke injection, variable speed |
| Smoking Techniques | Container or bag, table service, stand mixer, blender, shaker |
| Cleaning | Combustion chamber and barrel dishwasher safe; housing and fan hand wash; mesh filter brush clean |
| Safety | Do not use without filter, do not immerse housing, allow to cool, do not use a torch, keep away from flammable materials |
| Included Accessories | Hex key, adjustment screw, mesh filter, hose with fittings |
| Spare Parts Available | Mesh filter (US No. 20), O-ring, fan, adjustment screw M3x6mm, hex key 1.5mm AF |
| Repairability | Servicing other than cleaning at an authorized Breville | Commercial service center |
| Maintenance | Check regularly, lubricate O-ring if necessary, replace mesh filter if clogged |
| Warranty | Manufacturer's warranty (not specified in manual) |
Frequently Asked Questions - the Smoking Gun Pro CSM700 BREVILLE
User questions about the Smoking Gun Pro CSM700 BREVILLE
0 question about this device. Answer the ones you know or ask your own.
Ask a new question about this device
Download the instructions for your Cooking appliance in PDF format for free! Find your manual the Smoking Gun Pro CSM700 - BREVILLE and take your electronic device back in hand. On this page are published all the documents necessary for the use of your device. the Smoking Gun Pro CSM700 by BREVILLE.
USER MANUAL the Smoking Gun Pro CSM700 BREVILLE
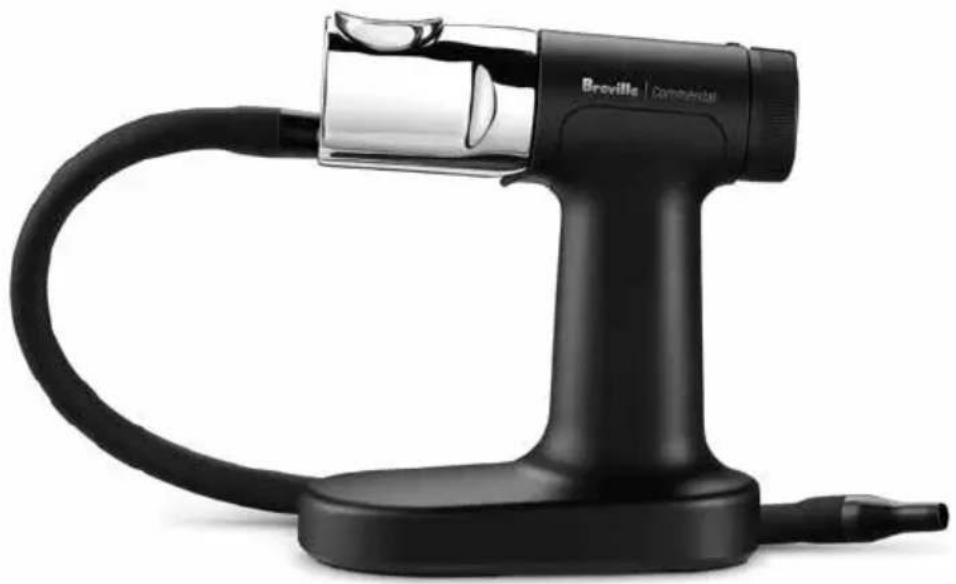
the Smoking Gun® Pro
Instruction Book - CSM700
natural_image
Black and white photo of a Breville brand hairdryer tool with a curved handle (no text or symbols visible)Breville® | Commercial

Contents
2 Breville | Commercial Recommends Safety First
6 Components
7 Assembly
8 Functions
9 Tips
10 Care & Cleaning
11 Troubleshooting
BREVILLE | COMMERCIAL RECOMMENDS SAFETY FIRST
At Breville | Commercial we are very safety conscious. We design and manufacture commercial products with the safety of you, our valued customer, foremost in mind. In addition we ask that you exercise a degree of care and adhere to the following precautions.
IMPORTANT SAFEGUARDS
READ ALL INSTRUCTIONS BEFORE USE AND SAVE FOR FUTURE REFERENCE
- Remove any packaging material and promotional labels before using the Smoking Gun® Pro appliance for the first time.
- Do not place the Smoking Gun® Pro appliance near the edge of a table, counter or bench top during operation. Ensure that the surface is level, clean and free of water.
- Do not place any part of the Smoking Gun® Pro appliance in a gas, electric or microwave oven or on a hot gas or electric burner.
- Keep Smoking Gun® Pro appliance clear of walls, curtains and other heat or steam sensitive materials. Minimum 8 inch distance.
• Always ensure the Smoking Gun® Pro
appliance is properly assembled before use. Follow the instructions provided in this book.
- Do not leave the product unattended when in use.
- Do not touch hot surfaces.
- Do not use harsh abrasives or caustic cleaners when cleaning this product.
- Keep the product clean. Follow the care and cleaning instructions provided in this book.
- This product is not intended for use by persons (including children) with reduced physical, sensory or mental capabilities, or lack of experience and knowledge, unless they have been given supervision or instruction concerning use of the product by a person responsible for their safety.
• This product is intended for commercial and household use. Do not use this product for anything other than its intended
use. Do not use in moving vehicles or boats.
- It is recommended to regularly inspect the product.
• Any maintenance other than cleaning should be performed at an authorized Breville | Commercial Service Center.
- Do not attempt to burn anything other than small wood chips, wood sawdust, dried herbs, cooking spices, or tea leaves, or any other food products safe for consumption.
- Do not leave the Smoking Gun® Pro appliance unattended.
- Use only in a well ventilated area; the burning of wood chips/ dust, dried herbs, cooking spices, and/or tea leaves may result in the emission of combustion by-products which are known to cause cancer, birth defects, and/or reproductive harm.
- The metal barrel and burn chamber of the Smoking Gun® Pro appliance will become very hot when in use. Allow device to cool completely before touching barrel or burn chamber, cleaning, or storing.
- Always use the Smoking Gun® Pro appliance in an upright position. Heated smoking materials may fall out of the burn chamber if tipped, resulting in a fire hazard.
• Always empty ash and burnt material into a non-flammable receptacle.
• Exercise proper care when igniting the smoking materials; improper ignition of flammable materials may result in explosion or fire hazard.
• Always use a match or lighter to ignite the materials in the Smoking Gun® Pro appliance; DO NOT USE a kitchen torch or other heat device as
the excessive heat may damage the unit.
- Do not point the Smoking Gun® Pro appliance at any person or flammable object.
- Avoid using the Smoking Gun® Pro appliance in areas where smoke may activate smoke alarms or fire suppression systems.
- Never operate the Smoking Gun® Pro appliance without the stainless steel mesh filter in place; burning/glowing embers may enter the barrel damaging the unit or be ejected through the nozzle, creating a fire or burn hazard.
- Removal or disassembly of any parts of the Smoking Gun® Pro appliance other than the burn chamber; stainless steel mesh filter, barrel, fan, O-ring, battery compartment cover, or batteries may result in irreparable damage and void the warranty.
CALIFORNIA PROPOSITION 65

WARNING
This product can expose you to chemicals including wood dust, which are known to the State of California to cause cancer, and carbon monoxide which are known to the State of California to cause birth defects or other reproductive harm. For more information go to www.P65Warnings.ca.gov.
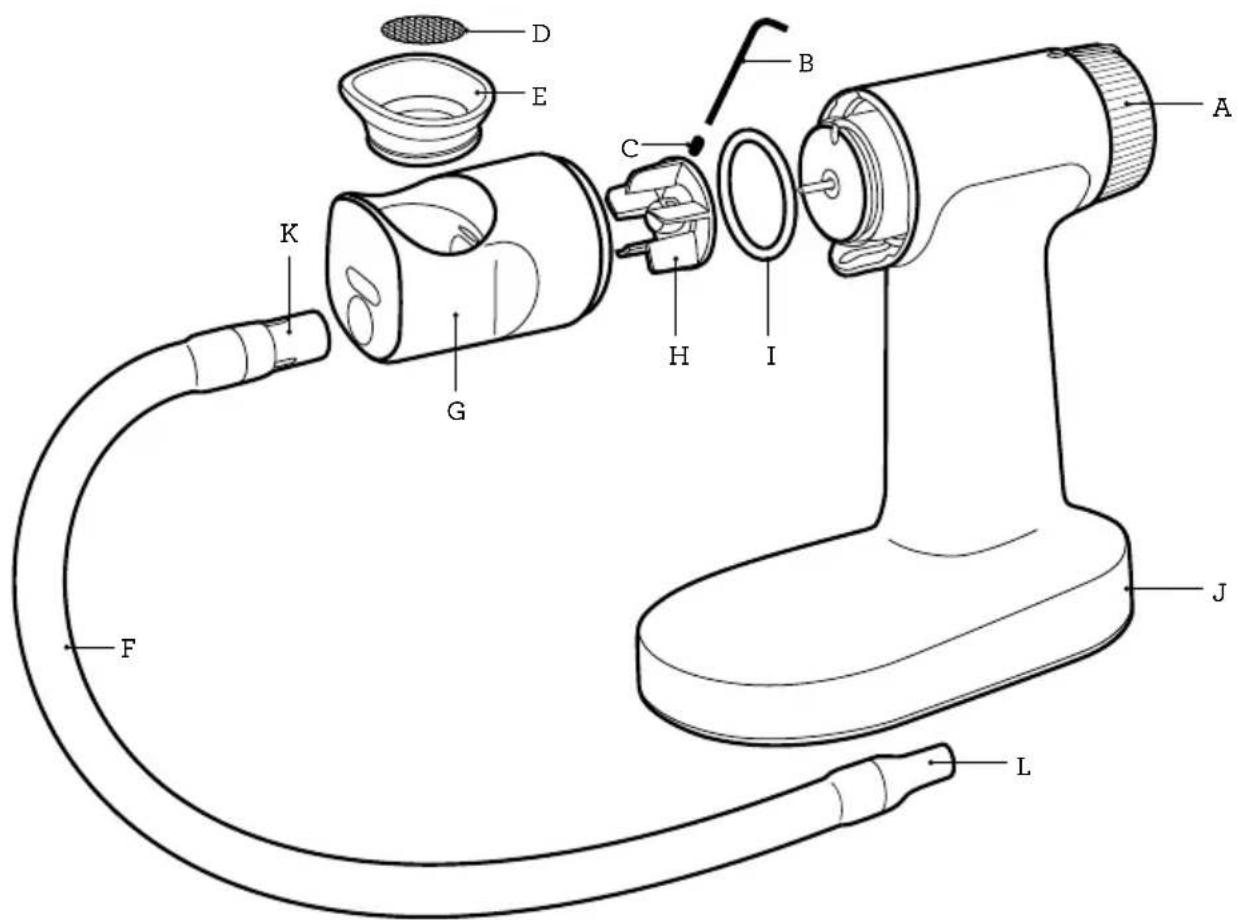
A. Variable speed & on/off dial
Variable speed for ignition and slow burn.
B. Hex key
C. Set screw
D. Removable mesh filter
Push out with finger to replace.
E. Removable burn chamber
Easy to tap out ash at the end of burn cycle.
F. Silicone hose
G. Barrel
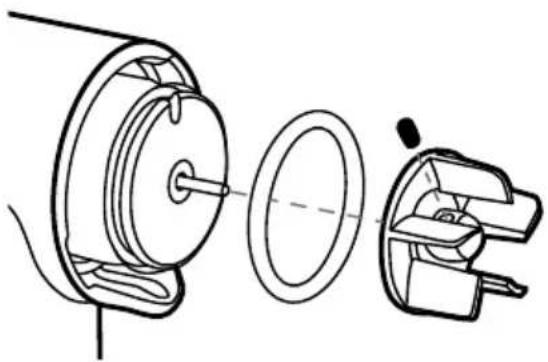
H. Removable metal fan
I. Removable O-ring
J. Robust housing
Integrated base provides stable secure platform.
K. Connection Nozzle
L. Smoking nozzle

Assembly

WARNING
- Remove batteries before removing barrel.
- Never operate unit when barrel is removed.
-
Keep fan away from face and avoid contact with fingers.
-
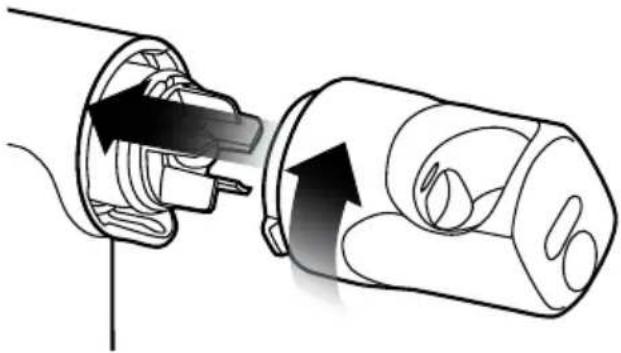
Align the two lugs on the rear face of the barrel with the two recesses on the inner edge of the front face of the housing and push together, rotating clockwise until small click and the large hole in the barrel is pointing directly upwards.
natural_image
Diagram of a plug inserted into a cylindrical socket with internal components, showing fluid flow direction (no text or symbols)- Ensure that a mesh filter is in the burn chamber. If no mesh filter is present, insert a mesh screen into the top of the burn chamber and press down with a finger to seat into the bottom of the burn chamber.
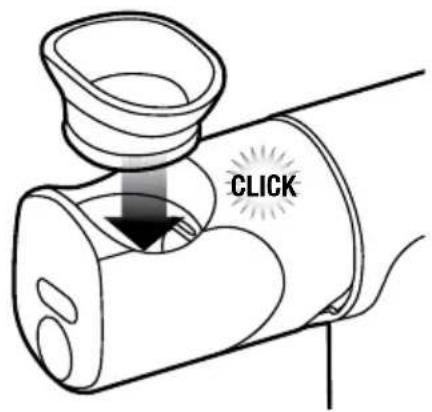
- Ensure the spring is seated in the groove on the outer cylindrical face of the burn chamber.
- Assemble the burn chamber into the open recess in the top of the barrel on the main unit. Push down until the spring provides a small click or the burn chamber is seated low in the barrel with no gaps around the perimeter.
- Retrieve the silicon hose with 2 rigid fittings, insert the connection nozzle into the circular hole in the front face and press firmly to secure the hose.
BATTERIES
Use 4 x AA (1.5V alkaline) batteries only. (No rechargeable batteries)
- Remove battery cover from underside of unit by sliding clip towards rear and rotating outwards.
- Insert batteries into cavity with orientation to match the outer face of the battery cover.
- Replace battery cover and press to snap into place.

Functions
BEFORE FIRST USE
Remove any packaging material and promotional labels from the Smoking Gun® Pro appliance.
Wipe the burn chamber, barrel, fan and mesh filter with a damp cloth.
CONTROLS
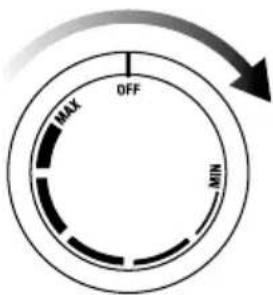
- The fan is operated by rotating the speed dial clockwise on the rear of the unit.
- The initial click indicates maximum speed. The word MAX will be at the approximate top of the dial.
- As the dial is rotated further clockwise, the speed of the fan is gradually reduced.
- Lowest speed is when the word MIN is at the approximate top of the dial until the dial cannot rotate further.
- Use MAX speed for greater airflow to assist in initially igniting wood chips.
- Use lower speed to smolder the wood chips and generate smoke.
OPERATION
- Place a small amount of wood chips (or desired smoking materials) into the burn chamber. Easiest ignition will be possible when the mesh filter is covered.
- Turn the dial on the Smoking Gun® Pro appliance to the MAX position

NOTE
Do not overfill the burn chamber.
The wood chips should just cover the mesh filter area with a thin layer.
- Use a handheld lighter or match to apply a flame to the top surface of the wood chips. Move the flame around to ignite the entire exposed surface. For best results make sure the burning area is evenly distributed or centered.

WARNING
- Do not use a kitchen torch or butane torch style lighter.
- Maintain the presence of the lighter for a period of time sufficient to start ignition only. Excessive heat may cause damage to the unit.
- Once the smoke is seen exiting the end of the hose, rotate the switch further clockwise to reduce the airflow and slow the burn rate of the wood chips. Allow the wood chips to smolder and direct the smoke to where required (see Tips page 9).
- When sufficient smoke has been generated or wood chips are extinguished, rotate the speed dial counter-clockwise until OFF is positioned at the top of the unit and the fan stops.
- Allow the unit to cool completely after burning has completed.

WARNING
The burn chamber is very hot after use. Exercise caution.
- When cooled completely the burn chamber can be removed by twisting it free of the barrel.

NOTE
- Invert the burn chamber and tap on a solid surface to remove any remaining wood chips or ash.
- The barrel, fan and O-ring can also be removed to clean these items individually.
- Wipe the cylindrical face and O-ring seat on the front of the housing to remove any residue from the smoke.
- It is recommended to clean the burn chamber prior to re-assembly.

Tips
- To provide smoke flavor and aroma for meats, fish, fruits, or vegetables after cooking, simply place the food in a covered casserole, stockpot, Dutch oven, or other covered dish/pan and inject smoke under the lid. See below table for smoking techniques.
- Use the Smoking Gur® Pro appliance to infuse delicate foods, such as cheeses and vegetables, with smoky flavor and aroma without changing their texture.
- One to three minutes under smoke is generally all that is needed to infuse foods with a smoky flavor and aroma. When using the Smoking Gun® Pro appliance with a covered receptacle, simply inject the smoke under the lid and let stand for a few minutes.
-
Don't place hose directly in the food. Place it just slightly above.
-
Continuous smoking with the Smoking Gun® Pro appliance is NOT required.
- Ensure the unit has had sufficient time to cool before reloading and operating additional burn cycles if required.
- Hickory chips impart a pungent, smoky bacon-like flavor that goes particularly well with most meats, especially pork (ham, ribs, etc.) and beef. They are good for most vegetables because they impart a strong earthy flavor.
- Applewood chips work well with poultry, game birds and pork. These woods provide a slightly sweet but denser, fruity smoke flavor.
- Use wood chips that have been specifically prepared for the purpose of smoking - these timbers will have been dried to the correct level and will produce less resinous materials in the smoke output from the unit.
TECHNIQUES
| CONTAINEROR BAG | 1. When smoking cooked foods, apply smoke after cooking.2. Place food in a container, cover with plastic wrap, insert tube and fill with smoke.Alternatively, place food in sealable bag, insert tube and fill bag with smoke.3. Let food absorb smoke for 1 minute and repeat 2–3 times for a stronger smoke flavor. |
| TABLESIDE 1. Plate food for serving.2. Hold drinking glass or glass cloche/dome upside down and fill with smoke.3. Place glass over food and let smoke absorb while serving.4. Lift glass at table in front of your guests. | |
| STAND MIXER 1. Whip or beat food in a stand mixer.2. Spread food evenly on mixing bowl walls for maximum surface area.3. Cover mixing bowl with plastic wrap, insert tube and fill with smoke.4. Let food absorb smoke for 1 minute and repeat 2–3 times for a stronger smoke flavor. | |
| BLENDER | 1. Fill blender with liquid to be smoked (sauce, soup, marinade, etc.)2. Insert tube into hole in blender lid.3. Blow smoke into blender, replace cap and blend.Repeat 2–3 times for a stronger smoke flavor. |
| SHAKER 1. Prepare beverage.2. Fill shaker with smoke, remove tube, cover with lid and shake. | |

Care & Cleaning
- Before cleaning, make sure the unit is completely cooled down and power dial is positioned to off position. Remove the batteries.
- Remove the burn chamber from the barrel. Invert the burn chamber and tap on a solid surface to remove any remaining wood chips or ash. The burn chamber may be cleaned by hand with warm soapy water or by placing in a dishwasher.
- Twist the barrel counter-clockwise and pull forward to remove. The barrel may be cleaned by hand in warm soapy water or by placing in the dishwasher.
- Mesh filter can be cleaned with warm soapy water and small brush as required.
- Clean hose and tube ends in warm soapy water as required.
- Use damp cloth to clean the main unit. Do not immerse in water.
- The fan can be removed by loosening the set screw (rotating counter-clockwise) using the hex key provided. Once loose the fan can be slid forward to remove from the motor shaft. The fan may be cleaned by hand in warm soapy water. It is not suitable for the dishwasher. Ensure it is completely dry before re-assembly.
- The O-ring can be removed by hooking under it (through the small slot above the fan) using the hex key and levering it off carefully.
Assembling the Fan
- The red O-ring should be assembled into the recess on the leading edge of the cylindrical section protruding from the front of the main housing. Ensure it is seated within the groove without any twisting.
- Assemble a small set screw into the small hole in the side of the fan.
natural_image
Technical line drawing of a mechanical assembly showing internal components and a close-up view (no text or symbols)- Slide the fan onto the motor shaft protruding from the front of the above cylinder until an approximate gap of 1mm is behind it. Use the hex key to tighten the set screw, applying a slight force (do not over-tighten).

NOTE
- Do not use unit without the barrel, burn chamber, fan and O-ring present.
- Do not use unit if there is no mesh filter in the burn chamber.
- Do not use to bubble smoke through liquid - this is not the intended use (see techniques section on page 9).
- Hose can be stored in loop to contain smell.
- Remove the batteries if the device is not to be used for a long period of time.
- Allow the unit to cool completely between consecutive burns.
- Burn chamber, spring, barrel and O-ring can be put in the dishwasher.
- If the O-ring is very sticky and makes the barrel hard to assemble, a small amount of oil can be placed on the outer faces to make it lubricated. Do not operate the unit without the barrel in place.
- Replace mesh filter if it becomes clogged.
Mesh Filter specification:
No.20 US Sieve Size [∅25.4mm (1 inch), stainless steel 304].
Set Screw specification: M3 x 6mm SS303
Hex Key specification: 1.5mm AF

WARNING
- Do not immerse the housing in liquid.
- Do not operate the unit without the barrel in place.
- Resin may stain hands, handle parts with caution.
Visit BrevilleCommercial.com to order more wood chips and more mesh filters.

Troubleshooting
POSSIBLE PROBLEM EASY SOLUTION
| Cannot attach fan. | Back out the small set screw to ensure it is not blocking the shaft hole.Ensure the motor shaft hole in the fan is not blocked. |
| Fan not starting. | Check orientation of batteries.Replace batteries.Ensure the fan is assembled correctly with an approximate 1mm gap behind the fan. See if it can rotate when the barrel is in place by poking it with toothpick (or similar). |
| Cannot attach barrel. | Ensure orientation is correct - large hole in the barrel should be facing upwards to the side of the center line of the unit when the bayonet lugs are initially engaged.Ensure the fan is in the correct position - it should have a small gap (about 1mm) behind.If the barrel is hard to rotate - add a small amount of food safe oil to the surface of the O-ring. |
| No smoke generated. | Ensure mesh filter is not blocked.Ensure the hose is not blocked or kinked.Ensure the fan starts when the switch is rotated between MAX and MIN.When using a closed container ensure there is an outlet for the air to escape.Ensure wood chips are dry and small.Increase fan speed to MAX. |
| Not enough smoke. | Turn fan to MAX to increase burn rate. |
| Smoke is leaking around the barrel. | Ensure the O-ring is in the correct position.Ensure the O-ring is free of any damage. |
the Smoking Gun® Pro
natural_image
Black and white photo of a Bruville Commercial hairdryer tool with a curved handle (no text or symbols visible on the device body)Breville® | Commercial

Table des matières
natural_image
Diagram showing a plug inserted into a socket with an arrow indicating direction (no text or symbols present)natural_image
Technical line drawing of a mechanical assembly showing a wheel, shaft, and housing (no text or symbols)Breville | Commercial
Breville, the Breville logo and the Smoking Gun are trademarks of Breville Pty, Ltd. ("Breville"). The trademarks, Breville and the Smoking Gun are distributed in the USA and in Canada under license.
Due to continued product improvement, the products illustrated/photographed in this booklet may vary slightly from the actual product.


- the Smoking Gun® Pro
- Contents
- BREVILLE | COMMERCIAL RECOMMENDS SAFETY FIRST
- IMPORTANT SAFEGUARDS
- READ ALL INSTRUCTIONS BEFORE USE AND SAVE FOR FUTURE REFERENCE
- CALIFORNIA PROPOSITION 65
- WARNING
- Assembly
- BATTERIES
- Functions
- BEFORE FIRST USE
- CONTROLS
- OPERATION
- NOTE
- Tips
- TECHNIQUES
- Care & Cleaning
- Assembling the Fan
- Mesh Filter specification:
- Troubleshooting
- Table des matières
- Breville | Commercial
Brand : BREVILLE
Model : the Smoking Gun Pro CSM700
Category : Cooking appliance