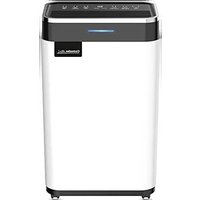
Demecto 30 Eco - Air purifier Comedes - Free user manual and instructions
Find the device manual for free Demecto 30 Eco Comedes in PDF.


User questions about Demecto 30 Eco Comedes
0 question about this device. Answer the ones you know or ask your own.
Ask a new question about this device
Download the instructions for your Air purifier in PDF format for free! Find your manual Demecto 30 Eco - Comedes and take your electronic device back in hand. On this page are published all the documents necessary for the use of your device. Demecto 30 Eco by Comedes.
USER MANUAL Demecto 30 Eco Comedes
natural_image
Line drawing of a portable air purifier with front panel and wheels (no text or symbols)COMEDES®
ENGINEERED FOR WELLBEING
CE
Inhaltsverzeichnis
DE
Vorwort....1
natural_image
Line drawing of a portable air conditioner unit with a separate open case and a directional arrow indicating assembly (no text or symbols)natural_image
Technical line drawing of a portable air conditioner unit with a side-view assembly (no text or symbols)natural_image
Simple line drawings of a screw and a rectangular box (no text or symbols)natural_image
Line drawing of a portable air conditioner unit with ventilation grilles and a black arrow pointing to the side panel (no text or symbols)- Setzen Sie den
natural_image
Line drawing of a rectangular industrial machine with a curved pipe extending from its side (no text or symbols)Safety instructions 2-6
Intended use 6
Operating instructions 6-7
Technical data 7
Device description 7-8
Installation instructions 8
Before commissioning 9
Commissioning 9-11
Empty water tank....11-12
Hose drainage 12-13
Recommendations for drying with the Comedes Demecto 30 eco ....13-14
Maintenance 15-16
Frequently asked questions ....17
Dear Customer,
Thank you for choosing the Demecto 30 eco from Comedes GmbH.
You have purchased a powerful dehumidifier that has been developed according to the latest technical standards. To ensure that the appliance will be a faithful servant to you over a long period of time, we ask you to study the operating instructions in detail, especially the safety instructions.
If you still have questions about the unit after reading the operating instructions, please do not hesitate to contact us:
E-mail address: service@comedes.com
If you give us your phone number, we will call you back free of charge.
We welcome any feedback from customers and welcome you to contact us.
With kind regards
Philipp Thannhuber
Managing Director
Comedes GmbH
WARNING:
Before commissioning, read the instructions carefully and ensure that you have fully understood them. Failure to comply with the safety information and instructions may result in electric shock, fire and/or serious injury. Keep all safety notices and instructions for future reference.
Caution! Do not open the unit until the mains plug has been removed from the mains socket. Danger to life due to electric shock! Have repairs carried out only by an authorised specialist workshop.

Only install the unit in rooms with an area of more than 6m^2 .
Do not install the appliance in a place where flammable gas may escape.
The refrigerant used is the environmentally friendly R290. R290 has no harmful effect on the ozone layer (ODP), a negligible greenhouse effect (GWP) and is available worldwide. Due to its efficient energy properties, R290 is an excellent refrigerant for this application. Due to the high flammability of the coolant, special precautions must be taken.
Symbols

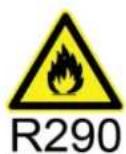
Danger due to flammable gas
This symbol draws your attention to dangers to health and life from extremely flammable gas.

Observe operating instructions
This symbol indicates that you should read the operating instructions before installing and operating the appliance.

Observe the operating instructions and operating notes
This symbol draws your attention to the need to observe and comply with the operating instructions and the operating instructions contained therein.

natural_image
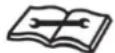
Simple line drawing of an open book with a wrench resting on it (no text or symbols)Observe repair instructions, technical manual
Activities on the refrigeration circuit, such as disposal, repairs and maintenance activities, may only be carried out by persons with a relevant certificate of competence and only in accordance with the manufacturer's instructions. Repair instructions as well as maintenance and disposal information are available from the manufacturer on request.

Danger
There is danger to the unit or objects in the vicinity of the unit.
Electrical hazard
Danger of electric shock
Safety instructions
Do not use any agents other than those recommended by the manufacturer to speed up the defrosting process or to clean the dehumidifier.
The appliance must be stored in a room without

continuously operating ignition sources (e.g. open flames, a gas appliance switched on or an electric heater switched on).

Do not pierce or burn the appliance, even after use.

Use the on/off switch to turn the unit on and off. Never use the plug to switch the unit on and off.

The appliance may only be installed, operated and stored in a room with a floor area of more than 6m^2 .

Maintenance must only be carried out in accordance with the manufacturer's instructions.
The unit must be stored in a well-ventilated area where the room size corresponds to the room size specified for operation.

All work processes that affect safety-relevant aspects (e.g. repairs) may only be carried out by qualified personnel.

Do not immerse the unit in water or other liquids.
Do not expose the unit to rain, steam or other liquids.
If the mains cable is damaged, it must be replaced by the manufacturer, its service partner or similarly qualified persons in order to avoid a hazard.
Please contact a professional to have the product repaired. Improper repairs may result in injury to the user.
Disconnect the appliance from the power supply before moving, cleaning or servicing it and also when it is not in use or in case of malfunction.
Never pull on the mains cable.
Observe the national installation regulations and only connect the unit to a properly installed protective contact socket with a mains voltage/frequency according to the type plate.
Do not place any objects on the dehumidifier.
Do not climb or sit on the unit.
Do not unplug the unit by pulling the mains cable.
Always grasp the mains plug for this purpose.
Do not tilt or overturn the unit. This may cause water leakage and damage the appliance.
Do not leave the unit unattended during operation.
This appliance can be used by children aged from 8 years and above and persons with reduced physical, sensory or
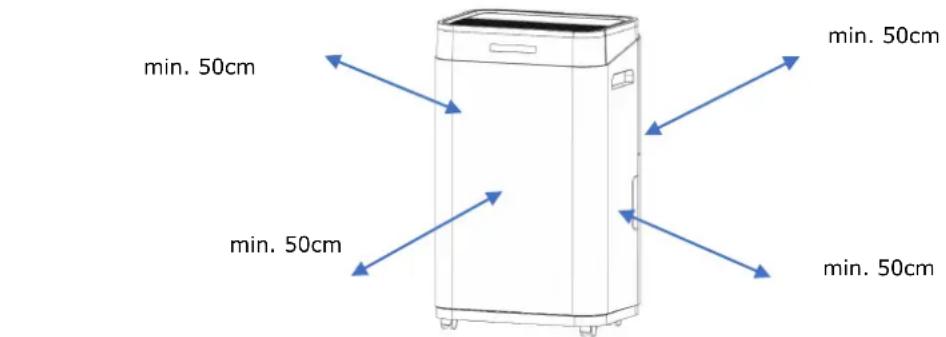
mental capabilities or lack of experience and knowledge if they have been given supervision and instruction concerning use of the appliance in a safe way and understand the hazards involved. Children must not play with the appliance. Cleaning and maintenance must not be carried out by children without supervision. Do not place the unit directly against a wall or under a wall cabinet or similar. The unit requires a free space of at least 50 cm at the top and on all sides.

The unit is only to be used in the temperature range between 5°C and 38°C.
Do not use the unit in a wet area. The unit is not splash-proof.
Position the unit on a flat, stable, non-slip, hard and dry surface. This is to avoid increased noise, vibration, water leakage or electric shock.

Never insert your fingers or other objects into the unit. This may cause damage to the unit.
Do not touch the air inlet or the aluminium fins of the unit.
Unplug the unit after you have switched it off or do not intend to use it for a long period of time.

The working area of the unit must be at least 6m^2 . It must be ensured that there are no flammable materials in the working area of the unit.
Do not clean the dehumidifier with water or chemicals.

Prevent water from getting on/near the unit.
Do not spray the unit with flammable liquids or cleaning agents.
Do not touch the ventilation slots.
Keep the air inlet and outlet clear of obstructions.
Keep all necessary ventilation openings free of obstructions.
Do not use the appliance if the mains lead is damaged.
Do not use the unit in hermetically sealed rooms.

Keep the water tank free of foreign objects.
Place the unit away from heaters or heat-generating appliances.
The unit must not be used in environments with high levels of dust or chlorine.

Only use the appliance if your socket outlet is equipped with an RCD (ground fault circuit interrupter).
Do not operate/touch the unit with wet hands.
Do not attempt to carry out repairs or other adjustments to the unit yourself.
Do not let children play with the packaging, such as plastic
film.
Ensure that the dehumidifier is positioned away from fire, flammable, corrosive and explosive materials.
Insert the mains plug firmly and securely into the socket.
Do not operate the
dehumidifier via a multiple socket, a plug adapter or an extension cable.
Do not operate the unit if it has been dropped, damaged or shows signs of malfunction.
Do not operate the unit in the immediate vicinity of walls, curtains or other objects that may block the air inlet and outlet.
If the unit has been tilted more than 45^ , let it stand upright for at least 24 hours before using it.
Do not operate or store the unit in direct sunlight or in the rain.
Never place the mains cable or the appliance on hot surfaces or near sources of heat. Lay the mains cable so that it does not come into contact with hot or sharp-edged objects.
Do not bend the mains cable or wrap it around the unit as this may cause the cable to break.
Please note that in addition to switching off the unit, you must also pull the mains plug out of the protective contact
socket to completely disconnect the unit from the mains.
No naked flames, cigarettes or other possible sources of ignition shall be used inside or near the equipment.

Transport, storage and disposal
When transporting units and parts containing flammable refrigerants, the transport regulations must be observed.
The disposal of appliances with flammable refrigerants must be carried out in compliance with national regulations.
The maximum number of units that may be stored together depends on the local regulations
The unit must be stored in such a way that no mechanical damage can occur.
Empty the water tank before moving the appliance to avoid water leakage.
The unit must be stored in a well-ventilated area with a room size at least equal to that specified for operation.
Notes on the refrigerant R290
The unit is only designed for use with R-290(propane) gas as refrigerant.
The refrigerant circuit is sealed. Maintenance work


in this regard may only be carried out by a qualified technician. The maintenance manual must be requested by the technician from the manufacturer.
Do not discharge the refrigerant into the atmosphere.
R290 (propane) is extremely flammable and heavier than air. It first accumulates in low areas, but can be circulated by fans.
If propane gas is present, or the presence is suspected, do not allow untrained persons to search for the cause.
The propane gas used in this appliance is odourless.
Therefore, gas may have leaked even without a noticeable odour.
The components used are designed for propane gas and are therefore not ignitable and spark-free. Components may only be replaced by identical spare parts approved by the manufacturer.
Note that the refrigerant may be odourless.
Compliance with national gas regulations must be observed.
Failure to comply with the safety instructions may result in an explosion, death, injury and property damage.
 Attention Attention | Any person carrying out work on the refrigerant circuit must hold a current valid certificate of competence from an industry accredited assessment body demonstrating their competence to handle refrigerants safely in accordance with an industry approved procedure. |
 Attention Attention | Maintenance must only be carried out in accordance with the manufacturer's instructions. During maintenance and repairs that require the assistance of other skilled personnel, the person trained in handling flammable gases must constantly supervise the work. |
If you do not understand something or need help, please contact the manufacturer. You will find the contact details at the end of these operating instructions.
Intended use
The dehumidifier is only intended for dehumidifying privately used rooms (e.g. for living rooms, bedrooms, storage rooms or cellars). The unit is not suitable for outdoor use. The user must comply with the specified operating parameters of these instructions.
The machine may only be used in accordance with its intended purpose. Any other use beyond this is not in accordance with the intended use. The user/operator and not the manufacturer is liable for any damage or injuries of any kind resulting from such use.
Operating instructions
The unit is designed for a temperature range between 5 and 38°C. Below 5°C, the humidity tends to be very low, so you do not need to use a dehumidifier. Above 38°C, the overheating protection may automatically switch off the unit. The unit is not approved for operation outside
the temperature range.
In order for the dehumidifier to dehumidify optimally, it warms the air. Therefore, the room temperature may rise by 1-2 degrees. This is quite normal and increases the efficiency of the unit.
When the water tank is full, the machine switches off automatically.
Technical data
Product name: Comedes Demecto 30 eco
Voltage: AC220-240V/50 Hz
Rated power: 380W
(30°C 80% humidity)
Current consumption: 2,2 A
(30°C 80% humidity)
Dehumidification capacity: 25 l/day (30°C 80% humidity)
Weight: 14,5 kg
Permissible operating temperature: 5-38°C
Coolant / Quantity: R290/75g
Water tank size: 6,5 l
Noise emission: ≤ 45 dB(A)
Dimensions: 340x240x575 mm
Device description
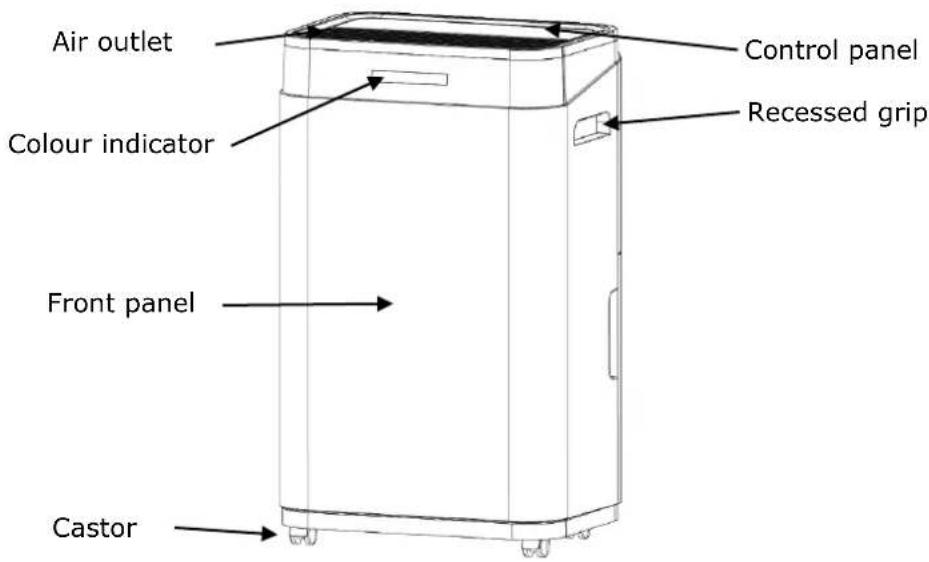
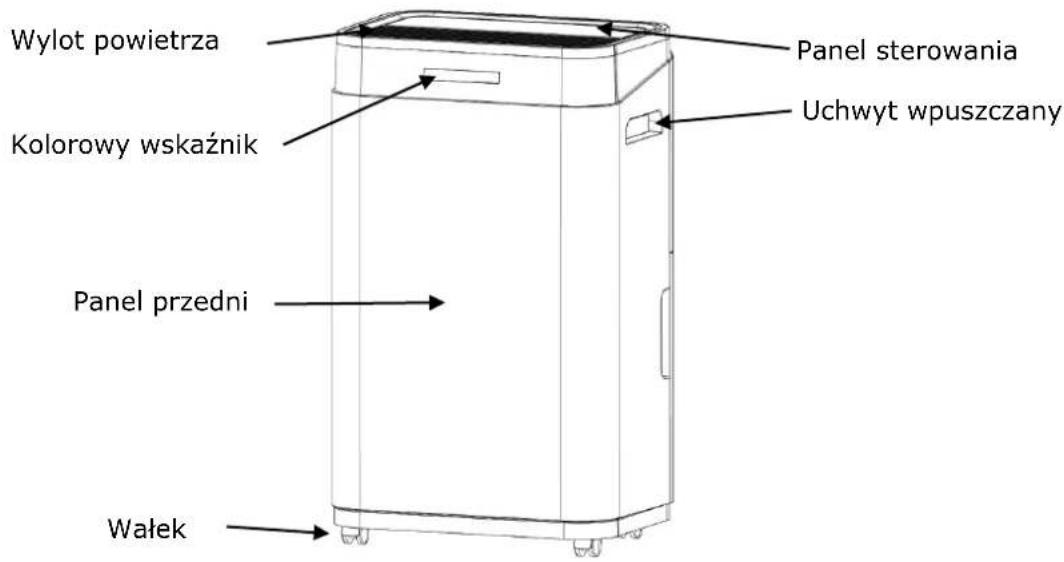
Figure 1:
text_image
Air outlet Colour indicator Control panel Recessed grip Front panel CastorFigure 2:
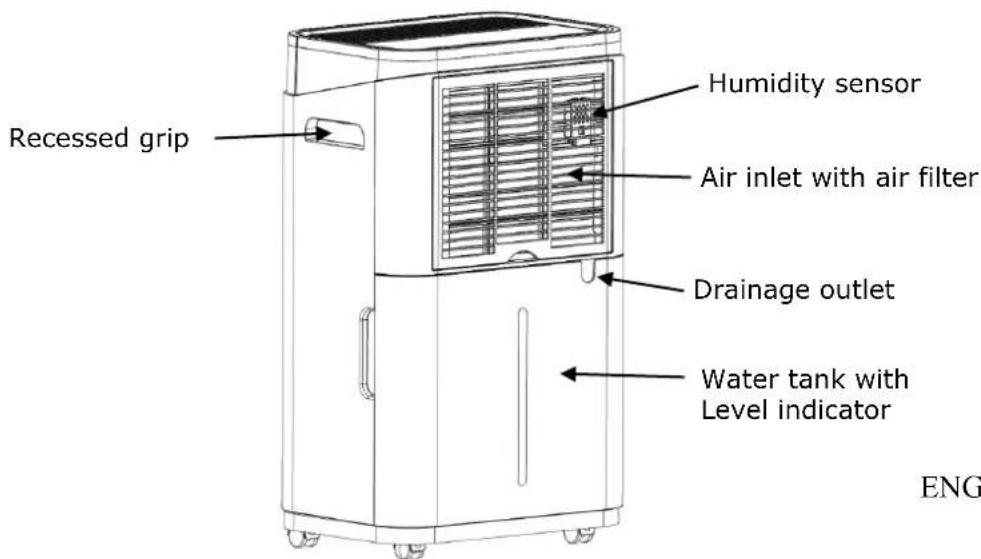
text_image
Recessed grip Humidity sensor Air inlet with air filter Drainage outlet Water tank with Level indicator ENGENG-7
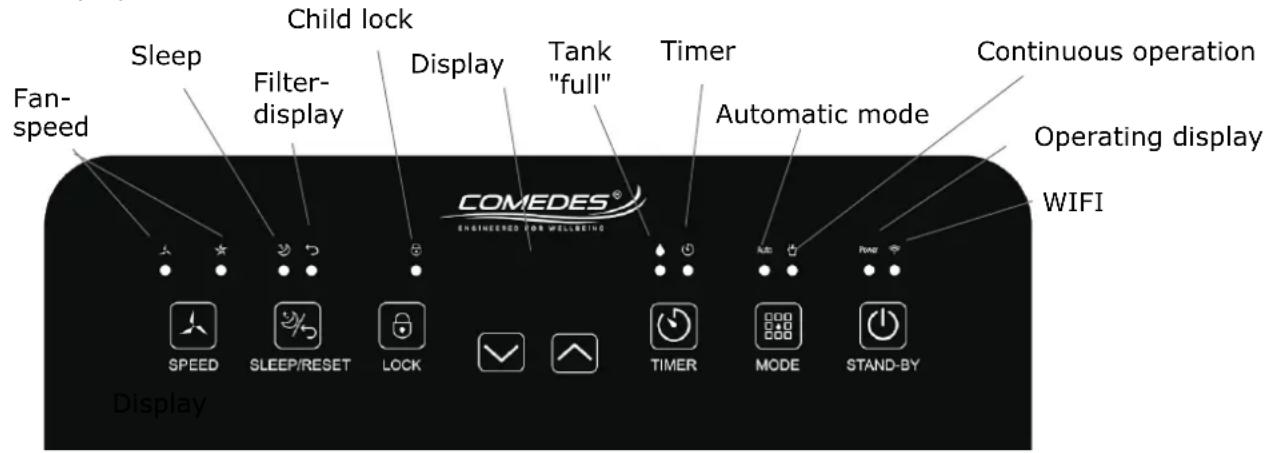
Control panel
Figure 3: Displays
text_image
Fan-speed Sleep Child lock Filter-display Display Tank "full" Timer Automatic mode Continuous operation Operating display WIFI COMEDES® ENGINEERED FOR WELLBEING SPEED SLEEP/RESET LOCK TIMER MODE STAND-BY DisplayDisplay:
The illuminated display shows the prevailing room humidity as soon as the unit is plugged in. During the setting of the timer and the target humidity, the selected values are displayed. After the setting is completed, the current room humidity is displayed again. If the current value is below 20%, the display shows "LO", the compressor stops and the fan continues to operate. If the current value is above 90%, the display shows "HI".
Installation instructions

Operate the appliance only in rooms with at least 6m^2 . Floor space
- Remove all adhesive tapes that were used to secure the unit for transport.
- Check that the unit is standing securely on firm, level and dry ground.
-
Never install the unit where it may be exposed to the following conditions:
-
Heat sources such as radiators, heat registers, stoves or other products that generate heat.
- In an area where oil or water may be splashed.
- Direct sunlight
- Mechanical vibrations or shocks
- Excessive dust exposure
- Escaping flammable gas
o Lack of ventilation, e.g. in the cupboard or bookshelf - Uneven surface
- Make sure that the socket outlet is equipped with an RCD circuit breaker (ground fault circuit interrupter). If you are not sure whether this is the case, you can ask your electrician or use a personal protection plug (available in DIY stores).


• To save power and avoid potential hazards, unplug the unit when not in use.
- Keep at least 50cm distance around the unit from walls and objects. Make sure that the air outlet is clear and that there are no curtains or textiles above it.

Before commissioning
After unpacking the unit, check it for completeness and possible transport damage to avoid hazards. If in doubt, do not use it, but contact our customer service. You will find the service address at the end of this manual.
Your unit is packaged to protect it from damage during transport.
- Carefully remove the unit from its sales packaging.
- Remove all packaging parts.
- Clean the unit and all accessories from packaging dust residues, according to the instructions in the chapter "Maintenance".
Commissioning
Before plugging in the mains plug, check the unit and especially the cable for damage. The unit may only be operated with a faultless mains cable.
Plug in the mains cable and switch on the unit with the on/off switch.
CAUTION: Always allow the unit to run for at least 35 minutes before switching it off and never switch the unit off and on continuously. There is a risk of compressor damage. In addition, the compressor is equipped with a 3 minute switch-on delay to prevent compressor damage. This switching delay also affects the fan.
After switching off the Comedes Demecto 30 eco, leave it to stand for at least 3 minutes without moving the appliance so that the water in the drip tray can drain off completely. The higher the humidity in a room and the higher the temperature in it, the better the Comedes Demecto 30 eco can dehumidify the air. Therefore, the compressor will generate heat and thus warm up the room air. This is quite normal and need not worry you.
Note: Before using the unit for the first time, we recommend that you operate it with the window open for 5-10 minutes to remove any residues that may be present due to production. Any odour that may occur is normal and disappears after a short time. This is not a malfunction of the unit. Ensure that there is sufficient ventilation.

On / Off switch:
When you plug in the unit, a beep sounds and the "POWER" LED lights up.
Press the On / Off switch to turn the unit on; the dehumidifier starts with the settings (except the timer setting) of the last operation.
Press the on/off switch again to switch the unit off. The compressor switches off immediately and the fan switches off with a delay of 30 seconds.
After a power failure, the unit restarts automatically with the settings (except the timer setting) of the last operation.

Fashion:
Press this button repeatedly to switch between automatic and continuous operation.
Automatic mode: Auto
The unit is equipped with a modern hygrostat (humidity controller) and switches off automatically after reaching the desired humidity in order to save energy. The compressor switches off first and then the fan 30 seconds later. When the humidity in the room rises again, the Comedes Demecto 30 eco switches on automatically.
When automatic mode is activated, the target humidity can be set between 30% and 80% in 5% steps using the two arrow keys.
The dehumidifier starts dehumidifying when the room humidity is at least 3% higher than the
set target humidity.
Continuous operation:
In continuous operation, the unit works continuously until the water tank is full or the dehumidifier is switched off manually.
In this mode, the unit operates at maximum air output to dehumidify the room air as quickly as possible.
During operation, the current humidity is shown on the display.
Tip: This mode is very suitable for drying laundry.

Timer:
Press the timer key to start the timer function. Then use the two arrow keys to set the desired run/start time from 1-24 hours. If the timer is activated, this is indicated by the corresponding LED.
If you activate the timer during operation, the appliance switches off after the set time.
If you activate the timer while the unit is in standby mode, the unit will start automatically after the set time has elapsed.
To switch off the timer, press the key again and set the running time to "00" using the two arrow keys.
If the unit is switched off via the on/off switch, the timer function is also deactivated.

Speed:
The fan speed can only be changed in automatic mode.
Press this button to switch between the two fan speeds.
The currently selected fan speed is displayed via the two LEDs.

Press Mode and then this arrow key to reduce the target humidity in 5% steps.
Press the timer and then this arrow key to reduce the start/run time in 1 hour steps.

Press Mode and then this arrow key to increase the target humidity in 5% steps.
Press the timer and then this arrow key to increase the start/run time in 1 hour steps.

Child lock
Press and hold this key for at least 3 seconds to switch the child lock/key lock on or off. If the child lock is activated, the corresponding LED lights up.

Sleep/Reset

Press this button to switch the sleep function on or off.
In "Sleep" mode, the unit operates at a low fan speed with a fixed target humidity of 60%. When the mode is active, the indicators for the sleep function, the child lock and power are dimmed. All other displays go out.
Activate the timer before you start the sleep function and the dehumidifier will switch off after the set runtime.

If the filter indicator lights up, the dust filter must be checked/cleaned/replaced. Then the display can be reset by pressing and holding (at least 3 seconds) the Sleep/Reset button.
Colour indicator:
| Relative humidity | Colour indicator |
| <44% | Blue |
| 45%-65% | Green |
| >65% | Red |

WIFI
The dehumidifier has a WIFI function.
This makes it possible to operate the appliance with the "Smart Life" app via your smartphone. To connect the appliance to the smartphone via the "Smart Life" app, the WIFI indicator must be flashing. If this is not the case, press and hold the timer button for at least 5 seconds to activate the function. Once the connection has been established, the WIFI indicator lights up continuously.
To deactivate the WIFI function, press and hold the timer button for at least 5 seconds.
Detailed instructions on how to use the WiFi function can be found https://www.comedes.de/demecto30eco/wifi or simply scan the QR code

Empty the water tank:
When the water tank is full, the Comedes Demecto 30 eco switches off automatically and the tank "full" indicator (Fig. 3) lights up. This is also signalled acoustically.
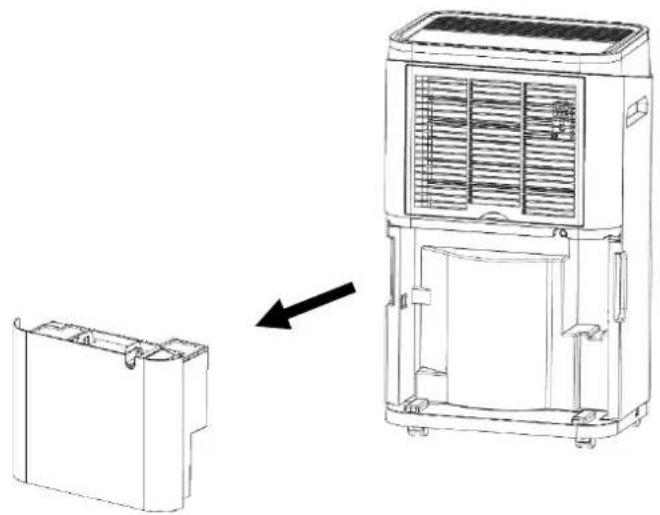
You must empty the water tank to be able to put the Demecto 30 eco back into operation. To do this, always switch off the unit first and disconnect the mains plug.
natural_image
Line drawing of a portable air conditioner unit with a separate housing component, showing internal airflow direction (no text or symbols)Grasp the water tank with both hands at the recessed grips provided on the side and carefully pull it backwards out of the appliance.
Now empty the water tank completely into a wash basin or similar.
text_image
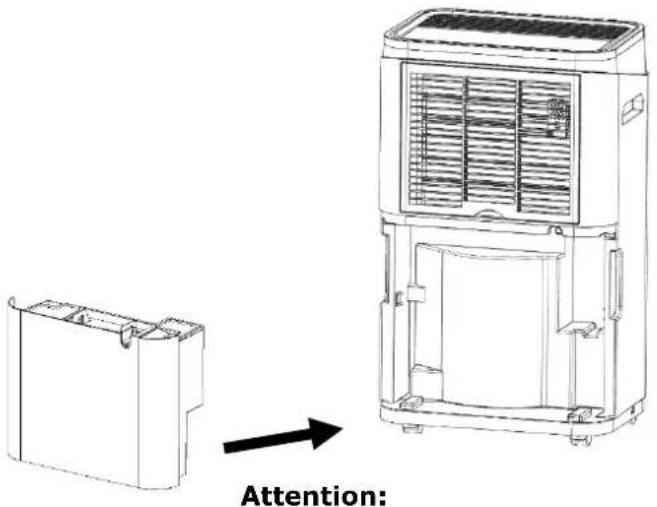
Attention:Carefully reinsert the tank after it has been completely emptied. To do this, grasp the water tank on both sides and push it straight into the appliance.
Make sure that the tank is correctly inserted to ensure proper operation of the unit.
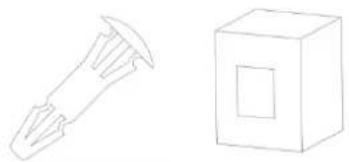
- To ensure correct and safer operation of the appliance, the float and its locking pin must not be removed from the water tank
natural_image
Simple line drawing of a nailbrush and a rectangular block (no text or symbols)- If the water tank is dirty, it should be cleaned. Use cold or warm water without additives. Additives or cleaning utensils such as washing-up liquid, steel wool, benzene or other chemical cleaners are not suitable as they can damage the tank and cause leakage. The lid of the water tank can be removed for this purpose. To do this, the handle of the tank must first be removed. To do this, first release the handle from the lock on one side and then on the other.
Hose drainage
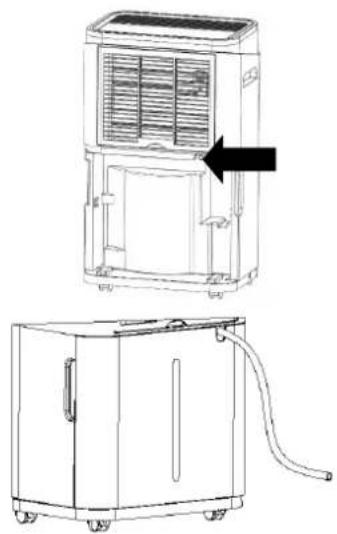
The Comedes Demecto 30 eco can also be operated using a drainage hose ( 11.0mm).
To do this, proceed as follows: Remove the water tank
Attach the drainage hose to the drain of the drip tray.
Replace the water tank by inserting the hose through the drainage outlet.
natural_image
Technical line drawing of a portable air conditioner unit with a side-view inset showing internal airflow path (no text or symbols)- guide the free end of the drainage hose into a floor drain or similar.

Attention:
- Make sure that the hose does not run higher than the hose connection on the appliance at any point and that it has a steady slope so that the water can drain away undisturbed.
• Make sure that the end of the hose is not under water.
• Make sure that the drainage hose is not kinked or blocked. Check this regularly.
The appliance must be switched off and disconnected from the mains after each use and before attaching or removing accessories by pulling the mains plug out of the protective contact socket after switching off. Let the appliance cool down to room temperature before cleaning and/or storing it.
Automatic defrost
The dehumidifier is equipped with a temperature-dependent defrost function. At a room temperature between 5^ C and 10^ C, the unit starts defrosting every 30 minutes. At a room temperature between 11^ C and 18^ C, the unit starts defrosting every 45 minutes.
Recommendations for drying with the Comedes Demecto 30 eco
In order to achieve the best possible dehumidification result with the Demecto 30 eco while using as little energy as possible, we provide the following instructions:
As this manual can only provide limited help, we recommend that you obtain further information at: www.comedes.com.
Basics of dehumidification with the Comedes Demecto 30 eco
The dehumidifier works similarly to a refrigerator with a refrigerating machine. This creates a cold surface (at the evaporator) on which water condenses. Depending on the humidity and ambient temperature, the water condenses at the dew point temperature. In order for the dehumidifier to dehumidify, the cold surface must be below the dew point temperature. Since the water would freeze at negative dew point temperatures, the dehumidifier can only work with positive dew point temperatures. To ensure this, the dehumidifier is equipped with a modern, temperature-controlled automatic defrosting system that keeps the evaporator temperature approximately between 0 and 5°C. In order to be able to dehumidify sensibly, the dew point temperature should be above 5°C. If the dew point temperature is below this, dehumidification is either not possible at all or only very inefficient. You can use the following table to determine the dew point temperature in your case.
If the dew point temperature is too low, it is recommended to heat.
Attention:
Only heat the room with water-bearing heating units, such as underfloor heating and permanently installed radiators.
If this is not possible, the room can be preheated with another electrical heater. However, the dehumidifier must not be in this room.
The safety and operating instructions in this manual must be followed under all circumstances.
| Temp. In °C | 20% | 25% | 30% | 35% | 40% | 45% | 50% | 55% | 60% | 65% | 70% | 75% | 80% | 85% | 90% | 95% |
| 30°C | 4.6 | 7.8 | 10.9 | 12.9 | 14.9 | 16.8 | 18.4 | 20 | 21.4 | 22.7 | 23.9 | 25.1 | 26.2 | 27.2 | 28.2 | 29.1 |
| 29°C | 2.8 | 7.2 | 9.7 | 12 | 14 | 15.9 | 17.5 | 19 | 20.4 | 21.7 | 23 | 24.1 | 25.2 | 26.2 | 27.2 | 28.1 |
| 28°C | 3 | 6.1 | 8.8 | 11.1 | 13.1 | 15 | 16.8 | 18.1 | 19.5 | 20.8 | 22 | 23.2 | 24.2 | 25.2 | 26.2 | 27.1 |
| 27°C | 2.1 | 5.3 | 8 | 10.2 | 12.2 | 14.1 | 15.7 | 17.2 | 18.6 | 19.8 | 21.1 | 22.2 | 23.3 | 24.3 | 25.2 | 26.1 |
| 26°C | 1.3 | 4.5 | 7.1 | 9.4 | 11.4 | 13.2 | 14.8 | 16.2 | 17.6 | 19.9 | 20.1 | 21.2 | 22.3 | 23.3 | 24.2 | 25.1 |
| 25°C | 0.9 | 3.6 | 6.2 | 8.9 | 10.9 | 12.2 | 13.9 | 15.3 | 16.7 | 18 | 19.1 | 20.2 | 21.3 | 22.3 | 23.2 | 24.1 |
| 24°C | -0.3 | 2.0 | 5.4 | 7.6 | 9.8 | 11.3 | 12.9 | 14.4 | 15.8 | 17 | 18.2 | 19.3 | 20.3 | 21.3 | 22.3 | 23.1 |
| 23°C | 1.1 | 1.9 | 4.5 | 6.7 | 8.7 | 10.4 | 12 | 13.5 | 14.8 | 16.1 | 17.2 | 18.3 | 19.4 | 20.3 | 21.3 | 22.2 |
| 22°C | -2 | 1.1 | 3.6 | 5.9 | 7.8 | 9.5 | 11.1 | 12.5 | 13.9 | 15.1 | 16.3 | 17.4 | 18.4 | 19.4 | 20.3 | 21.2 |
| 21°C | -2.8 | 0.2 | 2.8 | 3 | 6.9 | 8.6 | 10.2 | 11.6 | 12.9 | 14.2 | 15.3 | 16.4 | 17.4 | 18.4 | 19.3 | 20.2 |
| 20°C | -3.6 | -0.3 | 1.9 | 4.1 | 6 | 7.7 | 9.3 | 10.7 | 12 | 13.2 | 14.4 | 15.4 | 16.4 | 17.4 | 18.5 | 19.2 |
| 19°C | -4.4 | -1.4 | 1 | 3.2 | 3.1 | 6.8 | 8.3 | 9.8 | 11.1 | 12.3 | 13.4 | 14.5 | 15.5 | 16.4 | 17.3 | 18.2 |
| 18°C | -5.3 | -2.3 | 0.2 | 2.3 | 4.2 | 5.9 | 7.4 | 8.8 | 10.1 | 11.3 | 12.5 | 13.5 | 14.5 | 15.4 | 16.3 | 17.2 |
| 17°C | -6.1 | -3.1 | -0.6 | 1.4 | 3.3 | 5 | 6.5 | 7.9 | 9.2 | 10.6 | 11.3 | 12.5 | 13.5 | 14.5 | 15.3 | 16.2 |
| 16°C | -6.9 | -4 | -1.4 | 0.5 | 2.4 | 6.1 | 9.6 | 7 | 8.2 | 9.4 | 10.5 | 11.8 | 12.6 | 13.5 | 14.6 | 15.2 |
| 15°C | -7.7 | -4.8 | -2.2 | -0.3 | 1.5 | 3.2 | 4.7 | 6.1 | 7.3 | 8.5 | 9.6 | 10.6 | 11.6 | 12.5 | 13.4 | 14.2 |
| 14°C | -8.6 | -5.7 | -2.9 | -1 | 0.6 | 2.3 | 3.7 | 5.1 | 6.4 | 7.5 | 8.6 | 9.6 | 10.6 | 11.5 | 12.4 | 13.2 |
| 13°C | -9.4 | -6.5 | -3.7 | -1.9 | -0.1 | 3.3 | 2.8 | 4.2 | 5.5 | 6.6 | 7.7 | 8.7 | 9.6 | 10.5 | 11.4 | 12.2 |
| 12°C | -10.2 | -7.4 | -4.3 | -2.6 | -1 | 0.4 | 1.9 | 3.1 | 4.3 | 5.7 | 6.7 | 7.7 | 8.7 | 9.6 | 10.6 | 11.2 |
| 11°C | -11.3 | -8.2 | -5.2 | -3.4 | -1.8 | -0.4 | 1 | 2.3 | 3.5 | 4.7 | 5.8 | 6.7 | 7.7 | 8.6 | 9.4 | 10.2 |
| 10°C | -11.9 | -9.1 | -6 | -4.2 | -2.6 | -1.2 | 0.1 | 1.4 | 2.6 | 3.7 | 4.8 | 5.8 | 6.7 | 7.6 | 8.4 | 9.2 |
| 9°C | -13.6 | -10.8 | -8.5 | -6.5 | -4.8 | -3.2 | -1.8 | -3.5 | 0.67 | 1.8 | 2.03 | 3.42 | 4.77 | 5.66 | 6.48 | 7.32 |
| 8°C | -15.2 | -12.5 | -10.2 | -8.3 | -9.6 | -6.49 | -3.07 | -5.1 | -1.05 | -0.09 | 0.45 | 1.06 | 2.72 | 3.42 | 4.48 | 5.38 |
| 4°C | -16.8 | -14.2 | -12 | -10 | -8.4 | -6.12 | -4.88 | -3.09 | -2.61 | -1.79 | -0.88 | -0.09 | 0.78 | 1.42 | 2.44 | 3.2 |
| 2°C | -18.8 | -15.9 | -13.7 | -11.8 | -10.2 | -7.77 | -6.56 | -5.43 | -4.4 | -3.16 | -2.48 | -1.77 | -0.98 | -0.26 | 0.47 | 1.2 |
| 9°C | -20.2 | -17.6 | -15.5 | -13.6 | -12 | -10.5 | -9.2 | -7.9 | -6.8 | -5.8 | -4.8 | -3.8 | -3 | -2.2 | -1.4 | 0.7 |
Drying for problems with condensation moisture
Condensation moisture usually occurs in cellars when humid air enters the cellar in summer and condenses on the cold cellar walls. We recommend dehumidifying the cellar room by room in continuous operation first. First, let the unit run in continuous operation until you notice that the amount of water you empty from the tank every day is decreasing. Now move the unit to the next room. Once you have dried all the rooms, we recommend selecting a central installation location and operating the unit in automatic mode. This type of dehumidification is more energy-efficient than dehumidifying immediately in automatic mode, as the unit then switches off and on very frequently.
Drying in case of building defects or water damage
In the case of building defects and water damage, the cause should first be eliminated. The rooms can then be dried with condensation dryers such as the Demecto 30 eco. In this case, the dehumidifier is operated continuously. The ambient temperature should be at least 20°C (not more than 27°C).
Caution: Only heat the room with water-bearing heating units, such as underfloor heating and permanently installed radiators.
If this is not possible, the room can be preheated with another electrical heater. However, the dehumidifier must not be in this room.
The safety and operating instructions in this manual must be followed under all circumstances. Please note that depending on the construction defect, insulation drying may also be necessary.
can be carried out. This must be carried out by a specialist company.
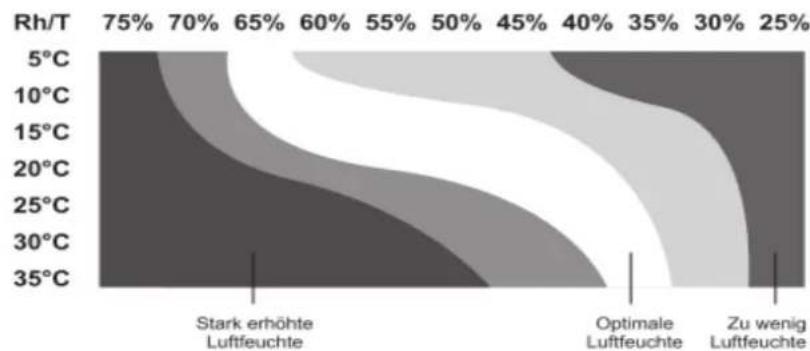
Recommended humidities for rooms
Basically, this depends on the ambient temperature. The higher the temperature of the room, the lower the relative humidity should be set, otherwise mould growth in the room is promoted. The comfortable humidity ranges from 35% to 65% relative humidity, depending on the ambient temperature. The following diagram gives an indication of which humidity is
heatmap
| Rh/T | 75% (%) | 70% (%) | 65% (%) | 60% (%) | 55% (%) | 50% (%) | 45% (%) | 40% (%) | 35% (%) | 30% (%) | 25% (%) | |---|---|---|---|---|---|---|---|---|---|---|---| | 5°C | Dark Gray | Dark Gray | Dark Gray | Dark Gray | Dark Gray | Dark Gray | Dark Gray | Dark Gray | Dark Gray | Dark Gray | Dark Gray | | 10°C | Medium Gray | Medium Gray | Medium Gray | Medium Gray | Medium Gray | Medium Gray | Medium Gray | Medium Gray | Medium Gray | Medium Gray | Medium Gray | | 15°C | Medium Gray | Medium Gray | Medium Gray | Medium Gray | Medium Gray | Medium Gray | Medium Gray | Medium Gray | Medium Gray | Medium Gray | Medium Gray | | 20°C | Medium Gray | Medium Gray | Medium Gray | Medium Gray | Medium Gray | Medium Gray | Medium Gray | Medium Gray | Medium Gray | Medium Gray | Medium Gray | | 25°C | Medium Gray | Medium Gray | Medium Gray | Medium Gray | Medium Gray | Medium Gray | Medium Gray | Medium Gray | Medium Gray | Medium Gray | Medium Gray | | 30°C | Medium Gray | Medium Gray | Medium Gray | Medium Gray | Medium Gray | Medium Gray | Medium Gray | Medium Gray | Medium Gray | Medium Gray | Medium Gray | | 35°C | Dark Grey | Dark Grey | Dark Grey | Dark Grey | Dark Grey | Dark Grey | Dark Grey | Dark Grey | Dark Grey | Dark Grey | Dark Grey | Legend: - Stark erhöhte Luftfeuchte - Optimale Luftfeuchte - Zu wenig Luftfeuchteoptimal at which ambient temperature.
The diagram assumes that temperatures >=20^ are living rooms and temperatures <=20^ are basement rooms.
Maintenance
Always switch off the appliance and disconnect the mains plug before starting to clean, maintain or repair the appliance.
A maintenance log must be kept for the operation of the unit as follows:
Maintenance log for Comedes Demecto 30 eco:
Serial number:......
| Maintenance and care interval | 1 | 2 | 3 | 4 | 5 | 6 | 7 | 8 | 9 | 10 | 11 | 12 | 13 | 14 | 15 |
| Check air inlet and air outlet and remove impurities. | |||||||||||||||
| Exterior cleaning | |||||||||||||||
| Visual inspection of the water outlet (hose connection) for contamination | |||||||||||||||
| Check the air filter for dirt and foreign bodies, clean or replace if necessary. | |||||||||||||||
| Check the unit for damage (mains cable, housing, tank, fan wheel). | |||||||||||||||
| Check fastening screws | |||||||||||||||
| Test run | |||||||||||||||
| Empty tank or check hose drainage | |||||||||||||||
| Visual inspection of the sockets used. | |||||||||||||||
| Testing the residual current device (RCD). |
| 1. Date: Signature | 2. Date: Signature | 3. Date: Signature | 4. Date: Signature |
| 5. Date: Signature | 6. Date: Signature | 7. Date: Signature | 8. Date: Signature |
| 9. Date: Signature | 10. Date: Signature | 11. Date: Signature | 12. Date: Signature |
| 13. Date: Signature | 14. Date: Signature | 15. Date: Signature | 16. Date: Signature |
Maintenance intervals:
| Maintenance and care interval | Before each Commissioning | At Demand | At least all 2 weeks | At least all 4 weeks | At least all 6 months | At least annually |
| Check air inlet and air outlet and remove impurities. (Fig. 2, Fig. 1) | X | X | ||||
| Exterior cleaning | X | X | ||||
| Visual inspection of the water outlet (hose connection) for contamination | X | X | ||||
| Check the air filter for dirt and foreign bodies, clean or replace if necessary. | X | X | ||||
| Check the unit for damage (mains cable, housing, tank, fan wheel). | X | |||||
| Test run | X | |||||
| Empty tank or check hose drainage | X | |||||
| Visual inspection of the sockets used. | X | |||||
| Testing the residual current device (RCD). | X |
Check air inlet and air outlet
The unit draws in air from the rear (Fig. 2) and blows it out again at the top (Fig. 1). Make sure that the air inlet and air outlet are not blocked and check this each time you use the unit. Make sure that no objects or walls obstruct the air inlet or air outlet and observe the distance rules.
Check air filter:
This should be done every 2 weeks.
To do this, switch off the unit and disconnect the mains plug.
You can now pull the filter out of the unit towards the back. Rinse the filter with warm (maximum 40^ C) clear water and let it dry. Make sure that the filter is not exposed to high temperatures and do not use any cleaning agents or other substances (such as petrol or alcohol). You can then reattach it to the unit. Never operate the unit without the air filter in place.
Check the drainage hose:
Check the hose used for hose drainage regularly for blockages and damage. If the hose is blocked or damaged, replace it with a new one.
Storage of the dehumidifier
If the dehumidifier is not used for a longer period of time:
1) Switch off and unplug the unit.
2) Empty the water tank completely and make sure that there is no more water in the water tank.
unit is located.
3) Remove and clean the dust filters. Make sure that the filters are completely dry before reinserting them.
4) Store the dehumidifier in a cool, dry place. Keep the unit away from direct sunlight, too high/low temperatures and high dust exposure.
Frequently Asked Questions (FAQ)
You can find current operating instructions at: www.comedes.com
The unit cannot be switched on or does not work.
- Is the unit plugged in correctly?
- Is the water tank inserted correctly?
- Is the tank "full" indicator lit?
- has the fuse blown?
- Is the room temperature above 38°C (display "CH") or below 5°C (display "CL"?
- if the above is ok, then try again in 10 minutes.
- Is the timer function activated?
- Is the set target humidity higher than the prevailing room humidity?
- if the unit still does not work, please contact service@comedes.com
The dehumidification capacity is too low.
- is the dust filter dirty?
- is the air inlet or outlet blocked?
- is the temperature or humidity too low?
The unit does not switch off in automatic mode.
- are the windows and doors closed?
- Does any appliance produce steam in this room?
- is the room too big?
The unit is very loud.
- is the dust filter dirty?
- is it standing on firm, level and suitable ground?
- Is the water tank inserted correctly?
- for tiled floors, it is advisable to place a piece of carpet underneath.
The fuse keeps blowing.

The RCD (ground fault circuit interrupter) keeps tripping. Stop operation and contact us at: service@comedes.com
The mains cable or the plug becomes disproportionately warm.
Stop operating and contact us at: service@comedes.com
There are objects or water in the unit.
Stop operating and contact us at: service@comedes.com
Caution: Switch off and unplug the unit immediately and contact the customer service if anything unusual happens.
Error code table:
| Error code | Cause | Impact/problem solving |
| E2 | Humidity sensor error | Contact service@comedes.com |
| CL | Room temperature below 5°C | Compressor stops, fan continues to work. |
| CH | Room temperature above 38°C | Compressor stops, fan continues to work. |
| LO | Room humidity below 20% | Compressor stops, fan continues to work. |
| HI | Indoor humidity above 90% | Compressor and fan continue to work. |
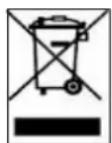
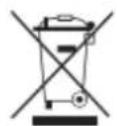
This product must not be disposed of in household waste. This dehumidifier must be taken to a recycling centre for electronic and electrical equipment. For more information about recycling points, please contact your local municipality or Comedes GmbH.
Table des matières
Avant-propos ....1

caution, risk of fire
natural_image
Line drawing of a portable air conditioner unit with a separate open case and a directional arrow indicating assembly (no text or symbols)natural_image
Technical line drawing of a device with an arrow indicating transformation from a rectangular component to a multi-tiered air conditioner unit (no text or symbols present)natural_image
Simple line drawing of a pen and a box (no text or symbols)natural_image
Technical line drawing of an air conditioning unit with a side view showing internal airflow and a handle (no text or symbols)
caution, risk of fire
Interruttore On / Off:
natural_image
Line drawing of a portable air conditioner unit with a separate open case and a directional arrow indicating assembly (no text or symbols)natural_image
Technical line drawing of a portable air conditioner unit with a side-view assembly (no text or symbols)natural_image
Simple line drawings of a screw and a cube (no text or symbols)natural_image
Technical line drawing of a portable air conditioner unit with side and top views (no text or symbols)
caution, risk of fire
natural_image
Line drawing of a portable air conditioner unit with a separate open case and a directional arrow indicating assembly (no text or symbols)natural_image
Technical line drawing of a portable air conditioner unit with a side-view assembly (no text or symbols)natural_image
Simple line drawings of a screw and a rectangular box (no text or symbols)natural_image
Technical line drawing of an air conditioning unit with a side view showing internal airflow and a handle (no text or symbols)natural_image
Line drawing of a portable air conditioner unit with a separate housing component, showing internal airflow direction (no text or symbols)natural_image
Line drawing of a device with a box and adjacent air conditioner unit, showing internal airflow direction (no text or symbols)natural_image
Two simple line drawings: a pin-like object and a 3D box with a square cutout (no text or symbols)natural_image
Technical line drawing of a portable air conditioner unit with a side-view inset showing internal components and airflow direction (no text or symbols)
caution, risk of fire
Wymiary: 340x240x575 mm
Opis urządzenia
Rysunek 1:
natural_image
Line drawing of a portable air conditioner unit with a separate open case and directional arrow indicating assembly (no text or symbols)natural_image
Technical line drawing of a portable air conditioner unit with a side-view assembly (no text or symbols)natural_image
Simple line drawings of a nail and a 3D block (no text or symbols)area
| Rh/T | 75% | 70% | 65% | 60% | 55% | 50% | 45% | 40% | 35% | 30% | 25% | |---|---|---|---|---|---|---|---|---|---|---|---| | 5°C | Dark Grey | White | White | White | White | White | White | White | White | White | White | | 10°C | Medium Grey | White | White | White | White | White | White | White | White | White | White | | 15°C | Medium Grey | White | White | White | White | White | White | White | White | White | White | | 20°C | Medium Grey | White | White | White | White | White | White | White | White | White | White | | 25°C | Medium Grey | White | White | White | White | White | White | White | White | White | White | | 30°C | Medium Grey | White | White | White | White | White | White | White | White | White | White | | 35°C | Medium Grey | White | White | White | White | White | White | White | White | White | White | | Stark erhöhte Luftfeuchte; Optimale Luftfeuchte; Zu wenig Luftfeuchte. The chart displays a single data point for each category at specific temperature values. The legend indicates that darker shades represent higher percentages.natural_image
Line drawing of a device with a box and adjacent air conditioner unit, showing a change in part (no text or symbols)natural_image
Simple line drawing of a nail screw and a 3D cube (no text or symbols)natural_image
Line drawing of a multi-chamber air conditioner unit with ventilation grilles and door (no text or symbols)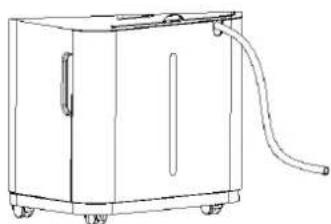
natural_image
Line drawing of a rectangular industrial machine with a curved pipe extending from its side (no text or symbols)ENGINEERED FOR WELLBEING
Comedes GmbH
Geschäftsführer:
Philipp Thannhuber
Vierhöfen 1
94522 Wallersdorf
service@comedes.com
www.comedes.com
Version:
110624 Demecto30eco