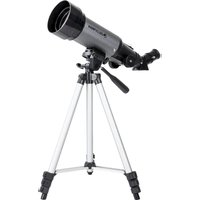
Travel Scope 22035 - Telescope CELESTRON - Free user manual and instructions
Find the device manual for free Travel Scope 22035 CELESTRON in PDF.


User questions about Travel Scope 22035 CELESTRON
0 question about this device. Answer the ones you know or ask your own.
Ask a new question about this device
Download the instructions for your Telescope in PDF format for free! Find your manual Travel Scope 22035 - CELESTRON and take your electronic device back in hand. On this page are published all the documents necessary for the use of your device. Travel Scope 22035 by CELESTRON.
USER MANUAL Travel Scope 22035 CELESTRON
natural_image
Two identical black-and-white telescopes on a tripod, one with visible lens and camera, the other with a close-up inset showing an orange-lit device (no text or symbols)TRAVEL SCOPE™ DX
INSTRUCTION MANUAL
Models #22007 (60 DX)
22035 (70 DX)
ENGLISH

CONTENTS
INTRODUCTION 5
SOLAR WARNING 5
WHAT'S IN THE BOX. 6
ASSEMBLING YOUR TELESCOPE....6
Setting up the Tripod 7
Attaching the Telescope Tube to the Tripod 8
Moving the Travel Scope Manually 8
Installing the Diagonal & Eyepiece 9
Installing the Finderscope....9
Aligning the Finderscope 10
Using your Smartphone Adapter 10
Using the Bluetooth Remote 11
TELESCOPE BASICS. 12
Focusing....12
Calculating Magnification....12
Installing & Using the Barlow Lens 12
Determining Field of View 13
General Observing Hints 13
ASTRONOMY BASICS....13
The Celestial Coordinate System. 13
Motion of the Stars 14
CELESTIAL OBSERVING 15
Observing the Moon. 15
Observing the Planets. 15
Observing Deep-Sky Objects. 16
Seeing Conditions....18
TELESCOPE MAINTENANCE....18
Care and Cleaning of the Optics . . . . . . . . . . . . . . . . . . . . . . . . . . . . . . . . . . . . . . . . . . . . . . . . . . . . . 18
TECHNICAL SPECIFICATIONS 20
NOTES. 21
CELESTRON TWO YEAR LIMITED WARRANTY....22
SAFETY WARNING....23
INTRODUCTION
Congratulations on your purchase of a Celestron Travel Scope. The Travel Scope is made of the highest quality materials to ensure stability and durability. All this adds up to a telescope that gives you a lifetime of pleasure with a minimal amount of maintenance.
This telescope was designed with traveling in mind offering exceptional value. The Travel Scope features a compact and portable design with ample optical performance. Your Travel Scope is ideal for terrestrial as well as very casual astronomical observation.
The Travel Scope carries a two year limited warranty. For details see our website at www.celestron.com
Some of the standard features of the Travel Scope include:
- Coated glass optical elements for clear, crisp images.
- Erect image diagonal so that your views are correctly oriented.
- Smooth functioning altazimuth mount with easy pointing to located objects.
- Preassembled aluminum full size photographic tripod ensures a stable platform.
- Quick and easy no-tool set up.
- The telescope and tripod fi t inside the standard backpack for easy traveling.
Take time to read through this manual before embarking on your journey through the Universe. It may take a few observing sessions to become familiar with your telescope, so you should keep this manual handy until you have fully mastered your telescope's operation. The manual gives detailed information regarding each step as well as needed reference material and helpful hints to make your observing experience simple and pleasurable as possible.
Your telescope is designed to give you years of fun and rewarding observations. However, there are a few things to consider before using your telescope that will ensure your safety and protect your equipment.
WHAT'S IN THE BOX
We recommend saving your telescope box so it can be used to store the telescope when it is not in use. Unpack the box carefully as some parts are small. Use the parts list below to verify that all parts and accessories are present.
PARTS LIST
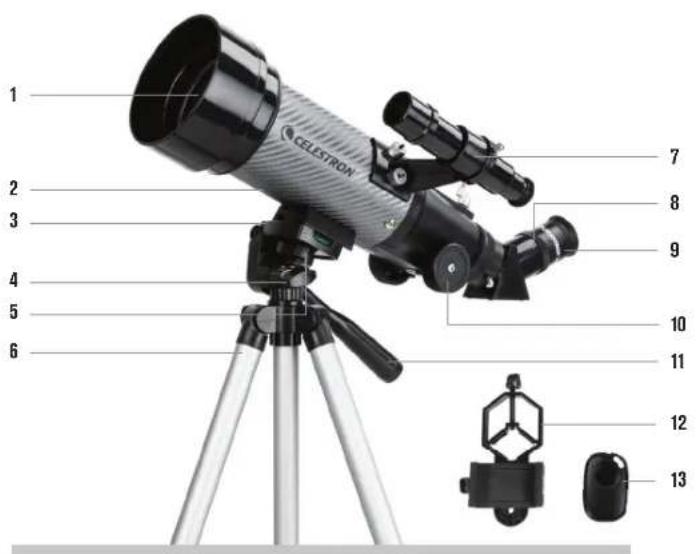
text_image
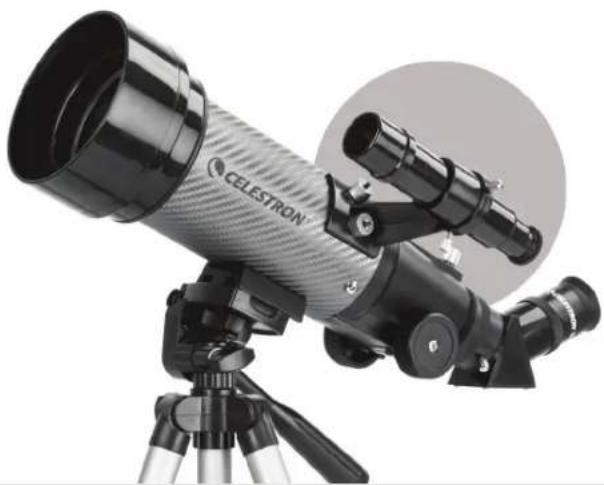
1 2 3 4 5 6 7 8 9 10 11 12 13 CELESTRONFig. 1 Travel Scope 70DX (Similar to Travel Scope 60DX)
- Objective Lens
- Telescope Optical Tube
- Tripod Head Platform
- Azimuth Lacking Knab
- Central Column Locking Knob
- Tripod
- Finderscope
B. Erect Image Diagonal - Eyepiece
- Focus Knob
- Pan Handle
- Smartphone Adapter
- Bluetooth Remote
ASSEMBLING YOUR TELESCOPE
This section covers the assembly instructions for your Travel Scope. Your telescope should be set up indoors the first time so that it is easy to identify the various parts and familiarize yourself with the correct assembly procedure before attempting it outdoors.
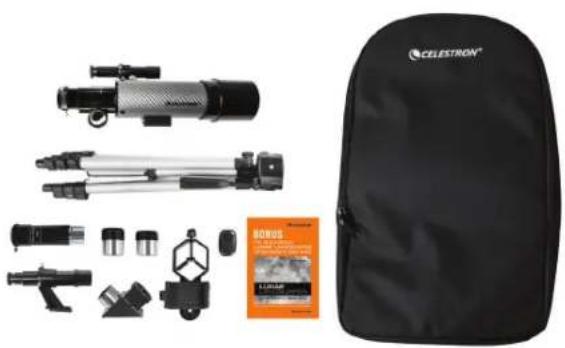
The Travel Scope 70DX comes in one box. The pieces in the box are – telescope optical tube, tripod, erect image diagonal, 20 mm eyepiece, 10mm eyepiece, 5x24 finderscope with bracket Smartphone Adapter, Bluetooth Remote (all packed in the travel backpack) and a bonus Astronomy software download.
The Travel Scope 60DX comes in one box. All items the same as above except it has a 5x24 finderscope and 8 mm eyepiece (instead of 10 mm). In addition, the kit includes a 3x Barlow Lens - 1.25".
natural_image
Product photo of CELESTRON® backpack with various optical equipment and accessories (no visible text or symbols)Fig. 2
SETTING UP THE TRIPOD
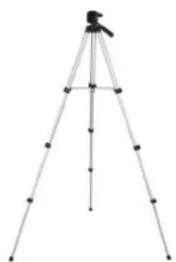
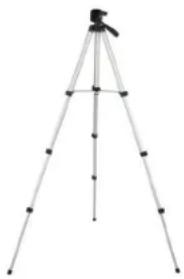
- The tripod comes preassembled so that the set up is very easy.
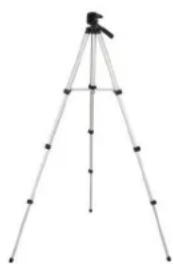
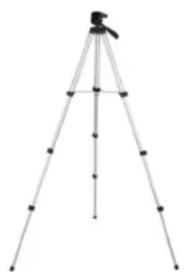
- Stand the tripod upright and pull the tripod legs outward until each leg is fully extended (Figure 3).
- You can raise the tripod legs to the height you desire. At the lowest level the height is about 16" (41 cm) and extends to about 49" (125 cm).
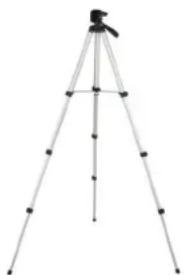
- To raise the height of the tripod, you unlock the tripod leg lock clamps at the bottom of each tripod leg (Figure 4) by opening the clamp for each section by pulling outward. Once a clamp is unlocked, then pull the tripod leg out as far as it will go and then close the leg lock to secure it. Continue doing this for each tripod leg and each section to raise the height to the level you desire. A fully extended tripod looks similar to the image in Figure 5. With all the legs raised up on all sections, the height will be about 42" (107 cm).
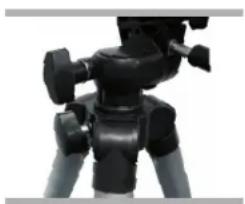
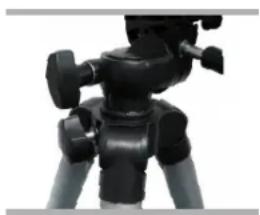
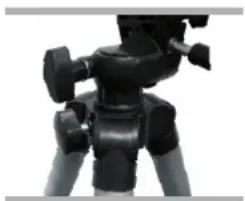
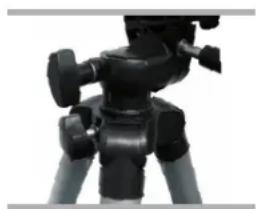
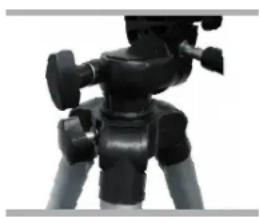
- If you want to raise the tripod height up further you must use the central column locking knob which is the knob located at the bottom left in Figure 6. Turn the locking knob counterclockwise until loose. Then, pull up on the head of the tripod and the central column will move up. Continue pulling to the height you desire and then tighten the locking knob. When the central column is raised up as far as it will go, then the maximum height possible is achieved - 49" (125 cm).

natural_image
Black tripod with adjustable arm and base (no text or symbols visible)Fig. 3
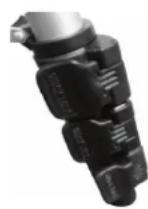
Fig. 4
natural_image
tripod-mounted tripod with tripod legs and tripod base, no text or symbols visibleFig. 5
natural_image
Close-up of a black tripod-mounted camera with adjustable arms (no visible text or symbols)Fig. 6
ATTACHING THE TELESCOPE TUBE TO THE TRIPOD
The telescope optical tube attaches to the tripod by using the mounting bracket on the bottom of the optical tube and the mounting platform of the tripod. Before starting make sure all of the knobs on the tripod are locked.
- Remove the protective paper covering the optical tube.
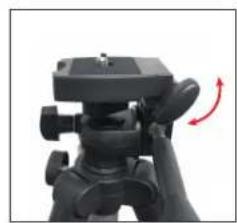
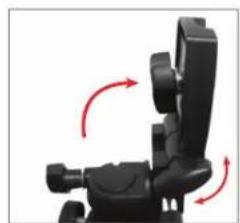
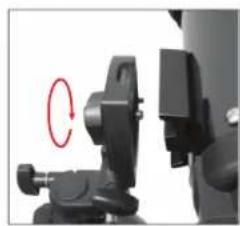
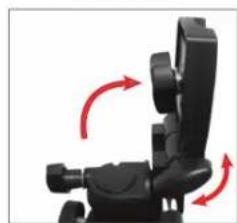
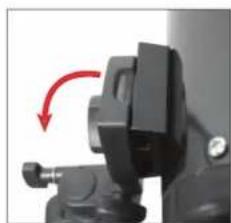
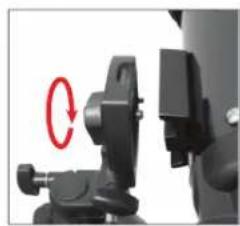
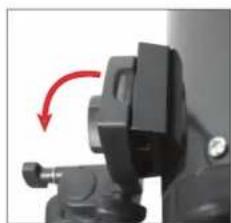
- Loosen the top right knob (Figure 7) by turning it counterclockwise. This allows you to tilt the tripod platform up 90° as shown in Figure 8. After tilting the platform up, tighten the knob to secure it in place.
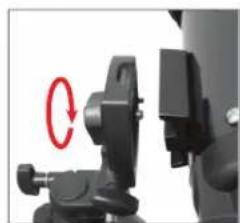
- Figure 9 shows the bottom of the optical tube, the tripod platform, and where they will attach to each other.
- Under the center of the tripod platform, you will see a knob (Figure 9) that contains a 14 × 20 screw to attach the platform to the telescope optical tube.
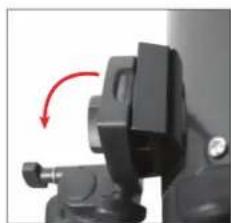
- Align the 14 x 20 screw with the threaded hole on the telescope's mounting bracket (NOTE: there are 2 threaded holes on the Travel Scope 70 and it doesn't matter which one you use). Hold the optical tube with one hand while threading the screw clockwise until tight with the other hand. Now the assembly will look like Figure 10. Hold the optical tube with one hand while threading the screw clockwise until tight with the other hand. Now the assembly will look like Figure 10.
- Lastly, loosen the knob for the tripod platform and lower the platform down to the level position. Then, tighten the knob securely.
natural_image
Close-up of a black tripod-mounted camera with a red arrow indicating rotation (no text or symbols visible)Fig. 7
natural_image
Close-up of a black mechanical device with red directional arrows indicating rotation or movement (no text or symbols visible)Fig. 8
natural_image
Close-up of a mechanical clamp or bracket with a red circular motion indicator (no text or symbols visible)Fig. 9
natural_image
Close-up of a black mechanical clip with a red arrow indicating rotation (no text or symbols visible)Fig. 10
MOVING THE TRAVEL SCOPE MANUALLY
The Travel Scope is easy to move wherever you want to point it. The up and down (altitude) is controlled by the Pan Handle Control Knob. The side-to-side (azimuth) is controlled by the Azimuth Locking Knob. Both knobs are loosened when turned counterclockwise and tightened when turned clockwise. When both knobs are loose you can find your objects easily (through the finderscope which is discussed shortly) and then lock the controls.
INSTALLING THE DIAGONAL AND EYEPIECE
The diagonal is a prism that diverts the light at a right angle to the light path of the telescope. This allows you to observe in a position that is more comfortable than if you had to look straight through. The Travel Scope diagonal is an erect image model that corrects the image to be right side up and oriented correctly left-to-right which is much easier to use for terrestrial observing. Also, the diagonal can be rotated to any position which is most favorable for you. To install the diagonal and eyepiece:
-
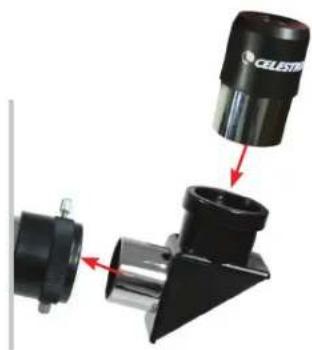
Make sure the two thumbscrews on the rear of the telescope tube do not protrude into the opening before installation, the plug up cap is removed from the opening at the rear of the telescope tube, and the caps are removed from the barrels on the diagonal. Insert the small barrel of the diagonal all the way into the rear opening of the telescope tube (Figure 11). Then tighten the two thumbscrews.
-
Put the chrome barrel end of one of the eyepieces into the diagonal and tighten the thumb screw. When doing this make sure the thumbscrew is not protruding into the diagonal before inserting the eyepiece.
-
The eyepieces can be changed to other focal lengths by reversing the procedure in step 2 above.
natural_image
Mechanical assembly diagram showing a black cylindrical component being inserted into a black wedge-shaped bracket, with red arrows indicating direction (no text or symbols present)Fig. 11
INSTALLING THE FINDERSCOPE
-
Locate the finderscope (it will be mounted in the finderscope bracket).
-
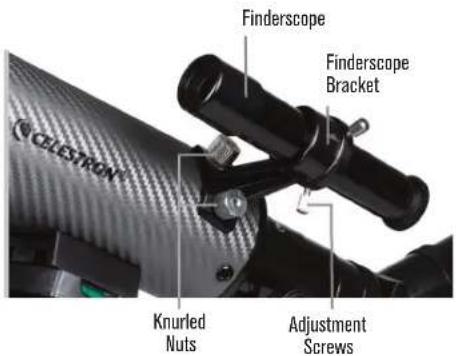
Remove the knurled nuts on the threaded posts on the telescope tube (Figure 12).
-
Mount the finderscope bracket by placing it over the posts protruding from the optical tube and then holding it in place thread on the knurled nuts and tightening them down.
-
Note that the finderscope should be oriented so that the larger diameter lens is facing toward the front of the telescope tube.
-
Remove the lens caps from both ends of the finderscope.
text_image
Finderscope Finderscope Bracket Knurled Nuts Adjustment ScrewsFig. 12
ALIGNING THE FINDERSCOPE
The fi nder is one of the most important parts of your telescope. It helps you locate objects and center them in the eyepiece. The fi rst time you assemble your telescope, you need to align the fi nder to the telescope's main optics. It's best to do this during the day*.

* SOLAR WARNING! Never attempt to view the sun through any telescope without a proper solar fi lte!
natural_image
Close-up of a CELESTRON telescope on a tripod, showing its optical components and lens (no text or symbols visible on the instrument body)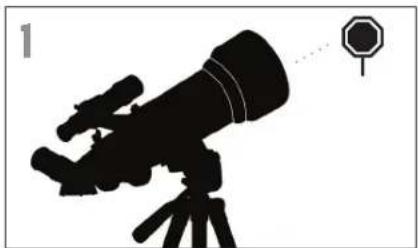
natural_image
Silhouette of a telescope with an octopus target, no text or symbols presentCHOOSE A TARGET
Take the telescope outside during the day and find an easily recognizable object, like a streetlight, license plate or sign. The object should be as far away as possible, but at least a quarter mile away.
text_image
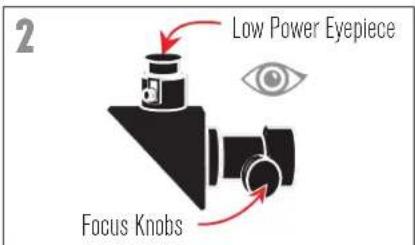
2 Low Power Eyepiece Focus KnobsCENTER THE TARGET IN THE EYEPIECE
Look through the telescope using your lower powered eyepiece. Move the telescope until the object you chose lies in the center of the view. If the image is blurry, gently turn the focus knobs until it comes into sharp focus.
natural_image
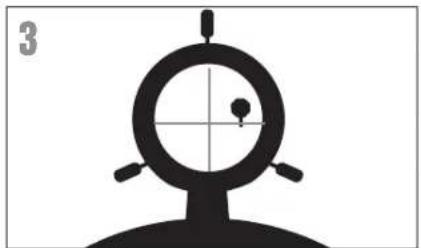
Silhouette of a target with a circular target and crosshair, no text or symbols presentLOOK THROUGH FINDERSCOPE
Once the object is centered in your 20mm eyepiece, look through the finderscope and locate the crosshair reticle.
natural_image
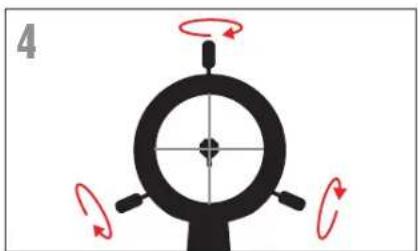
Diagram of a mechanical component with red motion arrows indicating rotational motion (no text or symbols)ADJUST THE FINDERSCOPE
Without moving the telescope, use the three finger knobs on the fi nderscope bracket to move the fi nder around in the bracket until the crosshair appears over the same object you are observing in the telescope's 20mm eyepiece.
natural_image
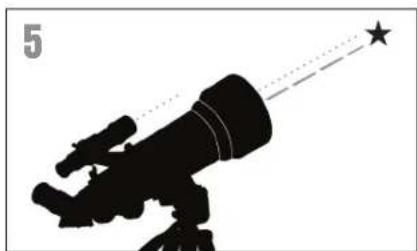
Silhouette of a telescope with a star pointer and tail, no text or symbols presentYOUR FINDERSCOPE IS NOWALIGNED!
It should not require realignment unless it is bumped or dropped.
TIP: Try adjusting one screw at a time. Loosen one screw by half a turn and tighten another by the same amount to ensure the finderscope is securely held in place.
USING THE SMARTPHONE ADAPTER
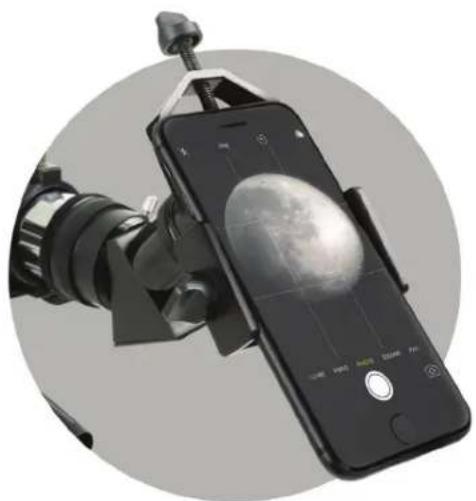
natural_image
Close-up of a smartphone mounted on a tripod-mounted camera, showing the moon's view with measurement grid (no text or symbols visible)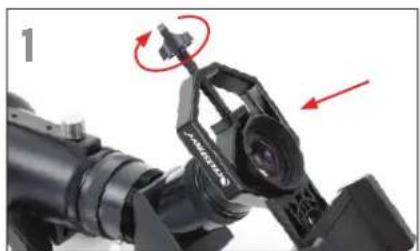
natural_image
Close-up of a mechanical device with red arrows indicating motion or assembly (no visible text or symbols)Open the eyepiece clamp and place it around the body of the eyepiece. Tighten the clamp until it's secure.
natural_image
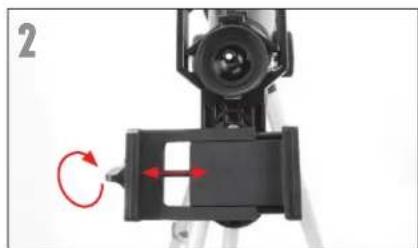
Close-up of a camera setup with a mounted device and red directional arrows indicating rotation (no text or symbols)Use the phone clamp knob to open the phone holder so that your phone fi ts inside. Tighten it to secure your phone in place.
natural_image
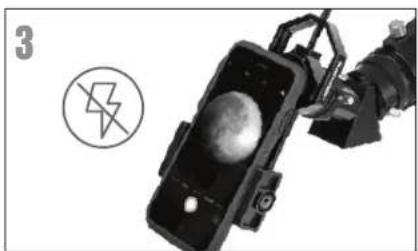
Black-and-white photo of a robotic arm holding a device with a moon inside, alongside a circular symbol with an exclamation mark (no text or symbols on the device itself)Turn on the phone and open your camera app. Make sure the flash is turned off.
natural_image
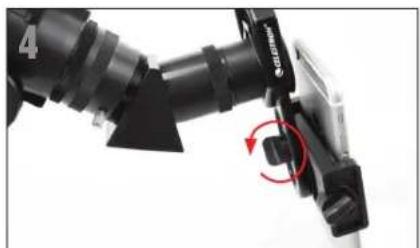
Close-up of a robotic arm with black components and a red circular arrow indicating rotation (no text or symbols)Loosen the knob on the bottom of the adapter that secures the phone clamp to the eyepiece clamp. Slide the phone clamp up and down and rotate it left and right until your camera is looking down through the eyepiece of the telescope. Tighten the knob on the bottom of the adapter to secure it in place.
natural_image
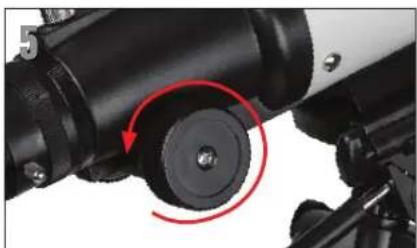
Close-up of a mechanical device with a red circular arrow indicating rotational motion (no text or symbols visible)Use the telescope's focuser to adjust focus of your camera. Snap the image using your app.
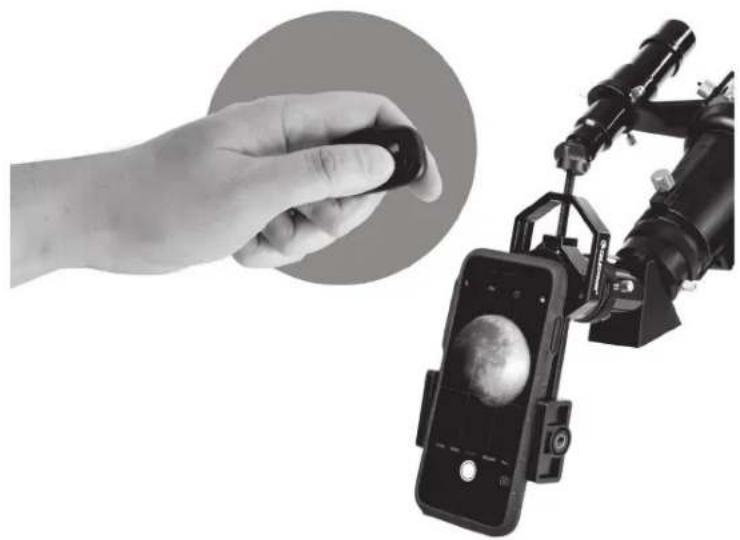
USING THE BLUETOOTH REMOTE
natural_image
Hand holding a small object next to a smartphone displaying a moon image, with a camera rig visible nearby (no text or symbols)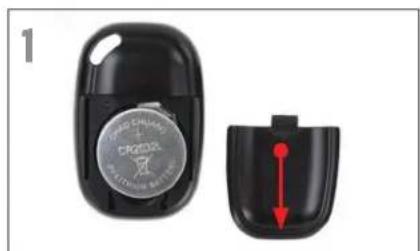
natural_image
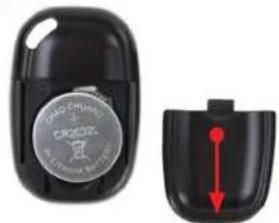
Close-up of a black car key with a circular emblem and red directional arrow indicating motion (no text or symbols on the main object)To insert or replace the battery, place your thumb in the center of the back cover, pressing inward and sliding downward remove the battery door. The CR2032 battery should be inserted with the positive (+) side facing upward. Replace the cover.
text_image
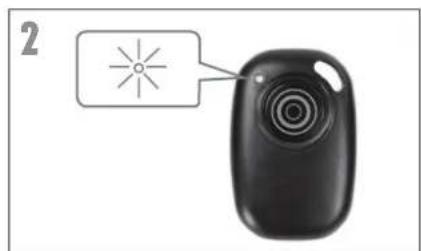
2Press and hold the button on the remote for 5 seconds. A blue light will turn on and, after a few seconds, start to blink. The remote is now in pairing mode.
text_image
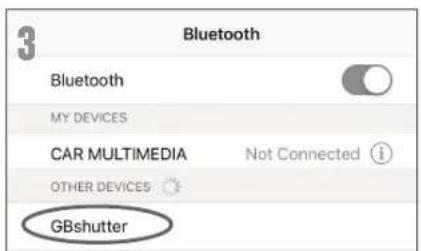
3 Bluetooth Bluetooth MY DEVICES CAR MULTIMEDIA Not Connected ⓘ OTHER DEVICES GBshutterUsing the Bluetooth settings on your phone, pair the device called "GBshutter".

natural_image
Close-up of a hand holding a small cylindrical object (no visible text or symbols)Open your camera app. Press the button on the remote to trigger the shutter on your phone.
natural_image
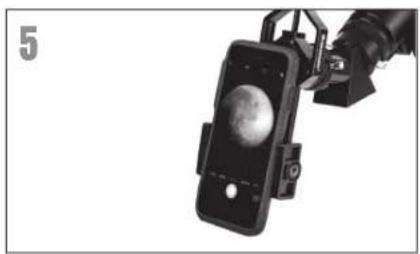
Close-up of a smartphone mounted on a mechanical device with a visible moon against the screen (no text or symbols)If your camera is in video mode, you can press the button once to start recording and again to stop the recording.
text_image
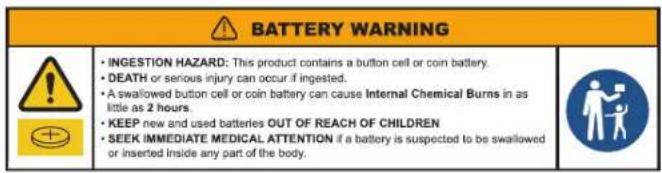
BATTERY WARNING • INGESTION HAZARD: This product contains a button cell or coin battery. • DEATH or serious injury can occur if ingested. • A swallowed button cell or coin battery can cause Internal Chemical Burns in as little as 2 hours. • KEEP new and used batteries OUT OF REACH OF CHILDREN • SEEK IMMEDIATE MEDICAL ATTENTION if a battery is suspected to be swallowed or inserted Inside any part of the body.TELESCOPE BASICS
FOCUSING
To focus your Travel Scope turn the focus knob located near the rear of the telescope (see Figure 1). Turning the knob counterclockwise allows you to focus on an object that is farther than the one you are currently observing. Turning the knob clockwise from you allows you to focus on an object closer than the one you are currently observing.
Note: Remove the front lens cap of the Travel Scope optical tube prior to attempting your observation.
Note: If you wear corrective lenses (specifically glasses), you may want to remove them when observing with an eyepiece attached to the telescope. If you have astigmatism, corrective lenses should be worn at all times.
CALCULATINGMAGNIFICATION
You can change the power of your telescope just by changing the eyepiece (ocular). To determine the magnification of your telescope, simply divide the focal length of the telescope by the focal length of the eyepiece used. In equation format, the formula looks like this:
$$ \text { Magnifi cation } = \frac {\text { Focal length of Telescope (mm) }}{\text { Focal length of Eyepiece (mm) }} $$
Let's say, for example, you are using the 20mm eyepiece that came with your Travel Scope 70 telescope. To determine the magnification you divide the focal length of your telescope (the Travel Scope for this example has a focal length of 400mm) by the focal length of the eyepiece, 20mm. Dividing 400 by 20 yields a magnification of 20x.
Although the power is variable, every telescope under average skies has a limit to the highest useful magnification. The general rule is that 60 power can be used for every inch of aperture. For example, the Travel Scope 70 is 2.8" inches in diameter. Multiplying 2.8 by 60 gives a maximum useful magnifi cation of 168 power. Although this is the maximum useful magnifi cation, most of your observing will be done at low powers which generate brighter and sharper images.
Note on Using High Powers– Higher powers are used mainly for lunar and sometimes planetary observing where you can greatly enlarge the image, but remember that the contrast and brightness will be very low due to the high magnification. When using the 8mm eyepiece together with the 3x Barlow lens with the Travel Scope 60 gives extremely high power and can be used on rare occasions – you will achieve the power but the image will be dark with low contrast because you have magnified it to the maximum possible. For the brightest images with the highest contrast levels, use lower powers.
You can purchase optional eyepieces to give you a range of powers you can observe with. Visit the Celestron website to see what is available.
INSTALLING AND USING THE BARLOW LENS (TRAVEL SCOPE 60 ONLY)
Your telescope also comes with a 3x Barlow Lens which triples the magnifying power of each eyepiece. However, the greatly magnified images should only be used under ideal conditions – see the Calculating Magnification section of this manual. To use the Barlow lens remove the diagonal and insert the Barlow directly into the focuser tube. You then insert an eyepiece into the Barlow lens for viewing.
Note: Start by using a low power eyepiece as it will be easier to focus.

text_image
Diagram showing mechanical assembly steps with labeled components and directional arrows indicating motion or movement.3x Barlow Lens
Fig. 13
DETERMINING FIELD OF VIEW
Determining the field of view is important if you want to get an idea of the angular size of the object you are observing. To calculate the actual field of view, divide the apparent field of the eyepiece (supplied by the eyepiece manufacturer) by the magnifi cation. In equation format, the formula looks like this:
$$ \text { True Angular Field } = \frac {\text { Apparent Field of of Eyepiece }}{\text { Magnifi cation }} $$
As you can see, before determining the field of view, you must calculate the magnification. Using the example in the previous section, we can determine the field of view using the same 20 mm eyepiece that is supplied standard with the Travel Scope 70. The 20 mm eyepiece has an apparent field of view of 50^ . Divide the 50^ by the magnification, which is 20 power. This yields an actual (true) field of 2.5^ .
To convert degrees to feet at 1,000 yards (which is more useful for terrestrial observing) multiply by 52.5. Multiply the angular field of 2.5^ by 52.5. This produces a linear field width of 131 feet at a distance of one thousand yards.
GENERAL OBSERVING HINTS
When using any optical instrument, there are a few things to remember to ensure you get the best possible image.
- Never look through window glass. Glass found in household windows is optically imperfect, and as a result, may vary in thickness from one part of a window to the next. This inconsistency can and will affect the ability to focus your telescope. In most cases you will not be able to achieve a truly sharp image, while in some cases you may actually see a double image.
- Never look across or over objects that are producing heat waves. This includes asphalt parking lots on hot summer days or building rooftops.
- Hazy skies, fog, and mist can also make it difficult to focus when viewing terrestrially. The amount of detail seen under these conditions is greatly reduced.
Note: Your telescope was designed for terrestrial observation. Knowing how to use it for this purpose has been described already as it is quite simple and straightforward. Your telescope can also be used for casual astronomical observing which will be discussed in the next sections.
ASTRONOMY BASICS
Up to this point, this manual covered the assembly and basic operation of your telescope. However, to understand your telescope more thoroughly, you need to know a little about the night sky. This section deals with observational astronomy in general and includes information on the night sky.
THE CELESTIAL COORDINATE SYSTEM
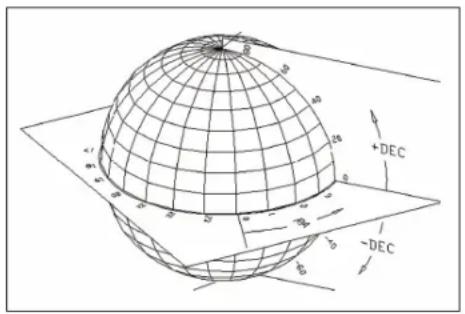
To help find objects in the sky, astronomers use a celestial coordinate system that is similar to our geographical coordinate system here on Earth. The celestial coordinate system has poles, lines of longitude and latitude, and an equator. For the most part, these remain fixed against the background stars.
The celestial equator runs 360 degrees around the Earth and separates the northern celestial hemisphere from the southern. Like the Earth's equator, it bears a reading of zero degrees. On Earth this would be latitude. However, in the sky this is referred to as declination, or DEC for short. Lines of declination are named for their angular distance above and below the celestial equator. The lines are broken down into degrees, minutes of arc, and seconds of arc. Declination readings south of the equator carry a minus sign (-) in front of the coordinate and those north of the celestial equator are either blank (i.e., no designation) or preceded by a plus sign (+).
The celestial equivalent of longitude is called Right Ascension or R.A. for short. Like the Earth's lines of longitude, they run from pole to pole and are evenly spaced 15 degrees apart. Although the longitude lines are separated by an angular distance, they are also a measure of time. Each line of longitude is one hour apart from the next. Since the Earth rotates once every 24 hours, there are 24 lines total. As a result, the R.A. coordinates are marked off in units of time. It begins with an arbitrary point in the constellation of Pisces designated as 0 hours, 0 minutes, 0 seconds. All other points are designated by how far (i.e., how long) they lag behind this coordinate after it passes overhead moving toward the west.
text_image
Diagram of a 3D globe with grid lines and coordinate axes, labeled with +DEC and -DEC annotationsFig. 14
The celestial sphere seen from the outside showing R.A. and DEC.
MOTION OF THE STARS
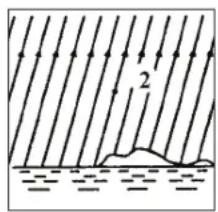
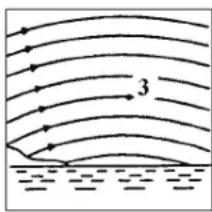
The daily motion of the Sun across the sky is familiar to even the most casual observer. This daily trek is not the Sun moving as early astronomers thought, but the result of the Earth's rotation. The Earth's rotation also causes the stars to do the same, scribing out a large circle as the Earth completes one rotation. The size of the circular path a star follows depends on where it is in the sky. Stars near the celestial equator form the largest circles rising in the east and setting in the west. Moving toward the north celestial pole, the point around which the stars in the northern hemisphere appear to rotate, these circles become smaller. Stars in the mid-celestial latitudes rise in the northeast and set in the northwest. Stars at high celestial latitudes are always above the horizon, and are said to be circumpolar because they never rise and never set. You will never see the stars complete one circle because the sunlight during the day washes out the starlight. However, part of this circular motion of stars in this region of the sky can be seen by setting up a camera on a tripod and opening the shutter for a couple hours. The timed exposure will reveal semicircles that revolve around the pole. (This description of stellar motions also applies to the southern hemisphere except all stars south of the celestial equator move around the south celestial pole.)
natural_image
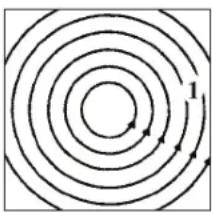
Concentric circular flow lines with arrows indicating direction, no text or symbols presentStars seen near the north celestial pole
natural_image
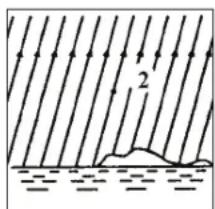
Diagram showing parallel light rays reflecting off a surface with a small irregular object at the bottom (no text or symbols)Stars seen near the celestial equator
text_image
3Stars seen looking in the opposite direction of the north celestial pole
Fig. 15
All stars appear to rotate around the celestial poles. However, the appearance of this motion varies depending on where you are looking in the sky. Near the north celestial pole the stars scribe out recognizable circles centered on the pole (1). Stars near the celestial equator also follow circular paths around the pole. But, the complete path is interrupted by the horizon. These appear to rise in the east and set in the west (2). Looking toward the opposite pole, stars curve or arc in the opposite direction scribing a circle around the opposite pole (3).
CELESTIAL OBSERVING
With your telescope set up, you are ready to use it for observing. This section covers visual observing hints for solar system and deep sky objects as well as general observing conditions which will affect your ability to observe.
OBSERVING THE MOON
With your telescope set up, you are ready to use it for observing. This section covers visual observing hints for solar system and deep sky objects as well as general observing conditions which will affect your ability to observe.
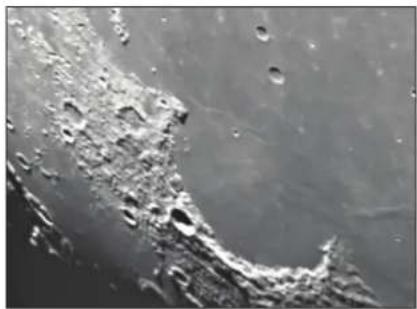
Often, it is tempting to look at the Moon when it is full. At this time, the face we see is fully illuminated and its light can be overpowering. In addition, little or no contrast can be seen during this phase. One of the best times to observe the Moon is during its partial phases (around the time of first or third quarter). Long shadows reveal a great amount of detail on the lunar surface. At low power you will be able to see most of the lunar disk at one time. Change to optional eyepieces for higher power (magnification) to focus in on a smaller area.
Lunar Observing Hints
To increase contrast and bring out detail on the lunar surface, use optional fi liters. A yellow fi liter works well at improving contrast while a neutral density or polarizing fi liter will reduce overall surface brightness and glare.
natural_image
Close-up grayscale image of a cratered planetary surface with visible lichen and small pits (no text or symbols)OBSERVING THE PLANETS
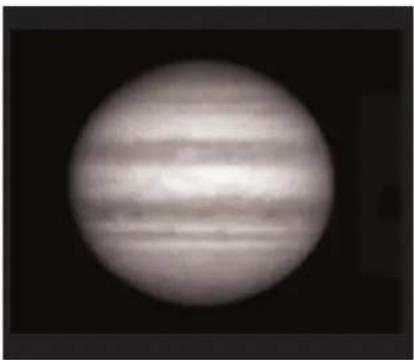
Other fascinating targets include the five naked eye planets. You can see Venus go through its lunar-like phases. Mars can reveal a host of surface detail and one, if not both, of its polar caps. You may be able to see the cloud belts of Jupiter and the great Red
Spot (if it is visible at the time you are observing). In addition, you will also be able to see the moons of Jupiter as they orbit the giant planet. Saturn, with its beautiful rings, is e visible at moderate power.
Planetary Observing Hints
- Remember that atmospheric conditions are usually the limiting factor on how much planetary detail will be visible. So, avoid observing the planets when they are low on the horizon or when they are directly over a source of radiating heat, such as a rooftop or chimney. See the "Seeing Conditions" section later in this section.
- To increase contrast and bring out detail on the planetary surface, try using Celestron eyepiece filters.
natural_image
Close-up grayscale image of the planet Jupiter showing its iconic horizontal bands against a dark background (no text or symbols visible)OBSERVING DEEP-SKY OBJECTS
Deep-sky objects are simply those objects outside the boundaries of our solar system. They include star clusters, planetary nebulae, diffuse nebulae, double stars and other galaxies outside our own Milky Way. Most deep-sky objects have a large angular size. Therefore, low-to-moderate power is all you need to see them. Visually, they are too faint to reveal any of the color seen in long exposure photographs. Instead, they appear black and white. And, because of their low surface brightness, they should be observed from a dark-sky location. Light pollution around large urban areas washes out most nebulae making them difficult, if not impossible, to observe. Light Pollution Reduction filters help reduce the background sky brightness, thus increasing contrast.
Star Hopping
One convenient way to find deep-sky objects is by star hopping. Star hopping is done by using bright stars to "guide" you to an object. For successful star hopping, it is helpful to know the field of view of you telescope. If you're using the standard 20 mm eyepiece with the Travel Scope 70, your field of view is approximately 2.5° or so. If you know an object is 3° away from your present location, then you just need to move a little more than one field of view. If you're using another eyepiece, then consult the section on determining fi eld of view. Listed below are directions for locating two popular objects.
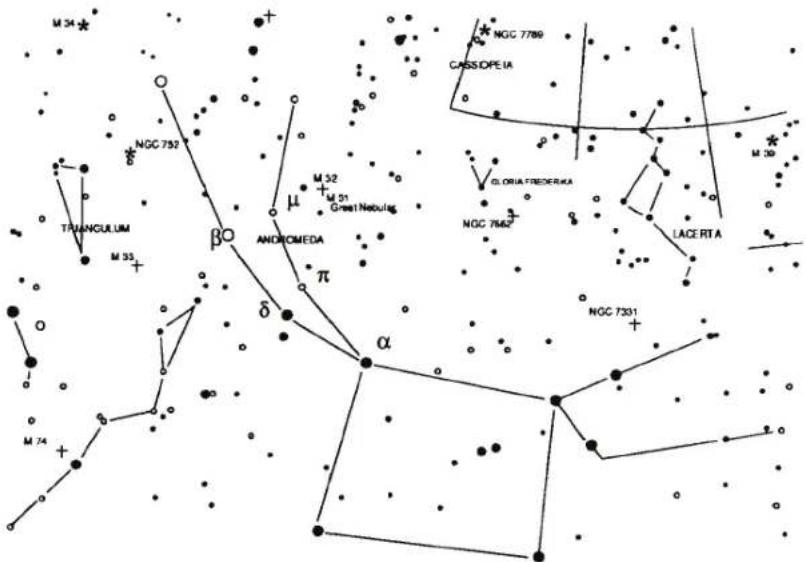
The Andromeda Galaxy (Figure 16), also known as M31, is an easy target. To find M3:
- Locate the constellation of Pegasus, a large square visible in the fall (in the eastern sky, moving toward the point overhead) and winter months (overhead, moving toward the west).
- Start at the star in the northeast corner—Alpha (α) Andromedae.
- Move northeast approximately 7^ . There you will find two stars of equal brightness—Delta ( ) and Pi ( ) Andromeda—about 3^ apart.
- Continue in the same direction another 8^ . There you will find two stars—Beta ( ) and Mu ( ) Andromedae—also about 3^ apart.
- Move 3° northwest—the same distance between the two stars—to the Andromeda galaxy.
Star hopping to the Andromeda Galaxy (M31) is a snap, since all the stars needed to do so are visible to the naked eye.
text_image
M 34 NGC 752 TRIANGULUM M 35 βO ANDROMEDA μ π δ α NGC 7789 CASSOPEIA M 30 GLORIA FREDERKA NGC 7642 LACE RT A NGC 7331 M 74Fig. 16 Andromeda Galaxy
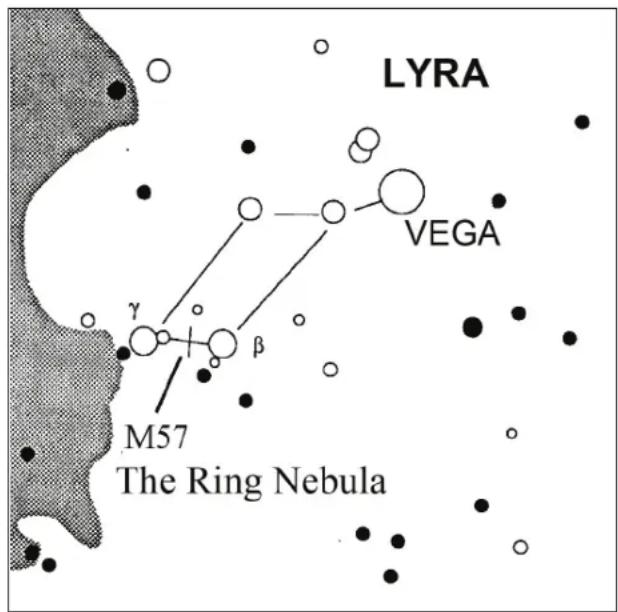
Star hopping will take some getting used to and objects that don't have stars near them that are visible to the naked eye are challenging. One such object is M57 (Figure 17), the famed Ring Nebula. Here's how to find it:
- Find the constellation of Lyra, a small parallelogram visible in the summer and fall months. Lyra is easy to pick out because it contains the bright star Vega.
- Start at the star Vega—Alpha ( ) Lyrae—and move a few degrees southeast to find the parallelogram. The four stars that make up this geometric shape are all similar in brightness, making them easy to see.
-
Locate the two southernmost stars that make up the parallelogram—Beta ( ) and Gamma ( ) Lyra.
-
Pointabout halfway between these two stars.
-
Move about 12^ toward Beta ( ) Lyra, while remaining on a line connecting the two stars.
-
Look through the telescope and the Ring Nebula should be in your field of view. The Ring Nebula's angular size is quite small and difficult to see.
-
Because the Ring Nebula is rather faint, you may need to use "averted vision" to see it. "Averted vision" is a technique of looking slightly away from the object you're observing. So, if you are observing the Ring Nebula, center it in your field of view and then look off toward the side. This causes light from the object viewed to fall on the black and white sensitive rods of your eyes, rather than your eyes color sensitive cones. (Remember that when observing faint objects, it's important to try to observe from a dark location, away from street and city lights. The average eye takes about 20 minutes to fully adapt to the darkness. So always use a red-fi iterated flashlight to preserve your dark-adapted night vision).
These two examples should give you an idea of how to star hop to deep-sky objects. To use this method on other objects, consult a star atlas, then star hop to the object of your choice using “naked eye” stars.
text_image
LYRA VEGA γ β M57 The Ring NebulaFig. 17
Ring Nebula
SEEING CONDITIONS
Viewing conditions affect what you can see through your telescope during an observing session. Conditions include transparency, sky illumination, and seeing. Understanding viewing conditions and the effect they have on observing will help you get the most out of your telescope.
Transparency
Transparency is the clarity of the atmosphere which is affected by clouds, moisture, and other airborne particles. Thick cumulus clouds are completely opaque while cirrus can be thin, allowing the light from the brightest stars through. Hazy skies absorb more light than clear skies making fainter objects harder to see and reducing contrast on brighter objects. Aerosols ejected into the upper atmosphere from volcanic eruptions also affect transparency. Ideal conditions are when the night sky is inky black.
Sky Illumination
General sky brightening caused by the Moon, aurorae, natural airglow, and light pollution greatly affect transparency. While not a problem for the brighter stars and planets, bright skies reduce the contrast of extended nebulae making them difficult, if not impossible to see. To maximize your observing, limit deep sky viewing to moonless nights far from the light polluted skies found around major urban areas. LPR filters enhance deep sky viewing from light polluted areas by blocking unwanted light while transmitting light from certain deep sky objects. You can, on the other hand, observe planets and stars from light polluted areas or when the Moon is out.
Seeing
Seeing conditions refers to the stability of the atmosphere and directly affects the amount of fine detail seen in extended objects. The air in our atmosphere acts as a lens which bends and distorts incoming light rays. The amount of bending depends on air density. Varying temperature layers have different densities and, therefore, bend light differently. Light rays from the same object arrive slightly displaced creating an imperfect or smeared image. These atmospheric disturbances vary from time-to-time and place-to-place. The size of the air parcels compared to your aperture determines the "seeing" quality. Under good seeing conditions, fine detail is visible on the brighter planets like Jupiter and Mars, and stars are pinpoint images. Under poor seeing conditions, images are blurred and stars appear as blobs.
The conditions described here apply to both visual and photographic observations.

natural_image
Five black-and-white diagrams showing abstract cellular or molecular patterns, no text or symbols presentFig. 18
Seeing conditions directly affect image quality. These drawings represent a point source (i.e., star) under bad seeing conditions (left) to excellent conditions (right). Most often, seeing conditions produce images that lie some where between these two extremes.
TELESCOPE MAINTENANCE
While your telescope requires little maintenance, there are a few things to remember that will ensure your telescope performs at its best.
CARE AND CLEANING OF THE OPTICS
Occasionally, dust and/or moisture may build up on the objective lens of your telescope. Special care should be taken when cleaning any instrument so as not to damage the optics.
If dust has built up on the optics, remove it with a brush (made of camel's hair) or a can of pressurized air. Spray at an angle to the glass surface for approximately two to four seconds. Then, use an optical cleaning solution and white tissue paper to remove any remaining debris. Apply the solution to the tissue and then apply the tissue paper to the optics. Low pressure strokes should go from the center of the lens (or mirror) to the outer portion. Do NOT rub in circles!
You can use a commercially made lens cleaner or mix your own. A good cleaning solution is isopropyl alcohol mixed with distilled water. The solution should be 60% isopropyl alcohol and 40% distilled water. Or, liquid dish soap diluted with water (a couple of drops per one quart of water) can be used.
Occasionally, you may experience dew build-up on the optics of your telescope during an observing session. If you want to continue observing, the dew must be removed, either with a hair dryer (on low setting) or by pointing the telescope at the ground until the dew has evaporated.
If moisture condenses on the inside of the optics, remove the accessories from the telescope. Place the telescope in a dust-free environment and point it down. This will remove the moisture from the telescope tube.
To minimize the need to clean your telescope, replace all lens covers once you have finished using it. Since the cells are NOT sealed, the covers should be placed over the openings when not in use. This will prevent contaminants from entering the optical tube.
Internal adjustments and cleaning should be done only by the Celestron repair department. If your telescope is in need of internal cleaning, please call the factory for a return authorization number and price quote.
| TECHNICAL SPECIFICATIONS | Model # 22035Travel Scope 70DX | Model # 22007Travel Scope 60DX |
| Optical Design Refractor Refractor | ||
| Aperture 70 mm (2.8") 60mm (2.4") | ||
| Focal Length 400 mm (15.74") 360 mm (14.17") | ||
| Focal Ratio f/5.7 f/6.0 | ||
| Optical Coatings Fully Coated | Coated | |
| Finderscope | 5x24 | 5x24 |
| Diagonal | Erect Image - 45° 1.25" | Erect Image -45° 1.25" |
| Eyepieces | 20 mm 1.25" (20x) | 20 mm 1.25" (18x) |
| 10 mm 1.25" (40x) | 8 mm 1.25" (45x) | |
| Barlow Lens - 3x 1.25" | N/A | Yes (9x & 142x) |
| Apparent Field of View | 20 mm @ 50° | 20 mm @ 32° |
| 10 mm @ 50° | 8 mm @ 30° | |
| Angular Field of View | 20 mm @ 2.5° | 20 mm @ 1.6° |
| 10 mm @ 1.3° | 8 mm @ 0.7° | |
| Mount | Manual Altazimuth | Manual Altazimuth |
| Altitude Locking Knob | Yes | Yes |
| Azimuth Locking Knob | No | No |
| Astronomy Software Download | Yes | Yes |
| Highest Useful Magnification | 168x | 42x |
| Limiting Stellar Magnitude | 11.7 11.4 | |
| Resolution -- Raleigh (arc seconds) | 1.98 | 2.32 |
| Resolution -- Dawes Limit " " | 1.66 | 1.93 |
| Light Gathering Power | 100x | 73x |
| Optical Tube Length | 431.8mm (17") | 381mm (15") |
| Telescope Weight | 1.68 lbs (.76 kg) | 1.5 lbs (.68 kg) |
Note: Specifications are subject to change without notice or obligation.
NOTES
CELESTRON TWO YEAR LIMITED WARRANTY
A. Celestron warrants this telescope to be free from defects in materials and workmanship for two years. Celestron will repair or replace such product or part thereof which, upon inspection by Celestron, is found to be defective in materials or workmanship. As a condition to the obligation of Celestron to repair or replace such product, the product must be returned to Celestron together with proof-of-purchase satisfactory to Celestron.
B. The Proper Return Authorization Number must be obtained from Celestron in advance of return. Please submit your request to Celestron's online technical support center at https://www.celestron.com/pages/technical-support to receive the number to be displayed on the outside of your shipping container.
All returns must be accompanied by a written statement setting forth the name, address, and daytime telephone number of the owner, together with a brief description of any claimed defects. Parts or product for which replacement is made shall become the property of Celestron.
The customer shall be responsible for all costs of transportation and insurance, both to and from the factory of Celestron, and shall be required to prepay such costs.
Celestron shall use reasonable efforts to repair or replace any telescope covered by this warranty within thirty days of receipt. In the event repair or replacement shall require more than thirty days, Celestron shall notify the customer accordingly. Celestron reserves the right to replace any product which has been discontinued from its product line with a new product of comparable value and function.
This warranty shall be void and of no force of effect in the event a covered product has been modified in design or function, or subjected to abuse, misuse, mishandling or unauthorized repair. Further, product malfunction or deterioration due to normal wear is not covered by this warranty.
CELESTRON DISCLAIMS ANY WARRANTIES, EXPRESSED OR IMPLIED. WHETHER OF MERCHANTABILITY OR FITNESS FOR A PARTICULAR USE, EXCEPT AS EXPRESSLY SET FORTH HEREIN. THE SOLE OBLIGATION OF CELESTRON UNDER THIS LIMITED WARRANTY SHALL BE TO REPAIR OR REPLACE THE COVERED PRODUCT, IN ACCORDANCE WITH THE TERMS SET FORTH HEREIN. CELESTRON EXPRESSLY DISCLAIMS ANY LOST PROFITS, GENERAL, SPECIAL INDIRECT OR CONSEQUENTIAL DAMAGES WHICH MAY RESULT FROM BREACH OF ANY WARRANTY, OR ARISING OUT OF THE USE OR INABILITY TO USE ANY CELESTRON PRODUCT. ANY WARRANTIES WHICH ARE IMPLIED AND WHICH CANNOT BE DISCLAIMED SHALL BE LIMITED IN DURATION TO A TERM OF TWO YEARS FROM THE DATE OF ORIGINAL RETAIL PURCHASE.
Some states do not allow the exclusion or limitation of incidental or consequential damages or limitation on how long an implied warranty lasts, so the above limitations and exclusions may not apply to you.
This warranty gives you specific legal rights, and you may also have other rights which vary from state to state.
Celestron reserves the right to modify or discontinue, without prior notice to you, any model or style telescope.
If warranty problems arise, or if you need assistance in using your telescope, please visit Celestron's online technical support center at https://www.celestron.com/pages/technical-support.
NOTE: This warranty is valid to U.S.A. and Canadian customers who have purchased this product from an authorized Celestron dealer in the U.S.A. or Canada. Warranty outside the U.S.A. and Canada is valid only to customers who purchased from a Celestron's International Distributor or Authorized Celestron Dealer in the specific country. Please contact them for any warranty service.

www.celestron.com/pages/warranty
Your purchase includes software for your computer. You don't need to download this software to use your telescope, but it can enhance your experience.

Starry Night
Celestron Starry Night Astronomy Software
Celestron Starry Night, the premier astronomy software on the market, takes you on a guided tour of our Solar System's past, present, and future. It can help you learn about the night sky and plan your next observing session. Use Starry Night to model exactly how the night sky will appear from your backyard, a neighboring town, or anywhere on Earth.
MINIMUM SYSTEM REQUIREMENTS
Windows:
- Windows 7 or higher
- 500MHz or higher processor
- 128 MB RAM
- 850 MB hard disk space
• 32 MB OpenGL-capable graphics card - Monitor with 1024x768 pixel resolution (recommended)
Mac:
- Universal binary (PPC/Intel-compatible)
- OS X 10.4 or higher (10.5 or higher for Elementary)
- G3 450 MHz or higher processor
- 128 MB RAM
- 850 MB hard disk space
- 32 MB OpenGL-capable graphics card
- Monitor with 1024x768 pixel resolution (recommended)
SAFETY INSTRUCTIONS
- There is a risk of explosion if the battery is replaced with an incorrect type.
- The included battery is not rechargeable.
- Only use the battery as originally intended to avoid a short circuit. Connecting the conductive material directly to the battery's positive and negative sides will cause a short circuit.
- Do not use a damaged battery.
- Do not store the battery in an extremely cold or hot environment. Doing so can reduce battery life.
- Remove batteries if drained or if product is to be left unused for a long time.
- When replacing the battery, refer to the instruction manual and ensure the positive and negative sides are oriented correctly.
- Do not put the battery in fire.
- Dispose of the battery according to local regulations.
FCC IDENTIFIER: 2A2FG-93974
NOTE: FCC certification is for the Bluetooth Remote Control included with this product. Model #93974
This device complies with Part 15 of the FCC Rules. Operation is subject to the following two conditions: (1) This device may not cause harmful interference, and (2) this device must accept any interference received, including interference that may cause undesired operation.
CAUTION: Changes or modifications not expressly approved by the party responsible for compliance could void the user's authority to operate the equipment.
NOTE: This equipment has been tested and found to comply with the limits for a Class B digital device, pursuant to part 15 of the FCC Rules. These limits are designed to provide reasonable protection against harmful interference in a residential installation.
This equipment generates, uses and can radiate radio frequency energy and, if not installed and used in accordance with the instructions, may cause harmful interference to radio communications. However, there is no guarantee that interference will not occur in a particular installation.
If this equipment does cause harmful interference to radio or television reception, which can be determined by turning the equipment off and on, the user is encouraged to try to correct the interference by one or more of the following measures:
- Reorient or relocate the receiving antenna.
- Increase the separation between the equipment and receiver.
- Connect the equipment into an outlet on a circuit different from that to which the receiver is connected.
- Consult the dealer or an experienced radio/TV technician for help.
FCC NOTE: This device complies with Part 15 of the FCC Rules. Operation is subject to the following two conditions: (1) This device may not cause harmful interference, and (2) this device must accept any interference received, including interference that may cause undesired operation.

SOLAR WARNING: Never attempt to view the sun through any telescope.
NEED ASSISTANCE? Contact Celestron Technical Support
celestron.com/pages/technical-support
Product design and specifications are subject to change without prior notification. This product is designed and intended for use by those 14 years of age and older.

CELESTRON
©2024 Celestron. Celestron and Symbol are trademarks of Celestron, LLC.
All rights reserved. • Celestron.com
US: Celestron, 2835 Columbia Street, Torrance, CA 90503 USA
UK: Celestron Global Ltd., Unit 2 Transigo, Gables Way, Thatcham RG19 4JZ, United Kingdom
Made in China | 09-24
text_image
BATTERY WARNING • INGESTION HAZARD: This product contains a button cell or coin battery. • DEATH or serious injury can occur if ingested. • A swallowed button cell or coin battery can cause Internal Chemical Burns in as little as 2 hours. • KEEP new and used batteries OUT OF REACH OF CHILDREN • SEEK IMMEDIATE MEDICAL ATTENTION if a battery is suspected to be swallowed or inserted inside any part of the body.
text_image
FR +Separate waste collection. Check your local municipal guidelines.
natural_image
Two identical telescopes on a tripod, one with visible lens and camera, the other with a close-up inset showing an orange-lit device (no text or symbols)TRAVEL SCOPE™
(LONGUE VUE DE VOYAGE)
MANUEL DE L'UTILISATEUR
natural_image
Product display of CELESTRON® backpack and accessories including optical equipment, camera, and a branded box (no visible text or symbols on main items)Fig. 2
INSTALLATION DU TRÉPIED
natural_image
tripod-mounted camera with tripod base and tripod handle (no text or symbols visible)Fig. 3
Fig. 4
natural_image
tripod-mounted camera setup with tripod base and tripod legs (no text or symbols)Fig. 5
natural_image
Close-up of a black tripod-mounted camera with adjustable arms (no visible text or symbols)Fig. 6
FIXATION DU TUBE OPTIQUE DU TÉLESCOPE AU TRÉPIED
natural_image
Close-up of a black tripod-mounted camera with a red arrow indicating rotation (no text or symbols visible)Fig. 7
natural_image
Close-up of a black mechanical device with red directional arrows indicating rotation or movement (no text or symbols visible)Fig. 8
natural_image
Close-up of a mechanical clamp or bracket with a red circular motion indicator (no text or symbols)Fig. 9
natural_image
Close-up of a black mechanical clamp or bracket with a red arrow indicating rotation (no text or symbols visible)Fig. 10
MOVING THE TRAVEL SCOPE MANUALLY
natural_image
Mechanical assembly diagram showing a black cylindrical component being inserted into a black wedge-shaped housing, with red arrows indicating direction (no text or symbols present)Fig. 11
INSTALLATION DU CHERCHEUR (TRAVEL SCOPE 70 UNIQUEMENT)
natural_image
Close-up of a CELESTRON telescope on a tripod, showing its optical components and screen (no text or symbols visible)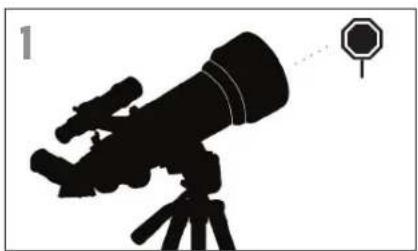
natural_image
Silhouette of a telescope with an octagonal target, no text or symbols presentCHOISIR UNE CIBLE
natural_image
Silhouette of a target with a circular target and crosshair, no text or symbols presentREGARDEZ DANS LE CHERCHEUR
natural_image
Diagram of a mechanical component with red circular arrows indicating rotational motion (no text or symbols)AJUSTER LE CHERCHEUR
natural_image
Silhouette of a telescope with a star pointer and a numbered label '5' (no text or symbols on the diagram itself)VOTRE CHERCHEUR EST MAINTENANCE ALIGNÉ !
natural_image
Close-up of a smartphone mounted on a tripod-mounted camera, showing the moon's view (no text or symbols visible)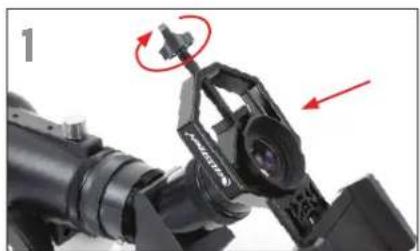
natural_image
Close-up of a mechanical device with red arrows indicating motion or assembly (no visible text or symbols)natural_image
Close-up of a camera setup with a mounted device and red directional arrows indicating rotation (no text or symbols)natural_image
Black-and-white photo of a mechanical device with a moon visible inside, accompanied by a circular symbol and a number 3 in the corner (no readable text or symbols on the device itself)natural_image
Close-up of a mechanical device with black components and a red circular arrow indicating rotation (no visible text or symbols)natural_image
Close-up of a black mechanical component with a red circular arrow indicating rotation or adjustment (no text or symbols visible)natural_image
Hand holding a small object next to a smartphone displaying a planet image, with a telescope mounted on top (no text or symbols visible)1
natural_image
Close-up of a black car key with a circular logo and red arrow indicating direction (no text or symbols on the main object)natural_image
Black handheld device with a circular sensor and a white starburst icon pointing to it (no text or symbols)natural_image
Close-up of a hand holding a small black object, possibly a button or sensor, with no visible text or symbols.natural_image
Close-up of a tripod-mounted telescope mounted on a smartphone, showing its screen and camera (no visible text or symbols)text_image
Diagram of a 3D sphere with coordinate axes and directional arrows labeled +DEC and -DECnatural_image
Concentric circular arrows forming a spiral pattern (no text or symbols)natural_image
Diagram showing parallel lines with arrows indicating direction, no text or symbols presentnatural_image
Close-up grayscale image of a cratered planetary surface with visible lichen and small pits (no text or symbols)OBSERVATION DES PLANÈTES
natural_image
Close-up grayscale image of the planet Jupiter showing its vertical bands against a dark background (no text or symbols)OBSERVATION D'OBJETS DU CIEL PROFOND
natural_image
Five black-and-white diagrams showing abstract circular patterns with varying dot textures and shapes (no text or symbols)Separate waste collection. Check your local municipal guidelines.
natural_image
Two identical telescopes on a tripod, one with visible lens and camera, the other with a close-up inset showing an orange-and-white photo of a device (no text or symbols present)TRAVEL SCOPE™
(REISETELESKOP)
BEDIENUNGSANLEITUNG
Modell 22007 (60 DX),
22035 (70 DX)
DEUTSCH

INHALT
EINFÜHRUNG 5
natural_image
Product photo of CELESTRON backpack with various optical equipment and accessories (no visible text or symbols)Abb. 2
AUFBAU DES STATIVS
natural_image
tripod-mounted camera with tripod base and tripod handle (no text or symbols visible)Abb. 3
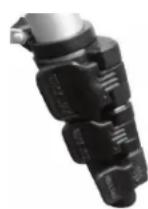
Abb. 4
natural_image
tripod-mounted tripod with tripod legs and tripod base, no text or symbols visibleAbb. 5
natural_image
Close-up of a black tripod-mounted camera with adjustable arms (no visible text or symbols)Abb. 6
AUFSATZ DES OPTISCHEN TUBUS DES TELESKOPS AM STATIV
natural_image
Mechanical assembly diagram showing a black cylindrical component being inserted into a black housing, with red arrows indicating direction (no text or symbols present)Abb. 11
INSTALLATION DES SUCHERFERNROHRS (NUR TRAVEL SCOPE 70)
natural_image
Close-up of a CELESTRON telescope on a tripod, showing its optical components and lens (no text or symbols visible on the instrument body)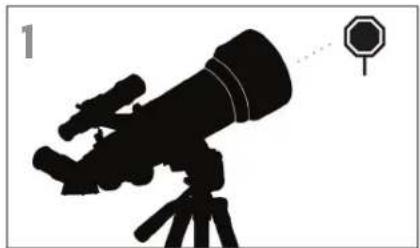
natural_image
Silhouette of a telescope on a tripod with an octagonal target nearby (no text or symbols)WÄHLEN SIE EIN ZIEL
natural_image
Silhouette of a target with a circular head and crosshair, no text or symbols presentSCHAUEN SIE DURCH DAS SUCHERFERNROHR
natural_image
Diagram of a mechanical component with red circular arrows indicating rotational motion (no text or symbols)SUCHERFERNROHR EINSTELLEN
natural_image
Silhouette of a telescope with a star pointer and tail, no text or symbols presentIHR SUCHERFERNROHR IST JETZTAUSGERICHTET!
natural_image
Close-up of a smartphone mounted on a tripod-mounted camera, showing the moon's view with a circular frame (no text or symbols visible)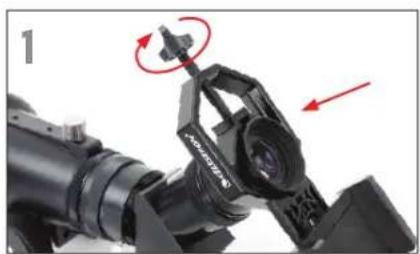
natural_image
Close-up of a mechanical device with red arrows indicating motion or assembly (no visible text or symbols)natural_image
Close-up of a camera setup with a mounted device and red directional arrows indicating rotation (no text or symbols)natural_image
Black-and-white photo of a surveillance camera with a moon visible, accompanied by a prohibition symbol (no text or labels present)natural_image
Close-up of a mechanical device with black components and a red circular arrow indicating rotation (no visible text or symbols)natural_image
Close-up of a black mechanical component with a red circular arrow indicating rotation or adjustment (no text or symbols visible)natural_image
Hand holding a small object next to a smartphone displaying a planet against a telescope (no text or symbols visible)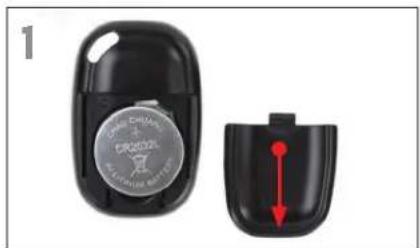
natural_image
Close-up of a black car key with a circular emblem and red directional arrow indicating left (no text or symbols on the main object)text_image
3 Bluetooth Bluetooth MY DEVICES CAR MULTIMEDIA Not Connected ⓘ OTHER DEVICES GBshutternatural_image
Close-up of a hand holding a small dark object, possibly a button or sensor, with no visible text or symbols.natural_image
Black-and-white photo of a tripod-mounted camera setup with a smartphone mounted on top (no visible text or symbols)text_image
Diagram of a 3D coordinate system with labeled axes (DEC) and grid lines, showing spherical geometry.natural_image
Concentric circular arrows forming a spiral pattern (no text or symbols)natural_image
Diagram showing parallel light rays reflecting off a surface with a small irregular shape at the base (no text or symbols)natural_image
Close-up grayscale image of a cratered planetary surface with visible lichen and small pits (no text or symbols)natural_image
Close-up grayscale image of Jupiter with visible atmospheric bands (no text or symbols)natural_image
Five black-and-white diagrams showing abstract circular patterns with varying dot textures and shapes (no text or symbols)natural_image
Two identical CLSTHON telescopes on a tripod, one with visible lens and camera, the other with a close-up inset showing an orange-lit device (no text or symbols)TRAVEL SCOPE™
(TELESCOPIO DA VIAGGIO)
natural_image
Product photo of CELESTRON backpack with various optical equipment and accessories (no visible text or symbols)Fig. 2
natural_image
tripod-mounted camera with tripod base and tripod handle (no text or symbols visible)Fig. 3
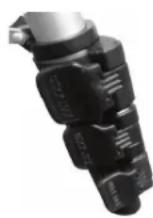
Fig. 4
natural_image
tripod-mounted camera setup with tripod base and tripod legs (no text or symbols)Fig. 5
natural_image
Close-up of a black tripod-mounted camera with adjustable arm (no visible text or symbols)Fig. 6
COLLEGAMENTO DEL TUBO OTTICO DEL TELESCOPIO AL TREPPIEDI
natural_image
Mechanical assembly diagram showing a black cylindrical component with red arrows indicating motion or assembly (no text or symbols)Fig. 11
INSTALLAZIONE DEL CANNOCCHIALE CERCATORE (SOLO PER IL TRAVEL SCOPE 70)
natural_image
Close-up of a CELESTRON telescope on a tripod, showing its optical components and lens (no text or symbols visible on the instrument body)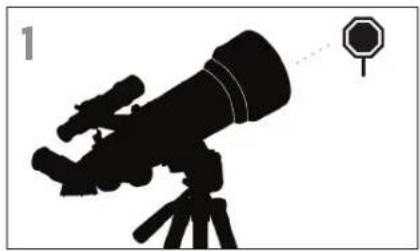
natural_image
Silhouette of a telescope with an octopus detection symbol (no text or labels)SCEGLIERE UN OGGETTO DA OSSERVARE
natural_image
Silhouette of a target with a circular head and crosshair, no text or symbols presentGUARDARE ATTRAVERSO IL CERCATORE
natural_image
Diagram of a mechanical component with red circular arrows indicating rotational motion (no text or symbols)REGOLARE IL CERCATORE
natural_image
Silhouette of a telescope with a star pointer and tail, no text or symbols presentnatural_image
Close-up of a smartphone mounted on a tripod-mounted camera, showing the moon's reflection and adjustment screen (no text or symbols visible)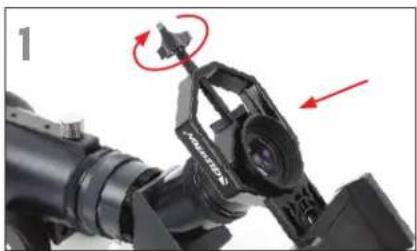
natural_image
Close-up of a camera lens assembly with red arrows indicating motion direction (no text or symbols)natural_image
Close-up of a camera setup with a mounted device and red directional arrows indicating rotation (no text or symbols)natural_image
Black-and-white photo of a robotic arm holding a device with a moon visible, alongside a circular symbol with a crossed-out lightning bolt (no text or symbols on the device itself)natural_image
Close-up of a mechanical device with black components and a red circular arrow indicating rotation (no visible text or symbols)natural_image
Close-up of a black mechanical component with a red circular annotation highlighting a specific area (no text or symbols visible)natural_image
Hand holding a small object next to a smartphone displaying a moon against a telescope (no text or symbols visible)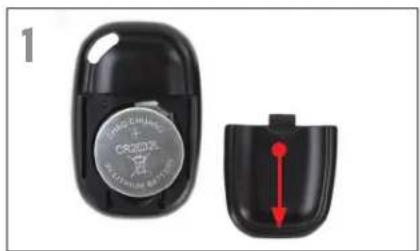
natural_image
Close-up of a black car key with a circular sticker and red directional arrow (no text or symbols on the main object)text_image
3 Bluetooth Bluetooth MY DEVICES CAR MULTIMEDIA Not Connected ⓘ OTHER DEVICES GBshutternatural_image
Close-up of a hand holding a small black cylindrical object (no visible text or symbols)natural_image
Black-and-white photo of a tripod-mounted camera setup with a smartphone mounted on top (no visible text or symbols)text_image
Diagram of a 3D coordinate system with a sphere and grid lines, labeled with DEC indicators.natural_image
Concentric circular arrows forming concentric rings, no text or symbols presentnatural_image
Diagram showing parallel light rays reflecting off a surface with a small irregular object at the base (no text or symbols)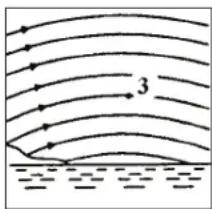
text_image
3opposta al polo nord celeste
Fig. 15
natural_image
Close-up of a lunar surface showing cratered ice formations and a curved trail (no text or symbols visible)natural_image
Close-up grayscale image of the planet Jupiter showing its atmospheric bands and atmospheric layers against a dark background (no text or symbols visible)OSSERVAZIONE DI OGGETTI DEL CIELO PROFONDO
natural_image
Five black-and-white diagrams showing abstract circular patterns with varying dot textures and shapes (no text or symbols)Separate waste collection. Check your local municipal guidelines.
natural_image
Two identical black-and-white telescopes on a tripod, one with visible lens and camera, the other with a close-up inset showing a device (no text or symbols)TRAVEL SCOPE™
(TELESCOPIO PARA VIAJES)
natural_image
Product photo of CELESTRON® backpack with various optical equipment and accessories (no visible text or symbols)Fig. 2
CÓMO ENSAMBLAR EL TRÍPODE
natural_image
tripod-mounted camera with tripod base and tripod handle (no text or symbols visible)Fig. 3
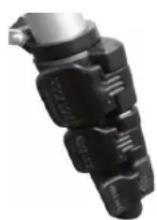
Fig. 4
natural_image
tripod-mounted camera setup with tripod base and tripod legs (no text or symbols)Fig. 5
natural_image
Close-up of a black tripod-mounted camera with adjustable arms (no visible text or symbols)Fig. 6
natural_image
Close-up of a black tripod-mounted camera with a red arrow indicating rotation (no text or symbols visible)Fig. 7

natural_image
Close-up of a black mechanical device with red directional arrows indicating rotation or movement (no text or symbols visible)Fig. 8
natural_image
Close-up of a mechanical clamp or bracket with a red circular motion indicator (no text or symbols visible)Fig. 9
natural_image
Close-up of a black mechanical clamp or bracket with a red arrow indicating rotation (no text or symbols visible)Fig. 10
MOVIMIENTO MANUAL DEL TRAVEL SCOPE
natural_image
Mechanical assembly diagram showing a black cylindrical component with red arrows indicating motion, no text or symbols present.Fig. 11
natural_image
Close-up of a CELESTRON telescope on a tripod, showing its optical components and screen (no text or symbols visible)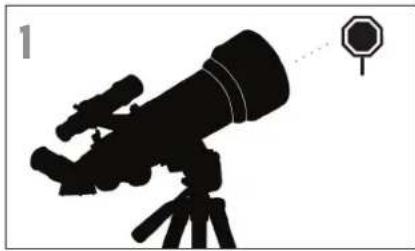
natural_image
Silhouette of a telescope with an octopus target, no text or symbols presentELEGIR UN OBJETO
natural_image
Silhouette of a target with a circular dial and two protruding rods, no text or symbols presentnatural_image
Diagram of a mechanical component with red circular arrows indicating rotational motion (no text or symbols)natural_image
Silhouette of a telescope with a star pointer and a numbered label '5' (no text or symbols on the diagram itself)natural_image
Close-up of a smartphone mounted on a tripod-mounted camera, showing the moon's screen and adjustment knobs (no text or symbols visible)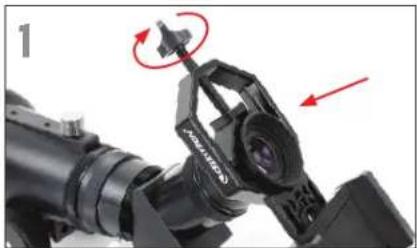
natural_image
Close-up of a camera lens assembly with red arrows indicating motion direction (no text or symbols)natural_image
Close-up of a camera setup with a mounted device and red directional arrows indicating rotation (no text or symbols)natural_image
Black-and-white photo of a handheld device with a globe inside, accompanied by a circular symbol and a numbered label '3' (no readable text or symbols on the device itself)natural_image
Close-up of a mechanical device with black components and a red circular arrow indicating rotation (no visible text or symbols)natural_image
Close-up of a black mechanical component with a red circular arrow indicating rotation or adjustment (no text or symbols visible)natural_image
Hand holding a small object next to a smartphone displaying a moon image, with a camera rig visible nearby (no text or symbols)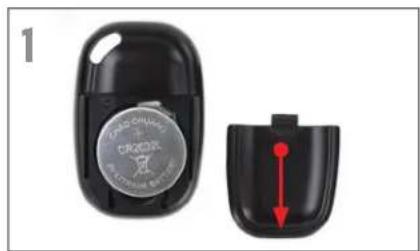
natural_image
Close-up of a black car key with a circular emblem and a red directional arrow indicating movement (no text or symbols)text_image
3 Bluetooth Bluetooth MY DEVICES CAR MULTIMEDIA Not Connected ⓘ OTHER DEVICES GBshutternatural_image
Close-up of a hand holding a small black object, possibly a button or sensor, with no visible text or symbols.natural_image
Black-and-white photo of a tripod-mounted surveying instrument with a smartphone mounted on top (no visible text or symbols)natural_image
Diagram of a mechanical device with rotating components and directional arrows indicating motion (no text or symbols)Lente de Barlow
de 3x
Fig. 13
CÓMO SE DETERMINA EL CAMPO VISUAL
text_image
Diagram of a 3D globe with coordinate axes and directional labels (DEC) indicating orientation relative to the surface.natural_image
Concentric circular arrows forming a spiral pattern (no text or symbols)Stars seen near the north celestial pole Estrellas que se ven cerca del ecuador celeste
natural_image
Diagram showing parallel lines with arrows indicating direction, no text or symbols present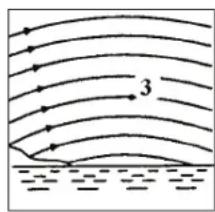
text_image
3natural_image
Close-up of a cratered planetary surface with visible water droplets and no text or symbolsnatural_image
Close-up grayscale image of the planet Jupiter showing its iconic vertical bands against a dark background (no text or symbols)natural_image
Five black-and-white diagrams showing abstract circular patterns with varying dot textures and shapes (no text or symbols)Separate waste collection. Check your local municipal guidelines.
