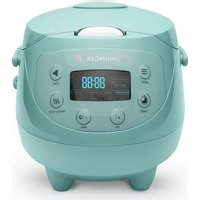
Digitaler Mini - Rice cooker Reishunger - Free user manual and instructions
Find the device manual for free Digitaler Mini Reishunger in PDF.


User questions about Digitaler Mini Reishunger
0 question about this device. Answer the ones you know or ask your own.
Ask a new question about this device
Download the instructions for your Rice cooker in PDF format for free! Find your manual Digitaler Mini - Reishunger and take your electronic device back in hand. On this page are published all the documents necessary for the use of your device. Digitaler Mini by Reishunger.
USER MANUAL Digitaler Mini Reishunger
natural_image
Line drawing of a stylized train or bus head with front and back views (no text or symbols)natural_image
Three simple line drawings: a bowl with mesh pattern, a cup with plastic cup, and a spoon with textured handle (no text or symbols)natural_image
Line drawing of a stylized train or bus head with front and back views (no text or symbols)RICE COOKER 0.6 L DIGITAL MINI USER MANUAL
REISHUNCER.COM
DE
EN
FR
ES
IT
NL
PL
CZE
SVK
CONTENT
1. GENERAL 24
1.1 Scope of delivery
1.2 Important: Prior to first use
2. INTRODUCTION OF OPERATION 26
2.1 Operation panel display
3. COOKING RICE 28
3.1 STANDARD mode
3.2 Special programmes
3.2.1 WHITE mode
3.2.2 BROWN mode
3.2.3 SUSHI mode
3.3 CRISPY mode
3.4 CONGEE mode
7. THE KEEP-WARM FUNCTION 35
8. CLEANING AND MAINTENANCE 36
9. SAFETY INSTRUCTIONS 37
9.1 Model identification
9.2 Place of use
10. WARRANTY 39
11. DISPOSAL 40
1. GENERAL
Your new Digital Mini Rice Cooker from Reishunger prepares rice just the way you like it. And it does so at the touch of a button! You can use it to prepare soup, grains and even bake cakes. But most importantly: you can get truly creative with the best rice varieties from around the world, right in your own kitchen. Or simply keep some grains warm for your evening snack.
How does it work? Well, fully automatically! You only need to know a few key combinations. You can find out what these are in this user manual. But first of all: Congratulations! From now on cooking rice will be even more fun, since with our high-quality Digital Mini Rice Cooker, you have a practical helper by your side in the kitchen. No more burnt rice or long waiting times at the oven. Oh yeah, and: no more never-ending user manuals. However, you should read this through carefully and keep hold of it - and if any questions should still arise, simply send us an email to support@reishunger.de.
But now: let's get going quickly! And let Reishunger satisfy your hunger for rice!
1.1 Scope of delivery
One thing we know: Anyone who is really hungry for rice, will want to start cooking immediately. Therefore we have included everything you need to get started with the Digital Mini Rice Cooker within the scope of delivery. In addition to the appliance itself, you also get a rice spoon, a measuring cup and a special steam insert for your side dishes. All that's missing is the rice! Grain from the best growing regions in the world can be found in our online shop at www.reishunger.de.
1.2 Important: Prior to first use
Before you start: Read through all the instructions for use in this manual – then nothing can go wrong! Also, make sure that all packaging materials have been removed. Take a look at the parts and accessories to make sure that everything is in perfect condition.
We recommend washing the accessories and internal pot with warm soapy water and thoroughly drying them prior to first use. Then fill the internal pot half full with water and boil in the Digital Reishunger Rice Cooker for 20 minutes on STANDARD mode. This can produce an unpleasant smell at first, however, this is quite normal during first use and is not harmful. And that's everything! You are now the touch of a button away from your first spoonful of rice from your new rice cooker.
text_image
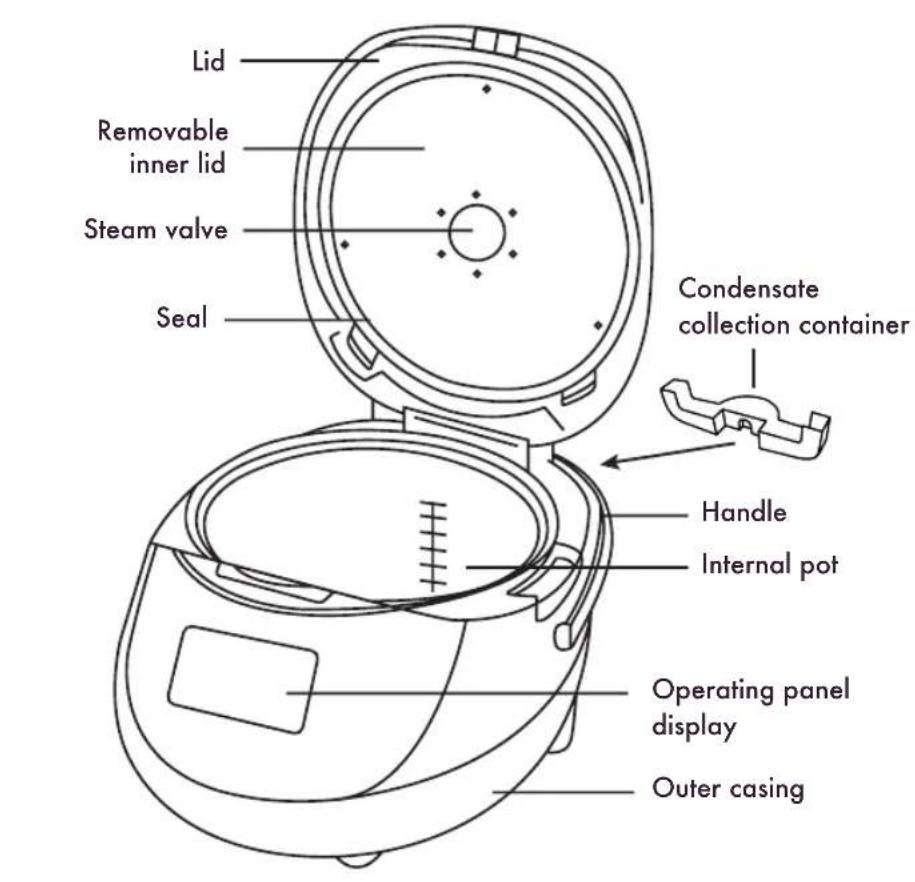
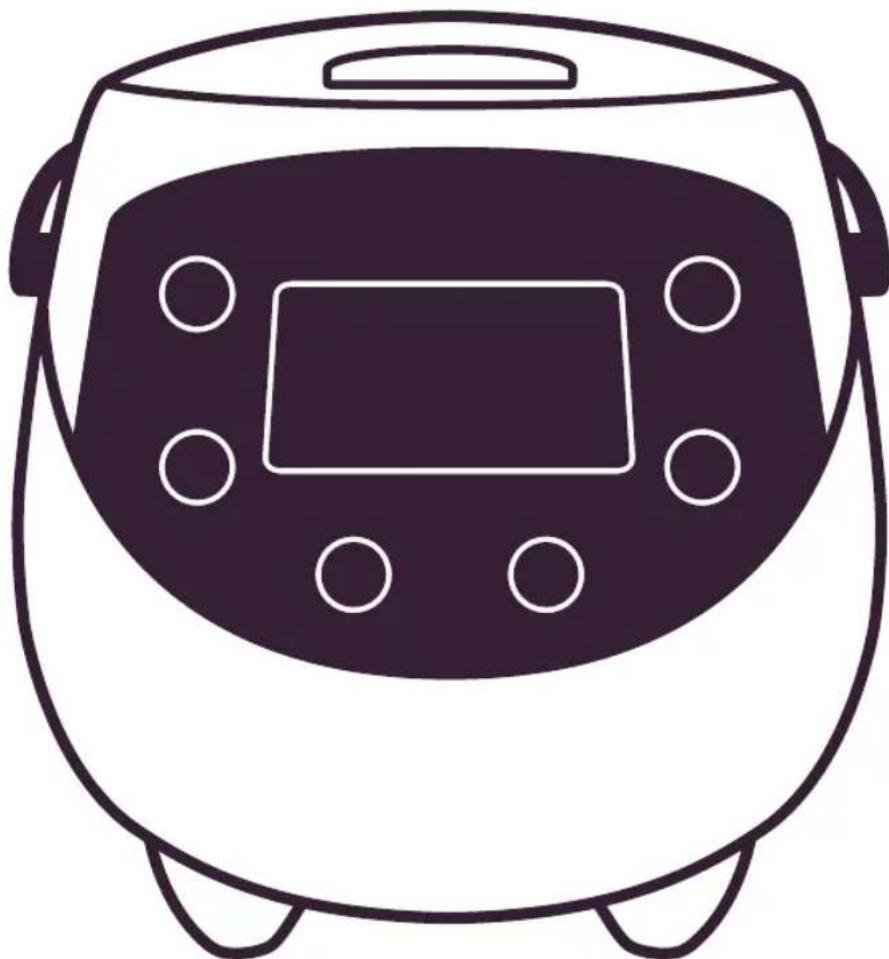
Lid Removable inner lid Steam valve Seal Condensate collection container Handle Internal pot Operating panel display Outer casing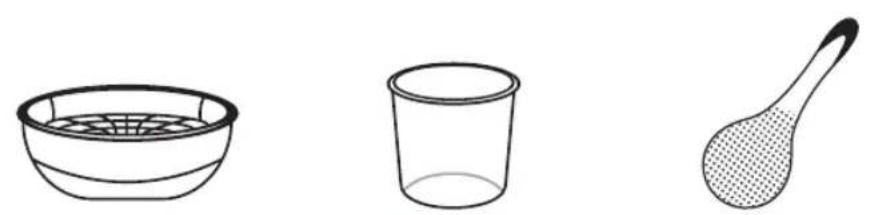
natural_image
Three simple line drawings: a bowl with mesh pattern, a cup with liquid, and a spoon with textured handle (no text or symbols)Steam insert Measuring cup Rice spoon
We have been tinkering for a long time to make the Digital Mini Rice Cooker as intuitive as possible. What you now get is a truly professional appliance, but that can be operated just as easily as a beginner's rice cooker. It offers various modes for the different rice varieties, all of which can be called up in a matter of seconds via an operating panel.
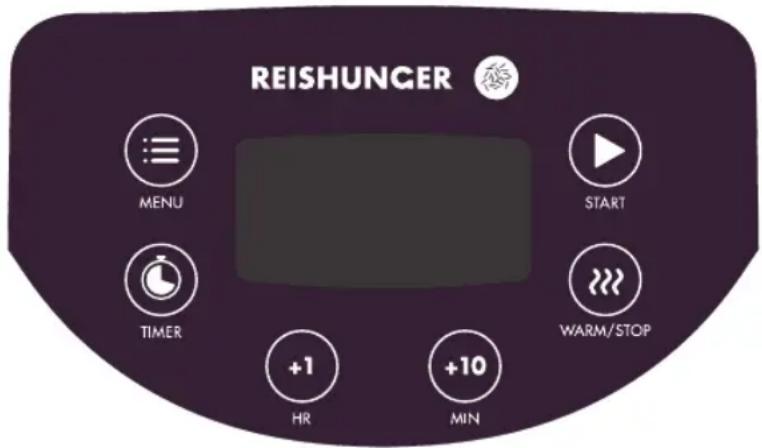
The operating panel consists of the digital display and the buttons that are arranged in a circle around it. The functions shown on the display are selected by pressing the buttons.
The rice cooker is suitable for use by children aged 8 and over, provided they are supervised or you have adequately explained the safe use of the appliance to them. It is important that you talk to the children about the possible dangers and that they understand them before using the appliance. The device should not be cleaned or serviced by children. If the children are older than 8 years, they can do this under your supervision. Store the rice cooker out of the reach of children under 8 years of age.
2.1 Operating panel and display
text_image
REISHUNGER MENU START TIMER +1 +10 HR MINBefore we explain the individual buttons to you, an important note regarding operation: In order to activate the START and WARM / STOP functions just press the respective button. If the corresponding function is triggered, it lights up on the display.

MENU
You can select between different rice programmes using the MENU button.
Important: When you connect the rice cooker to the power supply, the STANDARD programme, with which you can essentially cook any type of rice, is pre-selected. However, we recommend that you select special programmes for an even better result. You can select between programmes in the display by pressing the MENU button. To start a programme, simply press the START button.
Pressing the MENU button takes you to the individual programme.

START
To start the desired programme, just press the START button.

WARM/STOP
As soon as the selected programme is complete, the rice cooker automatically switches into Keep-Warm mode. With the running timer on the display, you can see how long the rice has already been kept warm at any time.
If the rice cooker is connected to the power supply and no programme is selected, you can start the Keep-Warm mode pressing the WARM / STOP button - perfect for heating cooked but cold rice.
To stop the cooking process, press the WARM / STOP button.

TIMER
Using the TIMER button, you can delay the cooking process for up to 24 hours. Simply add rice and water to the device, specify the desired end time for the cooking process using the +1HR or +10MIN buttons, and then enjoy rice exactly when you need it.
Important: Do not set the timer for too long if you want to cook perishable food with it.

HR
Do you prefer it grainer – or especially creamy? With certain programmes you can adjust the preset cooking time to achieve the perfect result to suit your taste.
During the corresponding programmes a timer also lights up on the display. Simply press the +1HR or +10MIN buttons to specify the desired time. Then start the selected programme as usual by pressing the START button.

MIN
3. COOKING RICE
With your new Digital Mini Rice Cooker, you can prepare any type of rice with consummate ease - cooked to utter perfection. It achieves this feat with the help of a special 7-cooking phase technology with 3D heating. Specifically this means: Unlike conventional rice cookers, this appliance does not cook at full power and with high energy consumption throughout the entire cooking process, but rather especially gently, over seven different phases. The supply of heat is adjusted accordingly for the Pre-heating, Water Absorption, Heating, Cooking, Nutrient Retention, Brief Water Absorption and Keep-Warm phases. This means that both resources and nutrients are preserved. And the rice ends up with the perfect amount of bite.
Important:
The maximum fill quantity of the Digital Reishunger Rice Cooker is
• 3,5 measuring cups with husked rice
OR
• 2,5 measuring cups with full grain rice.
Please only use the measuring cup provided for measuring out and do not exceed the specified quantities as otherwise the even cooking of the rice will no longer be guaranteed.
Various rice modes
The Digital Mini Rice Cooker offers a total of eight different modes, with six different rice programmes: the main programmes STANDARD, CRISPY and CONGEE, as well as the special programmes WHITE, BROWN and SUSHI. To start a selected mode, press the START button. To stop it, press the WARM / STOP button. This switches the device into Standby mode.
Estimated cooking time for the various modes
| Selected mode STAND | ARD WHITE BROWN SUSHI | ||
| Cooking time 26 min 2 | 6 min 62 min ca. 30 min |
3.1 'STANDARD' MODE
STANDARD mode is the general cooking programme and is intended for entirely normal (husked) rice. In principle, you can cook all other rice varieties in STANDARD mode - however, we recommend that you select the special programmes when cooking the individual types, in order to achieve an even more delicate result.
In order to prepare rice with the Digital Mini Rice Cooker, there is not much you need to do. Simply proceed as follows:
- Wash the rice. Add the grains to a bowl of water, knead it a few times through with your hands and then pour off the water. Repeat the process once or twice more until the water is clear.
- Pour the rice into the internal pot of the rice cooker.
- Add water. For husked rice we recommend a rice / water ratio of 1:1.25. The consistency of the grain depends considerably on the quantity of water - here it helps to be very precise. You can, however, vary the result by adding water, and thus adjust it to your taste.
- Select the mode. Close the lid of the rice cooker and then press the START button. The cooking process begins. This generally lasts for around half an hour. Preparation is complete as soon as WARM appears on the display. The rice is now kept warm until you remove it.
- Loosen the rice up. Once the rice cooker has been switched into Keep-Warm mode, you should stir the rice with the rice spoon provided. Excess humidity is then released and the rice becomes wonderfully loose.
Rice / water ratio for white rice
| Rice measuring cup 1 2 | 3 3,5 | |||
| Water measuring cup 1 | .25 2.5 3 | .75 4.35 |
3.2 SPECIAL PROGRAMMES
3.2.1 'WHITE' MODE
If you want to prepare husked long-grain rice, then WHITE mode is perfect, for example, it prepares Indian basmati, Persian Sadri and Asian jasmine rice, with the necessary bite. Using the MENU button, select the WHITE mode. The cooking time is around 26 minutes depending on the variety. For preparation, consult the steps and rice / water ratios stated under 3.1.
3.3.2 'BROWN' MODE
With BROWN mode you can prepare all types of unhusked rice, from full grain basmati or full-grain Jasmine rice. Using the MENU button, select the BROWN mode. The cooking time is around 62 minutes depending on the variety. When so doing, note that a maximum of 2,5 measuring cups of rice can be cooked with the Digital Mini Rice Cooker, The rice / water ratio here is 1:1,75. Preparation takes approx. 62 minutes.
Rice / water ratio for full grain rice
| Rice measuring cup 1 2 | 2.5 | ||
| Water measuring cup 1 | .75 3.5 4.35 |
3.3.3 'SUSHI' MODE
For sushi rice, sticky rice and other husked round-grain rice varieties, we recommend the special SUSHI programme – the result here is especially creamy or sticky. Using the MENU button, select the SUSHI mode. To prepare the rice, simply proceed as per 3.1. You can increase the rice / water ratio here slightly and use 1.25 times the quantity of rice to water.
Rice / water ratio for sushi rice
| Rice measuring cup 1 2 | 3 3.5 | |||
| Water measuring cup 1 | .25 2.5 3 | .75 4.35 |
3.4 'CRISPY' MODE
With CRISPY mode, you can adjust your rice for a wonderfully crispy, Persian-inspired Tahdig crust. To do so, press the MENU button until CRISPY mode flashes on the display. Add rice and water to the Digital Mini Rice Cooker as per the preparation recommendation – we recommend a rice / water ratio of 1:1.5. Close the lid and press the START button. The pre-programmed time for the cooking process is 90 minutes. However, you can reduce the cooking time to one hour or increase it to two hours using the +1HR and +10MIN buttons. After 60 minutes the crust is slightly brown, after 90 minutes medium-brown and after up to two hours it is dark brown and especially crispy.
After a certain time, a beep sounds: this signalises that you can open the lid in order to add additional ingredients to the rice cooker. Caution, hot! Close the lid again to continue the cooking process. As soon as preparation is complete, the rice cooker switches automatically into Keep-Warm mode.
3.7 'CONGEE' MODE
Congee is a Chinese rice pudding, which is cooked until the rice has almost dissolved. A delicious dish that is especially wholesome and filling, and that is therefore eaten at all meal times in Asia. Incidentally, the rice pudding is also known as healing porridge, as it is used in Chinese medicine, especially in case of digestive disorders. You can find a host of Congee recipes to try at www.rezepte.reishunger.de. However, you can also prepare porridge, for example, using the programme.
To access CONGEE mode, press the MENU button until the CONGEE field is selected in the display. Add rice and water to the appliance as per the recipe, close the lid and press the START button to begin the cooking process. The preparation time is set to one hour by default – however, you can also increase the time to up to two hours using the +1HR and +10MIN buttons.
As soon as the cooking process is complete, the Digital Mini Rice Cooker switches to Keep-Warm mode.
If you want to use the Digital Mini Rice Cooker as a steamer, you have two options:
- With rice. In order to steam vegetable, for example, while simultaneously cooking rice, select STANDARD mode or on of the special programmes (see 3.2) and place the provided steam insert with the respective ingredients onto the internal pot. Then press the START button.
Important: we recommend adding a maximum of one measuring cups of rice to the rice cooker. If you add larger quantities, the steam basket may be subjected to high pressure during cooking, causing the lid of the rice cooker to burst open. Incidentally: you can also add the food at a later stage. To do so, open the lid of the rice cooker slowly and carefully. Please be very careful when doing so, and be aware of the hot steam that escapes.
- Without rice. If you only want to steam food, press the MENU button repeatedly until the STEAM function appears on the display. Add 1-2 cups water to the internal pot and your chosen food to the steam insert and close the lid. Select the desired cooking time using the +1HR and +10MIN buttons and press the START button to start the steaming process. IMPORTANT: Do not steam foods that are thicker than 3.5cm.
You can prepare any quantity of food with the steam cooker. This table provides a guide, in that we have listed a few cooking times for a selection of foods. However, sometimes the result can deviate, therefore try it out yourself to see how you like it best.
| INGREDIENTS QUANTITY COOKING | TIME | TIPS FOR STEAM COOKING | |
| Carrots 75g 20 min | Cut into bite-sized pieces | ||
| Broccoli 75g 15 min | Cut into bite-sized pieces | ||
| Spinach 40g 15 min | Cut into bite-sized pieces | ||
| Pumpkin 95g 20 min | Cut into bite-sized pieces | ||
| Potato 165g 40 min | Cut into bite-sized pieces | ||
| Sweet potato 110g | 35 min Cut into bite-sized pieces | ||
| Corn 75g 30 min | Cut into bite-sized pieces | ||
| Chicken | 150g | 30 min | Cut surfaces of the chicken should touch the external steaming basket |
| Fish (white fish and salmon) | 75 g / cut into filet pieces | 25 min Cut | to smaller than 2 cm and wrap in aluminium foil. |
| Prawns 75 g / 7 pieces | 20 min Steaming | without removing the husks | |
| Scallops 75g 20 min | Remove the mussel meat from the | mussels (we recommend lining the steam basket with bok choi etc. to stop the mussels from sticking). | |
| Cooled meat pockets (dumplings) | 75g 15 min Allow spaces between the foods. | ||
| Frozen meat pockets (dumplings) | 75g 20 min Allow spaces between the foods. | ||
5. THE BAKE FUNCTION
Your new Digital Mini Rice Cooker not only prepares fantastic rice – it is also suitable for baking cakes. It really is true! And pretty simple. All you need to do is follow these steps:
- Smear the internal pot lightly and evenly with butter.
- Preparing cake mixture. It is best not to use too much baking powder as this can make the cake too heavy. The maximum total weight for all ingredients should not exceed 300 g.
- Place the internal pot on a level, flat surface and pour the cake mixture carefully into the pot. To prevent and remove air bubbles, shake the pot a little and gently hit the outside of the container with the palm of your hand.
- Place the internal pot inside the device and close the lid. Press the MENU button repeatedly until the BAKING function flashes on the operating panel. You can now select the cooking / baking time. By default, this is set to 50 minutes. You can configure a different time setting depending on your requirements and recipe using the +1HR and +10MIN buttons. Then press the START button to begin the baking process.
- When the baking cycle is complete, the device will switch to Keep-Warm mode and the word WARM appears on the display. You can use a toothpick to check whether the cake has fully baked. If this is not the case, press the WARM / STOP button and select BAKING mode once again.
6. SETTING THE TIMER
The TIMER function is a useful setting that helps you have your rice or other food ready at a desired time. You can use the TIMER function for the STANDARD, WHITE, BROWN, SUSHI, CONGEE and STEAM modes.
To set the TIMER, press the MENU button and select the desired cooking programme. Press the TIMER button until the preset time of the mode lights up on the display. You can now use the +1HR and +10MIN buttons to set the time at which the rice or your dish are to be ready. Then press the START button. The rice cooker will now begin to count down until the end of the programme. You can set the time from 70 minutes to up to 24 hours in advance.
7. THE KEEP-WARM FUNCTION
Keep your rice warm – for up to 24 hours! As soon as the Digital Mini Rice Cooker has completed the cooking process, it automatically switches to WARM mode. This is particularly practical, as: this way you can never burn rice again.
You can use the Keep-Warm mode to warm up cold cooked rice. Simply hold down the WARM / STOP button. The WARM / STOP button then lights up and the timer on the display starts running. This way you can always keep an eye on how long you have been keeping the rice warm for.
To end Keep-Warm mode, press the WARM / STOP button. The rice cooker then switches back into Standby mode.
8. CLEANING AND MAINTENANCE
The Digital Mini Rice Cooker is designed for a long lifespan. However, in order that you can reap the benefits for a really long time, you should observe a few care and maintenance instructions.
- After use you must remove all remaining food residue and clean the Digital Reishunger Rice Cooker directly.
- Avoid using metal brushes, scouring brushes or strong chemicals when cleaning – they cause more damage than they are worth. If residues cannot be removed directly, fill the internal pot with water and a little washing-up liquid before you attempt cleaning again.
- Do not, under any circumstances, hold the rice cooker under water! To clean the external housing, you are best to use a damp sponge or a soft cleaning cloth.
- The inner lid can be removed. To do so, simply grab behind the inner lid to pull it off carefully. You should clean the lid in soapy water with a sponge after each use.
- Never put the pot and inner lid in the dishwasher. The washing cycle and chemicals are too aggressive for it. Any damage caused by a dishwasher will not be covered by our warranty.
- The steam cap on the lid can be removed. It too should also be regularly cleaned.
- Only use cooking utensils made of plastic or wood. Metal cutlery can damage the ceramic coating in the internal pot.
- Remove and clean the condensate collection container after every use. Wash it, leave it to dry and then return it back to its position.
- Never clean the internal pot with vinegar. This will also damage the ceramic coating.
• Over time, the colour of the ceramic coating may change. This is completely normal and is no reason for concern.
9. SAFETY INSTRUCTIONS
Please read through the safety instructions thoroughly prior to first using your Digital Reishunger Rice Cooker and keep this user manual safe.
- Do not make any modifications to the rice cooker. Only trained experts may disassemble the appliance and replace internal parts.
- Only move the appliance during the cooking process with the utmost caution. The steam that is released is very hot and the steam outlet valve is positioned close to the handle. Touching the steam outlet valve may cause scalds and burns. Be especially careful that children do not come into contact with the valve.
- Do not touch the power supply if you have wet hands. This may cause an electric shock or other injuries.
- The body, the cable and the plug of the appliance must not be immersed in water.
- Please do not leave any children unsupervised near the appliance during use.
- Never open the lid of the rice cooker while it is in operation. This can cause burns.
- The rice cooker is intended for the cooking of rice and other dishes as specifically described in the user manual. Never use the rice cooker for other purposes. Please always follow the user manual and never cook the following things:
- food packed in plastic
- Dishes for which you require paper towels or other lids to cover the food, as this can block the steam valve.
- Do not insert metal objects into the steam discharge valve. This can result in electric shocks, malfunctions and, in the worst-case scenario, injury.
- Insert the plug full into the socket.
- The rice cooker is intended solely for private use and is not suitable for use in a commercial kitchen. Any commercial use shall render the warranty void.
- Do not use the rice cooker if the plug is not securely in the socket or if the plug is damaged. A plug that is inserted too loosely can result in fire, electric shocks, short circuits or smoke generation.
- Be sure to clean dirty contacts on the plug. Dirt on the plug's contacts can result in fire.
-
Our appliances can be used by persons with reduced physical, sensory or mental capabilities or lack of experience and knowledge if they have been given supervision or instruction concerning use of the appliance in a safe way and understand the hazards involved. Children must not play with the appliance.
-
Remove the plug from the socket when the rice cooker is not in use.
- The rice cooker requires sufficient space at walls, and underneath furnishings and shelves, to allow the steam to escape.
- Do not damage the power supply cable. Under no circumstances should the cable be be kinked, twisted or modified. Never place the cable under or between heavy objects. A damaged power cable can cause electric shock or fire. fire. If your power cable is damaged, you can order a new one from our shop, or from the Customer Service at support@reishunger.de to order a new one.
- Only use the rice cooker with the accessories provided.
- Never place the rice cooker on or near hot surfaces (e.g. hobs).
- After using the rice cooker, do not touch any hot surfaces on the appliance. Be careful when opening the lid of the rice cooker, as hot steam may be released. Take care to only touch the internal pot of the rice cooker on the handles and nowhere else when stirring the rice. Touching metal surfaces – e.g. the inner part of the lide, the internal pot in the rice cooker or the heat plate – can result in burns.
- Place the rice cooker on an easily accessible, level, waterproof, heat-resistant and sufficiently stable work surface. Do not place the rice cooker at the edge of the work surface. Do not place the rice cooker on a surface that cannot bear the weight of the rice cooker. Otherwise the surface may be damaged and the rice cooker may fall, which could result in injury. The table or extending table must have a load-bearing capacity of at least 18 kg.
| DISPLAY STATUS REASON SOLUTION | |||
| E1 | Termination of all processes | Open circuit on lower sensor (below -15°C) | Set the temperature sensor correctly (bring the unit to room temperature) and switch on the power supply again. |
| E2 | Termination of all processes | Open circuit on upper sensor (below -15°C) | Set the temperature sensor correctly (bring the unit to room temperature) and switch on the power supply again. |
| E3 | Termination of all processes | Short circuit on lower sensor (above 190°C) | Set the temperature sensor correctly (bring the unit to room temperature) and switch on the power supply again. |
| E4 | Termination of all processes | Short circuit on upper sensor (above 190°C) | Set the temperature sensor correctly (bring the unit to room temperature) and switch on the power supply again. |
9.1 MODEL IDENTIFICATION
These instructions apply to:
542-MDRK
542-MDRK-PI
542-MDRK-M
542-MDRK-R
542-MDRK-B
542-MDRK-G
9.2 PLACE OF USE
The rice cooker is intended for household use in the kitchen and office. Its use is not recommended in the following cases: Guest house, hotel, motel, boarding houses and their guests, commercial areas, farms.
10. WARRANTY
The warranty is valid for 24 months and covers defects that the product already had at the time of purchase. Liability expires in the event of improper use, unauthorised modification of the product or inadequate monitoring of parts of the device that are subject to wear and tear.
If you encounter a problem with the rice cooker, consult the error list on page 38 of the user manual to see if the problem is listed there. Should you continue to have problems with the appliance, send us an email to support@reishunger.de. Please include your contact details, a description and a photo of the problem.
If you need a spare part, please check our shop to see if you can reorder it. If you cannot find a suitable spare part, please contact our customer service at support@reishunger.de.
This Reishunger rice and multi-function cooker is intended for PRIVATE USE only and is not suitable for commercial use. Any commercial use will invalidate the warranty. Any technical modifications to the product will invalidate any warranty/property defect claim. In the event of improper action, liability for any damage caused as a result is forfeited. Repairs to the device may only be carried out by Reishunger GmbH. Otherwise the warranty claim will be forfeited.
11. DISPOSAL

Disused electrical appliances must be properly disposed of by the owner, separate from the general household waste. Bring the appliance to a waste collection point or a retailer who can take care of this for you. The improper disposal of electrical appliances can have negative environmental and health consequences. Your appliance has been manufactured using the best materials and parts. These materials are recyclable and reusable. This symbol means that electronic components and appliances must be separated from other household waste once they have reached the end of their lifespan. Please dispose of electronic components and appliances at your local recycling centre.

This symbol indicates the compliance of the product with the international directive for the avoidance of hazardous substances (ROHS).

The CE label symbolises the compliance of the product with the valid requirements imposed on the manufacturer by the European Community. This appliance is also certified for resale in the European Economic Area (EEA).
text_image
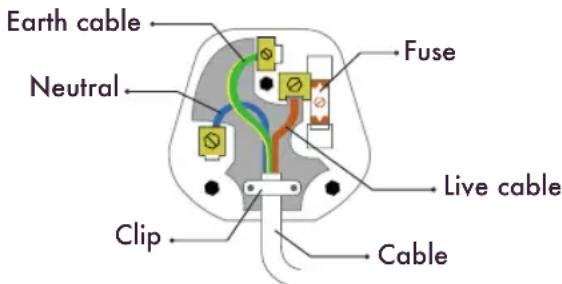
Earth cable Neutral Fuse Live cable Clip CableIMPORTANT! The cables in the main power line are coloured as follows: Green and yellow = earth cable, brown or red = live cable, blue or black = neutral. Connect the earth cable (green and yellow) to the terminal on the plug that is marked with the letter E, or at the earthing
symbol with the colours green and yellow. Connect the neutral cable to the terminal with the letter N, or that is coloured black. Connect the live cable to the terminal marked with the letter L, or that is coloured red.
Voltage: 220 - 240 V\~
Frequency: 50 - 60 Hz
Power: 350 W
Product made in China
REISHUNGER

www.reishunger.comwww.reishunger.com
03.07.2023
REISHUNGER

natural_image
Line drawing of a stylized train or bus head with front and back views (no text or symbols)GUIDE DE L'UTILISATEUR MINI CUISEUR À RIZ NUMÉRIQUE 0.6 L
REISHUNCER.COM
CONTENU
1. GÉNÉRALITÉS 44
natural_image
Line drawing of a stylized train or bus head with front and back views (no text or symbols)MINI HERVIDOR DE ARROZ DIGITAL 0.6 L
REISHUNCER.COM
CONTENIDO
1. GENERAL 64
natural_image
Line drawing of a stylized train or bus with front and back views (no text or symbols)GUIDA ALL'UTILIZZO 0.6 L DIGITALE MINI CUOCI RISO
REISHUNCER.COM
DE
EN
FR
ES
IT
NL
PL
CZE
SVK
INDICE
3.2.3 MODALITÀ 'SUSHI'
natural_image
Line drawing of a stylized train or bus head with front and back views (no text or symbols)DIGITALE MINI-RIJSTKOKER O-6 L GEBRUIKERS- HANDLEIDING
REISHUNCER.COM
DE
EN
FR
ES
IT
NL
PL
CZE
SVK
INHOUD
1. ALGEMEEN 104
natural_image
Three simple line drawings: a bowl with mesh pattern, a cup with liquid, and a spoon with textured handle (no text or symbols)natural_image
Line drawing of a stylized train or bus head with front and back views (no text or symbols)CYFROWY MINI 0.6L RYZOWAR INSTRUKCJA UZYTKOWNIKA
REISHUNCER.COM
DE
EN
FR
ES
IT
NL
PL
CZE
SVK
TREŚĆ
1. INFORMACJE OGÓLNE 124
natural_image
Line drawing of a stylized train or bus head with front and back views (no text or symbols)NÁVOD PRO UZIVATELE DIGITALNI MINI RYZLOVAR 0.6L
REISHUNCER.COM
DE
EN
FR
ES
IT
NL
PL
CZE
SVK
OBSAH
1. OBECNĚ 144
natural_image
Line drawing of a stylized train or bus head with front and back views (no text or symbols)0.6L RYZOVAR DIGITALNI MINI POUŽIVATEL'SKÁ PRÍRUČKA
REISHUNCER.COM