UDDARP - Washing machine IKEA - Free user manual and instructions
Find the device manual for free UDDARP IKEA in PDF.

| Product type | Washer dryer |
| Brand | IKEA |
| Model | UDDARP |
| Dimensions (W x H x D) | 595 x 845 x 572 mm |
| Power supply | 220-240 V, 50 Hz, 10 A |
| Washing capacity | 8 kg |
| Drying capacity | 5 kg |
| Maximum spin speed | 1400 rpm |
| Water pressure | 0.1 - 1 MPa |
| Programs | Mixed, Whites, Cotton, Eco 40-60, Delicates, Synthetics, Steam treatment, Spin & Drain, Rinse & Spin, Quick 30', Cotton 20°, Wool, Wash & Dry 45', Wash & Dry 90' |
| Main functions | Sensor technology, Fresh Plus, Steam treatment, Delayed start, Child lock, Dry only |
| Cleaning and maintenance | Cleaning of water filter, detergent dispenser, door seal and supply hose filters |
| Safety | Child lock, automatic stop, electrical safety |
| Spare parts | Available for 10 years after the last unit |
| Warranty | 5 years |
Frequently Asked Questions - UDDARP IKEA
User questions about UDDARP IKEA
0 question about this device. Answer the ones you know or ask your own.
Ask a new question about this device
Download the instructions for your Washing machine in PDF format for free! Find your manual UDDARP - IKEA and take your electronic device back in hand. On this page are published all the documents necessary for the use of your device. UDDARP by IKEA.
USER MANUAL UDDARP IKEA
Please refer to the last page of this manual for the full list of IKEA appointed Authorized Service Centre and relative national phone numbers.
| Safety Information 5 | Programme Chart 13 |
| About your new product 8 | Cleaning and maintenance 14 |
| Product description 9 | Hints and Tips 17 |
| Control Panel 10 | What to do if... 18 |
| First Use 10 | After-Sales Service 19 |
| Daily use 11 | Technical Data 19 |
| Programmes | 12 Environmental concerns 19 |
| Functions | 12 IKEA GUARANTEE 20 |
Safety Information
IMPORTANT TO BE READ AND OBSERVED
Before using the appliance, read these safety instructions. Keep them nearby for future reference. These instructions and the appliance itself provide important safety warnings, to be observed at all times. The manufacturer declines any liability for failure to observe these safety instructions, for inappropriate use of the appliance or incorrect setting of controls.
⚠️ Very young children (0-3 years) should be kept away from the appliance. Young children (3-8 years) should be kept away from the appliance unless continuously supervised. Children from 8 years old and above and persons with reduced physical, sensory or mental capabilities or lack of experience and knowledge can use this appliance only if they are supervised or have been given instructions on safe use and understand the hazards involved. Children must not play with the appliance. Cleaning and user maintenance must not be carried out by children without supervision. Never open the door forcibly or use it as a step.
PERMITTED USE
⚠️ CAUTION: The appliance is not intended to be operated by means of an external switching device, such as a timer, or separate remote controlled system.
This appliance is intended to be used in household and similar applications such as: staff kitchen areas in shops, offices and other working environments; farm houses; by clients in hotels, motels, bed & breakfast and other residential environments; areas for communal use in blocks of flats or in launderettes.
⚠ Do not load the machine above the maximum capacity (kg of dry cloth) indicated in the programme table.
This appliance is not for professional use. Do not use the appliance outdoors.
Do not use any solvents (e.g. turpentine, benzene), detergents containing solvents, scouring powder, glass or general purpose cleaners, or flammable fluids; do not machine wash fabrics that have been treated with solvents or flammable liquids.
⚠ Do not dry unwashed items in the tumble dryer.
⚠️ Items that have been soiled with substances such as cooking oil, acetone, alcohol, petrol, kerosene, spot removers, turpentine, waxes and wax removers should be washed in hot water with an extra amount of detergent before being dried in the tumble dryer.
⚠️ Items such as foam rubber (latex foam), shower caps, waterproof textiles, rubber backed articles and clothes or pillows fitted with foam rubber pads should not be dried in the tumble dryer.
⚠ Fabric softeners, or similar products, should be used as specified by the fabric softener instructions.
⚠ The final part of a tumble dryer cycle occurs without heat (cool down cycle) to ensure that the items are left at a temperature that ensures that the items will not be damaged.
⚠️ Never stop a tumble dryer before the end of the drying cycle unless all items are quickly removed and spread out so that the heat is dissipated.
⚠️ During the drying phase, the door tends to get quite hot.
⚠ Do not use the appliance to dry clothes that have been washed with flammable solvents (e.g. trichlorethylene).
⚠ Do not use the appliance to dry foam rubber or similar elastomers.
⚠ Make sure that the water tap is turned on during the drying cycles.
⚠️ Remove all objects from pockets such as lighters and matches.
INSTALLATION
The appliance must be handled and installed by two or more persons - risk of injury. Use protective gloves to unpack and install - risk of cuts.
If you want to stack a dryer on top of your washing machine, first contact our Stores or your specialist dealer to verify whether this is possible. This is only possible if the dryer is attached to the washing machine by means of appropriate stacking kit available through our Stores or your specialist dealer.
⚠ Move the appliance without lifting it by the worktop or top lid.
⚠️ Installation, including water supply (if any) and electrical connections and repairs must be carried out by a qualified technician. Do not repair or replace any part of the appliance unless specifically stated in the user manual. Keep children away from the installation site.
After unpacking the appliance, make sure that it has not been damaged during transport. Once installed, packaging waste (plastic, styrofoam parts etc.) must be stored out of reach of children - risk of suffocation. The appliance must be disconnected from the power supply before any installation operation - risk of electric shock. During installation, make sure the appliance does not damage the power cable - risk of fire or electric shock. Only activate the appliance when the installation has been completed.
⚠ Do not install your appliance where it may be exposed to extreme conditions, such as: poor ventilation, temperatures below 5°C or above 35°C.
When installing the appliance make sure that the four feet are stable and resting on the floor, adjusting them as required, and check that the appliance is perfectly to level using a spirit level.
⚠️ If the appliance is being installed on wood or “floating” floors (certain parquet and laminate materials), secure a 60 x 60 x 3 cm (at least) sheet of plywood to the floor then place the appliance on top of this.
⚠️ Connect the water inlet hose(s) to the water supply in accordance with the regulations of your local water company.
The washing machine is fitted with transport bolts to prevent any possible damage to the interior during transport. Before using the machine, it is imperative that the transport bolts are removed. After their removal, cover the openings with the 4 enclosed plastic caps.
⚠️ Make sure that the ventilation openings in the base of your washing machine (if available on your model) are not obstructed by a carpet or other material.
⚠ Use only new hoses to connect the appliance to the water supply. The old hose-sets should not be reused.
⚠ The supply water pressure must be in the 0.1-1 MPa range.
⚠ Do not repair or replace any part of the appliance unless specifically stated in the user manual. Use only authorized Stores. Self or non-professional repair may lead to dangerous incident resulting in live or health threatening and/or significant property damage.
⚠ The spare parts for the household machine will be available for 10 years after placing the last unit on the market as dictated by the European Ecodesign regulation.
ELECTRICAL WARNINGS
⚠ It must be possible to disconnect the appliance from the power supply by unplugging it if plug is accessible, or by a multi-pole switch installed upstream of the socket in accordance with the wiring rules and the appliance must be earthed in conformity with national electrical safety standards.
⚠ Do not use extension leads, multiple sockets or adapters. The electrical components must not be accessible to the user after installation. Do not use the appliance when you are wet or barefoot. Do not operate this appliance if it has a damaged power cable or plug, if it is not working properly, or if it has been damaged or dropped.
⚠️ If the supply cord is damaged, it must be replaced with an identical one by the manufacturer, its service agent or similarly qualified persons in order to avoid a hazard - risk of electric shock.
CLEANING AND MAINTENANCE
⚠ WARNING: Ensure that the appliance is switched off and disconnected from the power supply before performing any maintenance operation. To avoid risk of personal injury use protective gloves (risk of laceration) and safety shoes (risk of contusion); be sure to handle by two persons (reduce load); never use steam cleaning equipment (risk of electric shock). Non-professional repairs not authorized by the manufacturer could result in a risk to health and safety, for which the manufacturer cannot be held liable. Any defect or damage caused from non-professional repairs or maintenance will not be covered by the guarantee, the terms of which are outlined in the document delivered with the unit.
About your new product
Your new washing-machine / dryer is equipped with the following features to help you achieve perfect results.
| Feature Description | |
| Sensor Technology Advanced sensors able to adapt resources detecting the amount and the type of load.This allows to save up to 50%* on energy water and time. (*Comparison between maximum load and 1Kg load on washer with sensors technology and Cotton 60° program). | |
| Fresh Plus End of cycle treatment. After the cycle ends, a perfect combination of gentle steaming and tumbling starts, keeping the garments fresh for up to 6 hours.This treatment reduces the risk of creases formation, and inhibits the proliferation of the main bad odour sources | |
| Steam Care A delicate steam-only program designed to refresh clothes, remove unpleasant odours, relax fibers and smooth creases. | |
| Inverter Motor The motor reliability is ensured by the brushless technology and the inverter control achieve high energy efficiency. | |
| Drum moves Drum moves frequency and duration are tailored to each type of washed items (fabrics, colours and shape) ensuring care and performance. | |
| Drying option Versatile drying options. Customize the drying cycles of your Washer Dryer with the a set of versatile drying options. | |
| Quick 45' Wash & Dry Enjoy better results, faster. The 45 Minute program washes and dries 1 kg of laundry in just 45 minutes, providing the excellent results you deserve, in less time. | |
| Pause / Open the Door / Reload | Simply press the "Pause" button if you wish to add or remove laundry, then press it again to continue the programme. |
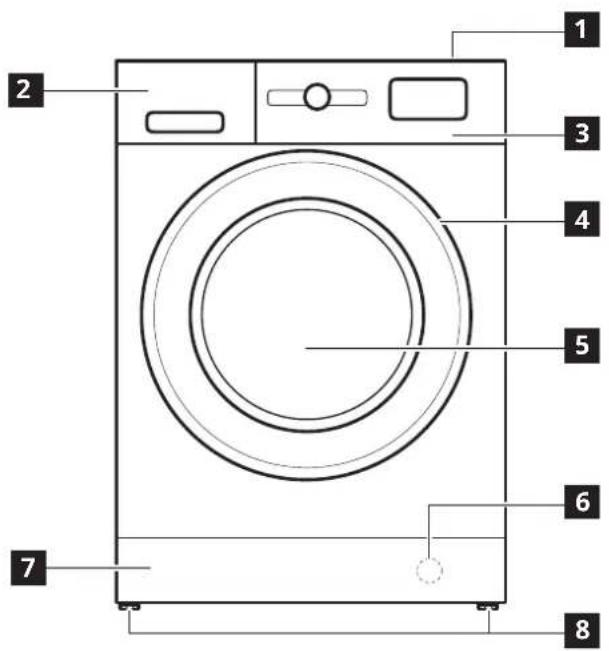
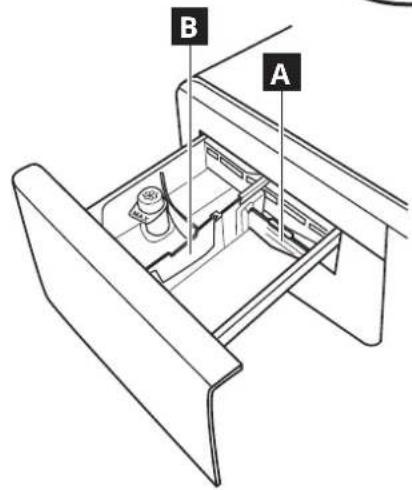
Product description
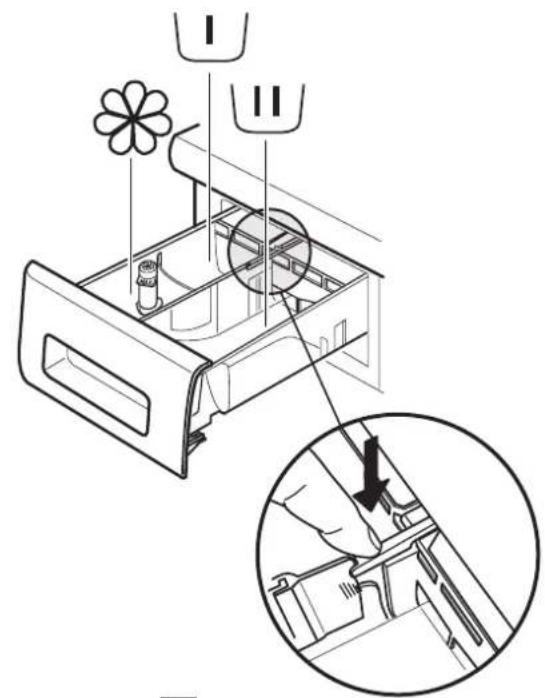
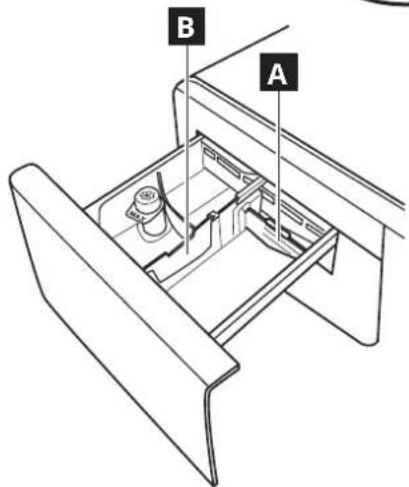
DETERGENT DISPENSER
- Main wash compartment ☺
• Detergent for the main wash
- Stain remover
- Water softener
- Prewash compartment
• Detergent for the prewash
-
Softener compartment
-
Fabric softener
- Liquid starch
⚠️ Pour softener or starch solution into the compartment without exceeding the "MAX" level.
- Release button ↗ (press to remove tray for cleaning)
Preferably use the partition A when washing with a liquid detergent for washing, to ensure that the correct quantity of detergent is used (the partition is included in the bag containing the instructions).
Move the partition into slot B when using detergent powder.
1 Top
2 Detergent dispenser
3 Control panel
4 Door handle
5 Door
6 Water filter - behind kick panel
7 Removable kick panel
8 Adjustable feet (2)

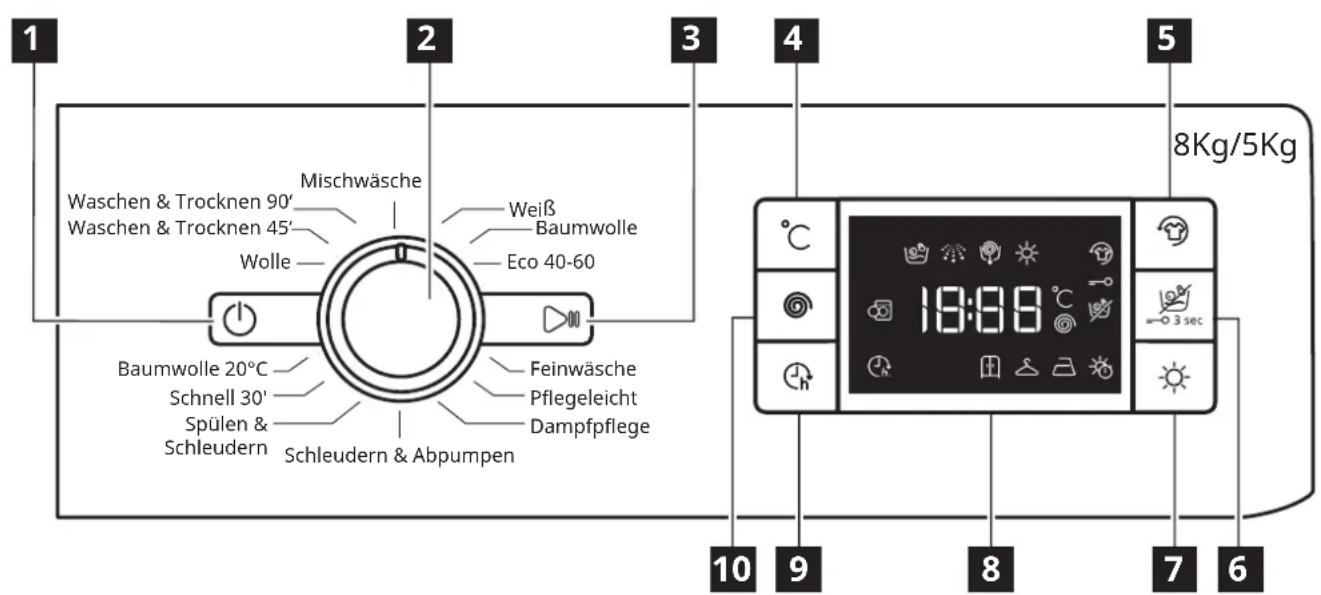
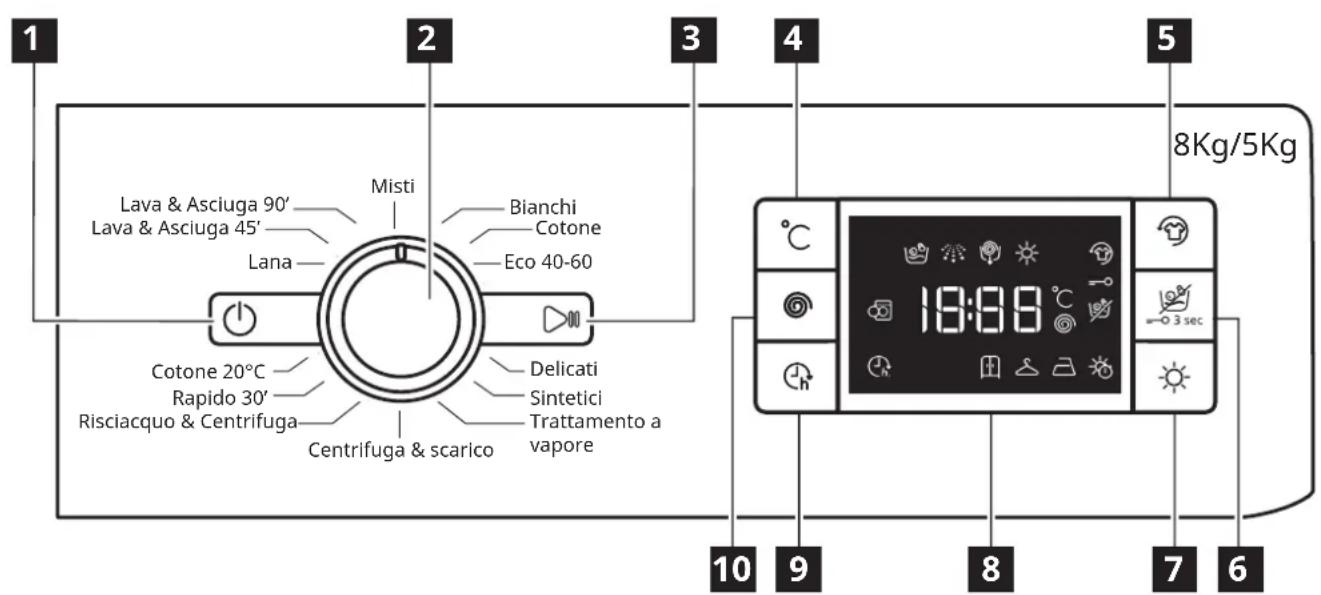
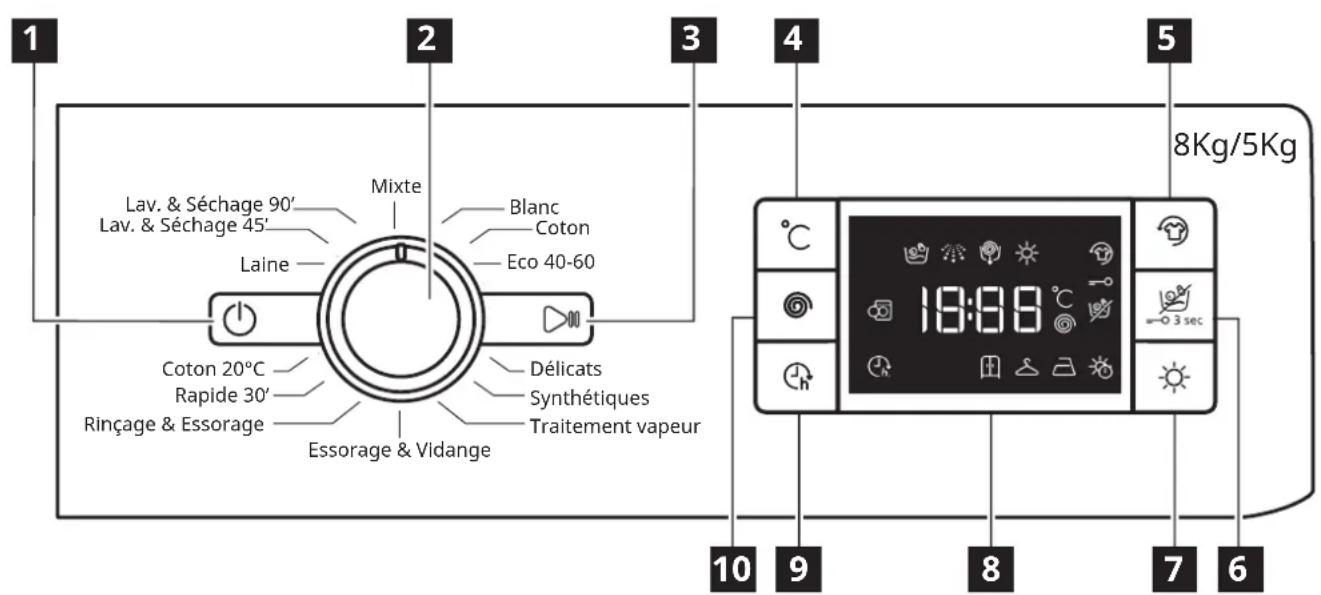
Control Panel
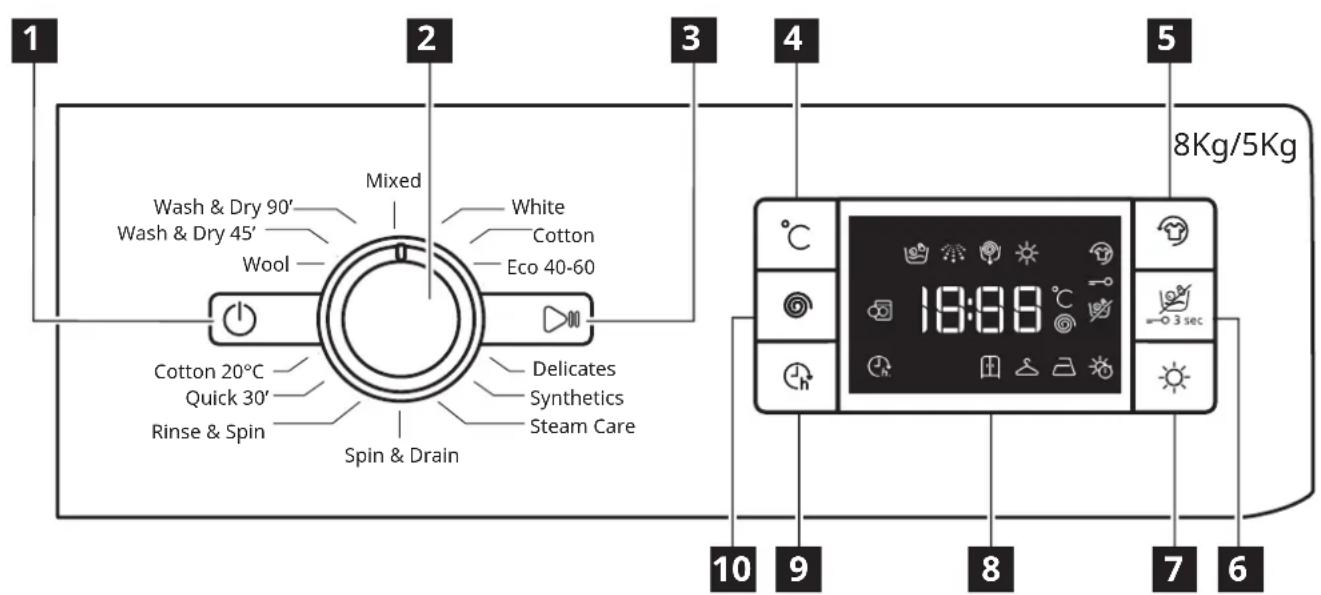
1 ON/OFF button ⏻
2 Programme selector
3 Start/Pause button
4 Temperature button
5 Fresh Plus button
6 Dry Only button/Lock button
7 Drying settings button
8 Display
9 Start delay button
10 Spin speed button
The options/functions are not available with all washing programmes and an option/function can exclude another one, in these case the appliance doesn't allow an incompatible setting.
DISPLAY INDICATORS
 | Fresh Plus | This indicator will light up• after you press Fresh Plus button. |
 | Start delay | This indicator will light up• after you press Start delay button. |
 | Key lock | This indicator will light up• after the “Key lock” function is activated, which is done by pressing the 6 key for 3 seconds. |
First Use
See the section DAILY USE for instructions on selecting and starting a programme.
FIRST CYCLE OPERATION
Remove any manufacturing debris:
- Start the programme without adding any laundry (with empty drum).
-
Select the "Cotton" programme with a temperature setting of 60^ .
-
Pour a small quantity of detergent powder into the main wash compartment of the detergent dispenser (maximum 1/3 of the quantity the detergent manufacturer recommends for lightly soiled laundry).
- Start the programme without loading the washer dryer machine (with empty drum).
Daily use
1. Load laundry
Prepare the laundry, following the recommendations given in the section "HINTS AND TIPS".
Open the door and load the laundry into the drum, without exceeding the maximum load capacities indicated in the Programme Chart.
2. Close door


Pressing until the latch audibly locks, and check that there is no laundry trapped between the door glass and the rubber seal.
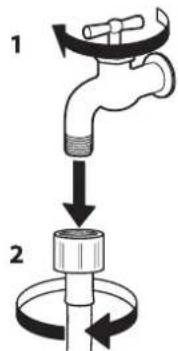
3. Open water tap
Check that the washer dryer is connected correctly to the water mains. Open the water tap. Switching on the washer dryer machine Press button ⏻ the lamp flashes slowly.
4. Selecting a programme and customising a cycle.
The following functions are possible with this appliance:
- Wash only
- Wash and dry
- Dry only
Wash only
Select the required programme with the "Program selector" dial. The washing machine automatically displays the default temperature setting and then the duration of the washing cycle. Adjust the temperature and/or spin speed settings if needed with the relative buttons.
- Press button "Temp" to cycle through progressively lower temperature settings until cold wash is set (-- -") shown on display.
- Press button "Spin speed" to cycle through progressively lower spin speed settings until the spin cycle is turned off ("0" shown on display).
- Pressing the button again sets the highest possible setting.
- Select the required options (if necessary).
- Press the button to select the option; the respective button lamp illuminates.
- Press the button again to cancel the option; the lamp extinguishes.
⚠️ If the selected option is not compatible with the programme set, an error warning tone sounds and the indicator lamp flashes three times. The option is not selected.
Wash and dry
To wash and dry a load with no interruption between the wash and dry cycles, make sure that the load does not exceed the maximum permissible drying load for the selected programme (see the column "Max. load for drying cycle" in the Programme chart).
- Follow the instructions given in the paragraph "Wash Only" to select and, if necessary, customise the required programme.
- Press "Drying settings" to select the required drying mode. Two drying modes are available: automatic or timer. Automatic drying with selectable levels:
In automatic drying mode, the washer dryer machine dries the laundry until the set level of dryness is reached.
Pressing button "Drying settings" once automatically selects the highest drying level available for the selected programme. Press the button again to reduce the drying level.
The following levels are available:
Wardrobe 1 laundry is completely dry and ready to be put away in the wardrobe without ironing. Hanger 2: laundry is left slightly damp to minimise creasing. Garments must be hung to air dry completely. Iron 3 garments are left reasonably damp to make ironing easier.
Timer drying mode:
Press button "Drying settings" repeatedly to set timer drying mode. After cycling through all the automatic drying levels, continue pressing button "Drying settings" until the desired time is displayed. Values from 210 to 30 minutes are settable.
To wash a load of laundry larger than the maximum permissible load for drying (see the column "Max. load for drying cycle" in the Programme chart), remove a few garments once the washing cycle has finished before starting the drying cycle. Proceed as follows:
- Follow the instructions given in the paragraph "Wash Only" to select and, if necessary, customise the required programme.
- Do not include a drying cycle.
- Once the washing cycle is finished, open the door and remove a few garments to reduce the load. Now follow the Instructions for "Dry only".
N.B.: always allow a cooling down period after drying before opening the door.
When using the two preset cycles "Wash & Dry 45" and "Wash & Dry 90", it is not necessary to select and start a drying cycle.
Dry only
This function is used to simply dry a wet load washed previously in the washer dryer or by hand.
- Select a suitable programme for the laundry you want to dry (e.g. select cotton to dry wet cotton laundry).
- Press button "Dry only" to dry without a wash cycle.
- Press "Drying settings" to select the required drying mode. Two drying modes are available: automatic or timer.
Automatic drying with selectable levels:
In automatic drying mode, the washer dryer machine dries the laundry until the set level of dryness is reached. Pressing button "Drying settings" once automatically selects the highest drying level available for the selected programme. Press the button again to reduce the drying level.
The following levels are available:
Wardrobe laundry is completely dry and ready to be put away in the wardrobe without ironing.
Hanger ☐: laundry is left slightly damp to minimise creasing. Garments must be hung to air dry completely.
Iron garments are left reasonably damp to make ironing easier.
Timer drying mode:
Press button "Drying settings" repeatedly to set timer drying mode. After cycling through all the automatic drying levels, continue pressing button "Drying settings" until the desired time is displayed.
Values from 210 to 30 minutes are settable.
N.B.: always allow a cooling down period after drying before opening the door.
5. USING THE CORRECT AMOUNT OF DETERGENT
Pull out the tray and pour detergent into the relative compartments as described in "Detergent dispenser".
This is only necessary when using a wash only or a wash + dry programme.
6. DELAYING THE START OF A PROGRAMME
- To set the selected programme to start at a later time (Max 24h), press the button to set the desired delay time.
- The symbol lights on the display when this function is enabled. To cancel the delayed start, press the button again untile the value, "0" is shown on the display.
7. STARTING A PROGRAMME.
Press the START/PAUSE button.
The relative indicator lamp illuminates with a "beep", the door locks and the door open symbol extinguishes.
To change a programme while a cycle is in progress, press START/PAUSE (confirmation "beep") to pause the washer dryer (the START/ PAUSE lamp flashes amber slowly); then select the required cycle and press START/PAUSE (confirmation "beep") again.
To open the door while a cycle is in progress, press START/PAUSE; the door may be opened if the symbol lights. Press the START/PAUSE button again to resume the programme from where it was paused.
8. CANCELLING A RUNNING PROGRAMME (IF NECESSARY)
Press and hold the button (a) count down is shown in the display until the washer dryer stops. If the water level and temperature are low enough, the door unlocks and may be opened. The door remains locked if there is water in the drum. To unlock the door, switch the washer dryer on, select the SPIN & DRAIN programme and turn the spin function off by setting the spin speed to 0. The water is emptied and the door unlocks at the end of the programme.
9. SWITCHING THE WASHER DRYER OFF AT THE END OF A PROGRAMME.
At the end of the cycle, the message "END" is shown on the display. The door can only be opened when the symbol lights. Check that the door unlocked symbol is lit, then open the door and take out the laundry.
Press ☐ to switch the washer dryer off. To save energy, if the washer dryer is not switched off manually with the ⏻ button, it turns off automatically approximately 10 minutes after the end of the programme.
Leave the door ajar to let the interior of the washer dryer dry.
Programmes
Follow the directions indicated in the garment wash symbols.
MIXED
For washing lightly to normally soiled resilient garments in cotton, linen, synthetic fibres and mixed fibres.
WHITE
For washing normally to heavily soiled towels, underwear, table and bed linen, etc in resilient cotton and linen. Only when the temperature is selected at 90^ C the cycle is provided with a prewash phase before main washing phase. In this case it is recommended to add detergent both, in the prewash and main wash sectionwash section.
COTTON
For washing normally to heavily soiled towels, underwear, table and bed linen etc. in resilient cotton and linen.
ECO 40-60
For washing normally soiled cotton garments. At 40^ C and 60^ C, this is the standard cotton programme and the most efficient in terms of water and energy consumption.
DELICATES
For washing particularly delicate garments.
Preferably turn garments inside out before washing.
SYNTHETICS
For washing normally soiled garments made from synthetic fibres (such as polyester, polyacrylic, viscose etc.) or cotton/synthetic blends.
STEAM CARE
For refreshing garments, neutralised unpleasant odours and relaxing the fibres by delivering steam into the drum. The garments will be damp at the end of the cycle.
SPIN & DRAIN
Spins the load then empties the water. For resilient garments.
RINSE & SPIN
Rinses and then spins. For resilient garments.
QUICK 30'
For washing lightly soiled garments quickly: this cycle lasts only 30 minutes, saving time and energy.
Maximum load 4,5 Kg.
COTTON 20°C
For washing lightly soiled cotton garments, at a temperature of 20^ C.
WOOL
All wool garments can be washed using programme, "Wool" even those carrying the "hand-wash only" label. For best results, use special detergents and do not exceed max kg declaration of laundry.
WASH & DRY 45'
For washing and drying lightly soiled cotton and synthetic fibre garments quickly. This cycle washes and dries a laundry load of up to 1 Kg in just 45 minutes.
WASH & DRY 90'
For washing and drying cotton and synthetic fibre garments quickly.
This cycle washes and dries a laundry load of up to 1 Kg in just 90 minutes.
Functions
Selectable directly by pressing the relative button.
If the selected function is not compatible with the programme set, an error warning tone sounds and the indicator lamp flashes three times. The function is not selected.
FRESH PLUS

If associated with wash cycles, this function increases their performances by generating steam to block proliferation of the main sources of unpleasant odours inside the appliance (exclusively for the wash). After the steam phase, the machine runs a delicate cycle with slow drum rotations. When the Fresh Plus function is associated with drying cycles, it prevents stubborn creases from stabilising on garments, thanks to slow drum rotations.
The Fresh Plus cycle starts at the end of the wash or drying cycle and continues for maximum 6 hours; it can be interrupted at any time by pressing any button on the control panel, or by turning the knob. Wait roughly 5 minutes before opening the door.
START DELAY
To set the selected programme to start at a later time, press the button to set the desired delay time. The symbol lights on the display when this function is enabled. To cancel the delayed start, press the button again until the value, "0" is shown on the display.
LOCK BUTTON = 0
To lock the control panel, press and hold the button "Dry only" for approximately 3 seconds. the symbol lights on the display to indicate that the control panel is locked (with the exception of the button). This prevents unintentional changes to programmes, especially with children near the machine. If any attempt is made to use the control panel, the symbol =0 flashes on the display.
To unlock the control panel, press and hold the button "Dry only" for approximately 3 seconds.
Programme Chart
| Maximum load 8 kgPower input in off mode 0.5 W / in left-on mode 8 W | Detergents and additives | Recommended detergent | Residual dampness (%***) | Energy consumption kWh | Total water lt | Laundry temperature °C | ||||||||||
| Wash cycle | Temperatures | Max spin (rpm) | Drying | Max load for washing (kg) | Max load for drying (kg) | Duration (h: mm) | Prewash | Wash | Fabric softener | Powder | Liquid | |||||
| Setting Range | ||||||||||||||||
| U | U | ※ | ||||||||||||||
| MIXED 40°C - 40°C 1000 8.0 5.0 0:39 - - - - | ✓ | ● | ○ | ✓ | ||||||||||||
| WHITE 60°C - 90°C 1400 8.0 5.0 2:45 | ✓ | ●(90°) | ● | ○ | ✓ | - | 49 | 0.90 | 90 55 | |||||||
| COTTON (2) | 40°C | ● - 60°C | 1400 | ✓ | 8.0 | 5.0 | 3:55 | - | ● | ○ | ✓ | ✓ | 49 | 1.40 | 105 | 45 |
| ECO 40-60 (1)(WASH) | 40°C | 40°C | 1351 | ✓ | 8.0 | 5.0 | 3:30 - | ● | ○ | ✓ | ✓ 53 | 0.77 | 54 33 | |||
| 1351 | ✓ | 4.0 | 2:45 | - | ● | ○ | ✓ | ✓ | 53 | 0.65 | 52 | 36 | ||||
| 1351 | ✓ | 2.0 | 2:10 | ● | ○ | ✓ | ✓ | 53 | 0.45 | 37 | 33 | |||||
| DELICATES | 30°C | ● - 30°C | - | ✓ | 1.0 | 1.0 | 1:20 | - | ● | ○ | - | ✓ | - | - | - | - |
| SYNTHETICS (3) | 40°C | ● - 60°C | 1200 | ✓ | 4.0 | 4.0 | 2:55 | - | ● | ○ | ✓ | ✓ | 35 | 0.8 | 55 | 43 |
| STEAM CARE | - | - | - | - | 2.0 | - | 0:20 | - | - | - | - | - | - | - | - | - |
| SPIN & DRAIN * | - | - | 1400 | ✓ | 8.0 | 5.0 | 0:10 | - | - | - | - | - | - | - | - | - |
| RINSE & SPIN | - | - | 1400 | ✓ | 8.0 | 5.0 | 0:55 | - | - | ○ | - | - | - | - | - | - |
| QUICK 30' | 30°C | ● - 30°C | 800 | - | 4.5 | - | 0:30 | - | ● | ○ | - | ✓ | 71 | 0.20 | 45 | 27 |
| COTTON 20°C | 20°C | ● - 20°C | 1400 | ✓ | 8.0 | 5.0 | 1:50 | - | ● | ○ | - | ✓ | 49 | 0.16 | 90 | 22 |
| WOOL | 40°C | ● - 40°C | 800 | ✓ | 2.0 | 2.0 | 1:25 | - | ● | ○ | - | ✓ | - | - | - | - |
| WASH & DRY 45' | 30°C | 30°C | 1400 | ✓ | 1.0 | 1.0 | 0:45 | - | ● | ○ | - | ✓ | - | - | - | - |
| WASH & DRY 90' | 30°C | 30°C | 1200 | ✓ | 2.0 | 2.0 | 1:30 | - | ● | ○ | - | ✓ | - | - | - | - |
| ECO 40-60 (4)(WASH&DRYING) | 40°C | 40°C | 1351 | ✓ | 5.0 | 5.0 | 9:10 | ● | ○ | ✓ | ✓ | 0 | 3.30 | 70 | 34 | |
| 1351 | ✓ | 2.5 | 2.5 | 5:10 | ● | ○ | ✓ | ✓ | 0 | 1.69 | 50 | 33 | ||||

Selectable/optional
- Not selectable/applicable
- Required quantity
○ Optional quantity
Sensor technology - the sensor technology adapts water, energy and programme duration to your wash load.
⚠ For wash programmes with temperatures above 50^ C, we recommend using powder detergent rather than liquid, and following the directions given on the detergent package.
* By selecting the cycle and excluding the spin cycle, the washer-dryer will drain only.
*** After programme end and spinning with maximum selectable spin speed, in default programme setting.
The cycle duration indicated on the display or instruction manual is an estimate based on standard conditions. The actual duration may vary in relation to several factors, such as the temperature and pressure of the incoming water, ambient temperature, amount of detergent, load quantity and type, load balancing and any additional options selected. The values given for programmes other than the Eco 40-60 programme are indicative only.
1) Eco 40-60 (Wash) - Test wash cycle in compliance with EU Ecodesign regulation 2019/2014.
The most efficient programme in terms of energy and water consumption for washing normally soiled cotton laundry.
Note: spin speed values shown on the display can slightly differ from the values stated in the table.
4) Eco 40-60 (Wash & Drying) - Test wash and drying cycle in compliance with EU Ecodesign regulation 2019/2014.
To access "wash and dry" cycle select "Eco 40-60" wash programme and set option level to ",". The most efficient programme in terms of energy and water consumption for washing and drying normally soiled cotton laundry. At the end of cycle the garments can be immediately stored to the cupboard.
For all testing institutes:
2) Long cotton cycle: set programme at temperature 40^ C.
3) Long synthetics cycle: set cycle at a temperature of 40^ C.
Cleaning and maintenance
For any cleaning and maintenance, switch off and unplug the washing machine.
Do not use flammable fluids to clean the washing machine.
CLEANING THE OUTSIDE OF THE WASHING MACHINE
Use a soft damp cloth to clean the outer parts of the washing machine.
Do not use glass or general purpose cleaners, scouring powder or similar to clean the control panel – these substances might damage the printing.
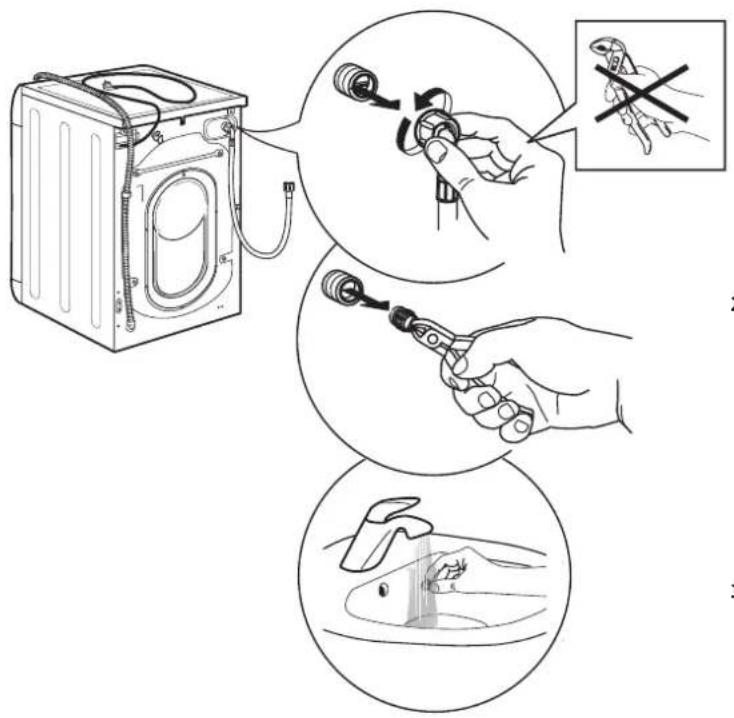
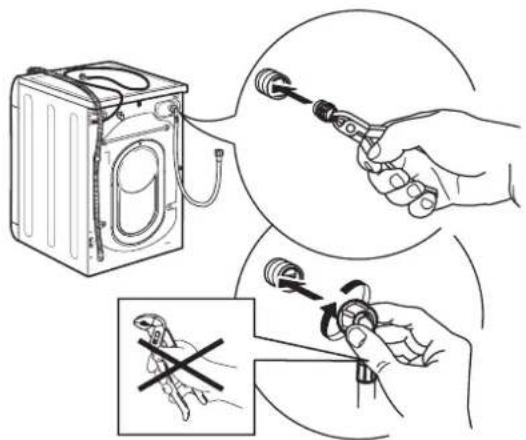
CHECKING THE WATER SUPPLY HOSE
Check the Inlet hose regularly for brittleness and cracks. If damaged, replace it by a new hose available through our After-Sales Service or your specialist dealer.
Depending on the hose type:
If the inlet hose has a transparent coating, periodically check if the colour intensifies locally. If yes, the hose may have a leak and should be replaced.
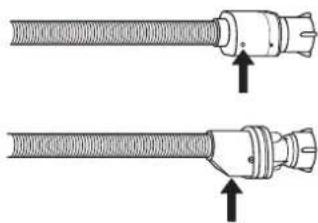
natural_image
Two diagrams showing a coiled cable or hose with connectors, each with an upward arrow indicating direction (no text or symbols present)For water stop hoses: check the small safety valve inspection window (see arrow). If it is red, the water stop function was triggered, and the hose must be replaced by a new one. For unscrewing this hose, press the release button (if available) while unscrewing the hose.
CLEANING THE MESH FILTERS IN THE WATER SUPPLY HOSE
- Close water tap and unscrew the inlet hose.
- Clean the mesh filter at the hose's end carefully with a fine brush.
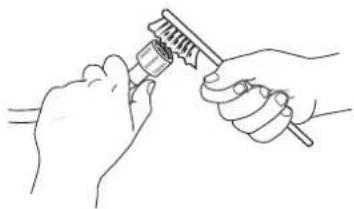
natural_image
Line drawing of two hands using a tool to apply a brush (no text or symbols present)- Now unscrew the inlet hose on the back of the washing machine by hand. Pull out the mesh filter from the valve on the back of the washing machine with pliers and carefully clean it.
- Insert the mesh filter again. Connect the inlet hose to water tap and washing machine again. Do not use a tool to connect the inlet hose. Open the water tap and check that all connections are tight.

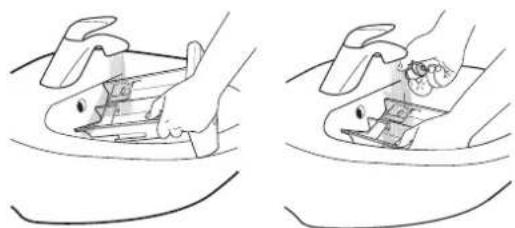
CLEANING THE DETERGENT DISPENSER
- Remove the detergent dispenser by pressing on the release button and at the same time pulling out the detergent dispenser.
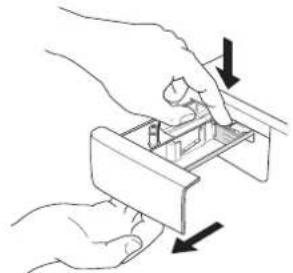
natural_image
Illustration of hands using a tool to adjust or install a small electronic component (no text or symbols visible)- Remove the insert from the softener compartment.

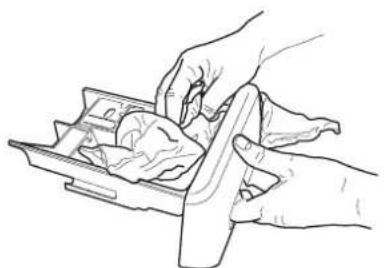
natural_image
Line drawing of hands using a tool to press or install a document (no text or symbols visible)- Clean all parts under running water, removing all detergent or softener residues.
natural_image
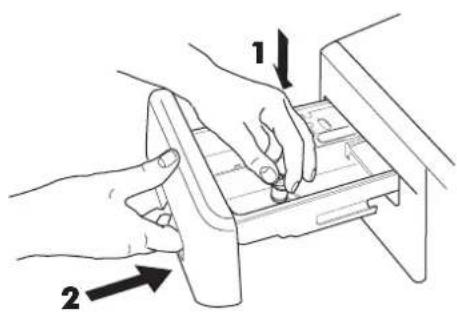
Two line drawings showing hands performing a manual tool on a surface, no text or symbols present- Wipe the parts dry with a soft cloth.
natural_image
Line drawing of hands handling a tray with food items (no text or symbols)- Reinstall the detergent dispenser and push it back into the detergent compartment.
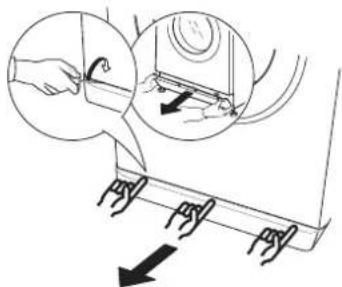
CLEANING THE WATER FILTER / DRAINING RESIDUAL WATER
⚠️ Switch off and unplug the washing machine before cleaning the water filter or draining residual water. If you used a hot wash programme, wait until the water has cooled down before draining any water.
Clean the water filter regularly, to avoid that the water cannot drain after the wash due to obstruction of the filter.
If the water cannot drain, the display indicates that the water filter may be clogged.
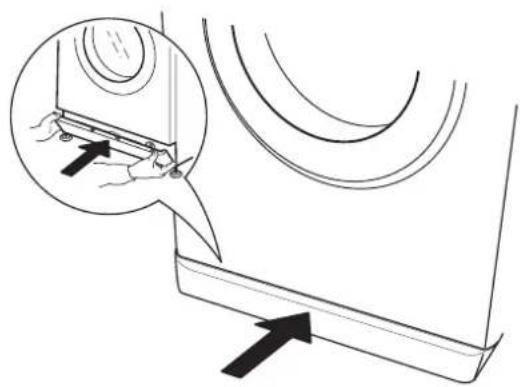
- Remove the kick panel:
using a screwdriver, do that which is shown in the following figure.
- Container for the drained water:
place a low and wide container under the water filter in order to collect the residual water.

natural_image
Technical line drawing of a mechanical assembly with no visible text or symbols- Drain the water:
slowly turn the filter counter-clockwise until all the water has come out. Allow the water to flow out without removing the filter. Once the container is full, close the water filter by turning it clockwise. Empty the container.
Repeat the procedure until all the water has been drained.
natural_image
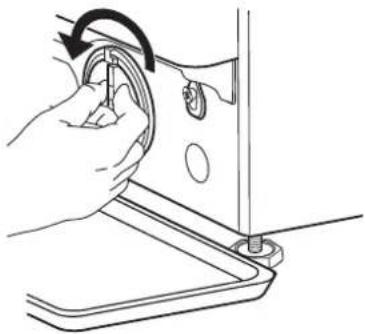
Line drawing of a hand using a tool to press or adjust a component, no text or symbols present- Remove filter:
lay a cotton cloth beneath the water filter, which can absorb a small amount of rest water. Then remove the water filter by turning it out anticlockwise.
natural_image
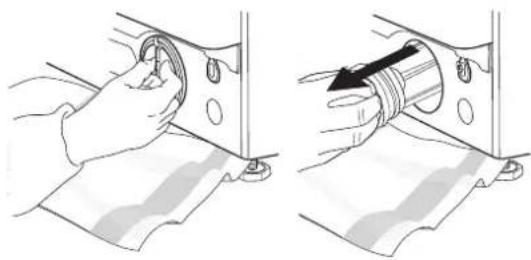
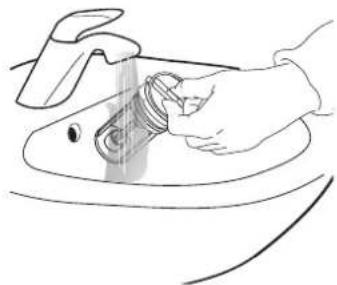
Illustration showing two-step fabric cutting process: one using a knob to cut fabric, the other using a tool to cut fabric (no text or symbols)- Clean the water filter:
remove residues in the filter and clean it under running water.
natural_image
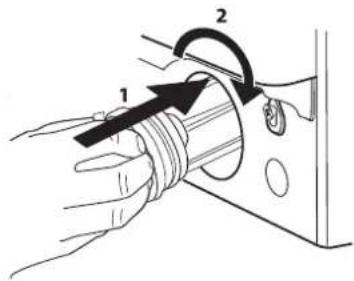
Line drawing of a hand using a tool to clean or wash a surface (no text or symbols)- Insert the water filter and reinstall the plinth:
reinsert the water filter again by turning it in clockwise direction. Make sure to turn it in as far as it goes; the filter handle must be in vertical position. To test water tightness of the water filter, you can pour about 1 liter of water into the detergent dispenser. Then reinstall the plinth.
natural_image
Technical diagram showing a mechanical component with an inset close-up of a tool interacting with a curved component (no text or symbols present)Hints and Tips
Sort your laundry according to
Type of fabric/care label (cotton, mixed fibres, synthetics, wool, handwash items).
Colour (separate coloured and white items, wash new coloured items separately).
Delicates (wash small items – like nylon stockings – and items with hooks – like bras – in a cloth bag or pillow case with zip).
Empty all pockets
Objects like coins or lighters can damage your laundry as well as the drum.
Follow the dosage recommendation / additives
It optimizes the cleaning result, it avoids irritating residues of surplus detergent in your laundry and it saves money by avoiding waste of surplus detergent.
Use low temperature and longer duration
The most efficient programmes in terms of energy consumption are generally those that perform at lower temperatures and longer duration.
Observe the load sizes
Load your washing machine up to the capacity indicated in the "PROGRAMME CHART" table to save water and energy.
Noise and remaining moisture content
They are Influenced by the spinning speed: the higher the spinning speed in the spinning phase, the higher the noise and the lower the remaining moisture content.
WASH SYMBOLS ON GARMENT LABELS
The value given in the tub symbol is the maximum temperature possible for washing the garment.

Normal mechanical action

Reduced mechanical action

Much reduced mechanical action

Hand wash only

Do not wash
SAVING ENERGY AND PROTECTING THE ENVIRONMENT
- Keeping within the load limits indicated in the programme chart will optimise energy, water and detergent consumption and reduce washing times.
- Do not exceed the detergent quantities recommended by the detergent manufacturer.
- Save energy by using a 60°C instead of a 90°C wash programme, or by using a 40°C instead of a 60°C wash programme. We recommend using the Eco 40-60 programme for cotton garments, which is longer but uses less energy.
- To save energy and time when washing and drying, select highest spin speed available for the programme to reduce the residual water remaining in the garments at the end of the wash cycle.
What to do if...
Your washing machine is equipped with various automatic safety and feedback functions.
They enable failures and needed maintenance to be detected and indicated accordingly.
These failures are frequently so minor that they can be removed within a few minutes.
| Problem Possible causes / Solutions: | |
| The washing machine does not turn on. | · The plug is not inserted into the electrical outlet, or not enough to make contact.· There has been a power failure.· The door is not fully closed. |
| The wash cycle does not start. | · The “ON/OFF” button has not been pressed.· The “Start/Pause” button has not been pressed.· The water tap is not open.· A “Start delay” has been set. |
| The washing machine does not fill with water (the message “h2o” is shown on the display). “Beep” sound every 5 seconds. | · The water intake hose is not connected to the tap.· The hose is bent.· The water tap is not open.· The mains water supply has been shut off.· There is not enough pressure. |
| The washing machine loads and drains water continuously. | · The “Start/Pause” button has not been pressed.· The drain hose has not been installed at 65 to 100 cm from the ground.· The end of the drain hose is immersed in water.· The drain connector on the wall does not have an air vent.· If the problem persists after having performed these checks, close the water tap, shut off the washing machine, and call the After-sales service. If the dwelling is located on one of the uppermost floors of a building, a siphon effect can sometimes occur, thus causing the washing machine to load and drain water continuously. Special anti-siphon valves are available on the market to prevent these types of problems. |
| The washing machine does not drain or does not spin. | · The programme does not include the draining function: with certain programmes it must be activated manually.· The drain hose is bent.· The drain line is obstructed. |
| The washing machine vibrates excessively during the spin cycle. | · At the time of installation, the drum was not properly unblocked.· The washing machine is not level.· The washing machine is squeezed between furniture and the wall. |
| The washing machine leaks water · The water intake hose has not been tightened properly.· The detergent dispenser is clogged.· The drain hose has not been properly fastened. | |
| The machine is locked and the display flashes, indicating an error code (e.g. F-01, F-..). | · Shut off the machine, disconnect the plug from the outlet, and wait about 1 minute before turning it back on.· If the problem persists, call the After-sales service. |
| Too much foam is formed. | · The detergent is not compatible with the washing machine (it must bear the wording “for washing machines”, “for hand washing and washing machines”, or something similar).· The dosage was excessive. |
| Door is locked, with or without failure indication, and the programme does not run. | · Door is locked in case of power breakdown. Programme will continue automatically as soon as the mains is available again.· Washing machine is in a standstill. Programme will continue automatically after the origin of the standstill does not persist anymore. |
After-Sales Service
Before contacting the After-Sales Service:
- See if you can solve the problem yourself with the help of the suggestions given in the "What to do if ..." table.
- Switch the appliance off and back on again it to see if the fault persists.
If after the above checks the fault still occurs, contact IKEA Authorized Service Centre.
Always specify:
- a brief description of the fault;
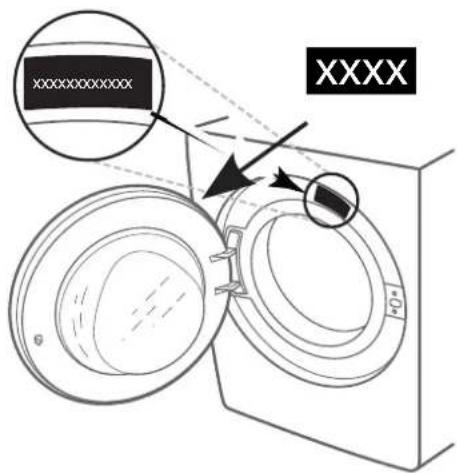
• the type and exact model of the appliance; - the service number (number after the word Service on the rating plate);

0000 000 00000
- your full address;
- your telephone number.
If any repairs are required, please contact IKEA Authorized Service Centre (to guarantee that original spare parts will be used and repairs carried out correctly).
Technical Data
| Product Dimension Width (mm) 595 | ||
| Height (mm) 845 - | 855 | |
| Depth (mm) 572 | ||
| Water connection | ||
| Water supply Cold | ||
| Water tap 3/4" threaded hose connector | ||
| Minimum water supply pressure 100 kPa (1 bar) | ||
| Maximum water supply pressure 1000 kPa (10 bar) | ||
| Voltage Rating [V / Hz / A] 220-240 V / 50 Hz / 10 A | ||
Environmental concerns
Disposal of packaging materials
The packaging material is 100% recyclable and is marked with the recycle symbol
The various parts of the packaging must therefore be disposed of responsibly and in full compliance with local authority regulations governing waste disposal.
Disposal of household appliances
This appliance is manufactured with recyclable or reusable materials.
Dispose of it in accordance with local waste disposal regulations. For further information on the treatment, recovery and recycling of household electrical appliances, contact your local authority, the collection service for household waste or the store where you purchased the appliance. This appliance is marked in compliance with European Directive 2012/19/EU, Waste Electrical and Electronic Equipment (WEEE).
By ensuring this product is disposed of correctly, you will help prevent negative consequences for the environment and human health.

The symbol on the product or on the accompanying documentation indicates that it should not be treated as domestic waste but must be taken to an appropriate collection center for the recycling of electrical and electronic equipment.
TRANSPORT AND HANDLING
⚠️ Never lift the washing machine by holding it at the worktop.
- Pull out the mains plug, and close the water tap.
- Make sure that door and detergent dispenser are properly closed.
- Disconnect the inlet hose from the water tap, and remove the drain hose from your draining point. Remove all rest water from the hoses, and fix them so that they cannot get damaged during transport.
- Refit the transport bolts. Follow the instructions for removing the transport bolts in the "Installation Guide" in reverse order.
Do not transport the washing machine without having fixed the transport bolts.
IKEA GUARANTEE
How long is the IKEA guarantee valid?
This guarantee is valid for five years from the original date of purchase of your appliance at IKEA. The original sales receipt, is required as proof of purchase. If service work is carried out under guarantee, this will not extend the guarantee period for the appliance.
Who will execute the service?
IKEA service provider will provide the service through its own service operations or authorized service partner network.
What does this guarantee cover?
The guarantee covers faults of the appliance, which have been caused by faulty construction or material faults from the date of purchase from IKEA. This guarantee applies to domestic use only. The exceptions are specified under the headline "What is not covered under this guarantee?" Within the guarantee period, the costs to remedy the fault e.g. repairs, parts, labour and travel will be covered, provided that the appliance is accessible for repair without special expenditure. On these conditions the EU guidelines (Nr. 99/44/EG) and the respective local regulations are applicable. Replaced parts become the property of IKEA.
What will IKEA do to correct the problem?
IKEA appointed Service Provider will examine the product and decide, at its sole discretion, if it is covered under this guarantee. If considered covered, IKEA Service Provider or its authorized service partner through its own service operations, will then, at its sole discretion, either repair the defective product or replace it with the same or a comparable product.
What is not covered under this guarantee?
• Normal wear and tear.
- Deliberate or negligent damage, damage caused by failure to observe operating instructions, incorrect installation or by connection to the wrong voltage, damage caused by chemical or electrochemical reaction, rust, corrosion or water damage including but not limited to damage caused by excessive lime in the water supply, damage caused by abnormal environmental conditions.
- Consumable parts including batteries and lamps.
- Non-functional and decorative parts which do not affect normal use of the appliance, including any scratches and possible color differences.
- Accidental damage caused by foreign objects or substances and cleaning or unblocking of filters, drainage systems or soap drawers.
- Damage to the following parts: ceramic glass, accessories, crockery and cutlery baskets, feed and drainage pipes, seals, lamps and lamp covers, screens, knobs, casings and parts of casings. Unless such damages can be proved to have been caused by production faults.
- Cases where no fault could be found during a technician's visit.
- Repairs not carried out by our appointed service providers and/or an authorized service contractual partner or where non-original parts have been used.
- Repairs caused by installation which is faulty or not according to specification.
- The use of the appliance in a non-domestic environment i.e. professional use.
- Transportation damages. If a customer transports the product to his home or another address, IKEA is not liable for any damage that may occur during transport. However, if IKEA delivers the product to the customer's delivery address, then damage to the product that occurs during this delivery will be covered by IKEA.
- Cost for carrying out the initial installation of the IKEA appliance.
• However, if an IKEA appointed Service Provider or its authorized service partner repairs or replaces the appliance under the terms of this guarantee, the appointed Service Provider or its authorized service partner will reinstall the repaired appliance or install the replacement, if necessary.
- This does not apply within Ireland, customer should contact the local IKEA dedicated after sales line or the appointed Service Provider for further information. (just for GB)
These restrictions do not apply to fault-free work carried out by a qualified specialist using our original parts in order to adapt the appliance to the technical safety specifications of another EU country.
How country law applies
The IKEA guarantee gives you specific legal rights, which cover or exceed all the local legal demands. However these conditions do not limit in any way consumer rights described in the local legislation.
Area of validity
For appliances which are purchased in one EU country and taken to another EU country, the services will be provided in the framework of the guarantee conditions normal in the new country.
An obligation to carry out services in the framework of the guarantee exists only if the appliance complies and is installed in accordance with:
- the technical specifications of the country in which the guarantee claim is made;
- the Assembly Instructions and User Manual Safety Information.
The dedicated AFTER SALES for IKEA appliances
Please don't hesitate to contact IKEA appointed Authorized Service Centre to:
• make a service request under this guarantee;
- ask for clarifications on installation of the IKEA appliance in the dedicated IKEA kitchen furniture;
- ask for clarification on functions of IKEA appliances.
To ensure that we provide you with the best assistance, please read carefully the Assembly Instructions and/or the User Manual before contacting us.
How to reach us if you need our service
Please refer to the last page of this manual for the full list of IKEA appointed Authorized Service Centre and relative national phone numbers.
In order to provide you a quicker service, we recommend to use the specific phone numbers listed on this manual. Always refer to the numbers listed in the booklet of the specific appliance you need an assistance for. Please also always refer to the IKEA article number (8 digit code) and 12 digit service number placed on the rating plate of your appliance.
i SAVE THE SALES RECEIPT!
It is your proof of purchase and required for the guarantee to apply. The sales receipt also reports the IKEA name and article number (8 digit code) for each of the appliances you have purchased.
Do you need extra help?
For any additional questions not related to After Sales of your appliances please contact your nearest IKEA store call centre. We recommend you read the appliance documentation carefully before contacting us.
Inhaltsverzeichnis

Bedienfeld
natural_image
Two illustrations of a coiled cable or hose with connectors and arrows indicating direction (no text or symbols)natural_image
Line drawing of two hands using a tool to adjust or install a mechanical component (no text or symbols present)
natural_image
Illustration of hands assembling a small electronic component with arrows indicating assembly direction (no text or symbols)natural_image
Line drawing of hands using a handheld device to press or install a document (no text or symbols visible)natural_image
Two line drawings showing hands performing a manual tool on a surface, no text or symbols presentnatural_image
Line drawing of hands handling a tray with food items (no text or symbols)natural_image
Technical line drawing of a mechanical assembly with no visible text or symbolsnatural_image
Line drawing of a hand using a sewing machine to adjust a cable or wire (no text or symbols present)natural_image
Illustration showing two steps of fabric cutting or sewing process, with no visible text or symbolsnatural_image
Line drawing of a hand using a tool to clean or wash a cylindrical object on a surface (no text or symbols)
natural_image
Diagram showing a mechanical component with an inset close-up of a tool interacting with a curved component (no text or symbols present)Tipps und Hinweise
Technische Daten
Pannello comandi
natural_image
Two types of cable connectors with threaded ends and connectors, shown in line and angle indicators (no text or symbols)natural_image
Line drawing of two hands using a tool to apply a brush (no text or symbols present)
PULIZIA DELLA VASCHETTA DEL DETERSIVO
natural_image
Illustration of hands assembling a small electronic component with arrows indicating assembly direction (no text or symbols)natural_image
Line drawing of hands using a tool to press or install a component (no text or symbols visible)natural_image
Two-step line drawings showing hands performing a mechanical or electrical component assembly (no text or symbols)natural_image
Line drawing of hands handling a tray with food items (no text or symbols)PULIZIA DEL FILTRO DELL'ACQUA / SCARICO DELL'ACQUA RESIDUA
natural_image
Technical line drawing of a mechanical component with mounting flanges and a central rod (no text or symbols)- Scaricare l'acqua:
natural_image
Line drawing of a hand using a sewing machine to adjust a component (no text or symbols present)natural_image
Two-step diagram showing hands using a tool to adjust or install a sheet of paper (no text or symbols present)natural_image
Line drawing of a hand using a tool to clean or wash a surface (no text or symbols)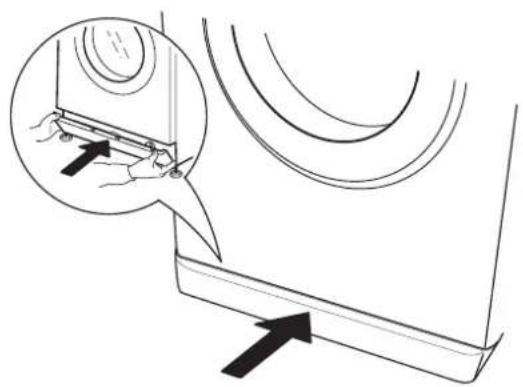
natural_image
Technical diagram showing a mechanical component with an inset close-up of a tool interacting with a curved component (no text or symbols present)Dati tecnici
Panneau de commande
natural_image
Two mechanical connectors with threaded ends and directional arrows indicating assembly (no text or symbols)natural_image
Line drawing of two hands using a tool to apply a component (no text or symbols present)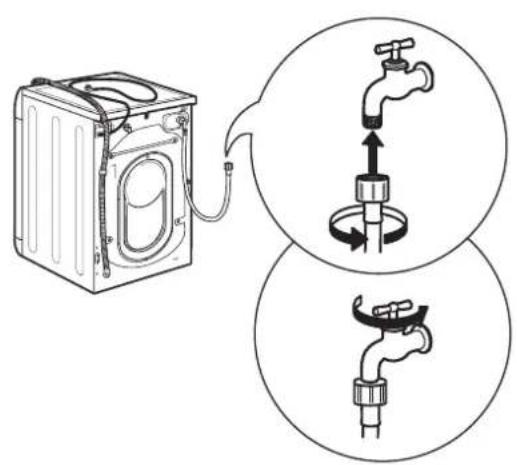
NETTOYAGE DU DISTRIBUTEUR DE DÉTERGENT
natural_image
Illustration of hands using a tool to adjust or install a small electronic component (no text or symbols visible)natural_image
Line drawing of hands using a tool to press or install a mechanical component (no text or symbols)natural_image
Two-step line drawing showing hands performing a manual tool on a surface, no text or symbols presentnatural_image
Line drawing of hands handling a tray with food items (no text or symbols)NETTOYAGE DU FILTRE À EAU / VIDANGE DES EAUX USÉES
natural_image
Technical line drawing of a mechanical assembly with circular components and a central rod (no text or symbols)natural_image
Line drawing of a hand using a sewing machine to adjust a cable or socket (no text or symbols present)natural_image
Illustration showing two-step fabric cutting process: one using a knob to cut fabric, the other using a tool to cut fabric (no text or symbols)natural_image
Line drawing of a hand using a tool to clean or wash a cylindrical object on a surface (no text or symbols)
natural_image
Technical diagram showing a mechanical component with an inset close-up of a detail (no text or symbols)Trucs et Astuces
Données techniques
TRANSPORT ET MANUTENTION
Opening hours: Monday - Friday 8.00am - 6.00pm
Saturday 8.30am - 4.30pm
Sunday 9.30am - 3.30pm