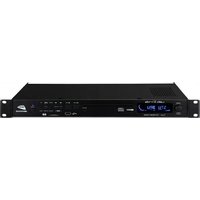
USB3.1-RDS - Turntable JB systems - Free user manual and instructions
Find the device manual for free USB3.1-RDS JB systems in PDF.


User questions about USB3.1-RDS JB systems
0 question about this device. Answer the ones you know or ask your own.
Ask a new question about this device
Download the instructions for your Turntable in PDF format for free! Find your manual USB3.1-RDS - JB systems and take your electronic device back in hand. On this page are published all the documents necessary for the use of your device. USB3.1-RDS by JB systems.
USER MANUAL USB3.1-RDS JB systems
Dispose of the unit and used batteries in an environment friendly manner according to your country regulations.
FR-DECLASSES L'APPAREIL
Thank you for buying this JB Systems® product. To take full advantage of all possibilities, please read these operating instructions very carefully.
FEATURES
- The USB3.1-RDS combines different audio sources in a small 19"/1U housing, perfect for all kinds of fixed installations such as pubs, shops, hotels, restaurants, shopping malls, ... :
AM / FM -radio: with RDS and 18 station presets
Slot-in CD-player: plays both audio CDs and MP3/WMA files (supports CD-R and CD-RW disks)
USB/SD-card media player: supports USB-sticks and SD/SDHC-cards up to 64GB
- Support for WMA and MP3-tracks up to 48kHz / 320kbps
- LCD-display shows FM RDS-station names and ID3-tags (title, artist, ...) for MP3 and WMA-tracks
- Different playback modes: normal, random, repeat one/folder/all.
- 2 fixed + 1 combined RCA/cinch output:
Perfect for use in multi-zone installations: FM-radio and media/CD-player can operate simultaneously and send different music to their separate outputs!
For simple installations a combined "tuner & media/CD-player" output with volume control is available.
- The RS-232 input makes remote control by for example "home automation systems" possible.
- 24Vdc emergency backup supply on EuroBlock connector.
BEFORE USE
- Before you start using this unit, please check if there's no transportation damage. Should there be any, do not use the device and consult your dealer first.
- Important: This device left our factory in perfect condition and well packaged. It is absolutely necessary for the user to strictly follow the safety instructions and warnings in this user manual. Any damage caused by mishandling is not subject to warranty. The dealer will not accept responsibility for any resulting defects or problems caused by disregarding this user manual.
- Keep this booklet in a safe place for future consultation. If you sell the fixture, be sure to add this user manual.
- To protect the environment, please try to recycle the packing material as much as possible.
Check the contents:
Check that the carton contains the following items:
USB3.1-RDS player
- Operating instructions
1 power cord
1 FM antenna
- 4 rubber feet stickers
- 4 rack mount screws
SAFETY INSTRUCTIONS:
CAUTION
RISK OF ELECTRIC SHOCK DO NOT OPEN

CAUTION: To reduce the risk of electric shock, do not remove the top cover. No user-serviceable parts inside. Refer servicing to qualified service personnel only.

The lightning flash with arrowhead symbol within the equilateral triangle is intended to alert the use or the presence of un-insulated "dangerous voltage" within the product's enclosure that may be of sufficient magnitude to constitute a risk of electric shock.

The exclamation point within the equilateral triangle is intended to alert the user to the presence of important operation and maintenance (servicing) instructions in the literature accompanying this appliance.
This symbol means: indoor use only
This symbol means: Read instructions
This symbol means: Safety Class I appliance
This appliance must be earthed in order to comply with safety regulations.
- To prevent fire or shock hazard, do not expose this appliance to rain or moisture.
- To avoid condensation to be formed inside, allow the unit to adapt to the surrounding temperatures when bringing it into a warm room after transport. Condense sometimes prevents the unit from working at full performance or may even cause damages.
- This unit is for indoor use only.
- Don't place metal objects or spill liquid inside the unit. No objects filled with liquids, such as vases, shall be placed on this appliance. Electric shock or malfunction may result. If a foreign object enters the unit, immediately disconnect the mains power.
- No naked flame sources, such as lighted candles, should be placed on the appliance.
- Don't cover any ventilation openings as this may result in overheating.
- Prevent use in dusty environments and clean the unit regularly.
- Keep the unit away from children.
- Inexperienced persons should not operate this device.
Maximum save ambient temperature is 40^ . Don't use this unit at higher ambient temperatures. - Minimum distances around the apparatus for sufficient ventilation is 5cm .
- Always unplug the unit when it is not used for a longer time or before you start servicing.
- The electrical installation should be carried out by qualified personal only, according to the regulations for electrical and mechanical safety in your country.
- Check that the available voltage is not higher than the one stated on the rear panel of the unit.
- The socket inlet shall remain operable for disconnection from the mains.
- The power cord should always be in perfect condition. Switch the unit immediately off when the power cord is squashed or damaged. It must be replaced by the manufacturer, its service agent or similarly qualified persons in order to avoid a hazard.
- Never let the power-cord come into contact with other cables!
- When the power switch is in OFF position, this unit is not completely disconnected from the mains!
- In order to prevent electric shock, do not open the cover. Apart from the mains fuse there are no user serviceable parts inside.
- Never repair a fuse or bypass the fuse holder. Always replace a damaged fuse with a fuse of the same type and electrical specifications!
- In the event of serious operating problems, stop using the appliance and contact your dealer immediately.
- Please use the original packing when the device is to be transported.
- Due to safety reasons it is prohibited to make unauthorized modifications to the unit.
INSTALLATION GUIDELINES:
- Placing and using the unit for long periods near heat-generating sources such as amplifiers, spotlights, etc. will affect its performance and may even damage the unit.
- Take care to minimize shocks and vibrations during transport.
- When installed in a booth or flight case, please make sure to have good ventilation to improve heat evacuation of the unit.
- To avoid condensation to be formed inside, allow the unit to adapt to the surrounding temperatures when bringing it into a warm room after transport. Condense sometimes prevents the unit from working at full performance.
- Choose the place where you put your installation very carefully. Avoid presence of heat sources. Avoid places with vibrations or places that are dusty and humid.
- The player will work normally when installed on a surface with max. 15^ inclination.
- Be very careful while handling CDs, do not touch them with wet or dirty hands.
- Discs that are dirty must be cleaned with special designed cloth and cleaning products.
- Do not use CDs that are badly damaged (scratched or deformed) they can damage your appliance.
- To prevent fire or shock hazard, do not expose this appliance to rain or moisture.
- In order to prevent electric shock, do not open the top cover. If a problem occurs, contact your dealer.
- Do not place metal objects or spill liquid inside the player. Electric shock or malfunction may result.
- This player uses the semiconductor laser. To allow you to enjoy music at a stable operation, it is recommended to use this in a room of 5^ - 35^ .
- The compact disc player should not be adjusted or repaired by anyone except properly qualified service personnel.
- This unit may cause interference to radio and television reception.
CLEANING THE PLAYER:
Clean by wiping with a polished cloth slightly dipped with water. Avoid getting water inside the unit. Do not use volatile liquids such as benzene or thinner which will damage the unit.
CONNECTING THE UNIT

- MAINS input with IEC socket and integrated fuse holder: connect the supplied mains cable here. Never repair a fuse or bypass the fuse holder. Always replace a damaged fuse with a fuse of the same type and with the same electrical specifications (T500mA /250V)
- DC 24V input connector : can be used to connect you back-up power supply (if needed)
- RS-232 connector: can be used to control the unit via external hardware so the unit can be integrated in automated systems, etc. You can find the list with commands on the last page of this manual.
- Variable Audio Output: This combined output sends out the audio signal of the CD player, the USB or SD media player and the Tuner
- Fixed Audio Output CD/MEDIA: This output will only send the audio signal of the CD player and the USB or SD media player. It doesn't include the audio signal of the Tuner. This means you can use 2 sources at the same time (for multi-zone applications) and send the signal of the CD or USB / SD media player to one room or zone, while the audio signal of the tuner can be sent to another room or zone.
- Fixed Audio Output Tuner: This output will only send the audio signal of the Tuner. It doesn't include the audio signal of the CD player and the USB or SD media player. This means you can use 2 sources at the same time (for multi-zone applications) and send the signal of the CD or USB / SD media player to one room or zone, while the audio signal of the tuner can be sent to another room or zone.
- 75 Ohm Antenna connection: can be used to connect the supplied FM antenna (or another FM antenna)
- 300 Ohm Antenna connection: can be used to connect an AM antenna
CONTROLS AND FUNCTIONS
-
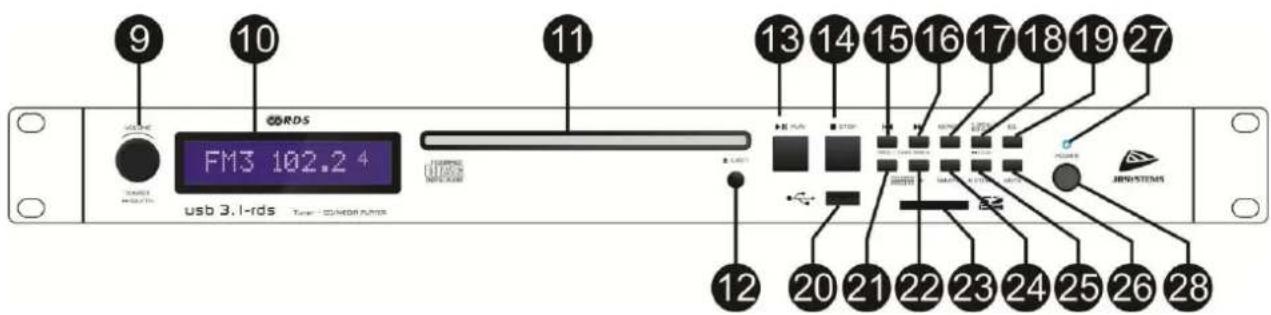
Function rotating / push button: This button has 3 different functions:
-
Turn the button to change the output level of the player
- Push the button shortly to toggle between the different players: Radio, CD, USB and SD/SDHC
-
Keep the button pressed for about 3 seconds to toggle between the 2 available playback modes:
-
SINGLE PLAY: when you press the play button, only 1 song will be played. The player stops at the end of each track and waits at the beginning of the next track.
-
NORMAL PLAY: the complete CD or USB storage will be played without interruption.
-
LCD Display: Shows all the important information needed during playback.
- Disc loading slot: to load a CD, slide it gently into the slot with the printed side facing up. Halfway the CD will automatically be pulled inside, don't press the CD in the slot with force, this will damage the loading mechanism! Only use standard size CD's (Ø=12cm), never try to insert mini CD's with or without adapter!
-
Eject Button: press this button to eject the inserted CD.
-
PLAY/PAUSE button:
-
In CD, USB or SD/SDHC mode: every time you press the PLAY/PAUSE button the player changes from play to pause or from pause to play.
-
In AM/FM radio mode: keep the button pressed for about 3 seconds to store the current radio station as preset 1 of the selected band.
-
STOP Button :
-
In CD, USB or SD/SDHC mode : Press this button to stop the playback of the current track and to return to the very first track on your media support.
-
In AM/FM radio mode: keep the button pressed to store the current radio station as preset 2 of the selected band.
-
PRE Button :
-
In CD, USB or SD/SDHC mode: this button has 2 functions:
-
Press the button shortly to go back to the starting point of the track. If you press several times, you can skip to the previous songs.
-
Keep the button pressed to navigate backwards in the current song
-
In AM/FM radio mode:
-
Press the button shortly to activate the Auto Seek mode. The tuner will search for the next strong radio signal by exploring the frequencies downwards.
-
Keep the button pressed for about 3 seconds: the tuner will go into Manual Seek mode. Each time you will press this same button shortly, the frequency will now decrease by one step. You can use the NEXT button to increase the frequency by one step. If the PRE or NEXT buttons are not used for a while, the tuner will return to it's initial Auto Seek mode for your next commands.
-
NEXT Button :
-
In CD, USB or SD/SDHC mode: this button has 2 functions:
-
Press the button shortly to go to the next track.
-
Keep the button pressed to navigate forwards in the current song
-
In AM/FM radio mode:
-
Press the button shortly to activate the Auto Seek mode. The tuner will search for the next strong radio signal by exploring the frequencies upwards.
- Keep the button pressed for about 3 seconds: the tuner will go into Manual Seek mode. Each time you will press this same button shortly, the frequency will now increase by one step. You can use the PRE button to decrease the frequency by one step. If the PRE or NEXT buttons are not used for a while, the tuner will return to it's initial Auto Seek mode for your next commands.
17. REPEAT Button :
-
In CD, USB or SD/SDHC mode: press the button shortly to toggle between the available repeat modes:
-
RPT ONE (REPEAT ONE): the same track will be played and repeated contuniously
- RPT FOLD (REPEAT FOLDER): all the songs of the current folder will be played and repeated continuously
- RPT ALL (REPEAT ALL): all the tracks on the media support will be played and repeated continuously
-
RPT OFF (REPEAT OFF): playback will be stopped when the tracks have been played once.
-
In AM/FM radio mode: Keep the button pressed for about 3 seconds to store the current radio station as preset 3 of the selected band
-
In CD, USB or SD/SDHC mode: this button has 2 functions:
-
Press the button shortly to show the ID3 tag information of the current track on the display.
-
Keep the button pressed for about 3 seconds to activate / desactivate the Loudness function.
-
In AM/FM radio mode: press the button shortly to toggle between the different radio bands: FM1 > FM2 > FM3 > MW1 > MW2
-
EQ Button : Press the button shortly to toggle between the different equalizer presets: FLAT > CLASSIC > POP > ROCK > OFF.
- USB connection: this USB connection can be used to connect an USB stick that was formatted in FAT32 with a maximum capacity of 64GB. When a USB Stick is inserted, the playback of the tracks on this USB stick will automatically start.
21. FOLDERS / PRESETS - Button :
- In CD, USB or SD/SDHC mode: press the button shortly to go to the previous folder
-
In AM/FM radio mode:
-
Press the button shortly to go to the previous radio preset.
- Keep the button pressed for about 3 seconds to store the current radio station as preset 5 of the selected band.
22. FOLDERS / PRESETS + Button :
- In CD, USB or SD/SDHC mode: press the button shortly to go to the next folder
-
In AM/FM radio mode:
-
Press the button shortly to go to the previous radio preset.
-
Keep the button pressed for about 3 seconds to store the current radio station as preset 6 of the selected band.
-
SD/SDHC CARD Slot : When a card is inserted, the playback of the tracks on this card will automatically start.
24. SHUFFLE Button :
- In CD, USB or SD/SDHC mode: press the button shortly to activate or desactivate te random play function
-
In AM/FM radio mode: Keep the button pressed for about 3 seconds to store the current radio station as preset 4 of the selected band
-
ASTORE Button : Press the button shortly to activate the automatic radio scan and storage function. Available radio stations will be automatically stored for all the bands.
- MUTE Button : Press this button to activate or desactivate the MUTE function.
Remark: only the VARIABLE output and the FIXED CD/MP3 output will be muted, not the FIXED TUNER output!
- Power LED: is ON when the player is switched ON.
- Power ON/OFF switch: switches the player on and off.
HOW TO USE ...
The functions are actually already explained in the previous chapter "controls and functions" In this chapter we provide you an overview of some specific functions for each type of player.
AM/FM RADIO:
- Push the Function knob (9) shortly to toggle between the different audio sources and select the RADIO function.
- Use the T.BAND button (18) to toggle between the available radio bands FM1>FM2>FM3>MW1>MW2
- Use the PRESETS - button to go to the previous radio preset or use the PRESETS + button (22) to go to the next radio preset of the selected radio band.
How to search for radio stations:
Use the PRE button (15) to search for a radio station with a lower frequency or use the NEXT button (16) to search for a radio station with a higher frequency.
- Press the PRE or NEXT button shortly to activate the auto scan function: the tuner will scan the frequencies until it finds a radio station with sufficient signal.
- You can also search manually. For this, press the PRE or NEXT button for about 3 seconds. You are now in manual mode. Each time you will now press the PRE or NEXT button shortly, the frequency will be decreased or increased by one step.
How to store radio channels:
There are 2 ways to do this: radio stations can be stored automatically or manually in the preset channels.
Full automatic scanning and storage:
- Press the ASTORE button (25) shortly to activate the automatic radio scan and storage function. Available radio stations will be automatically stored for all the bands..
Manual scanning and storage:
- Use the T.BAND button (18) to toggle between the available radio bands FM1 > FM2 > FM3 > MW1 > MW2
- Use the PRE button (15) to search for a radio station with a lower frequency or use the NEXT button (16) to search for a radio station with a higher frequency. (see previous chapter "how to search for radio stations")
-
Once you have found a radio station you want to store in the presets:
-
Keep the PLAY/PAUSE button (13) pressed for about 3 seconds to store the current radio station as preset 1 of the selected band.
- Keep the STOP button (14) pressed for about 3 seconds to store the current radio station as preset 2 of the selected band.
- Keep the REPEAT button (17) pressed for about 3 seconds to store the current radio station as preset 3 of the selected band.
- Keep the SHUFFLE button (24) pressed for about 3 seconds to store the current radio station as preset 4 of the selected band
- Keep the FOLDERS/PRESETS - button (21) pressed for about 3 seconds to store the current radio station as preset 5 of the selected band
- Keep the FOLDERS/PRESETS + button (22) pressed for about 3 seconds to store the current radio station as preset 6 of the selected band
CD / USB / SD/SDHC Player:
- Single play or normal (continuous) play:
Keep the button pressed for about 3 seconds to toggle between the 2 available playback modes:
- SINGLE PLAY: when you press the play button, only 1 song will be played. The player stops at the end of each track and waits at the beginning of the next track.
- NORMAL PLAY: the complete CD or Storage device will be played without interruption.
Navigation:
-
Navigation between folders (if available on your CD):
-
press the FOLDERS/PRESETS - button (21) shortly to navigate to the previous folder
-
press the FOLDERS/PRESETS + button (22) shortly to navigate to the next folder.
-
Navigation between tracks:
-
Press the PRE button (15) shortly to go back to the starting point of the track
-
Press the NEXT button (16) shortly to go to the starting point of the next track
-
Navigation in a track:
-
Keep the PRE button (15) pressed to navigate backwards in the current song
- Keep the NEXT button (16) pressed to navigate forwards in the current song
- Repeat function:
Press the REPEAT button (17) shortly to toggle between the available repeat modes:
- RPT ONE (REPEAT ONE): the same track will be played and repeated contuniously
-
RPT FOLD (REPEAT FOLDER): all the songs of the current folder will be played and repeated continuously
-
RPT ALL (REPEAT ALL): all the tracks on the media support will be played and repeated continuously
- RPT OFF (REPEAT OFF): playback will be stopped when the tracks have been played once.
- Random play:
Songs of the full media support will be played at random. Just press the SHUFFLE button (24) to activate or desactivate te random play function.
GENERAL SETTINGSFORALLPLAYERS:
- Output volume of the mixed output can be adjusted by turning the FUNCTION button (9).
- Loudness can be activated or desactivated by keeping the T.BAND (18) button pressed for about 3 seconds
- Equaliser settings can be adjusted by pressing the EQ button shortly to toggle between the different equalizer presets: FLAT > CLASSIC > POP > ROCK > OFF
SPECIFICATIONS
Power Supply: AC 110-240V 50/60Hz or DC+24V
Fuse: T500mAL/250V
Power Consumption: 10W
Fixed Output level (@ 1kHz,0dB):
Variable Output level (@ 1kHz,0dB):
CD/USB:1.22 Vrms RADIO:1.22 Vrms
0~1.22 Vrms
RADIO FM
Frequency range:
Channel Step:
Intermediate freq.:
Sensitivity:
Signal / noise ratio:
RADIO AM
Frequency range:
Channel Step:
Intermediate freq.:
Sensitivity:
Signal / noise ratio:
AUDIO PLAYER:
Signal / noise ratio:
FORMATS:
MP3 FORMAT:
Possible file extensions:
ISO9660:
Joliet:
CD-ROM sector format:
USB file system:
Max. capacity USB-memory:
Max. Folders on USB-memory:
Max. Files on USB-memory:
max. 63 character style
max. 63 character style
mode-1 only
FAT 32
64GB
500
999
mono / stereo sampled at: 32 - 44,1 - 48kHz
32-320Kbps
CBR (Constant Bitrate), VBR (Variable Bitrate) or Xing
mono / stereo sampled at: 16 - 22,05 - 24kHz
32 - 160 Kbps
CBR (Constant Bitrate), VBR (Variable Bitrate) or Xing
mono / stereo sampled at: 8 - 11,025 - 12kHz
32 - 160 Kbps
CBR (Constant Bitrate), VBR (Variable Bitrate) or Xing
3.82kg
Every information is subject to change without prior notice
You can download the latest version of this user manual on our website: www.jb-systems.eu
GUIDE D'UTILISATION
Reproducor CD/USB/SD/SDHC:
EN: Subscribe today to our mailing list for the latest product news!
Copyright © 2015 by BEGLEC NV
t Hofveld 2C B1702 Groot-Bijgaarden Belgium
Reproduction or publication of the content in any manner, without express permission of the publisher, is prohibited.