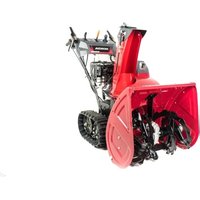
HSS 760A T - Snow blower Honda - Free user manual and instructions
Find the device manual for free HSS 760A T Honda in PDF.


| Product type | Snow blower |
| Brand | Honda |
| Model | HSS 760A T |
| Dimensions (L × W × H) | 1485 × 670 × 1105 mm (wheel type) / 1485 × 630 × 1105 mm (track type) |
| Weight (dry mass) | 95 to 115 kg depending on version |
| Engine | Honda GX200T2, 196 cm³, unleaded gasoline |
| Fuel tank capacity | 3.1 L |
| Engine oil | SAE 5W-30, 0.60 L |
| Start | Manual (recoil starter) or electric DC (ETD, EWD models) |
| Clearing width | 605 mm |
| Clearing height | 550 mm |
| Max throwing distance | 15 m |
| Cleaning capacity | 42 tons/hour |
| Transmission | Wheels or tracks, 2-wheel drive |
| Speeds | Forward and reverse, neutral |
| Discharge orientation | Manual (lever): up/down, left/right |
| Lighting | Work light (illuminates when engine is running) |
| Safety | Emergency engine stop, safety chute, clearing stick, anti-restart system |
| Routine maintenance | Oil change, spark plug, skid shoe adjustment, belt and chain inspection |
| Wear parts | Shear bolts for auger and impeller, reversible skid shoes, scrapers |
| Noise level | 100-102 dB(A) guaranteed sound power |
| Battery (electric models) | 12 V, 11 Ah/10 HR |
Frequently Asked Questions - HSS 760A T Honda
User questions about HSS 760A T Honda
0 question about this device. Answer the ones you know or ask your own.
Ask a new question about this device
Download the instructions for your Snow blower in PDF format for free! Find your manual HSS 760A T - Honda and take your electronic device back in hand. On this page are published all the documents necessary for the use of your device. HSS 760A T by Honda.
USER MANUAL HSS 760A T Honda
Thank you for purchasing a Honda snow thrower!
This manual covers the operation and maintenance of the Honda HSS760A snow thrower.
All information in this publication is based on the latest product information available at the time of approval for printing.
American Honda Motor Co., Inc. reserves the right to make changes at any time without notice and without incurring any obligation.
No part of this publication may be reproduced without written permission.
This manual should be considered a permanent part of the snow thrower and should remain with the snow thrower if it is resold.
SAFETY MESSAGES
Pay special attention to statements preceded by the following words:

DANGER
You WILL be KILLED or SERIOUSLY HURT if you don't follow instructions.

WARNING
You CAN be KILLED or SERIOUSLY HURT if you don't follow instructions.

CAUTION
You CAN be HURT if you don't follow instructions.
You will also see other important messages that are preceded by the following word:
NOTICE
Your snow thrower, other property, or the environment can be damaged if you don't follow instructions.
NOTE: Gives helpful information.
If a problem should arise, or if you have any questions about your snow thrower, consult an authorized Honda dealer.
The illustrations herein are mainly based on: ET type.
The illustration may vary according to the type.
HONDA
OWNER'S MANUAL
(Original instructions)
HSS760A
SNOW THROWER
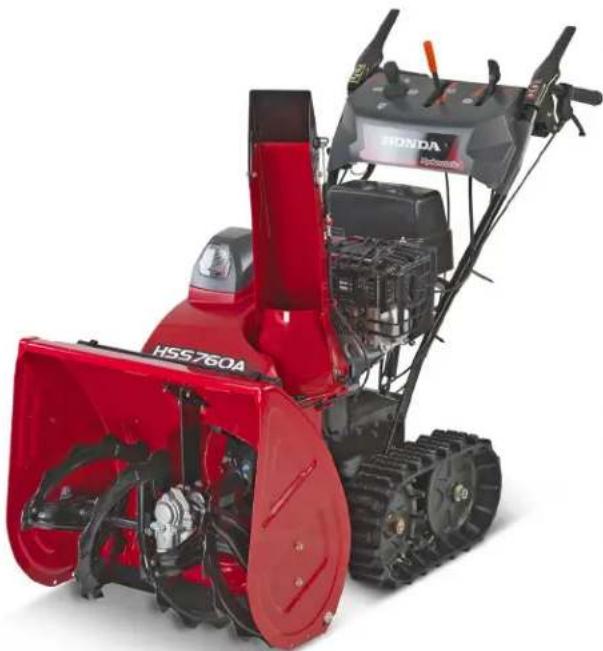
natural_image
Red HSS760A snowman with attached turbine and powertrain (no visible text or symbols)CONTENTS
SAFETY INSTRUCTIONS .....2
Operator Responsibilities .....3
SAFETY LABEL LOCATIONS ....4
COMPONENT IDENTIFICATION .5
CONTROLS 6
Engine Switch....6
Fuel Valve Lever 6
Chute Joystick Control.....6
Starter Grip 6
Throttle Lever (engine speed) ...6
Choke Knob....6
Shift Lever 7
Auger Clutch Lever .....7
Drive Clutch Lever .....7
Steering Control Levers.....8
Height Adjust Lever (track type
only).8
LED Work Light....8
PRE-OPERATION CHECK .....9
Fuel Level 9
Engine Oil Level 9
Skid Shoe and Scraper .....10
Auger and Blower Bolts .....10
Other Checks.....10
STARTING THE ENGINE....11
Manual Starting 11
DC Electric Starting ..... 12
High Altitude Operation .... 13
Engine Oil Change ..... 17
Spark Plug 17
Track Adjustment ..... 18
Tires (wheel type only) ..... 18
Auger/Blower Inspection ..... 18
Fuse (EWD, ETD starter type) . 18
TRANSPORTING ..... 19
STORAGE 20
Battery Removal....20
Battery Charging 20
Battery Installation ..... 20
TROUBLESHOOTING ..... 21
SPECIFICATIONS 21
EC Declaration of Conformity,
Honda Distributor Locations
Last pages
SAFETY INSTRUCTIONS
WARNING
To ensure safe operation:
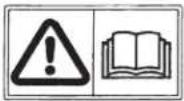

- Honda snow throwers are designed to give safe and dependable service if operated according to instructions.
- Read and understand this Owner's Manual before operating the snow thrower. Failure to do so could result in personal injury or equipment damage.
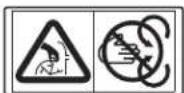
- Never put your hand into the snow discharge chute while the engine is running; serious personal injury could result.
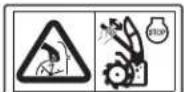
- If the snow discharge chute becomes clogged, stop the engine and use a snow drop bar or a wooden stick to unclog it.
- Never put your hand into the snow discharge chute while the engine is running; serious personal injury could result.
- Exhaust contains poisonous carbon monoxide, a colorless, odorless gas. Breathing carbon monoxide can cause loss of consciousness within minutes and may lead to death.

- If you run the snow thrower in an area that is confined, or even partially enclosed area, the air you breathe could contain a dangerous amount of exhaust gas.
- Never run your snow thrower inside a garage, house, or near open windows or doors.
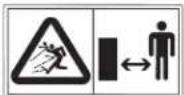
- Keep all persons and pets away from the snow thrower area.
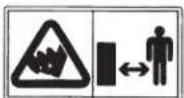
- Never stand or work around or near the auger while the engine is running. Your feet may be caught in the auger when the auger is accidentally started, increasing the risk of serious personal injury.
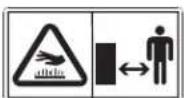
- A hot exhaust system can cause serious burns. Avoid contact if the engine has been running.
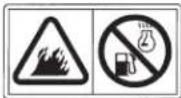
• Petrol is extremely flammable and is explosive under certain conditions.
- Do not smoke or allow flames or sparks in the area where the snow thrower is refueled or where petrol is stored.
- Do not overfill the fuel tank, and make sure the fuel tank cap is closed securely after refueling.
- Refuel in a well-ventilated area with the engine stopped.

- Keep flames and sparks away from the batteries. Batteries produce explosive gas that can cause an explosion.

- Do not allow children and other people to touch a battery unless they understand proper handling and hazards of the battery very well.

- Read this manual carefully and understand it before handling the batteries. Neglect of the instructions can cause personal injury and damage to the snow thrower.

- Wear eye protection

- Explosive gases–Shield eyes
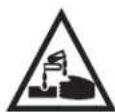
• Corrosive substance—Can cause blindness or severe burns

- Recycle-Contains lead
Pb
Operator Responsibilities
Operating this equipment requires special effort to ensure the safety of the operator and the safety of others. Read and understand this Owner's Manual before operating this equipment; failure to do so could result in personal injury or equipment damage.
Know how to stop the snow thrower quickly, and understand the operation of all controls.
Never permit anyone to operate the snow thrower without proper instruction. If people or pets suddenly appear in front of the snow thrower while it is in operation, immediately release the auger and drive clutch levers to stop the snow thrower and to avoid possible injury from rotating auger blades.
Tampering and Altering
Never attempt to tamper with or alter the emission control system. Among those acts that constitute tampering are:
- Removal or alteration of any part of the intake, fuel, or exhaust systems.
- Altering or defeating the governor linkage or speed-adjusting mechanism to cause the engine to operate outside its design parameters.
WARNING
To ensure safe operation:
- Always perform a pre-operation check (page 9) before you start the engine. You may prevent an injury.
- Honda snow throwers are designed to give safe and dependable service if operated according to instructions. Read and understand this Owner's Manual before operating the snow thrower. Failure to do so could result in personal injury.
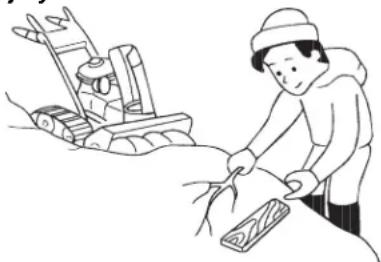
- Before operating the snow thrower, inspect the area in which you are going to clear snow. Remove debris and other obstacles the snow thrower might strike or throw, as they may cause injury.
natural_image
Illustration of a person in winter clothing handling a large object near a bed with a ladder (no text or symbols)- Inspect the snow thrower before operating it. Repair any damage and correct any malfunction before operation.
- If you hit an obstacle while operating the snow thrower, stop the engine immediately, and check for damage. Damaged equipment may increase the possibility of injury during operation.
- Do not use the snow thrower when visibility is poor. Under conditions of poor visibility, there is a greater risk of striking an obstacle or causing injury.
-
Never use the snow thrower to clear snow from a gravel road or gravel driveway, as rocks may be picked up and ejected. They may cause injury to bystanders.
-
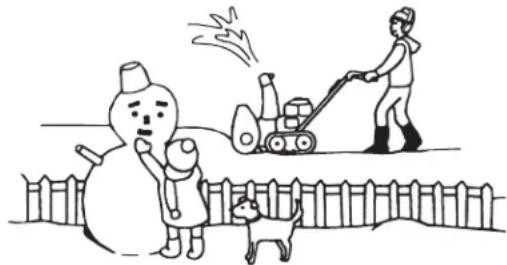
Adjust the snow discharge chute to avoid hitting the operator, or bystanders with ejected snow. Stay clear of the snow discharge chute while the engine is running.
- Children and pets must be kept away from the area of operation to avoid injury from flying debris and contact with the snow thrower.
natural_image
Illustration of a snowman and two people operating a lawn mower, with a dog nearby (no text or symbols)- Do not use the snow thrower to remove snow from a roof.
- To avoid overturning, be careful when changing the direction of the snow thrower while operating on a slope.
- The snow thrower may overturn on steep slopes if left unattended, causing injury to the operator or bystanders.
- Do not use the snow thrower on a slope of more than 20^ (36%).
- The maximum safe grade angle shown is for reference purposes only. To avoid tipping the snow thrower over, stay off slopes too steep for safe operation. The risk of snow thrower upset is even higher when the surface is icy, wet or uneven.
- Before starting the engine, check that the snow thrower is not damaged and is in good condition. For your safety and safety of others, exercise extreme care when using the snow thrower up or down a hill.
- If the snow discharge chute becomes clogged, stop the engine and use a snow drop bar or a wooden stick to unclog it. Never put your hand into the snow discharge chute while the engine is running; serious personal injury could result.
- Never run the engine in an enclosed or confined area. Exhaust contains poisonous carbon monoxide gas; exposure can cause loss of consciousness within minutes and may lead to death.
- The muffler becomes very hot during operation and remains hot for a while after stopping the engine. Be careful not to touch the muffler while it is hot. Let the engine cool before storing the snow thrower indoors.
- Stop the engine and let it cool before opening covers for inspection and other servicing.
- Carefully check the area before backing the snow thrower up or while working in reverse.
- For your safety and the safety of others, use caution while operating the snow thrower during darkness.
NOTE: While operating the snow thrower, hold the handle firmly and walk, don't run. Wear suitable winter boots that resist slipping.
Disposal
To protect the environment, do not dispose of this product, battery, engine oil, etc. by leaving them in the waste.
Observe the local laws and regulations or consult your authorized Honda dealer for disposal.
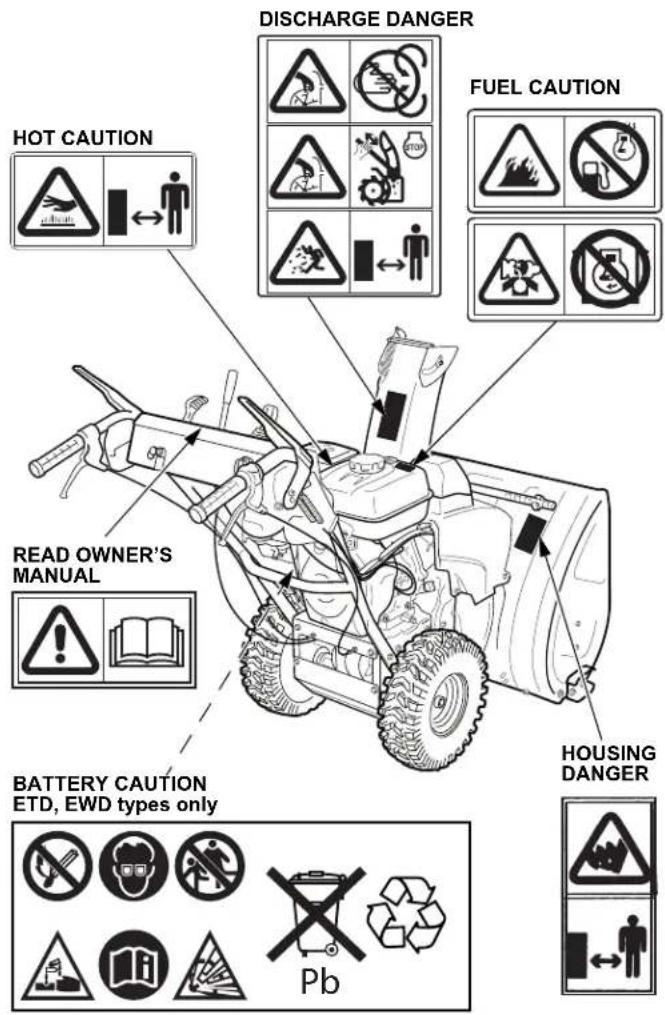
SAFETY LABEL LOCATIONS
These labels warn you of potential hazards that can cause serious injury. Read the labels and safety notes and precautions described in this manual carefully.
If a label comes off or becomes hard to read, contact your Honda dealer for a replacement.
CE Mark and Noise Label Locations
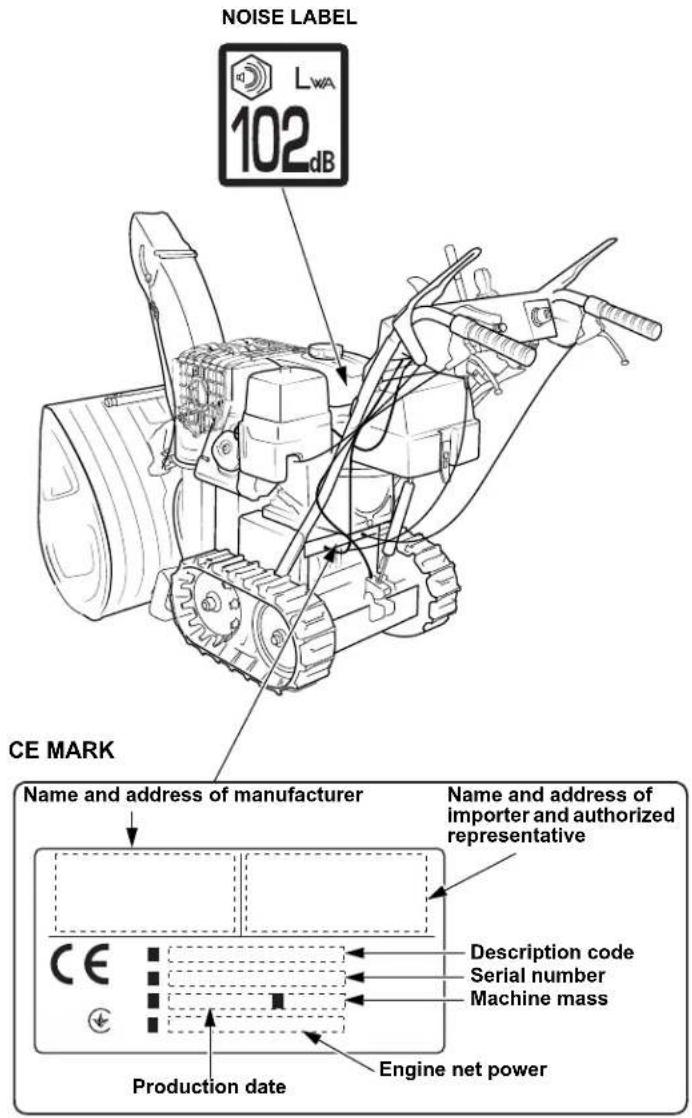
Name and address of manufacturer, importer, and authorized representative are written in the "EC Declaration of Conformity" CONTENT OUTLINE in this Owner's Manual.
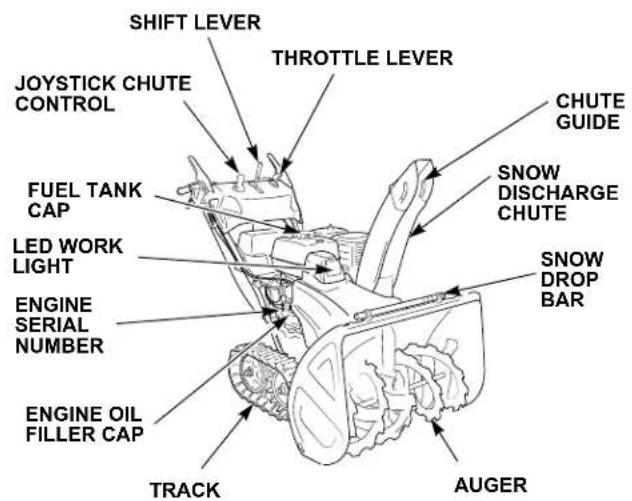
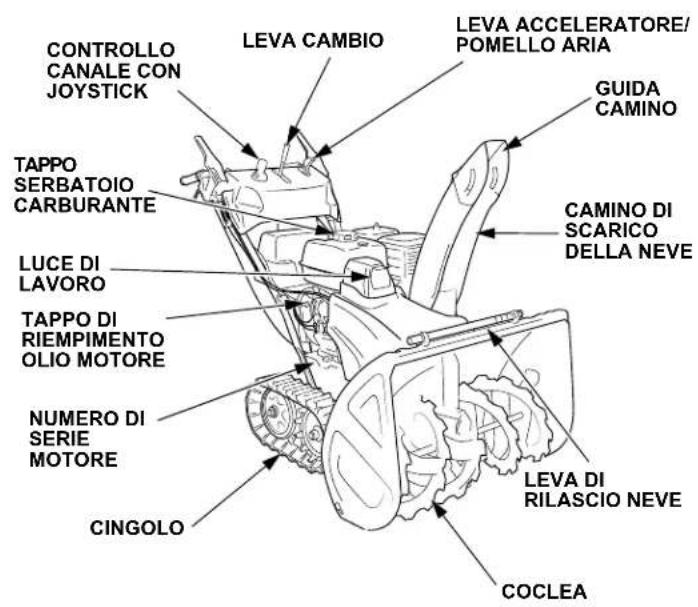
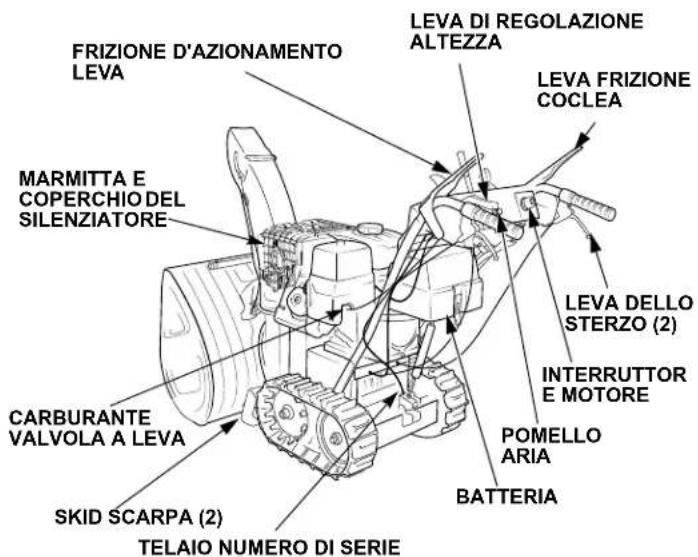
COMPONENT IDENTIFICATION
Wheel-Type Models (EW, EWD)
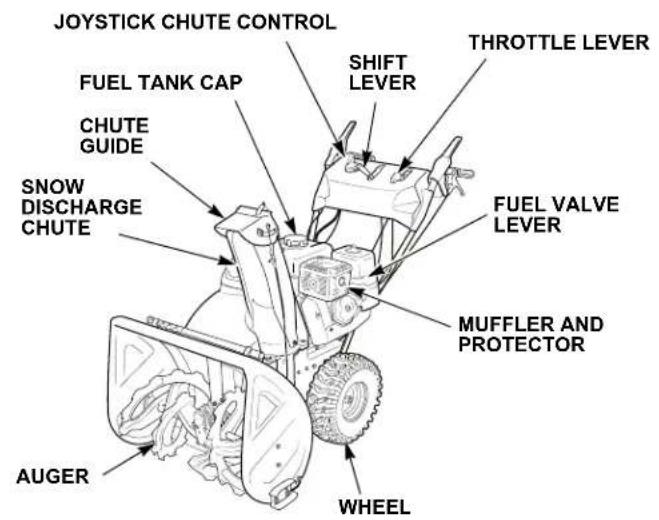
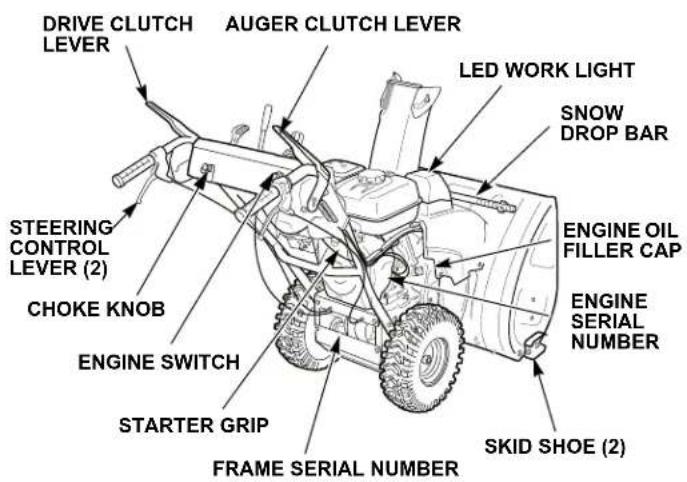
* The frame serial number is described on the CE mark label (see page 4).
Track-Type Models (ET, ETD)
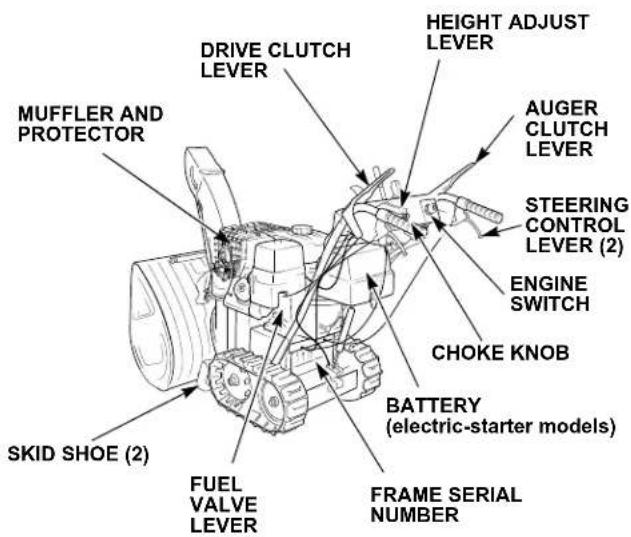
* The frame serial number is described on the CE mark label (see page 4).
CONTROLS
Engine Switch
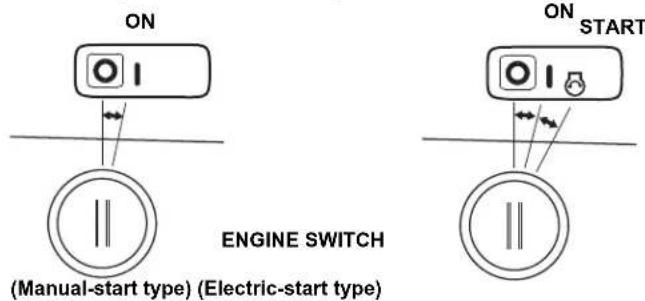
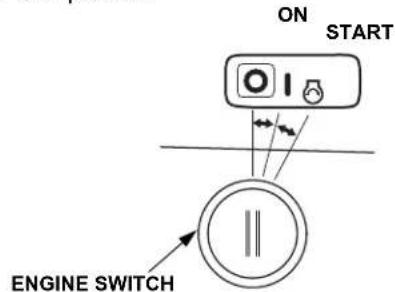
Use the engine switch to turn the ignition system on for starting, and to stop the engine.
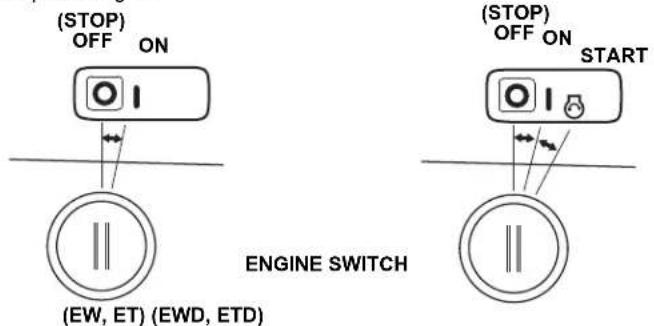
OFF...
Stops the engine. The key can only be inserted and removed when turned to OFF.
ON...
Running position, and for starting the recoil starter.
START...
(ETD, EWD types)
Use this position to start the engine with the self-start system. The starting motor will run. The switch returns to the "ON" position when you let go of the key.
Fuel Valve Lever
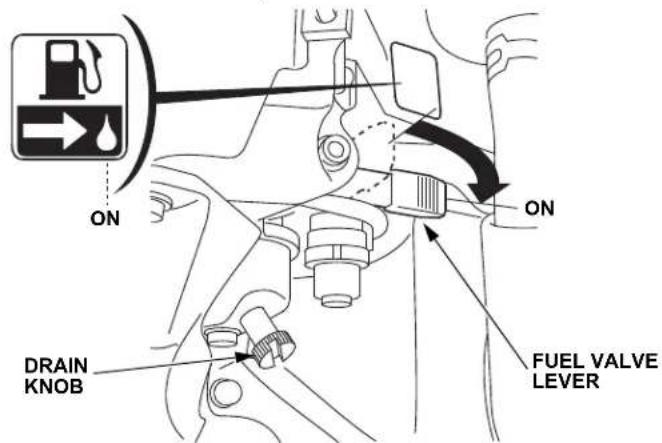
The fuel valve opens and closes the fuel line leading from the fuel tank to the carburetor. Make sure that the fuel valve lever is positioned exactly at either the ON or OFF position.
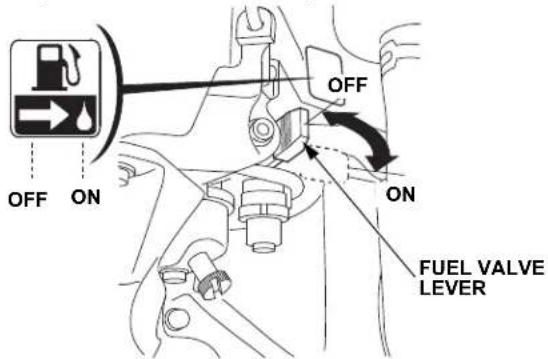
WARNING
Before transporting the snow thrower, be sure to turn the fuel valve lever to the OFF position to prevent possible fuel leaks; spilled fuel or fuel vapor may ignite.
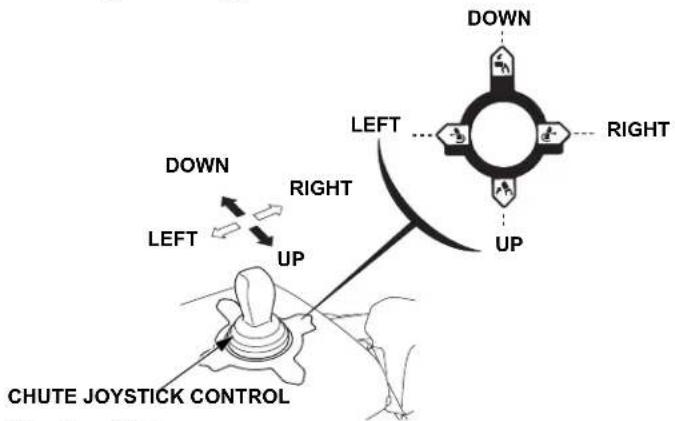
Chute Joystick Control
Use the chute joystick control to turn the snow discharge chute right or left and up or down.
The engine must be running to operate the chute joystick control. Chute movement speed will increase with engine speed. For maximum speed, move the engine throttle to the fastest position when using the chute joystick.
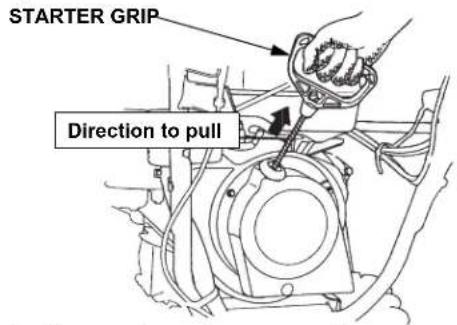
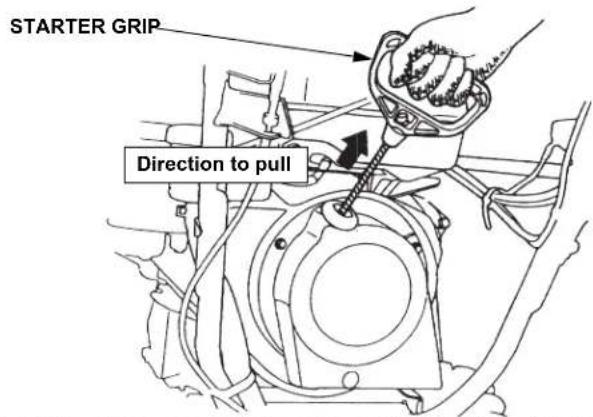
Pulling the starter grip operates the recoil starter to crank the engine for starting.
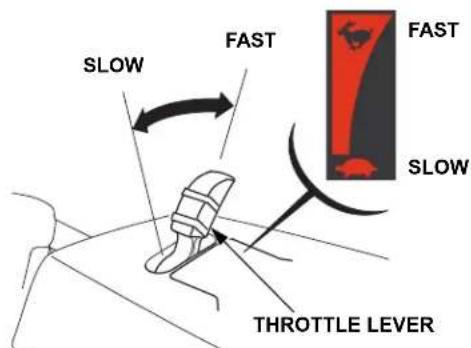
Throttle Lever (engine speed)
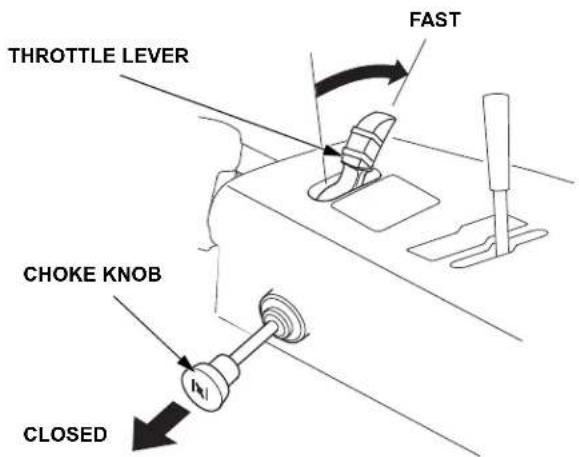
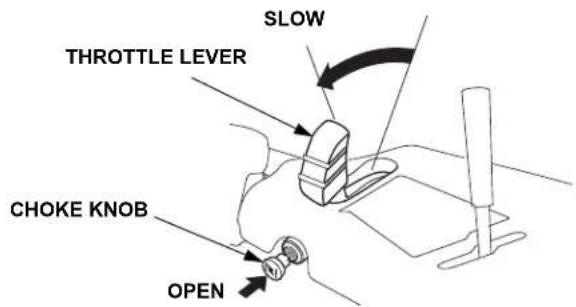
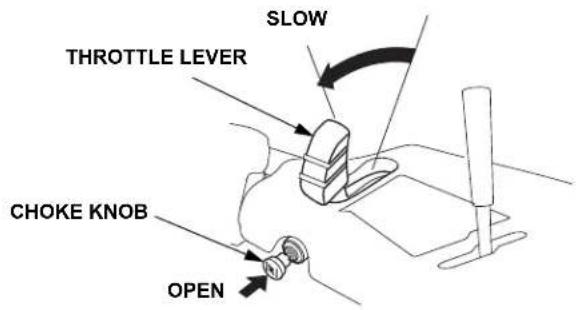
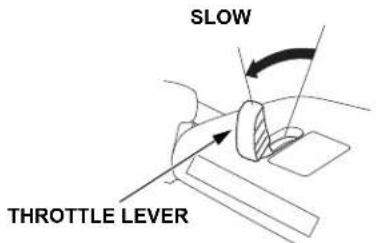
The throttle lever controls engine speed from SLOW to FAST, and it will stay in any designated position.
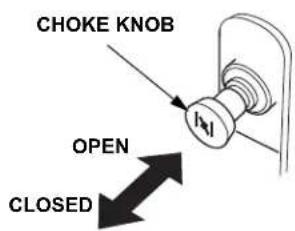
Choke Knob
The choke knob opens and closes the choke valve in the carburetor.
The CLOSED position enriches the fuel mixture for starting a cold engine.
The OPEN position provides the correct fuel mixture for operation after starting, and for restarting a warm engine.
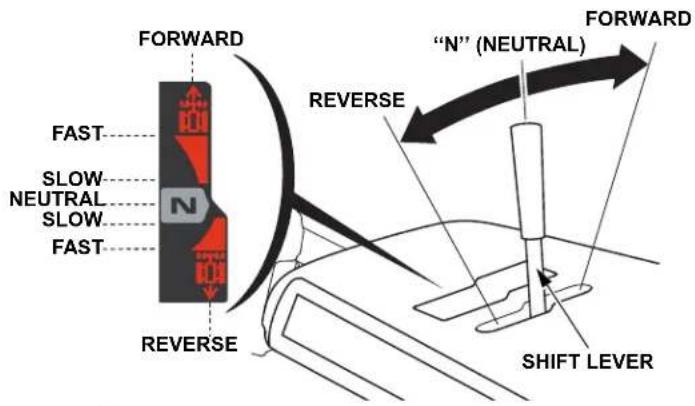
Shift Lever
Forward and reverse directions can be selected by shifting this lever, and it will stay in any designated position. Actual movement of the snow thrower will take affect when the drive clutch lever is engaged.
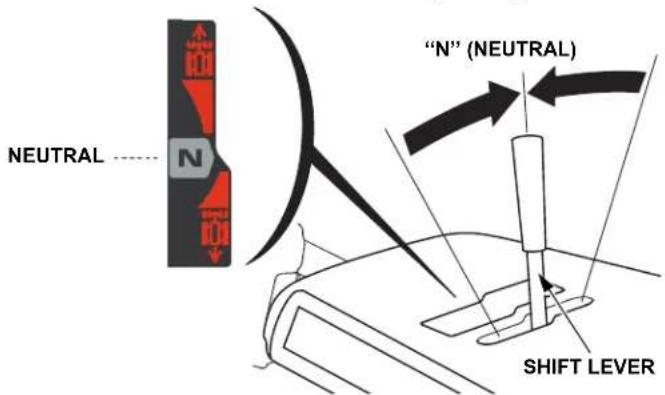
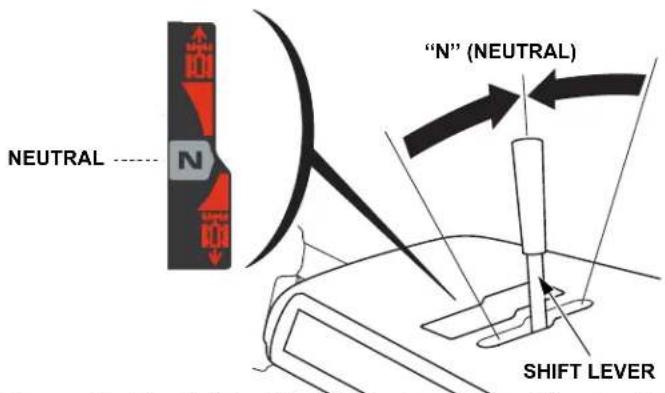
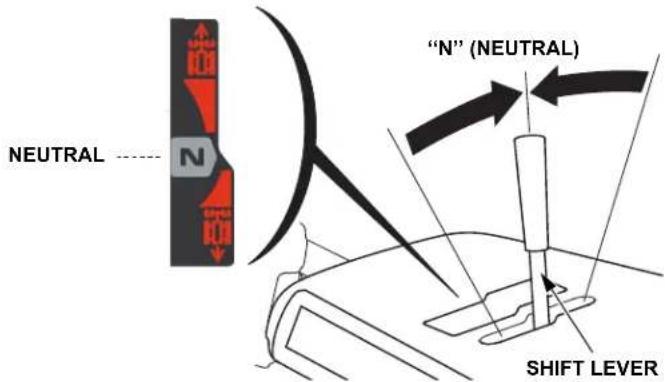
Set the lever in "N" (Neutral) when starting and when the snow thrower is not in use.
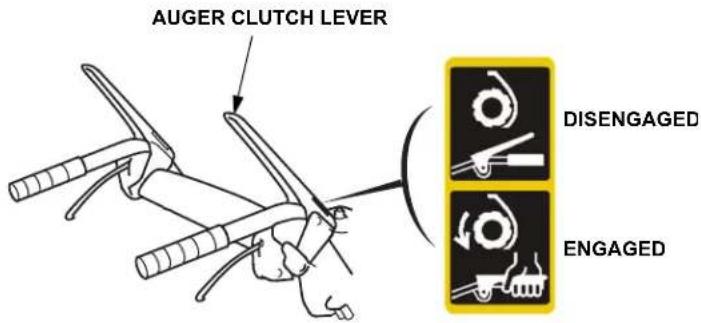
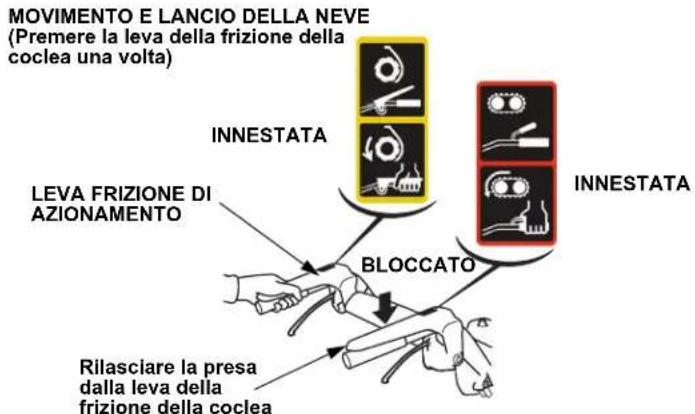
Auger Clutch Lever
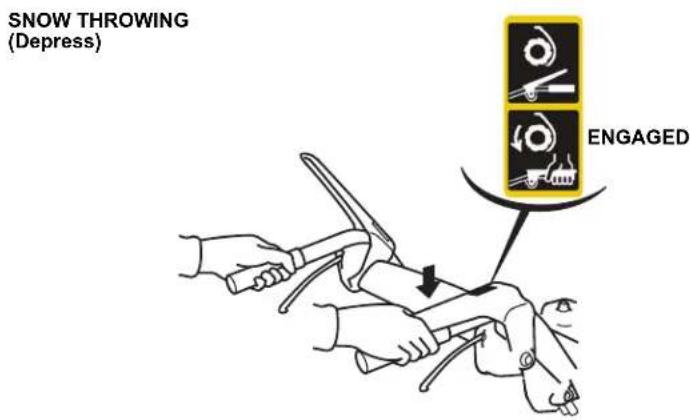
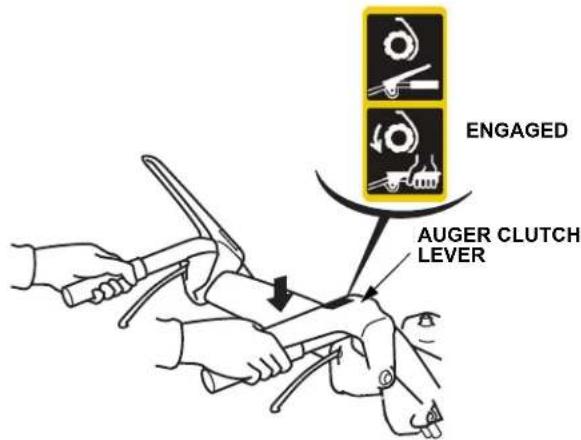
Depress the auger clutch lever to start the snow throwing mechanism. If the drive clutch lever is engaged, the auger clutch lever will lock engaged when it is depressed. However, the auger clutch lever will disengage when the drive clutch lever is released.
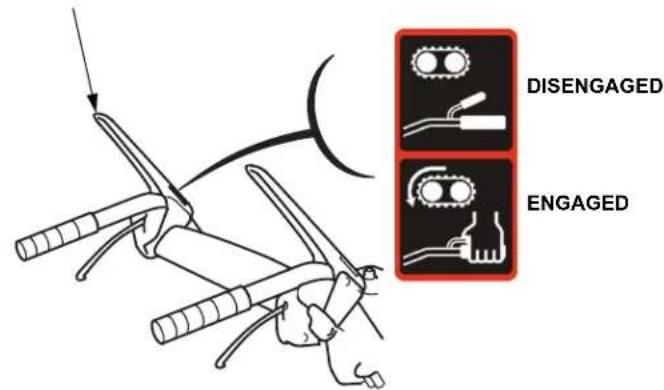
Drive Clutch Lever
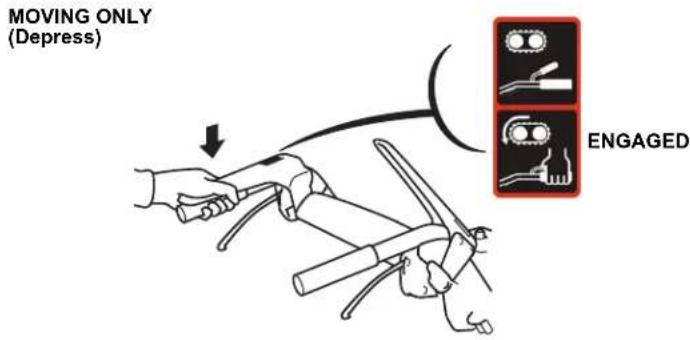
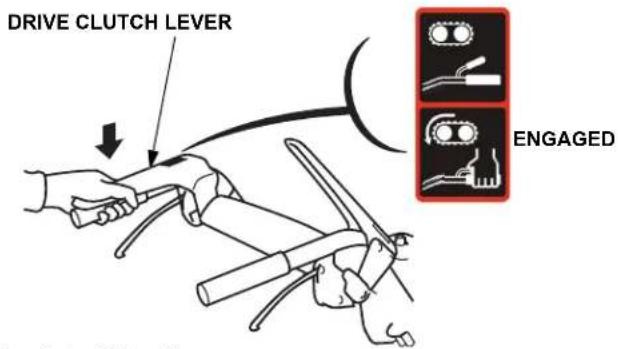
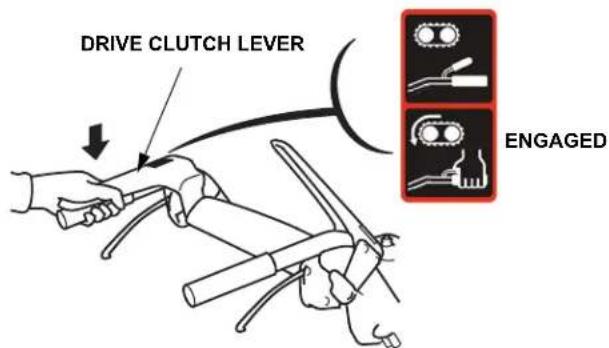
Depress the drive clutch lever to move the snow thrower forward or backward based on the position of the shift lever.
When transporting the snow thrower, depress the drive clutch lever without the auger clutch lever.
DRIVE CLUTCH LEVER
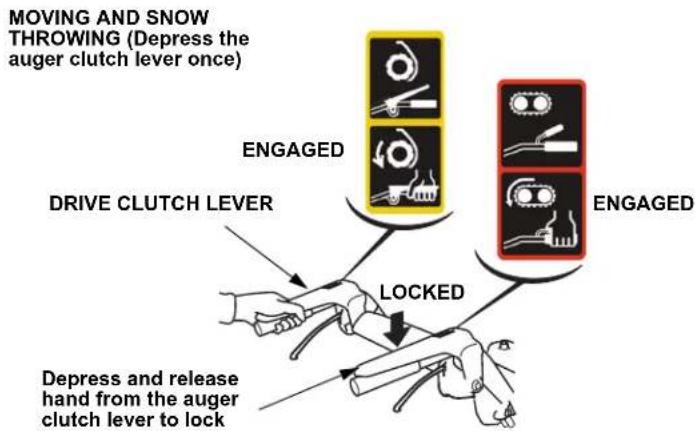
flowchart
graph TD
    A["MOVING AND SNOW THROWING (Depress the auger clutch lever once)"] --> B["DRIVE CLUTCH LEVER"]
    B --> C["LOCKED"]
    C --> D["DEPRESS AND RELEASE HAND FROM THE AUGER CLUTCH LEVER TO LOCK"]
    D --> E["ENGAGED"]
    E --> F["OPEN CLUTCH LEVER"]
    F --> G["ENGAGED"]
Steering Control Levers
With both steering control levers released, the snow thrower will advance in a straight forward direction.
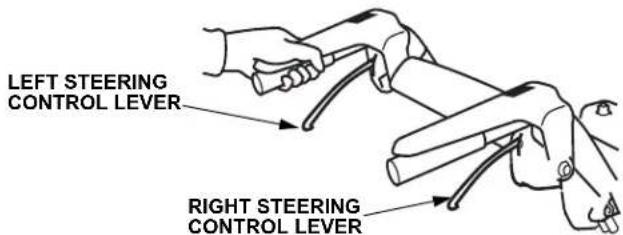
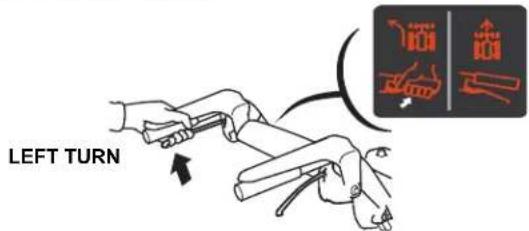
Pull the left steering control lever against the handlebar to turn the snow thrower to the left.
Pull the right steering control lever against the handlebar to turn the snow thrower to the right.
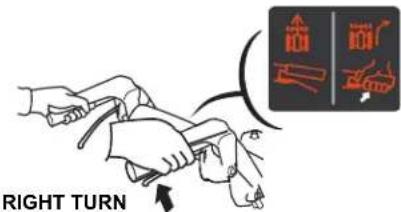
Do not partially engage the steering control levers. Always fully release the levers.
Pull both steering control levers at the same time to disengage the transmission and stop forward movement.
Note: Engaging the steering control levers only stops power transmission to the track or wheel; it does not apply a brake. Under high traction conditions, such as on asphalt or concrete, steering movement will be subtle and may require additional force be applied by the user to turn the snow thrower.
Height Adjust Lever (track type only)
Use the infinitely variable height adjust lever when changing the height of the auger housing.
- Hold the handlebar with both hands and depress the height adjust lever.
- Move the handle up or down as needed to obtain the desired auger height position.
- Release the height adjust lever to lock the auger in position.
- LOWER: Hard snow or fine finish
• MIDDLE: Normal use - HIGHER: Deep snow or for transporting the snow thrower.
If the handlebar is lifted while depressing the height adjust lever, the auger can contact the ground. This may be desirable under certain conditions to achieve maximum snow removal from the surface; however, be sure the surface is very smooth and ice covered. Otherwise, the auger teeth may become damaged. Under most conditions, use the middle position by simply depressing the lever and allowing the auger to rest on the ground, without lifting the handlebars.
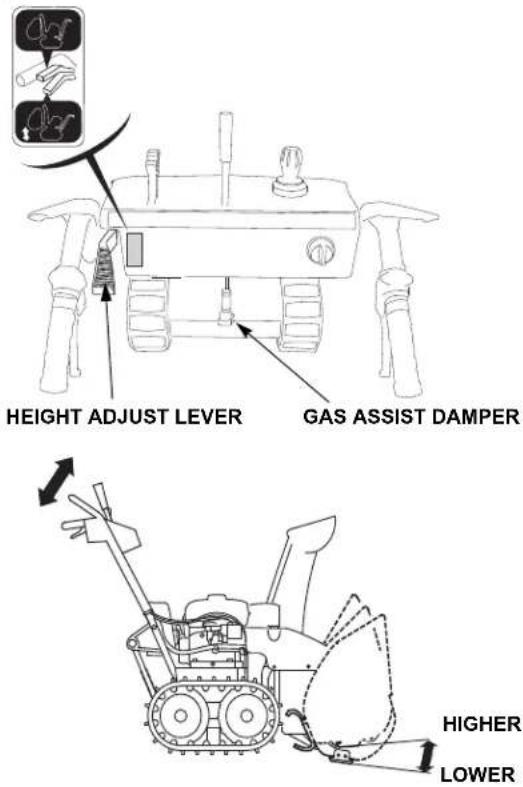
WARNING
Do not disassemble or throw assembly into fire as the gas assisted damper assembly is filled with a high pressure gas. The assembly can burst, causing injury. See your Honda dealer for proper disposal instructions.
NOTICE
Do not pull on the gas-assisted damper or tie with a rope, or it may cause functional damage of the gas-assisted damper assembly.
LED Work Light
The LED work light comes ON while the engine is running, and it goes OFF when the engine stops. The light does not come ON when the engine switch is turned ON unless the engine is started.
Snow Drop Bar
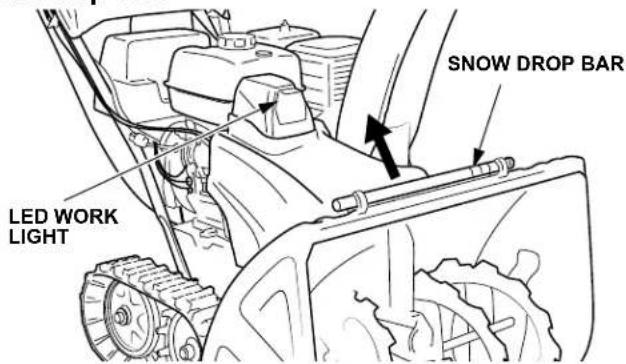
If the snow discharge chute or snow blowing mechanism becomes clogged, stop the engine and use this bar to unclog them.
After unclogging, wipe the bar clean, and store it in the holders.
WARNING
Before removing clogged snow, be sure to stop the engine, and make sure that all rotating parts have come to a complete stop. Remove the spark plug cap from the spark plug. Unexpected starting could cause personal injury.
PRE-OPERATION CHECK
Check the snow thrower on level ground with the engine stopped.
WARNING
To prevent accidental start-up, remove the engine switch key, and disconnect the spark plug cap before performing the pre-operation check. Unexpected starting could cause personal injury.
Fuel Level
If the needle is not in the FULL position, fill the fuel tank to the level shown.
Add fuel only while standing on the fuel tank side of the snow thrower.
Use unleaded petrol with a Research Octane Number of 91 or higher (a Pump Octane Number of 86 or higher).
Never use stale or contaminated petrol or an oil/petrol mixture.
Avoid getting dirt or water in the fuel tank.
Do not overfill the fuel tank (there should be no fuel in the filler neck). After refueling, make sure the fuel tank cap is closed properly and securely.
After refueling, tighten the fuel tank cap securely.
FUEL TANK CAP
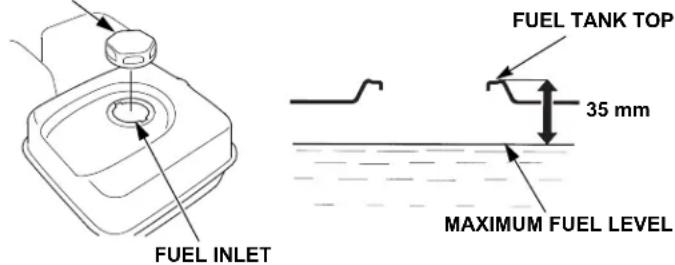
WARNING
Petrol is extremely flammable and is explosive under certain conditions.
Refuel in a well-ventilated area with the engine stopped.
Do not smoke or allow flames or sparks in the area where the engine is refueled or where petrol is stored.
Be careful not to spill fuel when refueling. Spilled fuel or fuel vapor may ignite. If any fuel is spilled, make sure the area is dry before starting the engine.
Avoid repeated or prolonged contact with skin or breathing of vapor. KEEP OUT OF REACH OF CHILDREN.
NOTE: Petrol spoils very quickly depending on factors such as light exposure, temperature, and time.
In worst cases, petrol can be contaminated within 30 days. Using contaminated petrol can seriously damage the engine (clogged carburetor, stuck valve).
Damage due to spoiled fuel is not covered by the Distributor's Limited Warranty.
To avoid this follow these recommendations:
- Only use specified petrol.
- Use fresh petrol.
- To slow deterioration, keep petrol in a certified, sealed, non-translucent fuel container.
- Store in a dark area away from direct sunlight.
- If long storage (more than 30 days) is foreseen, drain fuel tank and carburetor (see page 20).
- Don't let snow get in the fuel tank. Water in the fuel system can cause stalling and difficult starting.
Petrol Containing Alcohol
If you decide to use a petrol containing alcohol (gasohol), be sure its octane rating is at least as high as that recommended by Honda.
There are two types of "gasohol": one containing ethanol, and the other containing methanol.
Do not use gasohol that contains more than 10% ethanol.
Do not use petrol containing more than 5% methanol (methyl or wood alcohol) and that does not also contain co-solvents and corrosion inhibitors for methanol.
NOTE: Fuel system damage or engine performance problems resulting from the use of petrol that contains more alcohol than recommended is not covered under the warranty. Before buying petrol from an unfamiliar station, first determine if the petrol contains alcohol, if it does, find out the type and percentage of alcohol used. If you notice any undesirable operating symptoms while using a particular petrol. Switch to a petrol that you know contains less than the recommended amount of alcohol.
Engine Oil Level
Inspection
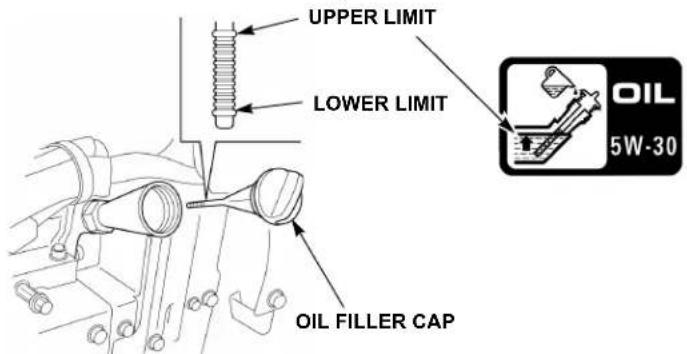
With the snow thrower on a level surface, remove the oil filler cap and wipe the dipstick clean.
Insert the dipstick into the filler neck, but do not screw it in. Remove the dipstick and check the oil level.
If the level is low, fill to the upper limit mark on the dipstick with the recommended oil. Do not overfill.
Recommended Oil
Use 4-stroke motor oil that meets or exceeds the requirements for API service classification SJ or later (or equivalent). Always check the API service label on the oil container to be sure it includes the letters SJ or later (or equiv
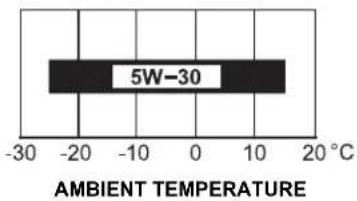
SAE 5W-30 is recommended for general use.
QUANTITY SPECIFIED: 0.60 L
CAUTION
Engine oil is a major factor affecting engine performance and service life. Non-detergent oils and 2-stroke engine oils are not recommended because of inadequate lubricating properties.
Running the engine with insufficient oil can cause serious engine damage.
Skid Shoe and Scraper
Adjust the skid shoe for the auger housing ground clearance best suited to your snow removal conditions.
The skid shoe is installed at the rear (ET, ETD type) or side (EW, EWD type) of the auger housing.
Remove the bolts to remove the skid shoe, and then set the skid shoe to the convenient position and tighten the bolts securely.
WARNING
To prevent accidental starting, turn the engine switch to the OFF position and disconnect the spark plug cap.
- Place the snow thrower on a level surface.
- Track models: Depress the auger height lever, push down on the handlebars to raise the auger off the ground, then slowly lower the auger until the skid shoes contact the ground.
- Loosen the skid shoe bolts and move the skid shoes up or down to obtain the desired auger housing ground clearance. Tighten the skid shoe bolts.
TORQUE: 26.5 N·m
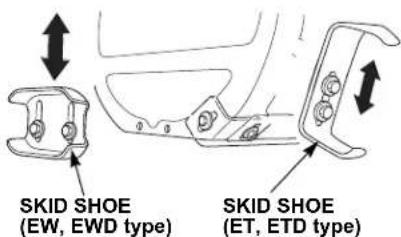
- After adjusting, raise the auger off the ground, then slowly lower and make sure both skid shoes contact the ground at the same time.
Auger Clearance
For ordinary snow: 4.0 - 8.0 mm
For finishing: 0 - 5.0 mm
For use on uneven surfaces: 25.0 - 30.0 mm
- Check the scraper ground clearance and readjust to 2.0 - 4.0 mm if necessary.
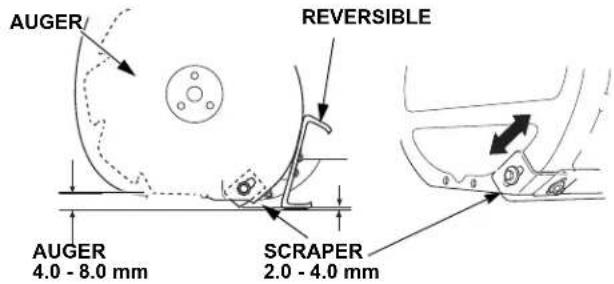
NOTE: Be sure to tighten the scraper bar bolts and nuts securely after making adjustments.
TORQUE: Scraper Bar Bolts (5) 26.5 N·m Nuts (2) 25.1 N·m
NOTICE
Do not use the snow thrower on rough or uneven surfaces with the auger ground clearance set for hard snow or smooth surfaces. This may cause serious damage to the snow blowing mechanism.
Wear Inspection
If the thickness of the skid shoe contacting the ground surface is 0.5 mm, turn the skid shoe upside down.
Replace the skid shoe if the thickness is less than 0.5 mm after turning the skid shoe upside down.
Auger and Blower Bolts
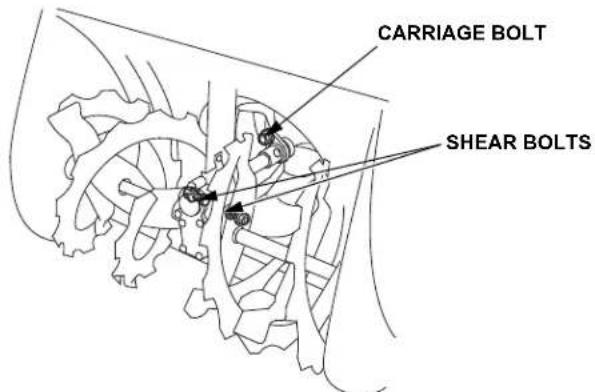
Check the auger and blower for loose or broken shear bolts. If broken, replace them with new ones (see page 18).
Other Checks
- Check all bolts, nuts, and fasteners for security.
- Check the entire machine for any other faults that may have occurred during previous use.
- If the machine was not properly cleaned, make sure no ice or snow is blocking the auger or impeller.
STARTING THE ENGINE
WARNING
Never run the engine in an enclosed or confined area. Exhaust contains poisonous carbon monoxide gas; exposure can cause loss of consciousness within minutes and may lead to death.
Manual Starting
- Move the shift lever to "N" (Neutral).

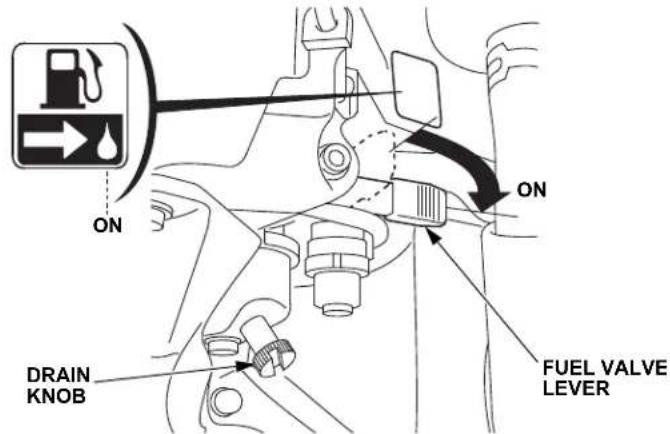
- Be sure that the drain knob is tightened securely and then turn the fuel valve lever to the ON position.
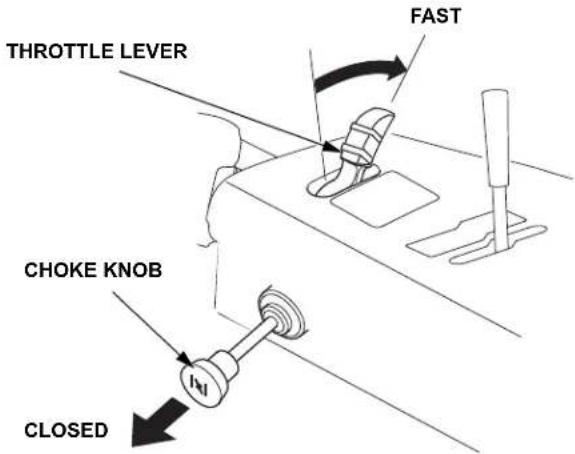
- When the engine is cold, pull the choke knob to the CLOSED position and move the throttle lever to the FAST position.
- Turn the engine switch to the ON position.
- Pull the starter grip lightly until you feel resistance, then pull briskly in the direction of the arrow as shown below.
NOTICE
Do not allow the starter grip to snap back against the engine. Return it gently to prevent damage to the starter. Damage may result if the starter grip is pulled while the engine is running.
Pull the starter rope toward the control panel.
- Let the engine warm up for several minutes. Then, follow the procedures below.
If the choke knob has been pulled to the CLOSED position to start the engine, gradually push it to the OPEN position as the engine warms up. Move the throttle lever to the SLOW position.
- While warming the engine up, also warm the transmission as follows:
a. Check that the shift lever is in the "N" (Neutral) position.
b. Depress the drive clutch lever for about 30 seconds.
DC Electric Starting
(ETD, EWD)
- Move the shift lever to "N" (Neutral).
- Be sure that the drain knob is tightened securely and then turn the fuel valve lever to the ON position.
- When the engine is cold, pull the choke knob to the CLOSED position and move the throttle lever to the FAST position.
- Turn the engine switch to the "START" position and release the switch after the engine is started. The switch automatically returns to the "ON" position.
WARNING
Never hold or depress the auger and drive clutch levers when operating the starter motor; the machine will start moving suddenly as the engine starts, possibly resulting in personal injury.
NOTE: When the speed of the starter motor drops after a period of time, it is an indication that the battery should be recharged.
Do not use the starter motor for more than 5 seconds. If the engine fails to start, release the key, and wait at least 10 seconds before operating the starter motor again.
- After starting the engine, allow it to idle for a few seconds to warm up to operating temperature. As the engine stabilizes, gradually move the throttle lever to the SLOW position.
If the choke knob has been pulled to the CLOSED position to start the engine, gradually push it to the OPEN position as the engine warms up. Move the throttle lever to the SLOW position.
- While warming the engine up, also warm the transmission as follows:
a. Check that the shift lever is in the "N" (Neutral) position.

b. Depress the drive clutch lever for about 30 seconds.
High Altitude Operation
At high altitude, the standard carburetor air-fuel mixture will be too rich. Performance will decrease, and fuel consumption will increase. A very rich mixture will also foul the spark plug and cause hard starting.
High altitude performance can be improved by specific modifications to the carburetor. If you always operate your snow thrower at altitudes above 610 meters, have your dealer perform this carburetor modification.
Even with carburetor modification, engine horsepower will decrease about 3.5% for each 300 meter increase in altitude. The effect of altitude on horsepower will be greater than this if no carburetor modification is made.
NOTICE
When the carburetor has been modified for high altitude operation, the air/fuel mixture will be too lean for low altitude use. Operation at altitudes below 610 meters with a modified carburetor may cause the engine to overheat and result in serious engine damage. For use at low altitudes, have your dealer return the carburetor to original factory specifications.
Before operating this equipment you should read and understand the SAFETY INSTRUCTIONS starting on page 2.
-
Start the engine according to the procedures described on page 11 or 12.
-
Move the throttle lever to the FAST position for normal operation.
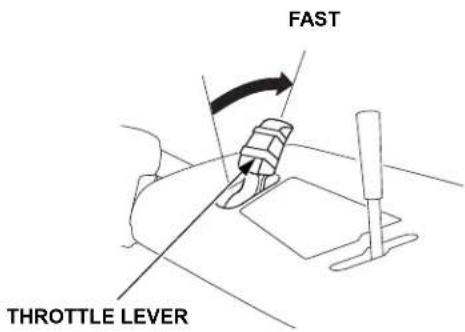
NOTE: Low speed is recommended for removing deep or hard-packed snow.
Track models:
- Set the auger housing to the appropriate position (see page 8).
- Fix the throwing direction by using the chute joystick (see page 6).
- Depress the auger clutch lever.
The machine will clear snow when you depress the auger clutch lever.
- Depress the drive clutch lever.
By depressing the drive clutch lever, the auger clutch lever will be locked and you can operate without holding the auger clutch lever with your right hand.
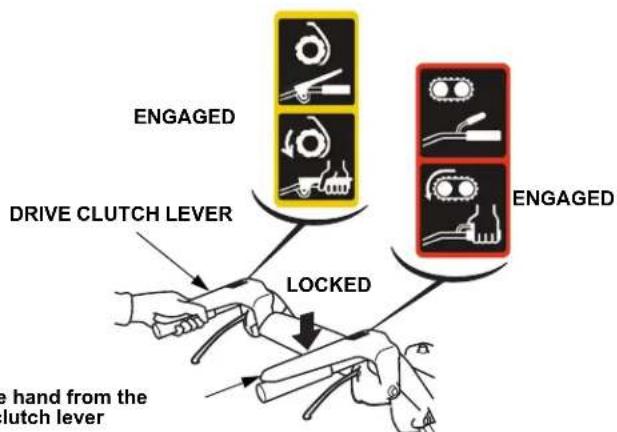
When both levers are depressed, the drive clutch lever locks the auger clutch lever down. This frees your right hand to operate the other snow thrower controls. Releasing the drive clutch lever unlocks and releases the auger clutch lever.
To move from one place to another, or to change direction, use the drive clutch lever only. Release both the drive clutch lever and auger clutch lever once, then depress the drive clutch lever.
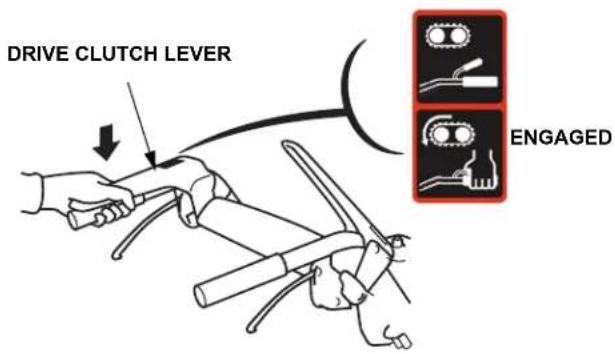
- Release the drive clutch lever to stop clearing or moving.
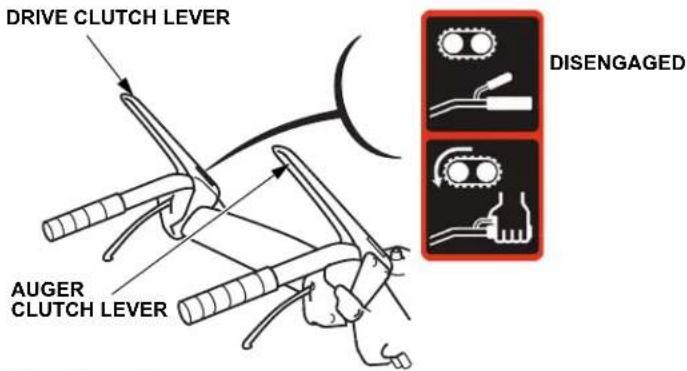
Clearing Snow
For best efficiency, clear snow before it melts, refreezes and hardens. Do not reduce engine speed while throwing snow. Observe the following to clear hard or deep snow.
Clear deep or hardened snow in a slow drive speed and in a narrow width.
Follow the steps described below when the engine lugs against deep or heavy snow.
- Release the drive and auger clutch levers.
- Move the shift lever to NEUTRAL.
- Depress the auger clutch lever to rotate the auger only.
- Release the auger clutch lever after the engine picks up speed.
- Move the shift lever to the desired position, then depress the auger clutch lever.
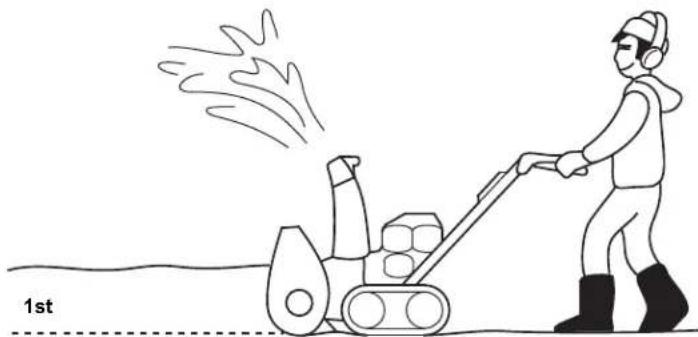
- Clearing with back and forth motions
If the snow is so hard that the snow thrower tends to ride over the surface, push it backward and forward to remove snow gradually. - Clearing in steps
If the height of the snow is greater than the height of the auger housing, remove it in several steps as shown.
natural_image
Line drawing of a person pushing a snowman with motion lines indicating speed (no text or symbols)2nd
3rd
WARNING
Adjust the snow discharge chute to avoid hitting the operator, bystanders, windows, and other objects with thrown snow. Stay clear of the snow discharge chute while the engine is running.
If the snow discharge chute becomes clogged, stop the engine, disconnect the spark plug cap, and use a snow drop bar or a wooden stick to unclog it.
Never put your hand into the snow discharge chute while the engine is running; serious personal injury could result.
To move from one place to another, or to change direction, use the drive clutch lever only. Do not use the auger clutch lever as this will cause the snow blowing mechanism to rotate, possibly resulting in personal injury.
STOPPING THE ENGINE
To STOP the engine in an emergency, turn the engine switch to the OFF position immediately.
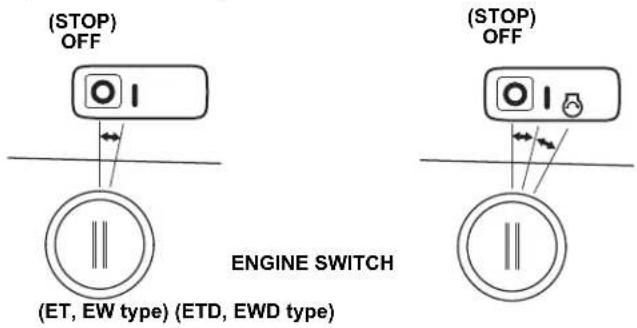
Under normal conditions, use the following procedure.
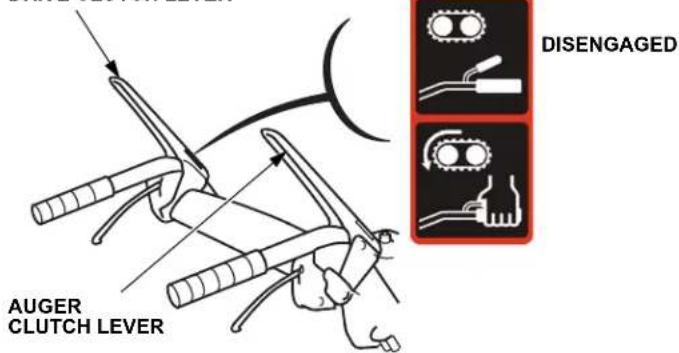
- Release the auger and drive clutch levers. The machine and snow blowing mechanism will stop operation.
DRIVE CLUTCH LEVER
- Move the shift lever to "N" (Neutral).
- Move the throttle lever to the SLOW position.
- Turn the engine switch to the OFF position.
- Turn the fuel valve lever to the OFF position.
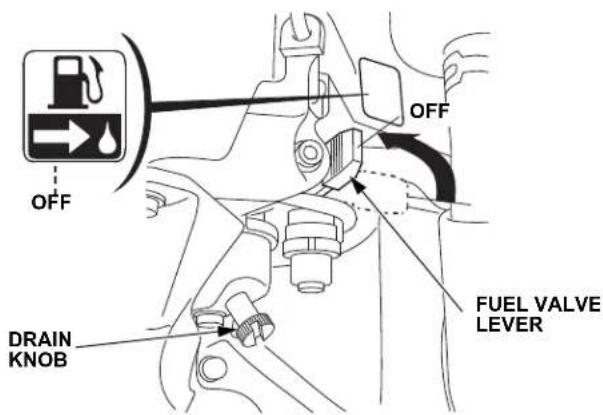
CAUTION
Do not park the snow thrower on a slope as it is not equipped with parking brake mechanism.
MAINTENANCE
Periodic inspection and maintenance will help extend the service life of your snow thrower while keeping it in the best operating condition. Inspect or service as described in the "Maintenance Schedule" on page 16.
Shut off the engine before performing inspection and maintenance, and disconnect the spark plug wire from the plug so the engine cannot be started.
WARNING
If the engine must be run, make sure the area is well-ventilated. Exhaust gas contains poisonous carbon monoxide; exposure can cause loss of consciousness within minutes and may lead to death.
To avoid overturning, place the snow thrower on a level surface before performing inspection and maintenance.
Use only genuine Honda parts or their equivalent. Replacement parts which are not of equivalent quality may damage the snow thrower.
Tools
A spark plug wrench and handle are supplied with the snow thrower. Some of the maintenance procedures described in this manual will require an additional set of metric wrenches (not supplied).
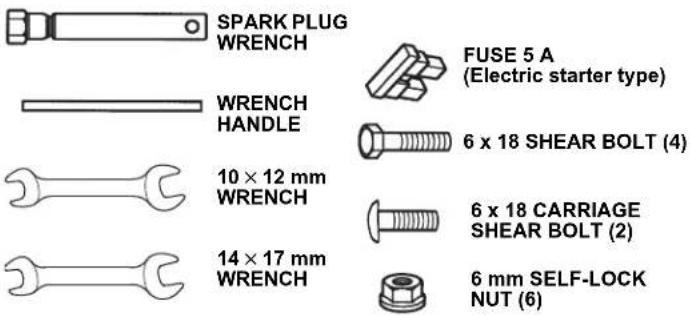
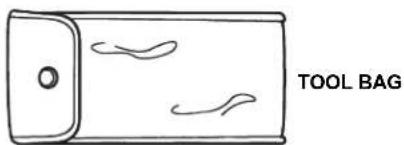
Maintenance Schedule
| REGULAR SERVICE PERIOD (1)Perform at every indicated month or operating hour interval, whichever comes first. Item | Each use | Every year | First month or 20 hours | Every 100 hours | Every 300 hours | Every 4 years | ||
| Before operation | Before storage | |||||||
| Engine oil | Check level o | |||||||
| Change o (4) o o (4) | ||||||||
| Auger transmission oil | Check level o (2) | |||||||
| Spark plug Check-adjust o (4) | ||||||||
| Replace o o | ||||||||
| Auger skid shoes and scraper | Check-adjust o o (4) | |||||||
| Track Check-adjust o (4) o | ||||||||
| Drive Chains (track models) | Lubricate o | |||||||
| Wheel | Check condition and tire pressure | o | o | |||||
| Auger and blower shear bolts | Check shear bolts | o | ||||||
| Bolts, nuts, fasteners | Check | o | ||||||
| Fuel sediment cup | Clean | o | ||||||
| Fuel tank and carburetor | Drain | o | ||||||
| Anti corrosion oil chain | Apply oil | o | ||||||
| Chute guide control cable | Check-adjust | o (2) (4) | o (2)(4) | |||||
| Auger clutch cable | Check-adjust | o (2) (4) | o (2)(4) | |||||
| Throttle cable | Check-adjust | o (2) (4) | ||||||
| Choke cable | Check-adjust | o (2) (4) | ||||||
| Drive clutch cable | Check-adjust | o (2) (4) | o (2)(4) | |||||
| Height adjust lever | Check-adjust (free play) | o (2) (4) | ||||||
| Drive belt | Check-adjust | o (2)(3)(4) | o (2)(3)(4) | |||||
| Auger belt | Check-adjust | o (2)(3)(4) | o (2)(3)(4) | |||||
| Idle speed | Check-adjust o (2) | o (2) | ||||||
| Valve clearance | Check-adjust | o (2) | o (2) | |||||
| Combustion chamber | Clean | After every 1,000 hours (2) | ||||||
| Fuel tank and filter | Clean | o (2) | o (2) | |||||
| Fuel tube | Check | Every 2 years (2) | ||||||
| Replace | o (2) | |||||||
| Battery | Check voltage | Charge if voltage is less than 12.7 V. | ||||||
| Charge | o | o | ||||||
(1) For professional commercial use, log hours of operation to determine proper maintenance intervals.
(2) These items should be serviced by your Honda servicing dealer, unless you have the proper tools and are mechanically proficient. Refer to the Honda Shop Manual for service procedures.
(3) Check the belt for wear or damage. Replace the belt with a new one if it is worn or damaged.
(4) These parts may require more frequent inspection and replacement under heavy use.
Engine Oil Change
If the engine oil is dirty, engine wear will occur more rapidly. Change the oil at designated intervals. Maintain the oil at the proper level.
OIL CHANGE INTERVAL: First month or 20 hours, or every year, before operation.
RECOMMENDED OIL: Use 5W-30 4-stroke motor oil that meets or exceeds the requirements for API service classification SJ or later (or equivalent). Always check the API service label on the oil container to be sure it includes the letters SJ or later (or equivalent).
QUANTITY SPECIFIED: 0.60 L
How to Change the Oil
Let the engine cool before changing the oil.
Drain the oil while the engine is still warm to assure rapid and complete draining.
- Place the snow thrower on a level surface.
- Remove the engine oil filler cap/dipstick, drain bolt, and sealing washer.
CAUTION
If you drain the oil immediately after stopping the engine, its temperature will be high and may cause burns.
- Install a new sealing washer and drain bolt and tighten the bolt securely.
TORQUE: 11 N·m
-
Fill with new oil (see page 10) up to the upper limit, as indicated by the oil filler cap/dipstick. (In checking the oil level with the oil filler cap/dipstick, do not screw the cap/dipstick in.) Do not overfill.
-
After replacing the oil, securely tighten the engine oil filler cap/dipstick.
Wash your hands with soap and water after handling used oil.
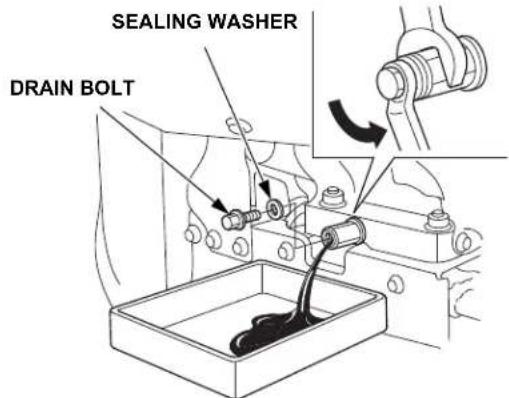
NOTE: Please dispose of used motor oil in a manner that is compatible with the environment. We suggest you take it in a sealed container to your local service station for recycling. Do not throw in the trash or pour it onto the ground.
Spark Plug
Checking and Adjustment
The spark plug must be periodically checked and adjusted to provide reliable ignition.
Interval at which the spark plug must be checked: Every year, before operation
Cleaning Procedure
WARNING
If the engine has been running, the muffler will be very hot. Be careful not to touch the muffler while it is hot. Allow the engine to cool before proceeding.
To ensure proper engine operation, the spark plug must be properly gapped and free of deposits.
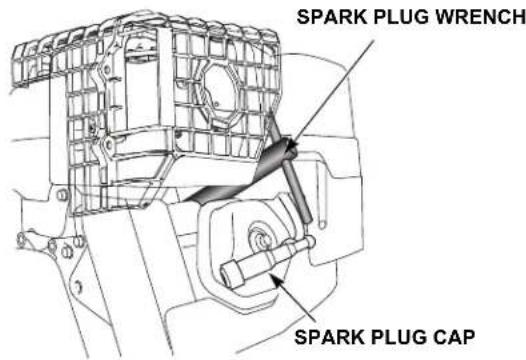
- Remove the spark plug cap.
- Clean any dirt from around the spark plug base.
- Use the wrench supplied in the tool kit to remove the spark plug.
- Inspect the spark plug. Replace it if the electrodes are worn or if the insulator is cracked or chipped. If it is to be reused, clean the electrode and the insulator with a wire brush.
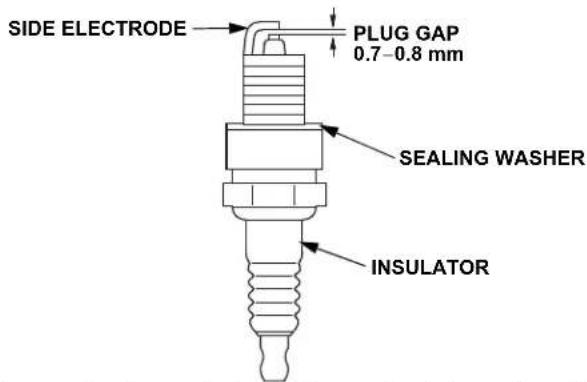
- Measure the plug gap with a feeler gauge.
Correct as necessary by carefully bending the side electrode.
The gap should be: 0.7 - 0.8 mm
REQUIRED PLUG: BPR5ES (NGK) or W16EPR-U (DENSO)
- Make sure that the spark plug sealing washer is in good condition and thread the spark plug in by hand to prevent cross-threading.
- After the spark plug is seated, tighten with a spark plug wrench to compress the washer.
TORQUE: 18 N·m
NOTE: If installing a new spark plug, tighten 1/2 turn after the spark plug seats to compress the washer. If reinstalling a used spark plug, tighten 1/8 to 1/4 turn after the spark plug seats.
NOTICE
Use only the required spark plugs or equivalent plugs. Spark plugs which have an improper heat range may cause engine damage. The spark plug must be securely tightened. An improperly tightened spark plug can become very hot and may damage the engine.
Track Adjustment
(track type only)
ADJUSTMENT INTERVAL: Every year, before operation
Make sure the tracks are clean and dry before adjustment. The tracks cannot be correctly adjusted if clogged with snow or debris, or coated with ice.
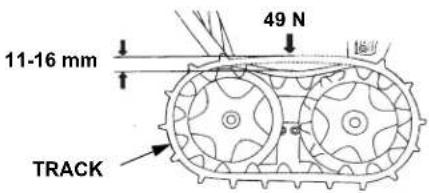
With the snow thrower resting on its tracks, check track deflection by pressing down midway between the wheels with a force of 49 N.
When correctly
adjusted, track deflection should be 11 - 16 mm.
Adjusting Procedure
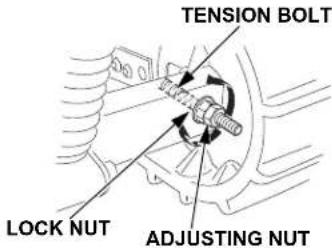
- Loosen the left and right tension bolt lock nuts at the rear axle, and turn the adjusting nuts to correctly tension both tracks.
- After adjustment, tighten the lock nuts securely.
TORQUE: 21.5 N·m
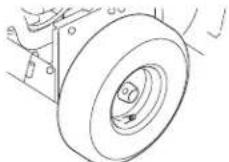
Tires (wheel type only)
NOTICE
Do not operate with a flat tire. This may cause the bead to come off.
Over inflation can cause premature tire failure. Inflate the tires to manufacturer's recommended tire pressure.
Before each use, check the tire pressure with an air pressure gauge.
Tire pressure: 138 kPa
NOTICE
Do not inflate more than 159 kPa or tire damage may result.
Auger/Blower Inspection
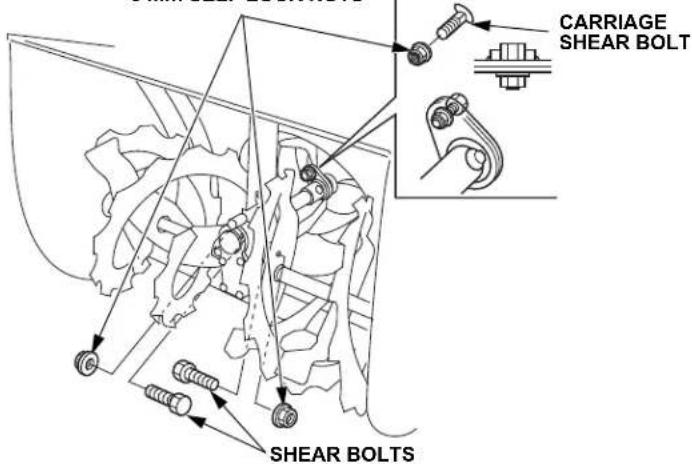
Check the auger, auger housing, blower, and shear bolts for signs of damage or other faults. If any of the shear bolts are broken, replace them with the one furnished with the snow thrower. Additional shear bolts and nuts are available from authorized Honda snow thrower dealers.
NOTICE
Shear bolts are designed to break under force that would otherwise damage auger and blower parts. Do not replace shear bolts with ordinary hardware bolts.
Shear Bolt Replacement Procedure
- Place the snow thrower on a firm, level surface.
- Turn the engine switch OFF and remove the cap from the spark plug. Check that all rotating parts have been brought to a complete stop.
- Clean the auger and blower of snow, ice, or any other foreign particles.
-
Check the entire snow clearing mechanism.
-
Replace any broken shear bolts. Tighten securely.
6 mm SELF LOCK NUTS
Fuse (EWD, ETD starter type)
If the fuse is blown, the starter motor won't operate.
In the event of a blown fuse, replace it with another fuse of the rated capacity only after investigating the cause for the failure. If the fuse is replaced without correcting cause, the new fuse may blow quickly again.
A replacement fuse was supplied with the snow thrower. Additional fuses are available from your Honda snow thrower dealer.
NOTICE
Never replace a blown fuse with any object other than another fuse of the rated capacity. Using any other object such as wire or aluminum foil may cause fires in wiring or other parts.
Fuse Replacement
- Turn the engine switch to the OFF position and remove the key before checking or replacing the fuse.
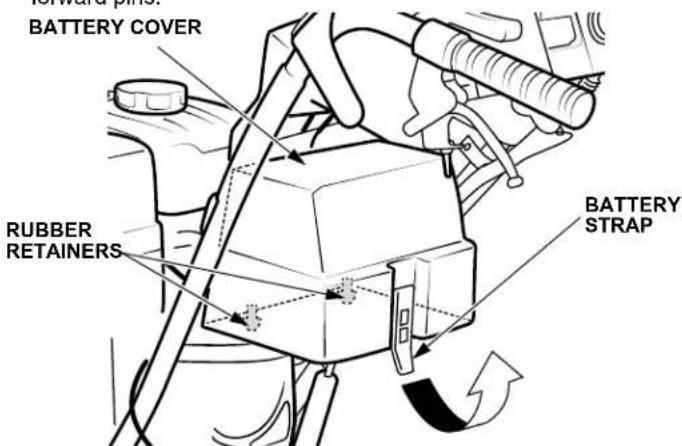
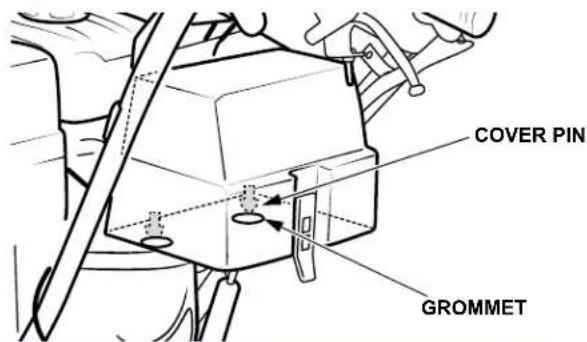
- Remove the battery cover by first pulling the battery strap from the bottom hook. Firmly pull the cover upward to unsnap the two forward pins.
-
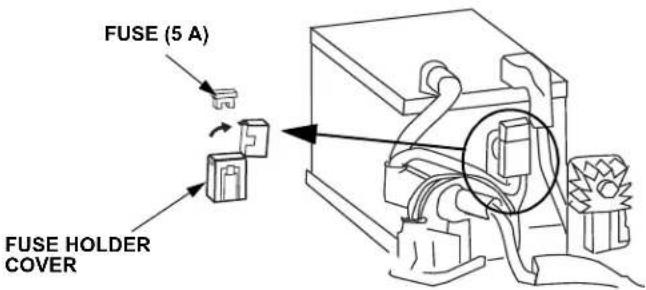
Rotate the fuse holder cover and pull the fuse out.
-
Replace the fuse with a fuse of the same type and rating.
Specified fuse: 5 A
NOTICE
If frequent fuse failure occurs, determine the cause and correct the problem before attempting to operate the snow thrower further.
Never use a fuse with a different rating from that specified. Serious damage to the electrical system or fire may result.
-
Install the fuse holder cover.
-
Install the battery cover by holding the bottom of the grommet and firmly squeezing the front side of the cover to engage each pin into the grommets.
TRANSPORTING
Before Loading
To move the snow thrower with the engine OFF, pull both steering control levers against the handlebar to release the transmission and then push or pull the snow thrower in the desired direction.
-
Loading the snow thrower on a trailer should be performed on a firm, level surface.
-
Use a loading ramp that is strong enough to support the combined weight of the snow thrower and the operator.
Weight of snow thrower (operating weight):
- The loading ramp must be long enough so that its slope is 15^ (26%) or less.
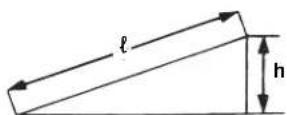
| Length of Ramp (l) | 2.5 m 3.0 m 3.5 m | |
| Height (h) 65 cm 78 cm 90 cm |
-
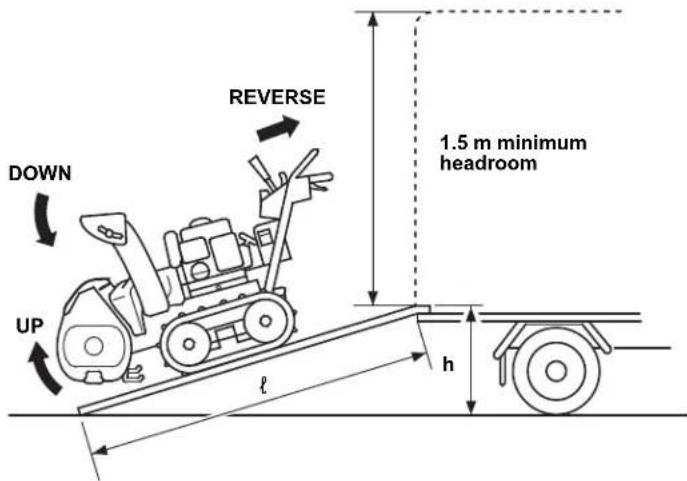
If the snow thrower is to be transported on a truck having a hood, check that the distance between the truck bed and hood is 1.5 m or more. Remove the discharge chute if the distance is less than 1.5 m.
-
Before loading, check that there is sufficient fuel in the tank. The engine may stall on the ramp if there is little fuel in the tank.
Loading
-
Press the height adjust lever, and push the handlebar down to raise the auger to the HIGH position (track type) (see page 8).
-
Lower the discharge chute all the way down by operating the chute joystick control (engine must be running for operation).
-
Use reverse gear to back the snow thrower up the ramp.
-
Use extreme care not to hit the discharge chute against the hood or any other parts of the truck.
Avoid stopping the snow thrower on the ramp. Should the engine stop, be sure to move the shift lever back to the NEUTRAL before attempting to restart the engine.
Track Models:
Lower the auger housing so the skids rest on the vehicle floor.
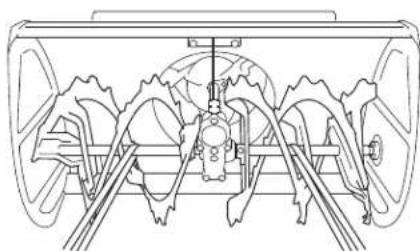
Tie the snow thrower down with rope or straps, and block the wheels or treads. Keep the tie-down rope or straps away from controls, cables, and the gas assisted damper on track models.
Do not tie with rope or straps stronger than necessary or over-tighten to prevent snow thrower parts from bending or breaking.
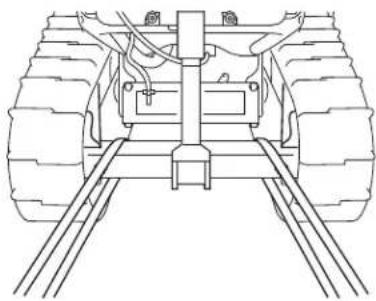
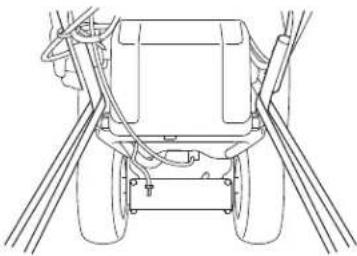
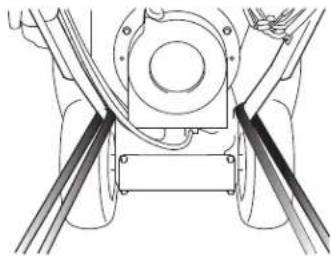
Tie-down Points
Front
natural_image
Technical line drawing of a mechanical assembly with gears and levers (no text or symbols)Rear
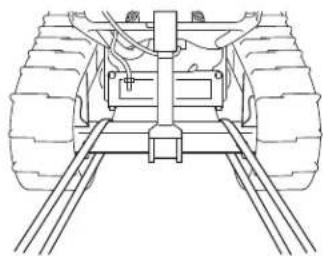
Track type:
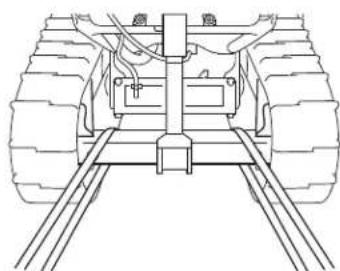
natural_image
Technical line drawing of a vehicle chassis frame with visible tracks and suspension components (no text or symbols)Wheel type:
with battery without battery
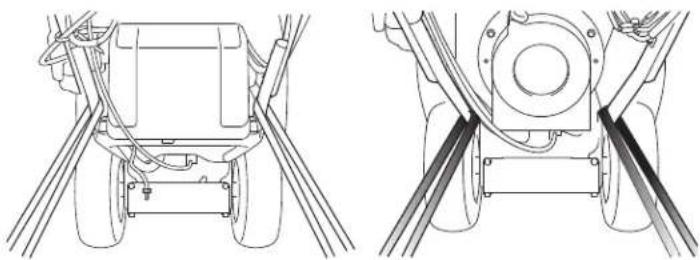
natural_image
Technical line drawings of mechanical components, showing front and side views (no text or symbols)STORAGE
Before storing the snow thrower for an extended period:
- Be sure the storage area is free of excessive humidity and dust.
- Drain the fuel.
WARNING
Petrol is extremely flammable and explosive under certain conditions. Do not smoke or allow flames or sparks in the area. Do not drain the fuel tank when the exhaust system is hot.
a. Turn the fuel valve lever to the ON position.
b. Loosen the carburetor drain knob, and drain the petrol into a suitable container. After draining, retighten the drain knob and turn the fuel valve lever to the OFF position.
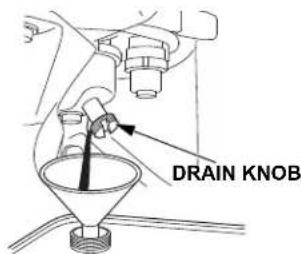
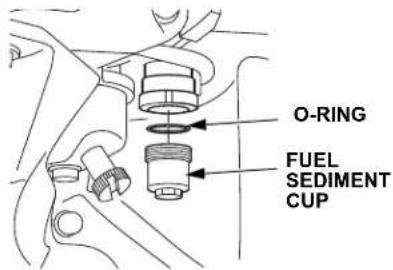
- Clean the fuel sediment cup.
a. Turn the fuel valve lever to the OFF position, remove, empty, and clean the fuel sediment cup. Do not remove the O-ring. Confirm the O-ring is properly
positioned and in good condition. Contact your authorized Honda dealer if the O-ring needs replacement.
b. Reinstall the cup and tighten securely.
TORQUE: 3.9 N·m
- Remove the spark plug and pour 5 cc of clean motor oil into the cylinder. Pull the starter rope slowly two or three times to distribute the oil.
Reinstall the spark plug.
- Pull the starter grip until resistance is felt. This closes the valves and protects the engine from internal corrosion.
(EWD, ETD)
- Battery service
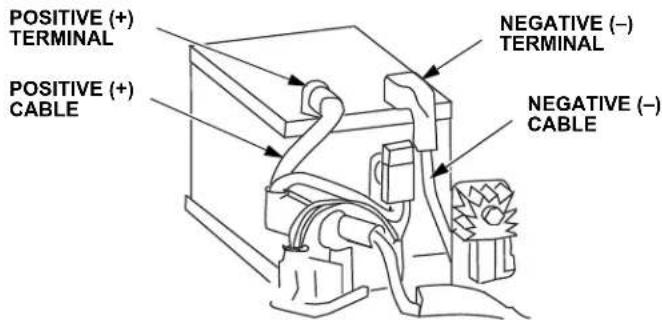
If the snow thrower will be stored for an extended period, remove the battery and store in a cool, dry place. If the battery will remain in the snow thrower during storage, disconnect the negative terminal from the battery. Recharge it every 6 months or if the voltage is less than 12.7V. Recharge every year before operation and before storage.
Battery Removal
- Remove the battery cover (see page 18).
- Remove the battery strap from the bottom hook.
- Remove the negative (−) cable from the battery first, and then remove the positive (+) cable from the battery.
- Remove the battery.
Battery Charging
A battery charger which is commercially available for 12 V batteries can be used to charge the battery.
The battery is rated at 11.0 Ah (10hr). Charging current should equal 10% of the battery's ampere-hour rating. A battery charger should be used that can be adjusted to deliver 1.1 amps.
- Connect the battery charger following the manufacturer's instructions.
- Charge the battery 5-10 hours.
The battery is completely sealed and does not require additional maintenance such as adding water.
Battery Installation
- Install the battery in its original position.
- Connect the battery positive (+) cable to the battery positive (+) terminal first, and tighten the bolt securely.
- Slide the battery boot over the positive (+) cable and terminal.
- Connect the battery negative (−) cable to the battery negative (−) terminal, and tighten the bolt securely.
- Install the battery strap and the battery cover (see page 18).
(Electric-start type)

This symbol on the battery means that this product must not be treated as household waste.
NOTE: An improperly disposed of battery can be harmful to the environment and human health. Always confirm local regulations for battery disposal.
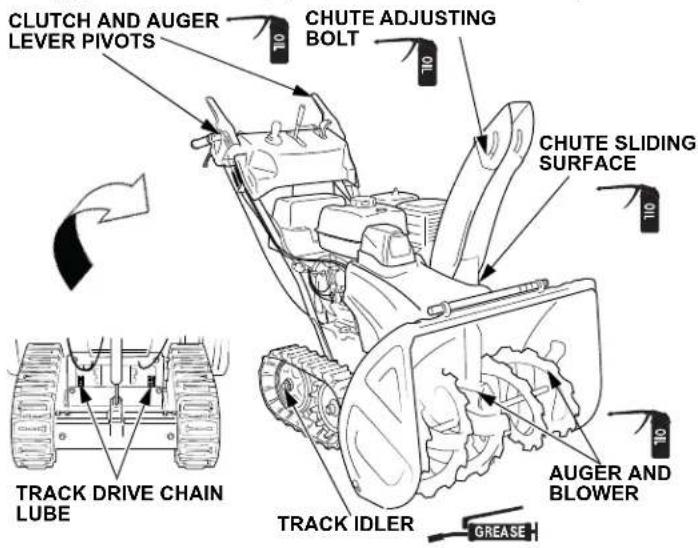
- Apply oil to the following parts for lubrication and rust prevention.
TROUBLESHOOTING
When the engine will not start:
-
Is there enough fuel?
-
Is the fuel valve on?
-
Is petrol reaching the carburetor?
To check, loosen the drain knob with the fuel valve on. Fuel should flow freely.
WARNING
Petrol is extremely flammable, and petrol vapor can explode. If any fuel is spilled, make sure the area is dry before testing the spark plug or starting the engine. Spilled fuel or fuel vapor may ignite.
-
Is the engine switch on?
-
Check the spark plug for dirt, fuel wetness and proper gap.
a. Clean the spark plug.
b. Reinstall the plug if it will be reused, or replace with a new one.
- If the engine still does not start, take the snow thrower to an authorized Honda dealer.
If the auger or blower does not operate, check the shear bolts (see page 10). Replacement shear bolts and nuts were supplied with your snow thrower. Additional shear bolts and nuts are available from authorized Honda snow thrower dealers. Do not replace shear bolts with ordinary hardware bolts.
If the engine stops while snow discharging, is there enough fuel? If not, refuel.
SPECIFICATIONS
Frame
| Model HSS760A | ||||
| Description code SACA | ||||
| Wheel type Track type | ||||
| Items EW EWD ET ETD | ||||
| Overall length 1,485 mm | ||||
| Overall width 670 mm 630 mm | ||||
| Overall height 1,105 mm | ||||
| Handle height | 930 mm | 940 mm | ||
| Dry mass [weight] | 95 kg | 100 kg | 105 kg | 115 kg |
| Width of snow clearance | 605 mm | |||
| Height of snow clearance | 550 mm | |||
| Snow throwing distance (varies based on snow conditions) | Max. 15 m | |||
| Clearing capacity | 42 Ton/hour | |||
NOTE: Specifications are subject to change without notice.
Engine
| Model | GX200T2 |
| Displacement | 196 cm ^3 |
| Bore x stroke | 68.0 x 54.0 mm |
| Starting method | Recoil starter,Recoil or electric starter |
| Ignition system | Transistor magneto |
| Oil capacity | 0.60 L |
| Fuel tank capacity | 3.1 L |
| Spark plug | BPR5ES (NGK),W16EPR-U (DENSO) |
| Battery | 12V•11Ah/10HR |
Noise and Vibration
| Model | HSS760A | |||
| Type | EW | EWD | ET | ETD |
| Sound pressure level at operator's ears (EN ISO 11200: 1995) | 85.5 dB (A) | 85.5 dB (A) | 85.5 dB (A) | 85.5 dB (A) |
| Uncertainty | 2 dB (A) | 2 dB (A) | 2 dB (A) | 2 dB (A) |
| Measured sound power level (2000/14/EC, 2005/88/EC) | 100 dB (A) | 100 dB (A) | 101 dB (A) | 100 dB (A) |
| Uncertainty | 2 dB (A) | 2 dB (A) | 1 dB (A) | 1 dB (A) |
| Guaranteed sound power level (2000/14/EC, 2005/88/EC) | 102 dB (A) | |||
| Vibration level at hand arm (EN1033: 1995) | 6.0 m/s ^2 | 9.1 m/s ^2 | 5.2 m/s ^2 | 4.8 m/s ^2 |
| Uncertainty (EN12096: 1997 Annex D) | 2.4 m/s ^2 | 3.6 m/s ^2 | 2.1 m/s ^2 | 2.4 m/s ^2 |
NOTE: Specifications are subject to change without notice.
INTRODUCTION
natural_image
Red HSS760A snowman with tracked wheels and visible engine components (no text or symbols)SOMMAIRE
RÈGLES DE SÉCURITÉ ..... 2
EMPLACEMENT DES
AUTOCOLLANTS DE SECURITE4 IDENTIFICATION DES
COMPOSANTS....5
COMMANDES 6
Fusible (ETD,EWD)....18
TRANSPORT....19
REMISAGE....20
DÉPANNAGE....21
CARACTÉRISTIQUES ..... 22
natural_image
Illustration of a person cleaning snow with a snow-covered machine in the background (no text or symbols)natural_image
Illustration of a snowman, a child, and a dog near a fence with a tractor in the background (no text or symbols)TORQUE: 26.5 N·m
natural_image
Line drawing of a person pushing a snowman with a blade, emitting smoke or dust (no text or symbols)2de
3ème
AVERTISSEMENT
natural_image
Technical line drawing of a mechanical assembly with gears and levers (no text or symbols)Arrière
Type à chenilles :
natural_image
Technical line drawing of a vehicle chassis with visible tracks and structural supports (no text or symbols)natural_image
Technical line drawing of two mechanical components with visible wiring and mounting brackets (no text or symbols)REMISAGE
natural_image
Red HSS760A snowman with attached powertrain and engine components (no visible text or symbols)INHALT
natural_image
Illustration of a person cutting wood with a lathe machine in the background (no text or symbols)natural_image
Illustration of a snowman plowing a tractor with a dog nearby (no text or symbols)AUS...
⚠️ WARNING
natural_image
Line drawing of a person using a manual power tool with motion lines indicating speed (no text or symbols)- 3.
⚠️ WARNING
⚠ VORSICHT
natural_image
Simple line drawing of a smartphone with two abstract curved lines on the screen (no text or symbols)WERKZEUGTASCHE
Wartungsplan
Sicherung (ETD, EWD)
natural_image
Technical line drawing of a mechanical assembly with gears and levers (no text or symbols)Hinten
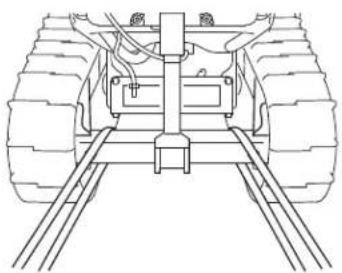
Raupentyp:
natural_image
Technical line drawing of a vehicle chassis frame with visible tracks and suspension components (no text or symbols)Radtyp:
natural_image
Technical line drawings of mechanical components, showing front and side views (no text or symbols)LAGERUNG
natural_image
Red HSS760A snowman with attached black roof-mounted blade and visible engine components (no text or symbols)INDICE
NORME DI SICUREZZA .....2
UBICAZIONI DELLE ETICHETTE DI
SICUREZZA. 4
IDENTIFICAZIONE DEI
COMPONENTI....5
COMANDI 6
Fusible (ETD,EWD)....18
TRANSPORTO 19
RIMESSAGGIO 20
DIAGNOSTICA 21
DATI TECNICI 22
natural_image
Illustration of a person cutting wood with a moving cart (no text or symbols)natural_image
Illustration of a snowman, a child, and a dog near a fence with a tractor in the background (no text or symbols)TIPO CON CINGOLI (ET, ETD)
OFF...
COPPIA: 26.5 N·m
natural_image
Line drawing of a person pushing a small utility pole with a blade, emitting smoke or dust (no text or symbols)2^
3^
AVVERTENZA
natural_image
Simple line drawing of a smartphone with two abstract curved shapes on the sides (no text or symbols)BORSA ATTREZZ
natural_image
Technical line drawing of a mechanical assembly with gears and blades (no text or symbols)Posteriori
Tipo con cingoli:
natural_image
Technical line drawing of a vehicle chassis frame with visible support legs and chassis structure (no text or symbols)Tipo a ruote:
con batteria
natural_image
Line drawing of a vehicle's rear suspension frame with visible tire tracks and structural components (no text or symbols)senza batteria
natural_image
Technical line drawing of a mechanical assembly with no visible text or symbolsRIMESSAGGIO
natural_image
Mechanical assembly diagram showing a valve and fitting with no visible text or symbolsPOZZETTO SEDIMENTI FILTRO
EC Declaration of Conformity
- The undersigned, Peter Neckebroeck, on behalf of the authorized representative, herewith declares that the machinery described below fulfils all the relevant provisions of:
• Directive 2006/42/EC on machinery
- Directive 2014/30/EU on electromagnetic compatibility
- Directive 2000/14/EC – 2005/88/EC on outdoor noise
- Directive 2011/65/EU - (EU) 2015/863 on the restriction of the use of certain hazardous substances in electrical and electronic equipment
- Description of the machinery
| a) Product: Snow thrower | |||
| b) Function: removing snow | |||
| c) Model d) Type e) Serial number | |||
| HSS760A | SACA | 2000001 | - 9999999 |
| HSS970A | SAEA | 2000001 | - 9999999 |
| HSS1380A | SAGA | 2000001 | - 9999999 |
- Manufacturer
Honda Power Equipment Mfg., Inc.
PO Box 37
Honda Drive, NC Hwy 119
Sweepsonville, NC 27359 USA
- Authorized representative and able to compile the technical documentation
Honda Motor Europe Ltd – Aalst Office
- References to applied standards
EN ISO 14982: 2009
ISO 8437-1: 2019
ISO 8437-2: 2019
ISO 8437-4: 2019
- Outdoor Noise Directive
a) Measured sound power dB(A): 101 (SACA), 101 (SAEA), 101 (SAGA)
b) Guaranteed sound power dB(A): 102 (SACA, SAEA, SAGA)
c) Noise parameter (kW/min ^-1 ): 4.3/3600 (SACA), 6.3/3600 (SAEA),
8.7/3600 (SAGA)
d) Conformity assessment procedure: Annex V
e) Notified body: N/A
-
Done at: Aalst, BELGIUM
-
Date: 8 April 2020
Peter Neckebroeck
Head of Certification
| Françals. (French)Déclaration CE de Conformité1. Le sous signé, Peter Neckebroeck, de la part du représentant autorisé, déclare que la machine décrit ci-dessous répond à toutes les dispositions applicables de* Diretive Machine 2006/42/CE* Direcutive 2014/30/UE sur la compatibilité électromagnétique* Direcutive 2000/14/CE-2005/88/CE des émissions sonores dans l'environnement des matériels destinés à être utilisé à l'extérieur des batiments* Direcutive 2011/65/UE - (UE) 2015/863 relative à la limitation de l'utilisation de certaines substances dangereuses dans les équipements électriques et électroniques2. Description de la machinea) Produit : Fraise à neigeb) Fonction : déneigerc) Modèled) Typee) Numéro de série3. Constructeur4. Représentant autorisé et en charge des éditions de documentation techniques5. Référence aux normes appliquées6. Directive des émissions sonores dans l'environnement des matériels destinés à être utilise à l'extérieur des batimentsa) Puissance accoustique mesuréeb) Puissance accoustique garantiec) Paramètre du bruitd) Procédure d'évaluation de conformitée) Organisme notifié7. Fail à8. Date | Italiano (Italian)Dichiarazione CE di Conformità1. Il sottoscritto, Peter Neckebroeck, in qualità di rappresentante autorizzato, dichiara qui di seguito che la macchina sotto descritta soddisfa tutte le disposizioni pertinenti delle:* Direttiva macchine 2006/42/CE* Direttiva sulla compatibilité elettromagnetica 2014/30/UE* Direttiva sulla emissione acustica delle macchine e attrezzature destinate a funzionare all'aperto 2000/14/CE-2005/88/CE* Direttiva 2011/65/UE - (UE) 2015/863 sulla restrizione dell'uso di determinate sostanze pericolose nelle apparecchiature elettriche ed elettroniche2. Descrizione della macchina) Prodotto : Spazzaneveb) Funzione : Rimozione di nevec) Modellod) Tipoe) Numero di serie3. Costruttore4. Rappresentante autorizzato e competente per la compilazione della documentazione tecnica5. Riferimento alle norme applicate6. Direttiva sulla emissione acustica delle macchine e attrezzature destinate a funzionare all'apertoa) Livello di potenza sonora misuratob) Livello di potenza sonora garantitoc) Parametri emissione acusticad) Procedura di valutazione della conformitàe) Organismo notificato7. Fatto a8. Data | Deutsch (German)EG-Konfilitätserklärung1. Der Unterzeichner, Peter Neckebroeck erklärt hiermit Im Namen der Bevollmächtigten, dass das hierunter genannte Maschine allen einschlägigen Bestimmungen der * entspricht.* Maschinenrichtlinie 2006/42/EG* Richtlinia der Elektromagnetischen Kompabitilität 2014/30/EU* Geräuschrichtlinie Im Freien 2000/14/EG-2005/88/EG* Richtlinie 2011/65/EU - (EU) 2015/863 zur Beschränkung der Verwendung bestimmter gefährlicher Stoffe in Elektro- und Elektronikgeräten2. Beschreibung der Maschinaa) Produkt : Schneefräseb) Funktion : Schnee räumenc) Modelld) Type) Seriennummer3. Hersteller4. Bevollmächtigter und in der Position, die technische Dokumentation zu erstellen5. Verweis auf aufwendbare Standards6. Geräuschrichtlinie im Freiena) gemessene Lautstärkeb) Schalleistungspegelc) Geräuschvorgabe d) Konformitätsbewertungs Ablaufe) Benannte Stelle7. Ort8. Datum |
| Nederlands (Dutch)EG-verklaring van overeenstemming1. Ondergetokende, Peter Neckebroeck, in naam van de gemachligde van de fabrikant, verklaart hiermee dat de hieronder beschreven machine voldoet aan alle toepasselijke bepalingen van :* Richtlijn 2006/42/EG betreffende machines* Richtlijn 2014/30/EU betreffende elektromagnetische overeenstemming* Richtlijn 2000/14/EG-2005/88/EG betreffende geluidsemissie (openlucht)* Richtlijn 2011/65/EU - (EU) 2015/863 betreffende beperking van het gebruik van bepaalde gevaarlijke stoffen in elektrische en elektronische apparaattu2. Beschrijving van de machinea) Product : Sneeuwruimerb) Functie : sneeuw ruimec) Modeld) Typee) Serienummer3. Fabrikant4. Gemachtigde van de fabrikant en in staat om de technische documentatie samen te stellen5. Referentie voor toegepaste normen6. Geluidsemissierichtlijn (openlucht)a) Gemeten geluidsvermogensniveau b) Gewaarborgd geluidsvermogensniveau c) Geluidsparamatord) Conformiteitsbecordeingsproceduree) Aangemelde instantie7. Plaats8. Datum | Dansk (Danish)EF OVERENSTEMMELSEERKLÆRING1. UNDERTEGNEDE, PETER NECKEBROECK, PÅ VEGNE AF DEN AUTORISERDE REPR/ESETANT, ERKLERER HERMED AT MASKINEN, SOM ER BESKREVET NEDENFOR, OPFYLDER ALLE RELEVANTE BESTEMMELSER IF∅LGE:* MASKINDIREKTIV 2006/42/EF* EMC-DIREKTIV 2014/30/EU* DIREKTIV OM ST∅JEMISSION 2000/14/EF-2005/88/EF* DIREKTIV 2011/65/EU - (EU) 2015/863 OM BEGRÆNSNING AF ANVENDELSEN AF VISSE FARLIGE STOFFER I ELEKTRISK OG ELEKTRONISK UDTSYR2. BESKRIVELSE AF PRODUKTETa) PRODUKT: Sneslyngeb) ANVENDELSE : Snerydningc) MODELD) TYPEe) SERIENUMMER3. PRODUCENT4. AUTORISERET REPR/ESSENTANT OG I STAND TIL AT UDARBEJDE DEN TEKNISKE DOKUMENTATION5. HENVISNING TIL ANVENDTE STANDARDER6. DIREKTIV OM ST∅JEMISSION FRA MASKINER TIL UDEND∅RS BRUGa) MÄLT LYDEFFEKTNIVEAUb) GARANTERET LYDEFFEKTNIVEAUC) ST∅JPARAMETERd) PROCEDURE FOR OVERENSSTEMMELSESVURDERINGe) BEMYNDIGET ORGAN7. STUD8. DATO | ΕΛληνικά (Greek)ΕΚ-Δήλωση συμμόρφωσης1. Ο κατωθι υπογεγραμμένος, Peter Neckebroeck, εκ μέρους του εξουνοδοθημένου αντιπροσώτου με το παρών δηλώνω ότι το παρακάτω περιγραφόμενο χύημα πληροί όλες τις σχετικές προδιαγραφές του:* Οδηνία 2006/42/ΕΚ για μηχανές* Οδηνία 2014/30/ΕΕ για την ηλεκτρομαγνητική συμβατότητα* Οδηνία 2000/14/ΕΚ/2005/88/ΕΚ για το επίτεδο θορύβου σε εξωτερικούς χώρους.* Οδηνία 2011/65/ΕΕ - (ΕΕ) 2015/863 για τον περιορισμό της χρήτης ορισμένων επικινδυνων ουσιών σε ηλεκτρικό και ηλεκτρικονό εξοπιλομό2. Περιγραφή μηχανισματοςa) προϊόν : Εκχιονιστικόb) λειτουργία : για εκχιονισμόςc) Μοντέλοd) Τύποςe) Αριθιμός σειράς παραγωγής3. Κατασκευακατής4. Εξουσιοδοιημένος αντιπρόσωτιος και είναι σε θέση να καταρτίατι τον τεχνικό φάκελο5. Παραπομήτι ατα ισχίοντα πρότυτα6. Οδηνία επιπόδου θορύβου εξωτερικών χώρωνa) Μετριηθείσα ηχητική ένισσηb) Εγγυημένη ηχητική ένισσηc) Ηυχτική παράμετροςd) Διαδικασία πιστοποίησηςe) Οργανισμόζπιστοποίησης7. Η δοκιμή έγνε8. Ημερομηνία |
| Slovensčina (Slovenian) ES izjava o skladnosti1. Spodaj podpisani, Peter Neckebroeck, ki je pooblašėena oseba in v imenu proizvajalca izjavija, da spodaj opisana strost ustreza vsem navedenim direklivam:* Direktiva 2006/42/ES o strojih* Direktiva 2014/30/EU o elektromagnestni združljivosti* Direktiva 2000/14/ES-2005/88/ES o hrupnosti* Direktiva 2011/65/EU - (EU) 2015/863 o omejevanju uporabe nekateriħ nevarnih snovi v elektròni opremi2. Opis napravea) Proizvod : Snežna frezab) Funkcija : odmetavanja snegac) Modeld) Tipese) Serijska številka3. Proizvajalec4. Pooblašėeni predstavnik ki lahko predloži tehniēno dokumentacijo5. Sklic na uporabljene standarde6. Direktiva o hrupnostia) Izmerjena zvočena moèb) Garantirana zvočena moéc) Parameterd) Postopeke) Postopek opravil7. Kraj8. Datum | Svenska (Swedish)EG-försäkrån om överensstämmelse1. Undertecknad. Peter Neckebroeck, på uppdrag avauktoriserad representant, dekliarerar härmed att maskinen beskriven nedan fulfiljöfer alia relevanta bestämmelser enl :* Direktiv 2006/42/EG gällande maskiner* Direktiv 2014/30/EU gällande elektromagnetiskkompatilitelt* Direktiv 2000/14/EG-2005/88/EG gällanda buller utomhus* Direktiv 2011/65/EU - (EU) 2015/863 om begränsning av användning av vissa farliga ämnen i elektrisk och elektronisk utrustning2. Maskinbeskrivlnagea) Produkt : Snöslungab) Funktion : flytta snöc) Modelld) Typese) Serienummer3. Tillverkare4. Auktoriserad representant och ska kunna sammanställa teknik dokumentationen,5. Referens för tillämpad standard6. Direktiv för buller ulomhusa) Uppmätt ljudnivåb) Garanterard ljudnivåc) Buller parameterd) Förfarande för bedömninge) Anmälda organ7. Utlärdat vid8. Datum | Español (Spanish)Declaración de Conformidad CE1. El abajo firmante, Peter Neckebroeck, en representación del representante autorizado, adjunto declara que la máquina abajo descrita, cumple las cláusulas relevantes de:* Directiva 2006/42/CE de maquinaria* Directiva 2014/30/UE de compatibilidad electromagnética* Directiva 2000/14/CE-2005/88/CE de ruido exterior* Directiva 2011/65/EU - (UE) 2015/863 sobre restricciones a la utilización de determinadas sustancias peligrosas en aparatos eléctricos y electrónicos2. Descripción de la máquinaa) Producto : Quitanievesb) Función : Quitar niovoc) Modelod) Typoe) Número de serie3. Fabricante4. Representante autorizado que puede compillar elexpediente técnico5. Referencia a normas aplicadas6. Directiva sobre ruido exteriora) Potencia sonora Medidab) Potencia sonora Garantizadac) Parámetros ruido d) Procedimiento evaluación conformidade) Organismo notificado7. Realizado en8. Fecha |
| Româná (Romanian)CE -Declaratie de Conformitate1. Subsematul Peter Neckebroeck, in numele reprezentantului autorizat, declar prin prezenta faptul ca echipamentul descris mai jos indeplineste toate conditiile necesare din:* Directiva 2006/42/CE privind echipamentul* Directiva 2014/30/UE privind compatibilitatea electromagnética* Directiva 2000/14/CE-2005/88/CE privind poluarea fonica in spatiu deschis* Directiva 2011/65/UE - (UE) 2015/863 privind restriciile do utilizare a anumitor substan.e periculoase in echipamentele electrice .i electronice2. Descrierea echipamentuluia) Produsul : Freza pentru curatat zapadab) Domeniu de utilizare : indepartarea zapezii c) Modeld) Tipe) Serio produs3. Producator4. Repreagent autorizat si abilitat sa realizeze documentatie tehnica5. Referin.a la standardele aplicate6. Directiva privind poluarea fonica in spatiu inchisa) Puterea acustica masuratab) Putore acustica maxim garantatac) Indice poluare fonica d) Procedura de evaluare a conformitatiie) Notificari7. Emisa la8. Data | Português (Portuguese)Declaração CE de Conformidade1. O abaixo assinado, Peter Neckebroeck, declara deste modo, em nome do mandatário, que a máquina abaixo descrito cumpre todas as estipulações relevantes da:* Directiva 2006/42/CE relativa às máquinas* Directiva 2014/30/UE relativa à compatibilidade electromagnética* Directiva 2000/14/CE-2005/88/CE relativa às emissões sonoras para o meio ambiente dose equipamentos para utilização no exterior* Directiva 2011/65/UE - (UE) 2015/863 relativa à restrição do uso de determinadas substâncias perigosas em equipamentos eléctricos e electrónicos2. Descrição da máquinaa) Produto : Limpa Neveb) Função : remoção de nevec) Modalod) Tipoe) Número de série3. Fabricante4. Mandatário com capacidade para compilar documentação técnica5. Referência às normas aplicadas6. Directiva relativa às emissões sonoras para o meio ambiente dos equipamentos para utilização no exteriora) Potência sonora medidab) Potência sonora garantidac) Parámetro de ruìdo d) Procedimento de avaliação da conformidadee) Organismo notificado7. Feito em8. Data | Polski (Polish)Dekiaracja zgodno.ci WE1. Ni.ej podpisany, Peter Neckebroeck, w imieniu upowa.nionego przedstawiciela, niniejszym deklaruje, .e urz.dženie opisane poni.ej spe.nia wszystkie odpowiednie postanowienia:* Dyrektywa Maszynowa 2006/42/WE* Dyrektywy Kompatybilno.ci Elektromagnetycznej 2014/30/UE* Dyrektywa Ha.asowa 2000/14/WE-2005/88/WE* Dyrektywy 2011/65/UE - (UE) 2015/863 w sprawie ograniczenia stosowania niektorych niebezpiecznych substancij w sprz.cle elektrycznym i elektronicznyma) Opis urz.dzenila Produkt : Od.nie.arkab) Funkcja : usuwanie .niegucc) Modeld) Type) Numery seryjne3. Producent4. Upowa.niony Przedstawiciel oraz osoba upowa.niona do przygotowania dokumentacji technicznej5. Referencia as normas aplicadas6. Dyrektywa Ha.asowaa) Zmierzony poziom mocy akustycznejb) Gwarantowany poziom mocy akustycznejc) Warto.. ha.asud) Procedura oceny zgodno.cl) Jednostka notyfikowana7. Miejsce8. Data |
| Suomi / Suomen kieli (Finnish)EY-VAATIMUSTENMUKAIJSUVAKUUTUS1. Allekirjoittanut, Peter Neckebroeck valtuotuttu valmistajan edustaja, vakuuttaa tälen että alla mainittu kone/tuote täyttää kakki seuraavia määräyksiä:* Konedirektivi 2006/42/EY* Direktivi 2014/30/EU sähkömagneetlinen yhteensopivuus* Direktivi 2000/14/EY-2005/88/EY ympäristön melu* Direktivi 2011/65/EU - (EU) 2015/863 tiettylen vaarallisten aineiden käytön rajoittamisesta sähkö- ja elektronikkalaitteissa2. TUOTTEEN KUVAUSA) Tuote : Lumilinkob) Toliminto : lumen polstaminenc) Mallid) TYYPPiE SARJANUMERO3. VALMISTAJA4. Valmistajan edustaja ja teknisten dokumettien laatia5. Viittaus sovellottuihin standardelihin6. Ympäristön meludirektlivia) Mitattu melutasob) Todennmukainen melutasoc) Melu parametritd) Yhdenmukaisuuden arvioinnin menetelmäae) Tiedonantoelin7. TEHTY8. PÄIVÄMÄÄRÄ | Magyar (Hungarian)EK-megfelelőségi nyilatkozata1. Alülirot Peter Neckebroeck, a gyártó cóg törvényes képviselőjeként nyilatkozom, hogy az állalunk gyártløgé megfelel az összes, alább felsorolt direktivának:* 2006/42/EK Direktivának berendezésekre* 2014/30/EU Direktivának elektrámagneses megfelelőségre* 2000/14/EK-2005/88/EK Direktivának kültéri zajszintre* Tanács 2011/65/EU - (EU) 2015/863 egyes veszélyes anyagok elektromos és elektronikus berendezésekben való alkalmazásának korlátozásáról2. A gép leírásaa) Termék : Hómarob) Funkció : hó eltakarításac) Modelld) Tipuse) Sorozatszám3. Gyártó4. Meghatalmazott képviselője és képes összeàllitani a műszaki dokumentációt.5. Referencia az alkalmazott szabványokhoz6. Kültéri zajszint Direktivaa) Mért hangerőb) Szavatolt hangerőc) Zajszint paraméterd) Megfelelőségi beclísléi eljárása) Kljelölőt szervezet7. Keltezés helye8. Keltezés ideje | Cestina (Czech)ES – Prohlášení o shodl1. Podopsaný Peter Neckebroeck, jako autorizovaná osoba zde potvrzuje, že stroj popsaný niže splõuje požadavky paisišučných opataeni:* Smírnice 2006/42/ES pro strojní zařelžení* Smírnice 2014/30/EU stanovující technické požadavky na výrobky z hlediska elektromagnetické kompatibility* Smírnice 2000/14/ES-2005/88/ES stanovující technické požadavky na výrobky z hlediska emisi hluku zařelžení pro venkovní použítí* Rady 2011/65/EU - (EU) 2015/863 o omezení používání nikterých nebezpeňých látek v elektrických a elektronických zařelženích.2. Popls zařelženía) Výrobek : Snihová frézab) Funkce : Uklid snihuc) Modeld) Type) Výrobní éÍslo3. Výrobcé4. Zplnomociný zástupce a osoba povíoená kompletaci technické dokumentace5. Odkaz na platné standardy6. Smírnice pro hluk pro venkovní použítía) Namišený akustický výkonb) Garantovaný akustický výkonc) Parametr hlukud) Způsob posouzení shodye) Notifikovaná osoba7. Podepsáno v8. Datum |
| Latvlešu (Latvian)EK atbilstības deklarācija1. Peter Neckebroeck ar savu parakstu zem ši dokumenta, autorizētā pärstāvja vārdā, pazino, ka zemāk apraksītle mašina, atbilsti visām zemāk norādīto direktīvu sadalām:a) Direktiva 2006/42/EK par mašinām* Direktiva 2014/30/ES attiecibā uz elektromagnétisko savietojamību* Direktiva 2000/14/EK-2005/88/EK par troksņa emisiju vidě* Direktiva 2011/65/ES - (ES) 2015/863 par dažu bístamu vielu Izmantošanas irerobežošanu elektriskās un elektroniskās iekārtās2. Iekārtas apraksita) Produkts : Snioga pūtājsb) Funkcija : sniega novāksanac) Modelisd) Tipee) Sērijas numurs3. Ražotājs4. Autorizētals pärstāvis, kas spēj sastādīt telnisko dokumentāciju5. Alsauce uz piemērotajlem standartiem6. Anjijo troksņu Direktivaa) Izmérità troksņa lielumsb) Pielaujamais troksņa lielumsc) Troksņa parametrid) Atbilstītas vērtējuma procedurae) Informētā lestāde7. Vieta8. Datums | Slovenčina (Slovak)ES vyhlásenie o zhode1. Dolupodpisany, Peter Neckebroeck, ako autorizovaný prostupca výrobcu, týmo vyhlasuje, že uvedený strojové je v zhode s nasledovými smamicami:* Smernica 2006/42/ES (Strojné zaradienia)* Smernica 2014/30/EÚ (Elektromagnetická kompatibilita)* Smernica 2000/14/ES-2005/88/ES (Emisie hluku)* Rady 2011/65/EÚ - (EU) 2015/863 o obmedzení používania urěřitých nebezpeňých látok v elektrických a elektronických zariadeniach2. Popis strojaa) Produkt : Snehnová frézab) Funkcia : Odstračovanie snehuc) Modeld) Type) Výrobné éíslo3. Výrobca4. Autorizovaný zástupca schopný zostavi? technickú dokumentáciu5. Referencia na použité normy6. Smernica pre emisie hluku vo vo/nom priestranstvea) Nameraná hladina akustického výkonub) Zaručená hladina akustického výkonuc) Rozmerd) Procedura posudzovania zhodye) Notifikovaná osoba7. Mieslo8. Dátum | Eesti (Estonian)EU vastusudeklaratsioon1. Käesolevaga kinnitab allakirjutanu, Peter Neckebroeck, vollitatud esindaja nimel, et allpool kirjeldatud masina vastab köikidele alljärgnevate direktiviđe sátetele:* Masinate direktiiv 2006/42/EÜ* Elektromagnetilise ohilduvuse direktiiv 2014/30/EL* Välismūra direktiiv 2000/14/EU-2005/88/EU* Direktiiv 2011/65/EL - (EL) 2015/863 teatavate ohtlike ainete kasulamise piramise kohta elektri- ja elektronnikaseadmetez2. Seadmete kirjeldusa) Toode : Lumepuhurb) Funktsioon : lume eemaldaminec) Mudeld) Tüipe) Seerianumber3. Tooljla4. Vollitatud esindaja, kes on pádev tältma tehnilist dokumentatsiooni5. Viida kohaldatud standarditele6. Välismūra direktiiva) Möõdetud helivõmsuse taseb) Lubatud helivõmsuse tasec) Mūra parameeterd) Vastavushindamismeneltus7. Kohl8. Kuupäev |
| Lietuvių kalba (Lithuanian)EB atitikties deklaracija1. Igaliotoja atstovo vardu pasirašės Peter Neckebroeck patvirtina, kad žemiau aprašyta mašina attitinka visas išvardintu direktyvu nuostatas:* Mechanizmu direktyva 2006/42/EB* Elektromagnetinio suderinamumo direktyva 2014/30/ES* Triuksmo lauke direktyva 2000/14/EB-2005/88/EB* Direktyva 2011/65/ES - (ES) 2015/863 del tam tikru pavojingu medžiagu naudojimo elektros ir elektronineje irangoje apribojimo2. Prietalso aprašymasa) Gaminys : Sniego putiklisb) Funkcija : sniego nuvalymasc) Modelisd) Tipase) Serijos numeris3. Gamintojas4. Igaliotasis atstovas ir galintis sudaryti techninė dokumentacij'5. Nuoroda i taikytus standartus6. Triuksmo lauke direktyvaa) Išmatuotas garso galingumo lygisb) Garantuojamas garso galingumo lygisc) Triuksmo parametrasd) Tipase) Registruota istalga7. Vieta8. Data | Български (Bulgarian)ЕО декларация за съответствие1. Долуподписанияt Peter Neckebroeck, от името на упълномощеня представител, с настоящото декларирам, че машините, описани по-долу, отговарят на всички съответни разпореди на:* Директива 2006/42/EO относно машините* Директива 2014/30/EC относно електромагнитната съвместимост* Директива 2000/14/EO-2005/88/EO относно шумовите емисии на съоръжения, предназначени за употреба извън сградите* Директива 2011/65/EC - (EC) 2015/863 година относно ограничението за употребата на определени опасни вещества в електрическото и електронното оборудване2. Описание на машинитеa) Продукт : Снегоринb) Функция : почистване на сняgc) Моделd) Типe) Сериен номер3. Производител4. Упълномощен представител и отговорник за съставяне на техническа документация5. Препратка към приложените стандарти6. Директива относно шумовите емисии на съоръжения, предназначени за употреба извън сградитеa) Измерена звукова мощностb) Гарантирана звукова мощностc) Параметърът шумd) Процедурата за оценка на съответствиетоe) Нотифициран орган7. Място на изготвяне8. Дата на изготвяне | Norsk (Norwegian)EF- Samsvarserkl-ring1. Undertegnede Peter Neckebroeck på vegne av autorisert representant herved erklærer at maskineri beskrevet nedenfor innfrir relevant informasjon fra følgende forskrifter.* Maskindirektivet 2006/42/EF* Direktiv EMC: 2014/30/EU Elektromagnetisk kompabilitet* Direktiv om støy utendørs 2000/14/EF-2005/88/EF* Direktiv 2011/65/EU - (EU) 2015/863 om restriksjoner av bruk av visse farlige matrialer i eletrisk og elektronisk utstyr.2. Beskrivelse av produkta) Produkt : Snofresb) Funksjon : Måke snøc) Modelld) Typee) Sarienummer3. Produsent4. Autorisert representant og i stand til å utarbeide den tekniske dokumentasjonen5. Henvisning til brukte standarder6. Utendørs direktiv får støya) Målt støyb) Maks støyc) Konstant støyd) Verdi vurderings prosedyree) Gjeldene kjøretøy/kropp/stamme/skrog7. Sted8. Dato |
| Türk (Turkish)AT Uygunluk Beyaný1. Apačyda imzasý bulunan Peter Neckebroeck, Yetkilii Temsilci olarak apačyda tarif edilen makinanýn, pu yönetmelliklerin ilgilih hükümlerline uygunluðunu beyan eder:* Makina Emniyet Yönetmeliči 2006/42/AT* Elektromanyetik Uyumluluk Yönetmeliči 2014/30/AB* Açyk Alanda Kullanylan Techizat Tarafýndan Olupturulan Čevredeki Gürültü Emisyonu Yle YlgiliYönetmelik 2000/14/AT-2005/98/AT* 2011/65/AB - (AB) 2015/863 elektrikli ve elektronik ekipmanlarda bazý tehlikeli maddelerin kullanýmýnyn yasaklanmasýna iliþkin yönetmelik2. Makinanýn tarifiα) Ürün : Kar püskürtme makinesib) Yplevi : Karýn kaldýrylmasýc) Modeld) Tipie) Seri numarasý3. Ymalatcy4. Teknik dosyayý hazýrlamakla yetkilii olan Toplulukta yerleplik yetkilii temsilici5. Uygulanan standartlara istinaden6. Açyk alan gürültü Yönetmeličiα) Ölçülen ses gücüb) Garanti edilen ses gücüc) Gürültü parametresid) Uygunluk deđeriendirme prosedürüe) Onaylanmýþ kurulup7. Beyanýn yeri8. Beyanýn tarihl | Išlenska (Icelandic)EB-Samtræmisýfirlýsing1. Undiritaður Peter Neckebroeck staðfestir hér með fyrir hönd lögglitra aðila að upplýsingar um vélbúnað hér að neðan eru tæmandi hvað varðar alla tillheyrandí málaflokka, svo semLeiðbeingar fyrir vélbúnað 2006/42/EBLeiðbeingar fyrir rafsegulsvið 2014/30/EULeiðbeingar um håvaðamengun 2000/14/EB-2005/88/EBTilskipun 2011/65/EU - (EU) 2015/863 varðandi leiðbeingar um notkun á hættulegum efnum i raf og rafeinda búnaði2. Lýsing á vélbúnaðiα) Őkutæki : Snjóblásarib) Virkni : Snjór fjarlægðurc) Gerðd) Tegundø) Serial númer3. Framlelibandl4. Löggildir aðilar og fær um að taka saman tækniskjölin5. Tilvisun til viðeigandi staðla6. Leiðbeingar um hávaðamenguna) Mældur hávaða styrkurb) Staðfestur hávaða styrkurc) Hávaða breytileikid) Staðfesting á gæðastöölume) Merkingar7. Gert hjá8. Dagsetning | Hrvatski (Croatian)EK Izjava o sukladnosti1. Potpisani, Peter Neckebroeck, u ime ovlaštenog predstavnika, ovime izjavljuje da strojevi navedeni u nastavku ispunjavaju sve važeae odredbe:* Propisa za strojeve 2006/42/EK* Propisa o elektromagnetskoj kompatibilnosti 2014/30/EU* Propisa o buci na otvorenome 2000/14/EK-2005/88/EK* Direktlva 2011/65/EU - (EU) 2015/863 o ograničenju odredjenih opasnih supstanci u elektricnoj i elektronskoj opremi.2. Opis strojevaa) Proizvod : Ġistače cnijegab) Funkcionalnost : uklanja snijegc) Modeld? Tipe) Sarijeski broj3. Proizvođað4. Ovlasteni predstavnik i osoba za sastavljanje tehniěke dokumentacije5. Referencija na primijenjene standarde6. Propis o buci na otvorenomea) Izmjerena jačina zvukab) Zajamáena jačina zvukac) Parametar buked) Postupak za ocjenu sukladnostie) Obaviješteno tijelo7. U8. Datum |
MAJOR Honda DISTRIBUTOR ADDRESSES • ADRESSES DES PRINCIPAUX DISTRIBUTEURS Honda
ADRESSEN DER HAUPT-Honda-VERTEILER • INDIRIZZI DEI PRINCIPALI DISTRIBUTORI Honda
| AUSTRIAHonda Motor Europe LtdHondastraße 12351 Wiener NeudorfTel.: +43 (0)2236 690 0Fax: +43 (0)2236 690 480http://www.honda.atHondaPP@honda.co.at | DENMARKTIMA A/SRyttermarken 10 DK-3520 FarumTel.: +45 36 34 25 50Fax: +45 36 77 16 30http://www.timadk | MACEDONIAMakpetrol A.D. Honda CentarBul.sv Kiril & Metodij br. 4 1000, SkopjeRepublic of Macedoniaaleksandar.stanojlovic@ makpetrol.com.mk | SLOVAK REPUBLICHonda Motor Europe Ltd Slovensko,organizačná zložkaPrievozská 6 821 09 BratislavaTel.: +421 2 32131111Fax: +421 2 32131112http://www.honda.sk |
| BALTIC STATES(Estonia/Latvia/ Lithuania)NCG Import Baltics OUMeistri 12 Haabersti District 13517 TallinnHarju County Estonia Tel.: +372 651 7300Fax: +372 651 7301info.baltic@ncgimport.com | FINLANDOY Brandt AB.Tuupakantie 78 01740 VantaaTel.: +358 207757200Fax: +358 9 878 5276http://www.brandt.fi | MALTAThe Associated Motors Company Ltd.New Street in San Gwakkin Road MriehelBypass, Mriehel QRM17 Tel.: +356 21 498561Fax: +356 21 480 150mgalea@gasanzammit.com | SLOVENIAAS Domzale Moto Center D.O.O.Blatnica 3A 1236 TrzinTel.: +386 1 562 3700Fax: +386 1 562 3705http://www.honda-as.cominfomacije@honda-as.com |
| BELARUSUAB JP MotorsMontazhnikov lane 4th, 5-16 Minsk 220019Republic of Belarus Tel.: +375172349999Fax: +375172380404Dudarevich@scanlink.by | FRANCEHonda Motor Europe LtdDivision Produit d'EquipementParc d'activités de Pariest, Allée du 1er maiCroissy Beaubourg BP46, 77312Marne La Vallée Cedex 2Tel.: 01 60 37 30 00Fax: 01 60 37 30 86http://www.honda.freespace-client@honda-eu.com | NORWAYBerema ASP.O. Box 454 1401 Ski Tel.: +47 64 86 05 00Fax: +47 64 86 05 49 http://www.berema.noberema@berema.no | SPAIN & all ProvincesGreens Power Products, S.L.Poligono Industrial Congost –Av Ramon Ciurans n°208530 La Garriga - Barcelona Tel.: +34 93860 50 25Fax: +34 93 871 81 80http://www.hondaencasa.com |
| BELGIUMHonda Motor Europe LtdDoornveld 180-1841731 ZellikTel.: +32 2620 10 00Fax: +32 2620 10 01http://www.honda.beBH_PE@HONDA-EU.COM | GERMANYHonda Deutschland Niederlassung derHonda Motor Europe Ltd.Hanauer Landstraße 222-224 D-60314FrankfurtTel.: 01805 20 20 90Fax: +49 (0)69 83 20 20http://www.honda.de info@post.honda.de | NORWAYKELLOXBox 24, N-141Trollàsveien 36, 1414 Trollåsen, NorwayMobile: +47 47 80 90 00Phone: +47 64 97 61 00http://kellox.no/finn.hoge@kellox.no | SWEDENHonda Motor Europe Ltd filialSverigeBox 31002 - Långhusgatan 4215 86 MalmöTel.: +46 (0)40 600 23 00Fax: +46 (0)40 600 23 19http://www.honda.sehpesinfo@honda-eu.com |
| BULGARIAPremium Motor LtdAndrey Lyapchev Blvd no 341797 SofiaBulgariaTel.: +3592 423 5879Fax: +3592 423 5879http://www.hondamotor.bgoffice@hondamotor.bg | GREECESaracakis Brothers S.A.71 Leoforos Athinon10173 AthensTel.: +30 210 3497809Fax: +30 210 3467329http://www.honda.gr.info@saracakis.gr | POLANDAries Power EquipmentPuławska 46702-844 WarszawaTel.: +48 (22) 861 43 01Fax: +48 (22) 861 43 02http://www.ariespower.plhttp://www.mojahonda.pl info@ariespower.pl | SWITZERLANDHonda Motor Europe Ltd., SloughSuccursale de Satigny/GenèveRue de la Bergère 51242 SatignyTel.: +41 (0)22 989 05 00Fax: +41 (0)22 989 06 60http://www.honda.ch |
| CROATIAHongoldonia d.o.o.Vukovarska ulica 432a 31000 Osijek, HRTel.: +38531320420Fax: +38531320429http://www.hongoldonia.hrprodaja@hongoldonia.hr | HUNGARYMP Motor Co., Ltd.Kamaraerdei ut 3.2040 BudaorsTel.: +36 23 444 971Fax: +36 23 444 972http://www.hondakisgepek.huinfo@hondakisgepek.hu | PORTUGALGROW Productos de Forca PortugalRua Fontes Pereira de Melo, 16 Abrunheira,2714-506 SintraTel.: +351 211 303 000Fax: +351 211 303 003http://www.grow.com.pt geral@grow.com.pt | TURKEYAnadolu Motor Uretim Ve Pazarlama AsSekerpinar MahAlbayrak Sok No 4 Cayirova 41420 KocaeliTel.: +90 262 999 23 00Fax: +90 262 658 94 17http://www.anadolumotor.com.trantor@antor.com.tr |
| CROATIAFred Bobek d.o.o.HONDA MARINEPut Gačeleza 5bHR 22211 VodiceTel. 00385 22 444336Fax. 00385 22 440500centrala@honda-croatia.com | IRELANDTwo Wheels ItdM50 Business Park, Ballymount Dublin 12Tel.: +353 1 4381900Fax: +353 1 4607851http://www.hondaireland.iesales@hondaireland.ie | ROMANIAHit Power Motor Srl7-15 Argonomici Boluevard Building N3.2Entrance A Apt 8, Floor 2 Sector 1015141 BucharestTel.: +40 21 637 04 58Fax: +40 21 637 04 78http://www.honda.ro/office@honda.ro | UKRAINEDnipro Motor LLC3, Bondarsky Alley,Kyiv, 04073, UkraineTel.: +380 44 537 25 76Fax: +380 44 501 54 27igor.lobunets@honda.ua |
| CYPRUSDemstar Automotive LtdMihail Giorgalla 142409 Engomi Nicosia CyprusTel.: +357 22 792 600Fax: +357 22 430 313 | ISRAELMayer's Cars and Trucks Co.Ltd. - Honda DivisionShevach 5, Tel Aviv , 6777936 Israel+972-3-6953162OrenBe@mct.co.il | ROMANIAAgrisorgSacadat 444/A Bihor Romania 417430http://www.agrisorg.comadrian@agrisorg.com | UNITED KINGDOMHonda Motor Europe LtdCain Road Bracknell BerkshireRG12 1 HLTel.: +44 (0)845 200 8000http://www.honda.co.uk |
| CZECH REPUBLICBG Technik cs, a.s.U Zavodiste 251/8 15900 Prague 5 - VelkaChuchleTel.: +420 2 838 70 850Fax: +420 2 667 111 45http://www.honda-stroje.cz | ITALYHonda Motore Europe LtdVia della Cecchignola, 13 00143 RomaTel.: +848 846 632Fax: +39 065 4928 400http://www.hondaitalia.cominfo.power@honda-eu.com | SERBIA & MONTENEGROITH Trading Co DooMajke Jevrosime 261100 Beograd SerbiaTel: +381 11 3240627Fax: +381 11 3240627http://www.hondasrbija.co.rssstevanovic@ithtrading.co.rs |
HONDA
The Power of Dreams
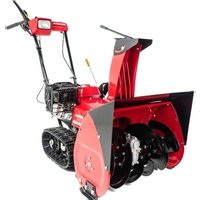
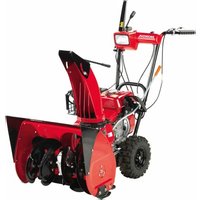
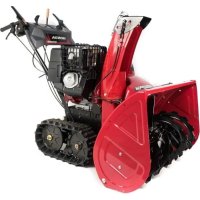
- SAFETY MESSAGES
- HONDA
- OWNER'S MANUAL
- CONTENTS
- SAFETY INSTRUCTIONS
- WARNING
- Operator Responsibilities
- Tampering and Altering
- To ensure safe operation:
- Disposal
- SAFETY LABEL LOCATIONS
- COMPONENT IDENTIFICATION
- CONTROLS
- Engine Switch
- Fuel Valve Lever
- Chute Joystick Control
- Throttle Lever (engine speed)
- Choke Knob
- Shift Lever
- Auger Clutch Lever
- Drive Clutch Lever
- Steering Control Levers
- Height Adjust Lever (track type only)
- NOTICE
- LED Work Light
- Snow Drop Bar
- PRE-OPERATION CHECK
- Fuel Level
- Petrol Containing Alcohol
- Engine Oil Level
- Inspection
- Recommended Oil
- CAUTION
- Skid Shoe and Scraper
- Auger Clearance
- Wear Inspection
- Auger and Blower Bolts
- Other Checks
- STARTING THE ENGINE
- Manual Starting
- DC Electric Starting
- (ETD, EWD)
- High Altitude Operation
- Track models:
- Clearing Snow
- STOPPING THE ENGINE
- MAINTENANCE
- Tools
- Engine Oil Change
- QUANTITY SPECIFIED: 0.60 L
- How to Change the Oil
- TORQUE: 11 N·m
- Spark Plug
- Checking and Adjustment
- Cleaning Procedure
- TORQUE: 18 N·m
- Track Adjustment
- (track type only)
- When correctly
- Adjusting Procedure
- Tires (wheel type only)
- Auger/Blower Inspection
- Shear Bolt Replacement Procedure
- Fuse (EWD, ETD starter type)
- Fuse Replacement
- TRANSPORTING
- Before Loading
- Loading
- Tie-down Points
- STORAGE
- TORQUE: 3.9 N·m
- (EWD, ETD)
- Battery Removal
- Battery Charging
- Battery Installation
- TROUBLESHOOTING
- SPECIFICATIONS
- INTRODUCTION
- SOMMAIRE
- AVERTISSEMENT
- REMISAGE
- INHALT
- AUS...
- ⚠️ WARNING
- ⚠ VORSICHT
- Sicherung (ETD, EWD)
- Hinten
- Radtyp:
- LAGERUNG
- INDICE
- COPPIA: 26.5 N·m
- AVVERTENZA
- RIMESSAGGIO
- EC Declaration of Conformity
- MAJOR Honda DISTRIBUTOR ADDRESSES • ADRESSES DES PRINCIPAUX DISTRIBUTEURS Honda
- ADRESSEN DER HAUPT-Honda-VERTEILER • INDIRIZZI DEI PRINCIPALI DISTRIBUTORI Honda
Brand : Honda
Model : HSS 760A T
Category : Snow blower