
CY 7106 - Vacuum Cleaner SEVERIN - Free user manual and instructions
Find the device manual for free CY 7106 SEVERIN in PDF.

| Product Type | Bagless Cyclonic Vacuum Cleaner |
| Brand | Severin |
| Model | CY 7106 |
| Color | Black and Red |
| Dimensions (approx.) | 30 x 25 x 40 cm |
| Weight (approx.) | 4.5 kg |
| Power Supply | 220-240 V, 50/60 Hz |
| Power (estimated) | 750 W |
| Dust Container Capacity | 2 liters |
| Filtration | Washable HEPA filter, motor pre-filter, white filter |
| Noise Level (estimated) | 75 dB(A) |
| Main Functions | Adjustable Premium Eco combined brush (2 positions), telescopic tube, auxiliary air regulator, accessory holder |
| Included Accessories | Combined brush, parquet brush, crevice tool, upholstery nozzle, attachment holder, additional pre-filter and white filter |
| Maintenance | Empty dust container after each use, clean filters every 6 months |
| Safety | Overheat protection, automatic shut-off, cable rewind |
| Spare Parts and Repairability | Spare parts kit (ref. 8290-048): dust container + motor pre-filter + HEPA filter; other accessories available (parquet brush, turbo, etc.) |
| General Information | Compliant with EU directives, domestic use, cable length approx. 6 m |
Frequently Asked Questions - CY 7106 SEVERIN
User questions about CY 7106 SEVERIN
0 question about this device. Answer the ones you know or ask your own.
Ask a new question about this device
Download the instructions for your Vacuum Cleaner in PDF format for free! Find your manual CY 7106 - SEVERIN and take your electronic device back in hand. On this page are published all the documents necessary for the use of your device. CY 7106 by SEVERIN.
USER MANUAL CY 7106 SEVERIN
natural_image
Exterior view of a black and white vacuum cleaner with coiled tubing (no text or symbols visible)ART.-NO. CY 7106
GB Instructions for use
FR Mode d'emploi
Bagless cyclone cylinder vacuum cleaner 11
| Technische Daten / Technical Data / Caractéristiques techniques / Technische gegevens /Datos técnicos / Dati tecnici / Tekniske data / Tekniska data / Tekniset tiedot /Dados técnicos / Dane techniczne / Τεχνικά χαρακτηριστικά | ||
| Modell / Model / Modèle / Model / Modelo / Modelo / Model / Model / Malli / Modelo / Model / Movtéλο | : CY 7106 | |
| Schallleistungspegel / Sound power level/ Puissance acoustique / Geluidsvermogensniveau / Nivel de potencia acústica / Livello d'intensità sonora / Støjniveau / Ljuddämpningsmätare / Äänitehotaso / Nivel de potência sonora / Poziom mocy akustycznej / Στάθμη ηχητικής ισχύος | : < 80 dB | |
| Leistungsaufnahme / Power consumption / Puissance absorbée / Stroomverbruik / Consumo de energía / Potenza assorbita / Strømforbrug / Prestandaupptagning / Ottoteho / Consumo energético / Pobór mocy / Ισχύς εισόδου | : 850 W | |
| Spannung/Frequenz / Voltage/Frequency / Tension/Fréquence / Spanning/frequentie / Tensión/frecuencia / Tensione/Frequenza / Spænding/Frekvens / Spänning/Frekvens / Jännite/taajuus / Tensão/frequência / Napięcie/częstotliwość / Τάση/Συχνότητα | : | 220-240 V~ 50-60 Hz |
| Schutzklasse / Protection class / Classe de protection / Veiligheidsklasse / Grado de protección / Classe di protezione / Beskyttelsesklasse / Skyddsklass / Kotelointiluokka / Classe de proteção / Stopień ochrony / Κατηγορία προστασίας | : | II |
| Stromkabellänge / Power cable length / Longueur du câble d'alimentation / Netsnoerlengte / Longitud del cable de alimentación / Lunghezza cavo di alimentazione / Ledningslængde / Strömkabellängd / Virtajohdon pituus / Comprimento do cabo de alimentação / Długość kabla zasilającego / Μήκος καλωδίου τροφοδοσίας | : ~ 6 m | |
| Staubbehältervolumen / Dust container capacity / Capacité du bac à poussière / Stofreservoir / Volumen del depósito de polvo / Volume serbatoio raccogli polvere / Støvbeholderens rumindhold / Dammbehållarevolym / Pölysäiliön tilavuus / Volumes do contentor de pó / Pojemność pojemnika na kurz / Χωρητικότητα δοχείου σκόνης | : ~ 1,75 L / λίτρα | |
flowchart
graph TD
    A["Step 1: Chair with blue box"] --> B["Step 2: Device icon with diamond"]
    B --> C["Step 2: Patterned bar chart"]
natural_image
3D architectural rendering of a curved structural element with grid background (no text or symbols)natural_image
3D rendered gray geometric shape resembling a curved rectangular prism or wedge (no text or symbols)natural_image
3D rendered mechanical part with a Y-shaped cutout (no text or symbols)natural_image
Illustration of a hand adjusting a seatbelt with an arrow indicating direction (no text or symbols)Bagless cyclone cylinder vacuum cleaner
Dear Customers,
Before using the appliance, read the instructions carefully and keep them for future reference. The appliance may only be used by persons who are familiar with the safety instructions.
Structure and scope of delivery
- Suction hose
- Secondary air regulator
- Telescopic tube
- Accessory bracket
- Premium eco floor nozzle
- Main unit
- Dust container with filter insert
- Motor pre-filter (used in the basic device)
- Mains plug with power cable
- HEPA filter cover
- Park hook
- Power cable retraction button
- Power button
- Handle for removing the dust container
- Dust bin flap
- Button to open the dust container
Not illustrated:
1 additional black dust container pre-filter
1 additional white dust container filter
1 instructions manual
Safety Instructions
Connecting the appliance
Since the appliance is operated with electrical current, there is a danger of electric shock. Therefore:
- Only connect and start up the vacuum cleaner according to the de-tails on the name plate (underside of the appliance).
- Check the appliance and power cable for possible damage beforeuse. Never operate a defective appliance or an appliance with a defective power cable.
- Never try to repair the appliance or its power cable yourself. To prevent hazards, repairs to the appliance and the power cable may only be made by our customer service. Give a defective appliance to a dealer or make contact with SEVERIN customer service.
- Do not immerse appliance in water or other liquids or treat it with liq-uids. Do not operate the appliance outdoors or in rooms with high humidity. Do not handle the plug with wet hands.
- Caution: the power cable must only be pulled out from the appliance as far as the first mark.
- Make sure that the power cable is not kinked, crushed or run over and that it does not come into contact with sources of heat, humidity and sharp edges. Make sure that the power cable does not become a stumbling hazard.
- Do not pull or transport the appliance using the power cable. When unplugging the plug from the outlet, always pull directly on the plug.
- If possible, do not use an extension cable. If this is unavoidable, only use GS-tested, simple extension cables (no multi-outlet adapters) that are designed for the appliance's power consumption.
- Before cleaning or maintaining the appliance, as well as before changing accessories, switch off the appliance and unplug the plug from the outlet.
Safety of particular groups of people
- This appliance may only be used by children over the age of 8 and by persons with reduced physical, sensory or mental capacities or a lack of experience and/or knowledge when they are supervised or if they have been instructed about the safe use of the appliance and have understood the risks resulting from the use of the appliance.
- Children may not play with the appliance or stand or sit on the appliance. Cleaning and user maintenance may not be performed by children without supervision.
- Keep children younger than 8 away from the appliance and power cable.
- Keep packaging materials out of the reach of children and dispose of them.
Otherwise they present a suffocation risk.
Intended use
The appliance may only be used in households. Only vacuum dry, normally-soiled floors or, depending on the accessories, also furniture and upholstery. Any other use is improper and is forbidden.
In order to prevent injuries, fires and damage, the appliance may not be used
to vacuum:
- People, animals and plants. Always keep nozzles and vacuum open-ings away from all body parts, hair and clothing. Do not vacuum near your head.
- Glowing or burning particles (such as ash, coals, charcoal, ciga-rettes, matches).
- Explosively or flammable materials or toner.
· Water and other liquids, e.g. damp carpet cleaners. - Pointy objects such as glass splinters, needles or constructionwaste.
- Fine dust, such as plaster, cement, fine drilling dust, powder.
CE Marking
This device is compliant with the mandatory EU directives for CE marking.
Using the appliance
Before using for the first time
- Remove any remaining packaging or inserts from the appliance.
- Assemble the appliance as shown below and check that the dust container and filters are fitted correctly (also see the sections on “Emptying the dust container” and “Cleaning or replacing the filter”).
Assembling
- Only assemble appliance parts when the plug has been disconnected from the mains socket.
- If necessary, insert the dust container into the device until it clicks into place.
- Push the suction hose onto the device until it clicks into place.
- Attach the telescopic tube to the suction hose and set the desired length.
- Select and attach the nozzle depending on the surface to be vacuumed. All nozzles can be used with or without a telescopic tube.
- Never use a damaged nozzle. A damaged nozzle could cause scratching of surfaces.
Select nozzle
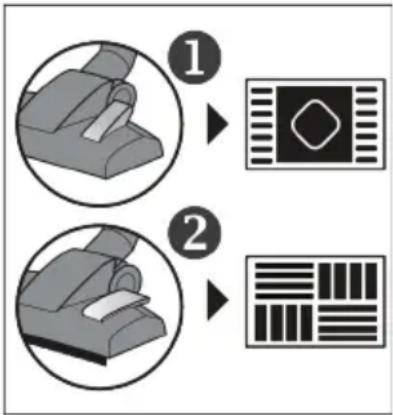
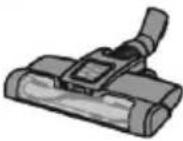
1. Premium Eco Floor Nozzle
flowchart
graph TD
    A["Step 1: Seat"] --> B["Image Bar"]
    C["Step 2: Code"] --> D["Barcode"]
The switchable Premium Eco Floor Nozzle has 2 setting options:
Position 1 is excellently suited to cleaning dirt and fibres from carpets, rugs etc. and for deep cleaning of these surfaces.
Position 2 is ideal for all kinds of smooth hard floors.
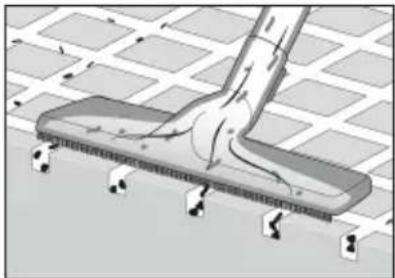
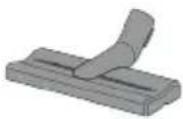
2. Parquet nozzle
natural_image
3D architectural rendering of a modern building with a curved roof and surrounding grid layout (no text or symbols)The parquet nozzle is suitable for cleaning hard floors with cracks and joints. For optimal cleaning of crevices and joint gaps, the nozzle must be in full contact with the floor. To pick up coarse dirt, it may be helpful to angle the nozzle slightly.
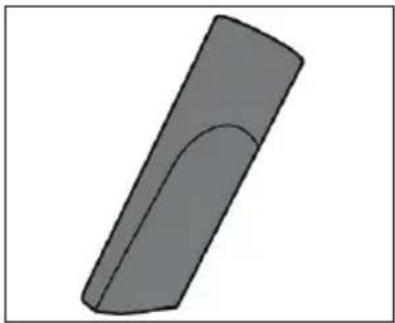
3. Crevice tool
natural_image
3D rendered image of a gray curved object with a smooth curved top surface (no text or symbols)The crevice nozzle is suitable for cleaning joints, sofa cracks and other spaces that are difficult to access.
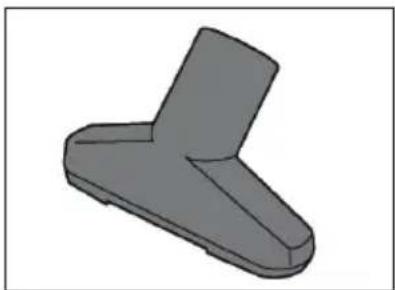
4. Upholstery nozzle
natural_image
3D rendered image of a gray Y-shaped mechanical component (no text or symbols)The upholstery nozzle is suitable for vacuuming armchairs, sofas or other upholstery fabrics.
5. Accessory bracket
- To always have the accessory to hand, clip the accessory holder to the suction tube and attach the crevice and upholstery nozzle.
Vacuum cleaning
- Especially when vacuuming stairs, make sure that you are always above the appliance. Other-Vacuum cleaning wise the appliance may fall down and cause injuries.
- When using of a brush with rotating bristles, keep it away from people, animals, plants, cables and lines at all times.
• Only use the appliance if the dust container and the filters have been correctly inserted. - Assemble the appliance, plug into mains power and switch on the appliance.
- Follow the cleaning and maintenance instructions of the floor covering, carpet or furniture manufacturer!
natural_image
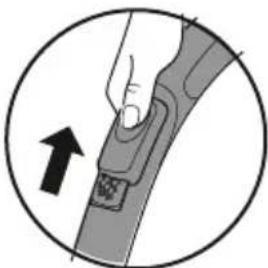
Illustration of a hand holding a bandage with an arrow indicating direction (no text or symbols)- If curtains or other objects are accidentally suctioned, quickly open the slide vent to release the objects again.
• After using the appliance, switch it off and unplug from mains power.
- When you press the power cable retraction button, the power cable will be retracted into the appliance. Be sure to hold the plug and guide it by hand towards the cable storage. Otherwise the cable could move around in an uncontrolled way with a risk of injuring those nearby, causing a tripping hazard or damaging objects.
Maintaining and cleaning
Before carrying out any maintenance or cleaning of your appliance, switch it off and unplug it from the mains power socket!
Emptying the dust container
It is best to empty the dust container after each use.
However, then empty at the latest:
- when the Max mark is reached,
- If suction power is lower than it should be
- before longer storage or
• before sending to the service centre.
· Pull the red handle up and remove the dust container.
- Press the button ☑ on the bottom of the dust container (see image), open the door and empty the contents of the dust container.
- The contents of the dust container can be disposed of in normal household garbage unless it contains dirt that is forbidden in the household garbage.
- Close the dust container and insert it into the device.
Cleaning the dust container
- if the suction power seems to be reduced
• before storing the appliance for an extended period -
before sending the appliance to the service centre.
-
Clean the dust container regularly, particularly under the following conditions:
- Pull the red handle up and remove the dust container.
· Empty the dust container as indicated above. - Reach behind the OPEN tab and open the lid of the dust container.
- Remove the white dust container filter.
- Remove the black pre-filter, tap it out thoroughly and brush it off.
- If necessary, clean the dust container filters as indicated under "Clean or replace filters".
- Remove the two piece dust container insert, disassemble and brush out.
- If necessary, rinse the dust container and insert with water (possibly with the addition of a mild detergent).
- Thoroughly dry the dust container and insert and allow them to air dry for a few hours before reassembling.
Assemble the dust container
- Insert the black top of the dust container insert into the clear bottom of the dust container insert and lock clockwise to lock.
- Insert the assembled dust container insert into the dust container.
- Insert the black pre-filter.
- Insert the white dust container filter into the dust container with the grip tab facing up.
- Close the lid of the dust container.
- Insert the dust container into the appliance.
Cleaning or replacing the filter
- Clean the filter regularly, particularly under the following conditions:
- If suction power is lower than it should be
- before storing the appliance for an extended period, or
• before sending to the service centre.
- With household use, the filters must be replaced after 6 months.
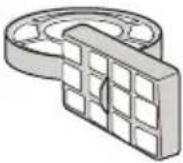
Dust container filter:
- Remove the white dust container filter from the dust container (see "Clean the dust container").
- First tap out the white filter and then brush it out with a brush. Then tap out any loosened dust residues again.
- Remove and knock out the black dust container pre-filter.
- Both filters are washable (max. 40 °C), but neither dishwasher nor washing machine safe. Rinse the filters thoroughly under running water.
-
After cleaning, leave the black pre-filter to dry at room temperature for approx. 24 hours and only replace it when it is completely dry.
• Let the white filter dry for about 3 days. -
During this time, use the replacement filters provided if necessary.
- Reinstall the dry filters as described under "Assemble the dust container".
• Take out the dust container and then take the motor pre-filter out of the appliance. - The filter is washable (max. 40 °C), but neither dishwasher nor washing machine safe.
- Rinse the filter thoroughly under running water.
• After cleaning, leave it to dry at room temperature for about 24 hours. Only put it back when it is completely dry. - Open the HEPA filter cover and take the filter out.
- First tap out the filter and then brush it out. Then tap out any loosened dust residues again.
- The HEPA filter is not washable.
- Put the filter back in and close the cover.
Motor pre-filter:
HEPA filter:
Cleaning
- The housing and power cable may not be handled with liquids or immersed in liquids for reasons of electrical safety. Rub housing with a slightly damp cloth and then dry.
- For cleaning, do not use any sharp or scouring cleansers or hard brushes.
Storing the appliance
- For easy storage when not in use, the floor nozzle can be hooked into the park hook above the cover of the HEPA filter.
Troubleshooting by yourself
- To avoid any problems, it is important to empty the dust container regularly and to take this opportunity to check the filters and clean or replace them depending on how dirty they are.
• Before contacting our customer service, check with the help of below table whether you can correct the problem yourself.
| Problem Solution | |
| The appliance stops suddenly | The integrated overheating protection has responded (possibly due to an overfilled dust container or similar) In this case, proceed as follows:1. Switch off the appliance.2. Pull plug from main socket.3. Eliminate the cause of overheating (either the dust container needs emptying - see the section on “Emptying the dust container”, or the filters need cleaning - see the section on “Cleaning or replacing the filters” or there is a blockage somewhere, which needs to be removed).4. Include the suction hose, nozzle, and tube and search for the cause of the overheating.5. Close the cover and re-fit all accessory.6. Wait another 45 minutes.After the appliance has cooled off, you may switch it on again. |
| The appliance hardly picks up any dust and/or the suction power drops | The dust container needs to be emptied (see the section on “Emptying/cleaning the dust container”).It is advisable to take this opportunity to clean the filters at the same time (see “Clean or replace the filters”). |
| With the switchable floor nozzle attached, the switch is not in a position appropriate to the type of floor.Select the correct position for the switch. | |
| Odours spread or even dust escapes from the appliance | It is likely that parts of the dust container or vacuum cleaner accessories that were dismantled to clean the filter or change accessories were not properly reinstalled or closed. Check that all parts are correctly and firmly in place. |
- If this does not help, please contact our customer service.
Spare parts and disposal
 | 8290-048:1 dust container set +1 motor pre-filter + 1 HEPA filter | 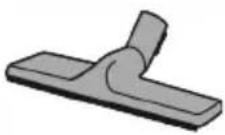 | PB7217:1 parquet brush |
 | TB7216:1 Jet Drive turbo brush | 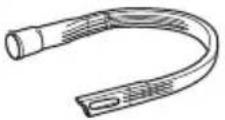 | ZB7214:1 long, flexible crevice nozzle |
 | PB7210:1 XXL Upholstery Nozzle | 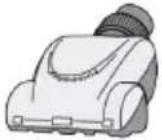 | TB7215:1 Mini Turbo Nozzle |
Disposal
Devices marked with this symbol must be disposed of separately from your household waste, as they contain valuable materials which can be recycled. Proper disposal protects the environment and human health. Your local authority or retailer can provide information on the matter.
Chère cliente, Cher client,
natural_image
Isometric view of a roof drainage system with visible foundation and support structure (no text or symbols)natural_image
3D rendered image of a gray curved object with a smooth curved top surface (no text or symbols)natural_image
3D rendered model of a gray Y-shaped mechanical component (no text or symbols)natural_image
Diagram of a hand holding a cable with a pad, showing an upward arrow (no text or symbols)flowchart
graph TD
    A["Step 1: Chair with blue diamond icon"] --> B["Step 2: Device icon with black diamond"]
    B --> C["Step 2: Patterned pattern with striped pattern"]
natural_image
Diagram of a mechanical assembly or mounting bracket with no visible text or symbolsnatural_image
3D rendered gray geometric shape resembling a curved rectangular prism or wedge (no text or symbols)natural_image
3D rendered image of a gray mechanical component with no visible text or symbolsnatural_image
Diagram of a hand adjusting a button on a device, with an arrow indicating direction (no text or symbols present)natural_image
Isometric view of a roof drainage system with visible foundation and support structure (no text or symbols)natural_image
3D rendered image of a gray curved object with a smooth curved top surface (no text or symbols)natural_image
3D rendered mechanical part with a Y-shaped cutout (no text or symbols)natural_image
Diagram of a hand holding a cable with a pad, showing an upward arrow (no text or symbols)natural_image
Diagram of a mechanical assembly with a central component and surrounding grid pattern (no text or symbols)natural_image
3D rendered image of a gray elongated object with a curved top surface (no text or symbols)natural_image
3D rendered mechanical part with a Y-shaped cutout (no text or symbols)natural_image
Diagram of a hand adjusting a button on a device, with an arrow indicating direction (no text or symbols present)natural_image
Diagram of a mechanical assembly with a central component and surrounding grid pattern (no text or symbols)natural_image
3D rendered gray geometric shape resembling a curved rectangular prism or wedge (no text or symbols)natural_image
3D rendered gray mechanical part with a Y-shaped cutout (no text or symbols)natural_image
Illustration of a hand adjusting a seatbelt with an arrow indicating direction (no text or symbols)natural_image
3D architectural rendering of a modern building with a curved roof and surrounding grid layout (no text or symbols)natural_image
3D rendered image of a gray curved object with a smooth curved top surface (no text or symbols)natural_image
3D rendered image of a gray Y-shaped mechanical component (no text or symbols)natural_image
Illustration of a hand holding a bandage with an arrow indicating direction (no text or symbols)flowchart
graph TD
    A["Step 1: Device with lever"] --> B["Arrow to Symbol"]
    C["Step 2: Assembly with lever"] --> D["Arrow to Symbol"]
natural_image
Diagram of a mechanical assembly with a central shaft and mounting base, no visible text or symbolsnatural_image
3D rendered gray rectangular object with a curved top surface, resembling a stylized tool or component (no text or symbols)natural_image
3D rendered gray mechanical part with a Y-shaped cutout (no text or symbols)natural_image
Illustration of a hand holding a bandage with an arrow indicating direction (no text or symbols)flowchart
graph TD
    A["1: Insert Seat"] --> B["2: Add Bar"]
    B --> C["3: Replace Bar with diagonal line and pattern"]
natural_image
Diagram of a mechanical assembly with a central shaft and mounting base, no visible text or symbolsnatural_image
3D rendered image of a gray curved object with a smooth curved edge (no text or symbols)natural_image
3D rendered model of a gray mechanical component with a Y-shaped cutout (no text or symbols)natural_image
Diagram of a hand adjusting a button on a device, with an arrow indicating direction (no text or symbols present)natural_image
Isometric view of a roof drainage system with visible foundation and support structure (no text or symbols)natural_image
3D rendered image of a gray curved object with a smooth curved top surface (no text or symbols)natural_image
3D rendered model of a gray Y-shaped mechanical component (no text or symbols)natural_image
Diagram of a hand holding a cable buckle with an arrow indicating direction (no text or symbols)flowchart
graph TD
    A["1: Insert Seat"] --> B["2: Add a Column"]
    B --> C["3: Replace Column with diagonal line and bar pattern"]