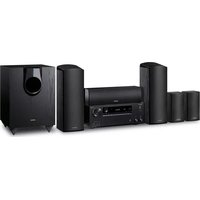
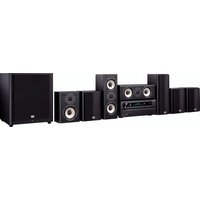
HT-R395 - Home Theater System ONKYO - Free user manual and instructions
Find the device manual for free HT-R395 ONKYO in PDF.

User questions about HT-R395 ONKYO
0 question about this device. Answer the ones you know or ask your own.
Ask a new question about this device
Download the instructions for your Home Theater System in PDF format for free! Find your manual HT-R395 - ONKYO and take your electronic device back in hand. On this page are published all the documents necessary for the use of your device. HT-R395 by ONKYO.
USER MANUAL HT-R395 ONKYO
natural_image
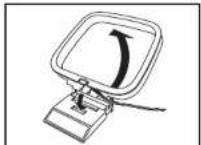
Line drawing of a hand using a tool to adjust or install a 3D object with multiple square cutouts (no text or symbols present)For detailed descriptions of this unit, see the "Operating Instructions". (En)
http://www.onkyo.com/manual/hts3800/en.pdf
text_image
1 2 3 4 5 6 Front Right Speaker Front Left Speaker Center Speaker Surround Right Speaker Surround Left Speaker Subwoofer123
natural_image
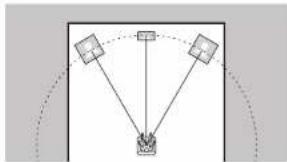
Diagram showing three satellites in a circular layout with dashed arcs, no text or symbols presentEn
Front Speakers, Center Speaker
Front speakers output front stereo sound and a center speaker outputs center sound such as dialogs and vocals.
The optimal positioning is for front speakers to be at ear height. Center speaker should be set up facing the listening position.
Fr
text_image
120° 120°En
Surround Speakers
Surround speakers create back sound field.
The optimal positioning is just above ear height.
Fr
text_image
Image showing a checklist with three checked items and one unchecked item, likely for a checklist or selection.En
Subwoofer
Subwoofer reproduces bass sounds and creates rich sound field.
Place it anywhere in the front of the listening position.
Placing it between the center speaker and either of the front speakers enables more natural playback of music sources.
Fr
Caisson de basse
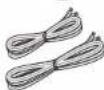
Supplied Accessories
The power cord must be connected only after all other connections are completed.
Connect speakers with 6 Ω to 16 Ω impedance.
The speaker setting is 5.1 channels at the time of purchase. If there are speakers you do not intend to connect, change the settings for them in "Speaker Setting (⇔ 12)".
Match the + and - terminals on this unit with the + and - terminals on the speakers when connecting.
Fr
Make sure the exposed wires of the speakers do not stick out of the speaker terminals when connecting. If the exposed wires of the speakers touch the rear panel or the + and - wires touch each other, the protection circuit will be activated.
En
Fr
Es
Fr
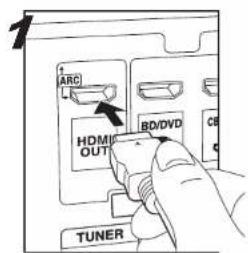
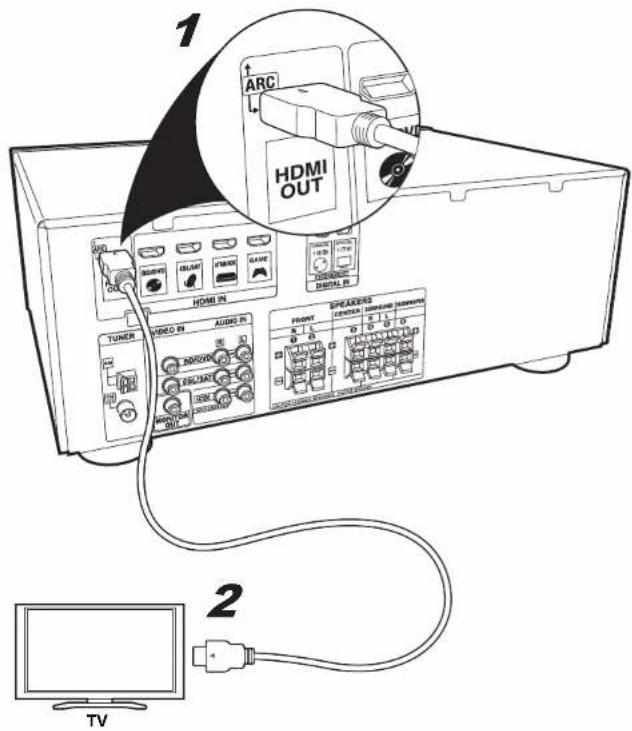
TV-1 (ARC TV) / TV-1 (TV ARC) / TV-1 (TV ARC)
text_image
ARC L HDM OUT BD/DVD CB TUNER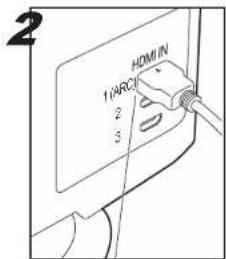
text_image
2 HDMI 1 (ARC) 2 3HDMI IN (ARC)
text_image
1 ARC HDMI OUT HDMI IN TUNER VIDEO IN AUDIO PK SPEAKERS FRONT CINEMA LPG/DAIR HDMI OUT TV 21-2 HDMI cable/Cable HDMI/Cable HDMI
En
This describes the connections for a TV that supports the ARC (Audio Return Channel) feature. With this connection, set ARC to ON in "HDMI Setup (→ 12)". To hear audio from the TV, press TV on the remote control.
• This unit does not support linked operations with other devices.
- Please refer to the TV's operation manual for directions on connections and setup for the TV.
Fr
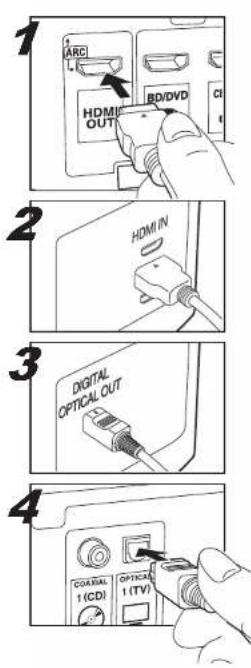
TV-2 (Non-ARC TV) / TV-2 (TV Non-ARC) / TV-2 (TV no ARC)
text_image
ARC HDMI OUT BD/DVD CI HDMI IN DIGITAL OPTICAL OUT COASTAL 1 (CDI) OPTICAL 1 (TV)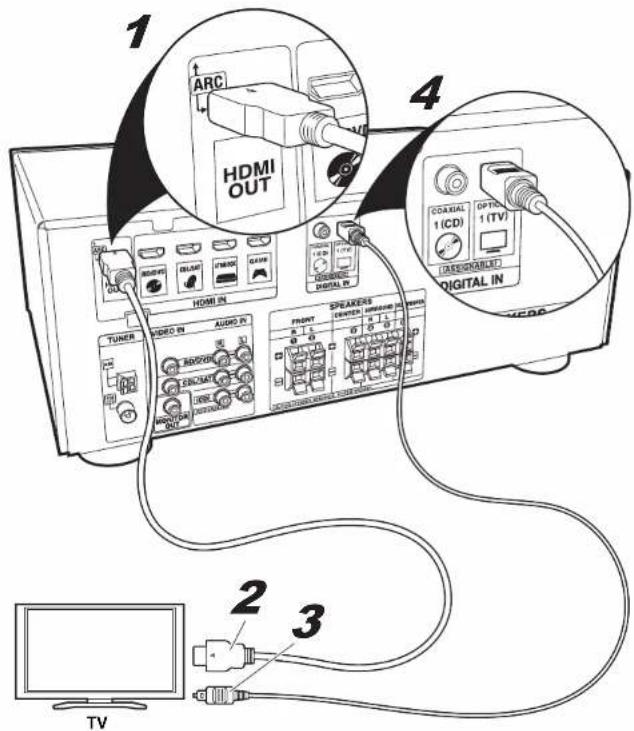
This describes the connections for a
TV that does not support the ARC
(Audio Return Channel) feature.
Connect using an optical cable along with a HDMI cable.
To hear audio from the TV, press TV on the remote control.
- Please refer to the TV's operation manual for directions on connections and setup for the TV.
Fr
To play the player, press INPUT SELECTOR on the remote control with the same name as the jack to which you connected the player so that the input on the unit is selected.
• This unit does not support linked operations with other devices.
Fr
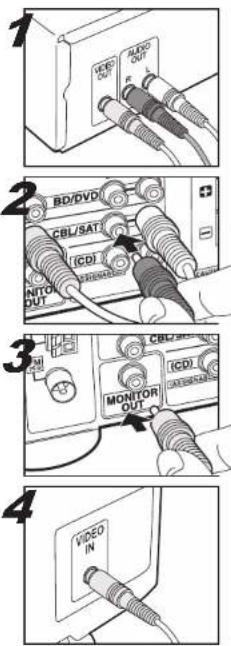
AV Component (Non-HDMI) / Appareil AV (Non-HDMI) / Componente AV (No HDMI)
text_image
1 VIDEO OUT ALOX OUT R L 2 BD/DVD CBL/SATI ICDI INTOL OUT MONITOR OUT ICDI MONITOR OUT 3 VIDEO IN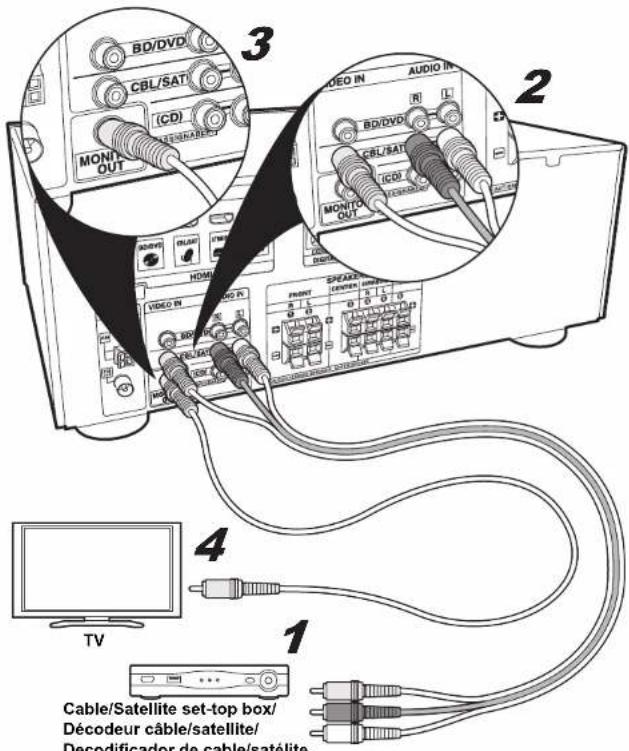
text_image
3 BD/DVD CBL/SATI (CDI) MONIC OUT AUDIO IN AUDIO IN BD/DVD CBL/SATI (CDI) MONIC OUT SHEAST PARENT CIRCUER HUMAN 4 TV 1 Cable/Satellite set-top box/ Décodeur câble/satellite/ Decodificador de cable/satéliteEn
When making this connection, the setup screen for this unit is not displayed on the TV. Perform the settings while
looking at the display on this unit. To play the player, press INPUT
SELECTOR on the remote control with the same name as the jack to which you connected the player so that the input on the unit is selected.
En
Fr
Es
Fr
text_image
AUDIO OUTPUT DIGITAL OPTICAL COAXIAL COAXIAL 1 (CD) DIGITAL IN (ASSIGNABLE)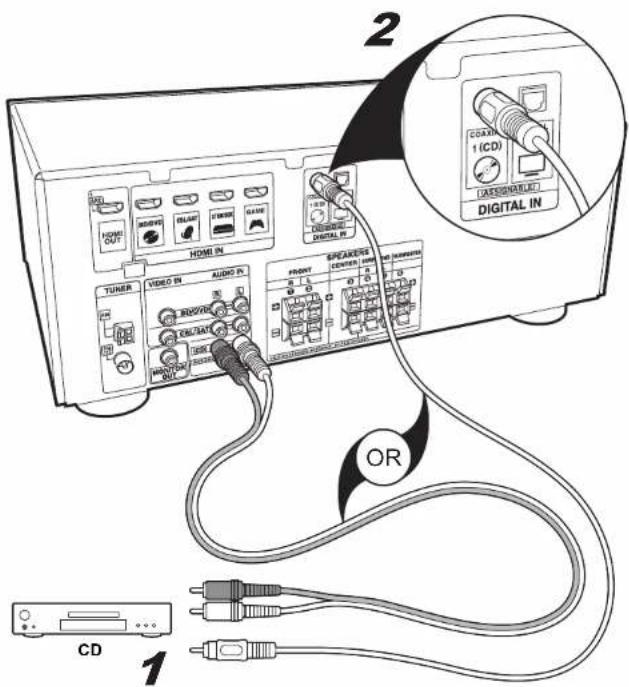
text_image
2 2 TUNER VIDEO IN AUDIO PV RHO/VD CD/TAI RHO/VD AUDIO PV SPEAKERS DAVIDEN OR CD 1 (CD) DIGITAL IN 1 2 3 4 5 6 7 8 9 10 11 12 13 14 15 16 17 18 19 20 21 22 23 24 25 26 27 28 29 30 31 32 33 34 35 36 37 38 39 40 41 42 43 44 45 46 47 48 49 50 51 52 53 54 55 56 57 58 59 60 61 62 63 64 65 66 67 68 69 70 71 72 73 74 75 76 77 78 79 80 81 82 83 84 85 86 87 88 89 90En
Connect using a coaxial cable or analog audio cable.
To play the player, press CD on the remote control.
Fr
1-2 Coaxial cable/Cable coaxial/Cable coaxial


Move the antenna around while playing the radio to find the position with the best reception. Use a thumb tack or similar to attach the FM wire antenna to a wall.
Fr
Connect the power cord to the power outlet after completing all other connections. Switch between on and standby using ⏻ RECEIVER on the remote control or ⏻ ON/STANDBY on the main unit.
Fr
The speaker configuration of this unit is set to 5.1 channel by default. This setting is required if there are speakers you do not intend to connect. The sound intended for speakers you will not be connecting is filtered to the other speakers.
-
Switch the input on the TV to that assigned to the unit.
-
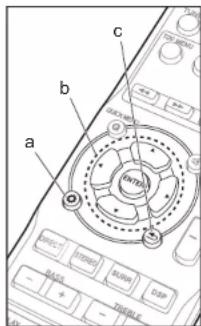
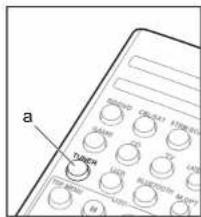
Press (a).
-
Select Manual SP Setup - Speaker Setting and in the following screen set NO for those speakers you will not be connecting. Set the front speakers to LARGE before trying to set the subwoofer to NO.
- Select the item with the cursors of the remote control and press ENTER to confirm your selection (b). To return to the previous screen, press 10.
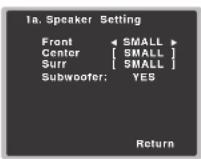
- You should normally select SMALL for your speakers. You cannot select NO for the front speakers.
- To exit setup, press (6).
When connecting to a TV that supports ARC (Audio Return Channel), enable the ARC feature.
- Switch the input on the TV to that assigned to the unit.
-
Press (fa).
-
Select HDMI Setup, and set ARC to ON in the next screen.
- Select the item with the cursors of the remote control and press ENTER to confirm your selection (b). To return to the previous screen, press 10.
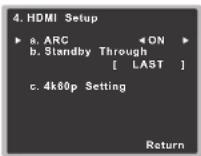
- To exit setup, press ←(c).
- You may need to change some TV settings to use the ARC feature. Please refer to the TV's operation manual for directions on connections and setup for the TV.
Standby Through
When the receiver is in standby, the HDMI input signal selected here will be output to the TV by HDMI. Select from the following Standby Through items to set.
LAST: The HDMI input signal selected previously will be output.
BD/DVD, CBL/SAT, STRM BOX, GAME: The HDMI input signal selected here will be output.
OFF: Signal will not be output during standby.


text_image
a b c D E F G H I J K L M N O P Q R S T U V W X Y Z A B C D e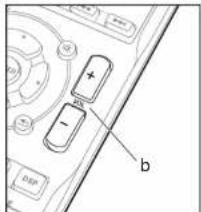
text_image
Diagram of a device control panel with labeled buttons and indicator lightsBasic Playback
- Switch the input on the TV to that assigned to the unit.
- Press INPUT SELECTOR (a) on the remote control with the same name as the jack to which you connected the player to switch the input.
- Start play on the player.
- Use VOL +/- (b) to adjust the volume.
- You can switch the audio to suit the connected cable. Press AUDIO SEL (c) to select H (HDMI cable), C1 (coaxial cable), O1 (optical cable), or A (analog audio cable).
text_image
a SABOTIO CUBUAYI KONJUN SAIN LAD AV GAM TALBOW RUBUAYI MUSUM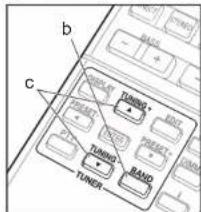
text_image
b c TURNO TUNING TURNO TUNER TURNO BAND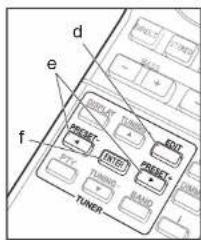
text_image
d e f TURER FASTER TUNER GARL GARL GARL GARL GARL GARL GARL GARLListening To the Radio
- Press TUNER (a).
- Press BAND (b) several times to select either AM or FM.
- Press and hold TUNING+ or TUNING- (c) for about a second to start automatic tuning to a radio station. Tuning stops when one is found.
You can preset up to 30 stations.
- Tune into the AM/FM radio station you want to register.
- Press EDIT (d) so that the preset number on the display flashes.
-
Press PRESET+ or PRESET− (e) to select a number between 1 and 30 while the preset number is flashing.
-
Press ENTER (f) to confirm.
- To select a preset radio station, press TUNER (a) then press PRESET+ or PRESET− (e).
| PRESET | |||
| FM | 8750 MHz | 0.1 | |


You can wirelessly enjoy music files stored in a smartphone or other BLUETOOTH-enabled device. The coverage area is about 33 feet (10 meters).
- Note that connection is not always guaranteed with all BLUETOOTH-enabled devices.
- Press BLUETOOTH (a).
- Enable (turn on) the BLUETOOTH function of the BLUETOOTH-enabled device.
- On the screen, etc., of the BLUETOOTH-enabled device, select "Onkyo AV Receiver". After a short time "CONNECT" is displayed and pairing is completed.
- If a password is requested, enter "0000".
- Play some music on the BLUETOOTH-enabled device. Increase the volume of the BLUETOOTH-enabled device to an appropriate level.
Playing a USB Device
Play music files on a USB storage device. This unit supports play of WMA/MP3/MPEG-4 AAC music files.
- Note that operation is not guaranteed with all USB storage devices.
-
Switch the input on the TV to that assigned to the unit.
-
Press USB (a).
-
Connect the USB storage device to the USB port on the main unit.
- Play of the first file starts automatically when the USB storage device is detected.
- To play another file, press ←(b) to display the list of files and folders on the TV, then use the cursors to select and ENTER to confirm (c).
- If characters that cannot be read are recorded on the USB file, they are replaced with >marks.
text_image
OK SIN DIP SIN OK SIN DIP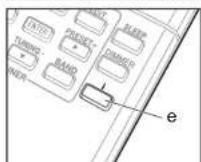
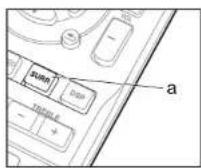
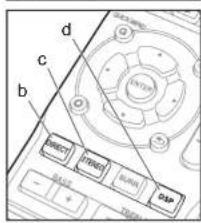
About Listening Modes
The default setting is for the All Ch Stereo mode to be selected which plays a stereo image from the front and rear, irrespective of the input audio format.
SURR button (a)
You can select the Dolby Digital and DTS listening modes. When the input signal is multi-channel, the listening mode switches to Dolby Digital or DTS-HD MasterAudio, for example, to suit the input audio format. When the input signal is 2-channel, you can select the DOLBY PLII MOVIE/MUSIC/GAME and NEO:6 CINEMA/MUSIC listening modes which expand playback to 5.1 channels.
DIRECT button (b)
You can select the DIRECT mode that shuts down circuits and processing that affect sound quality, such as the tone control circuits. In this case, speakers play the sound field according to the number of channels in the input signal, so there would be output from only the front speakers for a 2-channel signal, for example.
STEREO button (c)
You can select the STEREO mode to playback only from the front speakers and subwoofer.
DSP button (d)
You can select original surround modes such as the All Ch Stereo and TV Logic modes.


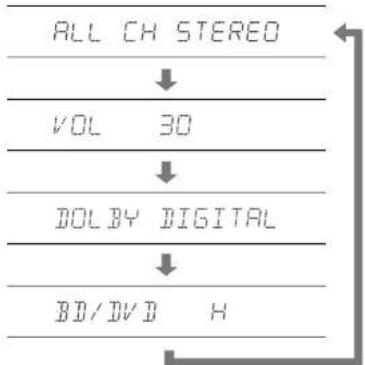
Press (e) several times to check various settings in the following order: listening mode → volume → input audio format → input source.
text_image
ALL CH STEREO ↓ VOL 30 ↓ DOL BY DIGITAL ↓ BD/DVD HYou can also see which audio format is being input by checking the indicators in the lower part of the display.
DTS HD 98/24 NEO6 HO D+PLB
This unit is compatible with the following digital audio formats. (with HDMI connection)
• Dolby Digital
• Dolby Digital Plus
• Dolby TrueHD
• DTS
• DTS 96/24
- DTS Express
• DTS-HD MasterAudio
• PCM (32 kHz to 192 kHz sampling frequencies)
• SACD (DSD 2ch only)
• DVD Audio (including 192 kHz)
Important: The listening modes may not be available depending on the current source, settings and status of the receiver.
Troubleshooting
- When a sound can not be heard from center and rear speakers, press SURR or DSP to change listening modes. E.g.) Press DSP for several times to select All Ch Stereo.
- In order to listen to the audio from the source component that is connected to this receiver, press AUDIO SEL to select H (HDMI cable), C1 (coaxial cable), O1 (optical cable), or A (analog audio cable).
- If there is no sound from the subwoofer: When the front speaker is set to LARGE then, in some cases, no sound may come from the subwoofer. Change the front speaker setting to SMALL or change the subwoofer to PLUS and the sound should be restored.
- If the power suddenly turns off:
- Check that there are no loose strands of speaker wire touching the rear panel or another set of wires. If so, re-attach the speaker wires, making sure there are no stray strands.
- When Auto Power Down is set, the power
automatically turns off at the set time.
• We will not accept responsibility for any damage arising from the connection of equipment manufactured by other companies.
Resetting the Main Unit
Use this procedure to reset all the receiver's settings to the factory default. Use the front panel controls to do this.
- Switch the receiver into standby.
- While holding down STEREO, press and hold
ON/STANDBY for about two seconds - When you see RESET? appear in the display, press SURROUND. OK? shows in the display.
- Press DSP to confirm.
VENTILATION CAUTION
When installing this unit, make sure to leave space around the unit for ventilation to improve heat radiation (at least 40 cm at top, 20 cm at rear, and 20 cm at each side).


text_image
a b c NAME CIRCUIT STRAWING NO. TALAW USS SIGHT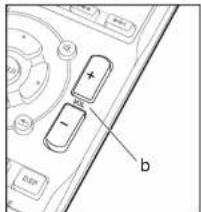
text_image
Diagram of a device control panel with labeled buttons and ports, including a plus/minus and minus signsLecture de base
text_image
a Talator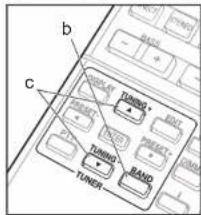
text_image
b c TURNO TURNO TURNO TURNO BAND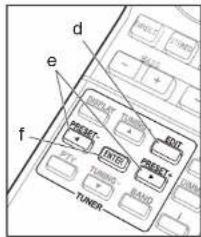
text_image
d e f TUNER TURNO TURNO TURNO TURNO TURNO TURNO TURNO TURNO TURNO TURNO TURNO TURNO TURNO TURNO TURNO TURNO TURNO TURNO TURNO TURNO TURNO TURNO TURNO TURNO TURNO TURN TURN TURN TURN TURN TURN TURN TURN TURN TURN TURN TURN TURN TURN TURN TURN TURN TURN TURN TURN TURN TURN TURN TURN TURN TURIN TURIN TURIN TURIN TURIN TURIN TURIN TURIN TURIN TURIN TURIN TURIN TURIN TURIN TURIN TURIN TURINÉcoute de la radio
text_image
Diagram of a device control panel with labeled buttons and ports, including a plus and minus signs.Reproducción básica
18 Park Way, Upper Saddle River, N.J. 07458, U.S.A.
For Dealer, Service, Order and all other Business Inquiries:
Tel: 201-785-2600 Fax: 201-785-2650
http://www.us.onkyo.com/
For Product Support Team Only:
1-800-229-1687
http://www.us.onkyo.com/
Gutenbergstrasse 3, 82178 Puchheim, Germany
Tel: +49-8142-4401-0 Fax: +49-8142-4208-213
http://www.eu.onkyo.com/
Anteros Building, Odyssey Business Park, West End Road, South Ruislip, Middlesex.
HA4 6QQ United Kingdom
Tel: +44 (0)871-200-1996 Fax: +44 (0)871-200-1995
Unit 1033, 10/F, Star House, No 3, Salisbury Road, Tsim Sha Tsui Kowloon, Hong Kong.
Tel: +852-2429-3118 Fax: +852-2428-9039
http://www.hk.onkyo.com/
302, Building 1, 20 North Chaling Rd., Xuhui District, Shanghai, China 200032,
Tel: +86-21-52131366 Fax: +86-21-52130396
http://www.cn.onkyo.com/
Please contact an Onkyo distributor referring to Onkyo SUPPORT site.
http://www.intl.onkyo.com/support/
Корпорация О энд Пи
The above-mentioned information is subject to change without prior notice.
Visit the Onkyo web site for the latest update.
Supplied Accessories/Accessoires fournis/Accesorios suministrados
Before use, check the packaging for the main unit and the accessories below.
Batteries/Piles/Pilas (AAA/R03) — (2)

FM wire antenna/Antenne filaire FM/Antena de hilos de FM --- (1)
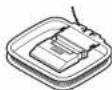
AM loop antenna/Antenne cadre AM/Antena en bucle de AM --- (1)
(C) Copyright 2016 Onkyo & Pioneer Corporation Japan. All rights reserved.
Printed in Vietnam / Imprimé au Vietnam / Напечатано во Вьетнаме
5707-00001-108-0V
SN 29402473
F1604-0