
KI2222FE0 - Refrigerator NEFF - Free user manual and instructions
Find the device manual for free KI2222FE0 NEFF in PDF.
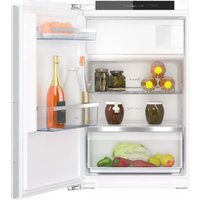


| Brand | Neff |
| Model | KI2222FE0 |
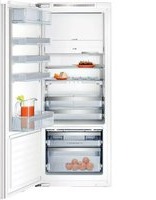
| Product type | Built-in combined refrigerator/freezer |
| Climate class | SN, N, ST, T |
| Permissible ambient temperature | 10 °C to 43 °C depending on class |
| Maximum weight | Approximately 45 kg |
| Power supply | 220-240 V ~ 50 Hz |
| Refrigerator temperature range | 2 °C to 8 °C |
| Special functions | Super-cooling, electronic temperature control |
| Interior lighting | LED (energy efficiency class E) |
| Refrigerator defrosting | Automatic |
| Freezer defrosting | Manual |
| Cleaning | Warm water and neutral dish soap; do not use steam cleaner |
| Safety | Child lock not present; instructions against electrical, explosion, burn risks |
| Spare parts | Available for at least 10 years after market launch |
| User repairability | Door gasket, hinges, shelves, bins; LED lighting by customer service |
| Included accessories | Ice cube tray, egg tray, bottle hook holder |
| Warranty | 2 years (in the European Economic Area) |
| Documentation | User manual available for free download |
Frequently Asked Questions - KI2222FE0 NEFF
User questions about KI2222FE0 NEFF
0 question about this device. Answer the ones you know or ask your own.
Ask a new question about this device
Download the instructions for your Refrigerator in PDF format for free! Find your manual KI2222FE0 - NEFF and take your electronic device back in hand. On this page are published all the documents necessary for the use of your device. KI2222FE0 by NEFF.
USER MANUAL KI2222FE0 NEFF
KI242..., KI232..., KI222...,
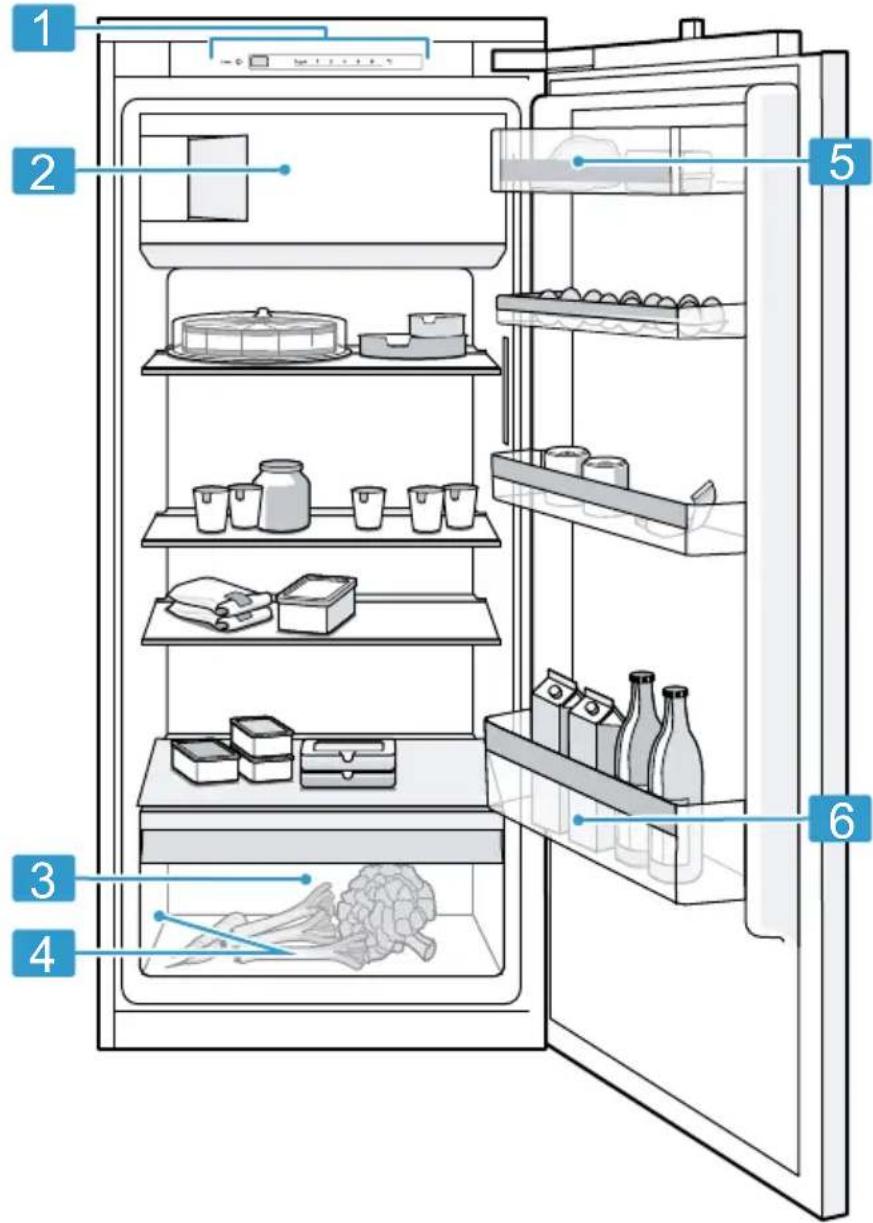
1
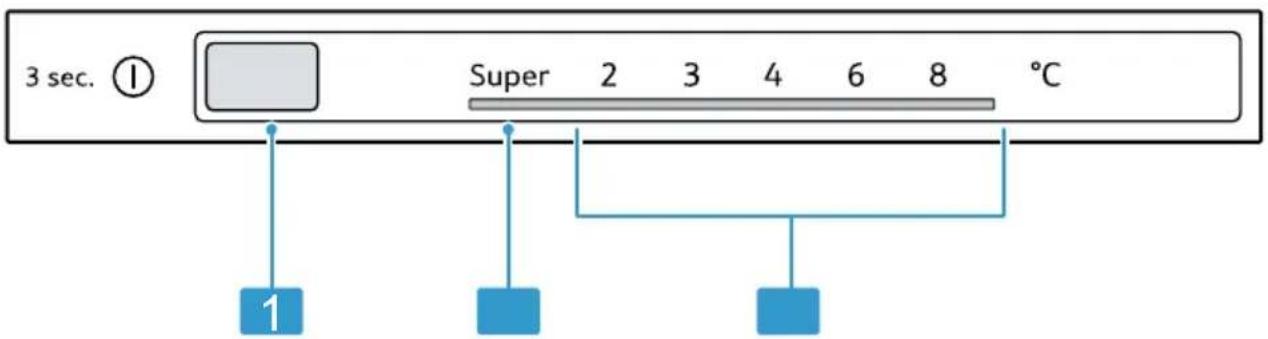
2
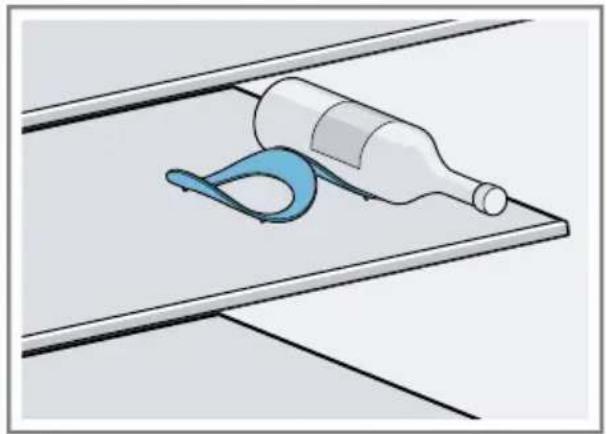
3
4
5
6
7
8
9
de
Table of contents
1 Safety 6
10 Freezer compartment..... 42
en Freezer compartment
used (waste electrical and electronic equipment - WEEE).
(waste electrical and electronic equipment - WEEE).
⚠ WARNING – Risk of injury!
⚠ WARNING – Risk of explosion!
⚠ WARNING – Risk of fire!
⚠ WARNING – Risk of suffocation!
⚠ WARNING – Risk of explosion!
⚠ WARNING – Risk of fire!
⚠ WARNING – Risk of injury!
⚠ WARNING – Risk of fire!
⚠ WARNING – Risk of explosion!
7 Operation in brief
7.1 Switching on the appliance
REGISTER YOUR PRODUCT ONLINE NEFF-HOME.COM
BSH Hausgeräte GmbH
Carl-Wery-Straße 34
81739 München, GERMANY

9001715343
de, fr, it, nl
020209
SELF-REPAIR HINTS
[bg] Съвети за ремонт 2 [hr] Savjeti za popravak....18 [cs] Poznámky k opravé 34 [da] Tip til reparation 50 [nl] Reparatie informatie 66 [en] Self-repair hints 82 [et] Remonditeave 98 [fi] Korjausvinkit 114 [fr] Conseils de réparation....130 [de] Reparatur Hinweise 146 [el] Υποδαίξεις επισκαυής 162 [hu] Javitási útmutató 178 [1] Consigli di riparazione.... 194 [IV] Informacija par remontu 210 [1] Informacija apie remonta 226 [no] Reparasjonstips 242 [pl] Wskazówki naprawy 258 [pt] Dicas de resolução 274 [ro] Indicii pentru reparatii 290 [sk] Poznámky k opravám 306 [sl] Nasveti za popravilo 322 [es] Consejos de reparación 338 [sv] Reparationsinformation 354 [ir] Onarim İpuçları 370


Repair


Repair

The hinges are removed.
The hinges are removed.
The shelf is removed.


Repair

The door seal is installed.

Repair

Repair
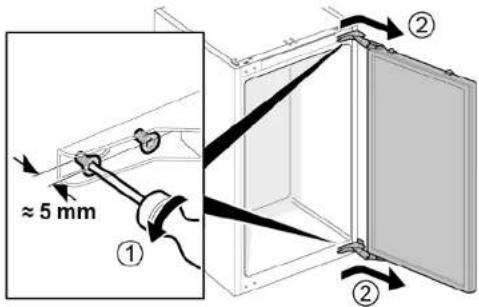
- Loosen the four screws (1).
- Push the door outward and remove it (2).
- Remove the four screws (1).
- Remove the hinges (2).
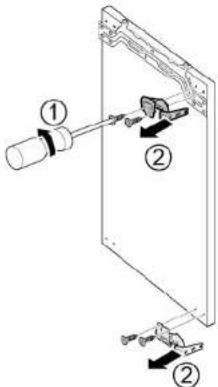

The hinges are removed.
4.2.2 Installing the flat hinge
Torx TX20 bit 6.3 mm (1/4") [00340865]

Heavy, large appliances!
The hinges are removed.



Repair


Repair




Repair
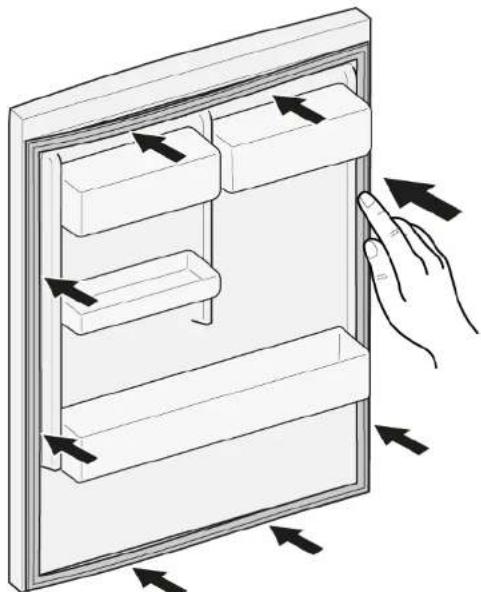
- Press the entire gasket gradually into the groove.


Repair
The shelf has been removed.



Repair


Repair

Self-repair hints - Refrigerator
i Concerning this document....83
1.1 Important information....83 1.1.1 Purpose....83 1.2 Explanation of symbols 83 1.2.1 Danger levels....83 1.2.2 Hazard symbols 83 1.2.3 Structure of the warnings....84 1.2.4 General symbols....84
Safety 85
2.1 General Safety instructions 85 2.1.1 All domestic appliances 85
Tools and aids....86
Repair 87
4.5 Replacing door rack....94
4.5.1 Removing door rack 94
4.6 Replacing fruit and vegetable container 95
4.6.1 Removing fruit and vegetable container....95
4.6.2 Installing fruit and vegetable container....95
4.7 Replacing LED side light 96
4.7.1 Removing LED side light 96
4.7.2 Installing LED side light 97
Concerning this document
1.1 Important information
1.1.1 Purpose
These repair hints support consumers to repair appliances by themselves according to the applicable eco-design regulation (as of 03/2021).
They contain information on how to exchange defined spare parts, including warnings and risks.
In case of questions, please contact our customer service. We will only be liable for damages if the repair hints have been followed properly.
1.2 Explanation of symbols
1.2.1 Danger levels
The warning levels consist of a symbol and a signal word. The signal word indicates the severity of the danger.
| Warning level Meaning | |
| Danger | Non-observance of the warning message will result in death or serious injuries. |
| Warning | Non-observance of the warning message could result in death or serious injuries. |
| Caution | Non-observance of the warning message could result in minor injuries. |
| Notice | Non-observance of the warning message could result in damage to property. |
Table 1: Danger levels
1.2.2 Hazard symbols
Hazard symbols are symbolic representations which give an indication of the kind of danger.
The following hazard symbols are used in this document:
| Hazard symbol Meaning | ||
 | General warning message | |
 | Danger from electrical voltage | |
 | Risk of explosion | |
 | Danger of cuts | |
 | Danger of crushing |
i Concerning this document
| Hazard symbol Meaning | ||
 | Danger from hot surfaces | |
 | Danger from strong magnetic field | |
 | Danger from non-ionizing radiation | |
Table 2: Hazard symbols
1.2.3 Structure of the warnings
Warnings in this document have a standardised appearance and a standardised structure.

Type and source of danger!
Possible consequences of ignoring the danger / warning.
▶ Measures and prohibitions for preventing the danger.
The following example shows a warning that warns against electric shock due to live parts. The measure for avoiding the danger is mentioned.

Risk of electric shock due to live parts!
Death by electrocution
- Disconnect appliances from electrical supply at least 60 seconds before starting repairs.
1.2.4 General symbols
The following general symbols are used in this document:
| Gen. symbol Meaning | |
| Identification of a special tip (text and/or graphic) | |
| Identification of a simple tip (only text) | |
| Identification of a link to a video tutorial |
| Gen. symbol Meaning | |
| Identification of required tools | |
| Identification of required preconditions | |
| Identification of a condition (if ..., then ...) | |
| Identification of a result | |
| StartIdentification of a key or button | |
| [00123456] Identification of a material number | |
| StatusIdentification of displayed text / window(in the appliance's display) | |
Table 3: General symbols
Safety
2.1 General Safety instructions
2.1.1 All domestic appliances
Risk of electric shock due to live parts!
- Errors by repairs involving electrical components can lead to electrical shock! ■ Disconnect the appliance from the mains for at least 60 seconds before starting work. ■ After the repair have a safety test according VDE 0701 or country-specific regulations performed.
Risk of injury from sharp edges!
■ Wear protective gloves.
Risk of crushing during repair, maintenance, troubleshooting and service due to heavy and moving components
■ Wear protective shoes. ■ Secure heavy components from falling down. ■ Do not stick body parts into moving components.
Risk to the appliance's safety / function! ■ Only use original spare parts. Risk of damage to electrostatically sensitive components (ESDs)! - Do not touch the modules, including connections and conductor paths.

Tools and aids
| Designation Details Images | |||
| Protection cloth[00342013] | 60 cm x 50 cm | 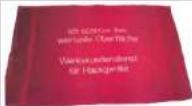 | |
| Suction cup[00342224] | ∅50 mm | ||
| Torx Bit TX20[00340865] | 6,3 mm (1/4") | 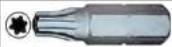 | |

Repair
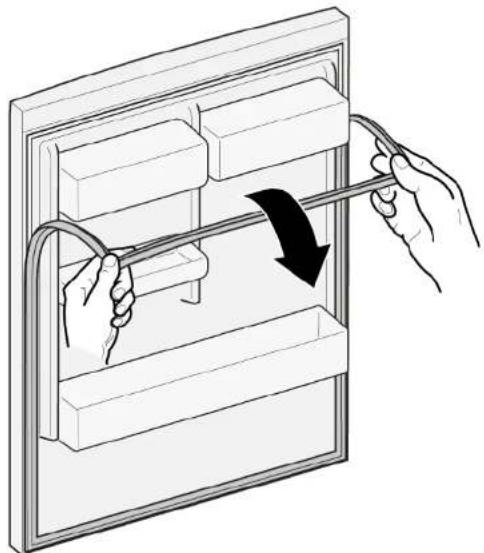
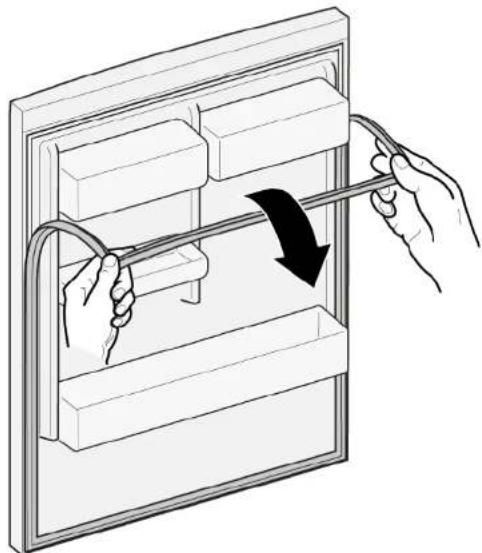
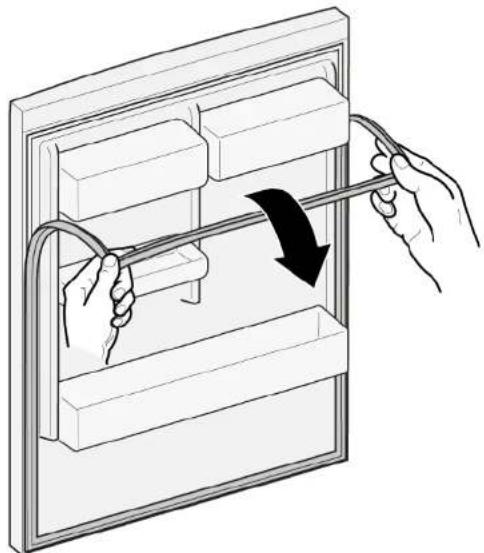
- Release the door gasket from the groove on the right and left corners.
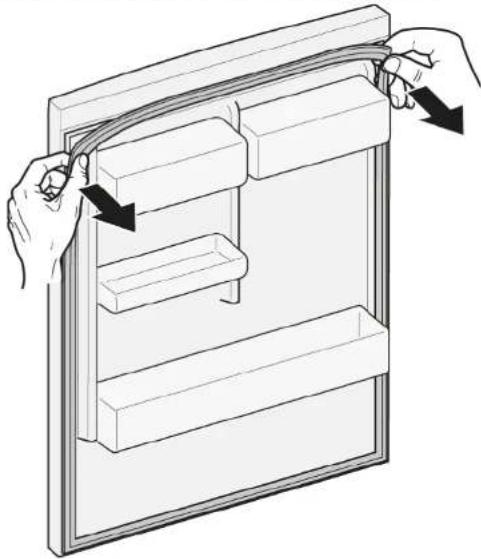
- Pull the door gasket out of the groove.


The door gasket is removed.
The thickness of the new door gasket may deviate slightly from that of the old one. This will not affect closing behavior or long-term function. If your appliance has adjustable hinges or hinge attachments, you can optimize the closing behavior subsequently. Small side holes in the door gasket are functional (required for ventilation). These are not production faults.
Repair
- Check the groove for the gasket for damage.
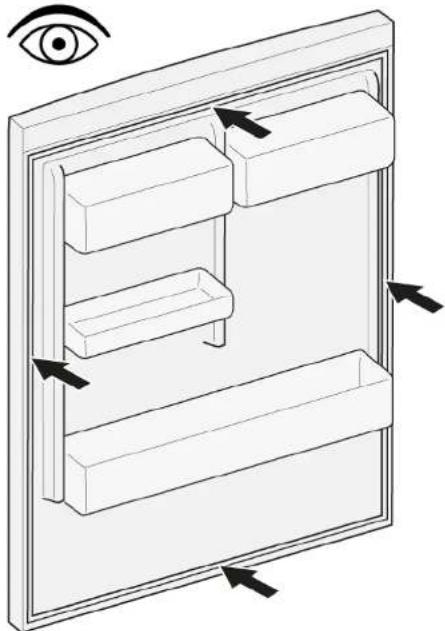
- If the groove for the gasket is damaged.
- Contact customer service.
- Note: Slight deformation of the door gasket is normal and does not affect its function. It is recommended to straighten the door gasket before inserting it into the appliance.
Heat the door gasket with a hair dryer or hot water and manually reshape it.
- Push the corners of the gasket at the top and bottom into the groove.
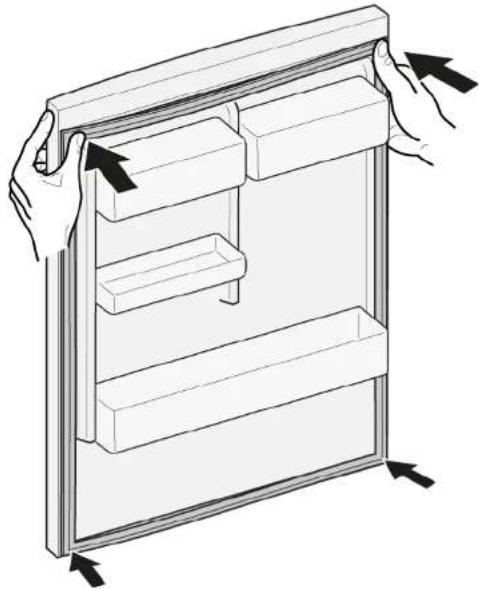

Repair
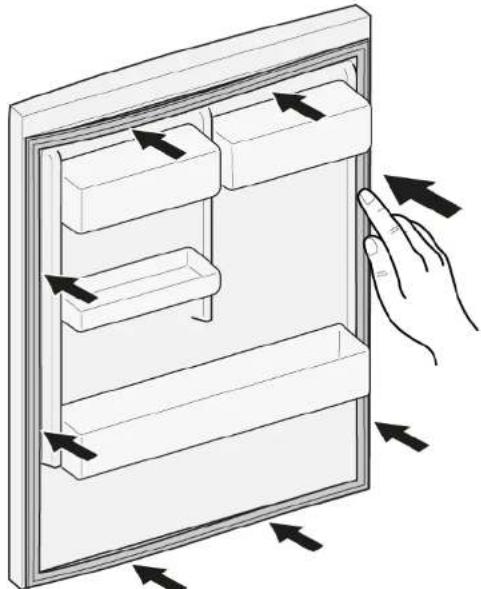
- Press whole gasket step by step into the groove.
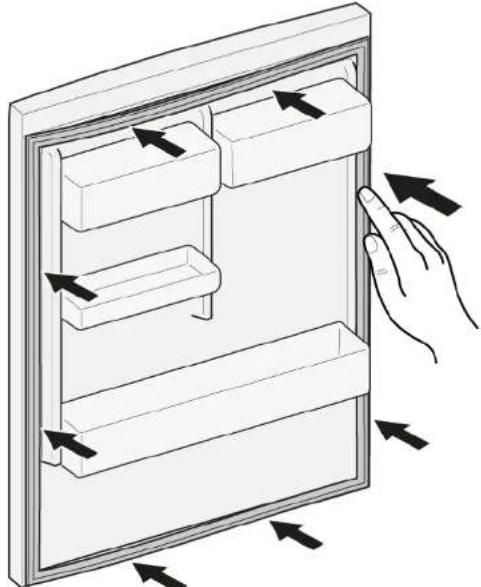

Door gasket is installed.

Repair
4.2 Replacing flat hinge
Required tools:
Torx Bit TX20 6.3 mm (1/4") [00340865]

Prerequisite:
√ Appliance is disconnected from power supply. √ Furniture door is removed. See Installation Instruction. √ Door is open.
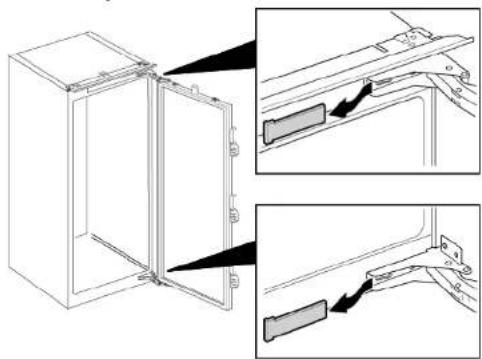
4.2.1 Removing flat hinge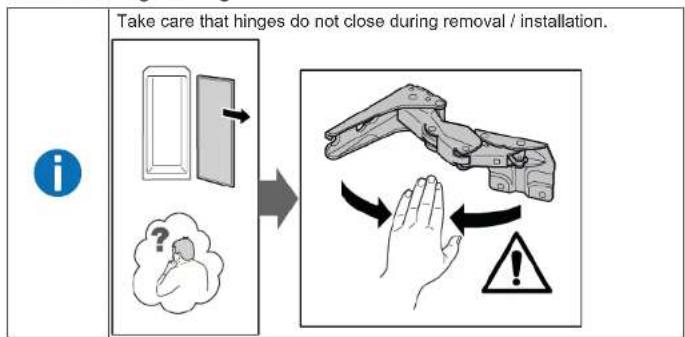
- Remove two hinge covers.

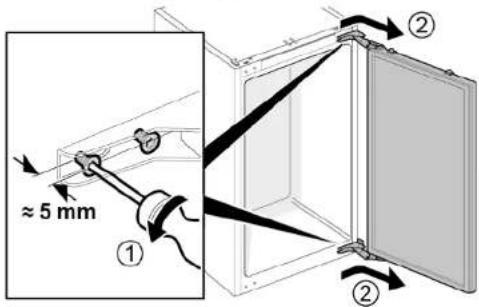
Repair
- Loosen four screws (1).
- Slide out and remove door (2).
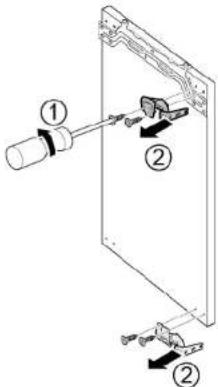
- Remove four screws (1).
- Remove hinges (2).
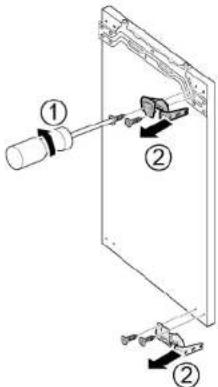

Hinges are removed.
4.2.2 Installing flat hinge
Install in reverse order.
Repair
4.3 Replacing sliding hinge
Required tools:
Torx Bit TX20 6.3 mm (1/4") [00340865]

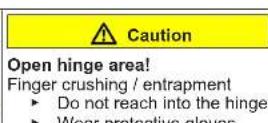
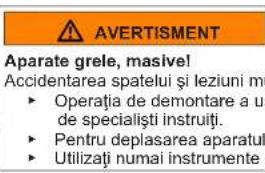
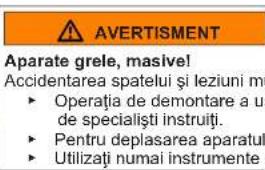
Heavy, bulky appliances!
Back and muscle injuries
- Appliance door removal operation should only be carried out by trained specialists. To move the appliance, two people are required. Use only suitable tools and equipment.

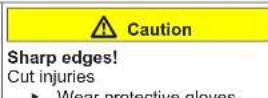
Sharp edges!
Cut injuries
Wear protective gloves.

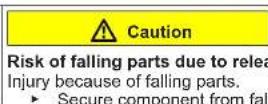
Risk of falling parts due to released screws!
Injury because of falling parts.
Secure component from falling down.

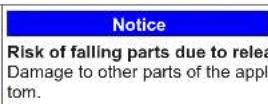
Risk of falling parts due to released screws!
Damage to other parts of the appliance or at customer's home, e.g., bottom.
Secure component from falling down.
Prerequisite:
Appliance is disconnected from power supply. Furniture door and appliance door are separated. See Installation Instruction.
4.3.1 Removing sliding hinge
- Unscrew two screws (1).
- Remove upper hinge (2).
- Remove door (3).
- Unscrew two screws (4).
- Remove lower hinge (5).
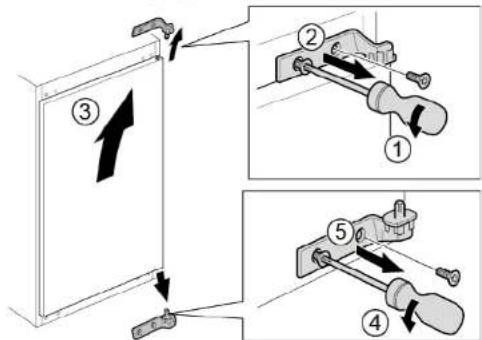
Hinges are removed.
4.3.2 Installing sliding hinge
Install in reverse order.

Repair
4.4 Replacing shelf
Prerequisite:
Door is open.
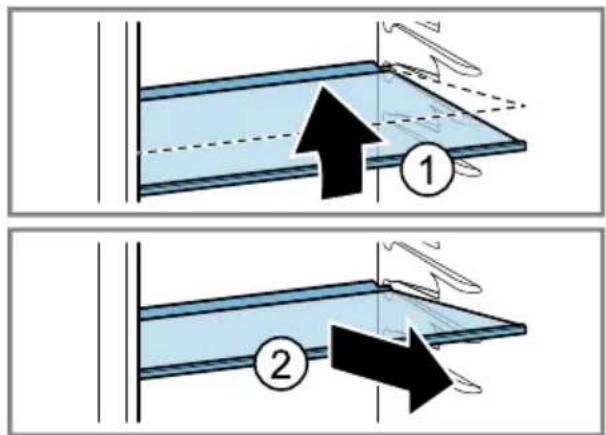
4.4.1 Removing shelf
Pull out shelf.
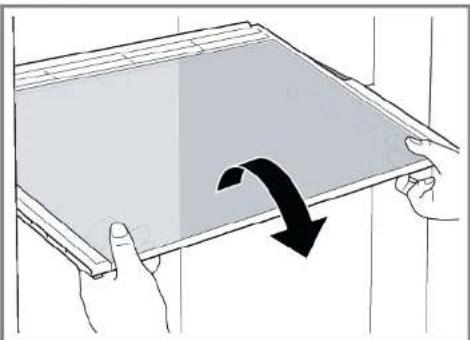
Shelf is removed.
4.4.2 Installing shelf
Install in reverse order.

Repair
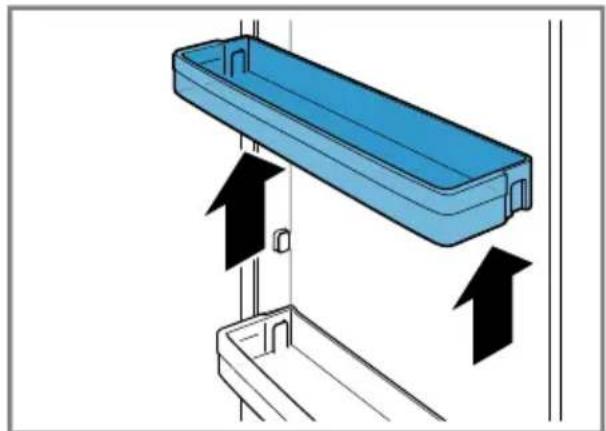
4.5 Replacing door rack
Prerequisite:
Door is open.
Lift door rack upwards.
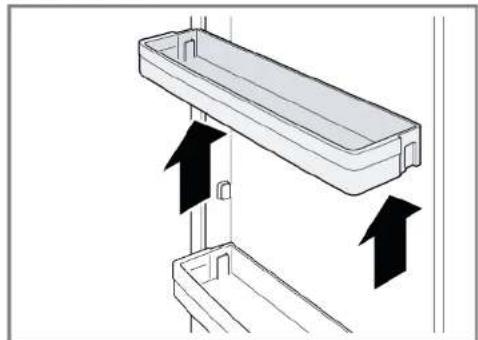
Door rack is removed.
Install in reverse order.

Repair
4.6 Replacing fruit and vegetable container
Prerequisite:
Door is open.
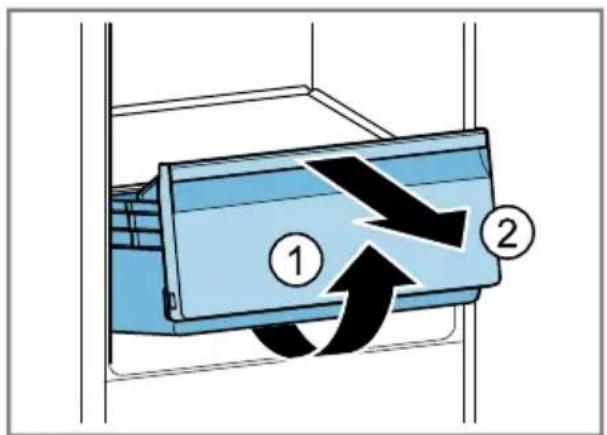
4.6.1 Removing fruit and vegetable container
- Pull out the fruit and vegetable container as far as it will go.
- Lift the fruit and vegetable container at the front (1).
- Remove container (2).
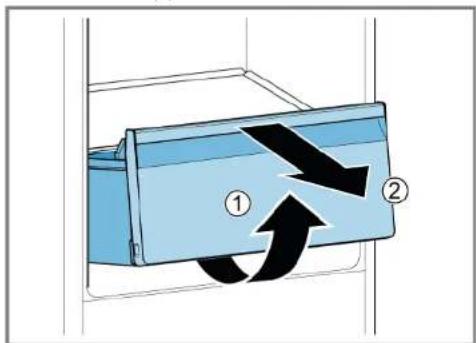

Fruit and vegetable container is removed.
4.6.2 Installing fruit and vegetable container
Install in reverse order.

Repair
4.7 Replacing LED side light
Required tools:

Suction cup ∅50 mm [00342224]

Your appliance features a maintenance-free LED light. These lights may be repaired by customer service or authorised technicians only!

Danger
Risk of electric shock due to live parts!
Danger to life through electric shock in case of improper repair. Electric parts should be repaired by qualified electricians. After the repair, have a safety test according to VDE 0701 or country-specific regulations performed.

Danger
Risk of electric shock due to live parts! Death by electrocution.
Disconnect appliances from electrical supply at least 60 seconds before starting repairs.

Caution
Sharp edges!
Cut injuries
▶ Wear protective gloves.
Prerequisite:
√ Appliance is disconnected from power supply. √ Door is open. √ Shelves are removed.
4.7.1 Removing LED side light
- Stick two suction cups on LED side light cover.
- Pull suction cups forward in one rotary movement.
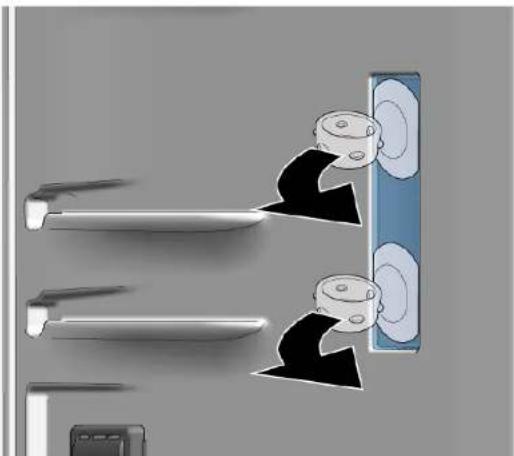
→ LED light cover is removed.

Repair
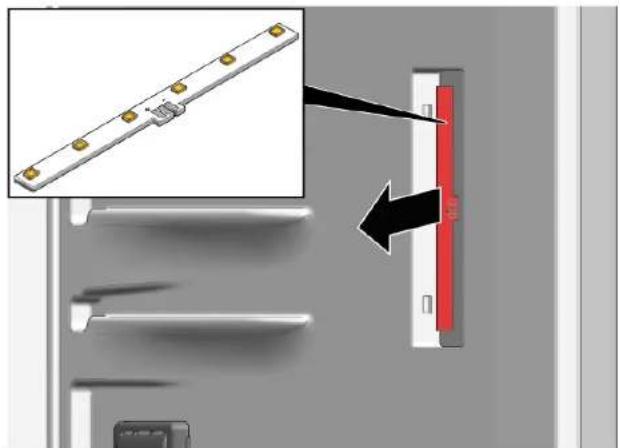
- Remove LED module.
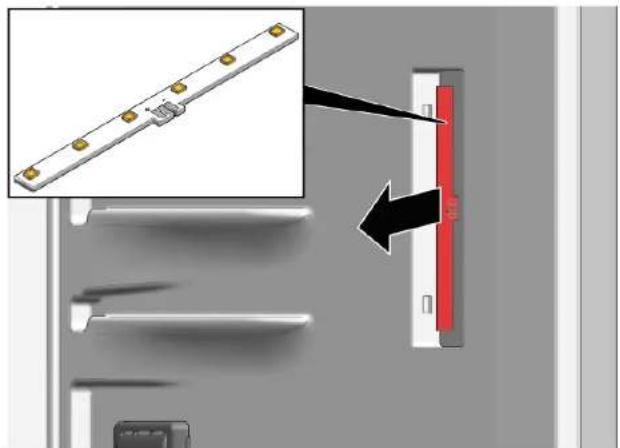

LED side light is removed.
4.7.2 Installing LED side light

Due to lamp cover hooks being easy to break during removal, the spare part LED side light is supplied as a set that includes the LED module and light cover.
Install in reverse order.
Repair - Refrigerator
i Regarding this document 99
1.1 Important information 99
1.1.1 Purpose 99
1.2 Explanation of symbols 99
1.2.1 Hazard levels....99


Repair
- Press the entire gasket into the groove piece by piece.
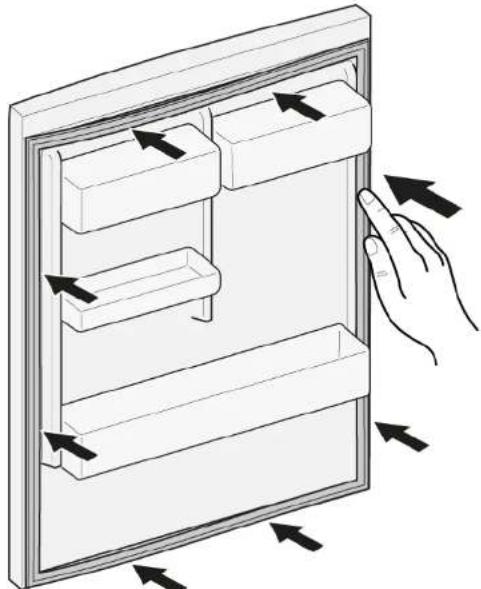


Repair





Repair


Repair

The shelf has been removed.
Suction cup ∅50 mm [00342224]



- Remove the door seal from the groove.


Repair


Repair




Repair


Repair


Repair


Repair

The shelf has been removed.
The door seal has been removed.
The container for fruits and vegetables has been removed.



Repair


Repair




Repair

Repair



Repair


Repairs

The cover has been removed.
The shelf has been removed.
The fruit and vegetable drawer has been removed.
4.6.2 Installing the fruit and vegetable drawer

The LED light cover has been removed.

Repairs
- Remove the LED module.
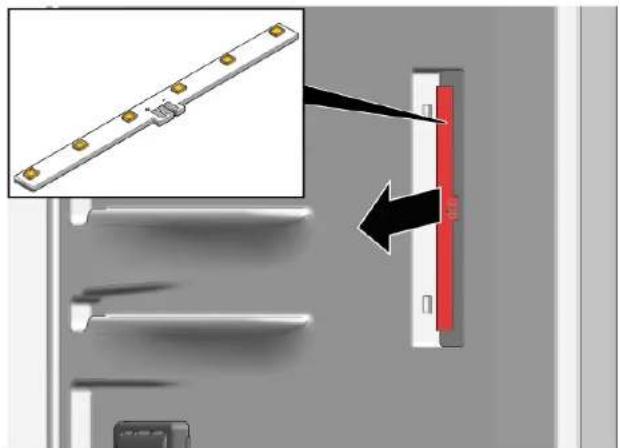


Repairs


Repairs

The hinges have been removed.
The hinges have been removed.
The shelf has been removed.



Repairs


Repairs



The LED lamp module is disassembled.
Repair
- Disassemble the LED module.
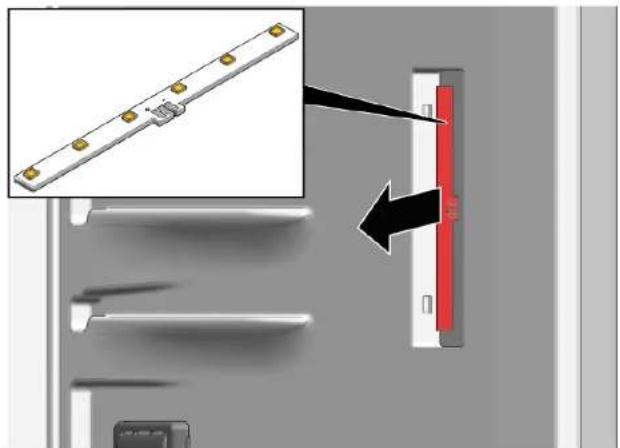
The LED side lamp is disassembled.
4.7.2 Assembly of the LED side lamp


Repairs


Repairs
The shelf is removed.
4.4.2 Assembly of the shelf



Repair


Repair
- Remove four screws (1).
- Remove the hinges (2).




Repair

Torx TX20 6.3 mm (1/4") bit [00340865]

Repair

The hinges are removed.
4.2.2 Mounting the flat hinge
Torx TX20 6.3 mm (1/4") bit [00340865]
The hinges are removed.
4.3.2 Mounting the sliding hinge

- Pull the seal out of the groove.


Repair

The door seal is installed.

Repair

Repair

The hinges are removed.
The hinges are removed.
The shelf in the door has been removed.

The LED light cover has been removed.

Repair
- Remove the LED module.
- Pull the door gasket out of the groove.


Repair
- Push the entire gasket into the groove step by step.


Repair

Back and muscle injuries
The shelf has been removed.
4.4.2 Installing the shelf
- Install in reverse order.

Repair
4.5 Replacing the door drawer
Requirement:
The doors are open.


Repair


Repair


Repair


Repair

The door shelf has been removed.
4.5.2 Mount the door shelf

Suction cup ∅50 mm [00342224]


The LED lamp housing has been removed.

Repair
- Remove the LED module.
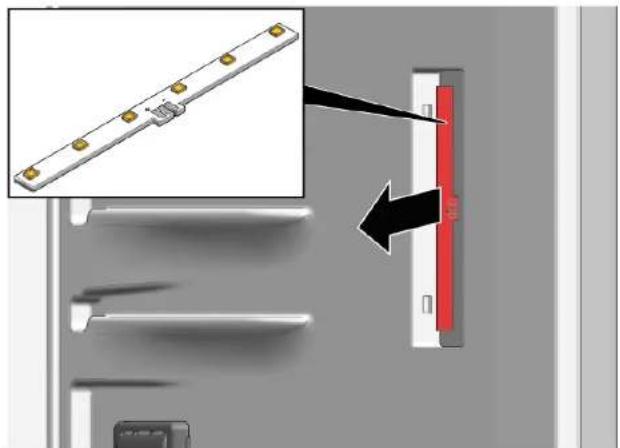
The LED side lamp has been removed.
4.7.2 Mount the LED side lamp


Repair


Repair



- DE
- TABLE OF CONTENTS
- SAFETY
- FREEZER COMPARTMENT
- EN FREEZER COMPARTMENT
- ⚠ WARNING – RISK OF INJURY
- ⚠ WARNING – RISK OF EXPLOSION
- ⚠ WARNING – RISK OF FIRE
- ⚠ WARNING – RISK OF SUFFOCATION
- OPERATION IN BRIEF
- SWITCHING ON THE APPLIANCE
- SELF-REPAIR HINTS
- REPAIR
- INSTALLING THE FLAT HINGE
- SELF-REPAIR HINTS - REFRIGERATOR
- I CONCERNING THIS DOCUMENT
- TOOLS AND AIDS
- CONCERNING THIS DOCUMENT
- IMPORTANT INFORMATION
- PURPOSE
- EXPLANATION OF SYMBOLS
- DANGER LEVELS
- HAZARD SYMBOLS
- STRUCTURE OF THE WARNINGS
- GENERAL SYMBOLS
- GENERAL SAFETY INSTRUCTIONS
- ALL DOMESTIC APPLIANCES
- REPLACING FLAT HINGE
- INSTALLING FLAT HINGE
- REPLACING SLIDING HINGE
- REMOVING SLIDING HINGE
- INSTALLING SLIDING HINGE
- REPLACING SHELF
- REMOVING SHELF
- INSTALLING SHELF
- REPLACING DOOR RACK
- REPLACING FRUIT AND VEGETABLE CONTAINER
- REMOVING FRUIT AND VEGETABLE CONTAINER
- INSTALLING FRUIT AND VEGETABLE CONTAINER
- REPLACING LED SIDE LIGHT
- DANGER
- CAUTION
- REMOVING LED SIDE LIGHT
- INSTALLING LED SIDE LIGHT
- REPAIR - REFRIGERATOR
- I REGARDING THIS DOCUMENT
- REPAIRS
- INSTALLING THE FRUIT AND VEGETABLE DRAWER
- ASSEMBLY OF THE LED SIDE LAMP
- ASSEMBLY OF THE SHELF
- MOUNTING THE FLAT HINGE
- MOUNTING THE SLIDING HINGE
- INSTALLING THE SHELF
- REPLACING THE DOOR DRAWER
- MOUNT THE DOOR SHELF
- MOUNT THE LED SIDE LAMP
Brand : NEFF
Model : KI2222FE0
Category : Refrigerator