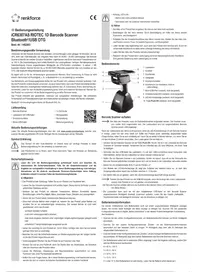
RioScan iCR6307AS - Barcode scanner Renkforce - Free user manual and instructions
Find the device manual for free RioScan iCR6307AS Renkforce in PDF.


| Product type | 1D barcode scanner |
| Brand | Renkforce |
| Model | RioScan iCR6307AS |
| Intended use | Fast and reliable reading of standard 1D barcodes (UPC, EAN, ISSN, etc.) indoors |
| Power supply | 5 V DC, max. 250 mA (operation), max. 500 mA (charging) |
| Battery | Built-in non-replaceable Ni-MH battery, 2 × 1.2 V, 2 × 1150 mAh |
| Battery life | More than 25,000 scans after full charge |
| Charging time | Approximately 4 to 5 hours |
| Internal memory | 1 MB (up to 65,000 EAN13 barcodes) |
| Wireless communication | Bluetooth Class 1 (up to 100 mW), range up to 100 m in open field |
| Wired communication | USB OTG (micro USB cable) |
| Bluetooth profiles | HID and SPP |
| Scan speed | 300 scans/second |
| Resolution | 4 mil (best resolution) |
| Illumination | Red LED (wavelength 610–640 nm) |
| Supported symbologies | EAN-13, EAN-8, UPC-A, UPC-E, ISSN, ISBN, Codabar, Code 128, Code 93, ITF-6, ITF-14, Interleaved 2 of 5, Industrial 2 of 5, Matrix 2 of 5, GS1 Databar, Code 39, Code 11, MSI |
| Dimensions (scanner) | 60 × 203 × 95 mm |
| Weight (scanner) | 202 g ±5 g |
| Weight (charging station) | 225 g ±5 g |
| Operating temperature | 0 to +50 °C |
| Operating humidity | 5 to 95% RH (non-condensing) |
| Compatible operating systems | Android 2.x to 6.x, iOS (including 9.3) |
| Package contents | Scanner, charging station with USB cable, mounting plate, smartphone holder, micro USB cable, 3 screws, quick start guide, user manual |
Frequently Asked Questions - RioScan iCR6307AS Renkforce
User questions about RioScan iCR6307AS Renkforce
0 question about this device. Answer the ones you know or ask your own.
Ask a new question about this device
Download the instructions for your Barcode scanner in PDF format for free! Find your manual RioScan iCR6307AS - Renkforce and take your electronic device back in hand. On this page are published all the documents necessary for the use of your device. RioScan iCR6307AS by Renkforce.
USER MANUAL RioScan iCR6307AS Renkforce
Copyright 2018 by Conrad Electronic SE. *1462883_V2_0318_02_mxs_m_de
GB Operating instructions
iCR6307AS RIOTEC 1D Barcode scanner Bluetooth®/USB OTG
Item no. 1462883
Intended use
Use this barcode scanner for quick and reliable scanning of conventional 1D barcodes, such as UPC, EAN or ISSN barcodes. The built-in rechargeable battery provides enough power for 20,000 – 25,000 barcode scans. The barcode scanner has a wireless range of 100 m, making it ideal for on-the-go use in shops, warehouses or offices. Data is transmitted via Bluetooth Class 1. You can also transfer data to an OTG-capable mobile device using a USB OTG cable. The scanner has a 1 MB internal memory, which can store up to 65,000 EAN 13 barcodes and send them to an OTG or Bluetooth®-capable mobile device.
It is intended for indoor use only. Do not use it outdoors. Contact with moisture, e.g. in bathrooms, must be avoided under all circumstances.
For safety and approval purposes, you must not rebuild and/or modify this product. If you use the product for purposes other than those described above, the product may be damaged. In addition, improper use can cause hazards such as short circuiting, fire, electric shock etc. Read the instructions carefully and keep them. Make this product available to third parties only together with its operating instructions.
This product complies with the statutory national and European requirements. All company names and product names are trademarks of their respective owners. All rights reserved.
Bluetooth ^® is a registered trademark of Bluetooth SIG, Inc.
Delivery content
- Barcode scanner
- 3 x screws
• Charging station with USB cable
- Mounting plate
- Smartphone holder
- Quick start guide
- Micro USB cable
- Operating instructions
Latest operating instructions
Download the latest operating instructions via the link www.conrad.com/downloads or scan the QR code shown. Follow the instructions on the website.
Explanation of symbols

An exclamation mark in a triangle indicates important instructions in this operating manual that absolutely have to be observed.

The arrow symbol indicates specific tips and advice on operation.
Safety instructions

Read the operating instructions carefully and especially observe the safety information. If you do not follow the safety instructions and information on proper handling in this manual, we assume no liability for any resulting personal injury or damage to property. Such cases will invalidate the warranty/guarantee.
a) General
• The device is not a toy. Keep it out of the reach of children and pets.
- Do not leave packaging material lying around carelessly. This may become dangerous playing material for children.
- Protect the product from extreme temperatures, direct sunlight, strong jolts, high humidity, moisture, flammable gases, vapours and solvents.
- Do not place the product under any mechanical stress.
- If it is no longer possible to operate the product safely, take it out of operation and protect it from any accidental use. Safe operation can no longer be guaranteed if the product:
- is visibly damaged,
- is no longer working properly,
- has been stored for extended periods in poor ambient conditions or
- has been subjected to any serious transport-related stresses.
- Please handle the product carefully. Jolts, impacts or a fall even from a low height can damage the product.
- Also observe the safety and operating instructions of any other devices which are connected to the product.
- Risk of injury! Do not point the product at people or animals.
- Consult an expert when in doubt about operation, safety or connection of the device.
- Maintenance, modifications and repairs are to be performed exclusively by an expert or at a qualified shop.
- If you have questions which remain unanswered by these operating instructions, contact our technical support service or other technical personnel.
- Attention, LED light:
- Do not look directly into the LED light!
- Do not look into the beam directly or with optical instruments

b) Rechargeable batteries
- The rechargeable battery is permanently built into the product and cannot be replaced.
- Never damage the rechargeable battery. Damaging the casing of the rechargeable battery might cause an explosion or a fire!
- Never short-circuit the contacts of the rechargeable battery. Do not throw the battery or the product into fire. There is a danger of fire and explosion!
- Charge the rechargeable battery regularly, even if you are not using the product. Due to the rechargeable battery technology being used, you do not need to discharge the rechargeable battery first.
- Never charge the rechargeable battery of the product unattended.
- When charging, place the product on a surface that is not heat-sensitive. It is normal that a certain amount of heat is generated during charging.
Operating elements

1 Charging station
2 Trigger
3 Scan window
4 Mounting plate
5 Smartphone holder
7 Micro USB port (hidden, not shown)
8 O C sliding switch (hidden, not shown)
9 LED indicator (hidden, not shown)
10 Push ON button (hidden, not shown)
6 Smartphone (not included, for illustration purposes only)
Charging the barcode scanner

The battery must be charged before using the product for the first time. The scanner does not need to be switched on in order for it to charge. However, the charging status is not shown when the scanner is switched off.
The LED indicator (9) blinks in orange when there is insufficient battery power remaining. Charge the battery straight away. If the product has turned itself off (sleep mode), fully charge the battery before turning it on with the trigger (2). To charge the battery, follow the steps below:
- Tum on the barcode scanner using the Push ON button (10), which is located on the bottom of the scanner. Use a sharp object (such as the tip of a pen) to push the button.
- Connect the USB cable on the charging station (1) to a USB port on a computer or USB power adapter. Place the charging station on a flat surface.
- Insert the barcode scanner into the charging station. Ensure that the contacts on the bottom of the scanner are clean and connected to the contacts on the charging station.
- Move the O C sliding switch (7) to the "C" position.
- The battery level indicator (9) blinks to indicate that the battery is charging. Depending on the remaining battery level, a full charge takes 4-5 hours.
• The LED indicator will change to a steady orange when the battery is fully charged.

Disconnect the product from the USB power source when the LED indicates that the battery is fully charged. The device is now ready for use.
The barcode scanner does not automatically enter sleep mode when the battery is charging.
- The charging station can also charge an Android mobile device that is connected to the barcode scanner using the USB cable provided. For details on how to connect a mobile device, see "Connecting the mounting plate, smartphone holder and mobile devices".
Battery status information
You can view battery status information on a connected mobile device. To configure the display settings, scan the corresponding configuration barcode in the "Battery information" section in the quick start guide that comes with the product.
• To display battery status on your mobile device, scan the first configuration barcode.
- To update the battery status information automatically, scan the second configuration barcode ("Enable"). Your mobile device will then display the latest battery status every 30 seconds.
- To stop displaying battery status information, scan the third configuration barcode ("Disable").
- The battery status is displayed in Arabic numerals. Refer to the following list for information on the battery level represented by each number.
0 = Less than 10 % (The battery level is very low; charge the battery immediately).
$$ 4 = 80 \% - 100 \% $$
$$ 3 = 55 \% - 80 \% $$
$$ 2 = 30 \% - 55 \% $$
$$ 1 = 10 \% - 30 \% $$
Connecting the mounting plate, smartphone holder and mobile devices
You can attach a suitable mobile device to the scanner by following the steps below (tablets are not supported).
- Connect the micro USB connector on the USB cable that came with the product into the micro USB port (7) on the scanner.
- Guide the USB cable through one of the slots on the scanner head. Connect the cable to a mobile device that supports USB OTG. For more information, refer to the quick start guide that came with the product.

If you move the O C sliding switch (7) to the "C" position, the connected mobile device is also being charged whenever the barcode scanner is charged.
• The mounting plate (4) comes with three screws attached.
- Attach the mounting plate to the top of the barcode scanner by tightening the three screws with a Phillips screwdriver. Ensure that the mounting plate is placed in the correct orientation. The screws must stand upright.
- Place the three key-shaped holes on the smartphone holder (5) onto the three screws on the mounting plate (4). Slide the smartphone holder in the direction of the narrower end of the key-shaped holes until it clicks into place.
- You are now ready to attach your mobile device to the holder.
- Start by peeling the transparent film off the adhesive pad. If necessary, remove any protective covers or other accessories from your mobile device. Place the holder on the back of your phone, ensuring that the hook sits over the edge of the phone. Press the suction pads and the adhesive pad firmly to secure both parts together.
- When your mobile device is not required, remove the scanner from the smartphone holder or remove your mobile device. The adhesive pad is reusable.
Configuring the data transfer mode
- The barcode scanner can transfer data to your mobile device either wirelessly via Bluetooth or by using a USB cable. You can switch between data transfer modes as desired. The wireless mode is enabled by default. To transfer data to an OTG-capable mobile device using a USB cable, you will need to enable the USB data transfer mode.
- Scan the "wired OTG communication mode" configuration barcode in the quick start guide that came with the product. For more information on how to scan configuration barcodes, see "Configuring the settings".
- To enable the wireless Bluetooth mode, scan the "wireless BT communication (default)" configuration barcode.
Pairing the barcode scanner with your mobile device via Bluetooth®
Your mobile device must support at least one of the following Bluetooth ^ profiles: Bluetooth ^ HID or Bluetooth ^ SPP.
Configuring the Bluetooth ^® connection
Ensure that your mobile device and its operating system supports the HID or SPP Bluetooth profiles. If you are not sure which profile your phone supports, start by trying the HID profile. If you are unable to pair your phone with the scanner, enable the SPP profile. For more information on how to scan configuration barcodes, see "Configuring the settings".
• To enable the HID profile, scan the A1 and A2 barcodes in the operating instructions.
• To enable the SPP profile, scan the B1 and B2 barcodes in the operating instructions.
- Enable Bluetooth ^® on your mobile device. For more information, refer to the instructions for your mobile device. Follow the onscreen instructions to pair your mobile device with the scanner. The LED indicator (9) turns red to indicate that the scanner is in pairing mode. It turns off when the two devices have been paired successfully. The barcode scanner is now ready to use and can read barcodes and transmit data via the Bluetooth ^® connection.
The barcode scanner will attempt to re-establish the Bluetooth ^* connection if it is interrupted when data is being uploaded. Bring the barcode scanner within range of your computer or mobile device. If necessary, repeat the pairing process.
- To reset the barcode scanner, scan the configuration barcodes in the "Reset Configuration to Defaults" section in the quick start guide. Ensure that you scan the barcodes in ascending order (A1 to A8 or B1 to B8).
Operation
- Before using the barcode scanner, refer to the "Configuring the scanner settings" section for information on how to configure the scanner.
- Press the Push ON button (10) to turn on the barcode scanner. The button is located on the bottom of the scanner.
- Move the O C sliding switch (8) to the "O" position.
- Open a document on your file management device (mobile device). The barcode will be inserted into the position where the cursor blinks.
- Point the scan window (3) at the barcode that you want to scan and press the trigger (2). You will hear two short beeps and the LED indicator (9) will flash briefly.
- Position the scan window (6) at a sufficient distance and an angle of 30^ - 60^ to the barcode. Depending on the size and specification of the barcode, you may need to adjust the distance between the barcode and the scanner. Pay attention to the following diagram when positioning the scanning unit.
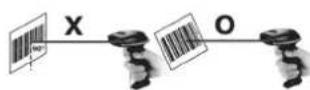
Hold the scanner at the correct angle to the barcode. Never hold the scanner at right angles to the barcode.
a) Switching between operating modes
- The barcode scanner features two operating modes. In data transmission mode, it sends the scanned barcode data directly to your mobile device. If your device is not connected (e.g. the barcode scanner is not within range), the data is saved temporarily and automatically transferred to your mobile device when the connection is re-established. Data transmission mode is enabled by default.
- In data storage mode, data is saved to the scanner's internal memory. Saved data can be uploaded onto a suitable reading device.
• To switch operating modes, scan the desired configuration ode. - To switch to data storage mode, scan the "Data Storage mode (Batch Mode)" configuration code in the quick start guide.
- To switch to data transmission mode, scan the "Data Transmission mode (Default)" configuration code in the quick start guide.
- You can switch operating modes when the data in the scanner's internal memory has been deleted. If you attempt to switch modes when there is data in the internal memory, the red/orange LED indicator (9) will blink and you will hear a long beep to indicate that the scanner failed to switch modes.
b) Uploading saved data
- To upload data from the internal memory, scan the "Transmit memory data" configuration code in the quick start guide. The green/orange LED indicator (9) will blink and you will hear three beeps.
Both devices must be within range or connected via a USB cable.
c) Deleting data from the memory
- If you want to switch operating modes or upload scanned data, you will need to delete the existing data from the scanner's memory. If you do not delete the existing data, you will not be able to scan more barcodes or switch operating modes.
- To delete data from the internal memory, scan the "Clean memory data" configuration code in the quick start guide. The green/orange LED indicator (9) will blink and you will hear three beeps. The saved data will be deleted.
Tips & notes
- Ensure that the barcode is clean before scanning it.
• The barcode must be fully visible. - Keep the barcode scanner at the specified distance and angle from the barcode.
- Hold the scanning unit parallel to the barcode.
• To prevent incorrect results, check the settings each time you turn on the barcode scanner.
Meaning of the LED indicator status (9)
Constant orange Battery is fully charged
Flashing orange Battery is charging / low battery
Constant red Not connected / not ready to use
Constant green Barcode detected
Constant orange Barcode detected (data storage mode)
If the barcode scanner is connected to an iOS mobile device, the mobile device may display an error message when the barcode scanner is placed into the charging station (1). If you encounter this issue, remove and then reinsert the barcode scanner into the charging station.
Configuring the scanner settings
The barcode scanner can be configured to suit different usage scenarios. Use the following instructions together with the quick start guide included with the product. The quick start guide includes all barcodes that are needed to configure the scanner. Scan the desired barcode with the barcode scanner to apply the corresponding settings. The configuration codes are printed next to each other in some places. Cover the other codes (apart from the code that you want to scan) with your hand or a piece of paper. All symbologies are enabled by default. You can enable or disable individual symbologies as required.
- Turn on the barcode scanner in data transmission mode.
- Select the desired symbology in the quick start guide.
- Enable a symbology by scanning the "ENABLE" barcode.
- Disable a symbology by scanning the "DISABLE" barcode.
-
Exit configuration mode by scanning the End Configuration barcode.
-
Enable configuration mode by scanning the Start Configuration barcode in the quick start guide.
Overview of the scanner settings
a) Setting the keyboard country
- Scan the configuration barcode for the desired country. The country barcodes can be found in the "Keyboard Country (Wired OTG mode only)" section in the quick start guide. You will hear a beep when the scanner registers the barcode.
- Barcodes are available for the following countries: USA, Norway, Germany, Sweden, Denmark, Switzerland, Italy, France, Vietnam, Spain, Portugal, Hungary.
Ensure that you select the US keyboard settings on your mobile device. The following symbols are usually supported when the keyboard settings are set to "US": @ | \$ # { }[] =/'1<>-. These symbols may not be available on keyboards for other countries.
b) Restoring default settings
If you encounter any input issues, reset the scanner to the default settings.
- To restore the default settings for the HID profile, scan the configuration codes A1 to A8 (in ascending order) in the "Reset Configuration to Default" section in the quick start guide.
- To restore the default settings for the SPP profile, scan the configuration codes B1 to B8 (in ascending order) in the "Reset Configuration to Default" section in the quick start guide.
• The barcode scanner will be restored to factory settings.
c) Data transmission rate ("Transmission Speed")
To prevent data loss, you need to select the correct transfer speed for your mobile device on the barcode scanner. The device is set to
- To set the data transmission rate, scan the configuration barcodes in the "Transmission Speed" section in the quick start guide. Configuration codes are available for six different speeds (high/medium/low, and three very low speeds).
Please note that some data transfer speeds may not be available depending on your Bluetooth profile. Refer to the quick start guide for details.
Setting symbologies
| Setting Function | |
| Setting symbologies 1D - 1 | |
| Industrial 2 of 5Set the Minimum Length to 6 digitsENABLE / DISABLE | Enable/disable Industrial 2 of 5 (2 or 6-digit length) |
| The length of the Industrial 2 of 5 symbology can be adjusted to a minimum of two digits. Scan the barcodes 1-6 in the final section of the quick start guide (page 7) to set the minimum length of an Industrial 2 of 5 barcode to two (left-hand column) or six (right-hand column). | |
| ISSN ENABLE / DISABLE Enable/disable ISSN | |
| ISBN ENABLE / DISABLE Enable/disable ISBN | |
| Interleaved 25 ENABLE / DISABLE Enable/disable Interleaved 25 | |
| Matrix 25 ENABLE / DISABLE Enable/disable Matrix 25 | |
| Setting symbologies 1D - 2 | |
| GS1-Databar (RSS) ENABLE / DISABLE Enable/disable GS1-Databar (RSS) | |
| GS1-Databar (RSS-Limited) ENABLE / DISABLE Enable/disable GS1-Databar (RSS-Limited) | |
| GS1-Databar (RSS-Expand) ENABLE / DISABLE Enable/disable GS1-Databar (RSS-Expand) | |
| CODE 93 ENABLE / DISABLE Enable/disable CODE 93 | |
| Setting symbologies 1D - 3 | |
| Industrial 25 ENABLE / DISABLE Enable/disable Industrial 25 | |
| MSI ENABLE / DISABLE Enable/disable MSI | |
| CODE 128 ENABLE / DISABLE Enable/disable CODE 128 | |
| GS1-128 UCC/EAN-128 ENABLE / DISABLE Enable/disable UCC/EAN-128 | |
| CODE 11 ENABLE / DISABLE Enable/disable CODE 11 | |
| CODABAR ENABLE / DISABLE Enable/disable CODABAR | |
| CODE 39 ENABLE / DISABLE Enable/disable CODE 39 | |
| Setting symbologies 1D - 4 | |
| EAN-8 ENABLE / DISABLE Enable/disable EAN-8 | |
| EAN-13 ENABLE / DISABLE | Enable/disable EAN-13 |
| UPC-E ENABLE / DISABLE | Enable/disable UPC-E |
| UPC-A ENABLE / DISABLE | Enable/disable UPC-A |
| CODE 39 FULL ASCII ENABLE / DISABLE | Enable/disable CODE 39 FULL ASCII |
| CODE 39 Transmit Start/Stop Character ENABLE / DISABLE | Enable/disable CODE 39 Transmit Start/Stop Character |
Care and cleaning
• Always unplug the charging cable before cleaning the product.
- Never use aggressive detergents, rubbing alcohol or other chemical solutions, as these could damage the casing or even impair the functioning of the product.
- Use a dry, lint-free cloth to clean the product. Do not press too hard on the surface when cleaning to avoid scratch marks.
- Dust can be easily removed using a clean long-haired brush.
- Do not immerse the product in water.
Declaration of conformity (DOC)
Conrad Electronic SE, Klaus-Conrad-Straße 1, D-92240 Hirschau hereby declares that this product conforms to the 2014/53/EU directive.

Click on the following link to read the full text of the EU declaration of conformity: www.conrad.com/downloads
Select a language by clicking on a flag symbol and enter the product order number in the search box. You can then download the EU declaration of conformity in PDF format.
Disposal

Electronic devices are recyclable waste and must not be disposed of in the household waste. At the end of its service life, dispose of the product according to the relevant statutory regulations. You thus fulfil your statutory obligations and contribute to the protection of the environment.
Technical data
| Operating voltage......5 V/DC |
| Operating current......max. 250 mA |
| Charging current......max. 500 mA |
| USB cable length......approx. 1.5 m |
| Internal rechargeable battery......Built-in Ni-MH batteries (not replaceable) 2 x 1.2 V (AA), 2 x 1150 mAh |
| Internal memory......1 MB (can store up to 65,000 datasets for EAN 13 barcodes) |
| Battery life......at least 25,000 scans (after full charge) |
| Charging time......approx. 4 - 5 hours (full charge) |
| Wireless range......100 m in open spaces |
| Working frequency......2.4 GHz |
| Bluetooth ^® power class......Class 1 (up to 100 mW) |
| Bluetooth ^® profile......HID or SPP (iOS and Android) |
| Bluetooth ^® version......v2.1 (all Android devices communicate over Bluetooth ^® apart from the Xiaomi Redmi) |
| Cable communication......USB OTG cable (connected devices must support Android OTG) |
| Scan element type......Red LED (610 nm - 640 nm wavelength) |
| Depth of field......UPCA (13 mil): 30 mm - 600 mmEAN13 (13 mil): 30 mm - 590 mm |
| Best resolution......4 mil |
| Ambient illumination......0 - 100,000 lux |
| Required contrast......≥30 % (between printed surface and barcode) |
| Symbologies......EAN-13, EAN-8, UPC-A, UPC-E, ISSN, ISBN, Codabar, Code 128, Code 93, ITF-6, ITF-14, Interleaved 2 of 5, Industrial 2 of 5, Matrix 2 of 5, GS1 Databar, Code 39, Code 11, MSI |
| Scan speed......300 scans/second |
| Scanning angle......Pitch ±60° @ 0° Roll and 0° Skew, Roll ±30° @ Pitch and 0° Skew, Skew ±60° @ Roll and 0° Pitch |
| Supported operating systems......Android 2.x, Android 3.x, Android 4.x, Android 5.x, Android 6.x and all iOS versions including iOS 9.3 |
| Operating conditions......0 to +50 °C, 5 – 95 % RH (non-condensing) |
| Storage conditions......-10 to +60 °C, 5 – 95 % RH (non-condensing) |
| Dimensions (W x H x D)......60 x 203 x 95 mm |
| Weight......202 g ± 5 g (barcode scanner)225 g ± 5 g (charging station) |
This is a publication by Conrad Electronic SE, Klaus-Conrad-Str. 1, D-92240 Hirschau (www.conrad.com).
All rights including translation reserved. Reproduction by any method, e.g. photocopy, microfilming, or the capture in electronic data processing systems require the prior written approval by the editor. Reprinting, also in part, is prohibited. This publication represents the technical status at the time of printing.
Copyright 2018 by Conrad Electronic SE.
*1462883_V2_0318_02_mxs_m_en
F Mode d'emploi
iCR6307AS RIOTEC 1D Scanner de codes-barres Bluetooth®/USB OTG
*1462883_V2_0318_02_mxs_m_fr
iCR6307AS RIOTEC 1D Streepjescodescanner Bluetooth®/USB OTG
Bestelnr. 1462883
Bedoeld gebruik
Copyright 2018 by Conrad Electronic SE.
*1462883_V2_0318_02_mxs_m_nl


- GB Operating instructions
- iCR6307AS RIOTEC 1D Barcode scanner Bluetooth®/USB OTG
- Intended use
- Delivery content
- Latest operating instructions
- Explanation of symbols
- Safety instructions
- a) General
- b) Rechargeable batteries
- Operating elements
- Charging the barcode scanner
- Battery status information
- Connecting the mounting plate, smartphone holder and mobile devices
- Configuring the data transfer mode
- Pairing the barcode scanner with your mobile device via Bluetooth®
- Configuring the Bluetooth ® connection
- Operation
- a) Switching between operating modes
- b) Uploading saved data
- c) Deleting data from the memory
- Tips & notes
- Meaning of the LED indicator status (9)
- Configuring the scanner settings
- Overview of the scanner settings
- a) Setting the keyboard country
- b) Restoring default settings
- c) Data transmission rate ("Transmission Speed")
- Care and cleaning
- Declaration of conformity (DOC)
- F Mode d'emploi
- iCR6307AS RIOTEC 1D Scanner de codes-barres Bluetooth®/USB OTG
- iCR6307AS RIOTEC 1D Streepjescodescanner Bluetooth®/USB OTG
- Bedoeld gebruik
Brand : Renkforce
Model : RioScan iCR6307AS
Category : Barcode scanner