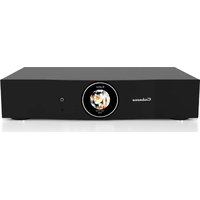
Stream BAR - Home Theater System CABASSE - Free user manual and instructions
Find the device manual for free Stream BAR CABASSE in PDF.

| Product type | Soundbar with wireless subwoofer |
| Brand | Cabasse |
| Model | Stream BAR |
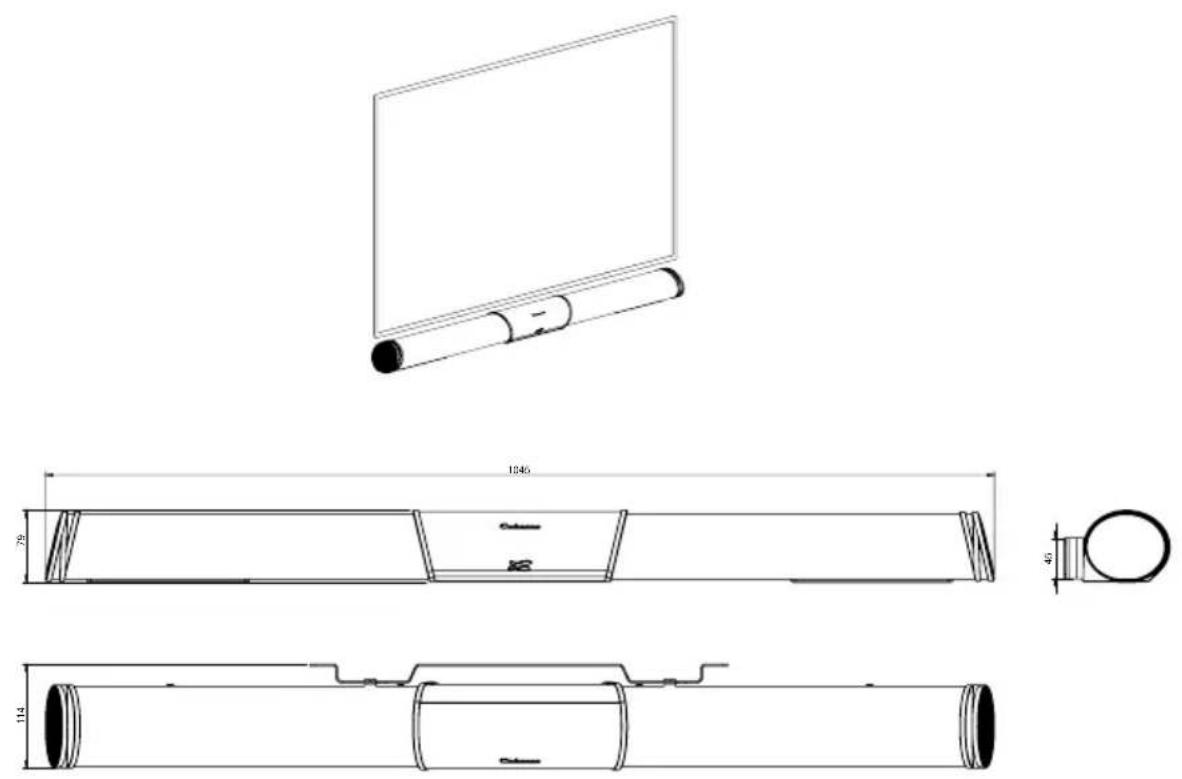
| Dimensions (soundbar) | 66 x 1047 x 83 mm |
| Dimensions (subwoofer) | 330 x 200 x 400 mm |
| Weight (soundbar) | 3.5 kg |
| Weight (subwoofer) | 8.5 kg |
| Power supply | 110-240 V ~50/60 Hz, 2 A |
| Power consumption (soundbar) | 100 W |
| Power consumption (subwoofer) | 100 W |
| Standby consumption (ECO mode) | 2.43 W |
| HDMI connectors | 1 x HDMI ARC, 1 x HDMI input |
| Optical input | 1 x S/PDIF |
| Analog input | 1 x 3.5 mm stereo mini-jack (LINE IN) |
| USB input | 1 x USB 2.0 (5 V / 1 A) |
| Network | Ethernet 10/100 (RJ45) and Wi-Fi 802.11 b/g/n |
| Bluetooth | Yes, APTX version |
| Supported audio formats (Wi-Fi/RJ45) | MP3, WMA, PCM, AAC, ALAC, FLAC (up to 24 bits/96 kHz) |
| Amplifier power (peak) | Soundbar: 2 x 15 W + 2 x 30 W + 2 x 15 W; Subwoofer: 100 W |
| Speakers (soundbar) | 2 tweeters + 6 mid-bass/midrange speakers |
| Speaker (subwoofer) | 1 x 17 cm |
| Functions | Surround mode, night mode, bass/treble adjustments, audio/video synchronization |
| Multiroom compatibility | Yes (via StreamCONTROL app) |
| Operating temperature | +5°C to +35°C |
| Operating humidity | 40% to 70% |
| Maintenance and cleaning | Clean with a soft dry cloth. Do not use solvents, chemicals, or liquids. |
Frequently Asked Questions - Stream BAR CABASSE
User questions about Stream BAR CABASSE
0 question about this device. Answer the ones you know or ask your own.
Ask a new question about this device
Download the instructions for your Home Theater System in PDF format for free! Find your manual Stream BAR - CABASSE and take your electronic device back in hand. On this page are published all the documents necessary for the use of your device. Stream BAR by CABASSE.
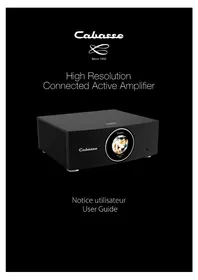
USER MANUAL Stream BAR CABASSE
STREAM BAR & STREAM BAR SUBWOOFER SET Owner's Manual
natural_image
Technical line drawing of a washing machine box and cylindrical device (no text or symbols)Cabasse

FONCTIONS STREAMING - ENTREES "BT" ET "LAN"
flowchart
graph TD
    A["Initial Component"] --> B["Assembly Step 1"]
    B --> C["Assembly Step 2"]
    C --> D["Final Assembly"]

CONNEXION BLUETOOTH
natural_image
Black triangular warning symbol with white exclamation mark (no text or numbers)CONNECTION BLUETOOTH AVEC UN ORDINATEUR APPLE
1) ACTIVATION DE LA LIAISON BLUETOOTH
AVEC L'APPLICATION StreamCONTROL
FONCTIONS STREAMING - ENTREES "BT" ET "LAN"
Thank you very much for choosing Cabasse Stream BAR. Please read these instructions carefully before setting it up.
IMPORTANT SAFETY INSTRUCTIONS
Explanation of graphical symbols
- The lightning flash with arrowhead symbol, within an equilateral triangle, is intended to alert you to the presence of uninsulated "dangerous voltage" within the product's enclosure that may be of sufficient magnitude to constitute a risk of electric shock to persons.
The exclamation point within an equilateral triangle is intended to alert you to the presence of important operating and maintenance (servicing) instructions in the literature accompanying the appliance.
Cleaning - Always take off the power cord before cleaning the device. Do not use cleaning solvent, whether liquid or air spray. Using a soft cloth is recommended.
Installation on a piece of furniture and stands - Do not place this device on an unsteady surface, i.e. a stand, tripod, table, shelf, etc. It may fall and cause serious injury to a nearby child or adult.
Ventilation outlets - The device shall not be placed in a position that restrains the operation of its fans. Avoid installing the device on a bed, couch, blanket or other similar surfaces that may prevent the appropriate air flow. Do not install the device in a confined space, such as a book shelf or other piece of furniture, that could prevent sufficient air from flowing freely.
Power - The device shall only be connected to a source of power compliant to the one described in this manual or on relevant printed labels on the product. If you are not sure of the type of power available, please contact your reseller or the local power company.
Easy access to mains plug - To completely disconnect this product from the mains, disconnect the plug from the wall socket outlet. The mains plug is used to completely interrupt the power supply to the unit and must be within easy access by the user.
Overloads - Avoid overloading the power plugs, extension cords or power relays. This could result in fire or electric shocks.
Foreign bodies and liquids - Avoid letting foreign materials or liquids enter the device. They could cause fire or electric shocks. Never spill any liquid on the device.
Troubleshooting - You must unplug your device from the power supply and have it checked by a qualified technician if:
■ The power supply or the plug is damaged.
■ Foreign bodies or liquid penetrated the device.
■ The device was exposed to dripping or splashing.
The device does not seem to work correctly under normal operating conditions. Only operate the controls described in this manual. Any other operation could damage the device and require on-site visit of a qualified technician.
■ The device has fallen or its housing is damaged.
■ The performances of the device are strongly altered.
Spare parts - If spare parts are needed to repair the device, make sure that the technician followed the manufacturer's recommendations or that the replacing parts feature the same specifications as the original ones.
Non-compliant parts can result in multiple damages, including fire or electric shocks.
Checks - After any servicing of the device, ask the technician to perform appropriate testing to make sure that the device works safely.
IMPORTANT SAFETY INSTRUCTIONS
- READ these instructions.
- KEEP these instructions.
- HEED all warnings.
- FOLLOW all instructions.
- DO NOT use this apparatus near water.
- CLEAN ONLY with dry cloth.
- DO NOT block any ventilation openings. Install in accordance with the manufacturer's instructions.
- DO NOT install near any heat sources such as radiators, heat registers, stoves, or other apparatus (including amplifiers) that produce heat.
- DO NOT defeat the safety purpose of the polarized or grounding type plug. A polarized plug has two blades with one wider than the other. A grounding type plug has two blades and a third grounding prong. The wider blade or the third prong are provided for your safety. If the provided plug does not fit into your outlet, consult an electrician for replacement of the obsolete outlet.
- PROTECT the power cord from being walked on or pinched, particularly at plugs, convenience receptacles, and the point where they exit from the apparatus.
-
ONLY USE attachments/accessories specified by the manufacturer.
-
UNPLUG this apparatus during lightning storms or when unused for long periods of time.
- REFER all servicing to qualified service personnel. Servicing is required when the apparatus has been damaged in any way, such as power-supply cord or plug is damaged, liquid has been spilled or objects have fallen into the apparatus, the apparatus has been exposed to rain or moisture, does not operate normally, or has been dropped.
- RAIN / MOISTURE: To reduced the risk of fire or electric shock, do not expose this apparatus to rain or moisture. The apparatus shall not be exposed to dripping or splashing and that no objects filled with liquids, such as vases, shall be placed on the apparatus.
- CELL BATTERY: The remote control supplied with a coin/button cell battery. If the coin/button cell battery is swallowed, it can cause severe internal burns in just 2 hours and can lead to death. Keep new and used batteries away from children. If the battery compartment does not close securely, stop using the product and keep it away from children.
If you think batteries might have been swallowed or placed inside any part of the body, seek immediate medical attention.
The mains plug is used as the disconnect device, the disconnect device shall remain readily operable.

Warning: don't ingest battery, chemical burn hazard
UNPACKING
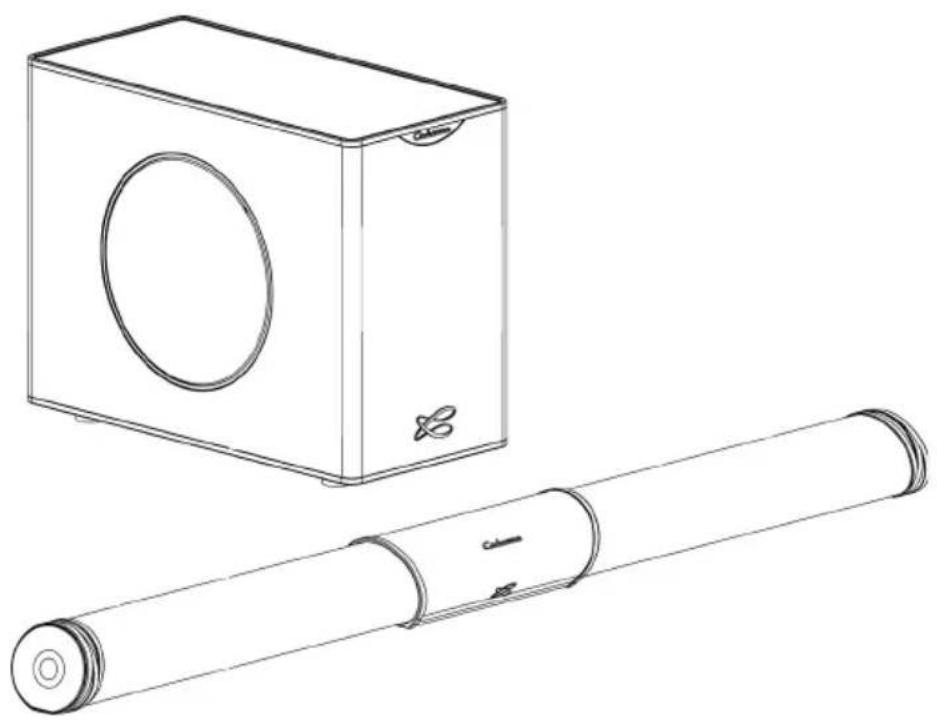
Open carton flaps; remove all the components. If the sound bar or the subwoofer appears damaged, do not use it. Repack everything in the original packing and contact your authorised Cabasse dealer immediately. We suggest you to retain the packing for future use.
SETTING UP THE COMPONENTS OF YOUR SYSTEM
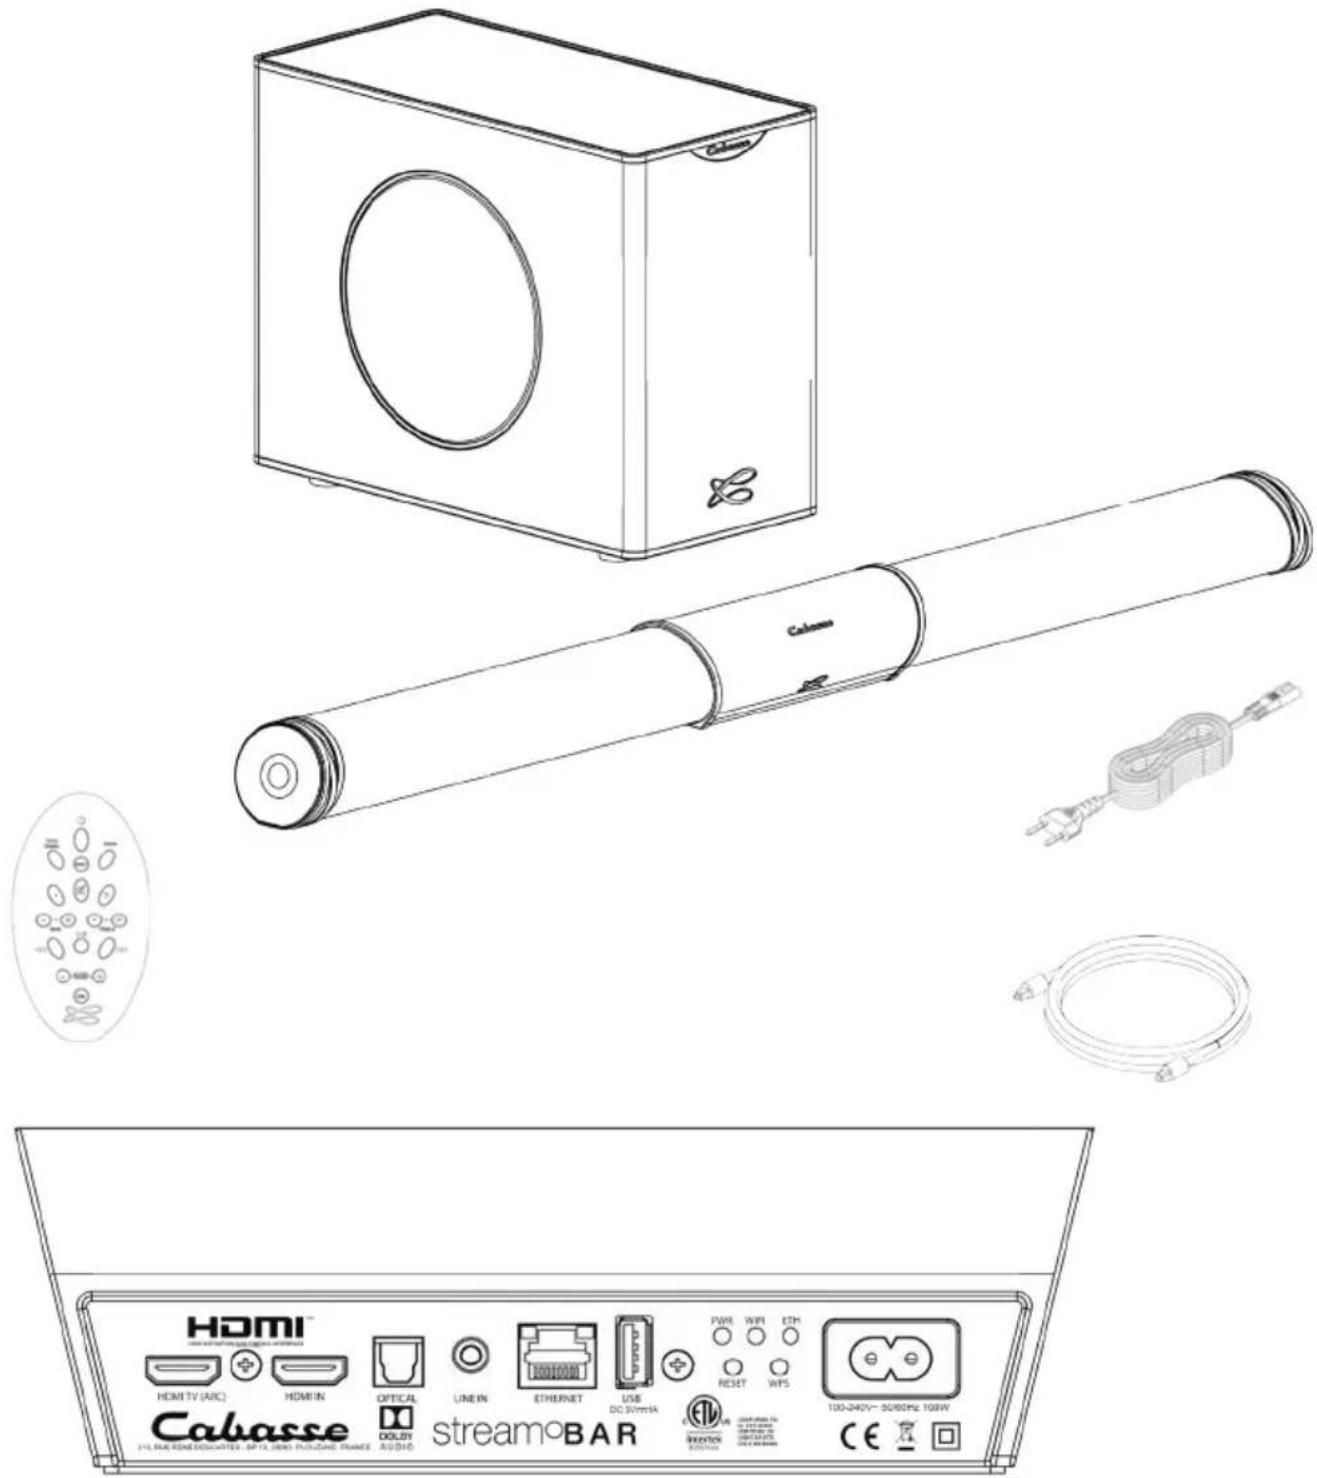
■ 1 STREAM BAR set consisting of 1 sound bar and 1 subwoofer, 2 power cords, 1 optical cable, 1 remote control, 1 manual and 1 warranty card.
flowchart
graph TD
A["Home Cinema"] --> B["Source"]
B --> C["NIGHT"]
C --> D["+"]
D --> E["BASS"]
E --> F["TREBLE"]
F --> G["+"]
G --> H["AUDYRC SYNC"]
H --> I["DM"]
style A fill:#f9f,stroke:#333
style B fill:#ccf,stroke:#333
style C fill:#cfc,stroke:#333
style D fill:#fcc,stroke:#333
style E fill:#cff,stroke:#333
style F fill:#ffc,stroke:#333
style G fill:#fcf,stroke:#333
style H fill:#cff,stroke:#333
style I fill:#ffc,stroke:#333
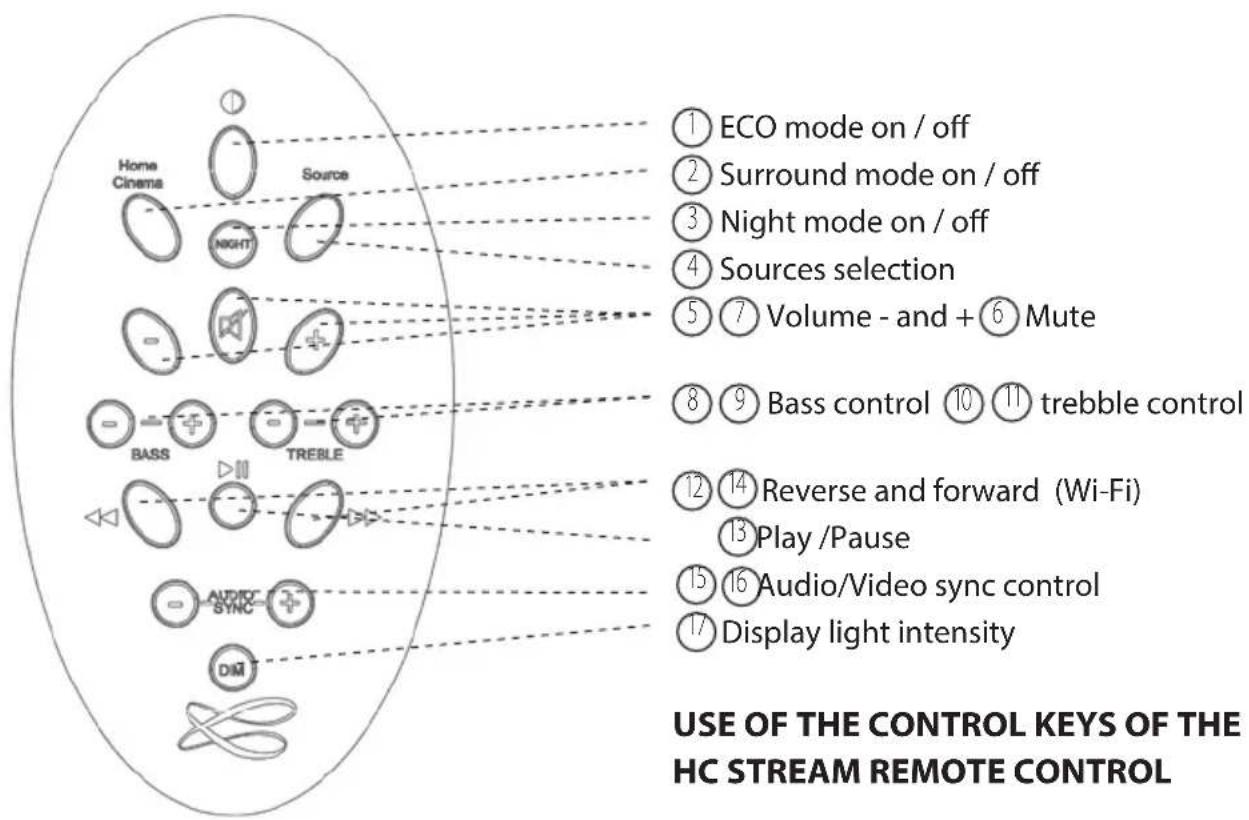
note1["① ECO mode on / off"] -.-> A
note2["② Surround mode on / off"] -.-> B
note3["③ Night mode on / off"] -.-> C
note4["④ Sources selection"] -.-> D
note5["⑤ Volume - and + ⑥ Mute"] -.-> E
note6["⑧ Bass control ⑩ ⑪ trebble control"] -.-> F
note7["⑫ Reverse and forward (Wi-Fi) ⑬ Play /Pause"] -.-> G
note8["⑮ Audio/Video sync control"] -.-> H
note9["⑰ Display light intensity"] -.-> I
STREAMING FEATURES - "BT" AND "LAN" INPUTS
| Bluetooth connection | WIFI/ETHERNET via internet router | WIFI direct to smartphone/tablet | |
| Uncompressed and loss less compressed audio playback | Yes Yes | ||
| Access to any audio from WLAN network (desktop...) | Yes | ||
| Multi-room Yes | |||
| Tracks playback from smartphone/tablet | Yes Yes Yes | ||
| Playback smart-phone/tablet a audio applications (youtube...) | Yes | ||
| Playback from USB device | Yes Yes | ||
| Web radio /Music services | Yes |
PLUG & PLAY WITH TV
SETTING UP
1- Place the sound bar of Stream BAR in front of the TV or underneath the TV either on a shelf or wall mounted thanks to the supplied bracket (instructions on page 28). All connections achieved, be sure to align the center of the sound bar with the center of the TV.
2- Place the subwoofer along the same wall as the TV, or along any other wall in the front third of the room.
3- Connect the Stream BAR with the TV using one of the 3 inputs available on the back panel of the bar. We recommend the HDMI ARC input for best performance and friendlier use:
- HDMI TV socket: connect this socket to the ARC HDMI output of the TV. Use a HDMI cable (not included in the packing) with the 1.4 (or higher) specification. This specification should on every TV turn off the TV speakers automatically and allow to use the TV remote to control the volume of the Stream BAR.
- HDMI socket: use this input to connect a source to Stream BAR, such as a cable/satellite box, DVD or Blu-ray Disc™ player, a digital video recorder.
- OPTICAL IN: use the supplied optical cable to connect it to the TV Audio OUT. Be sure to remove both the caps on both ends of the cable. Firmly push the plugs into the connectors until hearing or feeling a click.
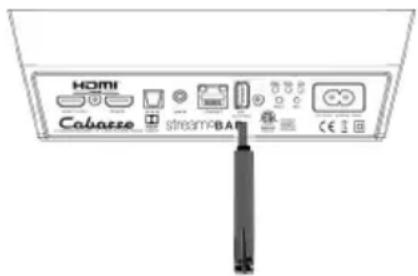
- LINE IN: if the TV is not fitted with an optical output, connect the RCA analog output of the TV with an RCA-mini-jack cable (not supplied). If there is no RCA output, use the headphone output and a Jack-mini-jack cable (not supplied).
Turn on the TV, go to the TV menu and select Audio, Sound, or Speaker Settings. Look for the menu item that allows you to turn off the TV speakers. If there is no setting for turning the TV speakers off, adjust the TV volume to its lowest setting. Using a ARC connection turns off the TV speakers automatically.
③ ENABLING DIGITAL AUDIO OUT
If there is no TV sound when on phase 4, look for the menu item that allows to enable the digital audio output and select the optical setting.

POWERING ON THE REMOTE CONTROL
Before first use, loosen the screw (PH00 screwdriver), remove the back cover, remove the battery protection tab, replace the cover, retighten the screw.
flowchart
graph TD
    A["Initial Component"] --> B["Assembly Step 1"]
    B --> C["Assembly Step 2"]
    C --> D["Final Assembly"]
Replacement of the CR-2025 type battery in the Stream remote control: loosen the screw, remove the rear lid, remove the old battery and load the new battery properly with the "+" side on the clasp side, put the rear cover back on, retighten the screw.
CHECKING FOR TV SOUND

Plug one end of the power cord in the POWER connector at the back of the Stream BAR and the other end into a live AC outlet. Stream BAR is ready to use as soon as the LED of the front display turns red. Press the ECO on/off key of the remote to power the Stream BAR on. The LED turns green, the screen displays "ON" followed by the name of the selected input.
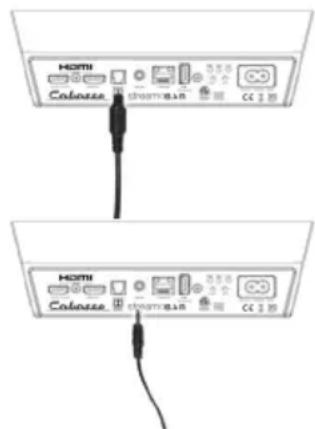
INITIALIZATION OF THE WIRELESS CONNECTION BETWEEN BAR AND SUBWOOFER
a) Press the "PAIRING" switch at the back of the Subwoofer
b) Press and release after 5 secondes the "DIM" key of the remote control, the remote aiming at the sound bar. A wheel on the screen shows that the set up is running.
c) The screen on the bar displays OK, the connection is effective.
Note: the DLNA fonction for Wi-Fi / Ethernet (WLAN/LAN) network use of Stream BAR is activated when the PWR power LED at the back of Stream BAR has turned from red to green, around 40 seconds after having powered the Stream BAR on.
TV being on, select the Stream BAR input connected to the TV by pressing the key 3 of the remote or the input selector of the bar until the screen displays the name of the right input:
- "HDMI TV" for the HDMI ARC input - "HDMI IN" for the HDMI input
- "OPT" for the optical input - "AUX" for the analog input
VOLUME : To adjust the sound level, use keys 5 (-) and 7 (+) of the remote or the "-" and "+" keys of the bar. Use the TV remote control when the HDMI ARC connection is being used.

SOUND OPTIMIZING FUNCTIONS
Stream BAR is fitted with several functions offering smart sound optimizations:
- HI-FI / SURROUND MODE: press key 2 of the remote to change mode. the HI-FI mode is recommended for pure audio and for TV programs in which dialogs are dominant, the SURROUND mode is recommended for movies and fictions.
- NIGHT MODE: the key 3 mode optimizes the system for a comfortable listening at low level.
- BASS / TREBLE ADJUSTMENTS: use these settings to adapt the sound balance to room acoustics, the source, your preference.
- LIPS SYNCHRONIZATION: adjust the sound delay with the "-" and "+" AUDIO SYNC keys of the remote
PLAYING AUDIO

Stream BAR is not only a high quality sound bar. It is fitted with wired and wireless connections enabling to benefit from its sound qualities with various sources, including Bluetooth and LAN/WLAN ones.
AUX ANALOG INPUT
If not connected to the TV, use this input to get music from an audio source (CD-player, MP3-player, smartphone) fitted with an analog connector, RCA or mini-jack type. A RCA/mini-Jack or a mini-Jack/mini-Jack cord will be necessary (not supplied).

USB INPUT
Use this input only in WIFI mode (see next § 4,5,6). Plug in an USB stick or a hard-drive to this input to get all the stored audio files available on the domestic network. All the audio files, under formats compatible with the built-in DLNA server of STREAM BAR, will be listed in the Stream Audio Control apps and can be played by any Cabasse Stream player connected to the same domestic network. The USB input is fitted with a 5V -1A direct current power output enabling the use of a portable hard drive with no need of an external power supply.

BLUETOOTH CONNECTION
STREAM BAR is set in on open mode for Bluetooth connections.
Select "Cabasse STREAM BAR" in the available Bluetooth devices list.
Select the BLUETOOTH input "BT" with the key "4" on the Stream HC remote or with the "S" key of Stream BAR. If a Bluetooth source is already connected to STREAM BAR, disconnect this item before selecting a new one.
BLUETOOTH CONNECTION WITH AN ANDROID TABLET: see the English explanation on page 30.
CONNECTION AND USE OF STREAM BAR WITH AN APPLE COMPUTER: see the English version page 31.
TO DESACTIVATE THE BLUETOOTH FUNCTION: select the BT input with the remote control, then press successively the following keys: "Home Cinema" or "NIGHT", then "MUTE", then "NEXT".
To activate the Bluetooth function, select the BT input with the remote control, then press successively the following keys: "Home Cinema" or "NIGHT", then "MUTE", then "PREV".

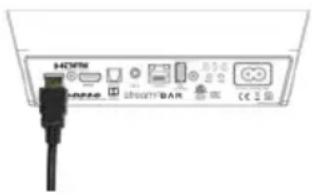
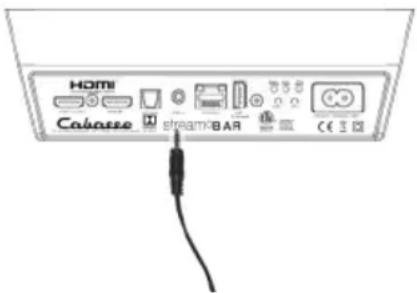
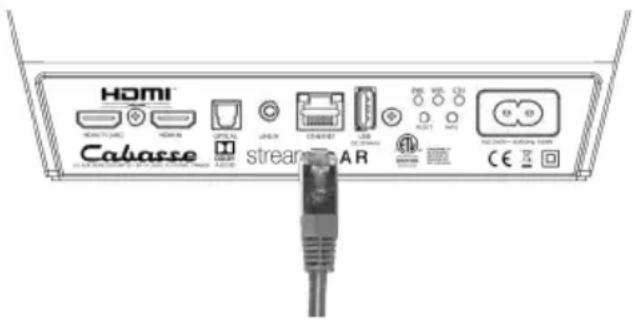
LAN WIRE CONNECTION TO THE ETHERNET NETWORK
The LAN (Ethernet) wire connection ensures a constant and optimum transfer rate. Use it if music reproduction stops or is erratic under Wi-Fi mode, because of a saturated Wi-Fi bandwidth or the distance between the router and the Stream unit being too long.
Use a RJ45 type cable to connect STREAM BAR to the domestic router.
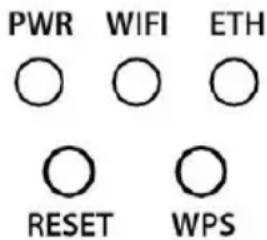
The connection is running when the blue LED "ETH" stops flashing and remains on. The WIFI connection is then automatically
turned off.
ATTENTION:
set up the router on DHCP mode.

WIFI DIRECT MODE
Wi-Fi direct allows to play with wifi quality all the audio tracks available in the tablet or the smartphone as well as those available in the hard-disk or USB-stick connect to the USB input of STREAM BAR, without need of a wifi network. Internet sources such as Vtuner, Deezer and the STREAM BAR firmware updates are not available.
Activate the STREAM BAR, Install and open the StreamCONTROL app on your tablet/ smartphone and select "Use this device in standalone mode" instead of "configure this audio device". Follow the instructions and start playing your music.

Press "RESET" before starting a new connection process (wired, auto, easy, manual) or connecting to a new router.
③
BLUETOOTH CONNECTION
STREAM BAR is set in on open mode for Bluetooth connections.
Select "Cabasse STREAM BAR" in the available Bluetooth devices list.
Select the BLUETOOTH input "BT" with the key "4" on the Stream HC remote or with the "S" key of Stream BAR. If a Bluetooth source is already connected to STREAM BAR, disconnect this item before selecting a new one.
BLUETOOTH CONNECTION WITH AN ANDROID TABLET: see the English explanation on page 32.
CONNECTION AND USE OF STREAM BAR WITH AN APPLE COMPUTER: see the English version page 33.
TO DESACTIVATE THE BLUETOOTH FUNCTION: select the BT input with the remote control, then press successively the following keys: "Home Cinema" or "NIGHT", then "MUTE", then "NEXT".
To activate the Bluetooth function, select the BT input with the remote control, then press successively the following keys: "Home Cinema" or "NIGHT", then "MUTE", then "PREV".
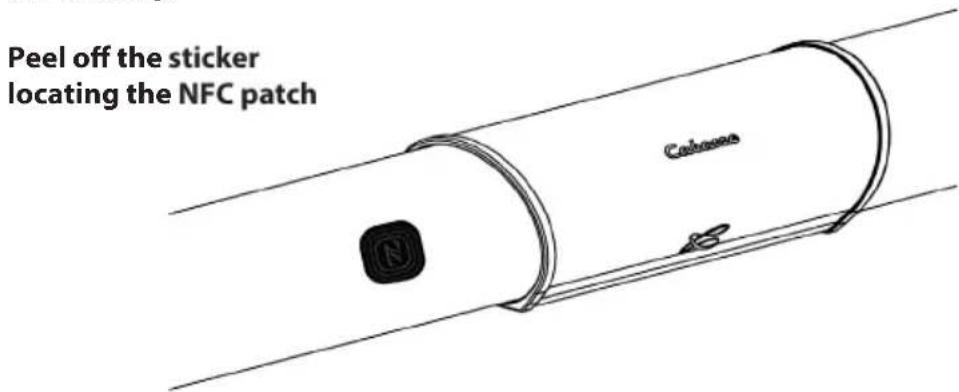
INSTANT NFC BLUETOOTH CONNECTION WITH A NFC SMART-PHONE
1) Installation of the Cabasse NFC application
a) Enable the NFC function in the set up of the NFC smartphone.
b) Check/activate the wifi or 3G connection of the smartphone to Internet.
c) Touch the smartphone together with the NFC located left of the control panel of STREAM BAR.
d) Accept the installation of the Cabasse NFC app from Google Play.
e) Your smartphone is now ready for instant Bluetooth NFC connections.
2) Using the Cabasse Bluetooth NFC application
a) Tap your smartphone on the NFC patch located left of the control panel of STREAM BAR for instant Bluetooth pairing; if necessary the STREAM BAR turns on, then the Bluetooth input is automatically selected and the first cut of the smartphone's playlist is being played by STREAM BAR.
b) Tap again to unpair both items and before pairing another smartphone to the STREAM BAR
NOTE: The Cabasse NFC application runs in background once installed in the smartphone. This application can be found in the list of applications, but there is no icon on the desktop.
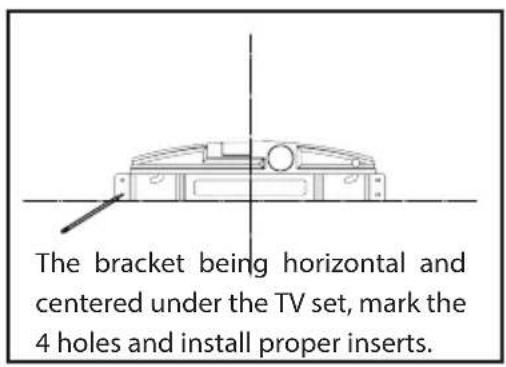
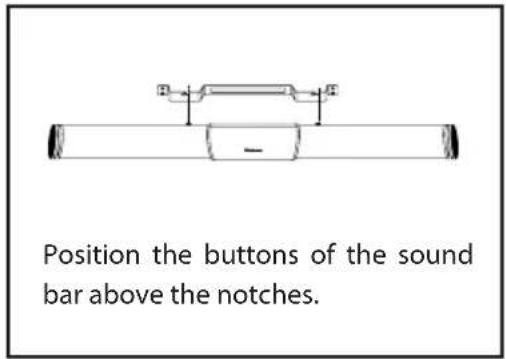
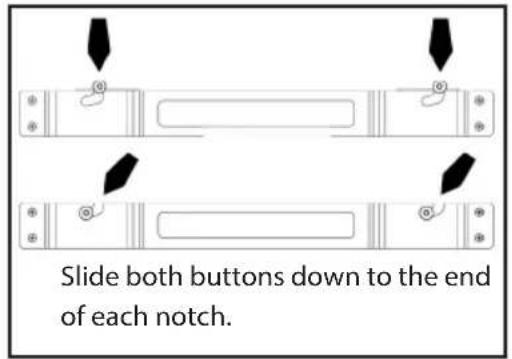
ON WALL MOUNT OF THE SOUND BAR

DLNA (WLAN) WIRELESS CONNECTION TO THE WIFI NETWORK
THERE ARE 2 SOLUTIONS TO CONNECT STREAM BAR TO THE WIFI NETWORK:
WPS CONNECTION: push the WPS button of the wireless router for 2 seconds or more and push the WPS button of the STREAM BAR within around 2 minutes (check for precise delays in the router's manual). The connection is completed when the blue LED "WIFI" is on. Now go to page 41 to install the Cabasse StreamCONTROL application.
② EASY WI-FI CONNECTION WITH THE CABASSE STREAMCONTROL APP with a smartphone or tablet wi-fi connected to the domestic network.
a) Install the Cabasse Stream App on an Android or Mac tablet or smartphone from "Play Store" or "App Store".
b) Switch the STREAM BAR on or press the reset button if already on. Activate the Wi-Fi in the "settings" application mode of the smartphone or tablet.
c) Launch the Cabasse STREAM CONTROL App and follow the set up instructions.
STREAM BAR is now ready to play all the shared audio files in your network as well as all the web radios proposed by vTuner.

natural_image
Black triangular warning symbol with white exclamation mark (no text or numbers)CAUTION! An automatic update of the firmware might start as soon as STREAM BAR is connected to the Web. The screen displays "UPDTE" for update until the update is fully completed.
Do not try to use STREAM BAR during the update, wait until STREAM BAR has restarted, when the front LED is steady red. Press ① to turn the STREAM BAR on and carry on.
Do not shut down or unplug STREAM BAR during updates. They might require several minutes.
BLUETOOTH CONNECTION TO AN ANDROID TABLET
- If not already done, activate the Bluetooth Function in the « Settings » menu of your tablet by pressing on the ON-OFF switch.
- Press "Scan for devices" and select « Cabasse STREAM BAR » among the available devices.
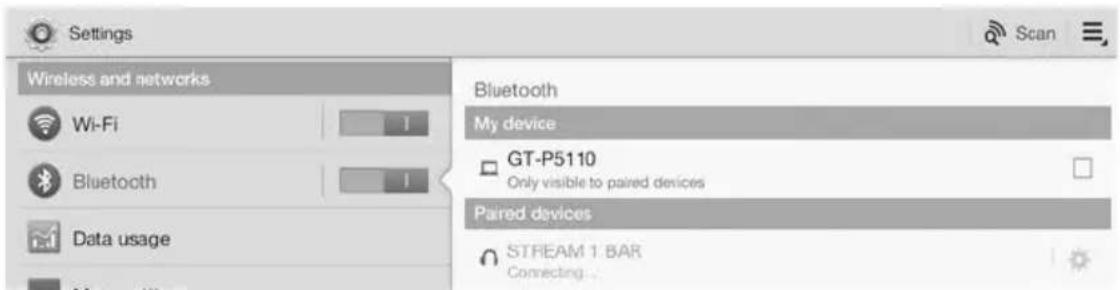
STREAM BAR is now paired with the tablet and connected to STREAM BAR is no other Bluetooth connection to STREAM BAR is active.
If the message « Connection.. » does not show up, stop the running Bluetooth connection with another device, either through the set up menu of the device or by switching off and on the STREAM BAR. Press on « Cabasse STREAM BAR » again.
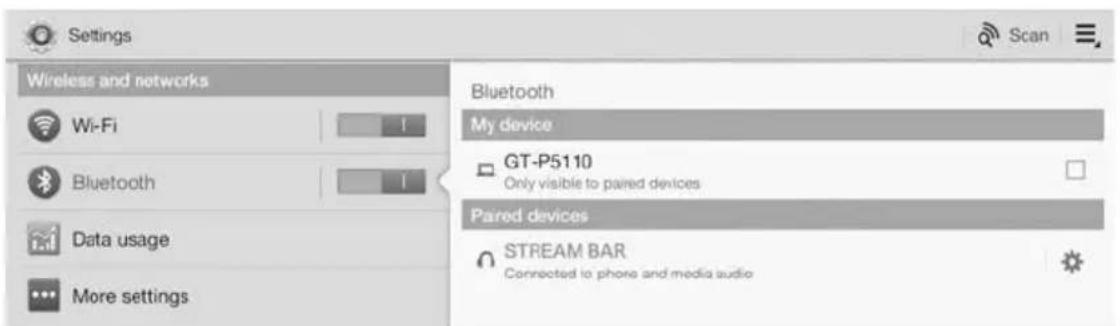
To play on STREAM BAR the audio files stored in the tablet (or smartphone), open the audio player application, select a file and press on "play".
If STREAM BAR remains silent, first check that the main volume of the tablet (or smartphone) is not down to zero level and that « mute » is off. Adjust the volume in the player application and finally raise the volume of the STREAM BAR with the Stream remote. Finally select « Bluetooth » as the active source on STREAM BAR pressing the ④ key of the Stream remote until the blue LED flashes.
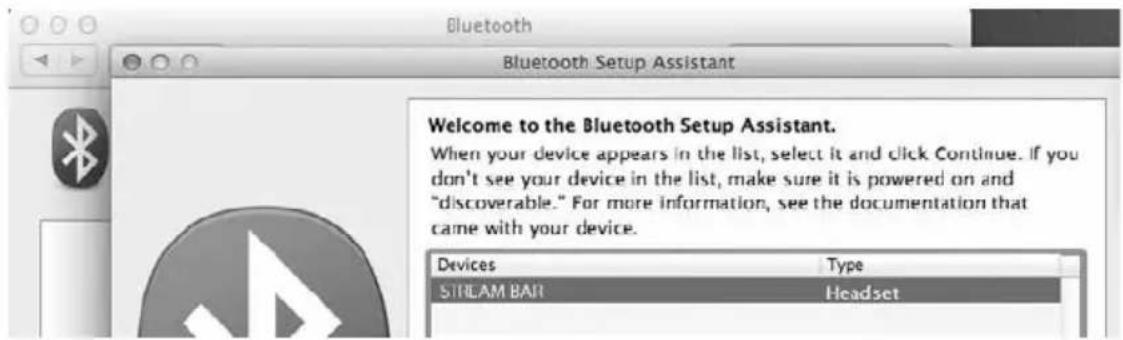
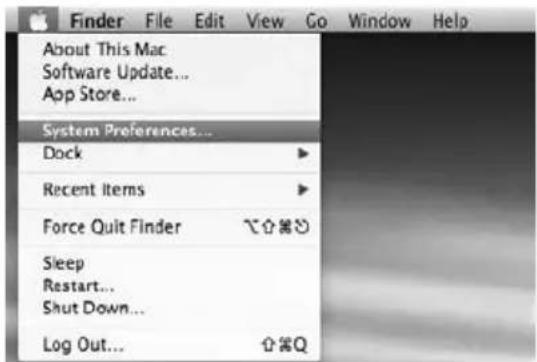
BLUETOOTH CONNECTION TO AN APPLE COMPUTER 1) BLUETOOTH MODE ACTIVATION
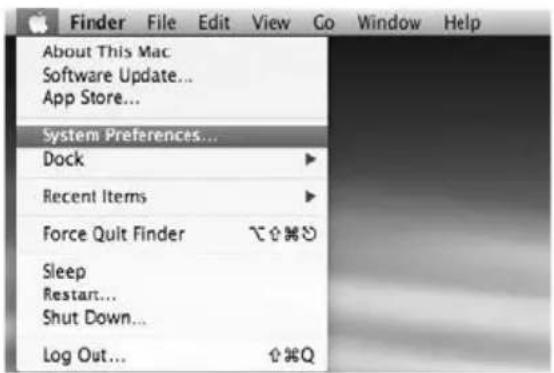
Connect the STREAM BAR to mains to power it on. If STREAM BAR is already on, stop any running Bluetooth connection between STREAM BAR and any other item.
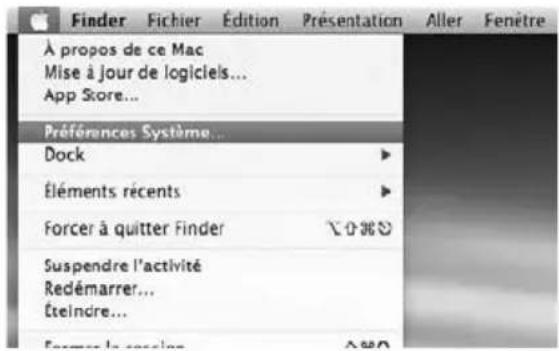
Activate the Bluetooth function of the computer: open the « apple » menu and select « Systems Preferences ».
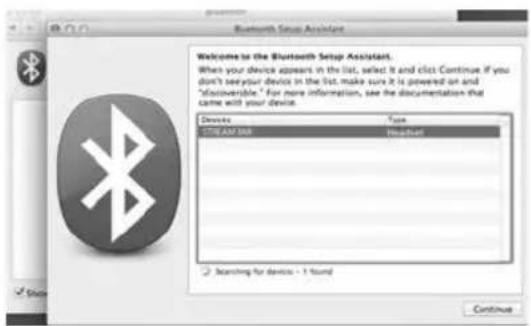
Select « STREAM BAR » in the list of items and click on "Continue" Connecting...
Connection completed. STREAM BAR is now paired with your Mac computer.
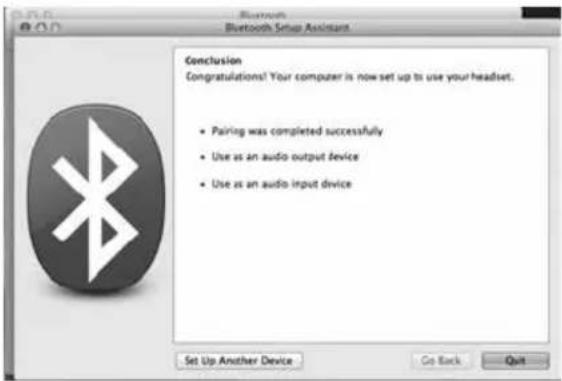
2) SELECTION OF THE AUDIO OUTPUT DEVICE
To enjoy the musics stored on you Mac with STREAM BAR, set up STREAM BAR as your audio output device in the "System Preferences" menu.
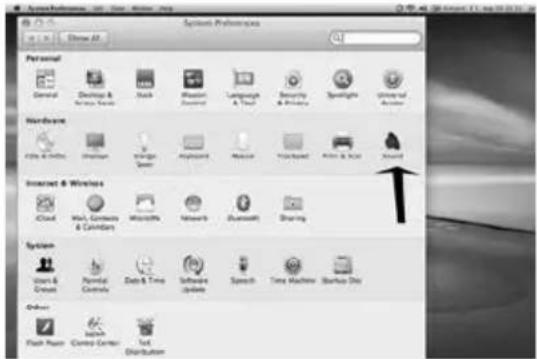
Select "STREAM BAR Stereo" in the « Output » tab. The line "STREAM BAR" stands for the hands free set up to be used only with a smartphone.
Set the volume control on far right position. Close the "Sound" window.
If the STREAM BAR is on Eco mode, it will take around 6 seconds to start playing, the Bluetooth input being automatically selected. Use the Stream remote control to adjust the sound level.
If STREAM BAR is active and connected to another active source (wifi, analog) use the Stream remote control and select the Bluetooth input with the ⑧ key, then adjust the sound level.
USE OF STREAM BAR WITH THE STREAMCONTROL APPLICATION
1 - Switch ON the POWER button on the back of the STREAM BAR. STREAM BAR is ready to play when the LED ① illuminates red (stand-by mode), press key ① on the front board of STREAM BAR or on the remote control to get STREAM BAR on.
2 - Connect the smartphone or the tablet to the WLAN network to be used with STREAM BAR.
3 - Download and install the free application names StreamCONTROL on Playstore for Android or on the App Store for iOS.
4 - Launch the application and follow the instructions from the setup wizard. Choose between direct Wi-Fi (see page 32) or network mode (see pages 33) upon request.
With the Stream BAR on the network input "LAN", you can now play all the audio files listed in your smartphones or tablets, PC and Mac computers, NAS hard disks, as well as the HD or USB sticks directly connected to any Stream BAR, Stream Source or Stream 1 connected to the network, discover thousands of web radios and stream with Deezer, Spotify, Tidal, Qobuz.
All the Stream players of the same network can be controlled by one or several smartphones and tablets. Groups of Stream players connected the same way (LAN or WLAN) can be created to play synchronised music with individual level control.
BATTERY REPLACEMENT
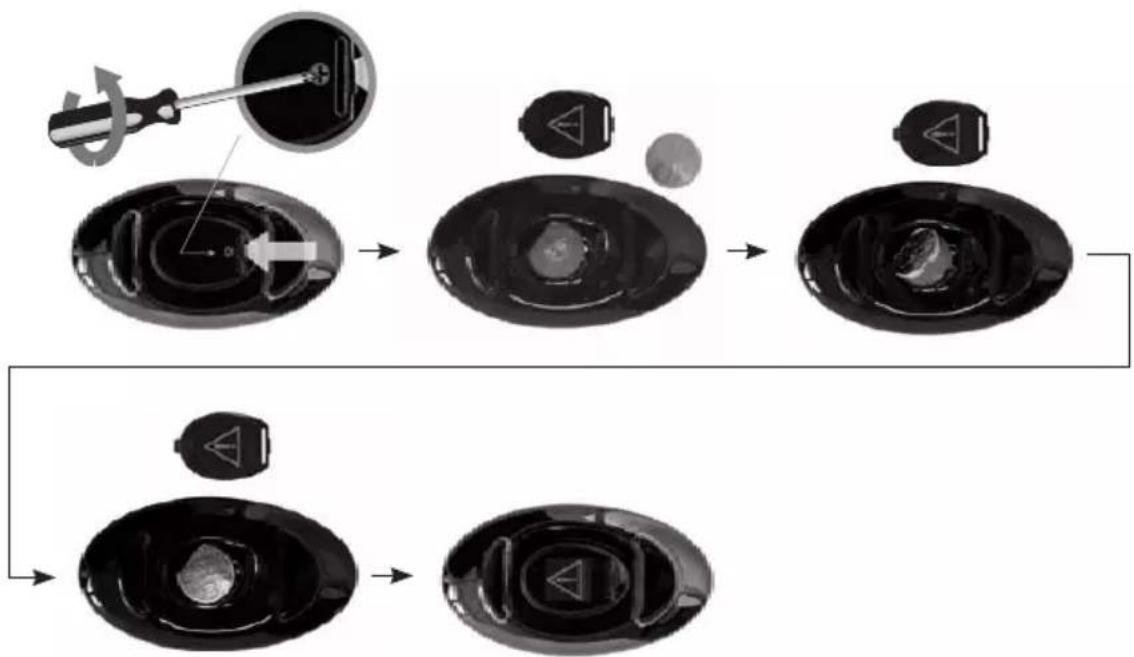
Take the remote control in your hand with the keyside facing the floor. Lift the locker and pull out the battery. Remove the dead battery and replace it with a new CR-2025 battery. Dispose of the old batteries according to these instructions.

CAUTION: there is a danger of explosion if the battery is incorrectly replaced. Replace only with the same or equivalent type. The battery shall not be exposed to excessive heat such as sunshine, fire or the like.
WEEE MARK
Disposal of Wastes of Electrical & Electronic Equipment (Applicable in the European Union)
This symbol on the product, consisting of the crossed-out wheeled bin, indicates that this product shall not be treated as household waste. Instead it shall be handed over to the applicable collection point for the disposal of electrical and electronic
equipment at the end of life. By ensuring this product is disposed of correctly, you will help prevent potential negative consequences for the environment and human health, which could otherwise be caused by inappropriate waste handling of this product. The recycling of materials will help to preserve natural resources. For more detailed information about recycling of this product, please contact your local city office, your household waste disposal service or the shop where you purchased the product.
DISACTIVATE/ACTIVATE THE BLUETOOTH FUNCTION: this fur
can turn on or off. To disactivate the function, select the BT input with the remote control, then press successively the following keys: "Home Cinema" or "NIGHT", then "MUTE", then "NEXT".
To activate the function, select the BT input with the remote control, then press successively the following keys: "Home Cinema" or "NIGHT", then "MUTE", then "PREV".
AUTO UPDATE
The updates of the firmware for STREAM BAR are done automatically. The duration of an update can vary from 5 minutes to half an hour.
The screen displays "UPDTE" continuously until the update is fully completed. STREAM BAR cannot be used during the updates.

WARNING: Do not shut down STREAM BAR during updates.
CLEANING STREAM BAR
The STREAM BAR components may be cleaned with a soft damp cloth. Do not use any spray near the system or allow liquids to spill into any openings. Also, do not use any solvents, chemicals, or cleaning solutions containing alcohol, ammonia, or abrasives.
FAQ
Looking for more information? Read our detailed answers to the Frequency Asked Question on www.cabasse.com, page STREAM.
CUSTOMER SUPPORT SERVICE
The Cabasse retailer network is at your disposal to ensure the after sale service of your product. To get the list of Cabasse retailers, contact us or consult our web site www.cabasse.com.
By following the above instructions, your STREAM BAR system is now properly set up and we hope you will enjoy your speaker system for many years. We receive letters every day from customers expressing the ever growing satisfaction and musical emotion they have been getting with our speakers over the years. These letters are our first motivation.
STREAM BAR
| HDMI connectors | 1 x TV ARC video out / audio in 1 x input |
| Digital inputs | - 1 DLNA input: either WAN, wired with RJ45 cable or WLAN - Wi-Fi- 1 Bluetooth APTX input- 1S/PDIF optical- 1 USB 2.0 input DC 5V---1A |
| Analog input 1 stereo 3.5 mm mini-Jack | |
| Voltage 100-240V~60/50 Hz, 2A | |
| Max power consumption | 150 W |
| Eco power consumption | 2.43 W @ 100-240 VAC~50/60Hz |
| Connection to network | always active to get the product listed in the StreamCONTROL application |
| Useable temperature range | +5 °C to +35 °C |
| Storage temperature | -5 °C to +40 °C |
| Useable humidity range | 40 % to 70 % |
| Network | 10/100Mb Ethernet MAC & PHY Wireless LAN 802.11b/g/n WPS 2.0 security Digital media renderer (compliant with DLNA 1.5) |
| Audio formats (WiFi/RJ45) | WMA (WMA9, CBR,CBR, up to 320kbps)WMA (WMA 9, CBR, up to 320 kbps)PCM (16 bits-44.1kHz, 24 bits- 44/48/96 kHz,.wav, .aiff, .aif, .aifc files, HTTP streams)AAC-LC (up to 320kbps), ALAC (.m4a)FLAC (16 bits-44.1kHz, 24 bits- 44/48/96 kHz) |

DOLBY
AUDIO
Manufactured under licence from Dolby Laboratories. Dolby, Dolby Audio and the double D symbol are trademarks of Dolby Laboratories.

HIGH-DEFINITION MULTIMEDIA INTERFACE
The terms HDMI and HDMI High-Definition Multimedia Interface, and the HDMILogo are trademarks or registered trademarks of HDMI Licensing LLC in the United States and other countries.
| Drivers | sound bar: 2 x tweeters + 6 x low-midrange/midrange subwoofer: 1 x 17 cm woofer |
| Amplification | sound bar: 2 x15 W + 2 x 30 W + 2 x 15 Wsubwoofer: 100 W |
| Distortion rate and noise(THD+N for the 20-20,000 Hz bandwidth and for 100 mW power output and more) | Wifi : < 0.2%Bluetooth : < 0.2%Analogue : < 0.2%Optical < 0.2% |
| Dimensions (H x W x D) | sound bar: 66 x 1047 x 83 mm / 2.6 x 41.2 x 3.3 in subwoofer: 330 x 200 x 400 mm / 13 x 7.9 x 15.7 in |
| Weight sound bar: 3.5 kg / 7.7 lbs - subwoofer: 8.5 kg / 18.7 lbs | |
STREAMING FEATURES - "BT" AND "LAN" INPUTS
| Bluetooth connection | WIFI/ETHERNET via internet router | WIFI direct to smartphone/tablet | |
| Loss less audio playback | Yes Yes | ||
| Access to any audio from WLAN network (desktop...) | Yes | ||
| Multi-room Yes | |||
| Tracks playback from smartphone/tablet | Yes Yes Yes | ||
| Playback smart-phone/tablet a audio applications (youtube...) | Yes | ||
| Playback from USB device | Yes Yes | ||
| Web radio /DEEZER Yes |
FCC STATEMENT
This equipment has been tested and found to comply with the limits for a Class B digital device, pursuant to Part 15 of the FCC Rules. These limits are designed to provide reasonable protection against harmful interference in a residential installation. This equipment generates uses and can radiate radio frequency energy and, if not installed and used in accordance with the instructions, may cause harmful interference to radio communications. However, there is no guarantee that interference will not occur in a particular installation. If this equipment does cause harmful interference to radio or television reception, which can be determined by turning the equipment off and on, the user is encouraged to try to correct the interference by one or more of the following measures:
-- Reorient or relocate the receiving antenna.
-- Increase the separation between the equipment and receiver.
-- Connect the equipment into an outlet on a circuit different from that to which the receiver is connected.
-- Consult the dealer or an experienced radio/TV technician for help.
This device complies with part 15 of the FCC Rules. Operation is subject to the following two conditions :(1) This device may not cause harmful interference, and (2) this device must accept any interference received, including interference that may cause undesired operation.
Changes or modifications not expressly approved by the party responsible for compliance could void the user's authority to operate the equipment.
This equipment complies with FCC radiation exposure limits set forth for an uncontrolled environment. This equipment should be installed and operated with minimum distance 20cm between the radiator & your body.
Cabasse

Cabasse SAS - 210, rue René Descartes - BP 10 - 29280 Plouzané
Tel +33 (0)2 98 05 88 88 - Fax +33 (0)2 98 05 88 99
www.cabasse.com