
The Pearl Theater - Audio System CABASSE - Free user manual and instructions
Find the device manual for free The Pearl Theater CABASSE in PDF.

| Product Type | 5.1 Home Cinema Audio System |
| Brand | Cabasse |
| Model | The Pearl Theater |
| System Composition | 5 Keshi satellites, 1 The Pearl subwoofer, 1 audio-video amplifier, 2 surround amplifiers, infrared remote control, calibration microphone |
| Satellite Dimensions | 101 x 80 x 80 mm (each) |
| Satellite Weight | Approx. 550 g (each) |
| Total System Weight | 20 kg |
| Power Supply | 100-120 V / 220-240 V ~ 50/60 Hz, 300 W |
| Wireless Connectivity | Wi-Fi, Bluetooth, DLNA, AirPlay |
| Wired Connectivity | HDMI eARC, Optical, Analog (RCA), USB, Ethernet RJ45 |
| Supported Audio Formats | Dolby Atmos, Dolby TrueHD, Dolby Digital Plus, DTS:X, DTS-HD Master Audio, PCM up to 32-bit / 768 kHz |
| Main Functions | 3-channel amplification (front, center, right), wireless pairing of subwoofer and surround satellites, automatic calibration, audio modes (Dolby Surround, DTS Neural:X, Direct, Stereo), control via Cabasse StreamCONTROL app |
| Care and Cleaning | Clean with a soft, dry cloth. Do not use detergents, solvents, or abrasive products. |
| Safety | Unplug before cleaning. Do not expose to water or humidity. Do not block ventilation openings. Use only recommended accessories. |
| Spare Parts and Repairability | Contact Cabasse customer service or an authorized dealer for any repair or replacement of parts. |
| General Information | 5.1 home cinema system with Dolby Atmos and DTS:X technology. Designed in France, assembled in China. Warranty and support through the Cabasse dealer network. |
Frequently Asked Questions - The Pearl Theater CABASSE
User questions about The Pearl Theater CABASSE
0 question about this device. Answer the ones you know or ask your own.
Ask a new question about this device
Download the instructions for your Audio System in PDF format for free! Find your manual The Pearl Theater - CABASSE and take your electronic device back in hand. On this page are published all the documents necessary for the use of your device. The Pearl Theater by CABASSE.
USER MANUAL The Pearl Theater CABASSE
natural_image
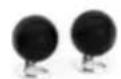
Product display of a black Cactus connected to a circular display unit with a spherical device and six spherical speakers (no visible text or symbols)natural_image
Black spherical device with ventilation grille and a white base (no visible text or symbols)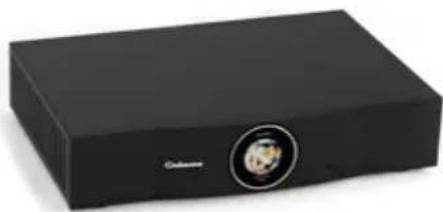
natural_image
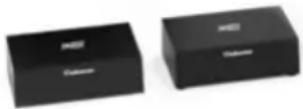
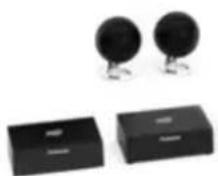
Black rectangular electronic device with a circular button and a small circular logo on the front (no visible text or symbols)COFFRET SUBWOOFER COFFRET AMPLIFICATEUR PRINCIPAL + TÉLÉCOMMANDE + MICROPHONE


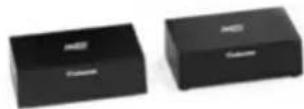
COFFRET 2 SATELLITES COFFRET 3 SATELLITES COFFRET 2 AMPLIFICATEURS SURROUND
Déballage
natural_image
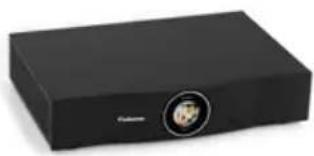
Black rectangular electronic device with a circular logo and a small portrait icon on the front (no visible text or symbols)L'AMPLIFICATEUR PRINCIPAL
natural_image
Technical line drawing of a mechanical component with threaded body and flange (no text or symbols)1
natural_image
Technical line drawing of a mechanical lever or dial with flanged end and central hub (no text or symbols)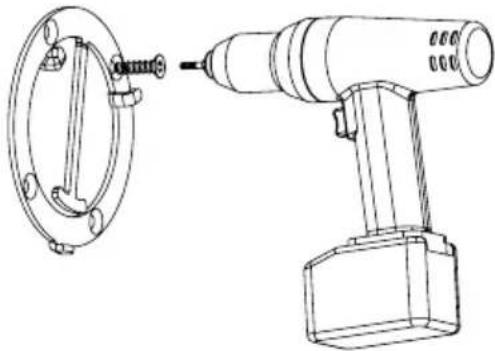
natural_image
Technical line drawing of a mechanical device with a flanged circular component and a drill bit (no text or symbols)2
natural_image
Technical illustration of a mechanical component with exploded view and side view (no text or symbols)3
natural_image
Technical illustration of a mechanical component with threaded body and curved base, showing internal structure and directional arrow (no text or symbols)CONNEXION WI-FI
natural_image
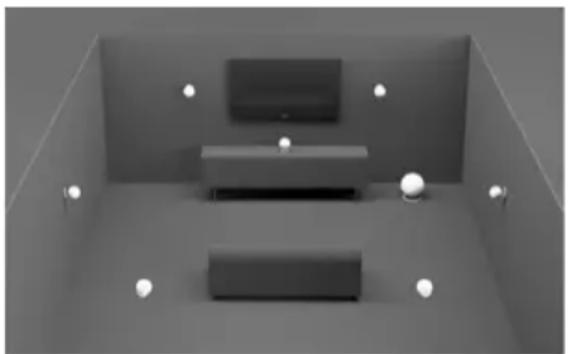
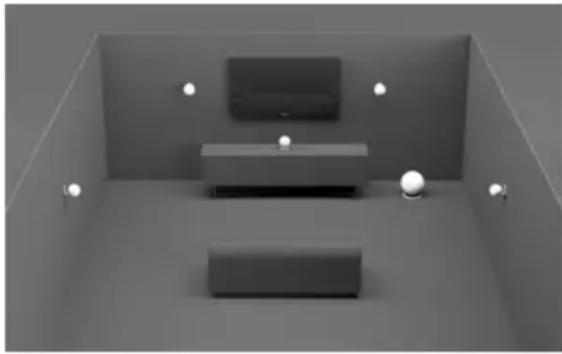
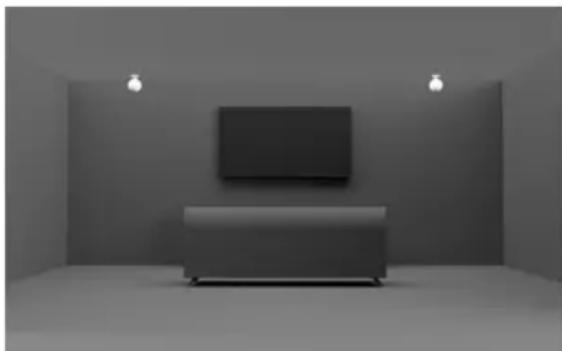
Interior view of a minimalist living room with TV and wall-mounted furniture (no text or symbols visible)5.1
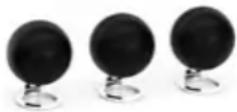
5 satellites
1 subwoofer
natural_image
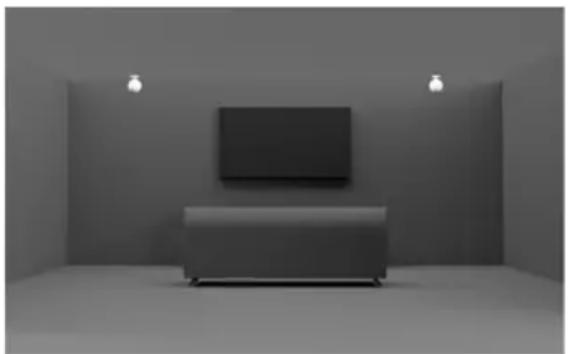
Interior view of a minimalist living room with two main furniture pieces and spotlights (no text or symbols visible)7.1
7 satellites
1 subwoofer
natural_image
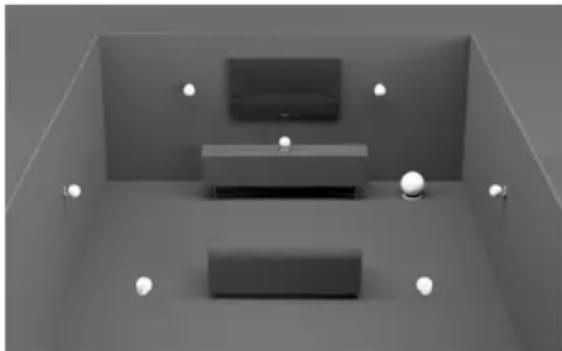
Interior view of a minimalist room with a single TV on a sofa, no visible text or symbols5.1.2
5 satellites
1 subwoofer
2 satellites en configuration atmos
natural_image
Two black rectangular electronic devices with 'Columbus' branding, shown from different angles (no visible text or symbols on the devices themselves)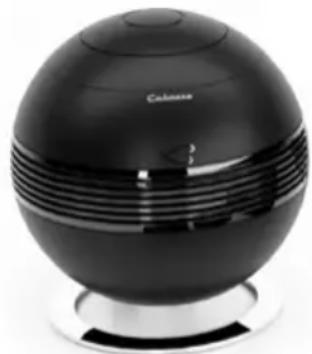
natural_image
Black spherical device with 'Calculus' branding and ribbed internal structure, mounted on a silver base (no visible text beyond brand name)CYAN Source streaming, Alexa, AirPlay, Tidal Connect
VERT Spotify Connect
○ BLANC Sources Analogiques (Entrées RCA, Analog 1)...

natural_image
Circular icon with abstract geometric design and 'USB' text, no readable document contentEntrée USB
Power 4 ohms = 100W RMS
Power 8 ohms = 50W RM
PEARL SUB SANS-FIL
Voies : 1
Volume sonore max
100 dB
112 dB en
Bande Passante
14 – 200 Hz
Power 4 ohms = 700W RMS
Dimensions
338 x 320 x 368 mm
SATELLITE
Volume sonore max
Qobuz, Deezer, Napster, Spotify, Tidal, Vtuner
Formats Audio supportés
https://cabasse.happyfox.com/home/
Contents of your system 31
Positioning recommendations 32
Wall braquet 33
Download and install the Cabasse StreamCONTROL app 34
System choice 35
Satellites connection 36
Wireless pairing of subwoofer and satellites 37
Using the remote control 38
Smart Digital Display 39
SYSTEM USAGE
First use 40
Main amplifier status lights 41
Wired and wireless inputs 42
Bluetooth / DLNA connection 44
Use/ synchronize with a TV 45
System reset / LAN connection 46
Wi-Fi reset / USB input 47
Spécifications 48
Possible music connections 49
Supported audio formats 50
Safety instructions 54
DEE marking, updates and cleaning 56
After-sales service / FAQ 57
FCC statement 58
Contents of your system
natural_image
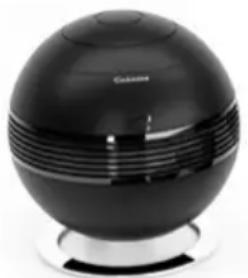
Black spherical electronic device with ventilation grille and a white base (no visible text or symbols)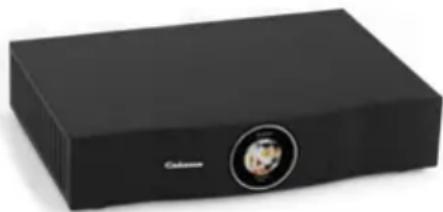
natural_image
Black rectangular electronic device with a circular button and a small circular logo on the front (no visible text or symbols)SUBWOOFER CASE MAIN AMPLIFIER BOX + REMOTE CONTROL + MICROPHONE
2 SATELLITES BOX
3 SATELLITES BOX 2 SURROUND AMPLIFIERS BOX
Unpacking
Open the box set widely and take out the different elements one by one. If any of the items on the box set appear to be damaged, do not use it, put it back in the original box set and contact your dealer immediately.
Keep your packaging for possible future transport of your system.
Components of your system
5 SATELLITES KESHI
1 SUBWOOFER THE PEARL
1 CABASSE AUDIO VIDEO AMPLIFIER
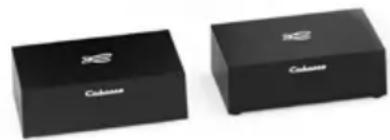
2 SURROUND AMPLIFIERS
4 POWER CORDS
1 INFRARED REMOTE CONTROL
Positioning recommendations
natural_image
Black rectangular electronic device with a circular logo and a small portrait icon on the front (no visible text or symbols)MAIN AMPLIFIER
- We recommend placing the amplifier close to the TV.
- Do NOT place the TV or any other device on top of your console.
- Place your console in a well-ventilated area.
- Make sure there is a power outlet nearby.
Note: until your system installation is complete, leave the control console outside your cabinet to facilitate access to the rear connector panel.
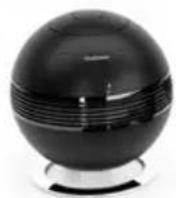
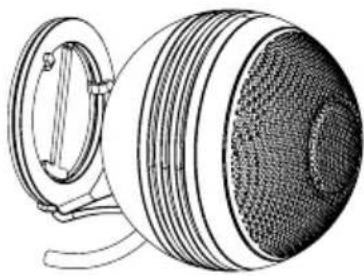
PEARL SUBWOOFER
Place the Pearl subwoofer along the same wall as the TV, or along another wall in the front third of the room.
- Choose a flat, stable surface. Vibrations may cause the subwoofer to move, especially if it is placed on a smooth surface such as marble, glass or sanded wood.
- Keep the front of the subwoofer at least 8 cm away from any other surface.
FRONT SATELLITES
- Position the speakers on either side of the TV.
- If you're installing the speakers in a bookcase, make sure they're the outer edge of the bookshelf.
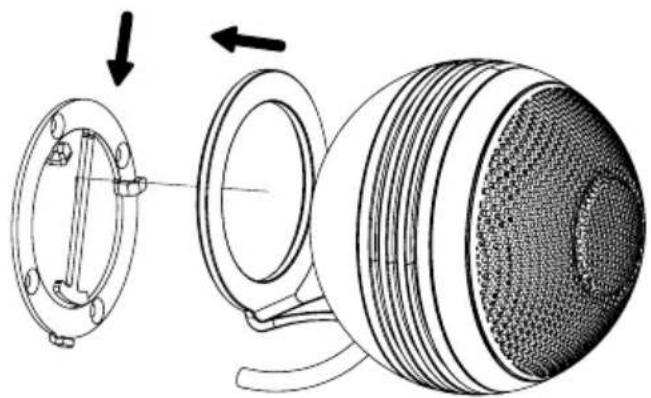
CENTER SATELLITE
- Place the center speaker on a flat, stable surface directly on or under the TV.
- The speaker can also be used in a wall-mounted position with the mounting accessory.
REAR SATELLITES/WIRELESS RECEIVERS
For optimum sound quality, place the rear speakers above and behind the seated listening position and space them as far apart as possible.
- Position satellites and wireless receivers to the left and right of the room, facing the TV.

Follow Dolby positioning recommendations
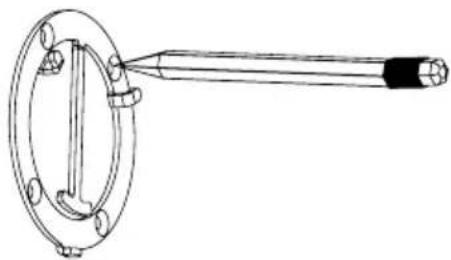
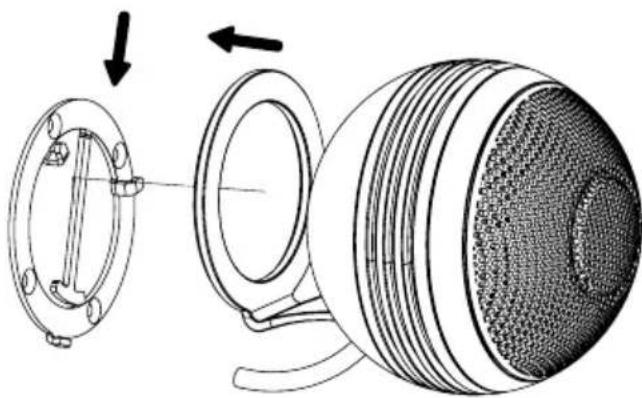
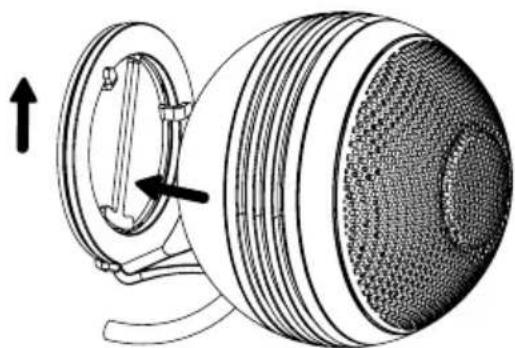
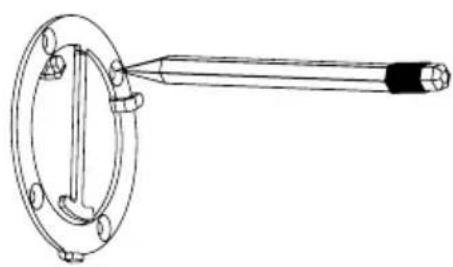
Wall braquet
CAUTION
This wall bracket has been designed exclusively for a secured wall mount for THE PEARL THEATER. Be assured that the structure of the wall can support this weight. The non included screws and inserts must also fit with the specifications of the wall.
natural_image
Technical line drawing of a mechanical component with threaded body and flange (no text or symbols)1
natural_image
Technical line drawing of a mechanical clamp or lever component (no text or symbols)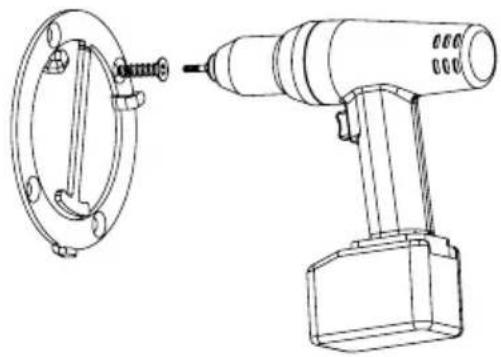
natural_image
Technical line drawing of a mechanical device with a flanged circular component and a cylindrical tool inserted into it (no text or symbols present)2
natural_image
Technical illustration of a mechanical component with cross-sectional view and assembly (no text or symbols)3

natural_image
Technical illustration of a mechanical component with a circular housing and directional arrows indicating motion (no text or symbols)Download and install the Cabasse StreamCONTROL app

Cabasse StreamCONTROL app

WI-FI CONNECTION
- Install the Cabasse Stream Control application on an Android or Mac tablet or smartphone from «Play Store» or «Control Application Store».
- Once the application has been installed, follow the steps to the "Satellite connection" page, where you'll need the application again.

WARNING!
An update of software can start automatically as soon as an internet connection is made. The beginning and the end of the update are announced by voice.
Do not turn off or disconnect your speaker during updates that may require several minutes.
System choice
natural_image
Interior view of a minimalist living room with a TV and two rectangular furniture blocks, no visible text or symbols5.1
5 satellites
1 subwoofer
natural_image
Interior view of a minimalist living room with two furniture blocks and spotlights (no text or symbols visible)7.1
7 satellites
1 subwoofer
natural_image
Interior view of a minimalist room with a flat-screen TV on a sofa, no visible text or symbols5.1.2
5 satellites
1 subwoofer
2 satellites en configuration atmos
Satellite connection

Do not wall-mount your satellites until they have been paired.
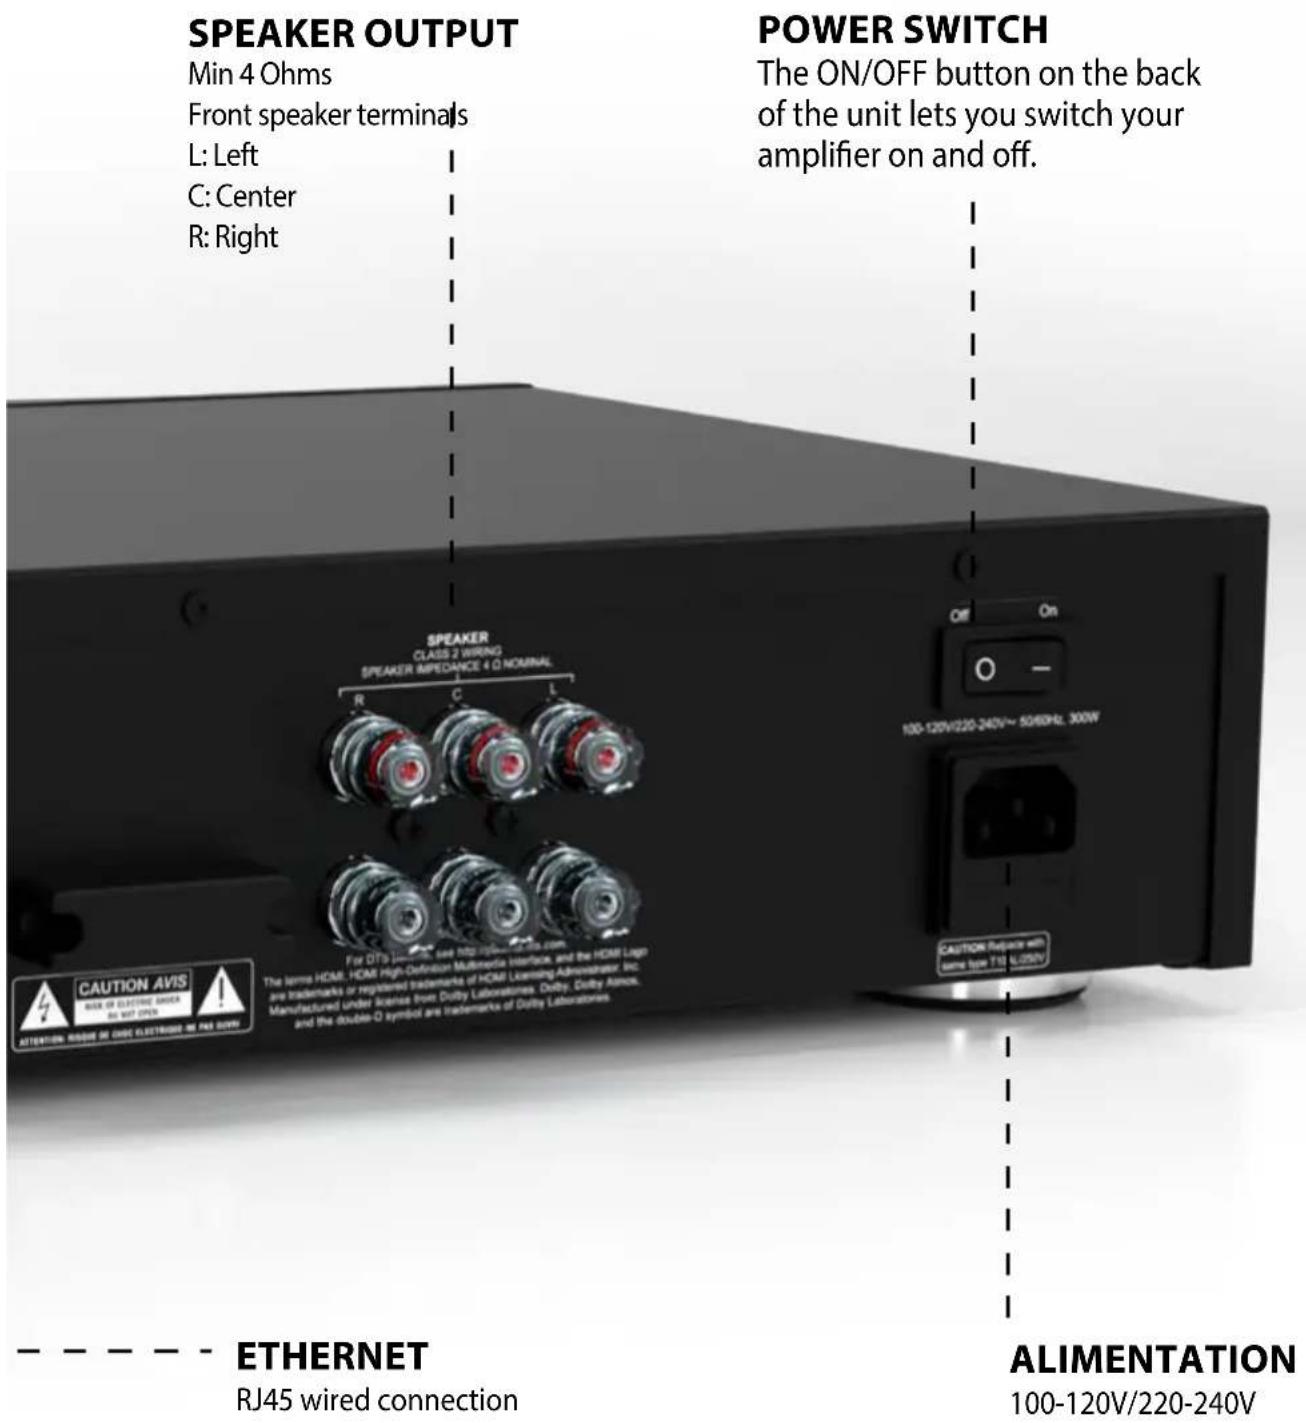
- Start by connecting your front satellites directly to the main amplifier terminals.
Left satellite on terminals L :
L- : Black socket
L+: Red socket
Central satellite to C terminals :
C- : Black socket
C+ : Red socket
Satellite Right on terminals R :
R- : Black socket
R+ : Red socket
- Then switch on the central amplifier using the switch button on the rear of the unit.
- Connect the satellites (rear or ceiling) to their wireless amplifier boxes.
Red wire on + terminal
Black wire on - terminal
- Switch on all wireless amplifiers and wireless subwoofer(s), then go to the Cabasse StreamCONTROL application to continue.
Wireless pairing of subwoofer and satellites
natural_image
Two black rectangular electronic devices labeled 'Cohours' with logo, shown from different angles (no additional text or symbols visible)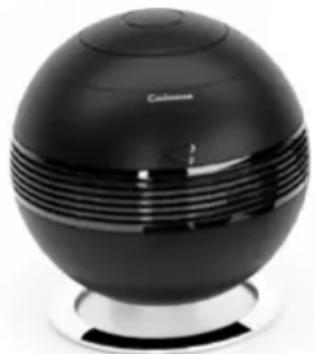
natural_image
Black spherical electronic device with ventilation grille and a 'Colone' label, no visible text or symbols on the device itself.Once you've added the main amplifier to your network, you'll be able to pair the subwoofer and rear modules with your system for the first time.
1) Connect the satellites to your surround amplifiers, then position them in the room.
2) Switch on all wireless components (1 sub + 2 surround amplifiers in the case of a 5.1 system), and pairing takes place automatically by following the installation wizard.
3) From the Cabasse StreamCONTROL application, you can assign and check settings per channel.
MEANING LED SUBWOOFER AND SURROUND AMPLIFIERS

STEADY GREEN: Streaming on for the first two minutes, then off

ASHING BLUE : Pairing mode engaged

FLASHING YELLOW : Reconnection, may warn of range problem
(Switches to standby after 10 minutes)
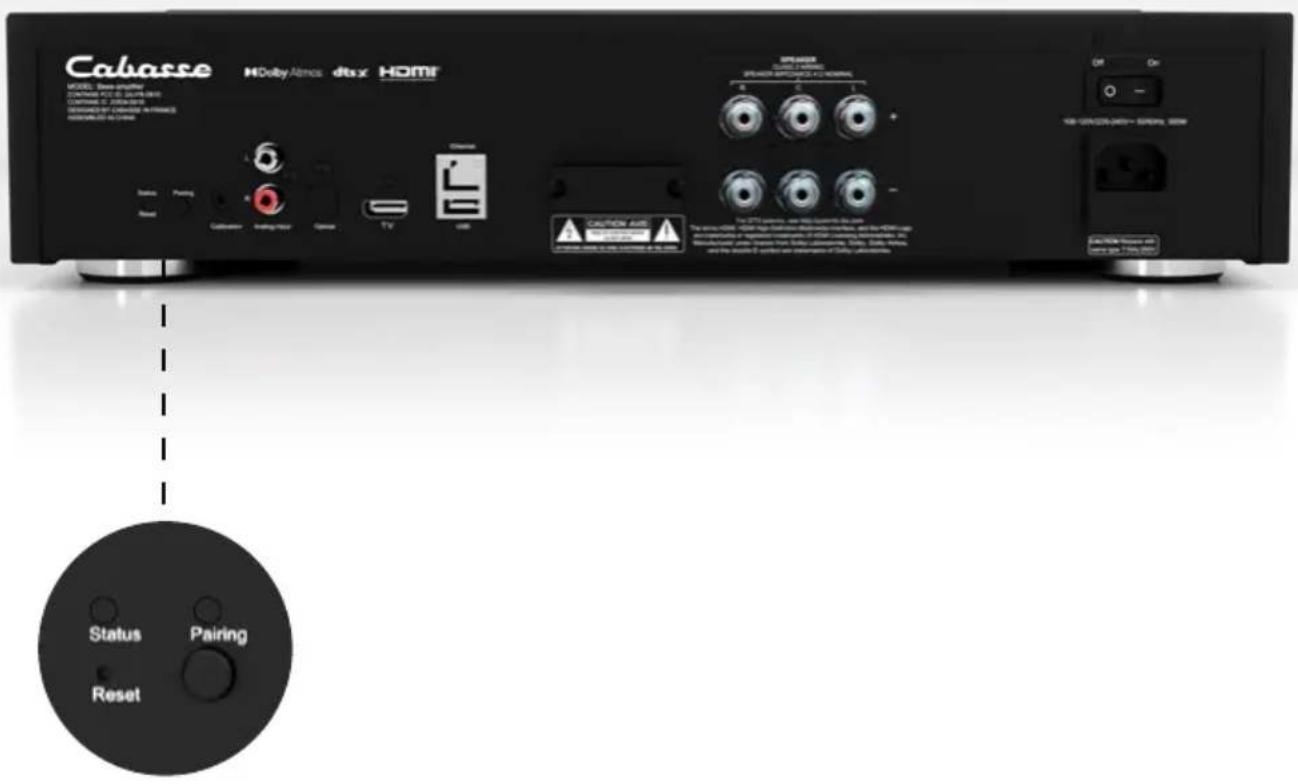
The «pairing» button on the subwoofer and rear modules activates pairing mode when the module is already paired with a system. The LED turns blue and flashes to confirm pairing mode has been activated.
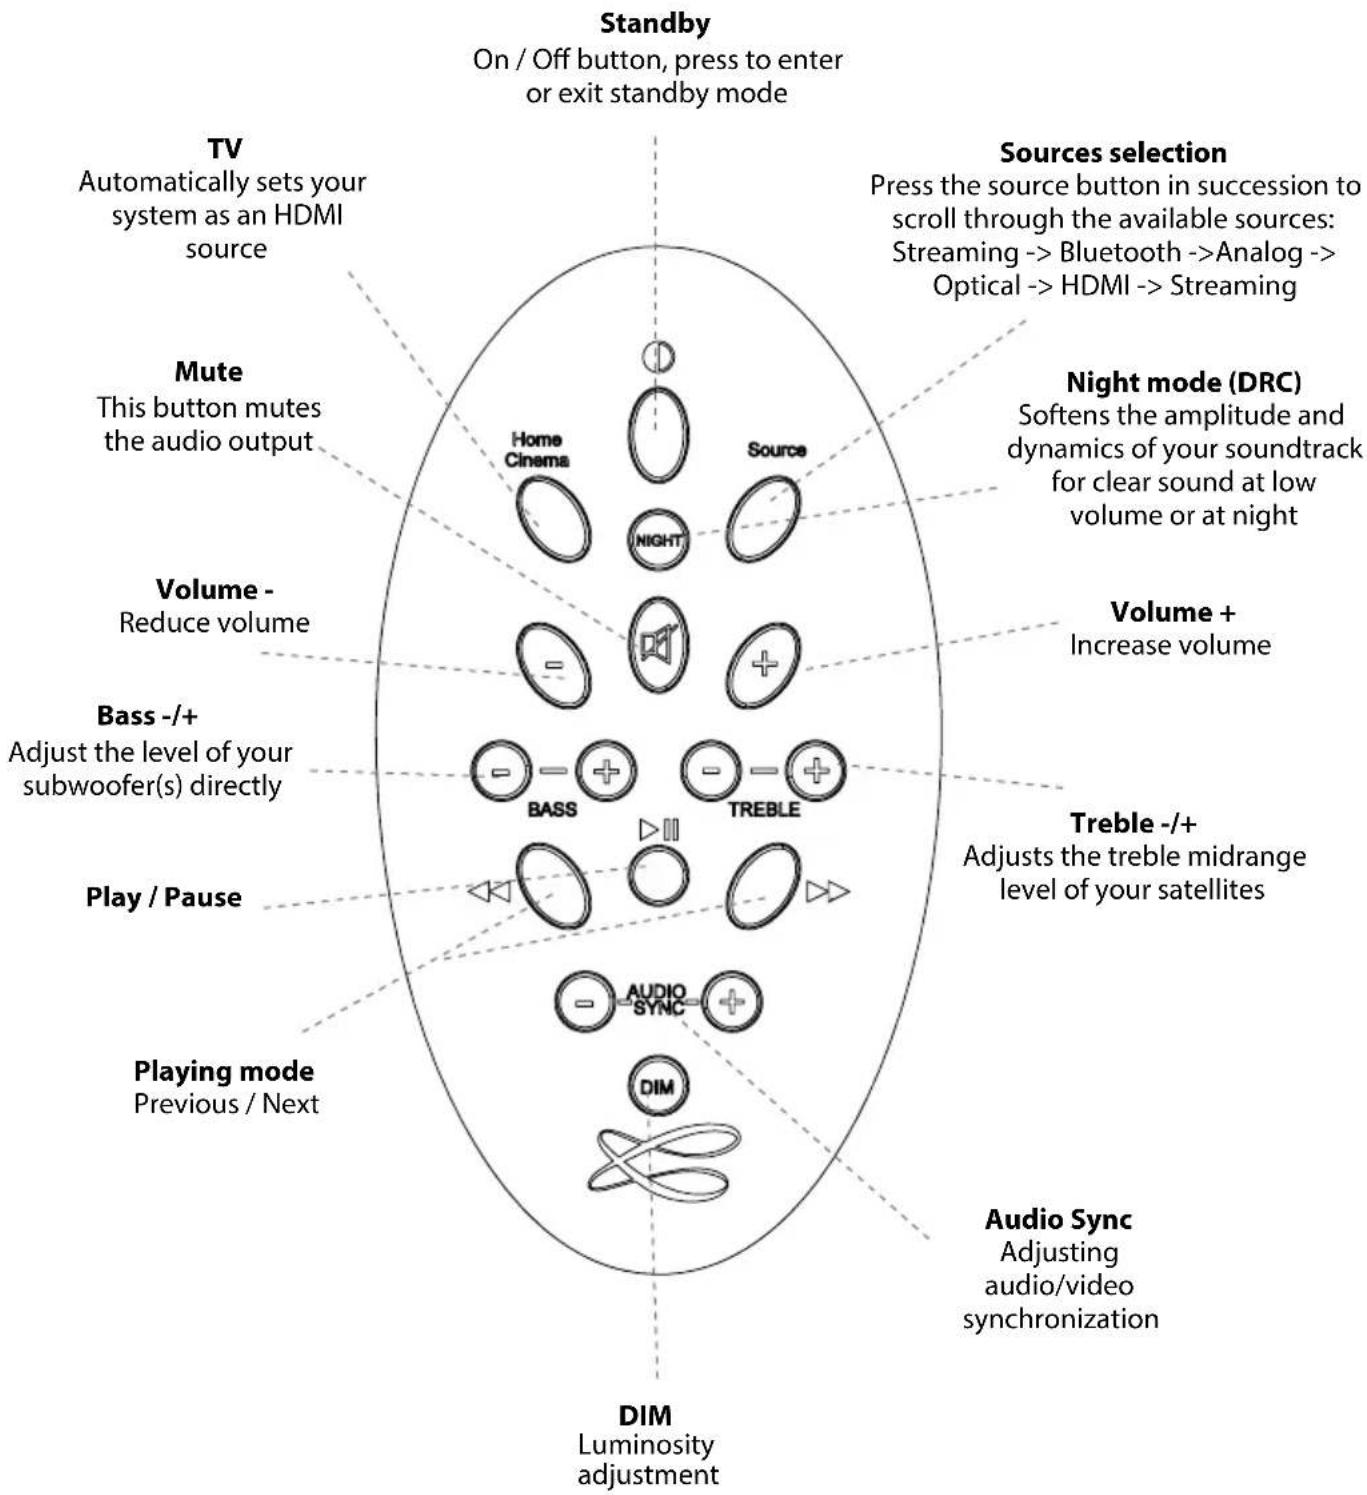
Using the remote control
flowchart
graph TD
A["Standby"] --> B["On / Off button, press to enter or exit standby mode"]
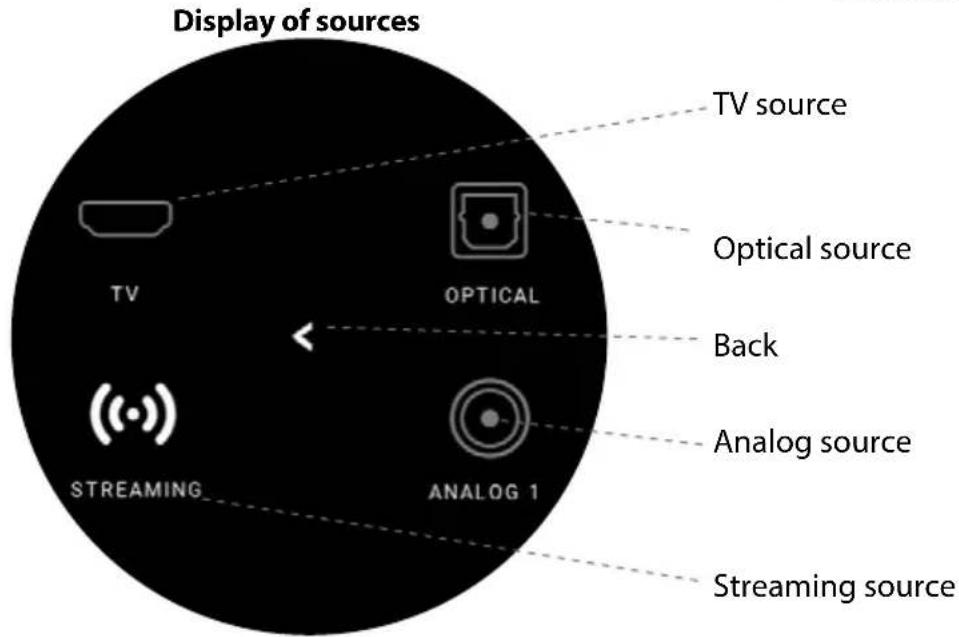
C["Sources selection"] --> D["Press the source button in succession to scroll through the available sources: Streaming --> Bluetooth --> Analog --> Optical --> HDMI --> Streaming"]
E["Night mode (DRC)"] --> F["Softens the amplitude and dynamics of your soundtrack for clear sound at low volume or at night"]
G["Volume + Increase volume"] --> H["Volume - Reduce volume"]
I["Treble -/+ Adjusts the treble midrange level of your satellites"] --> J["Bass -/+ Adjust the level of your subwoofer(s) directly"]
K["Play / Pause"] --> L["Playing mode Previous / Next"]
M["Audio Sync Adjusting audio/video synchronization"] --> N["DIM Luminosity adjustment"]
O["TV Automatically sets your system as an HDMI source"] --> P["Mute This button mutes the audio output"]
Q["Volume -"] --> R["Reduce volume"]
S["Play / Pause"] --> T["Playing mode"]
U["Volume +"] --> V["Increase volume"]
W["Audio Sync"] --> X["Adjusting audio/video synchronization"]
Note: If your TV's speakers are still playing sound after the system is set up, turn them off in your TV's setup menu.
Smart Digital Display

First Use
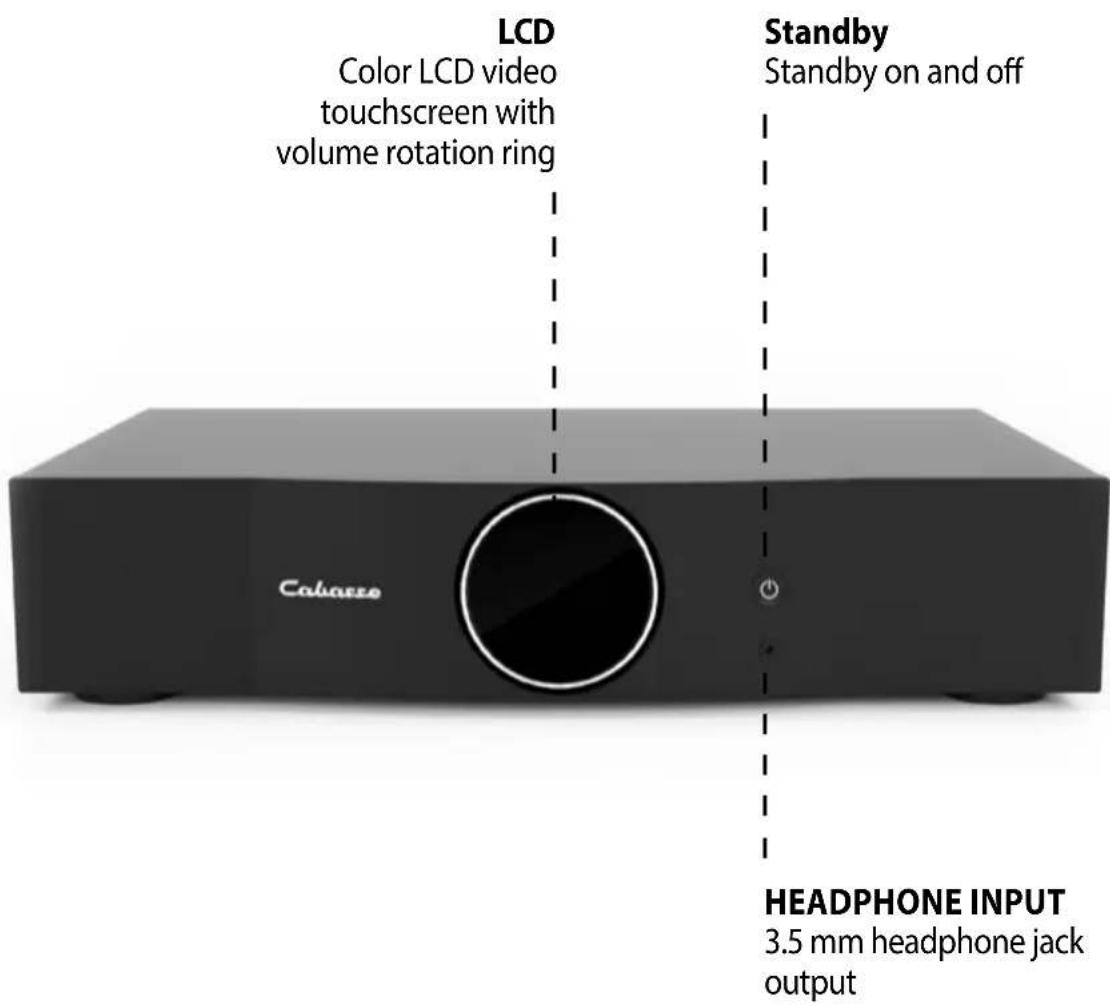
Plug your amplifier into the mains with the appropriate power cord
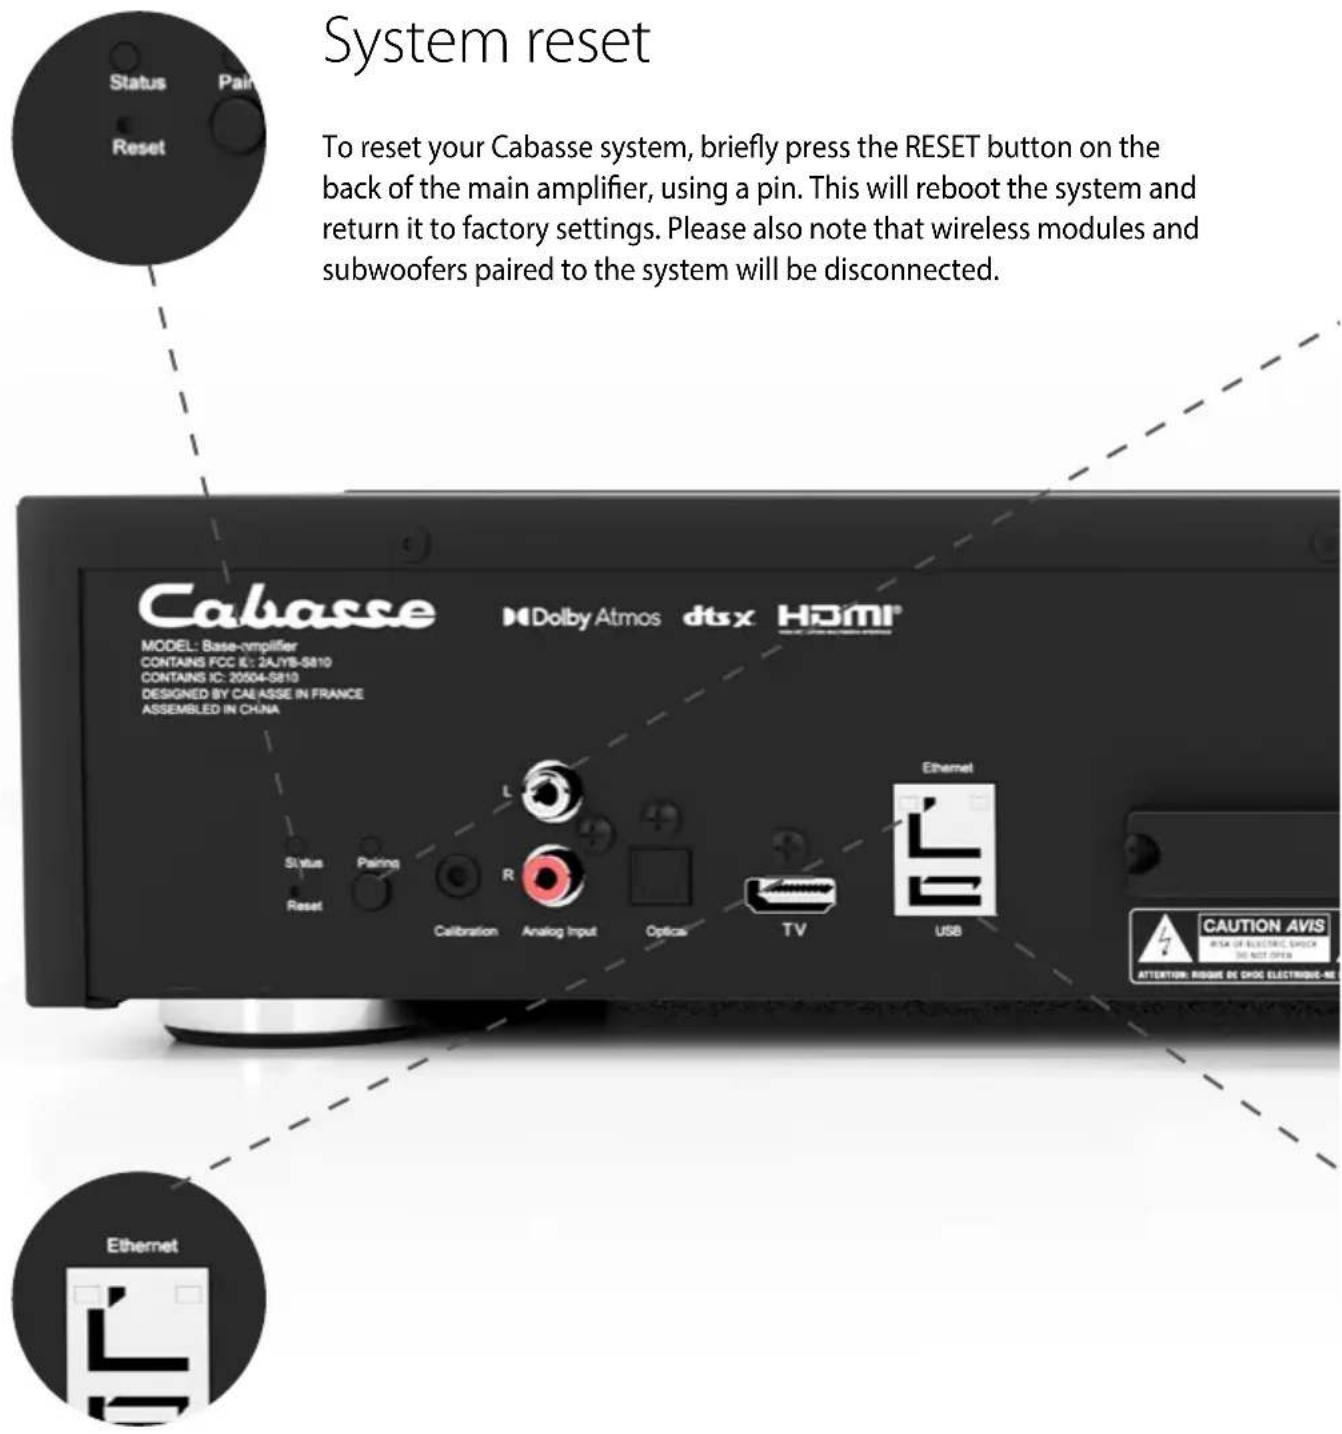
Your amplifier is ready for use as soon as the LED on the right side of the rear panel is lighted in solid cyan.
Main Amplifier Status Lights
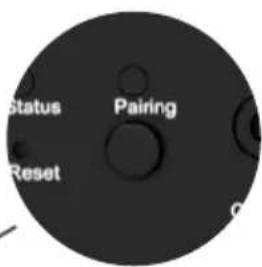
LED «STATUS» COLORS MEANING
CYAN Streaming source, Alexa, AirPlay, Tidal Connect
GREEN Spotify Connect
○ WHITE Analog sources (RCA, Analog 1)...
YELLOW Digital sources (OPT, HDMI inputs)...
BLUE Bluetooth source
RED Flashing Connection to network failed or start
PURPLE Automatic calibration running + Update in progress
Wired and wireless inputs
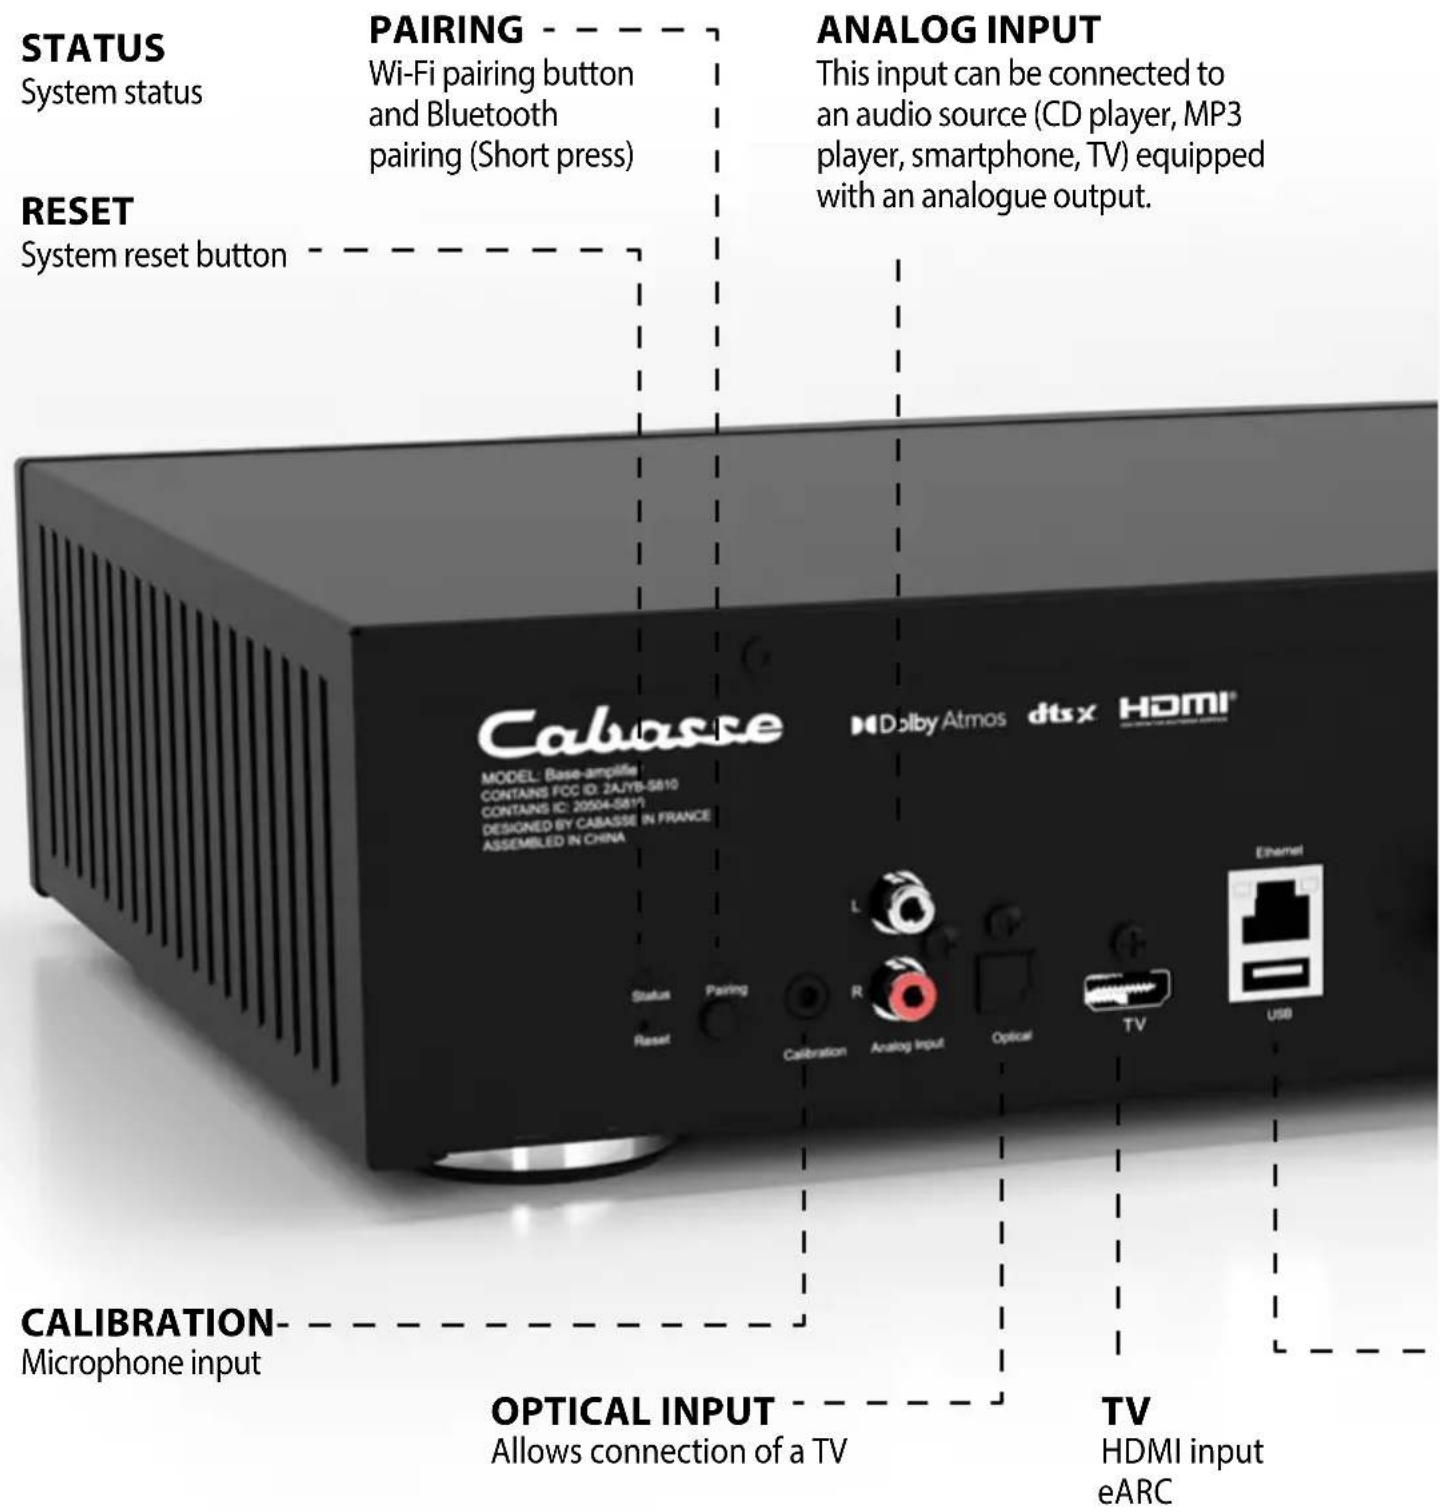
USB
Allows connection of a hard disk or USB key
Bluetooth Connection
- Once the speaker is on, press briefly the «Pairing» button on the back
- The «Pairing» LED on the back should flash
- Activate Bluetooth on your mobile
- Select «THE PEARL THEATER» from the list of available devices
- Once the connection is successful, the LED «Pairing» on the back stops flashing
Recommendations: prefer AirPlay or "Connect" sources
Wireless DLNA Connection
Your DLNA device can play several roles on your home network
Digital Media Player (DMP) - Network player
- Access media stored on your network (on a content server (DMS) NAS, PC/Mac servers, Router+USB...) from the Cabasse application, «Music» tab.
Digital Media Renderer (DMR) - Content receiver
- Play your audio media through your speakers directly from your DLNA/UPnP-compatible content server interface.
Digital Media Server (DMS) - Content server
- Play music services and USB media from your main speaker to other DLNA-compatible network players
Pro-tip: Choose an Ethernet network connection for optimal playback of your heaviest media.
Use / Synchronize with a TV set
The Pearl THEATER system is compatible with the HDMI eARC (enhanced Audio Return Channel) output of your TV via a 2.1 HDMI cable. It is also compatible with ARC/eARC and HDMI CEC protocol. The HDMI CEC protocol allows you to use the TV remote control to adjust the volume the volume of the speakers.
HDMI CABLE CONNECTION - HOME CINEMA SETUP
- First of all, please connect the device to your local network via Wi-Fi or Ethernet.
- Connect the HDMI ARC (Configuration max 5.1) or eARC output port of your TV and the TV port of the rear panel with a HDMI 2.1 cable.
- In your TV settings, enable eARC, ARC or CEC in the
HDMI SETTINGS. Refer to your TV's user manual for more details, as HDMI connections may have different names by different manufacturers (e.g. Anynet+ for Samsung, Simplink for LG). - Make sure that the TV's digital audio output setting is Multichannel (not Dolby, Bitstream, Auto not Dolby, Bitstream, Auto or similar).
CONNECTING THE OPTICAL CABLE
- First, please connect the device to your local network via Wi-Fi or Ethernet.
- Connect the optical output port of your TV and the optical port of the rear panel with an optical cable (Configuration max 5.1).
- On the TV, set the audio-video latency according to your configuration
Wire connection (LAN) to the Ethernet
The wired Ethernet connection guarantees optimum and constant transfer rates in any environment. Use it if Wi-Fi operation causes the music to stop or cut off, indicating a saturated Wi-Fi network or too great a WI-FI router distance from the main amplifier. Connect an RJ45 cable between your amplifier and your router (or Internet box). The connection is established when the STATUS LED turns solid blue. The Wi-Fi connection is then automatically deactivated.
ATTENTION: your router's DHCP mode must be enabled.
Wi-Fi reset
If you change your Wi-Fi password or Internet box, you can reset only the network settings, in order to retain all your settings. To do this, simply press at least 5 seconds the PAIRING button on the back of the main amplifier for 5 seconds, then the STATUS LED will flash blue.


natural_image
Circular icon with abstract geometric design and 'USB' text, no readable document contentUSB Input
This input is only useful for use in Wi-Fi / Ethernet mode. Connect a USB stick or hard drive containing audio files to this input so that you can read them from the application. All files in formats recognized by the DLNA server are then listed in the Cabasse StreamCONTROL application and can be read by all Cabasse Stream players connected to the same network. The USB socket has a 5V - 1A DC power supply for use with a portable hard drive without external power supply.
Specifications
MAIN AMPLIFIER
Amplification
Amplification x3 :
Channel :
Power 4 ohms = 100W RMS
Power 8 ohms = 50W RM
PEARL SUB WIRELESS
Channels: 1
Max. sound volume
100dB
112 dB in
Bandwidth
14 - 200 Hz
Power 4 ohms = 700W RMS
SATELLITE
Max. sound volume
115 dB stereo (peak)
200 - 23,000 Hz
Dimensions
338 x 320 x 368 mm
Medium-tweeter: Dom55
Dimensions
Satellites: 101 x 80 x 80 mm
Weight
Satellites: approx. 550 g each
Weight: 20 kg
Possible connections according to your music sources
RECOMMENDED CONNECTION TYPE ACCORDING TO MEDIA TYPE
Lossless audio broadcast
WLAN/LAN via Internet router / box
Access to all audio media from the Wi-Fi network (computer...)
WLAN/LAN via Internet router / boxt
Multi-room
WLAN/LAN via Internet router / box
Broadcast smartphone / tablet audio content
Bluetooth connection + WLAN/LAN via Internet router / box
Broadcast audio application (youtube ...) from smartphone / table
Bluetooth connection
Broadcasting from USB media
WLAN/LAN via Internet router / box
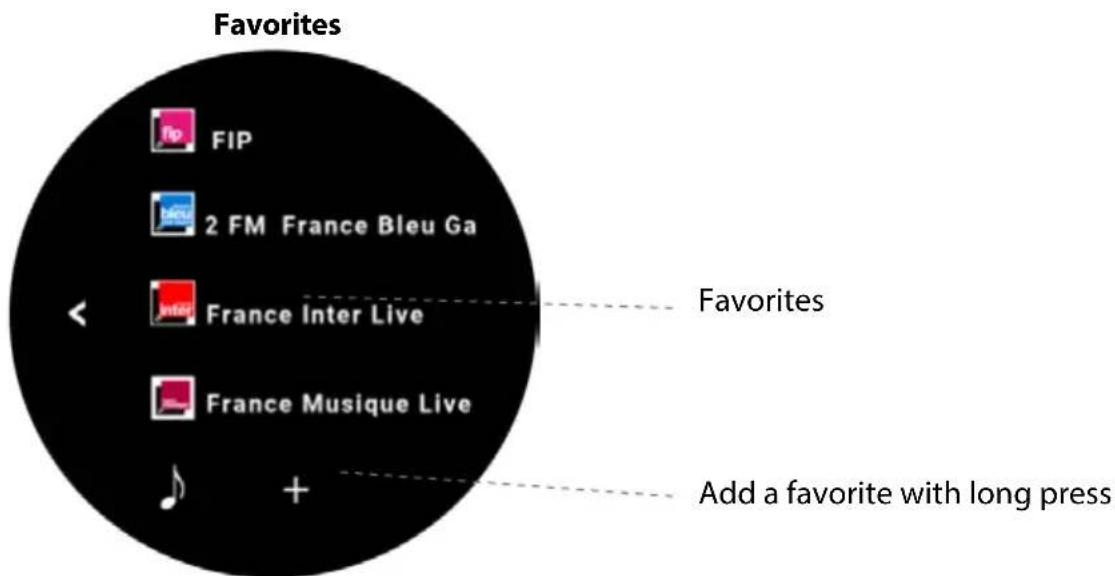
Internet radio and music services
Qobuz, Deezer, Napster, Spotify, Tidal, Vtuner
Supported audio formats
Dolby Atmos ^® is a three-dimensional audio format that allows each sound to be precisely positioned in space, including height. Your system supports full Dolby Atmos ^® signal decoding and playback, for an immersive and realistic soundstage.
| PCM DOLBY DIGITAL | ||
| RÉSOLUTION MAX THÉORIQUE | 32 bits / 768 kHz | 16 bits / 48 kHz |
| DÉBIT MAX | - | 640 kpbs |
| NOMBRE DE CANAUX MAX | 7.1 | 5.1 |
Dolby Digital
Dolby Digital is a digital format that can encode from 1 to 6 channels, from mono to 5.1. Compression can be achieved at bit rates ranging from 32 to 640 kilobits per second. Dolby Digital is the most widely used sound format for DVD. Among decoders supporting this format, Dolby Digital and Digital Surround EX are the most common. Dolby Digital provides a dedicated channel for the subwoofer.
Dolby Digital Plus
This is a high-definition evolution of Dolby Digital. This eight-channel spatialized format remains compatible with Dolby Digital-certified equipment. It is found on HD-DVD compressed to 3 Mb/s and Blu-ray Disc compressed to 4.7 Mb/s.
Dolby Atmos ^® is a three-dimensional audio format that allows each sound to be precisely positioned in space, including height.
Your system supports full Dolby Atmos ^® signal decoding and playback, for an immersive and realistic soundstage.
Dolby True HD (DTHD)
This format (and standard) is still relatively uncommon. It corresponds to lossless multichannel sound. It's sound that's bit-for-bit faithful to studio recordings. The number of channels can be increased to 7 + 1 subwoofer.
Dolby Surround
This format was the first developed by Dolby. It adds a channel to the two conventional channels of a stereo configuration. This is the surround channel. To be correctly reproduced, this analog solution requires equipment equipped with a Dolby Surround Pro Logic and Prologic II decoder. If this is not the case, "backward compatibility" to simple stereo is possible. Some TV programs use this format.
Digital Theater Sound (DTS) is a format that supports up to 8 channels at variable bitrates from 32 to 4096 kilobits per second. The resulting compression ratio and loss of quality can therefore be lower than some Dolby Digital encoded sounds. While it is commonly supported by home cinema systems, it is less widespread among DVD publishers. Some artists also offer concerts recorded in DTS.
DTS HD
The principle is identical to that proposed by Dolby. It is a format that can use eight channels at a maximum bitrate of 6 Mb/s. Although the format requires slight compression, there is no audible loss of sound.
DTS HD master audio
This looseless format has established itself as a competitor to Dolby True HD. It delivers eight channels at variable bitrates of up to 24.5 Mb/s. Like its counterpart, it is compatible only with HDMI 1.3 or 1.4.
This mode is designed to upmix (enhance and adapt) standard audio content (stereo or multichannel) to make it compatible with immersive audio systems such as DTS. It creates 3D sound by exploiting all the speakers in your system, including those in the ceiling or facing upwards, for maximum immersion. Ideal for soundtracks that are not already in DTS, but which you want to enhance with more immersive spatialization.
Dolby Surround Music
This mode is optimized for music. It offers a more natural, balanced rendering to enhance instruments and vocals. Unlike Movie mode, it favors a more faithful reproduction of the original mix for a pleasant, immersive listening experience to your favorite tracks.
Dolby Surround night
This mode optimizes sound for night-time or discreet listening. It reduces volume differences between noisy and quiet passages, while maintaining dialogue intelligibility. Perfect for not disturbing others while watching movies or series late at night.
Dolby Surround Movie
This mode is designed specifically for movies. It accentuates sound effects and spatialization to maximize immersion in action scenes, dialogue and cinematic soundtracks. Efficiently uses all your speakers to reproduce a cinema-like experience.
Direct: Plays the received stream by default without added audio effects
Stereo: Plays 2 channels only
These audio modes can be predefined in the application according to the source you are using.
1. Use the provided cardboard stand:
Assemble the cardboard stand included in the package and place the microphone on it. Position it at your main listening area (usually at ear level).
2. Calibrate in a quiet environment:
Ensure the room is quiet to achieve accurate speaker measurements.
3. Distance adjustments:
The calibration algorithm automatically suggests optimal distances between your listening area and each speaker. However, for the most accurate results, consider checking and fine-tuning these settings manually in the app after calibration.
Thank you for purchasing a Cabasse device. We recommend you read this leaflet carefully to take full advantage of the product.
Safety Instructions

Explanation of symbols
Lightning within an equilateral triangle warns of the existence of dangerous, uninsulated high voltage inside the product enclosure, of sufficient value to present a risk of electric shock.

The exclamation point in an equilateral triangle warned of the existence of instructions usage and maintenance in the docu- tion attached to this product.
Cleaning - Unplug the unit before cleaning. Do not use cleaning solutions in liquid or aerosol form. Use preferably a damp cloth.
Installation on furniture and stands - Do not place this unit on an unstable stand, such as stands, tripods, tables, shelves, etc. It could fall and cause serious injury to a child or adult who is nearby.
Ventilation - The appliance must be positioned so that it does not interfere with its own ventilation. For example, it should not be installed on a bed, sofa, blanket or similar surfaces that could block its vents. It should not be embedded in confined spaces such as narrow shelves or furniture that could limit the amount of air available to the air intakes.
Power supply - The appliance must only be connected to a power source of the type written in the user manual or in line with the product. If you are unsure of the type of power supplied to your location, contact your dealer or the local power company.
Electrical Overloads -Do not overload power outlets, extension cords, or power reminders. This could result in fire or electrocution.
Foreign bodies and liquids - Care should be taken never to let foreign objects or liquids enter the unit. They could cause fires or electrocutions. Never pour liquid of any kind into the device.
Maintenance - - In the following cases, you must unplug your appliance and have it checked by a qualified technician:
the power supply or plug has been damaged.
foreign bodies or liquid have entered the device.
the unit has been exposed to rain or has been sprayed with water.
the unit does not seem to be working properly while you are using it as part of its normal operating instructions.
Only handle the controls covered by the user manual. Any other procedure could damage it and require the intervention of a qualified technician.
the unit has fallen or its bodywork is damaged.
the device shows significantly changed performance.
In a disturbed area environment (thunderstorm etc ...), the product may sometimes require shutdown and restart by means of the ON / OFF power switch located on the rear panel of the device to work properly again.
Spare parts - If the repair required the use of spare parts, make sure that the technician has used the references recommended by the manufacturer or having the same characteristics as the original parts. Non-conforming parts may cause fire, electric shock or other.
Checks - After any work on the unit, have the technician perform tests to ensure that the unit operates safely.
Plastic Bags - Do not leave plastic bags in the box within reach of children to avoid choking.
- READ these instructions.
- SAVE these instructions.
- RESPECT all warnings.
- FOLLOW all instructions.
- DO NOT use this unit near water.
- CLEAN ONLY with a dry cloth.
- DO NOT obstruct the ventilation holes.
Install according to the manufacturer's instructions. - DO NOT install near any heat sources such as radiators, heat registers, stoves, or other apparatus (including amplifiers) that produce heat.
- DO NOT disable the safety feature of the polarized or ground pin plug. A polarized plug has one blade wider than the other. A ground pin plug has two blades and a third pin for the ground. The wide blade or the third pin is provided for the safety of the user. If the provided plug does not fit into the outlet, have an electrician replace this outlet type that is too old.
- PROTECT the power cord, making sure that it is not likely to be
stomped or crushed, particularly near the
plugs, power strips and its point of exit from the device.
- USE ONLY the accessories recommended by the manufacturer.
- Unplug this apparatus during lightning storms or when unused for a long time.
- CONFIRM any troubleshooting work to a competent professional repairer.
Have the device repaired in case of damage, for example: damaged plug or power cord, liquid spilled on the device or object inserted in the device, unit exposed to rain or moisture, malfunction or after a fall.
- RUNOFF / HUMIDITY: To prevent fire or shock hazard, do not expose the unit to water or moisture. The appliance must not be exposed to any risk of liquid leaks, no object such as a vase will be placed on or above the appliance.
- KEEP this product a safe distance away from any naked flame, such as a lit candle.
- THE MAINS are nor disconnected in the off position, but the circuits are de-powered.

Caution: do not ingest the battery, fatal risk of chemical burn within 2 hours. Always keep button cells, new and used, out of reach of children.
Seek immediate medical attention if you think that batteries may have been swallowed or inserted anywhere in the body. If the battery compart-
ment no longer closes securely, stop using the product and keep it away from children.
DEE marking, updates and cleaning
DEEE MARKING
Treatment of electrical and electronic devices at the end of their life (applicable in the countries of the European Union).

This crossed-out wheeled bin symbol affixed to the product indicates that this product should not be treated with household waste. It must be handed over to a collection point for the treatment of electrical and electronic equipment at the end of its life. By ensuring that this product is disposed of properly, you will help prevent potential negative consequences for the environment and human health. Recycling materials will help conserve natural resources. For more information about recycling this product, you may contact your municipality, your dump or the store where you purchased the product.
REPLACING THE BATTERY FROM THE REMOTE CONTROL
Turn the remote control over, facing towards the floor. Remove the old battery and replace it with another type CR-2450 coin cell. Dispose of the used battery according to the information below.
Information about batteries and accumulators in the equipment (Applicable in the countries of the European Union).
This crossed-out wheeled bin symbol affixed to a battery or accumulator indicates that the battery or accumulator should not be disposed of as unsorted household waste but should be collected separately from the battery. to make it easier to process and recycle. It must be returned to a collection point for the treatment of used batteries and accumula-
tors. By ensuring that this product is disposed of properly, you will help prevent potential negative consequences for the environment and human health. Recycling materials will help conserve natural resources. For more information about recycling this product, you may contact your municipality, your dump or the store where you purchased the product.
AUTOMATIC UPDATE
The software updates are automatic.
The update time is variable and can last up to fifteen minutes during the first connection to the Internet.
The beginning and the end of the update are announced by voice.
The speaker is not functional during this phase.
CLEANING
The device can be cleaned with a soft cloth, do not use detergent or liquid that can run inside the appliance.
Do not use any solvents, chemicals, or cleaning solutions containing alcohol, ammonia, or abrasives.

WARNING
For explosion hazard if battery is incorrectly replaced: use only the same or equivalent battery. Do not expose batteries to excessive heat such as the sun, fire or the like.
After-sales service
Cabasse has a network of authorized dealers who are available to provide after-sales service for your equipment.
For a list of authorized Cabasse dealers, please contact us or visit our website www.cabasse.com:
Cabasse hereby declares that the radio equipment of the type «THE PEARL THEATER» complies with Directive 2014/53/EU. This marking attests to the conformity of the equipment for the aspects of safety and health of users, electromagnetic compatibility of the equipment, and proper use of the radio frequency spectrum and reduction of the product's impact on the environment. Software updates are issued by the manufacturer to correct or improve product functions.
For the latest information on accessories and software, please consult the EU Declaration of Conformity at :
www.cabasse.com/faq-stream/
or send a written request to
Cabasse SAS - 210 rue René Descartes - F 29280 - Plouzané - France
FAQ
See our answers to frequently asked questions on our website, page : https://cabasse.happyfox.com/home/
FCC STATEMENT
This equipment has been tested and found to comply with the limits for a Class B digital device, pursuant to Part 15 of the FCC Rules. These limits are designed to provide reasonable protection against harmful interference in a residential installation. This equipment generates uses and can radiate radio frequency energy and, if not installed and used in accordance with the instructions, may cause harmful interference to radio communications. However, there is no guarantee that interference will not occur in a particular installation. If this equipment does cause harmful interference to radio or television reception, which can be determined by turning the equipment off and on, the user is encouraged to try to correct the interference by one or more of the following measures.
-- Reorient or relocate the receiving antenna.
-- Increase the separation between the equipment and receiver.
-- Connect the equipment into an outlet on a circuit different from that to which the receiver is connected.
-- Consult the dealer or an experienced radio/TV technician for help.
This device complies with part 15 of the FCC Rules. Operation is subject to the following two conditions : (1) This device may not cause harmful interference, and (2) this device must accept any interference received, including interference that may cause undesired operation.
Changes or modifications not expressly approved by the party responsible for compliance could void the user's authority to operate the equipment. This equipment complies with FCC radiation exposure limits set forth for an uncontrolled environment.
This equipment should be installed and operated with minimum distance 20 cm between the radiator & your body
Cabasse thanks you for your purchase and wishes you a lot of listening pleasure.
Cabasse

Cabasse SAS - 210, rue René Descartes - BP 10 - 29280 Plouzané - FRANCE
Tel +33 298 05 88 88
www.cabasse.com

- Déballage
- L'AMPLIFICATEUR PRINCIPAL
- CONNEXION WI-FI
- 5.1
- 7.1
- 5.1.2
- Entrée USB
- PEARL SUB SANS-FIL
- SATELLITE
- Formats Audio supportés
- SYSTEM USAGE
- Contents of your system
- Unpacking
- Components of your system
- Positioning recommendations
- MAIN AMPLIFIER
- PEARL SUBWOOFER
- FRONT SATELLITES
- CENTER SATELLITE
- REAR SATELLITES/WIRELESS RECEIVERS
- Wall braquet
- CAUTION
- Download and install the Cabasse StreamCONTROL app
- WI-FI CONNECTION
- WARNING!
- System choice
- Satellite connection
- Wireless pairing of subwoofer and satellites
- Using the remote control
- First Use
- Main Amplifier Status Lights
- Wired and wireless inputs
- USB
- Bluetooth Connection
- Wireless DLNA Connection
- Digital Media Player (DMP) - Network player
- Digital Media Renderer (DMR) - Content receiver
- Digital Media Server (DMS) - Content server
- Use / Synchronize with a TV set
- HDMI CABLE CONNECTION - HOME CINEMA SETUP
- CONNECTING THE OPTICAL CABLE
- Wire connection (LAN) to the Ethernet
- Wi-Fi reset
- USB Input
- Specifications
- PEARL SUB WIRELESS
- Possible connections according to your music sources
- RECOMMENDED CONNECTION TYPE ACCORDING TO MEDIA TYPE
- Lossless audio broadcast
- Access to all audio media from the Wi-Fi network (computer...)
- Multi-room
- Broadcast smartphone / tablet audio content
- Broadcast audio application (youtube ...) from smartphone / table
- Broadcasting from USB media
- Internet radio and music services
- Supported audio formats
- Dolby Digital
- Dolby Digital Plus
- Dolby True HD (DTHD)
- Dolby Surround
- DTS HD
- DTS HD master audio
- Dolby Surround Music
- Dolby Surround night
- Dolby Surround Movie
- Use the provided cardboard stand:
- Calibrate in a quiet environment:
- Distance adjustments:
- Safety Instructions
- Explanation of symbols
- DEE marking, updates and cleaning
- DEEE MARKING
- Treatment of electrical and electronic devices at the end of their life (applicable in the countries of the European Union).
- REPLACING THE BATTERY FROM THE REMOTE CONTROL
- Information about batteries and accumulators in the equipment (Applicable in the countries of the European Union).
- AUTOMATIC UPDATE
- CLEANING
- WARNING
- After-sales service
- www.cabasse.com/faq-stream/
- FAQ
- FCC STATEMENT
- Cabasse
Brand : CABASSE
Model : The Pearl Theater
Category : Audio System