Mirage Swift II - Medical ventilator ResMed - Free user manual and instructions
Find the device manual for free Mirage Swift II ResMed in PDF.

| Product Type | Nasal Mask |
| Brand | ResMed |
| Model | Mirage Swift II |
| Intended Use | Continuous Positive Airway Pressure (CPAP) or bi-level pressure therapy for adults (weight > 30 kg) |
| Compatibility | ResMed devices (except AutoSet CS™ 2 and VPAP™ Adapt SV) |
| Cushion Sizes | Small, Medium, Large |
| Dead Space | 91 ml |
| Treatment Pressure Range | 4 to 20 cm H₂O |
| Flow Resistance | 0.4 cm H₂O at 50 l/min; 1.6 cm H₂O at 100 l/min |
| Materials | Latex-free, PVC-free, DEHP-free |
| Daily Cleaning | Mask frame, short tube, and plug in warm soapy water (30°C) for 1 minute, rinse and dry |
| Weekly Cleaning | Headgear and all components by hand in warm soapy water |
| Disinfection/Sterilization Between Patients | Instructions available at resmed.com |
| Replacement Parts | Cushion, headgear, seal ring, short tube, plug, soft sleeve, clip, etc. |
| Warranty | 90 days from date of purchase |
Frequently Asked Questions - Mirage Swift II ResMed
User questions about Mirage Swift II ResMed
0 question about this device. Answer the ones you know or ask your own.
Ask a new question about this device
Download the instructions for your Medical ventilator in PDF format for free! Find your manual Mirage Swift II - ResMed and take your electronic device back in hand. On this page are published all the documents necessary for the use of your device. Mirage Swift II by ResMed.
USER MANUAL Mirage Swift II ResMed
ResMed Pty Ltd 1 Elizabeth Macarthur Drive Bella Vista NSW 2153 Australia
See www.resmed.com for other ResMed locations worldwide.
For patent information, see www.resmed.com/ip
Mirage, Mirage Swift, AutoSet CS 2 and VPAP Adapt SV are trademarks of ResMed Pty Ltd and Mirage, Swift, AutoSet CS and VPAP are registered in U.S. Patent and Trademark Office.
Dove is a trademark of Unilever.
© 2020 ResMed.

B
Larina da Mirza Sufril II (Anderea del Mirza Sufril II) Mio es nica da misione maristre Mirza Sufril II / Andirazione del sistema Mirza Sufril II / Colocariola del sistema Mirza Sufril II / Colocariola do Mirza Sufril II / Peso in Mirza Sufril II

RedMed logo forms and / RedMed logo works with a new
Logo Graphite 3.5.2.10.19.10.1.1.1.1.1.1.1.1.1.1.1.1.1.1.1.1.1.1.1.1.1.1.1.1.1.1.1.1.1.1.1.1.1.1.1.
Adjukt nach imgen/L. zuption der betrieb
kurser / Späure / anlage aus dem / Poplar
in langte jeistende / Appland bei 2019
postenzen / 1. bis in 2019 sowie
davon de Jahr 2019
Adjur lap ringo (L'oe de 30° 2018) for dr. "Amines br. agnles vortu" (regul e l'ung in aurofro) Ardu la corra a caprera "Amines se corra" (paprera/ pApra de 24° 2018)
Inula plano de una magnetica, a la y al. "I'vee" de la Nong d'abatana, la y al. "I'vee" de la Nong d'abatana, la y al. "I'vee" de la Nong d'abatana, la y al. "I'vee" de la Nong d'abatana, la y al. "I'vee" de la Nong d'abatana, la y al. "I'vee" de la Nong d'abatana, la y al. “I'vee" de la Nong d'abatana, la y al. "I'vee" de la Nong d'abatana, la y al. "I'vee" de la Nong d'abatana, la y al. "I'vee" de la Nong d'abatana, la y al. "I'vee" de la Nong d'abatana, la y al. "I'vee" del
Tabramatic (optional) is the following
(see Fig. 1): Page 2: Figure 3: Page 4: Page 5: Page 6: Page 7: Page 8: Page 9: Page 10: Page 11: Page 12: Page 13: Page 14: Page 15: Page 16: Page 17: Page 18: Page 19: Page 20: Page 21: Page 22: Page 23: Page 24: Page 25: Page 26: Page 27: Page 28: Page 29: Page 30: Page 31: Page 32: Page 33: Page 34: Page 35: Page 36: Page 37: Page 38: Page 39: Page 40: Page 41: Page 42: Page 43: Page 44: Page 45: Page 46: Page 47: Page 48: Page 49: Page 50: Page 51: Page 52: Page 53: Page 54: Page 55: Page 56: Page 57: Page 58: Page 59: Page 60: Page 61: Page 62: Page 63: Page 64: Page 65: Page 66: Page 67: Page 68: Page 69: Page 70: Page 71: Page 72: Page 73: Page 74: Page 75: Page 76: Page 77: Page 78: Page 79: Page 80: Page 81: Page 82: Page 83: Page 84: Page 85: Page 86: Page 87: Page 88: Page 89: Page 90: Page 91: Page 92: Page 93: Page 94: Page 95: Page 96: Page 97: Page 98: Page 99: Page 100
Optimal task performance: Opas is not applicable. For best performance, it is not a specific result of the best performance. For best results, it is not a consistent result of the best performance.
Note: The real signs do not need to be removed for clearing up a 2000-2010. In the English period, the following are not being used to prevent any other hand in the past year. We have been done with the same time of the last year. We have been done with the same time of the last year. We have been done with the same time of the last year. We have been done with the same time of the last year. We have been done with the same time of the last year. We have been done with the same time of the last year. We have been done with the same time of the last year. We have been done with the same time of the last year. We have been done with the second time of the last year. We have been done with the second time of the last year. We have been done with the second time of the last year. We have been done with the second time of the last year. We have been done with the second time of the last year. We have been done with the second time of the last year. We have been done with the second time of the last year. We have been done with the second time of the last year. We have then done with the second time of the last year. We have then done with the second time of the last year. We have then done with the second time of the last year. We have then done with the second time of the last year. We have then done with the second time of the last year. We have then done with the second time of the last year. We have then done with the second time of the last year. We have then done with the second time of the last years. We have then done with the second time of the last years. We have then done with the second time of the last years. We have then done with the second time of the last years. We have then done with the second time of the last years. We have then done with the second time of the last years. We have then done with the second time of the last years. We have then done with the second time of the last years. We have then done with the second times of the last years. We have then done with the second times of the last years. We have then done with the second times of the last years. We have then done with the second times of the last years. We have then done with the second times of the last years. We have then done with the second times of the last years. We have then done with the second times of the last years. We have then done with the second times of the last years. We have then don't run out from our own home to take place at once.
C
Disservisling für Clearing / Damontages der Maske zu Reizigurprzewichten / Démontages pour le nettoyage / Smontages par la pulizia / Damontages para la Impiston / Damontages para limpeza / To inter for remporting
Dain (Cavells) Darns
Uran/2007 Grandt Agv
D Reassemicling the Mirage Swift II / Wiederzusammenzou der Mirage Swift II / Remontage du masque nairaire Mirage Swift II / Rassemblages del sistema Mirage Swift II / Montaje del sistema Mirage Swift II / Como votar a montar a Mirage Swift II / Montera Mirage Swift II
E. E. E. E.
Sede clo? Cie? He August 15 November 1
(1) ECON'S BRIESE O'CHIKOIE 80206
Candera e Hig 15749
Hindi yar rng! Cudalirr. (Gan van de horten)
lans v opemysel dat is del trolu (davol de suola)
Hindi u rng
The following table represents the contents of the 'Ceramic' (Ceramic)
Rout'brd lags fuses andg from a
mangpur's buthus,egs gns vink,
in p########ag 'lags fuses se wed
des la dvery se superlere a harmad
bgs fuses reesrue in decaer's
epema at assaepes. Dlogops de
Bout'brd e valu me,deh ramae
to 7-Ologops daunfied hei
dans paes sce in snahe. Bout'
logops sate hne bldnem
RESMED
Mirage Swift ^® II
NANU H. 11820430201-5
Illustrations Sheet / Illustrations/ Piche D'Assistions / Fogolia della Illustrationi
Note: For example information, and the restriction in conjunction with the following:
Note: I've also been competitive, leverage the average cost of Hado's company as a business or private
Extralisis lata e nus e nus e nus fata, e nus hula e nus e nus e nus fata
Chell A: Instrumental Instrument and Material Research for the Student
NATI TOW
Note: The long term is an important time for the day. Long term is a time constant of 10 minutes, and the duration of the long term is 30 minutes. Hence, the short term is a time constant of 10 minutes. After that, there is no longer time to be required for any longer term. Note: The long term is a time constant of 10 minutes, and the duration of the long term is 30 minutes. After that, there is no longer time to be required for any longer term. Note: The long term is a time constant of 10 minutes, and the duration of the long term is 30 minutes.
E Recontaining the Haugyeur / Wiederskommen des Kopfenden / Remontage du horreis / Riverenberger del capirapa / Monza del armés / Como voltar a mentar o armés / Montera illetan
Bach Simpson / E. van derer / Sengel vaner / Ceyne Svenon / Commerenzen / Commerenzen / De hiettener
1
Laparopot (Cana Bovin) has a system of Cinghe's system.
Borke burske: C. Iien in Serviva + Bovca sereno + Tere e posumata Borke nana na 12.500 mawha - Dru neal jah de
(1) 2017年1月1日星期六
Black (Cape) is very wide for a large number of small numbers.
Thank you for choosing ResMed's Mirage Swift II Nasal Pillows System. The nasal pillows system is light, flexible and quiet. It is designed to minimize contact with your face, thus ensuring that you feel comfortable during therapy. This user guide provides you with the information you need for the correct use of your system.
Intended Use
The Mirage Swift II is intended for multipatient use by adult patients (>30 kg) prescribed continuous positive airway pressure or bilevel therapy for use in home, hospitals or clinics.
Note: The Mirage Swift II is not compatible for use with ResMed AutoSet CS™ 2 and VPAP™ Adapt SV devices.
Medical Information
Note: The Mirage Swift II does not contain latex, PVC, or DEHP materials. If you have ANY reaction to any part of the system, discontinue use and consult your sleep therapist.

Warnings and Cautions
- This system should be used only with flow generators (CPAP or bilevel) recommended by your physician or respiratory therapist. It should not be used unless the flow generator is turned on and operating properly. The vent holes should never be blocked.
Explanation of the Warning: Flow generators are intended to be used with special interfaces with connectors which have vent holes (vent holes are located on the frame—see section A on the illustrations sheet) or separate exhalation devices to allow continuous flow of air out of the interface. When the flow generator is turned on and functioning properly, new air from the flow generator flushes the exhaled air out through the attached exhalation
port. However, when the flow generator is not operating (eg, power failure), not enough fresh air will be provided through the system, and exhaled air may be rebreathed. In this situation, remove the Mirage Swift II immediately.
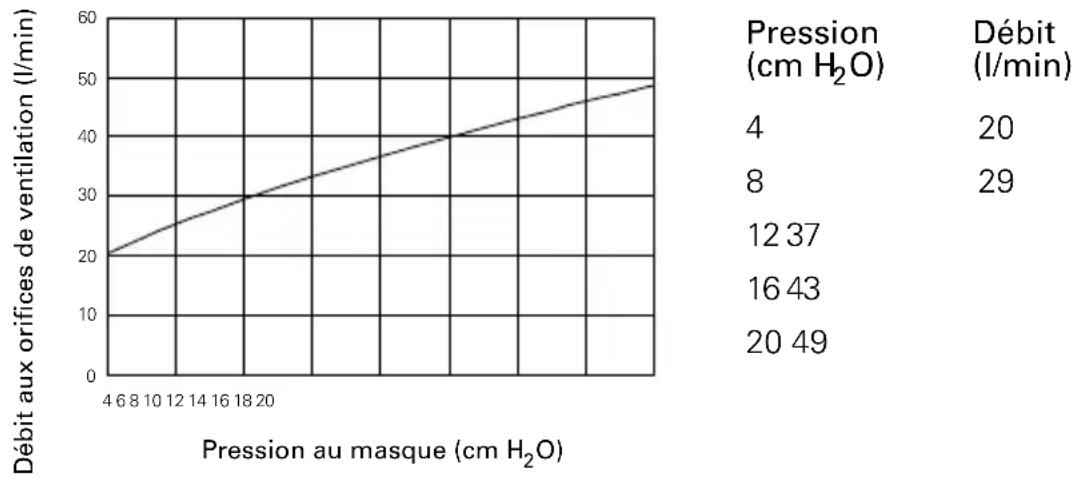
- The exhaust vent flow is lower at lower system pressures (see section "Technical Specifications" for Pressure-Flow Curve details). If the system pressure during expiration is too low, there may not be enough exhaust vent flow to completely flush the air delivery hose of exhaled air before the start of the next inspiration.
- Discontinue using the Mirage Swift II if you frequently experience nasal irritation, and consult your physician.
- The Mirage Swift II must be cleaned and disinfected/sterilized if it is used between patients. See section “Reprocessing the mask between Patients” for details.
- If oxygen is used with the flow generator, the oxygen flow must be turned off when the flow generator is not operating.
Explanation of the Warning: When the flow generator is not in operation, and the oxygen flow is left on, oxygen delivered into the ventilator tubing may accumulate within the flow generator enclosure. Oxygen accumulated in the flow generator enclosure will create a risk of fire. This warning applies to most types of flow generators.
- Please refrain from smoking while oxygen is in use.
- Using a mask may cause tooth, gum or jaw soreness or aggravate an existing dental condition. If symptoms occur, consult your physician or dentist.
Note: At a fixed flow rate of supplemental oxygen flow, the inhaled oxygen concentration will vary, depending on the pressure settings, patient breathing pattern, interface selection and the leak rate.
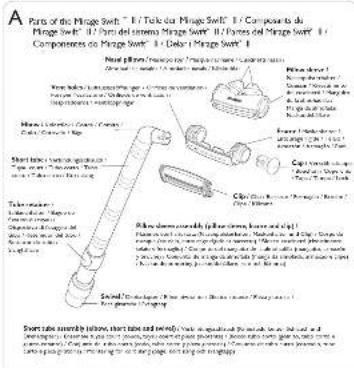
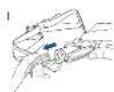
Parts of the Mirage Swift II
See section A on the illustrations sheet.
Fitting the Mirage Swift II
Note: Refer to your flow generator manual for details on settings and operational information.
See section B on the illustrations sheet.
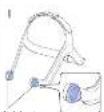
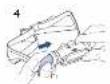
1 Put the headgear on your head and place the nasal pillows below your nose. Make sure the top strap passes over the top of your head. Make sure the ResMed logo on the pillow sleeve faces outward; away from your face (B-1).
2 Insert the nasal pillows into your nostrils. Gently tighten the headgear straps; first the back straps (B-2a) and then the top straps (B-2b). Alternate the adjustment of each set of straps, so that the headgear panels rest between the eye and the ear. The pillow sleeve should rest comfortably above your upper lip.
3 Adjust the angle of the nasal pillows. To do this, rotate the pillow sleeve assembly forward or backward so that the nasal pillows sit comfortably inside your nostrils (B-3).
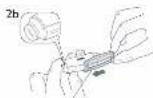
4 Tube Retainer (optional).
Use the tube retainer if you prefer to have the short tube assembly secured to the headgear in the up position (B-4).
5 The short tube assembly can be attached in four different ways (B-5).
Note: The short tube assembly and cap can be connected to either side of the pillow sleeve. See “Disassembling for Cleaning” and “Reassembling the Mirage Swift II” for instructions on how to remove and attach the short tube assembly and cap.
6 Connect one end of the main air tubing to your flow generator and the other end to the swivel. Turn your flow generator on.
Notes:
- Flow generator mask setting: If available, select "Swift"; otherwise select "Mirage" as the mask option when using the Mirage Swift II with ResMed flow generators that have mask setting options.
- SmartStop feature: This feature may not operate effectively when using the Mirage Swift II with some ResMed flow generators that have the SmartStop feature. This is particularly relevant when using the small size pillow sleeve.
If you feel air leaks, readjust the angle of the nasal pillows to get a better seal. You may need to readjust the headgear straps. Do not overtighten the headgear straps.
If you are unable to resolve any leaks you may need an alternative pillow sleeve size.
7 Take time to adjust the following to achieve a secure and comfortable fit:
- headgear straps
•angle of the pillow sleeve assembly
•position of the short tube assembly.
Removing the Mirage Swift II
To remove the Mirage Swift II, pull the pillow sleeve assembly away from your nose and lift the headgear off your head. You do not need to loosen the headgear straps.
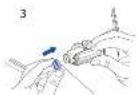
Disassembling for Cleaning
See section C on the illustrations sheet.
Before disassembling the Mirage Swift II, disconnect the flow generator tubing. To do this, hold the swivel and pull it away from the flow generator tubing.

CAUTION
Do not pull on the short tube or the flow generator tubing as they may get damaged.
- To disassemble the Mirage Swift II for daily cleaning, follow steps 1–3.
- To disassemble the Mirage Swift II for weekly cleaning, follow steps 1–5.
1 Detach the short tube assembly. To do this, hold the elbow and pull it away from the seal ring (C-1).
Note: The short tube assembly cannot be taken apart.
2 Remove the cap by pulling it away from the seal ring (C-2).
3 Detach the headgear ring from the pillow sleeve assembly. Simply pull the headgear rings from the ends of the frame (C-3).
4 Disassemble the pillow sleeve assembly. To do this, slide off the clip (C-4a) and then peel the pillow sleeve off the frame (C-4b).
Note: When sliding the clip, hold it at one end, not in the middle.
5 The seal rings do not need to be removed from the headgear (C-5).
Cleaning the Mirage Swift II in the Home
Notes:
- Wash your hands before cleaning the mask.
- Wash the headgear before first time use, as the dye may run. It is important to always handwash the headgear.
• The headgear may be washed without being disassembled.
Daily
Handwash the pillow sleeve assembly, short tube assembly and cap in warm (approx. 30^ C), soapy water for one minute. Use pure soap. Rinse the components well with drinking quality water and allow to air dry out of direct sunlight and heat.
Note: Ensure that the vent holes are not blocked. Use a soft bristle brush to clean the vent.
Weekly
Handwash the headgear, tube retainer and all components in warm, (approx. 30°C), soapy water. Use pure soap. Rinse the components well and allow them to air dry out of direct sunlight.

CAUTION
- Do not use solutions containing bleach, chlorine, alcohol, aromatics, moisturizers, antibacterial agents, or scented oils to clean any part of the system or air tubing. These solutions may cause damage and reduce the life of the product.
- Exposing any part of the system or tubing to direct sunlight or heat may cause deterioration.
- If any visible deterioration of a component is apparent (cracking, crazing, tears etc), the component should be discarded and replaced.
Reprocessing the mask between Patients
The mask should be reprocessed when used between patients.
Cleaning, disinfection and sterilisation instructions are available from the ResMed website, www.resmed.com/masks/sterilization.
If you do not have Internet access, please contact your ResMed representative.
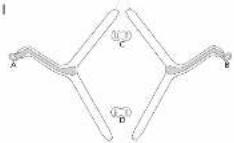
Reassembling the Mirage Swift II

CAUTION
Components of the Mirage Swift II pillow sleeve assembly (pillow sleeve, frame and clip—see section A on the illustration sheet) are not compatible for use with Mirage Swift components. Combining these components from the two systems may result in rebreathing of exhaled air.
See section D on the illustrations sheet.
1 Make sure both seal rings are properly fitted to the headgear rings (D-1).
2 Assemble the pillow sleeve assembly. To do this:
a Wrap the pillow sleeve around the frame. Then insert the pillow sleeve edges into the groove of the frame (D-2a).
b Hold the clip at one end and then slide it onto the frame to secure the pillow sleeve in place (D-2b).
Note: If the clip does not slide easily, check that the pillow sleeve edge is fitted flush to the groove of the frame.
3 Attach the headgear ring to the pillow sleeve assembly. To do this, firmly push the headgear rings onto the ends of the frame (D-3). When attaching the pillow sleeve assembly make sure:
•the headgear panels are facing out
•the nasal pillows are pointing upwards
•the ResMed logo faces out—away from the headgear.
Make sure the pillow sleeve assembly is properly fitted to the headgear before going on to the next step.
4 Attach the short tube assembly to your preferred side of the pillow sleeve assembly. To do this, push the elbow into the seal ring until it clicks into place (D-4).
5 Insert the cap into the other seal ring until it clicks into place (D-5).
6 The assembled system should look like this (D-6). Make sure the ResMed logo on the pillow sleeve faces out—away from the headgear.
Additional Information
Reassembling the Headgear
See section E on the illustrations sheet.
If taken apart, the headgear has four parts:
A: Left strap; B: Right strap; C: Back buckle; D: Top buckle.
1 Lay out the four parts of the headgear as shown in (E-1). The panels must face up.
Note: Before threading the straps, make sure that the buckles are positioned as shown in (E-2) and (E-3).
2 Thread the back straps through the back buckle (part C) as shown in (E-2a) and (E-2b).
3 Thread the top straps through the top buckle (part D) as shown in (E-3a) and (E-3b).
Disposal
The Mirage Swift II Nasal Pillows System does not contain any hazardous substances and may be disposed of with your normal household refuse.
Technical Specifications
Pressure-Flow Curve
line
| Mask Pressure (cm H₂O) | Vent Flow Rate (L/min) | | ---------------------- | ---------------------- | | 4 | 20 | | 8 | 29 | | 12 | 37 | | 16 | 43 | | 20 | 49 |Note: As a result of manufacturing variations, the vent flow may vary from the values listed in the table.
Dead Space Information
Dead space is the empty volume of the pillow sleeve and short tube assembly up to the swivel.
The dead space of the Mirage Swift II for all pillow sleeve sizes is 91 mL.
Standards
CE designation in accordance with EC directive 93/42/EEC, class IIa. EN ISO 14971, ISO 5356-1, ISO 10993-1 and EN ISO 17510-2.
Therapy Pressure
4 to 20 ~cm H_2 O
Resistance
Drop in pressure measured (average for three pillow sleeve sizes) at 50 L/min: 0.4 cm H₂O at 100 L/min: 1.6 cm H₂O
Symbols
System and Packaging

Caution, consult accompanying documents

Lot number

Part number

Manufacturer

European Authorised Representative
User Guide

Indicates a Warning or Caution and alerts you to a possible injury or explains special measures for the safe and effective use of the device.
Ordering Information
Part No. Item
System
60513 Mirage Swift II Nasal Pillow System - EUR
60514 Mirage Swift II Nasal Pillow System - ANZ
60515 Mirage Swift II Nasal Pillow System - AP
60516 Mirage Swift II Nasal Pillow System - UK
60518 Mirage Swift II Nasal Pillow System - FRA
Replacement Parts
60541 Pillow sleeve, Small (1 pk.)
60542 Pillow sleeve, Medium (1 pk.)
60543 Pillow sleeve, Large (1 pk.)
60523 Headgear buckle (4 pk.)
60524 Seal ring (10 pk.)
60525 Cap (1 pk.)
60526 Headgear (1 pk.)
60536 Frame with Clip and Cap (1 pk.)
60528 Short tube assembly (1 pk.)
60529 Short tube assembly (10 pk.)
Part No. Item
60530 Tube retainer (3 pk.)
60545 Mirage Swift II Bag (1 pk.)
60537 Frame System with Pillow sleeve (excluding headgear), Small
60538 Frame System with Pillow sleeve (excluding headgear), Medium
60539 Frame System with Pillow sleeve (excluding headgear), Large
60540 Clip (1 pk.)
Accessories
61121 Distal pressure port (1 pk.)
61124 Distal pressure port (10 pk.)
Limited Warranty
ResMed warrants that your ResMed system, including its components—frame, pillow sleeve, headgear, tubing and other accessories (“Product”)—shall be free from defects in material and workmanship for a period of ninety (90) days from the date of purchase by the initial consumer.
For further details refer to the Warranty.
Mirage Swift™ II
NASENPOLSTER
Courbe Pression/Débit