
XR210 - Power bank Xtorm - Free user manual and instructions
Find the device manual for free XR210 Xtorm in PDF.

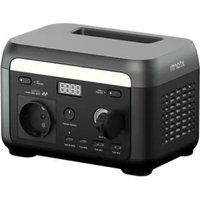
| Product type | Portable battery (Power Bank) |
| Brand | Xtorm |
| Model | XR210 |
| Maximum AC output | 100 W |
| AC waveform type | Modified sine wave |
| USB-C output | Yes, for charging and discharging |
| Charging input | USB-C |
| Charging time (with 60W charger) | Approximately 2 hours |
| Status display | Digital, battery percentage (0–100%) |
| Safety protection | Do not expose to water, do not disassemble, avoid heat sources |
| Recycling | WEEE compliant, contact a local recycling facility |
| Box contents | USB-C cable, power adapter (not specified) |
Frequently Asked Questions - XR210 Xtorm
User questions about XR210 Xtorm
0 question about this device. Answer the ones you know or ask your own.
Ask a new question about this device
Download the instructions for your Power bank in PDF format for free! Find your manual XR210 - Xtorm and take your electronic device back in hand. On this page are published all the documents necessary for the use of your device. XR210 by Xtorm.
USER MANUAL XR210 Xtorm
natural_image
Line drawing of a portable electronic device with a square top and side panel, no text or symbols presentSPECIFICATIONS PRODUCT OVERVIEW1 2

25.600 mAh Li-ion / 92.16Wh

1x USB-C PD 60W
1x USB-C 18W
1x USB-A QC 3.0 18W

206x82x82 mm

1065 grams

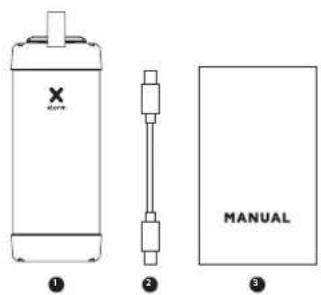
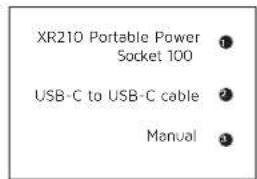
1x USB-C to USB-C cable 1x Manual
When using multiple outputs
When using 2 outputs
2/3 60W + 18W
3/4 18W + 18W
2/4 60W + 18W
When using all outputs

1/2 18W + 18W60W

Output
AC 100W/180W
Surge protection
Input/output
USB-C PD 60W
Output
USB-A QC 3.0 18W
Output
USB-C PD 18W
Digital power indicator
CHARGING YOUR DEVICE VIA AC3
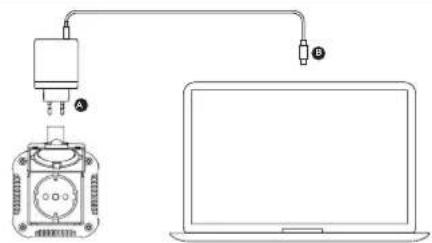

3A Connect an AC charger or power cable into the Power Bank's AC Socket and the other
end to the input of your device. The charging will start automatically.
3B Charging some devices requires a charging cable other than the one supplied.
E.g. an Apple Lightning * or a Micro USB or USB-C cable
CHARGING YOUR DEVICE VIA USB-C 4
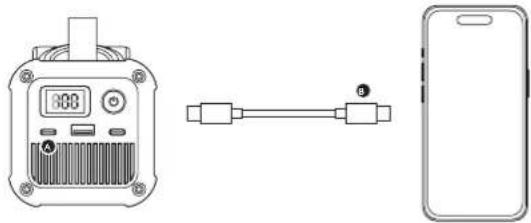
natural_image
Three technical illustrations: a digital device with indicator lights, a connected USB cable, and a smartphone (no text or symbols present)
4A Connect the USB-C end of the charging cable to the USB-C output of the Power Bank
and the other end to the input of your device. The charging will start automatically
4B Charging some devices requires a charging cable other than the one supplied.
E.g. an Apple Lightning or a Micro USB cable
RECHARGING THE POWER BANK5
MODIFIED SINE WAVE 6
Modified sine wave
5A Connect the USB-C end of the charging cable to a Wall Charger and the other end to output 2 of the Power Bank. The charging will start automatically. 5B For the fastest charging possible use a 60W charger. This will fully recharge the Power Bank within 2 hours.
6A Charge or power products that require 100W or less(!). Some products, such as those with an electric motor, cannot be powered by the XR210 - because the AC Output of the Power Bank has a modified sine wave.
DIGITAL POWER INDICATOR7
IN THE BOX 8
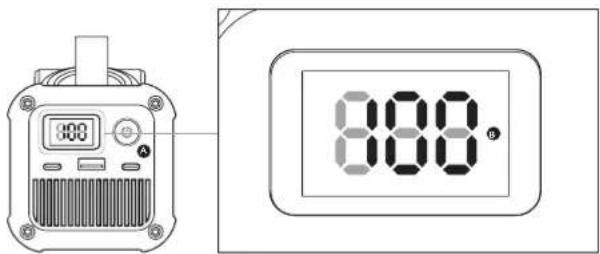
7A Press the Power Button once to display the battery level remaining in the Power Bank.
- Single press to turn on/off the display
- Double press to fully turn on/off the Power Bank
7B The display shows the remaining battery percentage between 0% (empty) and 100% (fully charged).
EN - ENGLISH
1 SPECIFICATIONS
2 PRODUCT OVERVIEW
3 CHARGING YOUR DEVICE VIA AC
3A Connect an AC charger or power cable Into the Power Bank's AC Socket and the other end to the input of your device. The charging will start automatically.
3B Charging some devices requires a charging cable other than the one supplied. E.g. an Apple Lightning ^® or a Micro USB or USB-C cable.
4 CHARGING YOUR DEVICE VIA USB-C
4A Connect the USB-C end of the charging cable to the USB-C output of the Power Bank and the other end to the input of your device. The charging will start automatically.
4B Charging some devices requires a charging cable other than the one supplied. E.g. an Apple Lightning ^® or a Micro USB cable.
5 RECHARGING THE POWER BANK
5.A Connect the USB-C end of the charging cable to a Wall Charger and the other end to output 2 of the Power Bank. The charging will start automatically.
5.B For the fastest charging possible use a 60W charger. This will fully recharge the Power Bank within 2 hours.
6 MODIFIED SINE WAVE
6.A Charge or power products that require 100W or less(!). Some products, such as those with an electric motor, cannot be powered by the XR210 - because the AC Output of the Power Bank has a modified sine wave.
7 DIGITAL POWER INDICATOR
7.A Press the Power Button once to display the battery level remaining in the Power Bank.
- Single press to turn on/off the display
- Double press to fully turn on/off the Power Bank
7.B The display shows the remaining battery percentage between 0% (empty) and 100% (fully charged).
8 IN THE BOX
NL - NEDERLANDS
1 SPECIFICATIES
2 PRODUCTOVERZICHT
3 JE APPARAAT OPLADEN VIA AC
4 JE APPARAAT OPLADEN VIA USB-C
7 DIGITALE STROOMINDICATOR
2 VUE D'ENSEMBLE DU PRODUIT
3 CHARGEMENT DE VOTRE APPAREIL VIA LE COURANT ALTERNATIF
- Dobbelt tryk for at taende/slukke Power Bank helt
4 INCĂRCAREA DISPOZITIVULUI DVS. PRIN USB-C
complet Power Bank in 2 ore.
6 UNDA SINUSOIDALĂ MODIFICATĂ
EN When recycling this product, please follow WEEE battery recycling procedures. Contact your local recycling organization for more information.
XTORM SAFETY CHECK WARNINGS


1. TEMPERATURE CONTROL
Provided with a temperature control chip that prevents overheating.

2. OVERLOAD PROTECTION
Protects both the internal battery as well as the battery of the attached device from overcharging.

3. SECURED POWER MANAGEMENT
Automatically picks the correct charging speed and efficiently devides power between attached devices.

4. SHORT CIRCUIT PROTECTION
Breaks the circuit automatically when an overcurrent is detected. This protects the Xtorm charger and your device from short circuit damage.

5. A-CLASS BATTERY CELLS
We only use the best battery cells that provide the fast charging you need and meet all safety requirements.

6. HIGH EFFICIENCY
Our power products are built to power your device as efficient as possible. This ensures the least possible loss of energy during the charging process.
EN Warnings
Don't crop, dissemble or attempt to repair the charger by yourself. Avoid exposure to water or high humidity. Don't expose to any heat source. Keep out of reach of children. Don't use in the presence of flammibia gas. The warranty will lose in the event of limproper use. Telco Accessories has tested the product in a test environment. All statements/declarations made by Telco Accessories about the operation of the product are based on the results obtained from such tests. These results/statements/declarations cannot be guaranteed, for example in cases of deviating or injudicious use and/or use in a different environment.
NL Waarschuwingen
The image is too blurry to recognize any text content.
BG Предупреждения
EU DECLARATION OF CONFORMITY


- SPECIFICATIONS PRODUCT OVERVIEW1 2
- When using multiple outputs
- CHARGING YOUR DEVICE VIA AC3
- CHARGING YOUR DEVICE VIA USB-C 4
- RECHARGING THE POWER BANK5
- MODIFIED SINE WAVE 6
- DIGITAL POWER INDICATOR7
- IN THE BOX 8
- EN - ENGLISH
- SPECIFICATIONS
- PRODUCT OVERVIEW
- CHARGING YOUR DEVICE VIA AC
- CHARGING YOUR DEVICE VIA USB-C
- RECHARGING THE POWER BANK
- MODIFIED SINE WAVE
- DIGITAL POWER INDICATOR
- IN THE BOX
- NL - NEDERLANDS
- SPECIFICATIES
- PRODUCTOVERZICHT
- JE APPARAAT OPLADEN VIA AC
- JE APPARAAT OPLADEN VIA USB-C
- DIGITALE STROOMINDICATOR
- VUE D'ENSEMBLE DU PRODUIT
- CHARGEMENT DE VOTRE APPAREIL VIA LE COURANT ALTERNATIF
- INCĂRCAREA DISPOZITIVULUI DVS. PRIN USB-C
- UNDA SINUSOIDALĂ MODIFICATĂ
- XTORM SAFETY CHECK WARNINGS
- TEMPERATURE CONTROL
- OVERLOAD PROTECTION
- SECURED POWER MANAGEMENT
- SHORT CIRCUIT PROTECTION
- A-CLASS BATTERY CELLS
- HIGH EFFICIENCY
- EN Warnings
- NL Waarschuwingen
- The image is too blurry to recognize any text content.
- BG Предупреждения
Brand : Xtorm
Model : XR210
Category : Power bank