K200 - Musical instrument LEXIBOOK - Free user manual and instructions
Find the device manual for free K200 LEXIBOOK in PDF.

| Product Type | Acoustic classical guitar |
| Brand | Lexibook |
| Model | K200 |
| Number of Strings | 6 nylon strings |
| Number of Frets | 12 frets |
| Included Accessories | 1 guitar, 1 instruction manual |
| Recommended Age | From 3 years (warning small parts) |
| Safety | Not suitable for children under 3 years. Choking hazard. |
| Warranty | 2 years (material or assembly defects) |
| Maintenance | Wipe with a dust cloth. Clean plastic parts with care. |
| Country of Manufacture | China |
Frequently Asked Questions - K200 LEXIBOOK
User questions about K200 LEXIBOOK
0 question about this device. Answer the ones you know or ask your own.
Ask a new question about this device
Download the instructions for your Musical instrument in PDF format for free! Find your manual K200 - LEXIBOOK and take your electronic device back in hand. On this page are published all the documents necessary for the use of your device. K200 by LEXIBOOK.
USER MANUAL K200 LEXIBOOK
natural_image
Color palette bar with grayscale gradient from black to white (no text or symbols)LEXIBOOK®
natural_image
Illustration of a acoustic guitar with visible strings and fretboard (no text or symbols)K200serieswww.lexil
W105 x H148 mm
Découvre ta guitare
natural_image
Line drawing of a person playing guitar on a stool (no text or symbols)
natural_image
Line drawing of a person playing an acoustic guitar (no text or symbols)Où poser tes mains
natural_image
Illustration of a hand pressing down on an acoustic guitar fretboard (no text or symbols)Discovering your guitar
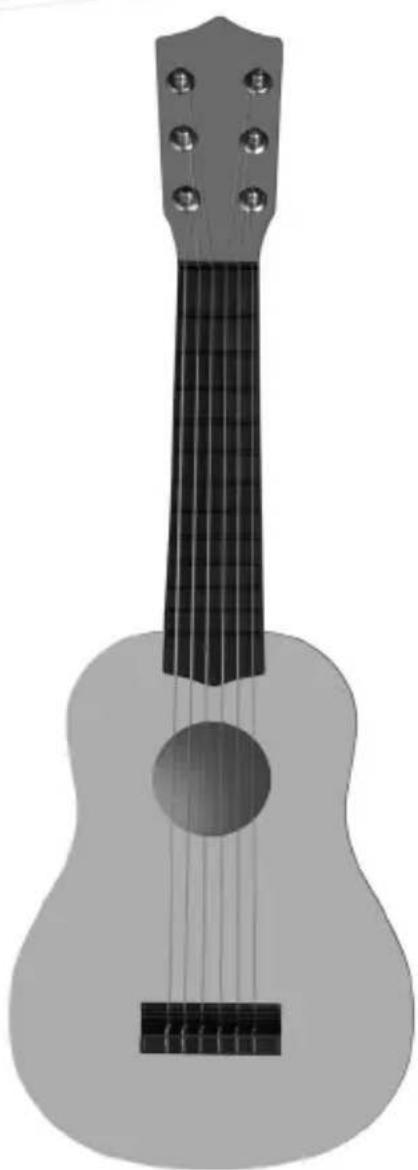
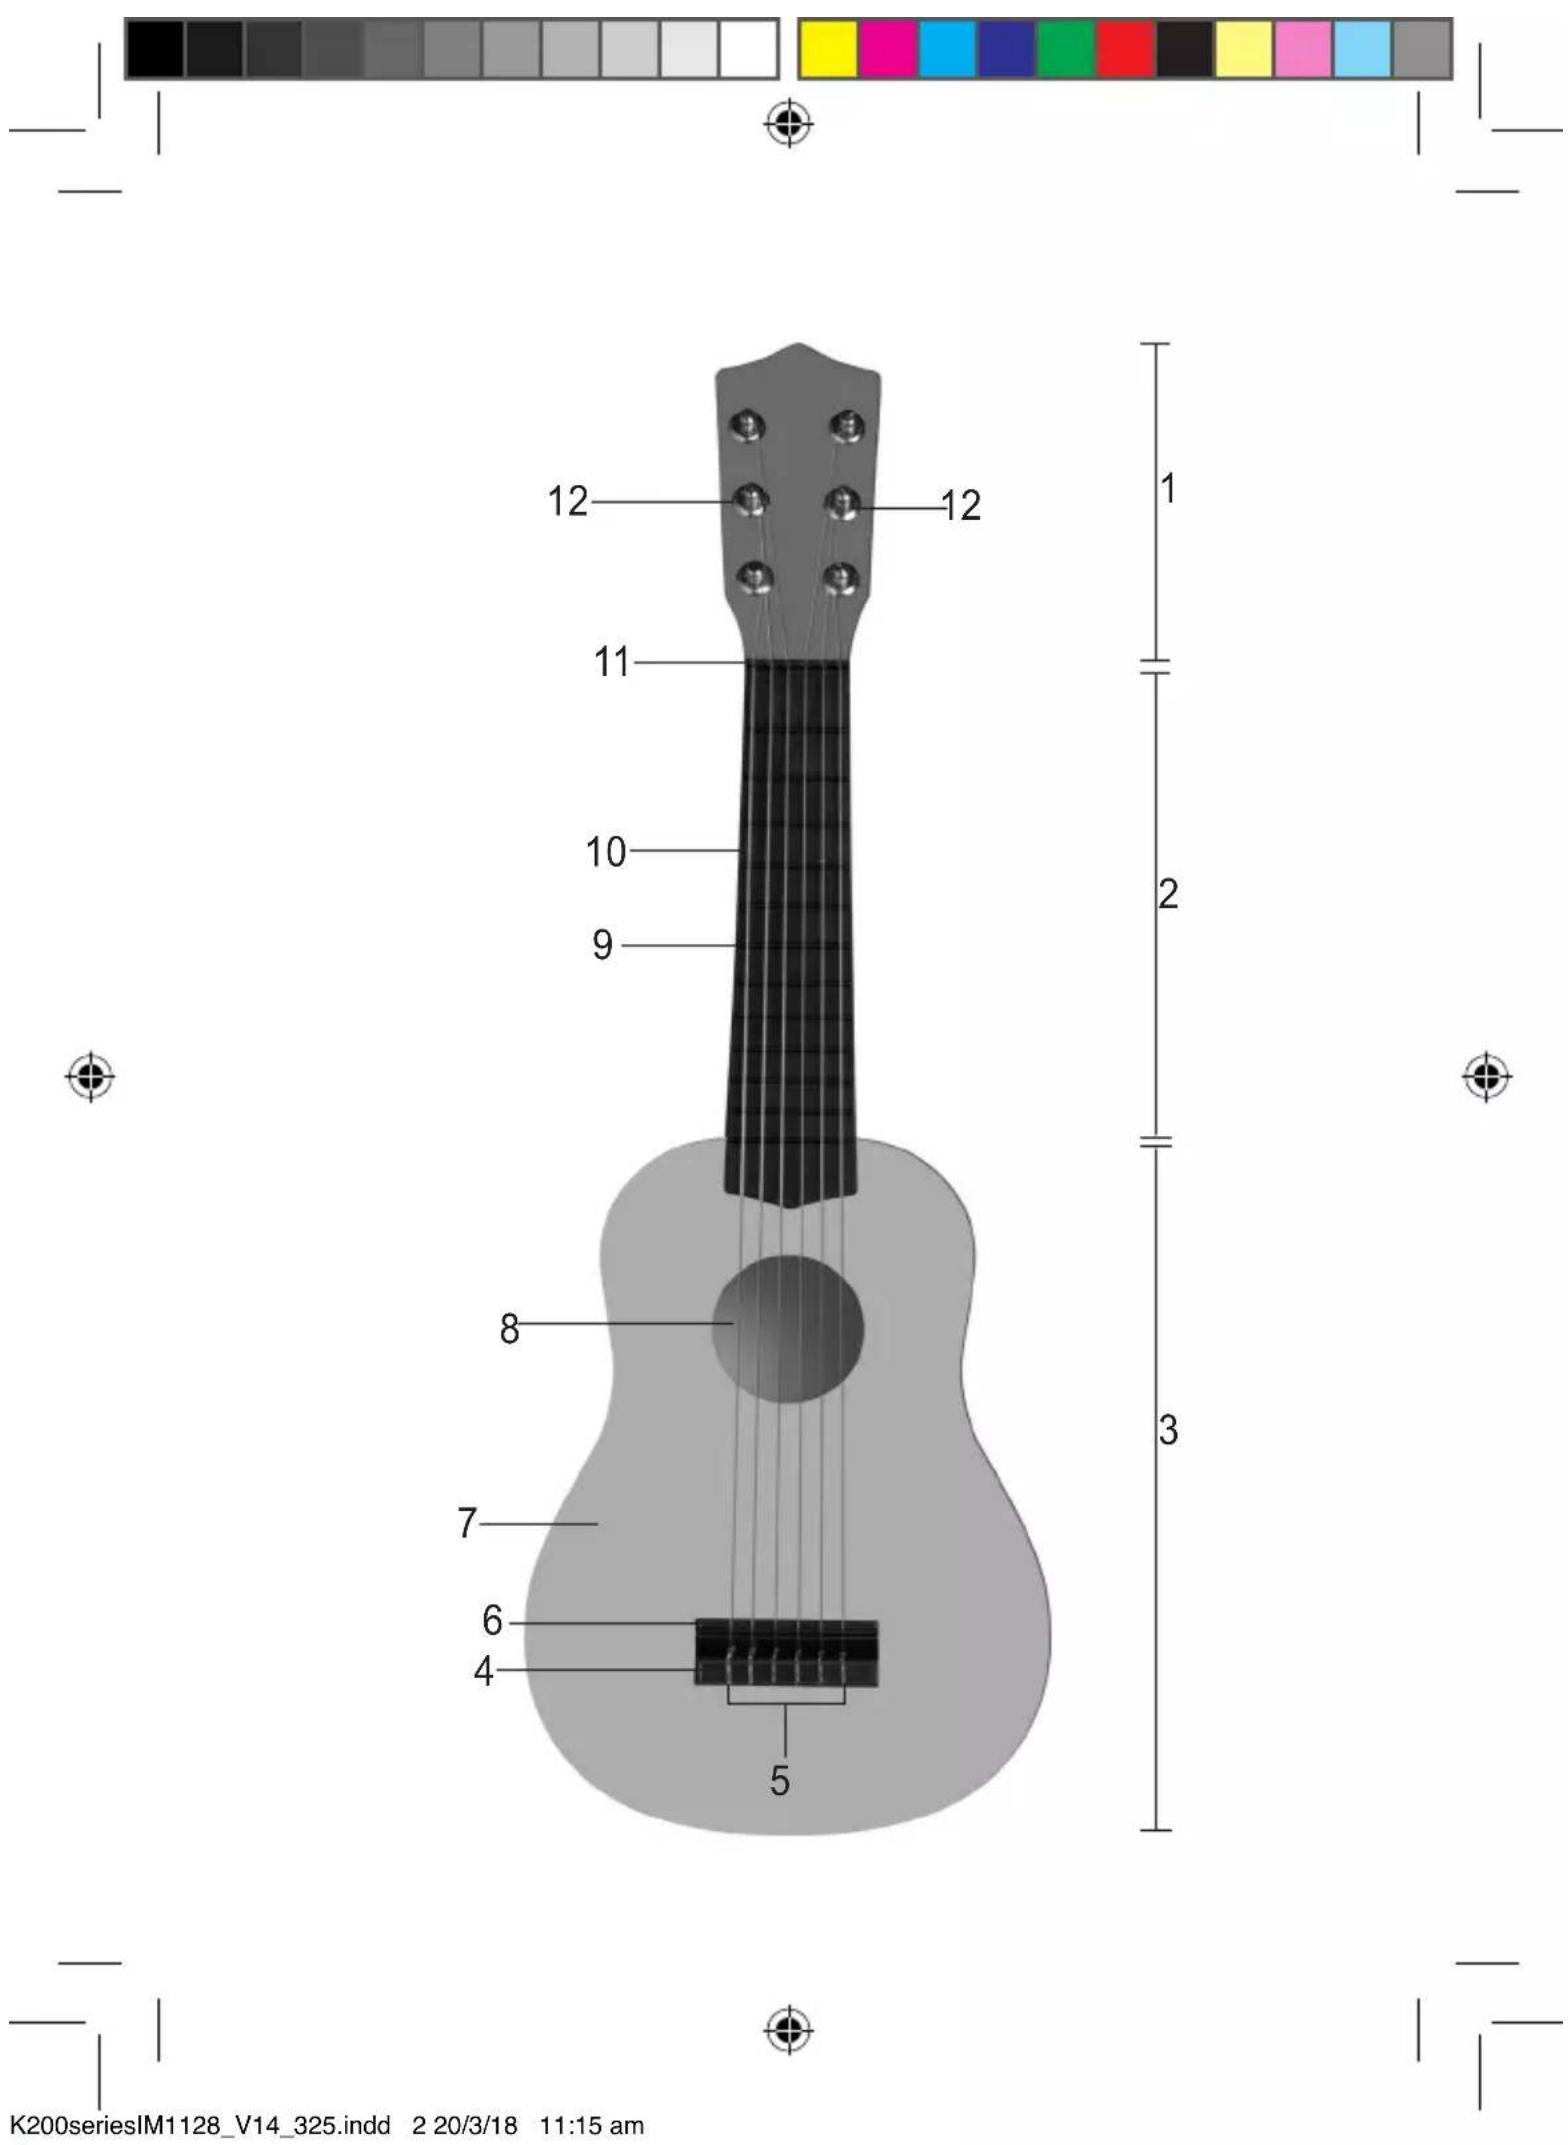
Discover your new guitar and become familiar with the different parts of your instrument by studying the diagram on the first page of the booklet.
- Headstock 5. Strings (x6) 9. Frets (x12)
- Neck 6. Saddle 10. Fingerboard/Fretboard
- Body 7. Soundboard/Top 11. Nut
- Bridge 8. Soundhole 12. Tuning machines/Keys (x6)
Your guitar has six strings (nylon): three left strings for playing lower notes and three right strings for playing higher notes.
When unpacking, ensure that the following elements are included:
1 x Guitar / 1 x Instruction manual
WARNING: All packaging materials, such as tape, plastic sheets, wire ties and tags are not part of this product and should be discarded for your child's safety.
Tuning your guitar
Before you start playing, it is recommended that you properly tune your guitar to avoid playing any wrong notes! To do this, use the tuning keys located at the top of the neck.
Each key is attached to a string. When you turn the key clockwise, the string will produce a lower tone, and if you turn the key in the opposite direction, the string will produce a higher tone.
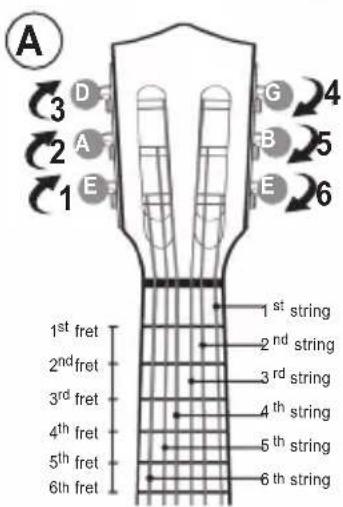
Your guitar is properly tuned when all the strings, played in an open position (without applying your fingers on the frets), produce the notes indicated on diagram A.
Warning: Be careful when turning the keys counter clockwise. If you turn them too much, the strings may become too tight and break.
Start from the 6th string (thickest and lowest in tone) and continue until the 1st string (thinnest and highest in tone) is tuned. Follow the order of the numbers presented in the diagram opposite. If you start in the opposite direction, your guitar may have a greater tendency to go out of tune as you play.
There are several methods for tuning a guitar. The easiest one consists in using an electronic tuner. It will definitely simplify the tuning of your guitar. If you don't have one, you can use the methods described below.
a) Using a piano
Play middle E/Mi on the piano (middle E/Mi is the 12th white key, counting from the left end of the standard piano keyboard, which is composed of 88 keys). Adjust the 6th string (E/Mi) cord up until it sounds the same. Refer to the diagram shown to tune the remaining five strings in the same way.

7

ENGLISH
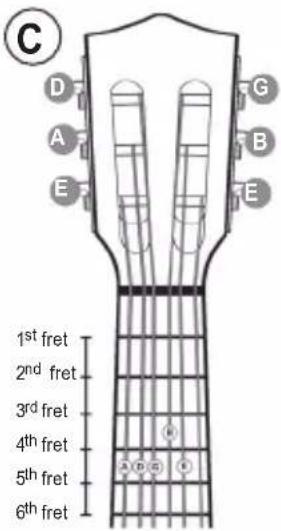
b) Tuning by ear (with one reference string) (see diagram C)
First tune the 5 ^th string (A/La) of your guitar using:
- a piano: adjust the string up until it sounds the same as the 15^th white key of the standard piano keyboard;
- a tuning fork (A/La 440Hz): adjust the string up until its tone is the same as the tuning fork, but 2 octaves lower.
Playing the 5th string open, put and keep your finger between the 4^th and the 5^th fret on the 6^th string, and adjust the string up until it sounds the same as the 5^th string (A/La);
- Press on the 5th fret of the 6th string. Adjust the string's tuning key until it sounds like the 5th string (La/A). See fig. A.
- Press on the 5th fret of the 5th string. Adjust the string's tuning key until it sounds like the 4th string (Re/D). See fig. D.
- Press on the 5th fret of the 4th string. Adjust the string's tuning key until it sounds like the 3rd string (Sol/G). See fig. G.
- Press on the 4th fret of the 3rd string. Adjust the string's tuning key until it sounds like the 2nd string (Si/B). See fig. B.
- Press on the 5th fret of the 2nd string. Adjust the string's tuning key until it sounds like the 1st string (Mi/E). See fig. E.
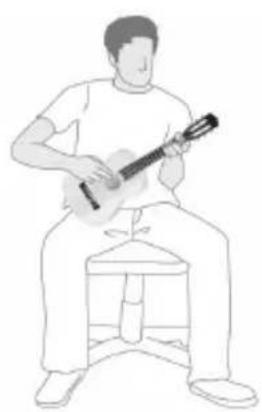
Holding your guitar
In general, for both right- and left-handers, the guitar is held in the following manner: left hand on the neck and right hand on the body. It is possible to hold your guitar left-handedly (right hand on the neck and left hand on the box), but you will have to change the bridge saddle in order to reverse the strings. In both cases, hold the instrument by your strumming arm with the back of the guitar against your body.
There are many ways to hold your guitar. The most important thing is that you feel comfortable.

① You may, for example, sit down and balance the guitar on your lap.
② You may also choose to play standing up with the guitar chest high.
natural_image
Line drawing of a person playing guitar on a stool (no text or symbols)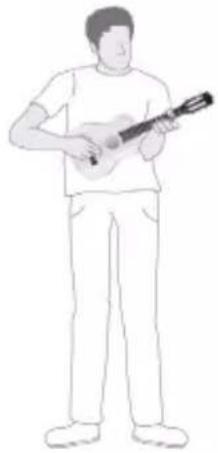
natural_image
Line drawing of a person playing an acoustic guitar (no text or symbols)
Where to put your hands
When playing guitar, you must put one hand on the neck and other on the body.
Your left hand
The fingers of your left hand are used to press down on the strings and to select notes. It is therefore important to properly position your left hand in order to have enough strength in your fingers.
Place your thumb flat under the neck, and then curve the other fingers over the front of the neck. Make a hollow in your hand so that your fingers are placed over top of the strings like a claw. You can now press harder on the strings using your fingertips.
When you start playing, your fingers will not be used to pressing hard on the strings, and it is possible that calluses will form on your fingertips. Do not worry, this is normal! Keep your nails short so they are not in the way when you play.
To be able to easily move your hand along the neck, maintain a slight distance between your elbow and the guitar body.

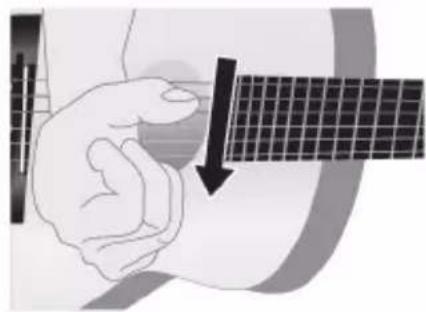
Your right hand
Place your right hand on the strings over the soundhole (8). Use your right hand to strum.
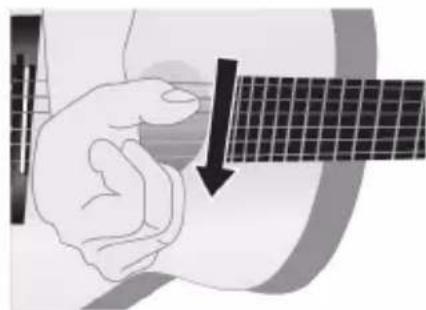
How to strum the strings
With a flick of the wrist, quickly run your right hand over the strings. Each strum corresponds to one beat.
natural_image
Illustration of a hand pressing down on an acoustic guitar fretboard (no text or symbols)Strum the strings using your thumb or the nail (reverse) of your index finger. Strum from the 6th string (the thickest / top string) to the 1st string (the thinnest / highest string).
ENGLISH
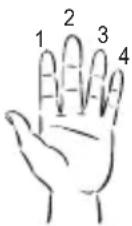
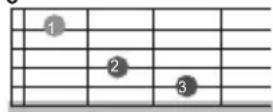
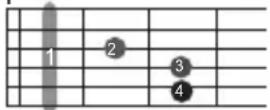
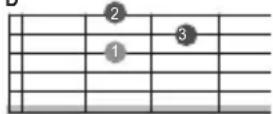
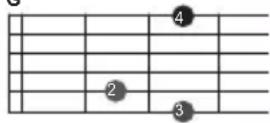
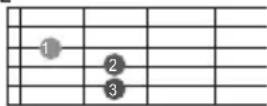
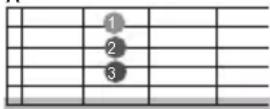
A few basic chords
Practice playing a few basic chords. The diagrams below represent your guitar neck. The lower horizontal lines correspond to the lower strings (thick strings) and those above to the higher strings (thin strings). The vertical lines are the frets. Each finger is assigned a number. Use the fingers of your left hand to press the strings by taking into account the numbers that correspond to those associated with your fingers. You can then play the notes on the different frets of the strings.
Notes:
- The vertical line represents the index finger which, instead of pressing the string with only the fingertip, presses down on all the strings using the entire length of the finger. The horizontal line corresponds to a string that is not played.
- For improved playing and better application of pressure on the strings, keep the nails on your left hand well trimmed.
C
F
B
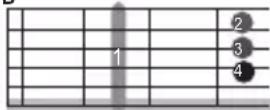
D
G
E
A
Maintenance and warranty
The finish on your unit may be cleaned with a dust cloth and cared for as other furniture.
Note: Please keep this instruction manual, it contains important information.
This product is covered by our 2-year warranty.
For any claim under the warranty or after sale service, please contact your distributor and present a valid proof of purchase. Our warranty covers any manufacturing material and workmanship defect, with the exception of any deterioration arising from the non-observance of the instruction manual or from any careless action implemented on this item (such as dismantling, exposition to heat and humidity, etc.). It is recommended to keep the packaging for any further reference. In a bid to keep improving our services, we could implement modification on the colours and the details of the product shown on the packaging.
WARNING! Not suitable for children under 3 years. Choking Hazard – Small parts.
Reference: K200series
Designed and developed in Europe – Made in China
©LEXIBOOK®
United Kingdom & Ireland
For after-sales service, please contact us at
customerservice@support.lexibook.com or +33 1 84 88 58 59.
www.lexibook.com
CE
natural_image
Line drawing of a person playing guitar on a stool (no text or symbols)natural_image
Line drawing of a person playing an acoustic guitar (no text or symbols)
natural_image
Illustration of a hand pressing down on a guitar fretboard with a downward arrow indicating compression (no text or symbols)natural_image
Line drawing of a person playing guitar on a stool (no text or symbols)natural_image
Line drawing of a person playing an acoustic guitar (no text or symbols)
natural_image
Illustration of a hand pressing down on an acoustic guitar fretboard (no text or symbols)natural_image
Line drawing of a person playing an acoustic guitar on a stool (no text or symbols)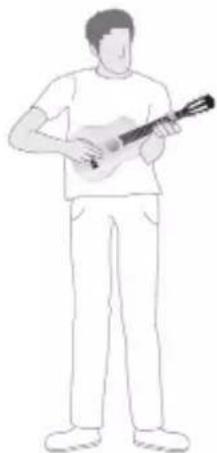
natural_image
Line drawing of a person playing an acoustic guitar (no text or symbols)
Como arranhar as cordas
natural_image
Illustration of a hand pressing down on an acoustic guitar fretboard (no text or symbols)natural_image
Line drawing of a person playing guitar on a stool (no text or symbols)natural_image
Line drawing of a person playing an acoustic guitar (no text or symbols)
Dove tenere le mani
natural_image
Illustration of a hand pressing down on an acoustic guitar fretboard (no text or symbols)natural_image
Line drawing of a person playing guitar on a stool (no text or symbols)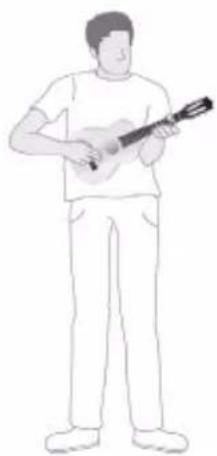
natural_image
Line drawing of a person playing an acoustic guitar (no text or symbols)
natural_image
Line drawing of a person playing guitar on a stool (no text or symbols)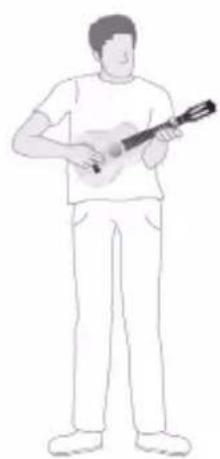
natural_image
Line drawing of a person playing an acoustic guitar (no text or symbols)POLISH

Układ rąk
natural_image
Illustration of a hand pressing down on an acoustic guitar fretboard (no text or symbols)natural_image
Line drawing of a person playing guitar on a stool (no text or symbols)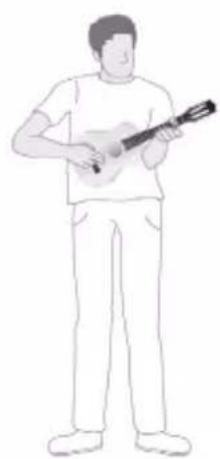
natural_image
Line drawing of a person playing an acoustic guitar (no text or symbols)SLOVENIAN
Kam položiti roke
natural_image
Illustration of a hand holding an acoustic guitar (no text or symbols visible)natural_image
Close-up of a hand forming a guitar chord on the fretboard (no text or symbols visible)Vaša desna roka
Desno roko položite na strune preko zvočnice (8). Brenkajte z desno roko.
Kako brenkati na strune
Z migom zapestja hitro pomikajte svojo desno roko čez strune. Vsak brenk ustreza enemu taktu.
natural_image
Illustration of a hand pressing down on an acoustic guitar fretboard (no text or symbols)IM code: K200seriesIM1128