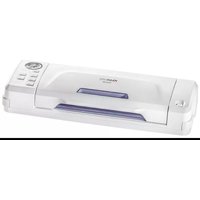
USER MANUAL P0116ED Magic Vac
natural_image
Line drawing of a portable air conditioner unit with control panel and buttons (no text or symbols)
ISTRUZIONI D'USO
GB OPERATING MANUAL
F INSTRUCTIONS SUR LE FONCTIONNEMENT
D BETRIEBSANLEITUNG
E INSTRUCCIONES DE USO
P INSTRUÇÕES DE USO
natural_image
Illustration of a printer printing a document with hands, showing mechanical components and a magnified view (no text or symbols)
natural_image
Anatomical illustration of a human brain inside a tissue structure, held by a hand (no text or labels)
natural_image
Illustration of a hand pouring liquid into a jar with an arrow indicating rotation (no text or symbols)
MAGIC VAC® Mod. P0116ED
MACCHINA PROFESSIONALE PER IL SOTTOVUOTO
LOCALIZZAZIONE DEI GUASTI
We are pleased with your purchase and thank you for your confidence in us.
Please read these instructions carefully so that you can correctly use the MAGIC VAC ^®
and achieve the best storage results. We also suggest that you keep this manual for future reference.
TABLE OF CONTENTS
CLEANING AND USE INSTRUCTIONS
| Mod. P0116ED MACHINE PART NAMES | Page 12 |
| DESCRIPTION OF CONTROLS AND FUNCTIONS Page 12 | |
| IMPORTANT INFORMATION Page 13-14 | |
| USE INSTRUCTIONS | Pages 15-18 |
| 1 - Positioning the machine Page 15 | |
| 2 - Connecting the machine Page 15 | |
| 3 - Setting the sealing mode Page 15 | |
| 4 - Cancel Button Page 15 | |
| 5 - Recommendations for bag use Page 15 | |
| 6 - Making bags from MAGIC VAC ^ rolls | Pages 15 |
| 7 - Automatic bag cycle (pre-cut or see point 5) | Pages 16 |
| 8 - Manual cycle for vacuum packing in bags | Pages 16 |
| 9- Automatic canister cycle | Page 16 |
| 9.1 - Packing in MAGIC VAC ^ ExecutiveCanisters or with Universal MAGIC VAC ^ Lids | Page 16 |
| 9.2 - Packing in MAGIC VAC ^ Family canisters | Page 17 |
| 9.3 - Packing in glass jars | Page 17 |
| 9.4 - Packing with MAGIC VAC ^ Bottle Capper | Page 17-18 |
| CLEANING INSTRUCTIONS | Page 18 |
| TROUBLESHOOTING | Page 19 |
| TECHNICAL CHARACTERISTICS | Page 20 |
AVAILABLE MAGIC VAC® ACCESSORIES
Pages 63-64
Mod. P0116ED MACHINE PART NAMES
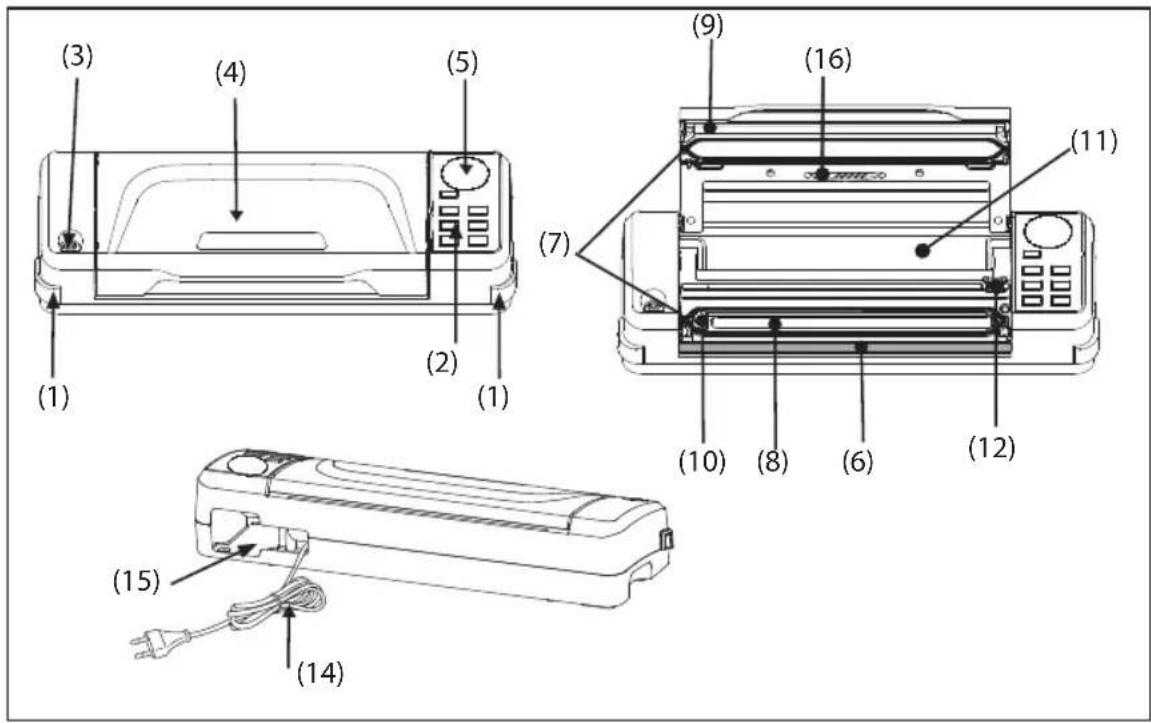
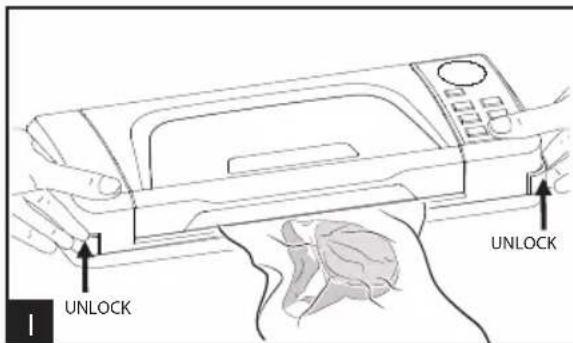
(1) Engage/release buttons - Lateral engage buttons that allow the bag insertion area to be locked and unlocked, allowing the packaging cycle to be carried out automatically and allowing the operator to carry out other activities. In the closed position, they lock the lid while starting the vacuum cycle in the bags, jars and containers.
(2) Control panel - To set the various functions of the machine (see paragraph: DESCRIPTION OF CONTROLS AND FUNCTIONS).
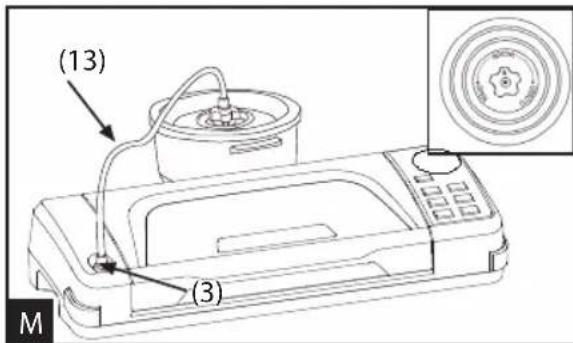
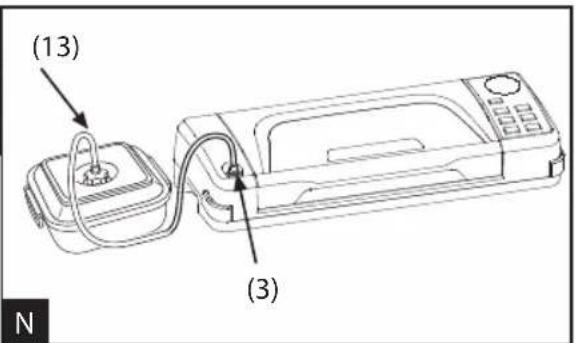
(3) Air intake for the Tube (ACCESSORY PORT) - To insert the Tube to perform vacuum packing in all canisters and with all MAGIC VAC ^c accessories.
(4) Cover - Open in the upper fixed position, it allows for bags to be positioned before proceeding with packing.
(5) Vacuum gauge (if provided)- Mechanically-operated analogue instrument indicating the vacuum value obtained.
(6) Sealing bar - Heating element which seals the bag.
(7) Airtight gasket - Guarantees the vacuum in the chamber allowing for air to be evacuated from the bags MAGIC VAC ^4 .
(8) Vacuum chamber - Is the location for positioning the bag and evacuating the air.
(9) Sealing gasket - Presses the bag on the Sealing Bar.
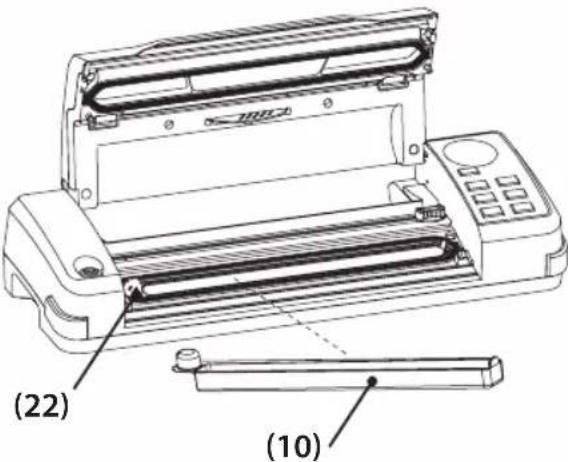
(10) Removable Tray - Solution that allows the Vacuum Chamber to be washed in the dishwasher for maximum hygiene.
(11) Roll-Holder Compartment
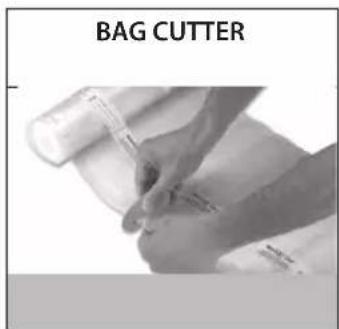
(12) Bag Cutter - Can be used in both directions.
(13) Canister Tube - This connects the machine to all of the MAGIC VAC® accessories.
(14) Power Cable - To connect the machine to power.
(15) Cable Compartment - Compartment for storing the Power Cable, located on the back of the machine.
(16) Accessory Compartment - Compartment for storing the Magic Cutter (where applicable) and the Canister Connection Tube, located on the lower part of the machine.
DESCRIPTION OF CONTROLS AND FUNCTION
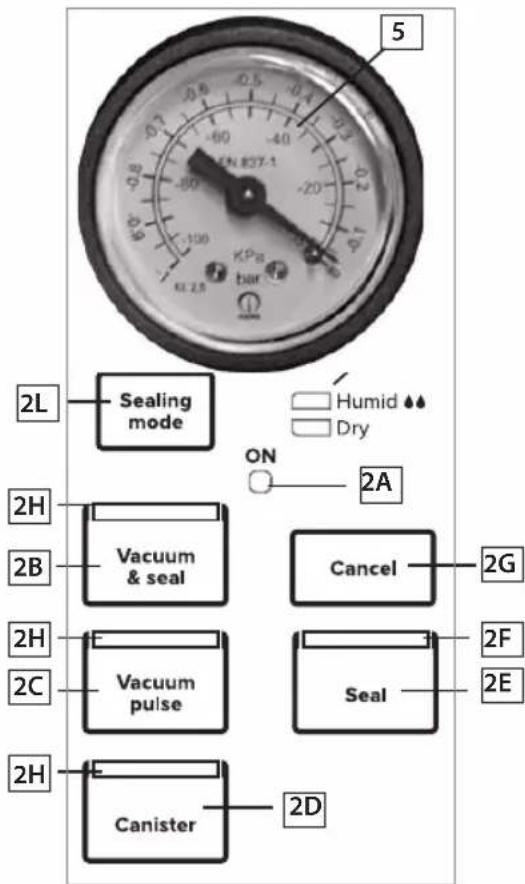
(2A) ON LED - When GREEN, it is activated with the Engage buttons (1) engaged.
(2B) Auto Vacuum & Seal Button - Start button for the automatic bag packing cycle, including final sealing.
(2C) Pulse button - Button to start the manual cycle; the machine continues extracting air until the button is released.
(2D) Canister Button - Start button for the automatic cycle for canisters and MAGIC VAC ^® accessories.
(2E) Seal Button - Start button for manual Sealing.
(2F) SEAL LED - Flashing RED when Sealing.
(2G) CANCEL Button - Stops the machine at any time.
2H) LED - When steady BLUE in the Vaccum & Seal, Vacuum Pulse and Canister operating mode.
(2I) Sealing Mode RED LEDs - indicate the sealing mode selected.
(2L) Sealing Mode Button - Selects from the 2 sealing modes.
(5) Vacuum gauge (if provided)- It indicates the vacuum value obtained
The manufacturer makes every effort to ensure that all of their products are of the highest quality and safety, however, as with any electric appliance, fundamental safety regulations must be observed in order to avoid hazards to people, animal and/or things.
- This appliance can be used by children aged from 8 years and above and persons with reduced physical, sensory or mental capabilities or lack of experience and knowledge if they have been given supervision or instruction concerning use of the appliance in a safe way and understand the hazards involved. Children shall not play with the appliance. Cleaning and user maintenance shall not be made by children without supervision.
- Carefully read the instructions before using your MAGIC VAC and keep it handy for future reference.
- The appliance is not designed for continuous operation. Do not carry out more than one complete cycle every 2 minutes. The operating cycle is 50 seconds approx and after then there's the break until 2 minutes. In extreme ambient conditions, an intensive use of the appliance may trigger the automatic thermal protection devices. In such a case allow the appliance to cool down sufficiently to enable resetting of the protection devices.
- Do not use the device near or on hot surfaces.
- The appliance cover is not protected against liquid penetration.
- Do not draw liquids into the vacuum chamber. Should this happen, immediately dry the vacuum chamber.
- Do not submerge the appliance in water and do not use it if the cable or plug is wet; if this should happen during use, immediately unplug it wearing dry rubber gloves. Do not remove or touch the appliance that is submerged in water before unplugging it. Do not use it after having removed it from the water (send it immediately to an authorized repair centre or our authorized dealer).
- Do not touch the sealing bar during use or at the end of the cycle in order to prevent possible burns.
-
Do not use knives or other sharp utensils to remove any residue from the sealing bar; always wait for it to cool off before cleaning it with a sponge dampened with gentle detergent.
-
Never use power adapters other than those reported on the device (see information label).
• Always unplug after use.
- Do not open or tamper with the device. Repairs must only be performed by authorized personnel. Unauthorized repairs will void the warranty.
- The Manufacturer, Retailer and Importer shall be deemed responsible for the safety, reliability and performance only if: a) the device is used in compliance with the use instructions; b) the electrical system in the area where the device is used is in compliance with current laws.
- The use of MAGIC VAC® original bags is highly recommended. If other types of vacuum bags are used to carry out multiple vacuum packaging operations, the plain side of the film should be laid face down onto the sealing bar.
- No lids or use containers that have cracks or is damaged!
This text is for users in countries except European countries:
- This appliance is not intended for use by persons (including children) with reduced physical, sensory or mental capabilities, or lack of experience and knowledge, unless they have been given supervision or instruction concerning use of the appliance by a person responsible for their safety.
- Children should be supervised to ensure that they do not play with the appliance.
Only use original MAGIC VAC ^® bags and accessories.
USE INSTRUCTIONS
Warning: When the machine is not used, keep the engage buttons (1) released in order not to deform the Sealing Gaskets (7) of the vacuum.
Before each use, carefully clean your machine and accessories that come in contact with food (canisters, lids, jars, etc....) following the instructions provided in paragraph "CLEANING INSTRUCTIONS".
1 - Positioning the machine
Position the machine in a dry place on a horizontal surface, being careful to leave the work zone around the machine itself free of obstacles and wide enough to allow for placing the bags of food to be packaged.
2 - Connecting the machine
Connect the power cable to an electrical outlet corresponding with its voltage (see the information label). Check that the connection is correct by pressing the Cover (4) with your hands; the GREEN LED ON (2A) and the RED LED (2I) of the "Humid ♦♠" or "Dry" sealing mode will light up
3 - Setting the sealing mode
The final bag sealing result can be influenced by the type of food to be packed or the temperature of the room.
Thus, to optimise the final result you can choose form 2 sealing modes:
- "dry" for dry foods like cookies, rice and coffee.
- "humid ♠♦" for red meats, which have liquids or blood, and fish.
When the machine is switched on, the sealing option will always be set to the previously selected mode. To set the sealing mode, before starting the packing cycle, press the "sealing mode" button (2L) to select the mode desired.
Stop the machine at any time by pressing the "cancel" (2G) button; all the blue LEDs will light up flashing; to reactivate the machine, release the Cover (4) by pressing the Engage buttons (1) and then close the Cover again.
5 - Recommendations for bag use
MAGIC VAC ^® bags are available in various sizes. Check the ideal bag size for the food that you intend to store. Make sure the length of the bag to be used is at least 8 cm greater than the food to be stored and add another 2 cm for each time the bag is to be reused.
6 - Making bags from MAGIC VAC ^® rolls
a) Open the machine.
b) Unroll the correct length from the roll (fig. A) and cut the piece using the Bag Cutter (12), as shown in (fig. B), by running it from one side to the other.
Now you can seal one open side of the piece by following these steps:
c) set one of the two open ends of the bag on the Sealing Bar (6) (fig. C).
Attention: do not let the bag protrude into the Vacuum Chamber (8) or on the Airtight Gasket (7), but set the end on the external part of the Airtight Gasket (7) as indicated in figure C1.
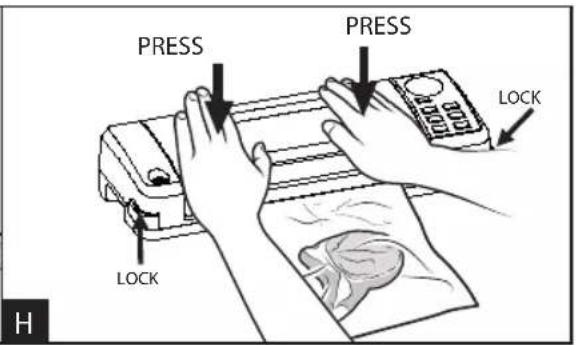
d) Close the Cover (4) and press it with your hands to engage the Engage buttons (1) (Fig. D)
e) Seal one open side of the piece by pressing the "seal" button (2E).
f) Release the Cover (4) by pressing the Engage buttons (1) (Fig.E) and remove the bag.
g) Check the seal obtained, which should look like a regular horizontal line, smooth and without wrinkles (fig. F).
7 - Automatic cycle for pre-cut MAGIC VAC ^® bags or those made from the roll
To perform the automatic packing cycling in MAGIC VAC Bags, proceed as follows:
a) Insert the food in the MAGIC VAC ^® Bag (see point 5), and eliminate any liquids or food residues from the inside of the end of the bag that must be sealed.
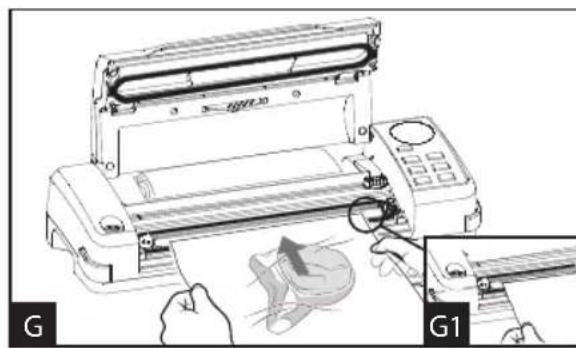
b) Lay the bag with its contents in front of the machine, placing the open end inside the Vacuum Chamber (8) (fig. G and G1).
c) Close the Cover (4) and press it with your hands to engage the Engage buttons (1) (Fig. H); select the "humid ♦♦" or "dry" sealing mode and start the automatic cycle by pressing the "vacuum & seal" button (2B). If you want to seal the bag before the automatic completion of the cycle, press the "seal" button (2E).
d) Wait for the LED seal light (2F) to stop flashing.
e) Release the Cover (4) by pressing the Engage buttons (1) (Fig.E) and remove the bag.
f) Check the seal obtained which should look like a regular horizontal line, smooth and without wrinkles (fig. L1).
8 - Manual cycle for vacuum packing in bags
To limit air extraction so as not to crush delicate and fragile foods, or for maximum air extraction even for complex food such as an entire cleaned chicken, a slice of Emmenthal cheese or a fish, proceed as follows:
a) Insert the food in the MAGIC VAC ^® Bag (see point 5), and eliminate any liquids or food residues from the inside of the end of the bag that must be sealed.
b) Lay the bag with its contents in front of the machine, placing the open end inside the Vacuum Chamber (8) (fig. G).
c) Close the Cover (4) and press it with your hands to engage the Engage buttons (1) (Fig. H); select the "humid ♠♦" or "dry" sealing mode
d) Press and hold the "Pulse" button (2C) to start the manual vacuum cycle, release the button to interrupt it. Repeat this operation until you reach the desired vacuum, then activate sealing by pressing the "Seal" button (2E) to seal the bag.
f) Wait for the LED seal light (2B)
g) Release the Cover (4) by pressing the Engage buttons (1) (Fig. I) and remove the bag.
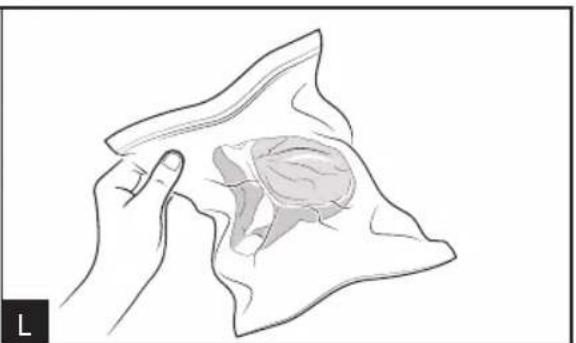
h) Check the seal obtained which should look like a regular horizontal line, smooth and without wrinkles (fig. L).
9 - Automatic cycle in MAGIC VAC ^® canisters
Use this cycle to perform vacuum packing in MAGIC VAC ^® Canisters, in canisters sealed with MAGIC VAC ^® Universal Lids, in bottles using the MAGIC VAC ^® Bottle Cap or in glass jars equipped with Lid and Ring using the MAGIC VAC ^® Lid Attachment.
ATTENTION: Only use MAGIC VAC* canisters since they are resistant to the vacuum created by the Mod. P0116ED, while other types of canisters could implode due to the vacuum created by the machine and cause injury.
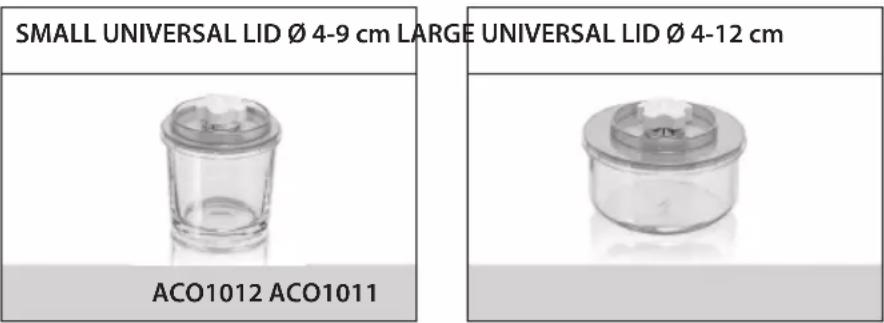
MAGIC VAC® Universal Lids, available in two diameters - 100 mm and 125 mm - are to be used with food storage jars, casseroles and tempered glass bowls. MAGIC VAC® Universal Lids work exactly like the MAGIC VAC® Executive Canister Lids.
ATTENTION: With MAGIC VAC ^® Universal Lids, do not use plastic or glass canisters that are not made for vacuum packing since they could implode due to the vacuum created by the machine and cause injury.
9.1- Packing in MAGIC VAC® Executive Canisters
To pack with MAGIC VAC ^® Executive Canisters or in canisters sealed with MAGIC VAC ^® Universal Lids, proceed as follows:
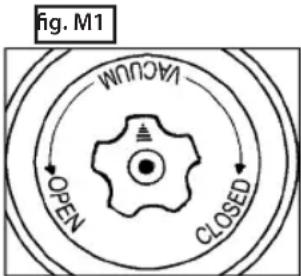
a) Refill the Canister leaving a space of at least 3 cm from the upper rim of the canister and place the lid on the canister. Turn the Knob on the lid to the "VACUUM" position (fig. M1).
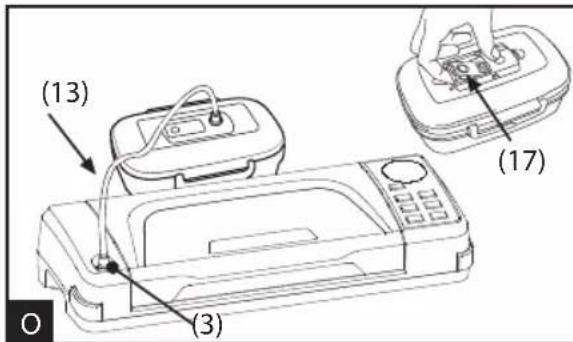
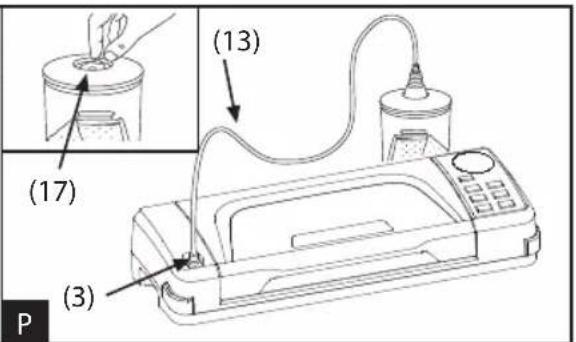
b) Using the Canister Tube (13), connect the knob on the lid of the Canister to the air intake ACCESSORY PORT (3) on the machine (fig. M).
Please Note: at the beginning of the vacuum phase you may need to press down on the lids of some types of canisters using your hand in order to hermetically seal them and make the cycle start easier.
c) Close the Cover (4) and press it with your hands to engage the Engage buttons (1) (Fig. H)
d) Press the "canister" button (2D); the machine will perform the vacuum cycle
automatically and will shut off when the operation is complete. In any event, the pump turns itself off automatically after about 5 minutes.
e) Detach the Canister Tube (13) from both the Canister Knob as well as the ACCESSORY PORT (3) on the machine.
f) Turn the Canister Lid knob to the "CLOSED" position.
To open the canisters, turn the Lid Knob to the "OPEN" position; you should hear the air whistle as it re-enters the canister. This sound is your guarantee that the contents were vacuum-packed.
9.2- Packing in MAGIC VAC® Family canisters
Multi-use canisters, ideal for storing products that are used frequently like dry and fragile foods; powdered foods; fruits and vegetables, fresh as well as blended or pureed; due to their transparency and design, they are attractive on kitchen shelves and guarantee excellent visibility of their contents.
- Fill the Canister leaving a space of at least 3 cm from the upper rim of the canister and place the lid on the canister.
- Using the Canister Tube (13), connect the canister lid to the air intake ACCESSORY PORT (4) on the machine (fig. O e P).
- Close the Cover (4) and press it with your hands to engage the Engage buttons (1) (Fig. H)
- Press the canister button (2D), the machine will perform the vacuum in the canister and will shut itself off once the operation is complete.
- Detach the Canister Tube (13) from the canister lid.
- To open the canisters, press the centre button (17) and open the valve (17) based on the model used (see canister instructions).
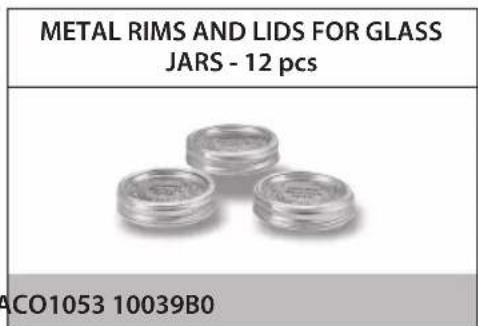
In order to perform the packing cycled in jars sealed with metal lids, you must use the MAGIC VAC® Lid Attachment (optional).
Proceed as follows:
a) Fill the jar leaving a space of at least 3 cm from the upper rim of the jar.
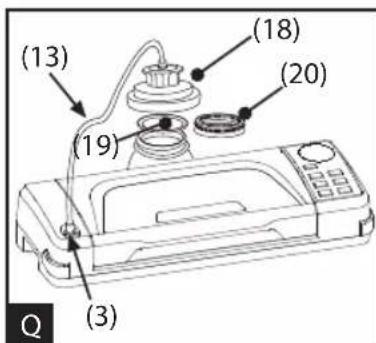
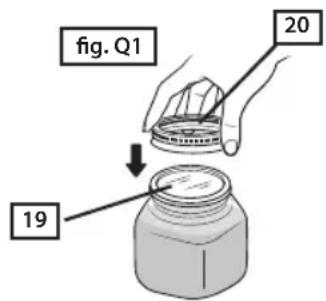
b) Using the Canister Tube(13), connect the Lid Attachment (18) (fig. Q) to the ACCESSORY PORT (3) on the machine. Place the Lid Attachment (18) (fig. Q), directly on the jar with only the Leifheit type Lid (19) and push it down, ensuring that it is correctly inserted.
c) Close the Cover (4) and press it with your hands to engage the Engage buttons (1) (Fig. H)
d) Press the Canister button (2D); the machine will perform the vacuum cycle automatically and will shut off when the operation is complete. In any event, the pump turns itself off automatically after about 5 minutes.
e) Detach the Tube from both the Lid Attachment and the ACCESSORY PORT (3) on the machine.
f) Apply and securely screw on the Ring (20) supplied with the Lid (19). (fig. Q1).
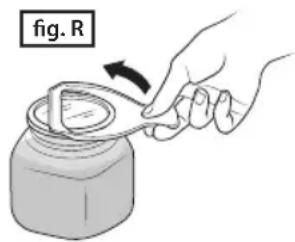
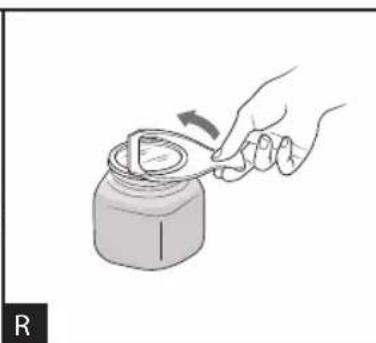
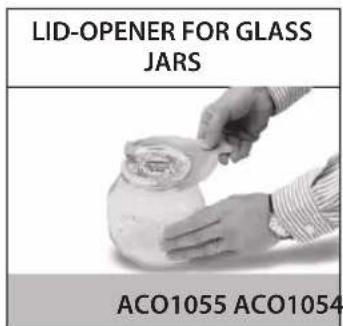
To open a vacuum-packed glass jar sealed with a metal lid, use the proper Lid Opener (ACO1055) with the written side up. After having unscrewed the Ring (20), place the Lid Opener as shown in figure R and delicately apply pressure without bending the Lid until the vacuum seal is released. Then remove the metal Lid. This accessory allows the Lid to be re-used.
9.4 - Packing with MAGIC VAC® bottle Capper
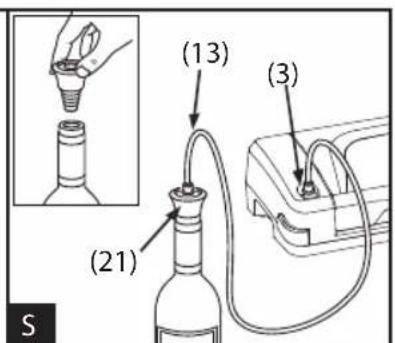
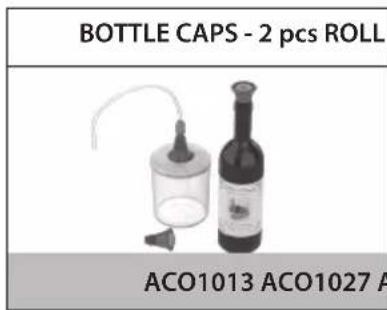
The MAGIC VAC ^* Bottle Capper (ACO1013) can be used for capping glass bottles, i.e. still wine or non-sparkling drinks. The Bottle Capper will let you vacuum-seal the bottle, maintaining quality and flavour for a longer period of time.
Proceed as follows:
a) Firmly push the Cap in the bottle.
b) Using the Canister Tube (13), connect the ACCESSORY PORT (3) on the machine with the MAGIC VAC Bottle Capper (21) (fig. S).
c) Close the Cover (4) and press it with your hands to engage the Engage buttons (1) (Fig. H)
d) Press the "canister" button (2D); the machine will perform the vacuum cycle automatically and will shut off when the operation is complete.
e) Detach the tube from both the Bottle Capper, as well as from the ACCESSORY PORT on the machine.
To open a bottle sealed with the MAGIC VAC® Bottle Capper, simple remove the cap from the bottle. You will hear the air entering the bottle
CLEANING INSTRUCTIONS
ATTENTION: Always unplug the cable from power before cleaning the MAGIC VAC.
- Clean hands thoroughly before proceeding with cleaning the machine and accessories.
- Both before and after use, clean the accessible surfaces of the machine with a sponge and neutral detergent or denatured alcohol or white vinegar diluted with water.
ATTENTION: Do not use aggressive detergents or solvents or products based on aromatic substances! In the event of accidental penetration of liquids inside the structure, do not plug the unit into power, do not use it and contact the nearest authorized service centre or your authorized dealer.
IMPORTANT: Avoid the use of pointed metal items (such as scissors, knives, awls or scrapers) to remove residues as they can ruin the surface.
- To clean MAGIC VAC ^® accessories (canisters, lids, jars, etc.), refer to the instructions included with the accessories themselves.
- Powdered food stop filter (22). Protects the pump from powdered foods which may enter (sugar, flour, ground coffee, etc.) and damage it, it is removable for easy cleaning and replacement. To remove the Filter (22), first remove the Removable Fluid tray (10). Before repositioning it in its seat, ensure that it is perfectly dry and free of impurities.
Washing the Removable Tray
The machine is equipped with a liquid-collecting Removable Tray (10) that is completely removable and washable, even in the upper dishwasher rack (fig. V2). Clean it like any other kitchen object and allow it to dry completely; then reinsert the tray into the vacuum chamber.
Remove the Removable Tray by opening the machine, grasping the Removable Tray and pulling it upwards.
TROUBLESHOOTING
| MAGIC VAC ^ does not work | ·Make sure the power cable on the MAGIC VAC ^ is fully inserted in the machine and in the electrical outlet. Check the electrical outlet by trying another device in the same outlet.·Make sure the power cable and/or plug is not defective. If so, do not use the machine. |
| MAGIC VAC ^ does not perform the first seal on the piece of cut roll. | ·Check that the piece of cut roll is correctly positioned as described in the paragraph: "5 - Making bags from MAGIC VAC ^ rolls". Check the position and integrity of the Sealing Gasket |
| MAGIC VAC ^ does not completely vacuum-pack the bags | ·In order to correctly seal the bags, the open end must be entirely inside the Vacuum Chamber (8).·Make sure the Sealing Bar(6), the Airtight Gasket (7) and Sealing Gasket (9) are not dirty.·The MAGIC VAC ^ bag may be punctured. To check, seal the bag with air inside, place it under water and squeeze. If you see bubbles, there is a leak. Reseal or use another bag. |
| MAGIC VAC ^ does not correctly seal the bag | ·When you can't completely seal the bag, press the "sealing mode" button (2L) and increase the sealing time.·If the Sealing Bar (6) overheats and melts the bag, lift the Cover (5) and allow the Sealing Bar (6) to cool for a few minutes.·Check the position and integrity of the Sealing Gasket (9)·If liquids escape during the vacuum-packing phase, remember that they must first be refrigerated. |
| The MAGIC VAC ^ bag doesn't maintain its vacuum after sealing | ·Leaks along the seal can be caused by wrinkles, crumbs, grease or liquids. Open the bag, clean the upper part of the inside of the bag and remove any residue from the Sealing Bar (6) before resealing.·Make sure the bag is not punctured and thus did not maintain the vacuum. Protect any pointed edges of the contents in the bag using paper napkins. |
| MAGIC VAC ^ does not seal containers. | ·Using the Canister Tube (13), connect the canister lid (or the Lid Attachment if necessary) and the ACCESSORY PORT (3) on the machine.·Leave adequate space (at least 3 cm) between the contents and the top of the jar or canister.·Make sure that the rim of the jar or canister and universal lid are not damaged in the sealing zone. Clean the rim and the lid with a damp cloth and reseal.·Make sure the gasket on the canister lid or universal lid is placed in the correct position and not damaged. |
| MAGIC VAC ^ Executive canisters or Universal MAGIC VAC ^ Lids do not maintain the seal | ·Make sure the knob on the canister lid is set to "VACUUM" before vacuum-packing and that it is set to "CLOSED" after it is complete.·Check that the O-Ring under the knob on the canister lid or universal lid is correctly positioned.·Makes sure that the rim of the jar or canister and universal lid are not damaged in the sealing zone. Clean the rim and the lid with a damp cloth and reseal.·Make sure the gasket on the canister lid or universal lid is placed in the correct position and not damaged.·Make sure the connection tube is correctly connected to both the canister knob as well as the ACCESSORY PORT (3) on the machine. |
TECHNICAL CHARACTERISTICS
Mod: P0116ED
Structure:
ABS
Dishwasher safe Removable Tray
Roll-Holder Compartment with integrated Bag Cutter
Machine Dimensions: 51(W) x 17(P) x 10(H) cm
Machine weight: Approx. 4 Kg.
Voltage/Power: 230V\~50Hz
Input: 140 W
Stand By: 0 W
Sealing: Adjustable on 2 levels
Sealing Bar: Width 315 mm
Pump type: Single cylinder with self-lubricating piston
Nominal pump capacity: 10 l/min
Max Vacuum: -0,80 bar
Vacuum chamber venting: Automatic upon opening
Compliant with Directives:

Electromagnetic compatibility
The MAGIC VAC ^® has been engineered to meet current electromagnetic compatibility requirements. However if you suspect that the appliance is interfering with the operation of your TV, radio or other electrical unit, try relocating the appliance until the interference ceases. Alternatively try plugging the appliance into a different power socket.

Disposal: In conformity with Directive 2012/19/EC, the symbol shown on the appliance to be disposed of indicates that this is considered as waste and must therefore undergo "sorted waste collection". The user must therefore take (or have taken) the above waste to a pre-sorted waste collection centre set up by the local authorities, or else give it back to the dealer when purchasing a new appliance of the same type. Pre-sorted waste collection and the subsequent treatment, recovery and disposal operations favour the production of appliances made of recycled materials and limit the negative effects of any incorrect waste management on the environment and public health. The unlawful disposal of the product by the user could result in administrative fines as provided by the laws transposing Directive 2012/19/EC of the European member state in which the product is disposed of.

Packaging disposal

Product box
Cardboard insert

Product packaging bag
MAGIC VAC ^® Mod. P0116ED
MACHINE PROFESSIONNELLE POUR L'EMBALLAGE SOUS VIDE
Barre de Scellage: L 315 mm
Conforme aux directives:

SCHADENSSUCHE
INSTRUÇÕES PARA O US
natural_image
Two translucent cylindrical objects with smooth surfaces, no text or symbols visible
Disponibili nelle seguenti misure: /Available in the following sizes: /Disponible dans les tailles suivantes: /Erhältlich in folgenden Größen: /Disponible en los siguientes tamaños: /Disponível nos seguintes tamanhos:
15x600 cm
20x600 cm
30x600 cm
SACCHETTI - BAGS - SACHETS - BEUTEL - BOLSAS - SACOS
natural_image
White rectangular object with a flat, rounded top surface against a white background (no text or symbols)
Disponibili nelle seguenti misure: /Available in the following sizes: /Disponible dans les tailles suivantes: /Erhältlich in folgenden Größen: /Disponible en los siguientes tamaños: /Disponível nos seguintes tamanhos:
15x30 cm
20x30 cm
25×35 cm
30x40 cm
COPERCHI - LIDS - COUVERCLES - DECKEL - TAPAS - TAMPAS
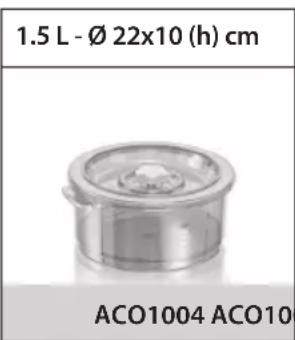
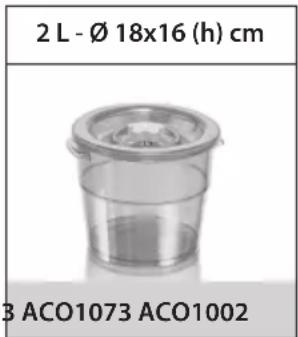
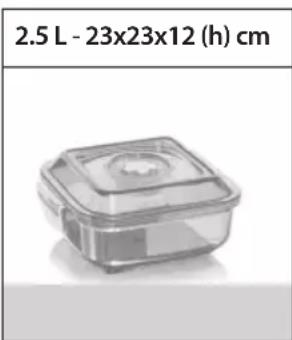
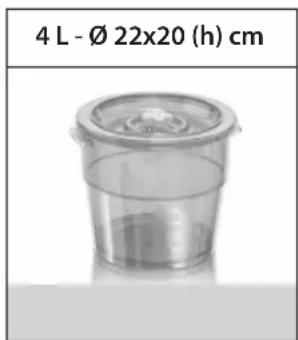
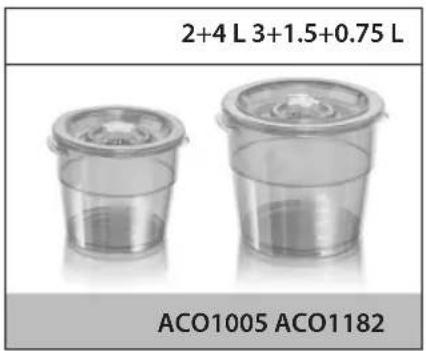
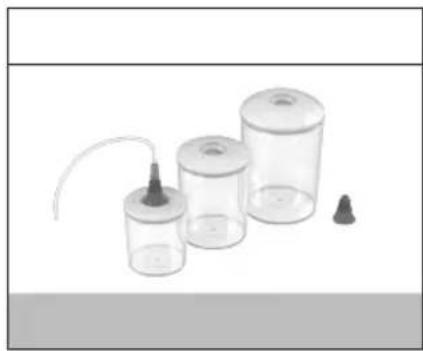
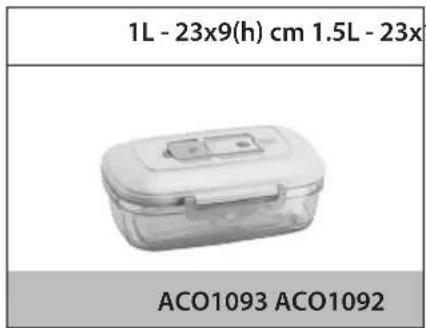
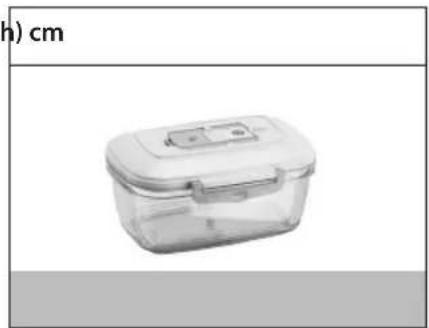
CONTENITORI - CANISTERS - RÉCIPIENTS BEHÄLTER - CONTENEDORES - RECIPIENTES
natural_image
Three transparent containers with different shapes and a connecting rod, arranged on a plain surface (no text or symbols visible)
natural_image
Transparent plastic food container with lid and side panel, no visible text or symbols
ALTRI ACCESSORI - OTHER ACCESSORIES - AUTRES ACCESSOIRES ANDERE ZUBEHÖRTEILE - OTROS ACCESORIOS - OUTRAS ACESSÓRIOS
natural_image
White plastic mechanical component with a flanged top and circular base, isolated on white background (no text or symbols)
For additional information on these products please contact your Dealer or visit our website www.magicvac.com
Fabbricante / Manufacturer:

Published by FLAEM NUOVA*
cod. 18346B0-0 rev. date 06/2021
© 2021 FLAEM NUOVA®
Printed in Italy
All rights reserved