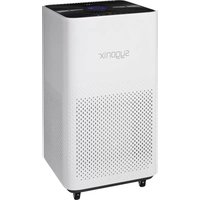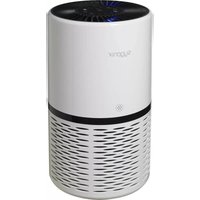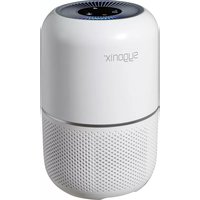
SY-4535296 - Air purifier Sygonix - Free user manual and instructions
Find the device manual for free SY-4535296 Sygonix in PDF.


User questions about SY-4535296 Sygonix
0 question about this device. Answer the ones you know or ask your own.
Ask a new question about this device
Download the instructions for your Air purifier in PDF format for free! Find your manual SY-4535296 - Sygonix and take your electronic device back in hand. On this page are published all the documents necessary for the use of your device. SY-4535296 by Sygonix.
USER MANUAL SY-4535296 Sygonix
GB Operating Instructions
Air Purifier 23 W, 25 - 30 m², White
Item No. 2267648 Page 16 - 28
F Mode d'emploi
text_image
Exploded view diagram of a cylindrical device with numbered parts for identificationtext_image
I II III A 2H 4H 8Htext_image
Diagram illustrating the process of locking a mechanical component with labeled parts and directional arrows indicating motion.natural_image
Exploded view diagram of a mechanical component showing internal parts and flow arrows (no text or symbols)natural_image
Exploded view diagram of a mechanical component showing internal structure and motion arrows (no text or symbols)natural_image
Diagram showing a mechanical component being processed with directional arrows, no text or symbols present9. Betrieb
natural_image
Illustration of two household appliances: a cylindrical brush holder and a woven basket with a coiled tube (no text or symbols)natural_image
Diagram of a mechanical component with a hand interacting with it, showing motion arrows (no text or symbols)natural_image
Exploded view diagram of a mechanical component showing internal gears and housing (no text or symbols)text_image
Diagram showing a hand pressing a power button next to an electrical socket with a plug, indicating the switch or plug is replaced.natural_image
Cross-sectional diagram of a mechanical component with internal gears and shafts, showing fluid flow direction (no text or symbols)natural_image
Diagram showing a device with rotating buttons and directional arrows, no text or symbols present- Introduction....17
- Explanation of symbols....17
- Intended use....17
- Delivery content....17
- Up-to-date operating instructions ....18
- Safety instructions ....18
a) General information....18
b) Plug and cable....19
c) Product....19
- Operating elements ......20
a) Air purifier 20
b) Control panel / LED display....21
c) Air quality indication....22
- Getting started 22
- Operation....24
a) General operation....24
b) Auto mode 24
c) Sleep mode 25
d) Timer 25
e) Air filter indicator....25
f) Reset the air filter indicator / lifetime 25
- Care and cleaning....26
a) Air purifier 26
b) Filter....26
- Replacing the air filter 27
- Troubleshooting....28
- Disposal....29
- Technical data....29
a) General....29
b) Filter....29
1. Introduction
Dear customer,
Thank you for purchasing this product.
This product complies with the statutory national and European requirements.
To maintain this status and to ensure safe operation, you as the user must observe these operating instructions!

These operating instructions are part of this product. They contain important notes on commissioning and handling. Also consider this if you pass on the product to any third party. Therefore, retain these operating instructions for reference!
If there are any technical questions, please contact: www.conrad.com/contact
2. Explanation of symbols

The symbol with the lightning in the triangle is used if there is a risk to your health, e.g. due to an electric shock.

The arrow symbol indicates special information and advice on operation.

The symbol with the exclamation mark in the triangle is used to indicate important information in these operating instructions. Always read this information carefully.

Product is designed according to protection Class II (reinforced or double insulation, protective insulation).
the operating instructions!
3. Intended use
The product is intended for use as an air purifier for household use under normal operating conditions.
It is intended for indoor use only. Do not use it outdoors. Contact with moisture, e.g. in bathrooms, must be avoided under all circumstances.
For safety and approval purposes, you must not rebuild and/or modify this product. If you use the product for purposes other than those described above, the product may be damaged. In addition, improper use can result in short circuits, fires, electric shocks or other hazards. Read the instructions carefully and store them in a safe place. Make this product available to third parties only together with its operating instructions.
All company names and product names are trademarks of their respective owners. All rights reserved.
4. Delivery content
- Air purifier - Air filter (pre-installed) - Operating instructions
5. Up-to-date operating instructions
Download the latest operating instructions at www.conrad.com/downloads or scan the QR code shown. Follow the instructions on the website.

6. Safety instructions

Read the operating instructions carefully and especially observe the safety information. If you do not follow the safety instructions and information on proper handling in this manual, we assume no liability for any resulting personal injury or damage to property. Such cases will invalidate the warranty/guarantee.
- The appliance is not to be used by persons (including children) with reduced physical, sensory or mental capabilities, or lack of experience and knowledge, unless they have been given supervision and instruction.
• Children should be supervised not to play with the appliance. - A damaged mains cable may only be replaced by the manufacturer, a workshop commissioned by the manufacturer or a similarly qualified person, so as to prevent any danger.
a) General information
- The device is not a toy. Keep it out of the reach of children and pets.
- Do not leave packaging material lying around carelessly. This may become dangerous playing material for children.
- Protect the appliance from extreme temperatures, direct sunlight, strong jolts, high humidity, moisture, flammable gases, steam and solvents.
- Do not place the product under any mechanical stress.
-
If it is no longer possible to operate the product safely, take it out of operation and protect it from any accidental use. Safe operation can no longer be guaranteed if the product:
-
is visibly damaged,
- is no longer working properly,
- has been stored for extended periods in poor ambient conditions or
- has been subjected to any serious transport-related stresses.
- Please handle the product carefully. Jolts, impacts or a fall even from a low height can damage the product.
- Consult an expert when in doubt about the operation, safety or connection of the appliance.
- Maintenance, modifications and repairs must only be completed by a technician or an authorised repair centre.
- If you have questions which remain unanswered by these operating instructions, contact our technical support service or other technical personnel.
b) Plug and cable
- The mains outlet must be located near to the device and be easily accessible.
- Never pull the mains plug from the socket by pulling at the cable. Always pull it from the mains socket using the intended grips.
- Unplug the mains plug from the mains socket if you do not use the device for an extended period of time.
- Disconnect the mains plug from the mains socket in thunderstorms for reasons of safety.
- Make sure that the mains cable is not squeezed, bent, damaged by sharp edges or put under mechanical stress. Avoid excessive thermal stress on the mains cable from extreme heat or cold. Do not modify the mains cable. Otherwise the mains cable may be damaged. A damaged mains cable can cause a deadly electric shock.
- Do not touch the mains cable if it is damaged. First, power down the respective mains socket (e.g. via the respective circuit breaker) and then carefully pull the mains plug from the mains socket. Never use the product if the mains cable is damaged.
- Never plug in or unplug the mains plug when your hands are wet.
c) Product
- Keep your air purifier away from water, wet or damp areas.
- Avoid environments that may cause moisture to build up inside the purifier (such as rooms with major temperature changes, or underneath an air conditioner).
- Keep your air purifier away from heat sources.
- Do not use the appliance near gas appliances, heating devices or fireplaces.
- Do not place anything into any opening on the air purifier, unless directed by the manual.
- Do not block the air inlet and outlet, e.g. by placing items on the air outlet or in front of the air inlet.
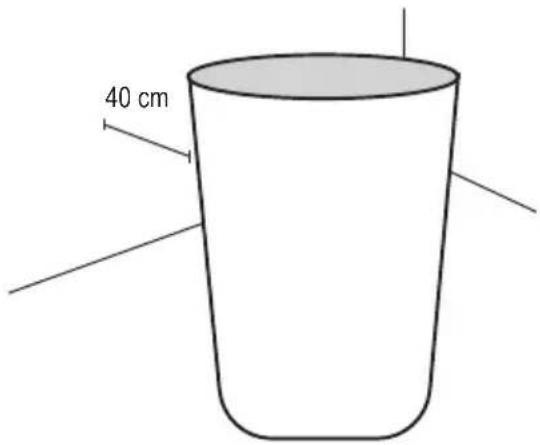
- Leave at least 40 cm free space around and above the appliance.
- Do not place any objects on top of the appliance.
- Always disconnect your air purifier from the power supply before servicing (for example, changing the air filter).
- This appliance is not a substitute for proper ventilation, regular vacuum cleaning or use of an extractor hood or fan while cooking.
- Only use the original filters specially intended for this appliance. Do not use any other filters.

Important: Do not use this air purifier with solid-state speed controls (such as a dimmer switch).
7. Operating elements
a) Air purifier
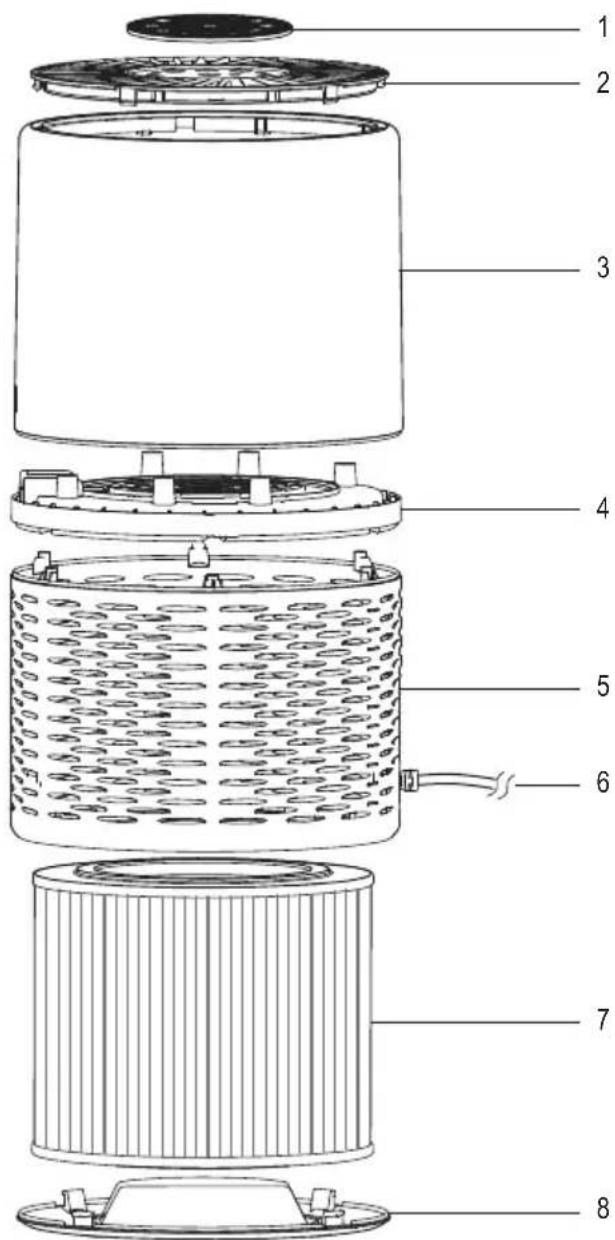
text_image
Exploded view diagram of a cylindrical device with numbered parts for identification1 Control panel / LED display
2 Outlet cover
3 Upper body
4 Decorative ring / fan motor
5 Lower body
6 Power cord
7 Combination filter
8 Base cover
b) Control panel / LED display
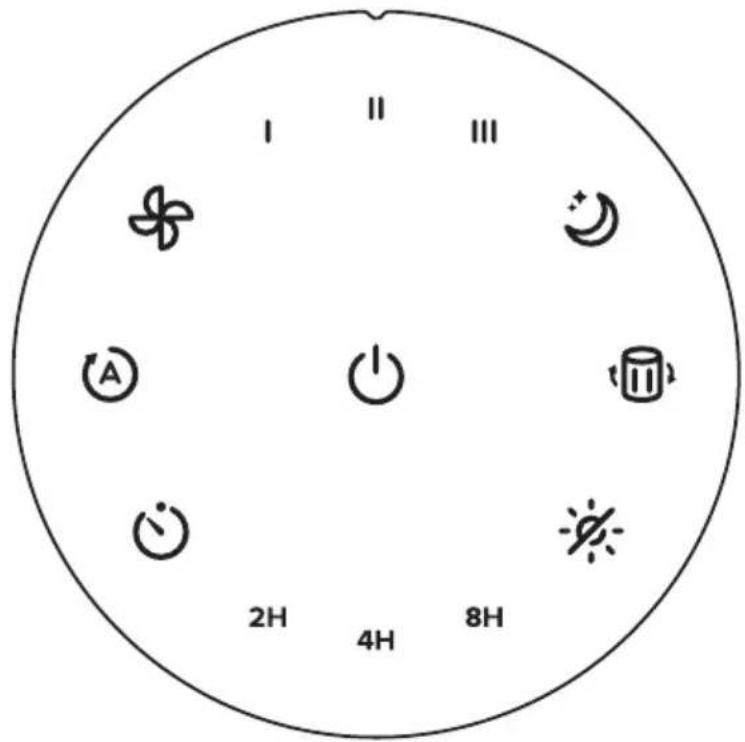
text_image
I II III A 0 2H 4H 8H| Icon Description Icon Description | |||
 | ON / OFF button. |  | Check filter button / filter indicatorLights to remind you to check the air filter. |
 | Timer buttonSet a timer.Cycle through timer durations:2H 4H 8H |  | Sleep mode buttonTurn sleep mode on. |
 | Auto mode buttonTurn auto mode on. |  | Display buttonTurn the display lights off.Press any button (except) to turn the display lights back on. |
 | Fan speed buttonCycle through fan speeds:Low, medium, High. | ||
c) Air quality indication
• Air quality is checked using the sensor inside the air purifier.
• The indicator will light up blue when the air purifier is first turned on, and changes based on the detected air quality.
• The air purifier may take up to 30 seconds to detect air quality.
| Colour Air quality Particle amount (ug/m) | 3) | ||
 | Blue Very good 0 - 75 | ||
 | Green Good 75 - 115 | ||
 | Yellow Moderate 115 - 150 | ||
 | Red Bad 150+ | ||
8. Getting started

If you are not planning to use the air purifier for a long period of time, we recommend leaving the filter inside its plastic packaging until it is ready to be used, to keep it clean.
- Place the appliance upside down on a soft cloth to avoid scratching.
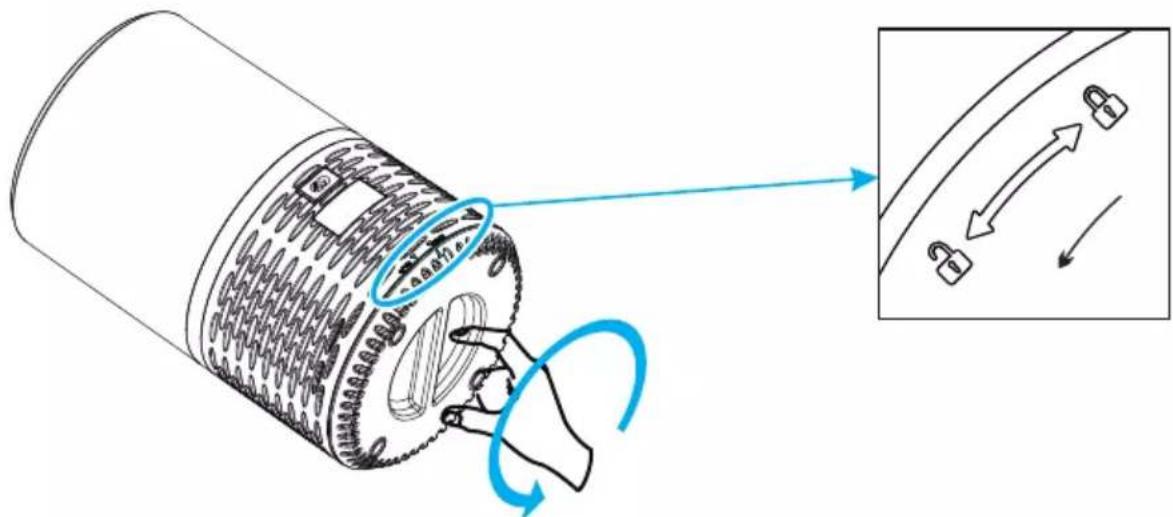
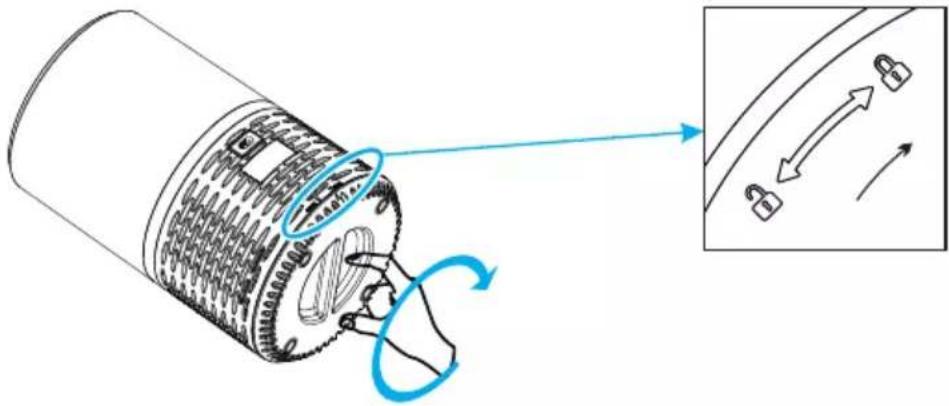
- Turn the base cover counterclockwise from lock → open.
text_image
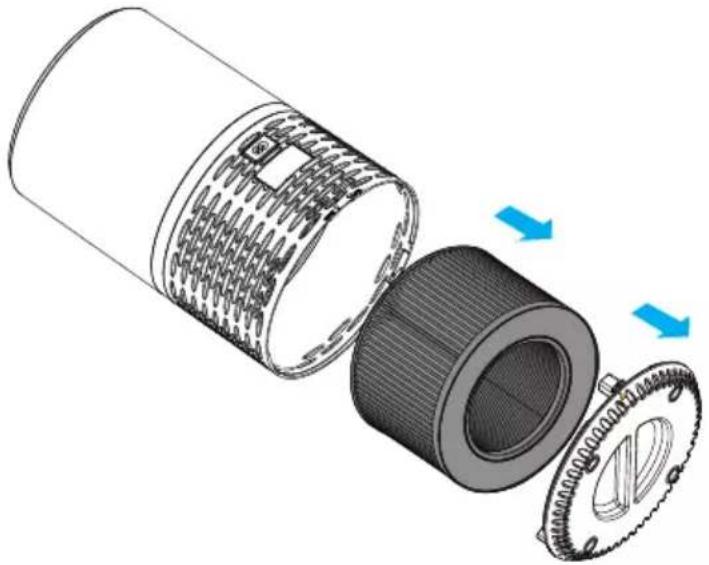
Diagram illustrating a mechanical component with directional arrows and lock symbols, showing motion and assembly steps.- Remove the base cover and take out the combination filters.
- Remove the packaging material from the filter.
natural_image
Exploded view diagram of a mechanical component showing internal parts and motion arrows (no text or symbols)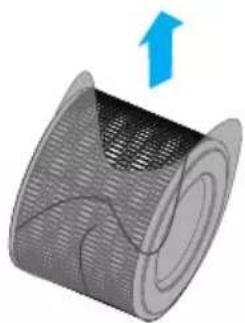
natural_image
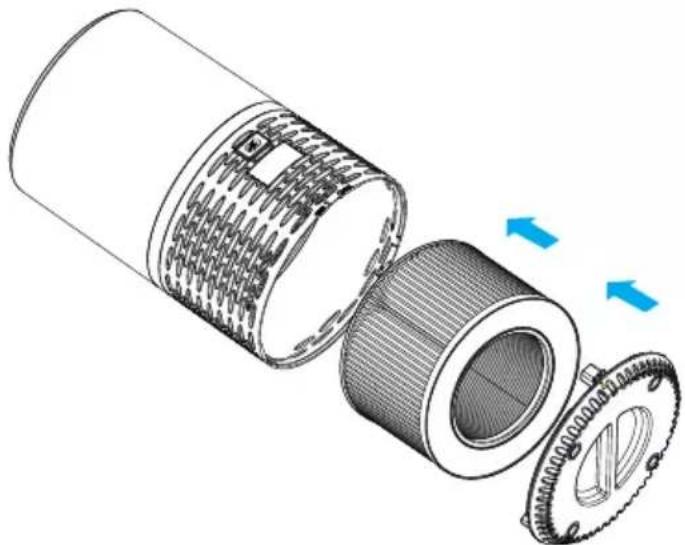
3D illustration of a mesh cylindrical component with a blue upward arrow indicating rotation (no text or symbols)- Put the filter back into the appliance.
natural_image
Exploded view diagram of a mechanical component showing internal structure and motion arrows (no text or symbols)- Turn the base cover clockwise from open → lock. The cover should lock into place with a "click".
text_image
Diagram illustrating the process of moving a mechanical component with directional arrows, showing step-by-step assembly.9. Operation
a) General operation
- Place the air purifier on a hard, flat surface. Leave 40 cm of clearance on all sides of the purifier.
- Connect the power plug to a power outlet.
- Press to turn the air purifier ON. The air purifier fan will start automatically.
- Optionally, press to change fan speed. You can also select "auto mode, sleep mode, or set a timer."
- For best results, run the air purifier at maximum speed for 15 to 20 minutes before using a lower speed or "auto mode".
- Keep windows closed while the purifier is operating.
text_image
40 cm-
Press to turn the air purifier OFF.
-
The air purifier will remember its programmed settings when turned OFF, and will resume these settings when turned back ON.
- The air purifier will not recall timers.
b) Auto mode
This mode uses the sensor inside the air purifier to adjust the fan speed automatically based on air quality.
For example, if the air quality is bad, the fan will automatically be set to high speed.
- Press to turn auto mode on.
- Press or to exit auto mode.
| Colour Air quality Fan speed Particle amount (ug/m) | 3) | |||
 | Blue Very good Sleep 0 - 75 | |||
 | Green | Good | Low | 75 - 115 |
 | Yellow | Moderate | Medium | 115 - 150 |
 | Red | Bad | High | 150+ |
c) Sleep mode
Sleep mode uses the lowest possible fan speed to operate quietly. All indicators will reduce to half brightness.
- Press to turn sleep mode on.
- Press on to exit sleep mode.
d) Timer
- Press repeatedly to turn the timer on or off, and to cycle through timer options (2 hours, 4 hours, 8 hours).
- The air purifier will automatically power off when the timer is finished.
- Press cancel the timer.
e) Air filter indicator
- w/ight up as a reminder to check if the air filter needs to be cleaned or replaced.
• See section "10. Care and cleaning" on page 26.
f) Reset the air filter indicator / lifetime
Reset
The filter lifetime should be reset if the icon lights up after replacing the filter with a new one.
-
Connect the air purifier to the power supply and press ⏻ to turn the power on.
-
Press and hold 103 seconds until the light turns off.
Hard reset
When using the air purifier in an environment of heavy pollution, the lifespan of the air filter may be significantly reduced. You can change filters even if the filter light does not light up.
After replacing the filter, follow the steps below to perform a hard reset:
-
In standby mode, when the air purifier is plugged in but the power is off, press and hold 📋 for 3 seconds until the lights up.
-
Press and hold for 3 seconds again until the light turns off.
10. Care and cleaning

Do not use any aggressive cleaning agents, rubbing alcohol or other chemical solutions as they can cause damage to the housing and malfunctioning.
Disconnect the product from the mains before each cleaning.
a) Air purifier
- Wipe the outside of the air purifier with a dry fibre-free cloth.
- Do not clean with water or any other liquid, to avoid risk of electric shock.
b) Filter
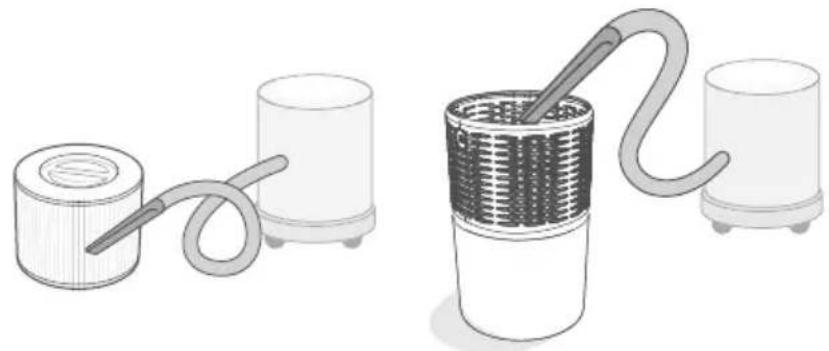
- Clean the outside of the filter and the inside of the housing with a soft brush or vacuum each month to prevent buildup of hair or dust.
natural_image
Illustration of two household appliances: a cylindrical brush holder connected to a coiled tube and a woven basket with a coiled tube (no text or symbols)- Do not clean the filter with water or other liquid.
• You may need to replace the filter after cleaning if there is: - Increased noise
- Decreased airflow
- An unusual odor
- Visible clogging

See section "11. Replacing the air filter" on page 27.
11. Replacing the air filter
You may need to replace your air fil 8 months (sooner or later) depending on how often it is used and how polluted the environment is.
Signs of an expired filter:
- Increased noise when the air purifier is on
• Decreased airflow - Unusual odors
-
Visibly clogged filter
-
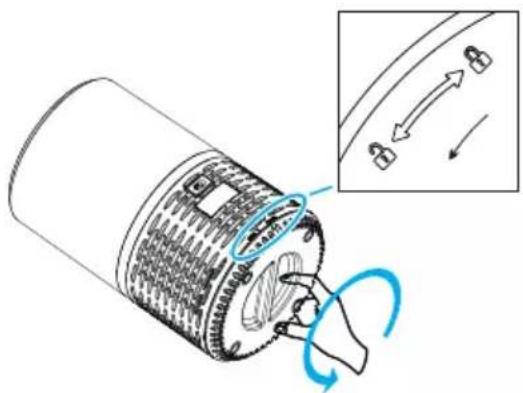
Turn the base cover counterclockwise from lock → open.
natural_image
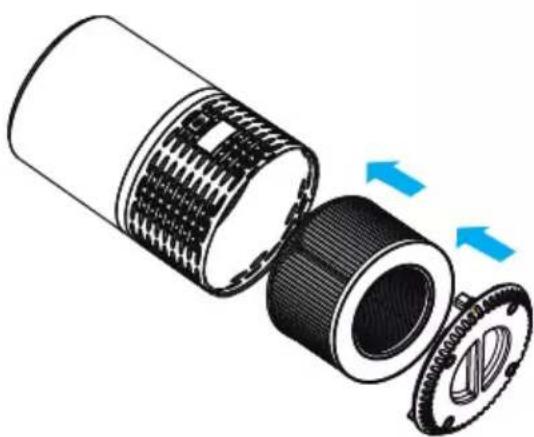
Diagram of a mechanical component with a hand interacting with a rotating arm, showing motion arrows (no text or symbols)- Unwrap the new air filter and place it into the housing.

Save the bag for storing / disposing filters.
natural_image
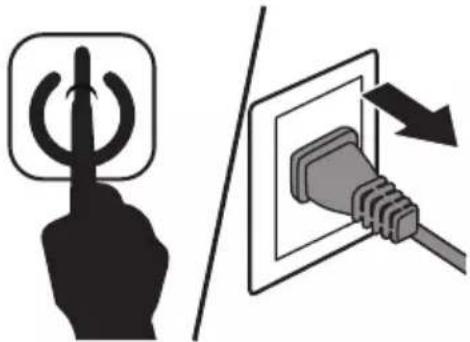
Exploded view diagram of a mechanical component showing internal parts and motion arrows (no text or symbols)Switch the aitpurifier off and disconnect it from the power supply.
natural_image
Diagram showing a hand pressing a button next to an electrical socket with a plug, no text or symbols present.-
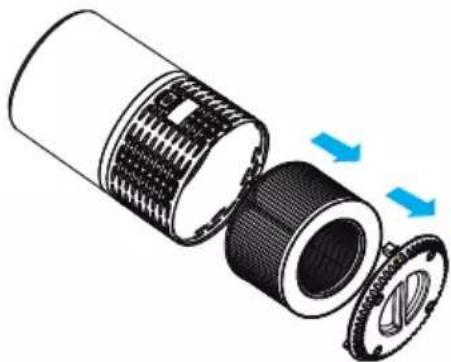
Remove the old air filter and properly dispose of it.
-
Clean any dust and dirt from inside of the housing using a vacuum.
natural_image
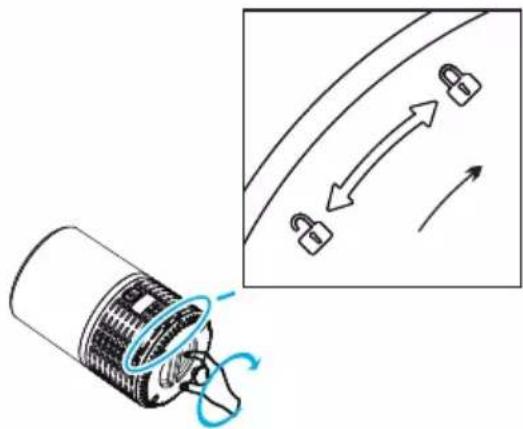
Cross-sectional diagram of a mechanical component showing internal structure and fluid flow arrows (no text or symbols)- Turn the base cover clockwise from open → lock.
- Connect the air purifier to the power supply.
- Reset the filter. See "f) Reset the air filter indicator / lifetime" on page 25.
natural_image
Diagram showing a mechanical component being locked, with an inset illustrating the motion of lock movement (no text or symbols present)12. Troubleshooting
| Problem Suggested solution(s) | |
| Air purifier will not turn on or respond to button controls. | Connect the air purifier to the power supply, or connect the air purifier into a different power outlet.Check to see if the power cord is damaged.Check if the filter cover is replaced correctly, so that the safety switch is activated.See “8. Getting started” on page 22. |
| Air purifier makes an unusual noise while the fan is on. | Make sure the air filter is installed correctly. See “8. Getting started” on page 22.Press to increase the fan speed.The air purifier may be damaged, or a foreign object may be inside. Stop using the air purifier and contact our technical support service. Do not open the air purifier.Replace the air filter. See “11. Replacing the air filter” on page 27. |
| Significantly reduced airflow | Check if the filter packaging has been removed.Replace the air filter. See “11. Replacing the air filter” on page 27.Check there is enough clearance on all sides of the purifier (≥40 cm). |
| Poor air purification quality. | Make sure no objects are blocking the air intakes or outlets.Make sure the air filter is installed correctly. See “8. Getting started” on page 22.Make sure the room is within the suggested room size. The air purifier may not be effective in larger rooms.Replace the air filter. See “11. Replacing the air filter” on page 27. |
| The air purifier is producing an unpleasant odor. | Make sure the air purifier is in a room where the relative humidity is <85% RH.Higher humidity levels may cause mildew to grow on the air filter.Replace the air filter. See “11. Replacing the air filter” on page 27. |
| is still illuminated after replacing the air filter. | Reset the air filter indicator See “f) Reset the air filter indicator / lifetime” on page 25. |
13. Disposal

Electronic devices are recyclable waste and must not be disposed of in the household waste. At the end of its service life, dispose of the product in accordance with applicable regulatory guidelines.

thus fulfill your statutory obligations and contribute to the protection of the environment.
14. Technical data
a) General
Input voltage / current....230 V/AC, 50/60 Hz
Power consumption....max. 23 W
Standby power consumption ....<0.5 W
Protection class ......II
Dust sensor ....yes
Fan speed....4 levels
Noise level....30 - 52 dB
Filter life.... approx. 6 - 8 months*
*depending on usage and operating environment
Suggested room size....25 - 30 m²
CADR (clean air delivery rate)....250m³/h
Operating conditions....5 to 45 °C, 25 – 85 % RH (non-condensing)
Storage conditions....5 to 75 °C, 25 – 85 % RH (non-condensing)
Dimensions (L x W) 400 x 233 mm
Weight 3.65 kg
b) Filter
Type....HEPA filter + activated carbon filter + prefilter
Table des matières
Page
France (email): technique@conrad-france.fr
Suisse: www.conrad.ch ____
2. Explication des symboles

text_image
Exploded view diagram of an electronic device with numbered parts for identificationtext_image
I II III A 2H 4H 8Htext_image
Diagram illustrating the process of a device's rotation and locking mechanism, with labeled parts and directional arrows.natural_image
Exploded view diagram of a mechanical component showing internal structure and motion arrows (no text or symbols)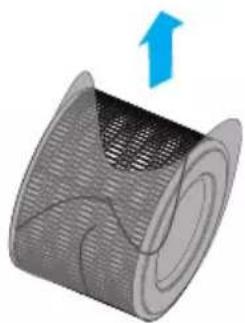
natural_image
3D illustration of a mesh cylindrical component with a blue arrow indicating upward motion (no text or symbols)natural_image
Exploded view diagram of a mechanical component showing internal structure and motion arrows (no text or symbols)text_image
Diagram illustrating a mechanical component being rotated by a blue arrow, with an inset showing the motion of rotation.9. Fonctionnement
natural_image
Illustration of two household appliances: a cylindrical brush holder and a woven basket with coiled tubing (no text or symbols)natural_image
Diagram of a mechanical component with a hand interacting with a curved arrow, showing motion direction (no text or symbols)natural_image
Exploded view diagram of a mechanical component showing internal parts and motion arrows (no text or symbols)natural_image
Illustration showing a hand pressing a button next to an electrical socket with a plug, no text or symbols present.natural_image
Exploded view diagram of a mechanical component showing internal structure and motion arrows (no text or symbols)text_image
Diagram illustrating lock mechanism with a device and directional arrows, showing motion sequence12. Dépannage
text_image
Exploded view diagram of a battery pack with numbered components from top to bottomtext_image
1 II III A 0 2H 4H 8Htext_image
Diagram illustrating the process of a mechanical component being rotated, with an inset showing the close-up of the rotation direction.natural_image
Exploded view diagram of a mechanical component showing internal parts and motion arrows (no text or symbols)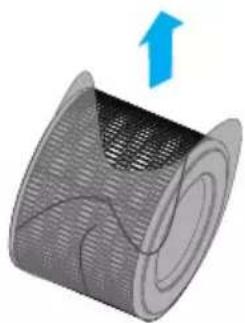
natural_image
3D illustration of a mesh cylindrical component with a blue upward arrow indicating rotation (no text or symbols)natural_image
Exploded view diagram of a mechanical component showing internal structure and motion arrows (no text or symbols)text_image
Diagram illustrating a mechanical component being rotated by a lock, with an inset showing the motion of the rotation.9. Bediening
a) Algemene bediening
natural_image
Illustration of two household appliances: a cylindrical brush holder and a woven basket with coiled tubing (no text or symbols)natural_image
Diagram of a mechanical component with a hand interacting with a circular housing, showing motion arrows (no text or symbols)natural_image
Cross-sectional diagram of a mechanical component showing internal structure and motion arrows (no text or symbols)natural_image
Illustration showing a hand pressing a button next to an electrical socket with a plug, no text or symbols present.natural_image
Exploded view diagram of a mechanical component showing internal structure and motion arrows (no text or symbols)natural_image
Diagram showing a device with rotating buttons and a close-up of a curved arrow with lock symbols (no text or labels)12. Problemen oplossen
This is a publication by Conrad Electronic SE, Klaus-Conrad-Str. 1, D-92240 Hirschau (www.conrad.com).
All rights including translation reserved. Reproduction by any method, e.g. photocopy, microfilming, or the capture in electronic data processing systems require the prior written approval by the editor. Reprinting, also in part, is prohibited. This publication represent the technical status at the time of printing. Copyright 2020 by Conrad Electronic SE.