TV 296 - Electrical measuring device Testboy - Free user manual and instructions
Find the device manual for free TV 296 Testboy in PDF.
User questions about TV 296 Testboy
0 question about this device. Answer the ones you know or ask your own.
Ask a new question about this device
Download the instructions for your Electrical measuring device in PDF format for free! Find your manual TV 296 - Testboy and take your electronic device back in hand. On this page are published all the documents necessary for the use of your device. TV 296 by Testboy.
USER MANUAL TV 296 Testboy
natural_image
Top-down architectural sketch of a rectangular room with three windows and a central display (no text or symbols)Testboy® TV 296
Version 1.2

Testboy ^® TV 296 3
Bedienungsanleitung

Testboy ^® TV 296 22
Operating instructions

Testboy ^® TV 296 41
Mode d'emploi

Testboy ^® TV 296 60
text_image
2022/08/24 08:14 71% ⑤ ⑥ ⑦ ⑧ ⑨ ⑩ ⑪ ⑫ Storage Space 13.18GB / 13.20GBSources of danger are e.g. mechanical parts that can cause serious injuries to persons.
There is also a risk of damage to objects (e.g. damage to the unit).
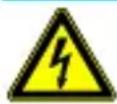
WARNING
Electric shock can cause death or serious injury to persons as well as a hazard to the function of objects (e.g. damage to the appliance).

WARNING
Never point the laser beam directly or indirectly at the eye through reflective surfaces. Laser radiation can cause irreparable damage to the eye. When measuring near people, the laser beam must be deactivated.
General safety instructions

WARNING
For safety and approval reasons (CE), unauthorised conversion and/or modification of the unit is not permitted. To ensure safe operation with the unit, it is essential to observe the safety instructions, warnings and the chapter "Intended use".

WARNING
Before using the appliance, please observe the following instructions:
Avoid operating the unit near electric welders, induction heaters and other electromagnetic fields.
After abrupt temperature changes, the unit must be adjusted to the new ambient temperature for approx. 30 minutes before use to stabilise the IR sensor.
Do not expose the unit to high temperatures for a long time.
Avoid dusty and humid environmental conditions.
Measuring instruments and accessories are not toys and do not belong in children's hands!
In commercial facilities, the accident prevention regulations of the Federation of Institutions for Statutory Accident Insurance and Prevention for electrical installations and equipment must be observed.

Please observe the five safety rules:
Unlock
Secure against restarting
Determine the absence of voltage (2-pole absence of voltage must be determined)
Ground and short circuit
Cover adjacent live parts
Intended use
The unit is only intended for the applications described in the operating instructions. Any other use is not permitted and may lead to accidents or destruction of the unit. These applications lead to an immediate expiry of any guarantee and warranty claims of the operator against the manufacturer.

To protect the unit from damage, please remove the batteries if the unit will not be used for a long time.

We accept no liability for damage to property or personal injury caused by improper handling or non-observance of the safety instructions. In such cases, any warranty claim becomes void. An exclamation point within a triangle is intended to alert the user to the presence of safety precautions in the user manual. Read the instructions completely before using the appliance. This unit is CE-approved and therefore complies with the required directives.
Rights reserved to change specifications without prior notice.
© 2023 Testboy GmbH, Germany.
Disclaimer

In case of damage caused by non-observance of the instructions, the warranty claim is void! We accept no liability for consequential damage resulting from this!
Testboy is not liable for damage resulting from
failure to follow the instructions,
changes to the product that have not been approved by Testboy, or
Spare parts not manufactured or approved by Testboy
Are caused by the influence of alcohol, drugs or medication result.
Correctness of the operating instructions
These operating instructions have been prepared with great care. No responsibility is taken for the correctness and completeness of the data, illustrations and drawings. Changes, misprints and errors excepted.
Disposal
Dear Testboy customer, with the purchase of our product you have the option to return the device to suitable collection points for electronic waste at the end of its life cycle.

WEEE regulates the take-back and recycling of waste electrical equipment. Manufacturers of electrical appliances are obliged to take back and recycle electrical appliances that are sold free of charge. Electrical appliances may then no longer be placed in the "normal" waste streams.
Electrical equipment must be recycled and disposed of separately. All appliances covered by this directive are marked with this logo.
Disposal of used batteries

As the end user, you are legally obliged (Battery Act) to return all used batteries and rechargeable batteries; disposal with household waste is prohibited!
Batteries/rechargeable batteries containing harmful substances are marked with the adjacent symbols indicating that they must not be disposed of with household waste.
The designations for the decisive heavy metal are:
Cd = cadmium, Hg = mercury, Pb = lead.
You can hand in your used batteries/rechargeable batteries free of charge at the collection points of your municipality or wherever batteries/rechargeable batteries are sold!
Quality certificate
All quality-relevant activities and processes carried out within Testboy GmbH are permanently monitored by a quality management system. Testboy GmbH further confirms that the test equipment and instruments used during calibration are subject to permanent test equipment monitoring.
Declaration of conformity
The product complies with the latest directives. For more information, please visit www.testboy.de
Operation
Structure of the camera
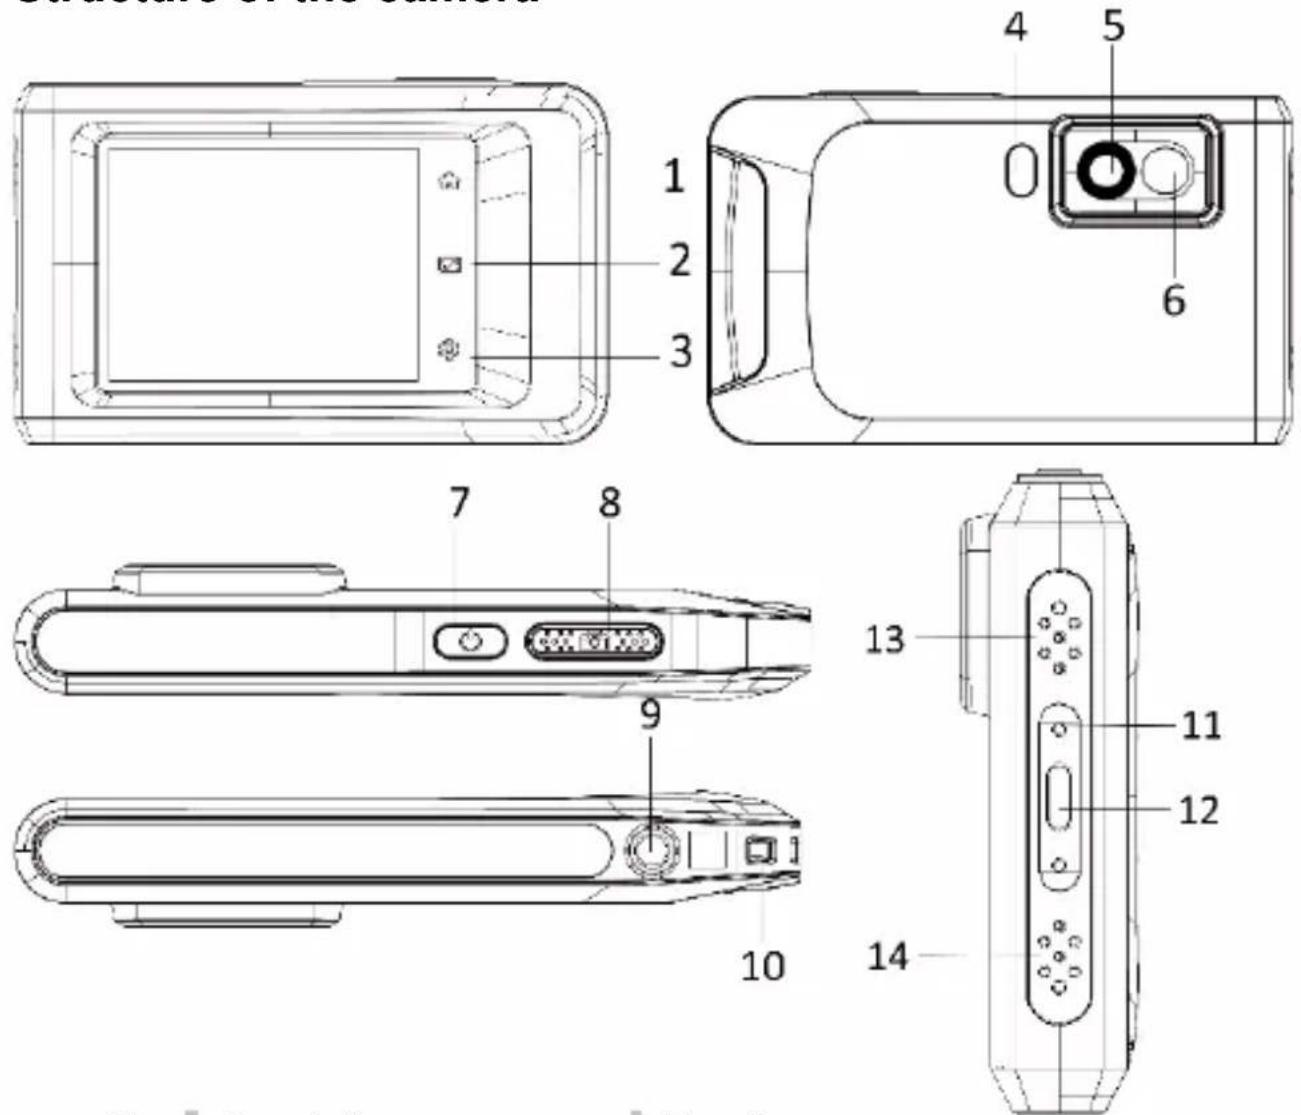
| No. | Description | Function |
| 1 | Homepage | Tap to return to the live view |
| 2 | File | Tap to access albums |
| 3 | Settings | Tap to access settings |
| 4 | Torch | Lighting / flashing alarm |
| 5 | Thermal imaging lens | Captures heat signatures |
| 6 | Optical lens | Optical recording |
| 7 | On/Off | Press and hold to switch on/off |
Operation
| 8 | Recording | Recording, from menu back to live view, press and hold for video recording |
| 9 | Tripod mounting | Thread for tripod |
| 10 | Belt attachment point | Mounting for belts |
| 11 | Status display | Indicates the charging status of the unit |
| 12 | Type-C interface | Charging interface, data transmission |
| 13 | Summer | Acoustic signal generator |
| 14 | Microphone | Records sound |
Introduction
The portable thermal imaging camera is a device for capturing optical and thermal images. It is suitable for temperature measurement, video recording, photo recording as well as alarming and can connect to WLANs, hotspots and Bluetooth. The integrated high-sensitivity IR detector and high-performance sensor detects temperature changes and measures the temperature in real time. The temperature measurement range is -20 °C to 400 °C with an accuracy of ± 2 °C or 2 % at an ambient temperature of 15 °C to 35 °C and an object temperature above 0 °C.
The unit is user-friendly and ergonomically designed. It is widely used for building inspection, HVAC, electrical and mechanical maintenance. The unit supports control via the touch screen. Tap the screen to set parameters and configurations.
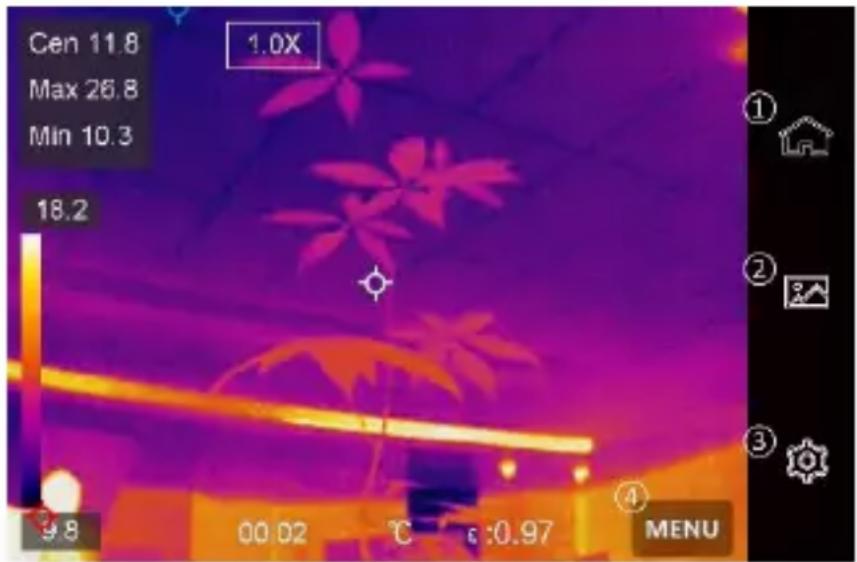
Menu description
On the display interface, tap the screen to show the menu bar and swipe down to access the swipe-down menu.
1 - Home page
2 - Files / Gallery
3 - Settings
4 - Menu
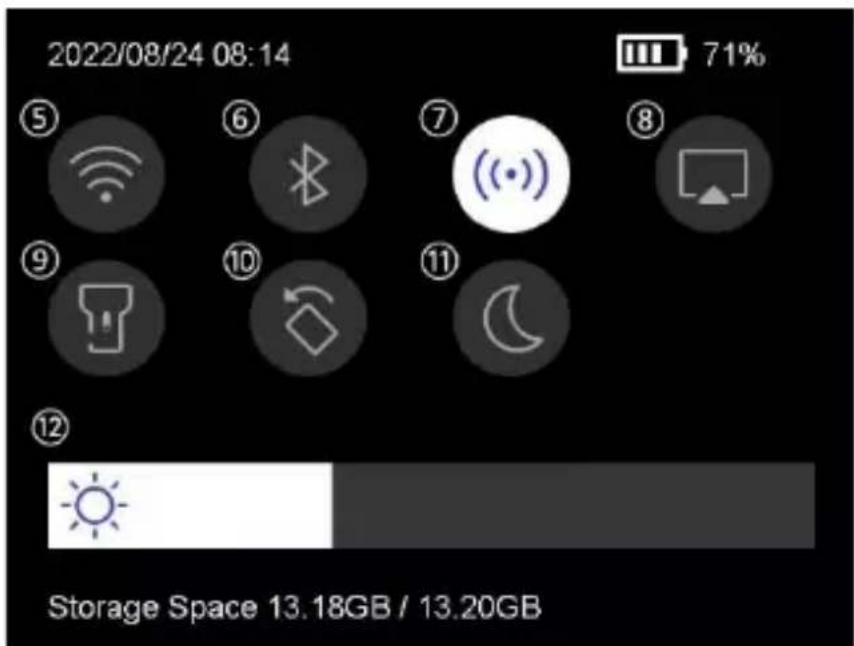
text_image
Cen 11.8 Max 26.8 Min 10.3 1.0X 18.2 9.8 00:02 ℃ 6:0.97 MENU5 - WLAN
6 - Bluetooth
7 - Hotspot
8 - Screen transmission
9 - Lightning
10 - Rotate automatically
11 - Dark/Light Mode
12 - Screen brightness
text_image
2022/08/24 08:14 71% ⑤ ⑥ ⑦ ⑧ ⑨ ⑩ ⑪ ⑫ Storage Space 13.18GB / 13.20GBBasic functions
Thermography
The device measures temperature in real time and displays it on the screen.
Fusion
The unit can combine the thermal and optical views.
Pallet and alarm
The unit supports multiple pallets. You can set the pallet mode according to the alarm function.
Client software connection
You can see the live view, capture photos and record videos via the app on your phone. You can analyse images offline and generate and share a report via the app.
You can also download the software client to professionally analyse images offline and create a report in a custom format on your PC.
Bluetooth
The unit can be connected to a headset via Bluetooth. This allows you to hear speech in the video recordings.
Charging the battery
Connect the unit to the mains adapter via the charging cable to charge the battery.
When the unit is fully charged, the charging cable should be disconnected.
The status display informs about the charging status:
Lights up red: normal charging process
Flashing red: Exception during charging
Lights up green: fully charged
To obtain the best possible performance from the battery, the unit should not be connected to a charger for more than 24 hours. The longest battery life can be ensured if the unit is charged for 2 hours at least every 3 months. The battery should not be charged in extremely cold environments.
Capture image
Before you start
Activate the torch via the swipe-down menu in dark surroundings.

●The unit does not support photo or video recording when the menu is displayed.
●The unit does not support photo or video recording when connected to your PC.
- In Settings → Capture Settings → File Name, you can set the file name for photo or video capture to distinguish the files captured in a particular scene.
- Go to Settings → Device Settings → Device Initialisation to initialise the memory card if necessary.
Go to Settings → Capture Settings.
Set the capture mode. You can choose between three modes.
Take a picture
Press once to take a picture.

If you want to edit captured images immediately, activate Edit before saving.

Your device performs a self-calibration at regular intervals to optimise image quality and measurement accuracy. During this process, the image is briefly paused and you will hear a "click sound" when a shutter moves in front of the detector. Self-calibration occurs more frequently during start-up or in very cold or hot environments. This is a normal process to ensure optimal performance of your device.
Continuous recording
Set the number of images to be taken continuously after selecting this mode. In live view, press L and the unit will continuously record the set number of images.
Planned recording
Set the interval for scheduled recording after selecting this mode. In live view, press and the unit will capture images according to the set interval. Press again to stop
capturing. Set the naming rule for the saved files. The default image naming is file name + storage time. You can set the file name. The storage time is the machine's system time at which the storage is made. Optional: If a visual image is to be saved separately, activate Save visual image and set the resolution of the visual image.

If the targets are poorly lit, activate flash. Then the unit turns on the flash when taking pictures.
Tap to exit. In live view, point the lens at the target and press to take pictures.

- When Capture One Image and Edit Before Save is NOT activated, the live image is frozen and saved in the default memory album. If Edit before save is enabled, the unit will enter the image editing menu.
- In Continuous Recording/Planned Recording, a counter is displayed at the top of the screen indicating the number of images taken.
Edit the image:

Select Text Note and open the editing page. Tap the screen to enter the content and save.

Display the image information.

Move the picture to the desired album.

Delete the image.
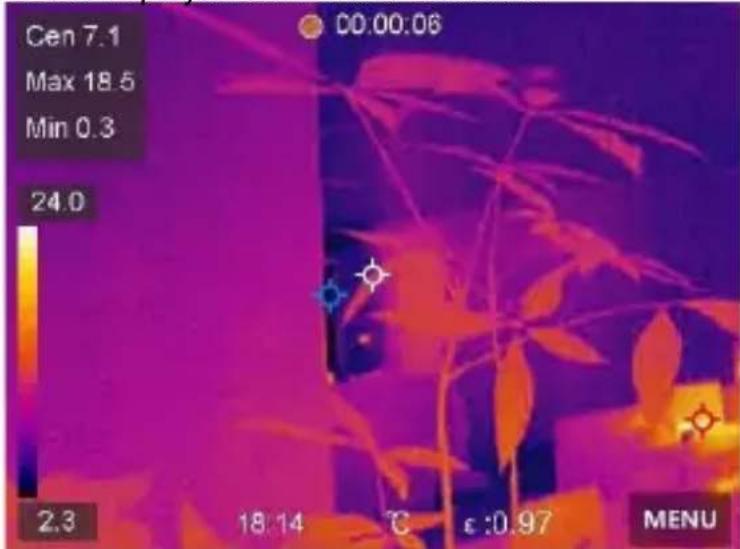
Record video
Before you start
Activate the torch via the drop-down menu in a dark environment.
In the live view, press and hold the record button to start video recording. The recording symbol and a counter are displayed on the user interface.
text_image
Cen 7.1 Max 18.5 Min 0.3 24.0 2.3 18:14 °C ε:0.97 MENUFinally, press the record button to stop recording. The recorded video is automatically saved.
Show recorded files
To access albums, press

Tap on the album in which the files are stored.
Tap on the video or photo that you want to display.
The unit displays the selected file and the relevant information.

text_image
HM20220901093637.jpeg Capture Time 2022/09/01/ 09:36:37 Thermal Resolution 640*480 Digital Resolution 33792*56064 Emissivity 0.97 Reflected Temperature 25.0°CDisplay settings
Set display mode
Here you select between thermal and visual display modes. You can choose between Thermal, Fusion, BiB and Visual.
1. Tap Menu and select
Tap the icons to select a display mode.

In thermal mode, the unit displays the thermal image view.

In fusion mode, the unit displays the combined view of thermal and optical channel.

When selecting the fusion mode, you must select the parallax correction in the live view according to the distance to the target so that the thermal and optical images overlap better.

In BiB mode (picture in picture), the unit displays the thermal view within the optical.

In visual mode, the unit displays the optical view.
Set pallets
You can select the desired colours with the palettes.
1. Tap Menu and select

Tap the icons to select a palette type.
White-hot
The hot area is brightly coloured in the view.
Black-hot
The hot area is coloured dark in the view.
Rainbow
The target displays several colours. It is suitable for scenes without significant temperature differences.
Iron annealing arc
The target is coloured like hot iron.
Red-hot
The hot area is coloured red in the view.
Mixed
Hot areas are coloured yellow and cold areas are coloured purple.
Rain
Hot areas in the image are coloured, the rest is blue.
Red
Hot areas in the image are red.
Set display temperature range
Set a temperature range and the palette will only work for targets within that temperature range. You can set the temperature range.
- Tap Menu and select
Select automatic setting

or manual setting

Automatic
Select the unit automatically sets the temperature range setting.
Manual
Tap on an area on the screen that interests you. A circle will appear around the area and the temperature range will be adjusted to show as much detail of the area as possible. Tap the value on the screen to lock or unlock a value. Turn the dial on the screen to fine-tune the maximum and minimum temperature. Tap OK to exit.
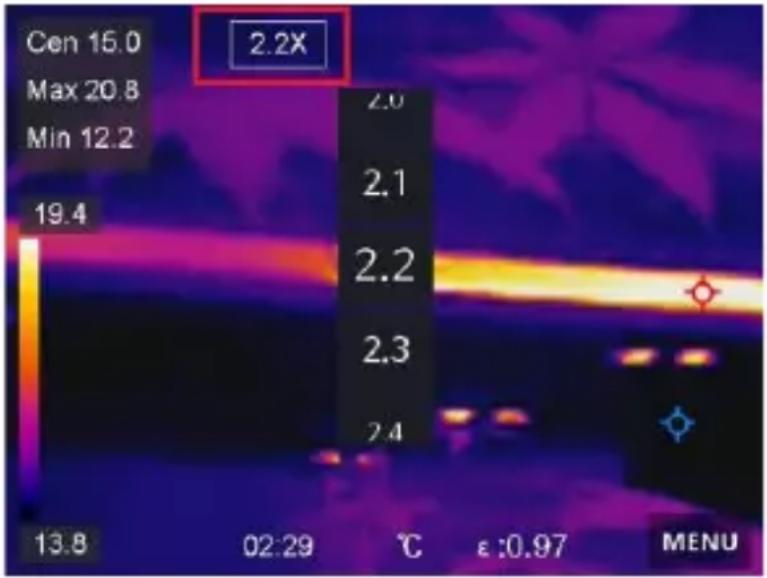
Set digital zoom
Tap the live view to access the digital zoom frame.
Tap the digital zoom frame.
text_image
Cen 15.0 Max 20.8 Min 12.2 19.4 2.2X 2.0 2.1 2.2 2.3 2.4 13.8 02:29 ℃ ε:0.97 MENUSelect the desired value for the digital zoom.
Tap on the screen to save and exit the function.
Display OSD information
Go to Settings → Display Settings to activate the display of information on the screen.
Time and date
Time and date of the unit.
Settings
Thermography settings, such as target emissivity, temperature unit, etc.
Temperature measurement
The thermography function (temperature measurement) provides the real-time temperature of the scene and displays it on the left of the screen. The thermography function is switched on by default.
Measurement settings
You have the option of adjusting the measurement settings to increase the accuracy of the temperature measurement.
-
go to Settings → Measurement Settings.
-
set the temperature range, emissivity, etc.
Temperature range
Select the temperature measurement range. In Auto Switch mode, the unit can detect the temperature and switch the thermographic range automatically.
Emissivity
Refer to the emissivity table to determine the emissivity of your target.
Reflection temperature
If there is an object other than the high temperature target in the scene and the emissivity of the target is low, set the reflection temperature as high temperature to correct the thermographic effect.
Distance
The distance between the target and the unit. You can adjust the distance of the target or select as Near, Medium or Far.
Humidity
The relative humidity of the current environment is set here.

Go to Settings → Device Settings → Device Initialisation → Remove All
Meters to initialise the temperature measurement settings.
Set unit
Go to Settings → Unit Settings → Unit to set the units of measurement for temperature and distance.
Adjusting the image measurement
You can set gauges to measure the minimum, maximum and average temperature of the current scene.
Tap Menu and select

Tap to select the desired thermography rule. Hot, Cold and Centre can be selected.
Tap Back to save and exit the function.

The minimum, maximum and average temperatures are displayed at the top left of the screen. Tap the rule again to delete it.
Set temperature alarm
When the temperature of the target triggers the set alarm rule, the unit performs the configured actions, such as emitting an acoustic warning signal and a flashing alarm.
Go to Settings → Measurement Settings → Alarm Settings.
Activate the temperature alarm and set the alarm parameters.
Alarm threshold
When the measured temperature exceeds the threshold, the unit sends an alarm message to the client software. If audible warning is activated, the unit emits a sound and the flash flashes if the light flash alarm has been activated.
Audible warning: The unit beeps when the temperature of the target exceeds the alarm threshold.
Flashing light alarm: The flashing light flashes when the target temperature exceeds the alarm threshold.
Manage albums
The recorded picture/video files are saved in albums. You can create new albums, rename an album, change the default folder, move files between albums and delete albums.
| Action | Process |
| Create new album | To access albums, pressTap to add a new album.A software keyboard is displayed that allows you to enter the name of the album by touching the screen.Tap to exit.The newly created album becomes the default storage album and is displayed at the top of the list of albums. |
| Rename album | To access albums, pressbSelect the album you want to rename.Tap and select Rename. A software keyboard is displayed.Touch to delete the old name and enter the new name for the album by touching the screen.Tap to exit. |
| Change default storage album | To access albums, pressSelect the album you want to use as the default storage album.Tap and select Set as Default Storage Album. |
| Delete album | To access albums, pressSelect the album that you want to delete.Tap and select Delete. An input field is displayed on the user interface.Tap OK to delete the album. |
Manage files
You can move, delete and edit the recorded files and add text notes to them.
| Action | Process |
| Delete video file | To access albums, pressTap to select the album where the file you want to delete is stored.In the album, tap the file to be deleted to display it.Tap the screen to display the menu bar below and tapAn input field is displayed on the user interface.Tap OK to delete the file. |
| Delete multiple files | To access albums, pressTap to select the album where the files you want to delete are stored.in the albumthen tap the files to be deleted.Tap onAn input field is displayed on the user interface.Tap OK to delete the files. |
| Move file | To access albums, pressTap to select the album where the file you want to move is stored.In the album, tap the file to be moved to display it.Tap the file to display the menu bar below and selectThe list of albums is displayed.Touch to select the album you want to move to. |
| Move multiple files | To access albums, pressTap to select the album where the files you want to move are stored.Tap in the albumselect the files to be moved.Tapthe list of albums is displayed.Touch to select the album you want to move to. |
Export files
Connect the unit to your PC using the cable supplied and export the videos and photos you have taken.
Open the cover of the USB port.
Connect the unit to your PC with the cable and open the recognised drive.
Select videos or photos and copy them to the PC to view them.
Disconnect the machine from your PC.
Connect Bluetooth
You can record and listen to sound in the videos via Bluetooth headsets after pairing the unit with a Bluetooth headset.
-
go to Settings → Connections → Bluetooth.
-
tap to activate Bluetooth.
After pairing, you can hear the sound through the headset while playing a video.
Set LED light
Tap Flashlight in the pop-up menu to activate the LED light.
Transferring the unit screen to the PC
The unit supports transferring the screen to the PC via a client software or player based on the UVC protocol. You can connect the unit to your PC via a Type-C cable and transfer the real-time live view of the unit to your PC.
Go to Settings → Connections → Transfer screen.
Tap to activate the function.
Open the UVC Alarm Client on your PC.
Connect the device to your PC using a Type-C cable.

During screen transfer, exporting files via a USB connection is not possible.
Connecting the machine with WLAN
Go to Settings → Connections → Wi-Fi.
Tap to activate the Wi-Fi. The WLANs found are then listed as follows.
Select a Wi-Fi network to which you want to connect. A software keyboard is displayed.
Enter password by touching the screen.

DO NOT tap the space bar or the password may not be correct.
Tap to enter the password in the password field.
Tap save the password and establish a Wi-Fi connection. A Wi-Fi icon is displayed on the main screen when the connection is established.
Set device hotspot
Thanks to the device hotspot, other devices that support WLAN can be connected to the device for data transfer.
Go to Settings → Connections → Hotspot.
Tap to activate the hotspot function. The hotspot name consists of the last 9 digits of the serial number of the unit.
Tap Set Hotspot. 4. A software keyboard is displayed.
Set the password for the hotspot.

DO NOT tap the space bar, otherwise the password may not be correct. The password must contain at least 8 characters and consist of numbers and letters. Tap to enter the password in the password field.
Tap to save.
Auto Power-Off
The unit has an auto power-off function to save energy. The setting can be adjusted in 10 min. steps from 0-60 min.
Set date and time
Go to Settings → Device Settings → Time and Date.
Set the date and time.
Press to save and exit.
Restore Device
Go to Local Settings → Device Settings → Device Restore to reset the device and restore the default settings.
Format memory card
When a memory card is used for the first time in the portable thermal imaging camera, it must first be initialised.
Select and go to Device Settings → Device Initialisation → Format Memory Card to initialise the memory card.
Emissivity table
| Material | Thermal emissivity | Material | Thermal emissivity |
| Aluminium | 0,30 | Glass | 0.90 to 0.95 |
| Asphalt | 0.90 to 0.98 | Iron oxides | 0.78 to 0.82 |
| Concrete | 0,95 | Lacquer | 0.80 to 0.95 |
| Leather | 0,95 | Plastic | 0.85 to 0.95 |
| Ceramics | 0.90 to 0.95 | Paper | 0.70 to 0.94 |
| Copper | 0,50 | Sand | 0,90 |
| Brick | 0,90 | Rubber | 0,95 |
| Carbon | 0,85 | Wood | 0,94 |
| Greasy sealant | 0,94 | Textiles | 0,94 |
| Frozen food | 0,90 | Lead | 0,50 |
| Hot dishes | 0,93 | Marble | 0,94 |
| Ice cream | 0.96 to 0.98 | Fabric (black) | 0,98 |
| Snow | 0,83 | Mortar | 0.8 to 0.90 |
| Human skin | 0,98 | Water | 0.92 to 0.96 |
Technical data
| Display | 3.5" LCD touch display (640 x 480 pixels) |
| IR resolution | 256 x 192 Pixel |
| Image resolution for visible light | 3264 x 2448 Pixel |
| Field of view | 50° x 37,2° |
| Emissivity | 0,01 - 1,00 |
| Temperature range | -20 to 400 °C |
| Accuracy | ±2 % or measured value ±2 °C |
| Frame rate | 25 Hz |
| Digital zoom | 1x - 4x |
| Spectral band | 7.5 - 14 μm |
| Focus | fixed |
| Colour palette | White Hot, Black Hot, Rainbow, Ironbow, Red Hot, Fusion, Rain, |
| Display options | Thermal/Visual/Fusion/BIB |
| Image storage | Internal memory (16 GB) |
| Operating temperature | -10 to 50 °C |
| Storage temperature | -20 to 60 °C |
| Relative humidity | <95 % RH |
| Power supply | Integrated battery |
| Auto Power-Off | 0-60 min. adjustable in 10 min. steps |
| Weight | 218 g |
| Size | 138.5 x 85.2 x 23.8 mm |
| Protection class | IP54 |
Cd = cadmium, Hg = mercure, Pb = plomb.
text_image
2022/08/24 08:14 71% ⑤ ⑥ ⑦ ⑧ ⑨ ⑩ ⑪ ⑫ Storage Space 13.18GB / 13.20GBFunciones básicas
Termografía
text_image
2022/08/24 08:14 71% ⑤ ⑥ ⑦ ⑧ ⑨ ⑩ ⑪ ⑫ Storage Space 13.18GB / 13.20GBFunzioni di base
Termografia
Cd = cadmium, Hg = kwik, Pb = lood.
text_image
2022/08/24 08:14 71% ⑤ ⑥ ⑦ ⑧ ⑨ ⑩ ⑪ ⑫ Storage Space 13.18GB / 13.20GBBasisfuncties
Thermografie
Germany info@testboy.de