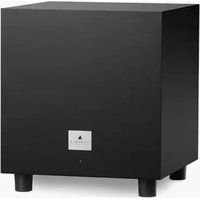
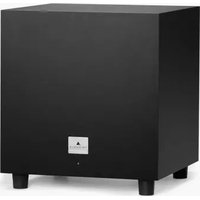
THETIS 300 - Subwoofer TRIANGLE - Free user manual and instructions
Find the device manual for free THETIS 300 TRIANGLE in PDF.
User questions about THETIS 300 TRIANGLE
0 question about this device. Answer the ones you know or ask your own.
Ask a new question about this device
Download the instructions for your Subwoofer in PDF format for free! Find your manual THETIS 300 - TRIANGLE and take your electronic device back in hand. On this page are published all the documents necessary for the use of your device. THETIS 300 by TRIANGLE.
USER MANUAL THETIS 300 TRIANGLE
MANUFACTURE ELECTROACOUSTIQUE
THETIS
natural_image
Pure diagram of a rectangular frame with no text, numbers, or symbols
natural_image
Simple line drawing of a rectangular frame with two legs and a central label (no text or symbols)THETIS 300THETIS 340
Owner's manual & Warranty
SOMMAIRE / SUMMARY
MODE D'EMPLOI - FRANÇAIS 5
- Unpacking 18
- Installation precautions 18
- Connecting 20
3.1 Connecting to a multi-channel audio/video amplifier 20
3.2 Connecting to a stereo amplifier 21
3.3 Connecting to a powered speaker equipped with a Subwoofer Output 24
- Powering ON 25
4.1 Placement and Settings 25
4.2 Using the remote control 26
- Troubleshooting 27
SPÉCIFICATIONS TECHNIQUES / TECHNICAL SPECIFICATIONS 30 INSTRUCTIONS DE SÉCURITÉ / SAFETY INSTRUCTIONS 32 GARANTIE / WARRANTY 34
MODE D'EMPLOI
FRANÇAIS
1. DÉBALLAGE
text_image
INPUT LFE LINE IN TRIANGLE OUTPUT RANKOUTFR
4. MISE SOUS TENSION
Open the box and take out the subwoofer.
If you notice any defects on any elements when unpacking, contact your dealer.
Before disposing the packaging, check that nothing is left inside.
INSTALLATION PRECAUTIONS
Before installing
Before connecting your installation, make sure all equipment is switched off. Make sure the switch is OFF before removing or connecting cables. Do not connect the power supply cable before completing all connections.
Moving the unit
Always disconnect the power supply cable and the cables between any other audio components when moving the unit. This is in order to prevent any short-circuiting or damage on plugs and connection cables.
Before switching the unit on
Check once again that all connections are correct and that volume buttons are at the minimum.
Places to avoid
Avoid placing your enclosure near damp areas or areas exposed to excessive sunlight and install it in a cool place.
Recycling
Your product contains valuable materials which can be recovered or recycled. Leave it at local point.
DESCRIPTION
- Power plug
- ON / OFF
- Auto ON / OFF
- Phase inversion button 0-180°
- Frequency cutoff knob
-
Volume
-
Low level inputs
- Low level input without filtering
- High level input
- High level output

text_image
INPUT LINE IN LFE VOLUME 30Hz 120Hz CROSSOVER PHASE ON OFF ACTIVE SUBWOOFER THETIS 9 10 HIGH LEVEL INPUT HIGH LEVEL OUTPUT LEFT | RIGHT | LEFT | RIGHT Serial Number TRIANGLE DISTRIBUTION FRANCE 301 Avenue Flandres Dunkerque 1940, 02200 Villeneuve-Saint-Germain FRANCE 6 5 4 3 2 1 CAUTION ATTENTION TO PREVENT FIRE DERELECTIVE BLOCK, DO NOT BE DURING THE APPLIANCE, TO SHOW ON MOUNTAGE ATTENTION - ME HAS OPEN - RANGES D'ELECTROSION ME HAS DURING A FE PRODUCTION FROM TO B TINBURDE, ASSEMBLED IN CHINA AC IN ON OFF POWER AC 105-240/- 60 Hz/50 Hz 1kW3. CONNECTING
Before making any connection to your system, turn off all devices.
If you are not sure about how to connect your system, we recommend that you contact your authorized reseller.
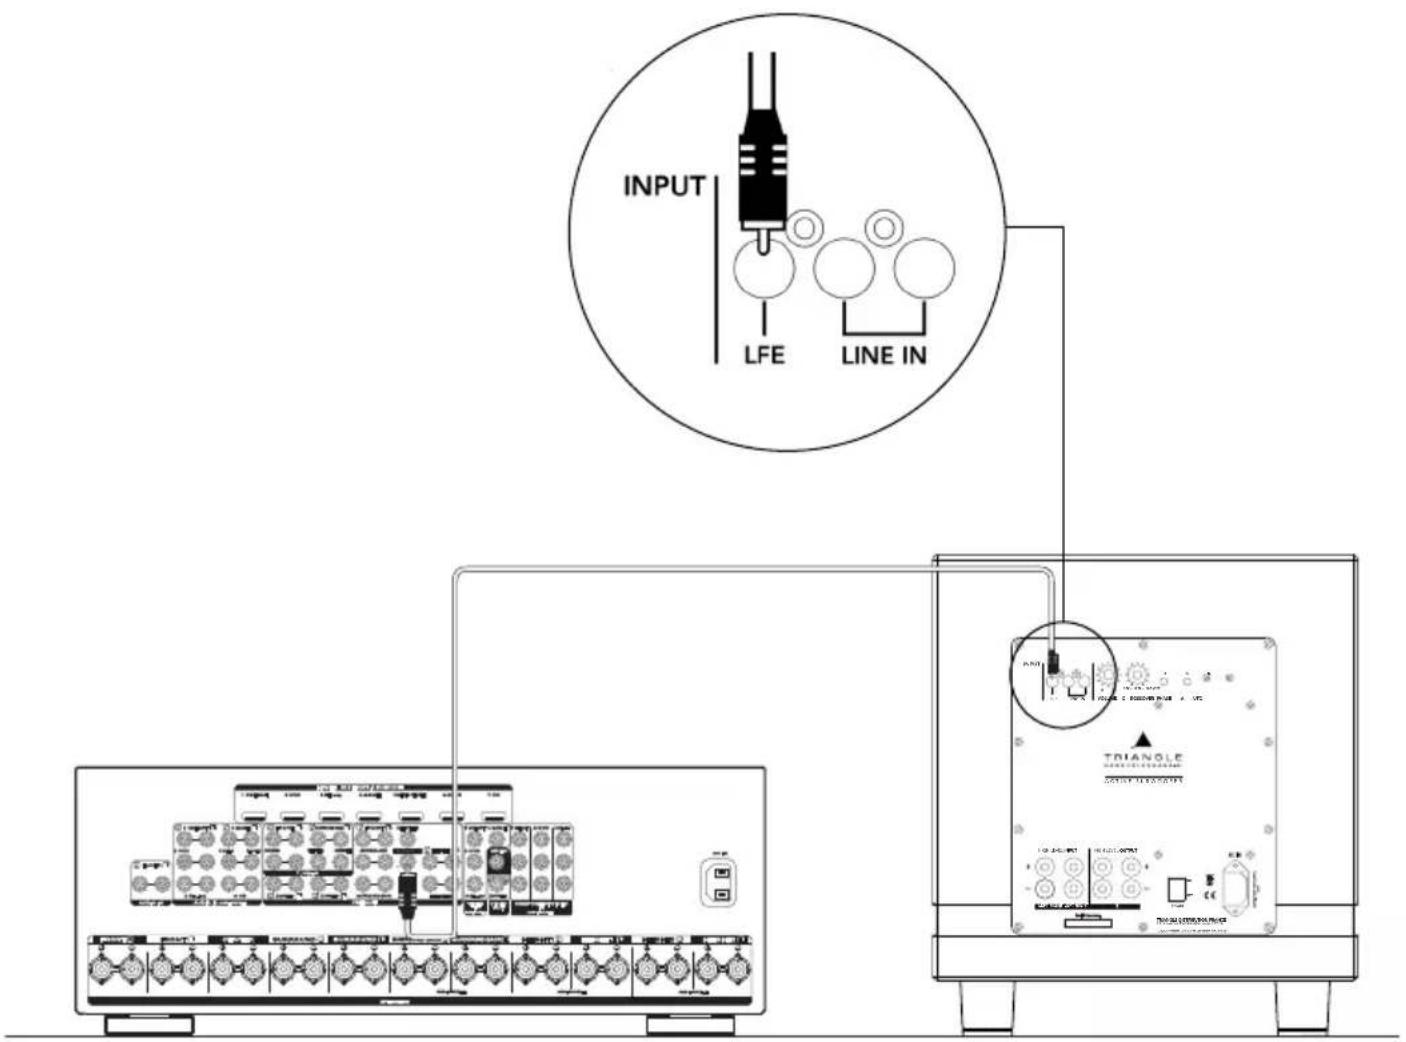
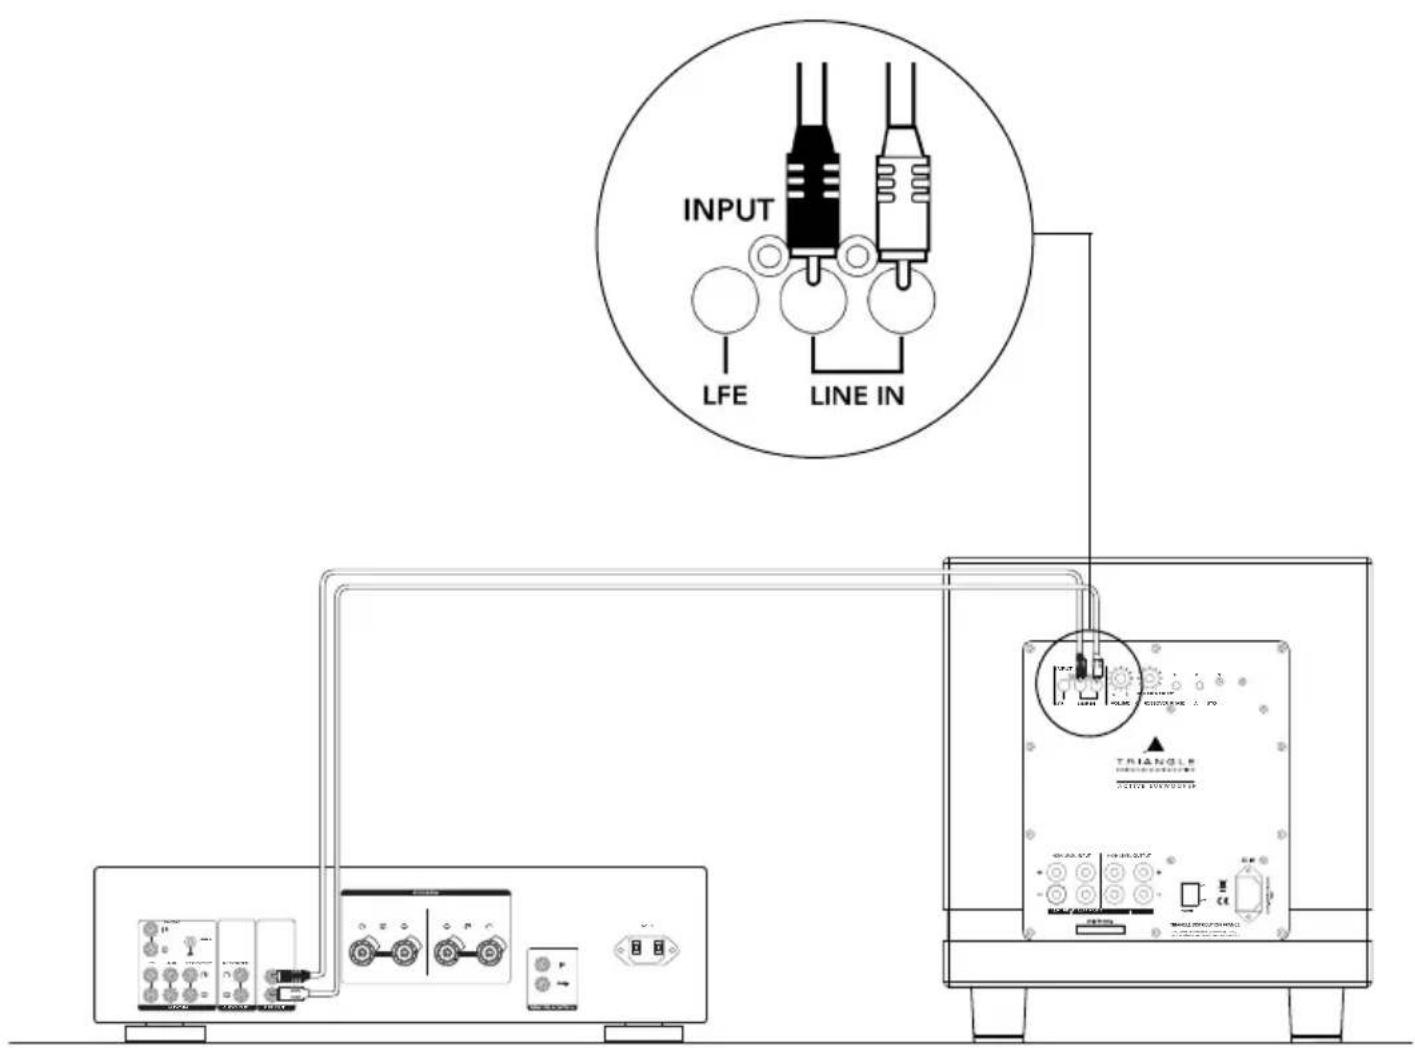
3.1 Connecting to a multi-channel audio/video amplifier
Use the SUBWOOFER output on your Audio/Video amplifier (RCA plug) and connect it to the LFE input on the subwoofer.
You can control the frequency roll-off from the menu of your AV amplifier. We recommend setting it to 80Hz to begin with (see the user's manual of your amplifier). The «Crossover» button on the subwoofer is inoperative in this mode.
Position the volume button to 3/4 on the subwoofer. You can change the volume on your audio/video amp or on the subwoofer if necessary.
See «Placement and Settings» (page 25) for more information on the settings.
text_image
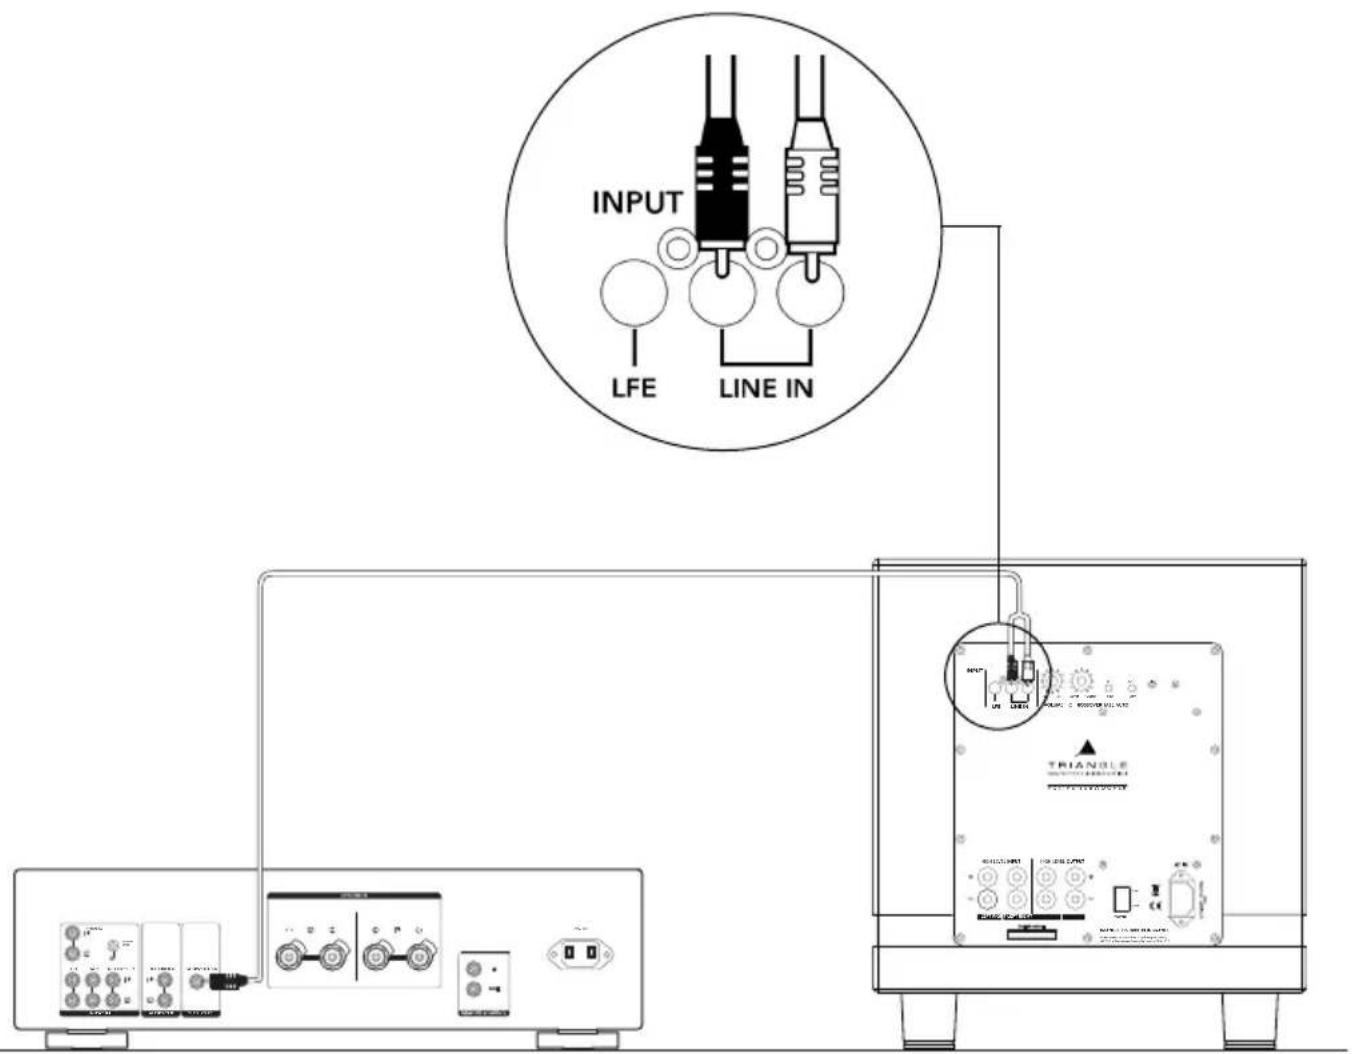
INPUT LFE LINE IN TRIANGLE OUTPUT3.2 Connecting to a stereo amplifier
There are 3 connection options depending on the connectors available on your preamplifier or integrated amplifier:
- If it has a PRE-OUT (L+R) output, you need to use an RCA stereo cable to connect to the LINE IN (L+R) on your subwoofer.
The volume and the frequency roll-off must be set on the subwoofer. For the first time use, we recommend setting the volume to half and the frequency roll-off (Crossover button on the subwoofer) to 80Hz.
See «Placement and Settings» (page 25) for more information on the settings.
text_image
INPUT LFE LINE IN TRIANGLE COUNTER CONTROLLEREN
- If it has a Subwoofer output, you need to use an RCA-to-dual RCA cable (Y cable) to connect to the LINE IN on your subwoofer.
The volume and the frequency roll-off must be set on the subwoofer. For the first time use, we recommend setting the volume to half and the frequency roll-off (Crossover button on the subwoofer) to 80Hz.
See «Placement and Settings» (page 25) for more information on the settings.
text_image
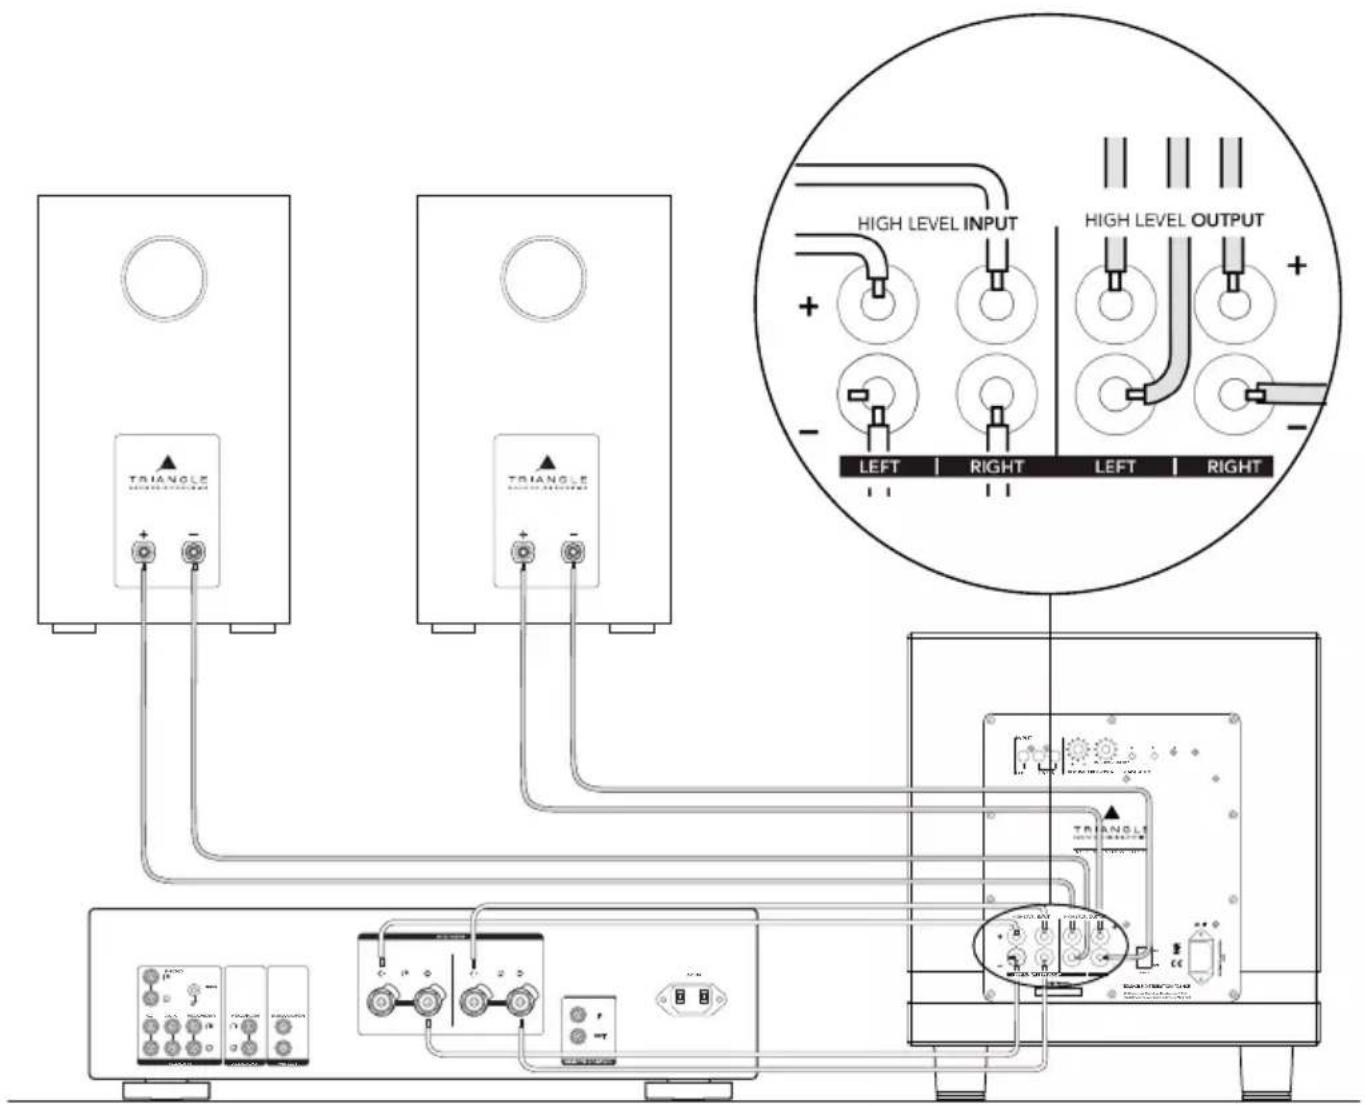
INPUT LFE LINE IN TRIANGLE POWER/INFORMATION- If it does not have any Subwoofer or PRE-OUT output, you must connect the speaker outputs of your amplifier to the HIGH LEVEL INPUT on your subwoofer.
For this, use of a hi-fi quality cable. During the connection, it is crucial to observe proper polarity to ensure correct use: the red terminals «+» of the subwoofer must be connected to the «+» terminals on your amplifier, the black terminals «-» to the «-» terminals on your amplifier.
The volume and the frequency roll-off must be set on the subwoofer. For the first time use, we recommend setting the volume to half and the frequency roll-off (Crossover button on the subwoofer) to 80Hz.
Your speakers can be connected to the HIGH LEVEL OUTPUT or directly to the amplifier.
See «Placement and Settings» (page 25) for more information on the settings.
text_image
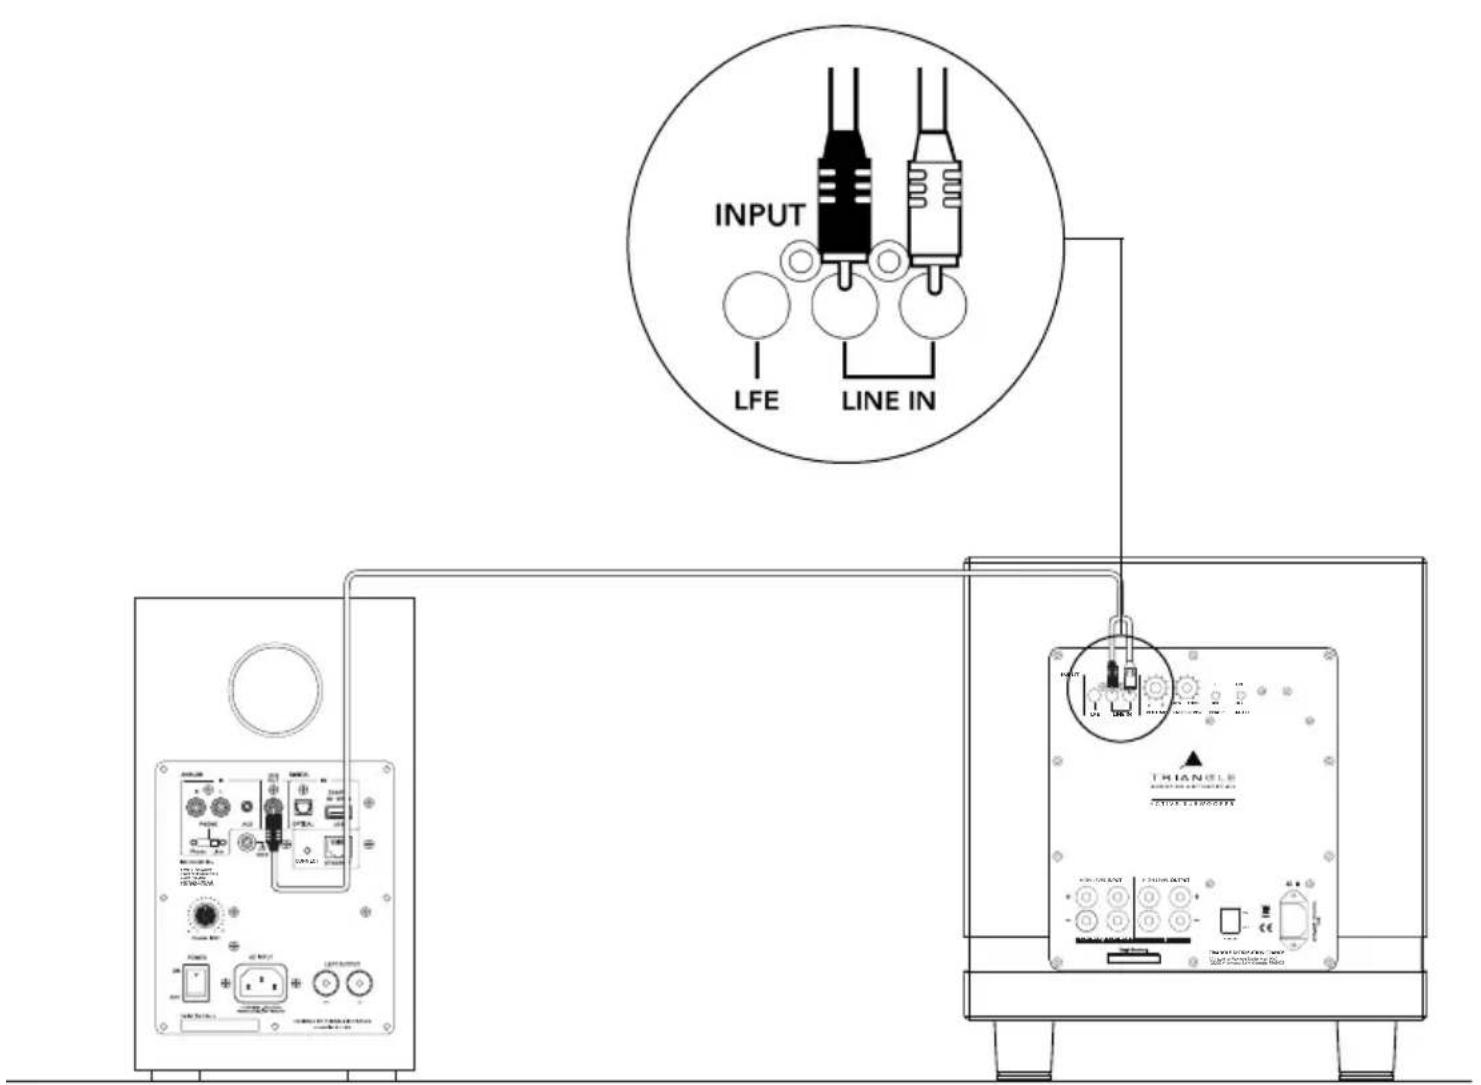
HIGH LEVEL INPUT HIGH LEVEL OUTPUT LEFT | RIGHT | LEFT | RIGHT3.3 Connecting to a powered speaker (such as TRIANGLE LN01A or LN05A) equipped with a Subwoofer Output
You need to use an RCA-to-dual RCA cable (Y cable) to connect the Subwoofer output of the powered speaker to the LINE IN on your subwoofer.
The volume and the frequency roll-off must be set on the subwoofer. For the first time use, we recommend setting the volume to half and the frequency roll-off (Crossover button on the subwoofer) to 80Hz.
text_image
INPUT LFE LINE IN THIANGLE TRELLA THIANGLE THIANGLE THIANGLE THIANGLE THIANGLE THIANGLE THIANGLE THIANGLE THIANGLE THIANGLE THIANGLE THIANGLE THIANGLE THIANGLE THIANGLE THIANGLE THIANGLE THIANGLE THIANGLE THIANGLE THIANGLE THIANGLE THIANGLE THIANGLE THIANGLE THIAAAA THIAAAA THIAAAA THIAAAA THIAAAA THIAAAA THIAAAA THIAAAA THIAAAA THIAAAA THIAAAA THIAAAA THIAAAA THIAAAA THIAAAA THIAAAA THIAAAA THIAAAA THIAAAA THIAAAA THIAAAA THIAAAA THIAAAA THIAAAA THIAAAA THIXXXXXXX THIXXXXXXX THIXXXXXXX THIXXXXXXX THIXXXXXXX THIXXXXXXX THIXXXXXXX THIXXXXXXX THIXXXXXXX THIXXXXXXX THIXXXXXXX THIXXXXXXX THIXXXXXXX THIXXXXXXX THIXXXXXXX THIXXXXXXX THIXXXXXXX THIXXXXXXX THIXXXXXXX THIXXXXXXX THIXXXXXX4. POWERING ON
Power on as follows:
▶Plug your subwoofer into AC power.
▶ Set the Auto selection switch to the ON position to enable the automatic powering on, or to the OFF position to disable it and use the remote to turn on the subwoofer. When using this function, the subwoofer will automatically enter standby mode when no audio signal is received for 15 minutes.
▶Toggle the ON/OFF switch to «ON».
Notes: When the subwoofer is not used for several days, cut the power using the power switch.
4.1 Placement and Settings
Place your subwoofer at the front of the listening area (between the two main speakers or in a corner) for a better sound quality.
There are 2 possible adjustments available: volume and frequency roll-off.
The ideal setting is the one that matches a lifelike reproduction of the lowest frequencies, harmonized as much as possible with your main speakers. You should not "feel" the subwoofer. The bass must seem to come from the main speakers.
Tip to set the frequency roll-off: between 30Hz and 80Hz with larger main speakers, between 80 and 120Hz with smaller speakers.
When searching for the optimal result, it can be very convenient to use the polarity reverse switch. This switch has the function of reversing the polarity of the acoustic signal emitted by the subwoofer. Depending on where you place the subwoofer in relation to the main speakers in the room, the reversing of the polarity of the subwoofer can help find a better consistency in the system's overall response at lower frequencies.
We recommend making different tests to find the setting that suits your needs best. You can use a track that you know well and analyze the result, depending on your taste, and aspirations.
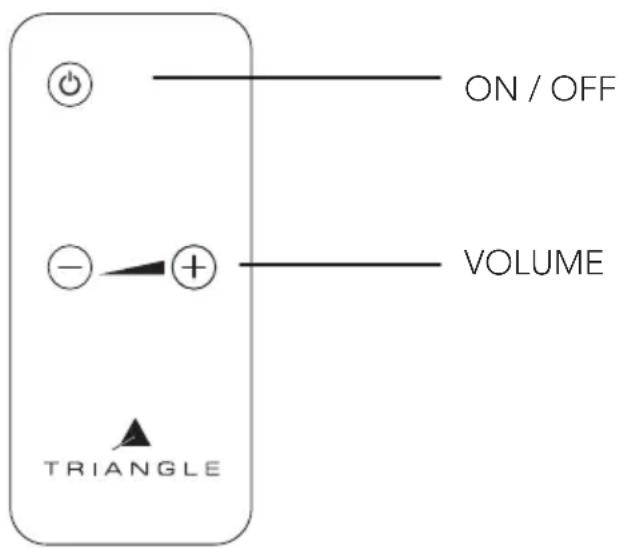
4.2 Using the remote control
The remote allows you to power your subwoofer on and off, and to adjust the level.
The subwoofer features a level meters with LED, with 9 volume positions available for controlling the desired volume. When using the remote, always point it towards the receiver at the front of the subwoofer.
text_image
ON / OFF VOLUME + - - ▲ TRIANGLECAUTION
Never open the subwoofer due to risk of electrical shock.
Check well that your power supply voltage corresponds to the one on the product (230V or 120V). A wrong voltage can break the product.
TROUBLESHOOTING
If the equipment fails to operate correctly, check the points below. If the problem continues, a malfunction may be possible. Disconnect the power supply immediately and contact your dealer.
| OBSERVATION CAUSE SOLUTION | ||
| The subwoofer does not turn ON | There is no power supply to the subwoofer | Check these points by order:- if the switch is on ON or OFF- if the power supply cable is connected- if the power plug is working |
| No sound is coming from the subwoofer | There is no input signal to your subwoofer | Check these points by order:- if the subwoofer is correctly connected to the amplifier- if the A/V or stereo amplifier is switched on- if your A/V or stereo amplifier has a working source of music (CD,DVD,etc.)- if the signal sent by the A/V amplifier is not too weak or if the subwoofer function is not on NO (see your owner's manual) |
| The level of the sound is weak, although the subwoofer volume is at maximum | Incorrect adjustment of the A/V amplifier | Check the subwoofer setting at the A/V amplifier (see your owner's manual) |
| The subwoofer shuts off at loud peaks | The sound level of the subwoofer is too high and the integrated electronic protection sets in | Lower the sound level (on the A/V amplifier or directly on the subwoofer) |
For any further information concerning your system, please consult our website:
http://www.trianglehifi.com/
www.trianglehi.com
facebook.com/trianglehi

instagram.com/trianglehi

twitter.com/trianglehi
GAMME THETIS / THETIS RANGE
| Spécifications Techniques Technical Specifications | THETIS 340 THETIS 300 | |
| Type Bass-Reflex Bass-Reflex | ||
| Diamètre du haut-parleur (cm)Driver diameter (inch) | 2510 | 208.3 |
| Bande passante Bandwidth | 25-120 Hz 32-120 Hz | |
| Fréquence de coupure filtre Crossover cutoff frequency | Bouton rotatif 30-120 HzRotating knob 30-120 Hz | Bouton rotatif 30-120 HzRotating knob 30-120 Hz |
| Puissance amplificateur (RMS)Amplifier Power (RMS) | 250 W Classe D / D-Class 150 | W / Classe D / D-Class |
| Affichage Display | Afficheur Volume Façade avant Front panel Volume display | Afficheur Volume Façade avant Front panel Volume display |
| Volume | Bouton rotatif, Télécommande Rotating knob - IR remote | Bouton rotatif, Télécommande Rotating knob - IR remote |
| Phase | 0-180°(2 positions) | 0-180°(2 positions) |
| Entrées Inputs | LFE - Line IN (L/R) -Speaker IN | LFE - Line IN (L/R) -Speaker IN |
| Sorties Outputs | Speaker OUT Speaker OUT | |
| Dimensions LxHxP (mm)Dimensions LxHxW (inch) | 340x 380 x 34013.38 x 14.96 x 13.38 | 300 x 340 x 30011.81 x 13.38 x 11,81 |
| Poids de l'enceinte (kg)Net Weight (lbs) | 16.135.5 | 10.623.4 |
| Poids avec packaging (kg)Gross Weight (lbs) | 17.839.2 | 12.127.6 |
natural_image
Simple line drawing of a rectangular frame with two side supports and a central label (no text or symbols on the frame itself)
natural_image
Simple line drawing of a rectangular frame with two legs and a horizontal bar, no text or symbols present.THETIS 340 THETIS 300
INSTRUCTIONS DE SÉCURITÉ
WARNING: Read carefully all the safety instructions before using the device.
- Keep these safety instructions for future reference.
- Do not use this apparatus near water or liquid.
- Only clean with a dry and soft cloth.
- Make sure the openings (vents) on the device are not blocked.
- Do not install near any heat sources such as radiators, stoves, or any other apparatus (including amplifiers) that produce heat.
- Only use accessories specified by the manufacturer.
- Be sure that the stand/table/furniture is strong enough to support the apparatus (stand, shelf, furniture...).
- Protect the power cord from being walked on or pinched, particularly at the plugs, and protect the connector where it exits from the apparatus.
- Unplug the apparatus during lightning storms or when it's unused for long periods of time.
- The plug of the apparatus must fit with the outlet. Never modify the plug in any way. The apparatus should be connected to a mains socket outlet with protective earthing connection.
- Refer to your authorized TRIANGLE dealer or qualified service personnel if the apparatus is damaged in any way. For example, if the power cord or the wall outlet is damaged, liquid has been spilled or objects have fallen on the apparatus, the apparatus has been exposed to rain or moisture, does not operate normally, or has been dropped.

text_image
CAUTION RISK OF ELECTRIC SHOCK DO NOT OPENGARANTIE / WARRANTY
Thanks for buying a TRIANGLE product.
We want you to enjoy your purchase to the fullest. The first step is an easy registration of your product. By doing this, you will benefit from helpful tips, products support, special offers and 2 years warranty.
1- Online registration
Register your product easily online at the following address: http://register.trianglehifi.com/
2- Warranty card
You can also register your product and validate your warranty by filling the warranty card and sending it to:
TRIANGLE DISTRIBUTION FRANCE
301 Avenue Flandres Dunkerque 02200 Villeneuve-Saint-Germain FRANCE
Note on the warranty
Your TRIANGLE loudspeakers are warranted for 2 years. This warranty takes effect from the date of purchase and covers any manufacturing defect or damage your loudspeakers could suffer as a result of these same defects. This warranty is granted solely to the first owner of the product and is not transmittable in the case of resale. To validate your warranty, you will need to register online or mail the warranty coupon to TRIANGLE. Please note, this warranty is voided if any fault arises from ill-treatment or careless handling of the product.
The following are excluded from this warranty:
- A burned voice-coil caused by overloading the loudspeaker
- Any fault occurring from professional usage (public sound systems, PA systems, etc.)
- Any fault resulting from storage in areas of high humidity
• A pierced or torn membrane - A torn suspension
- Any fault resulting from a mechanical shock (e.g. if dropped or handled roughly)
- Any fault arising from servicing by anyone other than an authorized TRIANGLE service technician
• Damaged cabinets due to mishandling