Comfortbakery 99356 - Saucepan TREBS - Free user manual and instructions
Find the device manual for free Comfortbakery 99356 TREBS in PDF.
User questions about Comfortbakery 99356 TREBS
0 question about this device. Answer the ones you know or ask your own.
Ask a new question about this device
Download the instructions for your Saucepan in PDF format for free! Find your manual Comfortbakery 99356 - TREBS and take your electronic device back in hand. On this page are published all the documents necessary for the use of your device. Comfortbakery 99356 by TREBS.
USER MANUAL Comfortbakery 99356 TREBS
natural_image
Red plastic electrical fuse housing with black clamps and a small orange button (no visible text or symbols)Handleiding 6-in-1 Snackmaker Bedienungsanleitung 6-in-1 Snackmaker Manual 6-in-1 Snackmaker Mode d'emploi Machine à Snacks 6-en-1
Index
Nederlands 3
Deutsch....13
English 23
Français....33
Nederlands
WAARSCHUWING - VERBRANDINGSGEVAAR:
- This appliance can be used by children aged from 8 years and above, as well as by persons with reduced physical, sensory, or mental abilities, or lack of experience and knowledge. if they have been given supervision or instruction concerning use of the appliance in a safe way and if they understand the hazards involved. Children must not play with the appliance. Cleaning and user maintenance must not be carried out by children without supervision.
- Children must not play with the appliance.
- Children under 8 years of age must be kept away from the appliance and from the cord.
- Before commissioning, please check the entire appliance, including possible accessories, for defects which could impair the functional safety of the appliance. If any faults are found, the appliance must not be put into operation.
- The appliance may only be plugged into a properly installed electrical socket, whose ratings match the rating plate of the appliance.
- Pull the plug out of the socket
■ When the use has been terminated,
■ When you take the appliance apart or reassemble it,
■ If the appliance is not in use for a long period of time,
■ Before cleaning,
■ During a thunderstorm. - Do not pull the plug out of the socket by the cord; grasp the plug.
- Never pull the power cord to move the appliance. Make sure that the power cord is not squashed or kinked.
- Never let the power cord hang down (risk of stumbling!), and make sure that it does not touch hot surfaces.
- The appliance must not be operated by means of an external timer.
- The appliance is intended for use in households or similar applications (offices, flats, customers in hotels, etc.), not for commercial use.
- Place the appliance on even, stable surfaces.
- Make sure that the underlay is heat resistant (do not put on tablecloth, wooden plates, etc.).
- Never operate or place the appliance on hot surfaces (cooking surface) or near open flames.
- Make sure that the warm/hot parts do not come into contact with highly flammable objects such as curtains, tablecloths, etc. Risk of fire!
- Use the appliance only in indoor areas.
- Use the appliance only in a clean, dust-free environment.
- Do not cover or place any objects on top of the appliance (vases, candles, doilies, etc.).
- Make sure that the appliance is free during operation. To prevent heat build-up, do not place the appliance directly under a cabinet.
- Do not operate the appliance near flammable liquids or pressurized aerosol cans.
- Do not leave the appliance unattended while in operation.
- Do not use any accessories that are not part of the appliance.

- Never immerse the appliance base, power cord or plug in water or other liquids - ELECTRIC SHOCK HAZARD!
- A possible warranty claim will expire if the following precautions are not observed:
■ Use the appliance only for its intended use as described in this manual. Any other use may cause damage to the appliance.
■ Do not rebuild or modify the appliance for safety reasons.
■ Do not open the housing of the appliance, there are no user serviceable parts inside.
If the power cord of the appliance is damaged, the appliance must not be put into operation. Bring it to an authorised service centre for repair.
■ Repairs to electrical appliances must be carried out by specialists as safety regulations must be observed, and in order to avoid hazards.
■ This user manual is intended to familiarize yourself with the safety instructions and functions of this appliance. Please keep this manual in a safe place for future reference.
WARNING - HEAT RISK:
- Parts of the appliance become hot during operation. Use caution not to touch these hot surfaces with your hands while handling.
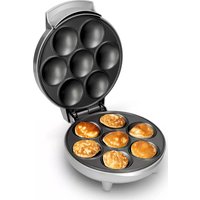
Appliance description
- Power on indicator
- Support foot (top and bottom)
- Rubber pad (top and bottom)
- Handle
- Safety lock
- Retaining clips for insert plates
- Non-stick coated insert plates / baking moulds

text_image
2 1 3 6 4 5 7 A B C D E FA. Insert plate waffle cups
B. Insert plate cakes or donughts in flower shape
C. Insert plate cake pops
D. Insert plate madeleines
E. Insert plate waffles
F. Insert plate donughts
Before first use
- Remove the packing material and the transport safety devices completely from the appliance. Packing material is recyclable - dispose of the safety regulations.
- Rinse the plates with warm water. Dry them well before inserting them into the appliance.
- Wipe the housing of the appliance with a damp cloth.
- Unwind the power cord completely.
- Allow the appliance to heat up for a few minutes. This means that any protective grease that may be present is eventually evaporated. This causes slight smell and smoke to form, but this is non-hazardous and occurs only at initial use. Ensure adequate ventilation.
Insert / remove the plates
- Use the handle to lift the upper part.
- Press the two-sided retaining clips of the plate gently, slightly apart and remove the plate from the appliance.
- To insert the plates, slide the lower tabs of the plate into the dedicated openings in the appliance and guide the plate downwards until it locks in the retaining clips.
Connection
- Plug into the electrical socket. The power on indicator goes on.
- The appliance may only be plugged into a properly installed and freely accessible grounded socket.
- The mains voltage must match the voltage rating specified in the rating plate of the appliance (230V \~ 50/60 Hz).
- The appliance complies with the directives which are mandatory for the CE marking.
Operation
- Insert the desired baking moulds into the appliance as described above.
- Oil/grease the plates slightly.
- Plug into the electrical socket - the power on indicator goes on. Let the appliance heat up while keeping it closed (about 2 minutes). Once the baking temperature has been reached, the power on indicator will go off.
Please note:
The appliance is equipped with a Thermostat which causes the heater to heat up to the baking temperature and then switch off (power on indicator goes off). If the baking temperature is undershot, the thermostat will switch the heater on again (power on indicator goes on again).
- Pour the prepared dough into the baking mould.
For doughnuts and pop cakes a pastry bag is suitable for filling.
Please note:
Do not overfill the baking moulds, leaking dough might burn and cause damage to the appliance.
- Lower the upper part of the appliance and lock the upper and lower parts with the safety lock.
- The baking process takes about 4 - 8 minutes depending on the recipe and the baking mould. Use the handle to turn the appliance over halfway through the baking process so that the dough can rise evenly in the moulds.
-
Release the safety lock and check whether the baked goods have reached the desired tan; if not, close the appliance again and continue the baking process.
-
Once the baked goods are ready, take them out of the mould, taking care not to damage the non-stick coating.
- If necessary, grease the baking moulds (approx. after every third filling) and refill the dough.
- In order to avoid unnecessary heat loss, the appliance should always be kept closed during baking breaks.
- If you want to stop the baking process, unplug the appliance and allow it to cool down open.
Note:
The appliance is equipped with a support foot and a non-slip rubber pad both at the top and the bottom. These items allow the appliance to be overturned during the baking process. By overturning, the dough can spread more evenly in the baking moulds.
Cleaning
In order to achieve the longest possible service life of the appliance, it is necessary to ensure its regular cleaning. This is especially necessary for hygienic reasons:
- Pull the plug out of the socket.
- Allow the appliance to cool down completely.
- Remove the plates from the brackets as described above.
- Wash the plates in mild rinsing water. A soft kitchen brush or sponge can be used for persistent dough residues.
- Clean the housing with a damp cloth.
- Do not use sharp cleansers, gasoline or alcohol based cleaning agents for cleaning.
- Do not use abrasive cleansers or scrapers as these could damage the non-stick coating of the baking plates.
- Do not immerse the appliance base with power cord and plug in water or other liquids.
- Dry the plates carefully before reinserting them into the appliance base.
Storage
The appliance can be stored upright to take up minimum space. Keep the appliance in a dust-free, dry place away from children.
A variety of recipes for waffles, doughnuts, cake pops, waffle cups, cakes and madeleines cakes can be found on the Internet. The book store also offers a good selection of recipe books. In this manual is only included a base recipe for waffles, donuts, cake pops, madeleines, ice waffle cups and flower looking cakes.
| Ingredients: | Preparation: |
| Waffles: | |
- 110 g flour- 1/4 tsp baking powder- 100 g butter (soft)- 75 g sugar- Salt- 2 eggs- 50 ml milk- Oil for the waffle mould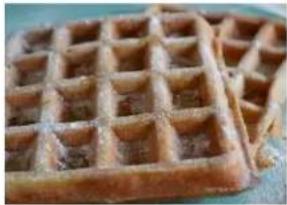 | - Put flour and baking powder through a sieve.- Stir the butter, sugar, and salt until frothy.- Whisk the eggs gradually.- Add flour mixture and milk alternately and stir well.- Allow to cure for 10-15 minutes before use.- Place the waffle plates in the appliance and smear with oil. Once the appliance has reached the baking temperature, add about 2 tbsp dough to the middle of the waffle plates, close and bake the waffles until crispy.- Process the remaining dough in the same way.- If desired, sprinkle waffles with sugar or cinnamon sugar. |
| Donuts: | |
- 170 g flour- 1/2 pkg baking powder- 2 eggs- 85 g sugar- 1 pkg vanilla sugar- 170 ml milk- 4 tbsp oil- Salt- Oil for the doughnut mould | - Put flour and baking powder through a sieve.- Whisk eggs with sugar, vanilla sugar, and salt until frothy.- Add flour mixture, milk, and oil alternately, and then knead into a smooth dough.- Place the doughnut plates in the appliance and smear with oil. Once the appliance has reached the baking temperature, add 1 tbsp tinted dough to each ring. Close the appliance and bake the doughnuts in for 4 minutes until golden brown.- Process the remaining dough in the same way.- If desired, sprinkle warm doughnuts with sugar powder or decorate with glaze. |
| Pop cakes: | |
- 110 g flour- 1 tsp baking powder- 2 tbsp cocoa- 2 eggs- 110 g sugar- 1 pkg vanilla sugar- Grated lemon peel- 70 ml oil- 50 ml water- Oil for the pop cake mould | - Put flour, cocoa, and baking powder through a sieve.- Whisk until frothy, add sugar, vanilla sugar, and lemon peel.- Add flour mixture, oil, and water alternately, and then knead into a smooth dough.- Place the pop cake plates in the appliance and smear with oil. Once the appliance has reached the baking temperature, add 1 tbsp tinted dough to each mould. Close the appliance and bake the pop cakes in for 7 minutes.- Process the remaining dough in the same way.- Place the ready-baked balls on top of pop cake sticks, glaze and sprinkle as desired. |
| Madeleines: | |
- 1 egg- 1 egg yolk- 50 g sugar- 50 g butter- 30 g flour- 1,5 tbsp maizena- 0,5 tsp baking powder- Grated lemon (half)- Oil for the Madeleine mould | - Melt the butter- Whisk the egg, egg yolk, sugar and grated lemon into smooth dough- Add flour, maizena and backing powder- Mix the butter under the texture- Place the Madeleine plates in the appliance and smear with oil. Once the appliance has reached the baking temperature, add 1 tbsp tinted dough to each mould. Close the appliance and bake the Madeleines in for 8 minutes.- Process the remaining dough in the same way.- Cover them with powdered sugar- Add cocoa powder to make chocolate Madeleines |
| Waffle cups: | |
- 1 egg- 125 g flour- 250 ml milk- 0,5 tbsp sugar- 1 tbsp oil- 0,5 tbs baking powder- 0,5 tbs salt- Oil for the waffle cup mould | - Mix flour, sugar, baking powder and salt- Whisk milk, egg and oil- Add the mixture with the ingredients- Place the waffle cup plates in the appliance and smear with oil. Once the appliance has reached the baking temperature, add 2 tbsp tinted dough to each mould. Close the appliance and bake the waffle cups in for 4 minutes.- Process the remaining dough in the same way.- Fill the waffle cups with your desired fillings |
| Flower shape cake: | |
- 4 eggs- 200 g butter- 200 g sugar (bastard)- 1 bag of vanilla sugar- 200 g flour- Touch of salt- Oil for the cake/donut mould | - Mix the butter, sugar, vanilla sugar and salt into a smooth dough- Mix the eggs one by one- Fold the flour- Place the flower cake plates in the appliance and smear with oil. Once the appliance has reached the baking temperature, add 2 tbsp tinted dough to each mould. Close the appliance and bake the flower cakes in for 8 minutes.- Process the remaining dough in the same way.- If desired, sprinkle warm doughnuts with sugar powder or decorate with glaze. |

Old electric and electronic devices frequently still contain valuable materials. However, they also contain damaging substances, which were necessary for their functionality and safety. If these were put in the non-recyclable waste or were handled incorrectly,
they could be detrimental to human health and the environment. Therefore, do not put your old device into the non-recyclable waste under any circumstances.
PLEASE NOTE
- Utilize the collection point, established in your town, to return and recycle old electric and electronic devices. If necessary, contact your town hall, local refuse collection service or your dealer for information.
- Ensure that your old device is stored safely away from children until it is taken away.
Guarentee
• We provide a 24 month guarantee for this product, commencing from the date of sale, for faults
• which are attributable to production or material faults.
- The guarantee does not include damages, which were incurred as a result of improper handling or use, as well as malfunctions which only have a minor effect on the function or the value of the device. Consumables, transit damages, inasmuch as we are not responsible for these, as well as damages, which were incurred as a result of any repairs that were not performed by us, are also excluded from the guarantee entitlements.
- This device is designed for use in domestic situations and has the appropriate performance levels.
- Any use in commercial situations is only covered under the guarantee to the extent that it would be comparable with the stresses of being used in a domestic situation. It is not intended for any additional, commercial use.
- In the event of justified complaints, we will repair the faulty device at our discretion or replace it with a trouble-free device. Please always go back to the store you bought the product.
Any pending faults must be reported within 14 days of delivery to the store you bought the product. All further claims are excluded.
To enforce a guarantee claim, please contact your store prior to returning the device (always provide us with proof of purchase).
Technical data
| Device | 6-in-1 Snackmaker |
| Model | 99356 |
| Mains data | 220-240V~50/60Hz |
| Power consumption | 700 W |
Service
If you have any further questions about the product after reading this manual, please contact the Trebs customer service.
Trebs BV
Thermiekstraat 1a
6361 HB Nuth
Nederland