
ES50H-CK1 - Boiler HAIER - Free user manual and instructions
Find the device manual for free ES50H-CK1 HAIER in PDF.

| Product type | Electric storage water heater |
| Brand | Haier |
| Model | ES50H-CK1 |
| Capacity | 50 liters |
| Rated power | 1200 W |
| Rated voltage | 220-240 V |
| Rated frequency | 50/60 Hz |
| Maximum temperature | 75 °C |
| Protection rating | IPX4 |
| Water inlet pressure | 0.05 - 0.75 MPa |
| Approximate dimensions (H × L × P) | 640 × 420 × 390 mm |
| Net weight | Approximately 20 kg (estimated) |
| Tank type | Enameled tank with magnesium rod |
| Temperature adjustment | Rotary knob, from minimum temperature to 75 °C |
| Heating indicator light | On during heating, off when insulated |
| Safety valve | Integrated, to be checked monthly |
| Cleaning | Exterior: damp cloth with mild detergent; Interior: draining and rinsing |
| Periodic maintenance | Replacement of magnesium rod and descaling by a professional |
| Safety instructions | Mandatory grounding, do not use without water, do not install outdoors |
Frequently Asked Questions - ES50H-CK1 HAIER
User questions about ES50H-CK1 HAIER
0 question about this device. Answer the ones you know or ask your own.
Ask a new question about this device
Download the instructions for your Boiler in PDF format for free! Find your manual ES50H-CK1 - HAIER and take your electronic device back in hand. On this page are published all the documents necessary for the use of your device. ES50H-CK1 by HAIER.
USER MANUAL ES50H-CK1 HAIER
Electric Water Heater Instruction manual
ES50H-CK1(MEA)
ES80H-CK1(MEA)
natural_image
Exterior view of a modern white cylindrical water heater with a gauge and indicator lights (no text or symbols on the body)EN FR ES PT AR
- Please read this manual carefully before use
- Please keep this manual for reference
Contents (EN)
Safety Precautions....3-4
Installation Instructions....5-7
Instructions for Use....7-8
Cleaning and Maintenance....8
FAQs....9
Réponses aux questions....16
Directorio (ES)
Safety Precautions (Please read before use)
Explanation of the symbols

prohibition Warnin
Acts that must be prohibited

Acts that must be performed

Acts that must be noted

If you find any abnormalities in the water heater or smell a burnt odor, please cut off the power immediately and contact the service center.

Warning
Be sure to use a separate 220-240V,50/60 Hz power supply.

Ensure grounding
In order to ensure safety, the water heater should use an independent socket (multi-function socket is forbidden) and be reliably grounded, and the quality of the socket should meet the national standards. It is strictly prohibited to use the water heater without grounding. Use the measuring pen to measure whether the live line and the neutral line are connected inversely.

Warning
Do not use broken power cords and power sockets. Clean dust from power plugs and sockets in a timely manner.

Warning
You can refer to the below part for the type or characteristics of the pressure-relief device (safety valve) and how to connect it, unless it is incorporated in the appliance.

Warning
The max. inlet water pressure is 0.75MPa, and the min. inlet water pressure is 0.05MPa.

prohibition
Do not touch the plug with wet hands to prevent the water heater, plug and socket from getting wet. If it is soaked by accident, it must be inspected and confirmed by the professional designated by the company before use again to prevent electric shock.

Warning
You can refer to the below part for how the appliance is to be fixed to its support.

Warning
You can refer to the below part for how the water heater can be drained.

prohibition
Non-professional maintenance personnel are not allowed to repair, maintain, disassemble or modify the water heater without authorization.

Note
Children aged from 3 to 8 years are only allowed to operate the tap connected to the water heater. (EN standard)

prohibition
Do not install the water heater outside.

Warning
A discharge pipe connected to the pressure-relief device is to be installed in a continuously downward direction and in a frost-free environment.

Warning
Children should be supervised to ensure that they do not play with the appliance.

Warning
If the power cord is damaged, it must be replaced by the manufacturer or the maintenance department or by dedicated personnel to avoid danger.

Warning
The pressure-relief device is to be operated regularly to remove lime deposits and to verify that it is not blocked.

Warning
The water may drip from the discharge pipe of the pressure-relief device and that this pipe must be left open to the atmosphere.

Note
If the water heater is not used for an extended period of time, disconnect the power and drain the water heater as described in the Cleaning and Maintenance section.

prohibition
This appliance is not intended for use by persons (including children) with reduced physical, sensory or mental capabilities, or lack of experience and knowledge, unless they have been given supervision or instruction concerning use of the appliance by a person responsible for their safety.

Note
This appliance can be used by children aged from 8 years and above and persons with reduced physical, sensory or mental capabilities or lack of experience and knowledge if they have been given supervision or instruction concerning use of the appliance in a safe way and understand the hazards involved. Children shall not play with the appliance. Cleaning and user maintenance shall not be made by children without supervision. (EN standard)
Installation precautions
- In order to prevent the occurrence of accidents, you must install the accessories provided by our company and shall not replace or replace them by yourself. If the accessories are damaged, you must inform the maintenance department of our company to repair and replace them with the accessories provided by our company.
- Water heater should be installed indoors. Do not install the water heater in an icy environment below 0°C. Icing may break containers and water pipes, resulting in burns and water leakage. Piping should be centrally arranged, and the hot water outlet should not be too far away from the hot water use point. If the distance is more than 8m, the hot water pipe should be insulated to reduce heat loss.
- When installing the water heater, a certain space should be reserved (at least 300mm on the right side) for the convenience of future maintenance. If the water heater is installed in the gusset, the right gusset should be movable to facilitate removal of the plastic cover during maintenance.
- The installation location of the water heater should be convenient for use, maintenance and floor drain. In case of tank or pipe leakage, no damage will be caused to nearby or lower facilities. Try to avoid installation in the toilet, bathtub, wash basin, door frame above, so as not to let the user produce depression or insecurity.
- The wall of the water heater should be solid and firm, and can bear the weight of the water heater after being filled with 4 times more water. For non-load-bearing walls or hollow brick walls, appropriate protective measures must be taken, such as installing supports, using through-wall screws, installing backboards, etc.
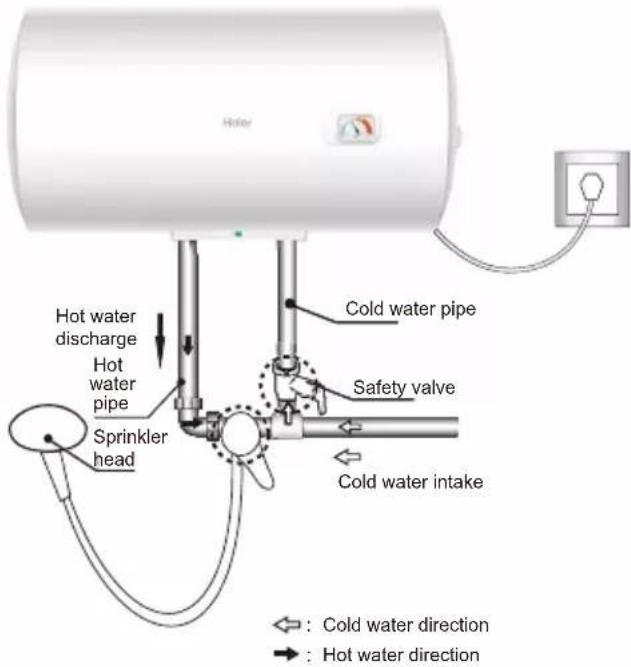
- Do not reverse the inlet and outlet water pipes. The safety valve should be installed according to the specified position, and can not be changed without permission. The pressure relief hole of the safety valve should be kept communicated with the atmosphere, do not plug it.
- Ensure that the tap water inlet pressure is not less than 0.05MPa, the maximum pressure is not more than 0.75MPa.
- The power socket of the water heater should be installed in a dry place that will not be wet with water, and it is best to have a waterproof box so as not to affect the normal operation of the machine.
- The water heater should be used in line with the national standard of the independent socket, and reliable grounding, with the measuring pen to measure the live wire, neutral wire is connected correctly. Do not use multifunctional sockets.
Precautions for use
- Do not switch on the power supply before the water heater is filled, so as not to damage the machine.
- Hot water above 50^ C may cause scald. Please be sure to adjust the water temperature to the appropriate temperature before your family, especially children, use it.
- In the case of sufficient hot water, to lower the set temperature as far as possible, so as to reduce heat loss, high temperature corrosion and scaling, prolong the service life of the water heater.
- This water heater is closed and can supply water to many places through the pipeline, such as: bathroom bathtub, bathroom nozzle, kitchen.
- Please do not put gasoline and other flammable materials near the water heater, otherwise it may cause fire and other accidents.
- It is normal for the water heater to produce white turbid water. This is because the dissolved air in the water expands with heat and the pressure decreases, so it spills out and produces bubbles (similar to beer foam), which is pollution-free and harmless.
- The electric water heater will produce sound in the process of high temperature heating, just like our commonly used hot kettle, it is a normal phenomenon, please rest assured to use.
Installation Instructions
Electrical schematic diagram
L: Brown wire
N: Blue wire
MT: High temperature limiter
BT: Thermostat
EH: Heating indicator
HL: Heating element
E: Yellow/ green wire

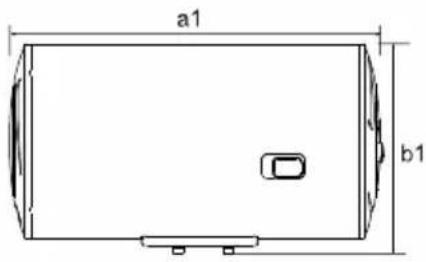
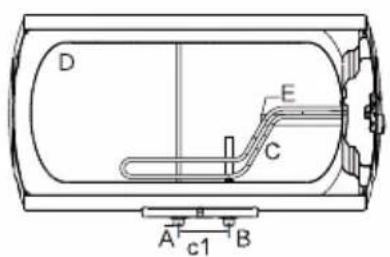
■ Introduction of appearance and components
Main view Side viewCutaway view
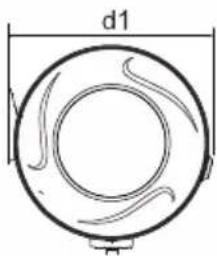
natural_image
Pure technical diagram of a circular component with internal curved lines, no text or symbols presentA Hot water outlet B Cold water inlet C Heating tube D Enameled inner liner E Magnesium rod
| Main view | Capacity (L) | Net weight (kg) | a1 (mm) | b1 (mm) | c1 (mm) | d1 (mm) |
| ES50H-CK1(MEA) | 50 | 640 | 420 100 | 39015 | ||
| ES80H-CK1(MEA) | 80 | 810 | 42210045022 |
Note: The allowable error range of the above parameters is ± 10%
■ Technical parameter
| Rated power supply | Rated frequency | Rated pressure | Rated power | Rated temperature | Waterproof grade | Water inlet pressure |
| 220-240V | 75°C IP | X4 ≥0.05 MPa | 1200W0.80MPa 50Hz/60Hz |
Packing list
| Component name | Electric water heater | Safety valve | Expansion hook | Instruction manual |
| Quantity | 1211 |

Installation method
This is just the machine installation diagram, the specifics subject to the actual machine!
- Installation must be carried out by the installation personnel of the company's after-sales department or its designated installation personnel.
- The water heater is mounted on the wall.
- Determine the installation position of the water heater. According to the size shown in Figure 1, drill two holes on the wall for matching the expansion hook of the attachment with a hammer drill, insert the expansion hook into the corresponding wall hole, and fix it.
- Lift the water heater and put the wall rack on the hook. Install the safety valve and other accessories by referring to "Installing the safety valve" (for installation reference only). Be careful to seal with PTFE tape to prevent water leakage. Note: Different machines correspond to different wall brackets, installers can refer to the actual drilling of the bracket installation.
- To facilitate the installation and disassembly of the water heater, it is recommended to install G1/2 loose joints at appropriate positions of the water heater inlet and outlet pipes. Determine the location of the water supply, and connect the inlet and outlet water pipes and the inlet water pipes to the water points respectively. Fill the liner with water, check whether the water is leaking and reconnect if there is water leakage.
Note: 1. Be sure that the wall bracket is reliably hung on the hook before letting go, in case the water heater falls, causing personal injury or property damage. - The two holes in the hanging frame can ensure the safe installation of the machine.
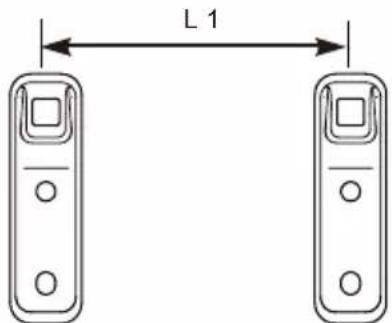
Figure 1
| Volume (L) | 50 | 80 |
| L1(mm) | 159 334 |
Installing the safety valve:
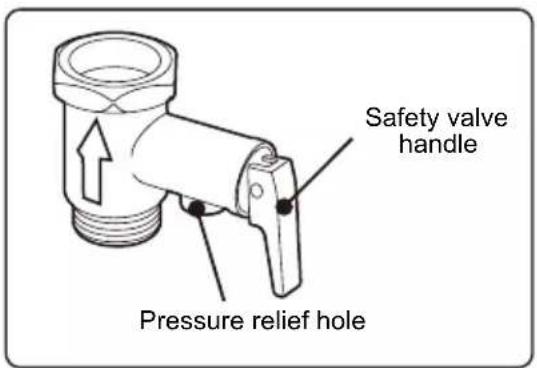
• Install the G1/2 valve on the water inlet pipe by referring to the direction of the arrow on the valve (thearrow points to the water flow direction).
Pressure relief holes should be kept open to
• theatmosphere, do not block it.
When the water heater is heated by electricity,
- therewill be a small amount of water droplets coming out of the pressure relief hole of the safety valve. This is due to the expansion of the water tank by heat and is a normal phenomenon.
Instructions for use
After installation, the water inlet valve and water outlet valve must be opened for the first time because there is no water in the tank, and the water outlet valve must be adjusted to the maximum hot water gear. When the hot water outlet is continuously discharged (indicating that the water in the container is full at this time), close the outlet valve. Check each interface without leakage and then turn on the power.
How to use
-
Adjust the water temperature knob on the right side of the water heater to set the water temperature
-
The maximum water temperature can be set to 75^ C
- Rotate the temperature control knob clockwise, the set temperature will gradually increase, when the setting reaches the highest temperature, the knob will not continue to rotate;
- Turn the temperature control knob counterclockwise, the set temperature will gradually decrease, when the setting reaches the lowest temperature, if you continue to turn the knob, the power will be cut off.
- When the heating indicator light is on, the water heater is heating. When the heating indicator light is off, the heating is completed and the water heater is in the holding state.
- When the water temperature reaches the set temperature, the power will be automatically-turned off, and when the water temperature drops to a certain temperature, the power will be automatically turned on to continue heating.
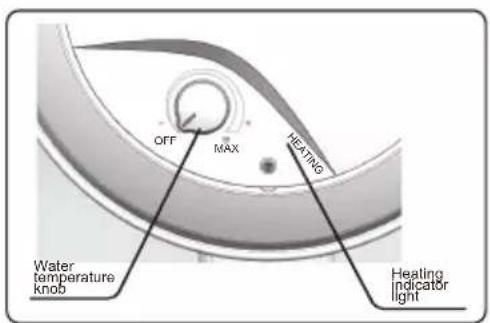
The water temperature knob and heating indicator are shown in the figure above. For the specific machine, please refer to the actual object
- Observe the thermometer to know the current water temperature zone
Thermometer pointer in the low temperature zone (left) : indicates that the tank water temperature is low
Thermometer pointer in the high temperature zone (right) : indicates that the tank water temperature is high
- Observe the drainage of the pressure relief hole of the safety valve
- When the tap water pressure is ≥ 0.8MPa , there will be a large amount of water flowing out of the safety valve relief hole, which means that the water pressure is too high, and the after-sales service should be notified to deal with it.
Cleaning and Maintenance
NOTE: This water heater should only be serviced by qualified service personnel. Improper handling may cause serious injury or property damage.
Be sure to unplug the water heater before cleaning and servicing it.
Cleaning
1. External cleaning
Gently wipe with a damp cloth dipped in a small amount of neutral cleaning agent, do not use gasoline or other solutions. Finally, dry with a dry cloth to keep the water heater dry. Be careful not to scrub with cleaners that contain abrasives (such as toothpaste), acids, chemical solvents (such as alcohol), or polish agents.
2. Internal cleaning
- The power must be turned off before cleaning the tank.
- When cleaning, close the water inlet valve, open the water outlet valve, remove the safety valve at the cold water inlet, drain the water in the tank, then open the water inlet valve and rinse repeatedly for a few minutes until the net water is discharged.
Safety check
- Check the safety valve once a month: pull the small handle of the safety valve. If water flows out, it indicates that the safety valve is working properly. If no water flows out, please contact the after-sales service department of Haier to repair or replace it.
- Regular safety checks should be conducted by professional personnel. Remove scale of heating pipe in time and replace magnesium rod.
■ Prolonged non-use
If you need to disable the water heater for a long time, follow this step:
- Close the tap water valve.
- Open the safety valve handle.
- Open the hot water valve of the water heater to the maximum (if there are multiple hot water outlets, it is recommended to open all to the maximum. Please note that you will not be scalded by hot water at this time) and discharge the water in the tank. Note: Some buried wall pipes cannot be discharged by users. Therefore, open the loose connection at the water outlet.
When using again, in order to avoid injury accidents, it is recommended to open the hot water valve before opening the power switch of the water heater, to discharge the gas that may exist in the pipeline from the pipeline. At this time, no smoking or other open flame is allowed near the open valve. At the same time, it is necessary to carefully check whether all parts of the water heater are in good condition and confirm that the tank is full of water before it can be put into use.
FAQs
| Phenomenon Solutions | Matters to be confirmed | |
| No water | 1Whether the water supply system is off or he water pressure is too low | Check |
| 2Whether the water is blocked, and whether the hot water valve is open | Check and clean up | |
| Only cold water comes out but the heat indicator is on | 1Whether the hot water outlet is not opened | Check and open |
| 2Whether the water temperature is adjusted well | Turn up the set temperature appropriately. After heating to the set temperature, control the hot and cold water by adjusting the mixing valve | |
| 3Whether the heating time is too short to reach the set temperature | Continue heating | |
| 4Whether the components are damaged | If not 123, contact with maintenance department | |
| Only cold water comes out and the heating indicator is off. No water comes out. | 1Whether the power supply is properly connected | Check the power outlet |
| 2Whether the temperature controller is invalid | If not 1, contact the maintenance department. | |
| The water comes out big and small, cold and hot | Whether the tap water pressure is stable | Turn down the flow rate of the mixing valve or wait for the water pressure to stabilize before use |
| The heat indicator is on all the time | 1The water does not reach the set temperature | Continue heating |
| 2Whether the temperature controller is invalid | If not 1, contact the maintenance department. | |
| The amount of hot water produced is low | 1Whether the current temperature setting is too low | Calibrate according to the instruction manual. |
| 2Whether the tap water pressure is too high | Turn down the flow rate of the mixing valve. |