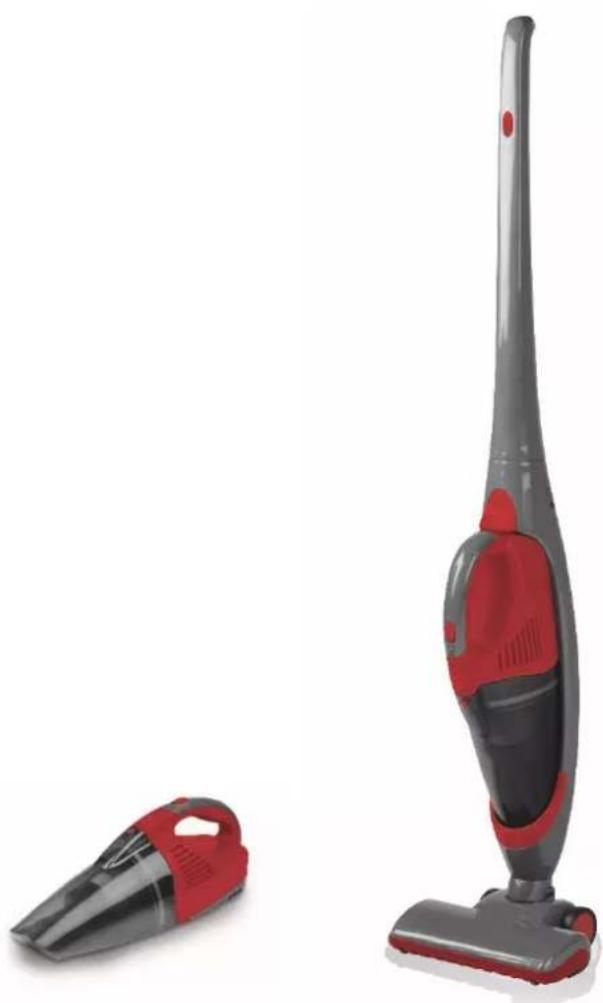
Chicago CVC639 - Vacuum Cleaner Montiss - Free user manual and instructions
Find the device manual for free Chicago CVC639 Montiss in PDF.
| Product type | Stick vacuum with handheld function |
| Brand | Montiss |
| Model | Chicago CVC639 (compatible with CVC637, CVC641, CVC643) |
| Power source | Rechargeable battery 9.6 V DC |
| Power | 70 W |
| Charger | Mains adapter 230-240 V~50 Hz, output 12 V DC 200 mA |
| Filter | Washable HEPA filter |
| Dust capacity | Approximately 0.5 L (estimate) |
| Runtime | Approximately 20-30 minutes (estimate) |
| Charge time (first use) | 24 hours minimum |
| Charge time (normal) | 16 hours maximum |
| Included accessories | Turbo brush, crevice tool, oval brush, rubber attachment for liquids |
| Functions | Dry and liquid vacuuming (handheld only) |
| Maintenance | Emptying the tank, washing the HEPA filter and the roller brush |
| Safety | Do not immerse, household use only, do not vacuum incandescent objects or flammable liquids |
| Warranty | 24 months |
Frequently Asked Questions - Chicago CVC639 Montiss
User questions about Chicago CVC639 Montiss
0 question about this device. Answer the ones you know or ask your own.
Ask a new question about this device
Download the instructions for your Vacuum Cleaner in PDF format for free! Find your manual Chicago CVC639 - Montiss and take your electronic device back in hand. On this page are published all the documents necessary for the use of your device. Chicago CVC639 by Montiss.
USER MANUAL Chicago CVC639 Montiss
Wet & Dry Vacuum Cleaner CVC639 - Chicago
natural_image
Two red and black vacuum cleaner units displayed against a white background (no text or symbols visible)Gebruiksaanwijzing
User manual
Bedienungsanleitung
Mode d'emploi
Inhoud
Nederlands 3
Deutsch....10
English 16
Français....23
Nederlands
Gebruiksaanwijzing
Monss Cordless Wet & Dry Vacuum Cleaner
INHOUDSOPGAVE
VEILIGHEIDSVOORSCHRIFTEN
HET PRODUCT
MONTAGE
HET GEBRUIK
ONDERHOUD EN REINIGING
PROBLEMEN OPLOSSEN
INFORMATIEPLICHT INZAKE BATTERIJVERORDENING
TECHNISCHE GEGEVENS
GARANTIEBEWIJS
VEILIGHEIDSVOORSCHRIFTEN
Waarschuwing:
text_image
Exploded view diagram of a washing machine with numbered parts and labeled parts like motor button and electric shock absorber.- Oplader 16. Kierenzuiger
- Bout 17. Turboborstel
- Moer 18. Basiseenheid
- Luchnlaat 19. Handgreep
- Knop ontgrendelen stofcontainer 20. Aan/uit knop steelstofzuiger
- Indicaelampje vermogen 21. Indicaelampje opladen
- Aan/uit knop handstofzuiger 22. Oplaadpunt oplader
- Motor 23. Knop ontgrendelen handstofzuiger
- Luchtuitlaat 24. Vergrendelingsknop handstofzuiger
- Afdichngsring 25. Elektrode
- HEPA-Iter 26. Rolborstel
- Kunststof afdekkap Iter 27. Elektrode
- Stofcontainer 28. Vergrendelingsknop turboborstel
- Rubber opzetstuk 29. Ontgrendelingsknop rolborstel
- Ovale borstel 30. Afdekkapje rolborstel
MONTAGE
text_image
Diagram of a device showing two views with numbered annotations pointing to componentsnatural_image
3D rendered device showing internal components and a green 3D model with a numbered annotation (1), no readable text or symbols present.
natural_image
3D rendered mechanical component with green highlighted surface and numbered annotations (no text or symbols)
text_image
Diagram of a device rear view with labeled components, showing front and side views with numbered annotations.natural_image
Four black-and-white recycling symbols: a trash can with cross, a crossed-out bin, a blank rectangle, and a recycling symbol (no text or labels)TECHNISCHE GEGEVENS
Stofzuiger input 9,6V dc 70W
Adapter input 230-240V\~50Hz, 40mA
Adapter output 12V dc 200mA
Model nummer CVC637/CVC639/CVC641/CVC643
UW GARANTIEBEWIJS
Monss Cordless Wet & Dry Vacuum Cleaner
INHALTSVERZEICHNIS
text_image
Exploded view diagram of a washing machine with numbered parts and motor button insetnatural_image
Simple line drawing of a faucet with a tassel, no text or symbols present
text_image
Abb. 14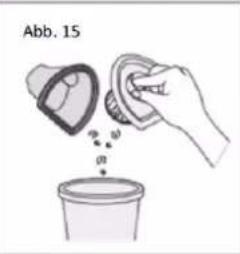
text_image
Abb. 15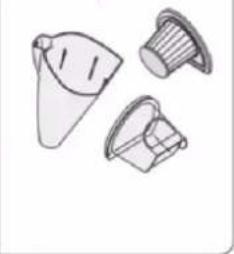
natural_image
Illustration of three plastic containers with different shapes and surfaces (no text or symbols)text_image
Four-step diagram illustrating a mechanical device with labeled parts and a hand tool interacting with it.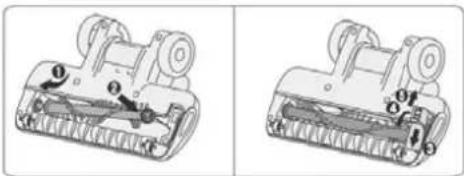
natural_image
Two mechanical components with labeled parts, shown from different angles (no text or symbols present)text_image
Diagram of a device showing two views with numbered annotations pointing to componentsnatural_image
3D model of a green mechanical component with a close-up view showing internal structure (no text or symbols)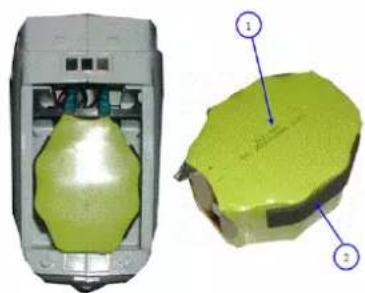
natural_image
3D rendered model of a green mechanical component with labeled parts (1 and 2), no visible text or symbols beyond labels
text_image
Diagram of a mobile phone casing with labeled components and internal wiring, showing front and back views with numbered annotations.natural_image
Four black-and-white recycling symbols: a trash can with a cross, a crossed-out bin, a blank rectangle, and a recycling symbol (no text or labels)TECHNISCHE DATEN
Monss Cordless Wet & Dry Vacuum Cleaner
TABLE OF CONTENTS
SAFETY REGULATIONS
THE PRODUCT
ASSEMBLY
THE USE
MAINTENANCE AND CLEANING
SOLVING PROBLEMS
COMPULSORY INFORMATION REGARDING THE DECREE ON BATTERIES
TECHNICAL DETAILS
GUARANTEE
SAFETY REGULATIONS
Warning:
When using any electrical appliance, always observe all basic safety precautions. The following instrucons should be followed to reduce the risk of re, electric shock or injury.
General:
-
Read this manual carefully before using the appliance. Keep this manual in a safe place for future reference.
-
Use the appliance only as described in this manual.
-
Make sure the power supply indicated on the charger corresponds with the local voltage before connecng the charger.
-
The charger should be plugged into a grounded electrical outlet.
-
Regularly check the device and the charger are intact. Do not use the device or the charger if damaged. If the power cord of the charger is damaged, have it replaced by Trebs or by one of Trebs authorized service centers to avoid possible risks.
-
This appliance is not suitable for use by children or persons with reduced physical, sensory or mental capabilities, or lack of experience and knowledge, unless someone who is responsible for their safety is supervising them or explains to them how the appliance must be used. Close supervision is required if the appliance is used in the vicinity of children, pets or plants.
-
Never allow children to play with the packaging, there is a risk of suocaon.
-
Never leave the device unaended. Always switch the device o when cleaning or servicing the device or when not in use.
-
Keep the appliance and the charger away from ames and hot surfaces.
-
Store the appliance indoors.
-
Never immerse the appliance and/or the charger in water or other liquids.
-
Do not use aachments which are not recommended by Trebs, especially accessories which are not supplied with the appliance.
-
Never use the appliance in areas where certain vapors may be present (paint thinner, flammable material, oil based paint and varnish, ammable liquids and gases) for risk of a possible explosion.
-
This appliance is only intended for domesc use; do NOT use it for commercial purposes.
-
Do not use the device to vacuum hot items such as a glowing cigaree ends or to pick up combustible dust.
-
The device is only suitable, as a hand sick vacuum cleaner for vacuuming dry dust. Use for the vacuuming of liquids the hand vacuum cleaner with rubber aachment.
-
Make sure the air exhaust is not blocked.
-
Don't touch the turbo brush while in use.
-
Only use the original charger, which is suitable for this model. Don't use the charger when the cord of the charger shows signs of possible damage.
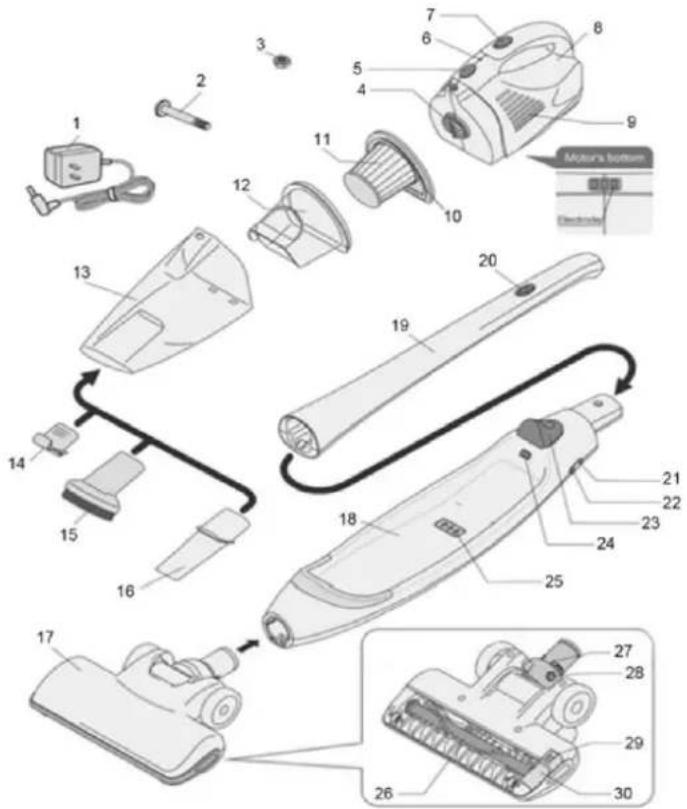
THE PRODUCT
text_image
Exploded view diagram of a handwashing device with numbered parts and labeled parts including a motor button and electrical switch.- Charger 16. Crevice nozzle
- Bolt 17. Turbo brush
- Nut 18. Main unit
- Air inlet 19. Handle
- Buon to unlock dust container 20. On/o switch sick vacuum cleaner
- Indicaon light power 21. Indicaon light charging
- On/o switch hand vacuum cleaner 22. Charge point charger
- Motor 23. Buon to unlock hand vacuum cleaner
- Air outlet 24. Lock buon hand vacuum cleaner
- Sealing ring 25. Electrode
- HEPA-Iter 26. Roll brush
- Plasc cover Iter 27. Electrode
- Dust container 28. Lock buon turbo brush
- Rubber nozzle 29. Buon to unlock roll brush
- Oval brush 30. Plasc cover roll brush
ASSEMBLY
- Remove all packaging materials.
-
Clean the device with a wet cloth and some detergent if necessary (also see the paragraph "maintenance and cleaning").
• Make sure that all parts are clean and dry before assembling the appliance. -
Place the nut into the hole at the top of the main unit (Fig. 1).
- Aach the handle to the main unit (Fig. 2).
- Place the bolt at the backside in the handle and turn the bolt clockwise to ghten it(Fig. 3).
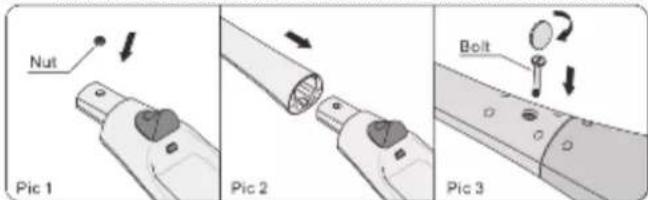
text_image
Nut Pic 1 Pic 2 Bolt Pic 3-
Push the lock buon turbo brush (28) while u place the main unit on the turbo brush (17) (Fig. 4).
-
Place the plasc cover Iter (12) in the dust container (13).
- Then put the HEPA-Iter (11) in the plasc cover Iter.
- Mount the dust container with HEPA-Iter thereaer on the motor (8). The hand vacuum cleaner is now fully assembled.
- Push the hand vacuum cleaner next, with the front side downwards, into the main unit until you hear a click(Fig. 5).
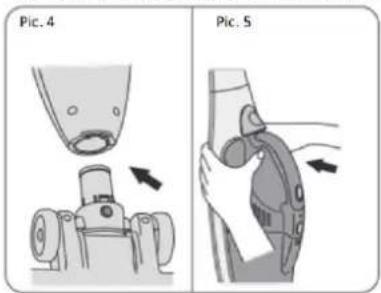
text_image
Pic. 4 Pic. 5THE USE
Before use
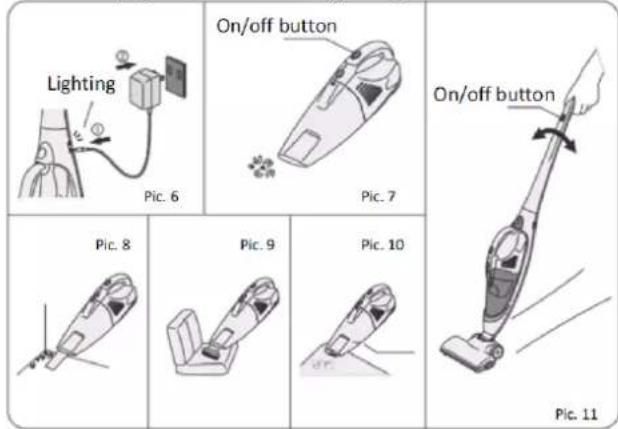
- Charge the device for at least 24 hours before rst me use (Fig. 6). Aer this rst me charge, the maximum charging me will be 16 hours.
Note: the device may become warm during charging. This is normal.
- Check the device for damage before each use. Do not use the device if it is damaged or not working properly.
Use of the handheld vacuum cleaner
The handheld vacuum cleaner can be used for cleaning both wet and dry dirt.
- Make sure that the handheld vacuum cleaner has been mounted in the correct way (see chapter Assembly).
- Turn on the handheld vacuum cleaner by pushing the on/o switch on the handle (7) forward (Fig. 7).
- If desired, you can use the following aachments:
Note: always turn o the handheld vacuum cleaner before you mount the aachments on it.
a. Crevice nozzle (16) (Fig. 8) to clean corners, cracks and other places which are difficult to reach.
b. Oval brush (15) (Fig. 9) to clean furniture.
c. Rubber nozzle (14) (Fig. 10) to clean up liquids.
Use of the upright vacuum cleaner
Note: the upright vacuum cleaner can only be used to vacuum dry dirt. In order to vacuum wet dirt, you must use the hand-held vacuum cleaner with the rubber nozzle.
- Make sure that the upright vacuum cleaner has been mounted correctly (see chapter Assembly).
- Turn on the upright vacuum cleaner by pushing the on/ switch on the handle (20) forward (Fig.. 11).
text_image
Lighting Pic. 6 On/off button Pic. 7 On/off button Pic. 8 Pic. 9 Pic. 10 Pic. 11Charging
As soon as the indicaon light power (6) is connuously on, you must recharge the device.
Note: always turn o the device before recharging.
At the moment you turn o the device, the power indicaon light will be switched o. As soon as the device has been fully recharged, the light will switch on again.
Aer use
Recharge the device aer use so it will have full power the next me you use it.
MAINTENANCE AND CLEANING
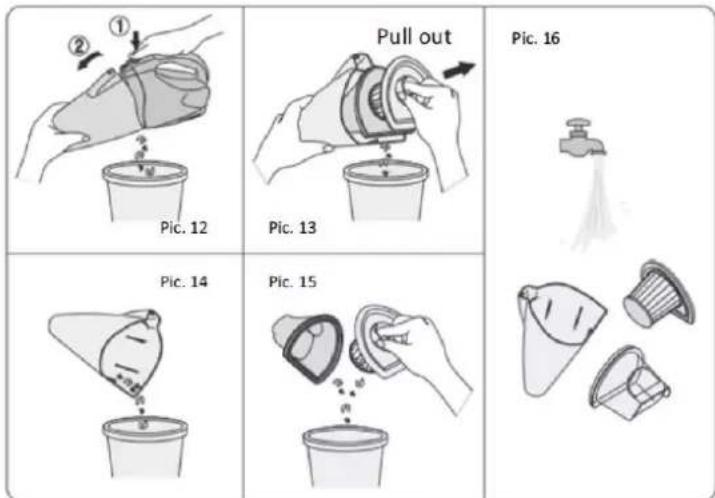
Empty dust container
Note: clean the dust container, the plasc cover and the HEPA-Iter regularly. The power decreases when the dust container is too full or when the HEPA-Iter is dirty.
- Push the buon (5) to unlock the dust container (Fig. 12).
- Remove the HEPA-Iter (11) and the plasc cover (12) (Fig. 13).
- Carefully shake the dust container (13), the plasc cover (12) and the HEPA-Iter (11) over a dust bin (Fig. 14 and 15).
- The dust container (13), plasc cover (12) and the HEPA-Iter may be cleaned with water (Fig. 16).
Note: do not use cleaning aids to clean the HEPA-Iter and make sure all parts are completely dry before you mount them back on and use the device.
text_image
① ② Pic. 12 Pull out Pic. 13 Pic. 16 Pic. 14 Pic. 15Cleaning the turbo brush
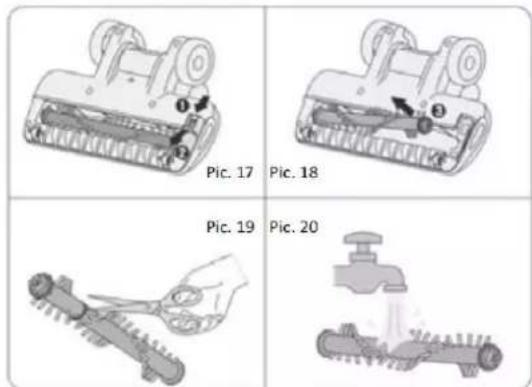
- Push the button on the cover of the roller (30) downwards (Fig. 17).
- Remove the roller (26) from the device (Fig. 18).
- Remove the grove debris from the roller with for example a scissor or comb (Fig. 19).
- The roller may be cleaned with water (Fig. 20).
Note: make sure that the roller is completely dry before you mount it back on and use the device - Mount the roller back onto the device (Fig. 21).
- Put the cover of the roller back on its place and push the button up to lock it(Fig. 22).
- Mount the roller back onto the device (Fig. 21).
- Put the cover of the roller back on its place and push the button up to lock it (Fig. 22).
text_image
Pic. 17 Pic. 18 Pic. 19 Pic. 20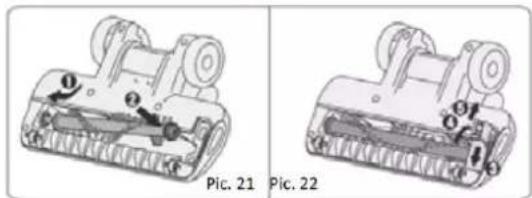
natural_image
Two mechanical components labeled Pic. 21 and Pic. 22, showing internal mechanisms without any text or symbols.Cleaning the device
Note: never immerse the device and/or the charger in water or other liquids.
- Shut the device down before cleaning it.
- Clean the device with a wet cloth and some detergent if necessary and dry o thoroughly.
- Never use abrasives, bleaching agents or steel wool to clean the device. This could cause damage to the material.
Storage
Make sure that the device and the aachments are completely clean and dry before you store the device
SOLVING PROBLEMS
| Problem | Possible cause | Possible soluon |
| The device won't turn on. | Baery is empty. | Recharge the device. |
| Low sucon. | The dust container is full. | Empty the dust container |
| The HEPA-Iter is dirty. | Clean the HEPA-filter. | |
| Baery empes faster. | The device has not been recharged long enough. | Recharge the device. |
| The baery won't charge. | Replace the baery. |
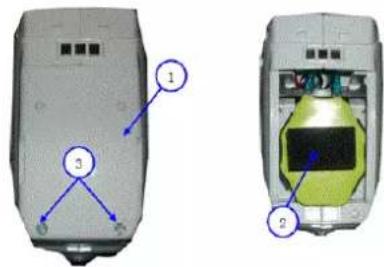
THE BATTERY
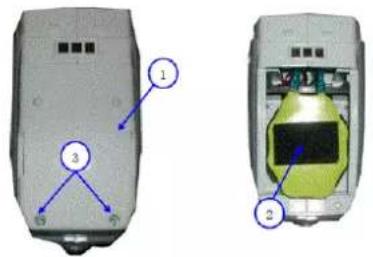
The baery can be removed or replace explained underneath. Please do not try to remove or replace he baery by yourself, but send it sufficient stamped and complete to our address.
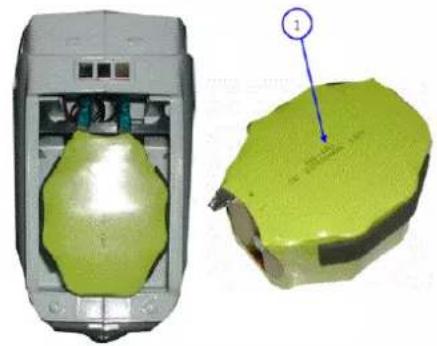
Unght the 2 screws (3), unght the protecon cover (2) and take out the baery (2)
text_image
Diagram of a mobile phone rear panel with labeled components including ports, buttons, and a battery coverTake o the red and black wire and take out the baery (1), plug in the new baery
natural_image
3D model of a device showing internal components and a green highlighted part with annotation number 1 (no text or symbols on the object itself)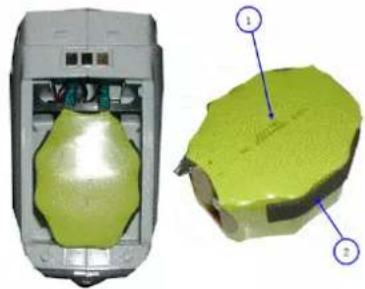
natural_image
3D rendered mechanical component with green and gray surfaces, shown from two views (no text or symbols)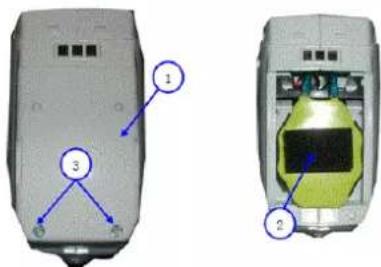
text_image
Diagram of two electronic devices with labeled components, showing front and side views with numbered annotations.Put back the protecon cover (2) and screw back the cover with the screws (3)
COMPULSORY INFORMATION REGARDING THE DECREE ON BATTERIES
Baeries and this product do not belong in your household waste. Users are required by law to return used baeries and. For proper disposal of baeries and this product, you can find designated disposal containers in specialized shops as well as in municipal collecng facilities. This is a solid contribuon to the protecon of the environment. Since 1998, the decree on baeries requires all citizens to dispose used baeries only via these specialized shops or collecng facilities. Specialized shops and manufactures are obliged to accept used baeries in return and re-use them in accordance to the decree or dispose of them as dangerous waste. If you wish to return your used baeries to us, you can mail them complete to our address in an adequately stamped envelope. Please, do not try to build out the baery by yourself. If you want to dispose your product, please go to specialized collecng facilities in your neighbourhood.
Baeries that need to be labelled by law are provided with one of the illustraons below, being a crossed-out wheeled bin and the chemical symbol for the classicaon of pollutants-containing heavy metals. The chemical symbol (Cd, Hg or Pb) will be shown under the illustraon.
According to Waste of Electrical and Electronic Equipment (WEEE) direcve, WEEE should be separately collected and treated. If at any me in future you need to dispose of this product, please do NOT dispose of this product with household waste. Please send this product to WEEE collecting points where available.
The following text can be found on the pollutants-containing baeries:
Pb: Baery contains lead
Cd: Baery contains cadmium
Hg: Baery contains mercury

natural_image
Four black-and-white icons representing recycling symbols: a trash can, a no-drawn box, and a recycling symbol (no text or labels)TECHNICAL DETAILS
Vacuum cleaner input 9,6V dc 70W
Adapter input 230-240V\~50Hz, 40mA
Adapter output 12V dc 200mA
Model number CVC637/CVC639/CVC641/CVC643
GUARANTEE
This guarantee covers your device for a period of 24 months from the date of purchase for service and replacement of parts, on the condition that you have used the device correctly as described in this user manual. This guarantee does not exclude national legislaon that may exist in the country of purchase in regards to warranty regulaons.
When you make a claim under this guarantee, you must submit the original invoice or receipt with clear menon of the date of purchase, name of retailer and the descripon and model number of the device. You are advised to keep these documents in a safe place.
This device is intended for domesc use only. Damage and/or malfuncons as the result of industrial or commercial use are excluded from the warranty.
The guarantee does not cover the supplied accessories or other parts of the device that are subject to wear. If you want to reorder these parts, then that is possible through www.muppa.nl.
The guarantee for this device expires if:
• The original invoice or receipt has in one way or another been changed or made illegible;
• The model or serial number on the device has been changed, removed, deleted or made illegible;
• Repairs have been executed by unauthorized repair workshops or persons who are not authorized to do so;
- The damage is the result of an external cause, such as re damage, water damage, transport damage, atmospheric discharges, insucient or improper maintenance;
- The device has been operated in another country than for which originally designed, approved, released and produced, as well as defects occurred as the result of such modicaons;
• The device has not been used according to the guidelines and direcons in this user manual supplied with the device.
In the unlikely event your device is not functioning well or shows any defect, please contact your retailer. To avoid any inconvenience, we advise you to read this user manual carefully before contacting them.
SERVICE
Trebs BV
Thermiekstraat 1a
6361 HB Nuth
Netherlands
www.trebs.nl
www.monss.com
CE
Français
Mode d'emploi
Monss Cordless Wet & Dry Vacuum Cleaner
SOMMAIRE
CONSIGNES DE SÉCURITÉ
LE PRODUIT
ASSEMBLAGE
UTILISATION DE L'APPAREIL
ENTRETIEN ET NETTOYAGE
RÉSOLUTION DES PROBLÈMES
INFORMATION DE RIGUEUR SUR LE DECRET À PROPOS DES PILES
DONNÉES TECHNIQUES
VOTRE CERTIFICAT DE GARANTIE
CONSIGNES DE SÉCURITÉ
Averssement:
text_image
Exploded view diagram of a vacuum cleaner with numbered parts and labeled accessoriestext_image
Diagram of a device showing two views with numbered annotations pointing to componentsnatural_image
3D rendered device showing internal components and a green 3D model with a numbered annotation (1), no readable text or symbols present.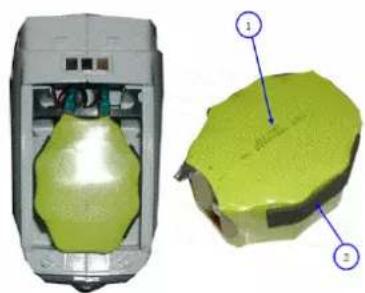
natural_image
3D rendered mechanical component with green highlighted surface and numbered annotations (no text or symbols)