
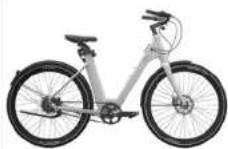
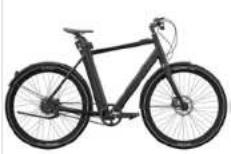
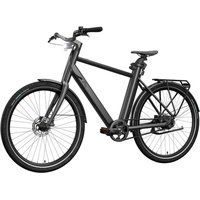
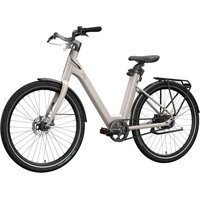
Urban E-Bike X - Bicycle CRIVIT - Free user manual and instructions
Find the device manual for free Urban E-Bike X CRIVIT in PDF.
| Product Type | Electric bike (EPAC / Pedelec) |
| Brand | CRIVIT |
| Model | Urban E-Bike X |
| Battery voltage | 36 V |
| Battery capacity | 360 Wh (12.4 Ah) |
| Motor type | Electric motor 36 V, 750 W |
| Charger | 200-240 V ~ 50/60 Hz, 3 A |
| Wheel size | 27.5 inches |
| Maximum total permitted weight | 120 kg |
| Assistance levels | 5 (0 to 5) |
| Approximate range | Up to 70 km (varies with conditions) |
| Charging time | Approximately 2.5 hours |
| Brake type | Disc brakes |
| Transmission | Toothed belt |
| Lighting | LED front headlight and LED rear light |
| Display | LED screen with battery level and assistance level indicators |
| Intended use | Public roads and designated paths |
| Minimum recommended age | 14 years |
| Warranty | 2 years (wear parts excluded) |
| Routine maintenance | Cleaning every 100-150 km, annual inspection |
| Main wear parts | Brake pads (replace at 5000 km max), tires, belt, battery |
| Battery storage temperature | 5 °C to 25 °C (ideally 40-60 % charge) |
Frequently Asked Questions - Urban E-Bike X CRIVIT
User questions about Urban E-Bike X CRIVIT
0 question about this device. Answer the ones you know or ask your own.
Ask a new question about this device
Download the instructions for your Bicycle in PDF format for free! Find your manual Urban E-Bike X - CRIVIT and take your electronic device back in hand. On this page are published all the documents necessary for the use of your device. Urban E-Bike X by CRIVIT.
USER MANUAL Urban E-Bike X CRIVIT
URBAN E-BIKE Y / URBAN E-BIKE X
DE AT CH
URBAN E-BIKE Y / URBAN E-BIKE X
Gebrauchsanweisung
NL BE
URBAN E-BIKE Y / URBAN E-BIKE X
Gebruiksaanwijzing
FR BE
URBAN E-BIKE Y / URBAN E-BIKE X
Instructions for use
CE
A
IAN 413888_2204
IAN 413889_2204

M
0
Inhaltsverzeichnis
Table des matières
DE AT CH
Motor-in-yulblossofern 25
Extraviridis 45
Magnetische min. 45
Aerbo wunderstiegen an
пределя (п/в. 1) 45
Mobiele telefoonhauder ....45
Fleshovder 45
Begedagetar 25
Kinderzije 45
Fictator 45
Orderhood 45
Inspecios de Venter 45
2.1.1.3.
Lekke band 46
Voorwiel demonteren [alb. M] 46
Achterwiel demonteren (alla. N) 46
Slang repareren 46
- Schanial mabelen (ofa, C)
E-mail: icai@cn.com (c/n, C) 46
Opslag, reinicing 46
Transport 46
Aivalverwicking 47
Cate for the AFC-Kand The
GB
Scope of delivery/Paris [e] [fig. A] 53
Technical data 53
Symbols and signal words used ....53
Intended use ....53
Description EPAC/bedding 53 Level com/revenue 52
Safety instructions 54
Danger to life 54
Risk of injury to children 54
Risk of injury 54
Risk of burial 54
Dangers from taking risks when riding! .....54
Assembly 54
Assembling the Handelby dav. wachington's, 81
Radj. potential (hot: C/D)
Adjusting the solids now with
integrated rechargeable battery (lip. El ....54
Adjusting for schedule (Fig. 1) 5.5
Rechargeable battery and
rechargeable battery charger 59
Charging the rechargeable battery 53
Charging the rechargeable battery.
on the CPAC [Fig. G]
Charging the rechargeable
Buchery exeirally ....55
D-connecting the reorganizing
Doltery (Fig. 4)
including the recharged
Tips for using the exchangeable
battery 54
For brevocable battery stator
conditions 56
Before your first ride 36
Before each ride 56
Check tyre pressure 56
Check brakes 56
Inspect wheel nms 56
Texler Trading Series 56 Brokers 54
Adversing the banks
Position of the broken layers 56
operating the display (in. 1) 17
Switching the sales on/off 57
Rechargeable battery status 57
Error messages 57
Motor assistance 57
Acid-on components and
accessories [Fig. 1] 57
Mobile phone holder 57
Bottle Holder 57
Bagsage track 5/
Child meal 57
Bike ruler 57
Millionence 27
Inspection: MIBAL....57
We can be
1 x Maulschlüssel 13:15 mm (5)
Hydroelectric power. 100 watt Aio
计息情况:
Dispute the Inein (22)
Foignès (23)
Moteur (24)
Phare & LED (251)
Courcie [26]
Données techniques
Foids - any 20
Grandau du cadre
413888.50cm/413889.57cm
2011/65/UE Directive RoHS
2006/42/CE Directive relative aux machines
The image is too blurry to recognize any text content.
utilisation excessive (see definitions making
1 LED: Assistance minimum 2 LED: Assistance maximal
Directive relative aux machines
2008/42/CE, RoHS 2011/65/UE
Snelsparhetboom [11]
Remheftboom (links 12a/rechts 12b)
Display (13)
Zudelpan met geïregraurde noco. [14]
Skt (15)
Zodeklem [16]
Achterlicht (17)
Landstekker (18)
Voorwielrem [19a]
Achtertelem (19b)
Borden 120
Velgen (21)
Remychijera (27)
Handgroep [23]
Motor 124
LED-kanlamp (7.5)
Siem [26]
Technische gegevens
Gewicht: 20 kg
Fremegrotois
413889.50 cm / 413889.57 cm
Bondeomagt 27.5"
Motorsequencing: 36V
Motorvoltage: 250W
Laodtoestel: 200 240V/50-60Hz/3A
• Snelspanhetboom (11) zadelpen met
- Incentive gelobric - 10 °C for 35 °C
• Insems for disapirations: 5 °C for 25 °C

on one, however, met one hope is/coorad diet.
3 lodx - 60% occupied
2 leds - 40% occustand
1 led - 20% occasions
I led: geringste understaining
The following table is in Chinese:
(二) 目录
Tel No: 201759315
- Committent/advie
D2 Bank AG
2017年
(1)
Boros, Ayibuto
5.2.10.03 16:59分
公司股票交易价格
表决方式的项目
项目
[2018]国泰君安证券
四届监事会
特此公告请详细说明了编号。
(100) 金诚
表决结果:同意
7.12.11
HAMBURG SHANGHAI
HOCHI MINHCITY
CHICAGO
ISTANBUL
• The following mentioned in the above section is
(四)是否同意
(2)本公司及控股股东
Systemology
限制性
(二)利润分配
Nueva
Hemothy J. Holajpaworth
回购事项及措施
表决结果:9票
的扣除非经常性损益
(fate)
(2018)第359号第146号
表决结果:同意9票,反对0票。
(2) 公司名称:中国银行股份有限公司
(1)
10年调升28
(5)陈志02
HAMBURG
SHANGHAI
HOCHI MINHCITY
CHICAGO
ISTANBUL
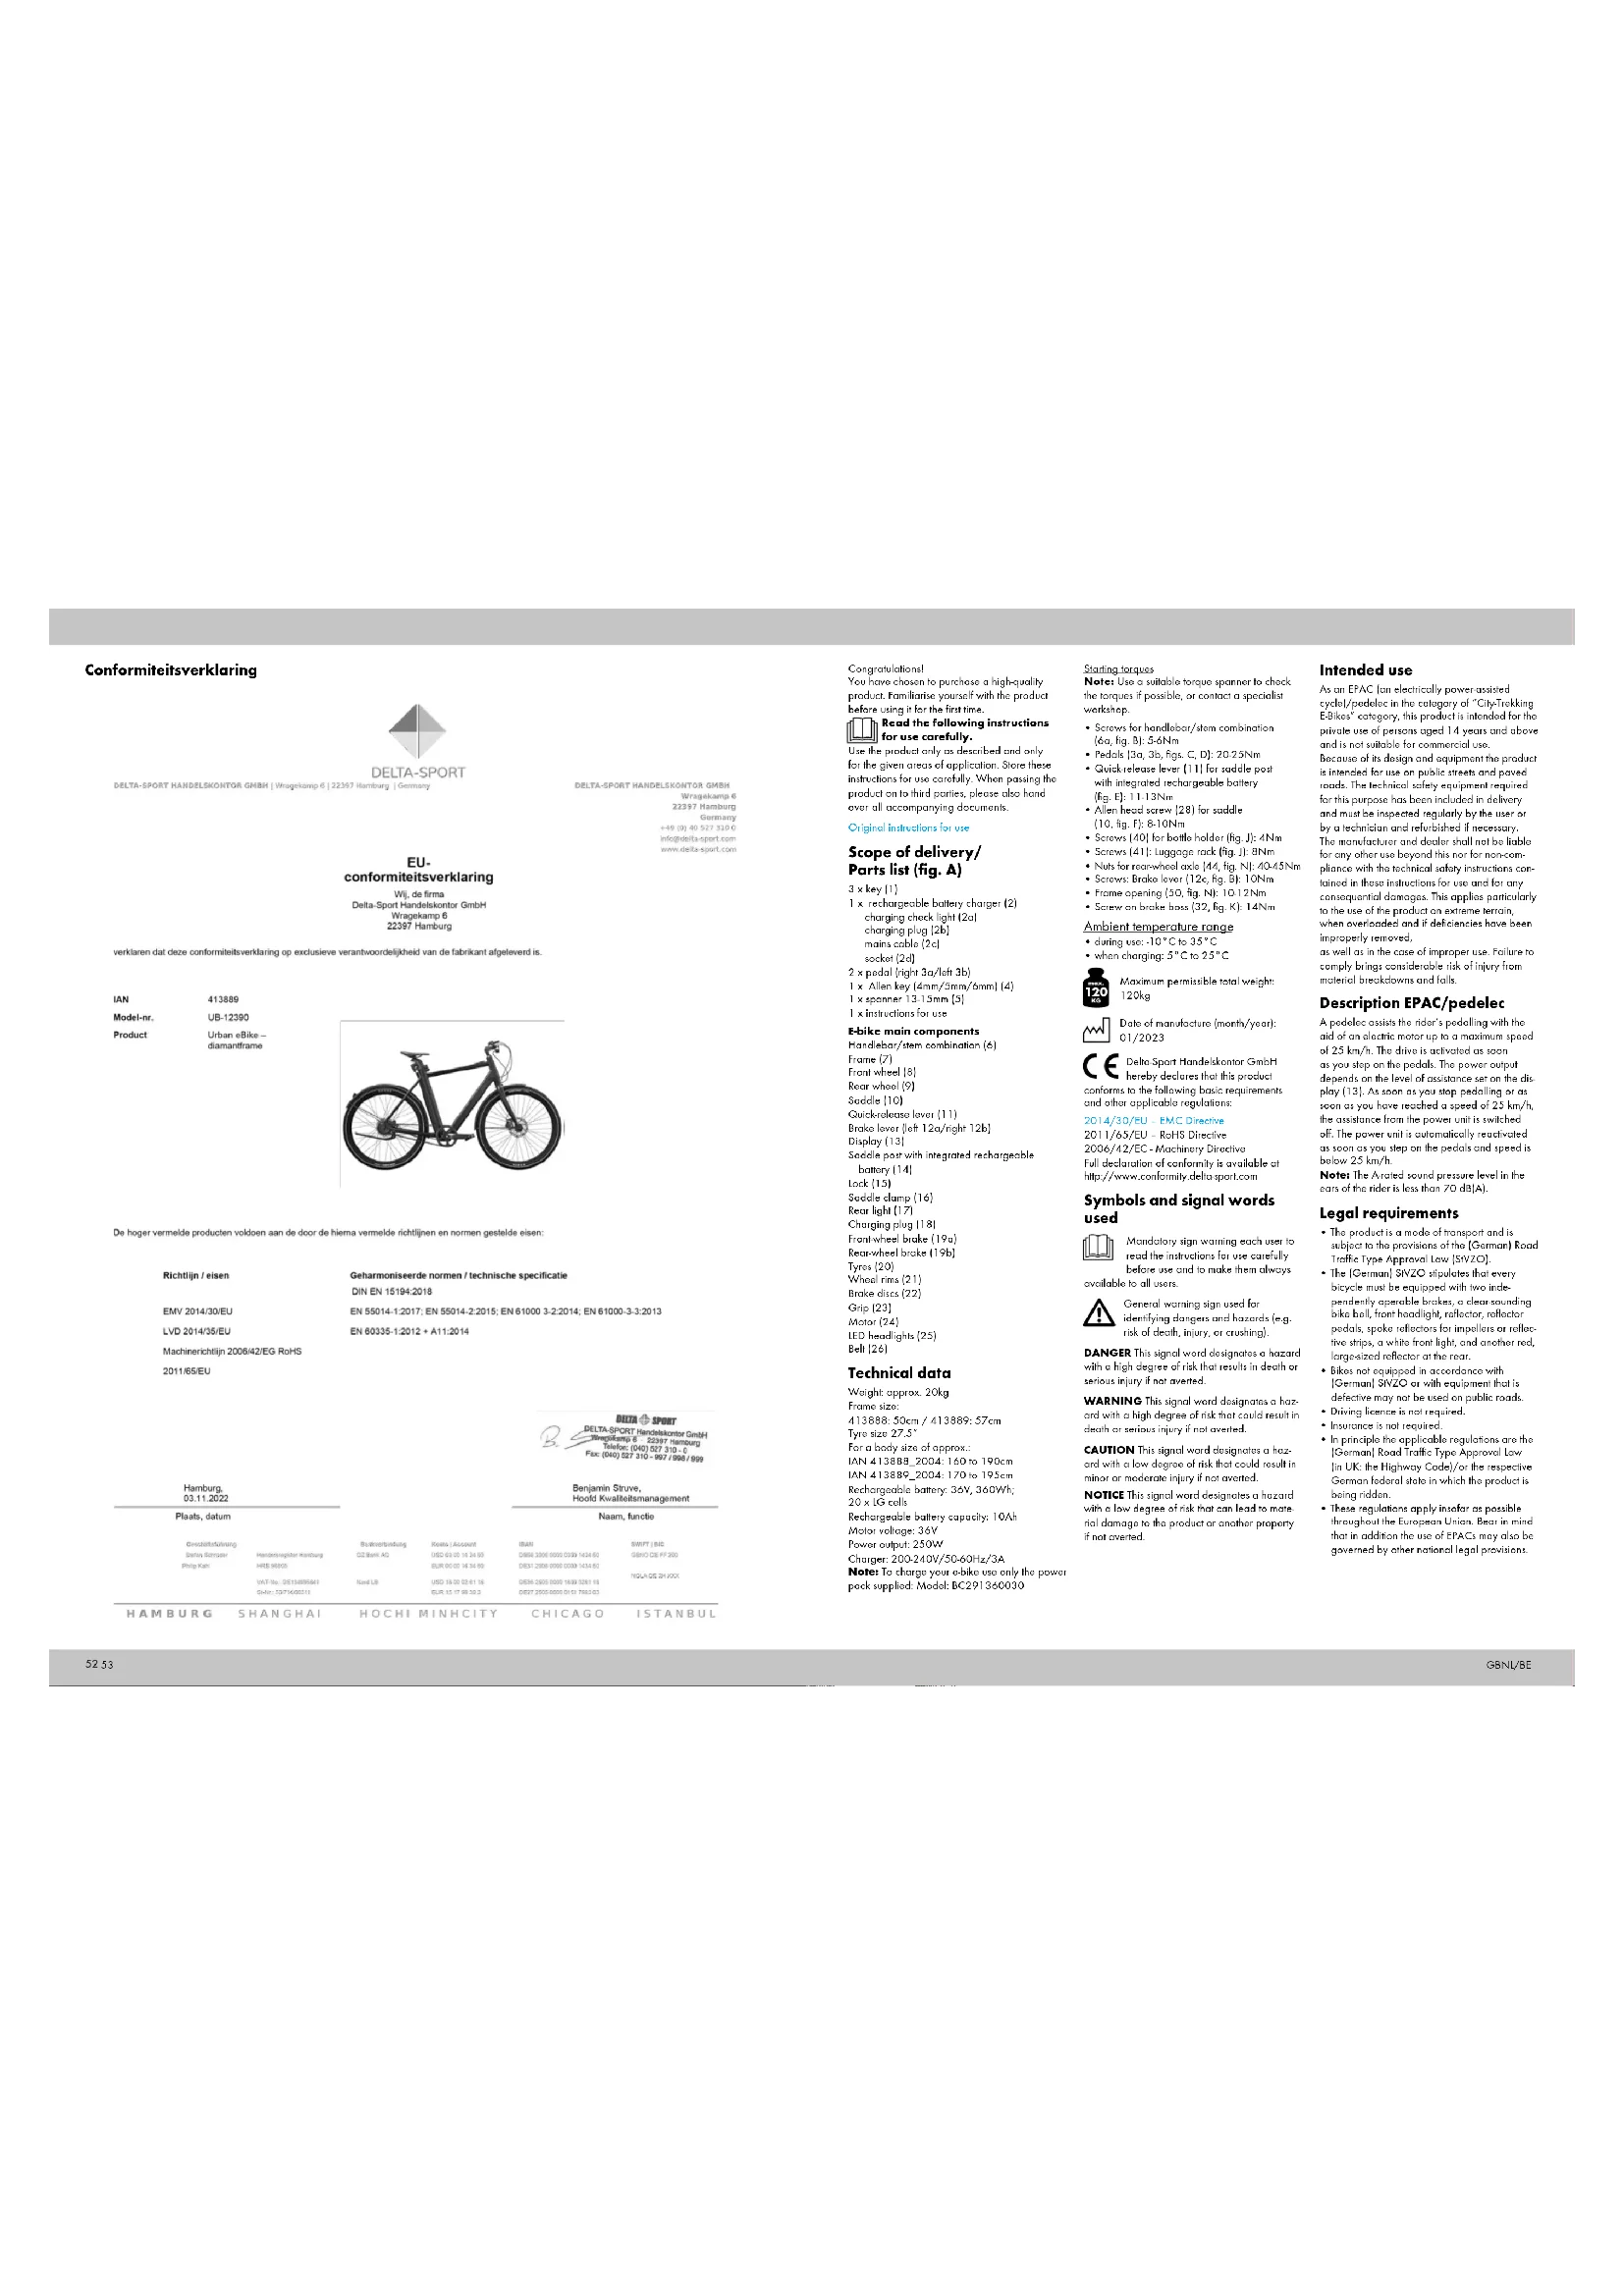
Congratulations!
You have chosen to purchase a high quality product. Familiarise yourself with the product before using it for the first time.

Read the following instructions
for use carefully.
Use the product only as described and only for the given means of application. Store these instructions for use carefully. When passing the product on to third parties, please also hand over all accompanying documents.
Original induction for a
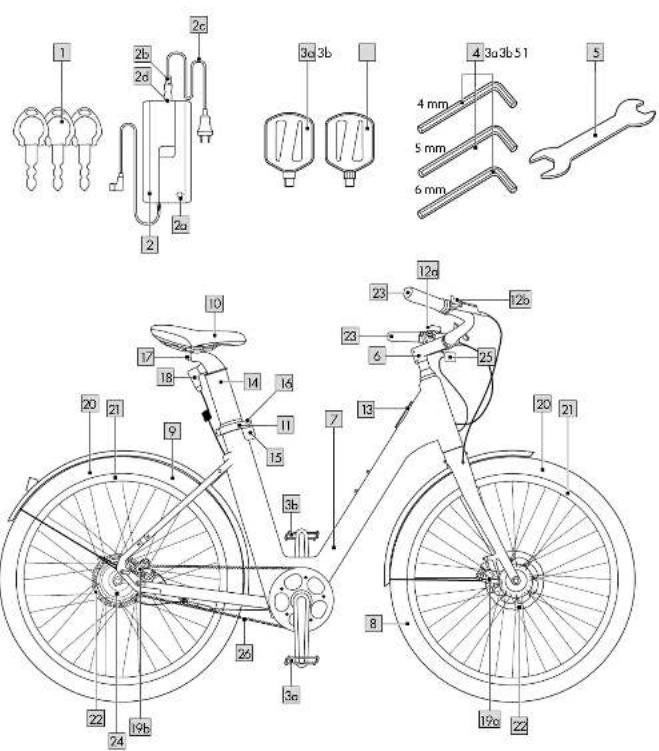
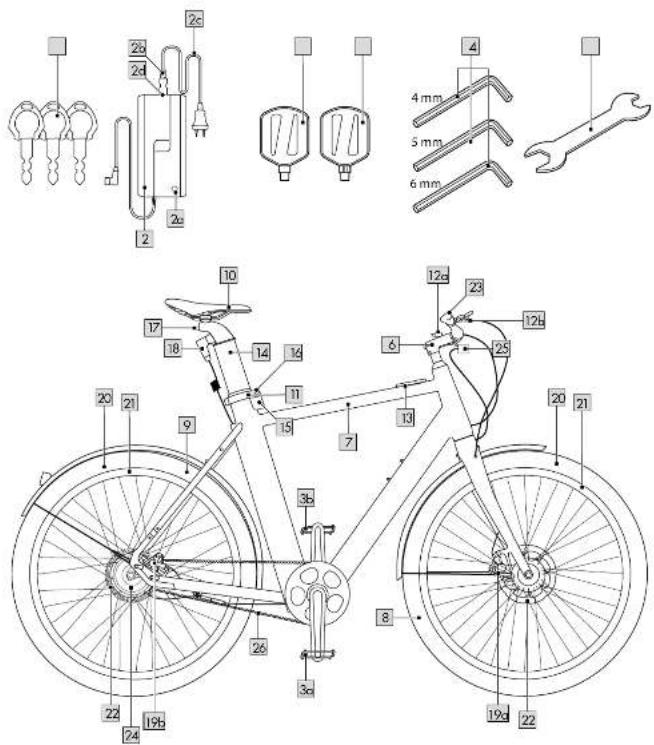
Scope of delivery/Parts list (fig. A)
3 x key [1]
1 × rechargeable battery charger (2)
charging check light (2a)
charging plug 12
mainsable (2c)
socket [2d]
2 x pedal (right 3a/ left 3b)
1 x Allen key [4mm/5mm/6mm] (4)
1 x spcm= 13-15mm (5)
1 x instructions for use
E-bike main components
Handlebar/stem combination (6)
Frame [7]
Front wheel (8)
Rear wheel [9]
Sodde[10]
Quick-release lever (11)
Brake lever (left 12c/right 12b)
Display (12)
Saddle post with integrated rechargeable
bottery (14)
Lack (15)
Saddle clamp (16)
Rear light (17)
Charging plug (18)
Front-wheel broke [19a]
Sewheel broke (19b)
Tyres (20)
Wheel rims (21)
Broku discs [22]
Grip (23)
Motor |24
LED headlights (25)
Selt (25)
Technical data
(1) _i (2)
Weight: app
1.100 32%
413885:30cm / 213687:37cm
-
-
-
-
-
-
-
-
-
-
-
-
-
-
-
-
-
-
-
-
-
-
-
-
-
-
-
-
-
-
-
-
-
-
-
-
-
-
-
-
-
-
-
-
-
-
-
-
-
-
-
-
-
-
-
-
-
-
-
-
-
-
-
-
-
-
-
-
-
-
-
-
-
-
-
-
-
-
-
-
-
-
-
-
-
-
-
-
- 90.
-
-
-
-
-
-
-
-
-
-
-
-
-
-
-
-
-
-
-
-
-
-
-
-
-
-
-
-
-
-
-
-
-
-
-
-
-
-
-
-
-
-
-
-
-
-
-
-
-
-
-
-
-
-
-
-
-
-
-
-
-
-
-
-
-
-
-
-
-
-
-
-
-
-
-
-
-
-
-
-
-
-
-
-
-
-
-
For a body size of approx.
IAN 413888_2004:16016190cm
IAN 413889_2004:176% 195cm
Kanharganika battery: 36V, 360Wh,
20 x 10 cells
Kechargeable battery capacity: 10Wh
Motor voltage: 36V
Power output: 250W
Charger: 200-240V/50-60Hz/3A
Note: To charge your e-bike use only the power
pock supplied: Model: 8C291360030
Starting toruys
Note: Use a suitable torque spanner to check the torques if possible, or contact a specialist workshop.
- Screws for handlebar/stem combination
(ba, fig. 6): 5-6Nm
• Pedals (3a, 3b, ligs. C, D): 20·25Nm
- Quick-release lever (11) for slide post
with integrated rechargeable battery
Fig. El: 11-13Nm
• Allen head screw (29) for saddle
(10, Fig. 1): 8-10Nm
- Screws (40) for bottle holder (fig. 1): 4Nm
- 5crews (41): luggage rock (fig. 1): 8Nm
• Nuts for rear wheel axle (44, fig. N): 40 45Nm
• Screws: Brake lever |12c, fig. B|: 10Nm
• Frame opening (5D, fig. N): 10.12Nm
- Screw on broke boss (32, hg. K): 14Nm
Ambient temperature range
• during use: -10°C to 35°C
- when charging 5^ C to 25^ C

Maximum permissible total weight:
120kg

Date of manufacture (month/year):
01/2023

hereby declares that this product conforms to the following basic requirement and other applicable regulations:
2014/30/EU - EMC Directive
2011/65/EU - RoHS Directive
2006/42/EC Machinery Directive
Full declaration of conformity is available at
http://www.confcomity.dega-sport.com
Symbols and signal words used

Mandatory sign warning each user to
read the instructions for use carefully
before use and to make them always
available

General warning sign used for
identifying dangers and hazards [e.g.
risk of death, injury, or crushing).
DANGER This signal word designates a hazard with a high degree of risk that results in death or serious injury if not averted.
WARNING This signal word designates a hazard with a high degree of risk that could result in death or serious injury if not averted.
CAUTION This signal word designates a hazard with a low degree of risk that could result in minor or moderate injury if not overtaken.
NOTICE This signal ward designates a hazard with a low degree of risk that can lead to material damage to the product or another property if not assessed.
Intended use
As an EPAC (an electrically power-assisted cycle/position in the category of "CityTraking Editis" category, this product is intended for the private use of persons aged 14 years and above and is not suitable for commercial use. Because of its design and equipment the product is intended for use on public streets and paved roads. The technical safety equipment required for this purpose has been included in delivery and must be inspected regularly by the user or by a technician and rehabilitation if necessary. The manufacturer and dealer shall not be liable for any other use beyond this not for non-compliance with the technical safety instructions contained in these instructions for use and for any consequential damages. This applies particularly to the use of the product on extreme terrain, when overloaded and if deficiencies have been improperly removed.
on well as in the case of improper use. Failure to comply brings considerable risk of injury from material breakdowns and falls.
Description EPAC/pedelec
A pedaloc assara the rider's pedalling with the aid of an electric motor up to a maximum speed of 25 km/h. The drive is activated as soon as you step on the pedals. The power output depends on the level of assistance set on the display (13). As soon as you stop pedalling or as soon as you have reached a speed of 25 km/h, the assistance from the power unit is switched off. The power unit is automatically reactivated as soon as you step on the pedals and speed is below 25 km/h.
Note: The A-rated sound pressure level in the ears of the rider is less than 70 dB(A).
Legal requirements
- The product is a mode of transport and is subject to the provisions of the (German) Road Traffic Type Approval Law (SNZO).
- The [German] SIVZC stipulches hier every
bicycle must be equipped with two independently operable brakes, a clear-sounding bike belt, front headlight, reflector, reflector pedals, spoke reflectors for impellers or reflective strips, a white front light, and another red, largastrized reflector at the rear.
- Bikes not equipped in accordance with
(German) 51VZO or with equipment that is
defective may not be used on public roads.
- Driving licence is not required.
• Insurance is not required.
- In principle the applicable regulations are the (German) Road Traffic Type Approval Law (in UK: the Highway Code)/or the respective German federal state in which the product is being ridden.
• These regulations apply insofar as possible throughout the European Union. Semi in mind that in addition the use of EPACs may also be governed by other national legal provisions.
Safety instructions
Before using, read the safety instructions and instructions for use. Failure to comply can lead to serious injuries. When passing the product on to third persons hand over all documents as well. Do not remove any name tags or warning signs.
- This appliance can be used by children aged from 8 years and above and persons with reduced physical, sensory or mental capabilities or lack of experience and knowledge if they have been given supervision or instruction concerning use of the appliance in a safe way and understand the hazards involved.
- The product must be secured against unauthorized operation by third parties by attaching a bicycle lock and/or by removing the rechargeable battery from the bike.

Danger to life!
- Never leave children unsupervised with the packaging material. Risk of suffocation.

Risk of injury to children!
- Children may not play with the product. Won children specifically but the product is not a key - Cleaning and user maintenance may not be performed by children without supervision. - When not in use, the product must be stored out of the reach of children.

Risk of injury!
- The device can be used by children above the age of 14 and by people with reduced physical, sensory, or mental capacities, or by those lacking experience and knowledge provided they are supervised or have been instructed in the safe use of the devices and understand the risks involved. Children may not play with the device.
- This product is not a device manufactured in accordance with medical requirements. To prevent any interference with your passenger or medical device it is imperative that you consult your GP or the manufacturer of the medical device in question before using the product.
- Pregnant women as well as persons with disabilities, heart problems, or head, shoulder, or neck complaints (or having had previous operations on these parts of the body) should not use this product. Contact your doctor before using the product.
• Do not use the product offer consuming alcohol, sedatives, or psychotropic drugs that could affect your powers of judgement
- Always wear a bicycle helmet and other appropriate protective equipment. - Always wear shoes that can give you a proper grip on the surface of the pedals, especially also in wet weather.
- Before riding, check that brakes, lights, and other safety-related parts are working properly.
- Make sure that frame size and operating controls are adjusted to your body size. - Do not make any adjustments to brakes while riding.
Do not ride with the rechargeable battery taken out. The rechargeable battery serves as a power source for the lights, which means that riding with the rechargeable battery removed effects how the lights work. Controversion constitutes an administrative offence and can lead to fines, loss of insurance cover, or accidents or falls that result in injuries.
- The product is exposed to wear and heavy loads. Different materials and components can react in various different ways to wear or continuous loading. If the planned period of use of a component is saturated, it may suddenly fail and thus possibly come injury to the rider. Any kind of cracks, scarring, or changes in the colour of paint in heavily stressed areas indicates that the component's period of use is coming to an and the component must then be replaced.
- Do not hamper with the maximum assistance speed or the handling by changing the pa-rameter. Tempering constitutes an administrative offence and can lead to lines, loss of insurance cover, or accidents are falls that result in injuries. Furthermore, making changes of this kind increases the wear on the drive system and the components considerably. This also makes all warranty claims and guarantees null and void. Do not make any general changes to components that affect the performance or maximum-assisted speed of your tide, especially not any that would increase them.
Risk of burns!
• After a ride do not touch the housing of the power unit or the brakes with unprotected hands or legs. Under extreme conditions with sustained high torques at low speeds or on ascents and when carrying loads, for instance - temperatures in the housing and the brakes can become very high.
Dangers from taking risks when riding!
- be mindful not only of obstacles directly in front of you but also those at a distance - unimpeded vision contributes to safe use!
- When riding in a group keep a sole enough distance from the other riders. This should be a distance of at least one meter on all sides from the other rider in order to avoid accidents.
- Be considerate of other food users, walkers, and children. Always assume that others may be negligent. Never role without lights when it is dark!
- Never ride with no hands. - Bear in mind that bonding can be severely affected when carrying an additional load. - Never ride two up on the product. - Comply with all national road traffic laws and regulations.
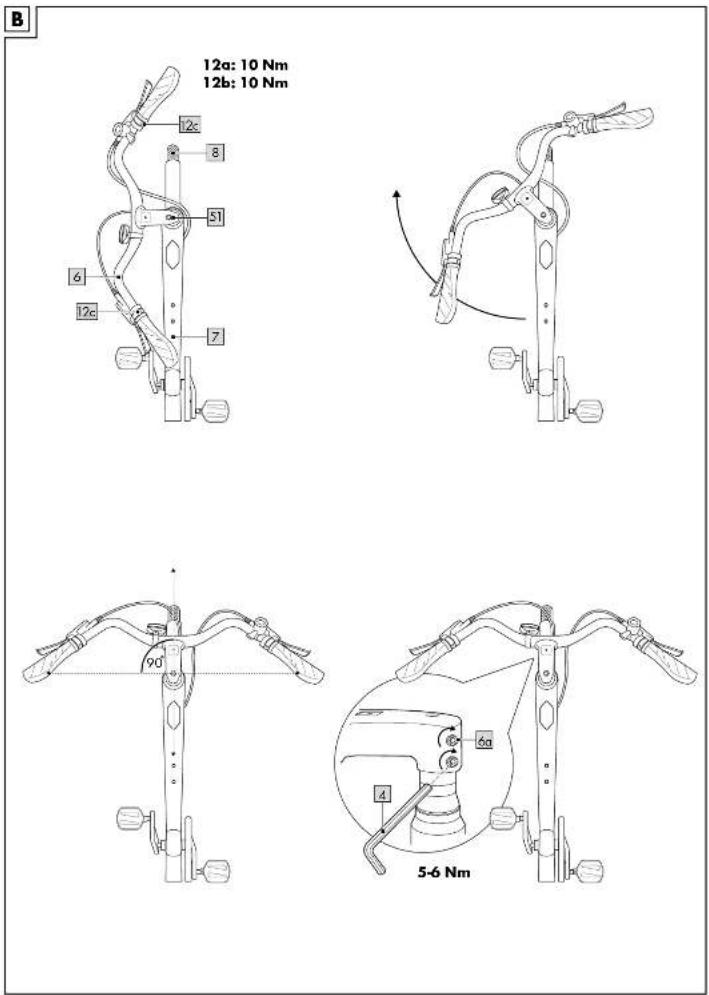
Assembly
Note1 Figs. B-O serve as examples for both model numbers
Assembling the handlebar/stem combination(fig. B)
The product comes delivered with the handlebar/stem combination (6) positioned parallel to the frame (7) and is not ready to be ridden. As delivered it comes with the screws (6a) loose. 1.Turn the handlebar/stem combination clockwise 90°. Align frame, handlebar/stem combination and front wheel (8) flush in one alignment.
- Tighten both screws [6a] with the aid of the appropriate 4mm Allen key [4].
Important: Observe the correct torques. All torques are given in the section "Technical data." Note: The steering head play is pre-set and may not be adjusted. The steering set screw (51) is marked by a slicker and may only be adjusted by a specialist company.
Important: Check that the handlabor/stem combination is securely sacred by jamming the front wheel between your legs and moving the steering forcefully. The front wheel and the handlabor/stem combination must stay in one line as you do this.
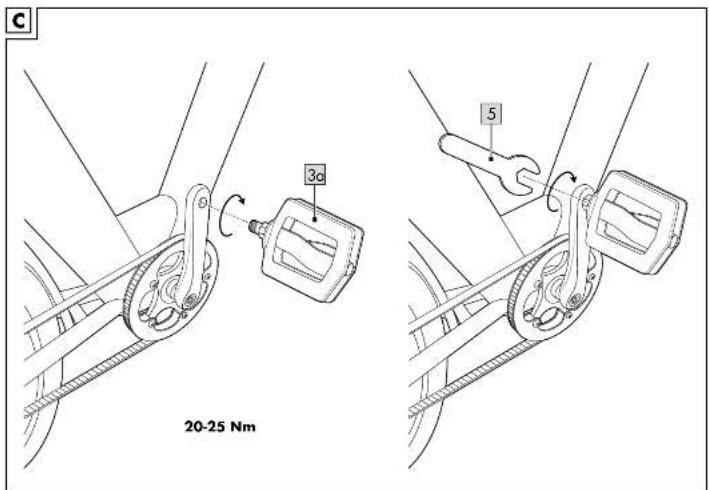
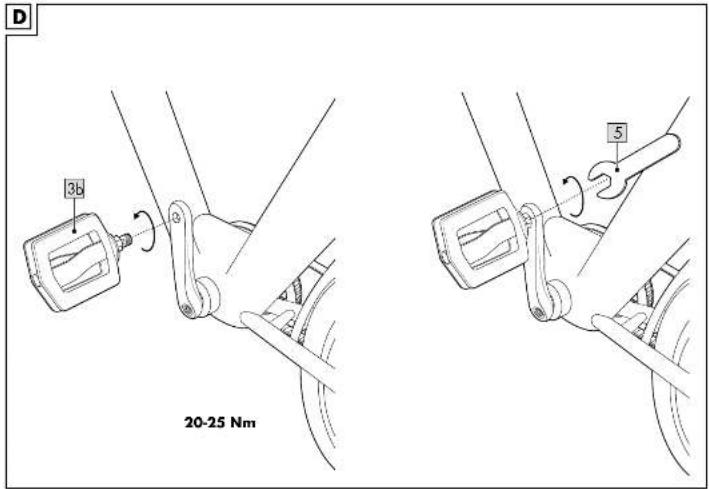
Pedal assembly (figs. C/D)
Make sure that the pedals (3a, 3b) are threaded in opposite directions. The left pedal (3b) is identified by little grooves. The end face of each thread is engraved with a letter L or R, which lies in with correct matching.
-
Tighten the right pedal (3a) by hand in a clockwise direction.
-
Tighten the pedal with the aid of the spanner [5] Important: Observe the correct torques. All torques are given in the section "Technical data"
-
Repeat the previous steps for the left pedal. Note: The left pedal is tightened counterclock
Adjusting the saddle post with integrated rechargeable battery (fig. E)

WARNING Risk of injury
An open quick release lever can lead to heavy falls and injuries.
- Close the quick-release lever fully until it fits tightly and tighten the knurled screw (27).
-
Loosen the quick release lever (11) of the saddle post with integrated rechargeable battery (14)
-
Open the lock (15) with the key (1).
- To adjust the height of the saddle post with integrated rechargeable battery, turn the saddle (10) 90 degrees and pull the saddle post with integrated rechargeable battery out of the
frame smoothly and evenly to avoid twisting it. Note: The saddle past with integrated rechargeable battery is lubricated. Please mind your clothing!
Important: Do not extend the saddle post with integrated rechargeable battery above the line marked "MAX"! Otherwise the saddle post with integrated rechargeable battery can no longer be guaranteed to hold securely and frame breaks or falls may result.
The lock (15) built into the saddle clamp (14) must be closed. It also limits the maximum length of extension of the saddle post with integrated rechargeable battery.
Note: The maximum insertion depth of the saddle post with integrated rechargeable battery is limited by the upper end stop and thus defines the minimum height of the saddle (10).
-
Position the pedals (3a, 3b) at 6 mo (10 o'clock)
-
Apply tensioning load to the knurtled screw (27) on the quick-release lever and then close the quick-release lever.
Important: Observe the correct torques. All torques are given in the section "Technical data". 6. Sit down on the product. The saddle post with integrated rechargeable battery is at the right height when your knee is just slightly bent.
- Check that you are correctly seated and repeat the steps previously described if necessary.
Important: Check that the quick-lease lever is securely in position. Riding with the quick-lease lever not properly closed can lead to falls and various injuries. The quick-lease lever must be closed with some considerable force to be absolutely sure to prevent it from unintentionally coming loose while riding. If it can be closed too easily, the knurled screw [27] on the opposite side to the quick-release lever needs to be tightened a little. The quick-lease lever should now close with somewhat greater resistance, if it can still be closed very easily, repeat the procedure.
Important: When closed the quick-release lever must fit closely against the saddle clamp.
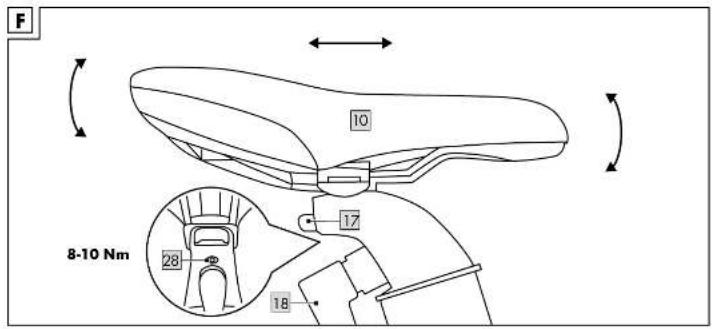
Adjusting the saddle (fig. F)
Loosen the Allan head screw (28) between rear light (17) and charging plug (19). Adjust the tilt of the saddle (10) or push it forwards or backwards into an individual position. Retighten the Allan head screw (28).
Important: Observe the correct torques. All torques are given in the section "Technical data".
Rechargeable battery and rechargeable battery charger

WARNING
Risk of explosion!
If used improperly, there is a risk of the rechargeable battery exploding.
- Keep the rechargeable battery away for excessive heat, sustained solar radiation (sunlight), first and similar hazards.

WARNING
Risk of injury!
Improper use of the rechargeable battery can lead to injuries.
- If you have not used the rechargeable battery for longer than 30 days, recharge it fully.
- Exchange the rechargeable battery completely every 90 days since it may otherwise discharge by itself and become permanently damaged. - if the rechargeable battery emits a strong
odour or gets hot, stop using it immediately. • The rechargeable battery may only be used with the rechargeable battery charger supplied.
The rechargeable battery charger is not intended for use by persons (including children) with limited physical, sensory, or mental capabilities or by those lacking experience or knowledge, unless they have been instructed and supervised in the use of the device by a
person who is responsible for their safety. • Children should be supervised to ensure that they do not play with the rechargeable battery charger.
- Cleaning and maintenance may not be carried out by children.
- Inspect the plugs and connection cable regularly. If the connection cable is damaged, it must be replaced by the manufacturer, their customer service department, or a qualified person in order to avoid risks.
- Disconnect the rechargesable battery charger from the power supply and let it cool down before you clean, write, or transport.
- Prove the electrical parts from humidity. Do not immersate (the rechargeable battery, for example) in water or other liquids during cleaning to avoid on electric shock. Do not hold the rechargeable battery charger under running water.
- The rechargeable battery must be in a well ventilated location during charging. - Disconnect the rechargeable battery charger from the power supply as soon as the rechargeable battery is fully charged. Inspect the rechargeable battery charger regularly for damage. A damaged rechargeable battery charger must be repaired before being used again.
- Do not use the rechargeable battery charger if it has been exposed to vibrations or impacts or if it has been dropped or damaged in some other way.
- Never connect a damaged rechargeable battery to the rechargeable battery charger. Risk of electric shock! - Never take the rechargeable battery charger unit. Repair must be performed by an accredited customer service department. Incorrect assembly can lead to fire or electric shock.
- Never use the rechargeable battery charger near explosive or flammable materials. There is a risk of fire and explosion.
- Check the technical data before you connect the rechargeable battery charger to the power supply. Connect the rechargeable battery charger only to a plug that matches the technical data on the type plate. Risk of electric shock
- The rechargeable battery charger is intended for use in indoor spaces only
- Always use the rechargeable battery charger as designed. The rechargeable battery charger is intended for use only with the rechargeable battery that is built into the product. Use of any other kind can lead to fire or electric shock. Make sure that the rechargeable battery charger and the charge connection hues been properly connected and are not impeded by foreign objects.
- Keep the charge connection clean and dry and protect it from dirt and humidity.
- Do not place any objects on top of the rechargeable battery charger and do not cover it up since this might lead to over-heating.
- Do not position the rechargeable battery charger near a heat source. - Always place the charging cable so that no one can trip over it, stop on it, or damage it in any other kind of way. In case of non-compliance there is a risk of material damage or injuries. - Do not separate the rechargeable battery charger from the power supply by pulling the connection cable. Always hold the power plug to disconnect the power. Rechargeable batteries may not be exposed to any mechanical impacts. There is a risk that the rechargeable battery will be damaged.
- The rechargeable battery may not be charged unattended.
Charging the rechargeable battery
With a saddle post with an integrated rechargeable battery the rechargeable battery (14) is built in and can be charged directly on the EPAC or it can be removed for charging.
Note: The charging check light (2a) on the rechargeable battery charger (2) comes on during charging and lights up red. When charging is complete, the charging check light on the rechargeable battery charger lights up green. Be mindful of the following:
• IMPORTANT: Charge the rechargeable battery fully before first use.
• IMPORTANT: Pay attention to the mains voltage! The voltage of the power source must match the information on the type plate of the rechargerable battery charger. 1. Plug the charging plug (2b) of the mains cable (2c) into the socket (2d) on the rechargerable battery charger (2).
- Connect the mains cable (2c) to the power supply.
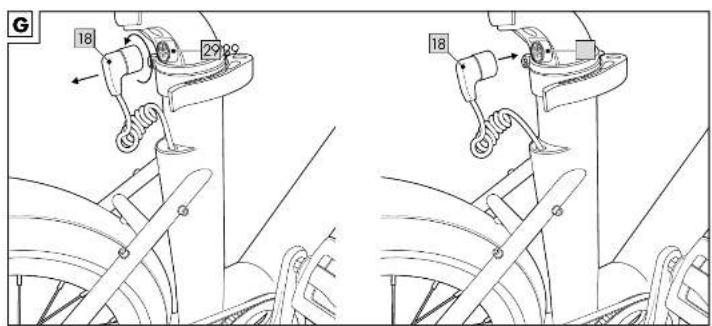
Charging the rechargeable battery on the EPAC (fig. G)
-
Rotate the locking ring on the charging plug (19) one quarter turn to the left and then pull the charging plug out of the connection cable (29) of the EPAC.
-
Connect the rechargeable battery charger (2) to the EPAC.
-
When charging has been completed, disconnect the mains cable (2c) again and plug the charging plug back into the connection.
Charging the rechargeable battery externally
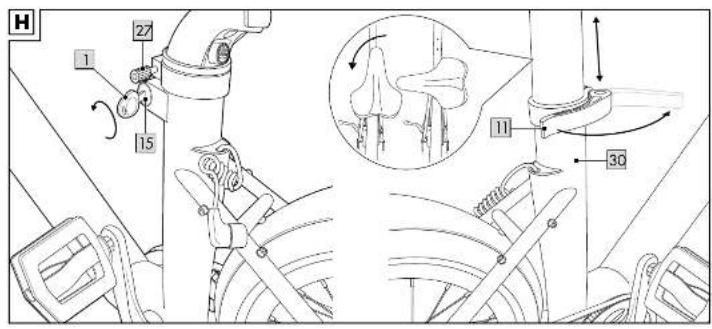
Disconnecting the rechargeable battery (fig. H)
-
Loosen the quick release lever (11) of the saddle post with integrated rechargeable battery (14).
-
Open the lock [15] with the key [1].
-
Rotate the locking ring on the charging plug [16] one quarter turn to the left and then remove it from the connection cable [29] of the EPAC (see fig. G).
-
To remove the saddle post with integrated rechargeable battery, turn the saddle (10) 90 degrees and pull the saddle post with integrated rechargeable battery out of the frame smoothly and evenly to avoid twisting it.
Note: The saddle post with integrated rechargeable battery is lubricated. Please mind your clothing!
-
Turn the key in the direction of the arrow and pull it out.
-
Charge the rechargeable battery (see "Charging the rechargeable battery").
Notes: Bear in mind that removing a component or a rechargeable battery is not a protection against theft. The EPAC can also be operated without assistance from the drive components. Always product the EPAC by securing it to some fixed object with a reliable and taste bicycle lack.
Installing the rechargeable battery (fig. H)
- Open the locking mechanism with the key (11).
-
Insert the saddle (10) and the saddle past with integrated rechargeable battery (14) into the saddle type (30).
-
Plug the charging plug [18] back into the expansion.
-
Adjust the seat height (see hg. E).
- Turn the key in the direction of the arrow and pull 3 end.
Tips for using the rechargeable battery
- Rechargeable battery life can be prolonged if it is properly maintained and especially if it is stored at the right temperatures.
- If the rechargeable battery is stored empty for a lengthy period, it can become damaged despite the low self-discharge and the storage capacity can then be seriously reduced.
- It is not recommendable to leave the rechargeable battery permanently connected to the charger.
• For example, do not leave the rechargeable battery in the car in the summer; instead, store it away from direct sunlight.
- Do not ride with the rechargeable battery token out.
Rechargeable battery storage conditions
- Whenever possible, store the rechargeable battery in a dry, well-ventilated location. Protect it from humidity and water.
- The ambient temperature must be between 5 C and 25 C. Under unfavourable weather conditions it is recommended to remove the rechargeable battery and store it in enclosed spaces until it is next used. For storage the rechargeable battery should be neither fully charged nor empty. A charging status of around 40 - 60% is ideal. Store the rechargeable battery as follows:
- in areas with smoke detectors - not in the vicinity of combustible or easily flammable objects - not near heat sources
Before your first ride
- Change the rechargeable battery fully. - Familiarise yourself with the handling and the brakes. Make sure you know which brake lever to apply for each wheel, front and rear. Note: The brake lever on the left (12a) is for the front-wheel brake (19a) and the brake lever on the right (12b) is for the rear-wheel brake (19b).
- Adjust the saddle height to the size of your body (fig. E).
Before each ride
Check tyre pressure
Tyres (20) should be at the pressure recommended in the manufacture's specifications. Always follow the tyre pressure recommendations marked on the side walls of the tyres! Check the tyre pressure with a suitable pump that has a pressure gauge.
Check brakes
Apply the brakes and test whether they work properly.
Inspect wheel rims
Check your wheel rims (21) and impellers regularly for damage such as cracks or impacts from stones and also make sure that the bike runs straight.
Tips for riding safely
- Slowly familiarise yourself with how the EPAC operates.
- It is recommended that you gain experience with the EPAC away from heavily traveled roads at first. Try out various assistance levels. Begin with the level of least assistance. As soon as you feel secure you will be able to join in with other road users with your EPAC. Test the EPACs range under different conditions before planning longer, more demanding tips.
Note: The actual range of the EPAC is dependent on many specific factors.
These may be, for example, the outside temperature, the riding style, or weight of the rider, as well as the conditions of the terrain and the selected assistance level.
The exact range of the rechargeable battery depends on various factors, such as the assistance level, speed, route profile, rechargeable battery condition, etc. and can vary individually. - Look ahead when riding, especially at higher speeds. Adapt the way you ride to the respective conditions.
- Do not attempt to manipulate the maximum assistance speed or the handling by changing the parameters.
- When setting off, power from the motor can engage abruptly, especially at high assistance levels. Avoid putting stress on the pedals if you are not safely seated on the bike or if you are pushing off with just one leg when setting off.
- For your own safety apply the brakes when you get on the bike to prevent it from accidentally moving off.
- If you are sitting motionless on the hike, apply the brakes to prevent setting off unintentionally. Remember that the handling can be severely affected when riding carrying a load. When loading comply with the maximum total weight permissible. Always make sure that the load is evenly distributed.
Braking
WARNING Risk of burns!
The brake disc (22) can get vary hot when the brakes are constantly being applied.
- Never touch the brake disc with your bare hands immediately after using it. Wait until the brake disc has cooled down before touching it.
• Familiarise yourself with the honeling and the brakes. Make sure you know which brake
lever is apply for each wheel, from this head. Note: The brake lever on the left (12a) is for the front-wheel brake (19a), and the brake lever on
the right (12b) is for the rear-wheel brake (19b). - Brake in such a way that the impellers do not lock. As soon as the impeller locks you lose rear grip and this may cause a fall. Practice braking in places with little traffic that are suitable for this.
- Never apply the front brake abruptly. You might be thrown over the hurdles. When driving, shift your centre of gravity towards the rear wheel by sliding for back on the saddle. Whenever possible, use both brakes to achieve maximum braking effect. Always take into account that in wet weather conditions, on dry roads, and with loose natural materials, the braking distance may increase considerably.
Adjusting the brakes
When working in the area of the disc brake (22), remember that with a rotating brake disc, there is a considerable risk of injury.
Important: To avoid broke failure, disc brakes and their linings may not come into contact with lubricants/oils!
- In some situations it is necessary to adjust the brake disc (e.g. if you hear grinding noises). - Clean the brake disc if it grinds.
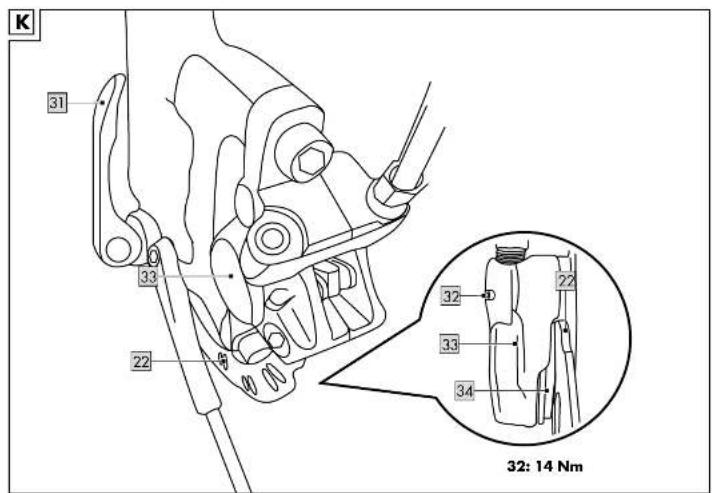
- If the brake disc (22) is misaligned, open the quick release (31) and loosen the screw (32) on the brake boss (33) (see fig. 6) so that the wheel is free. Tighten the brake levers (12a, 12b) on the handlebars. This straightens the brake disc automatically. Let go of the brake levers and then attach the quick release and the screw.
Important: Observe the correct torques. All torques are given in the section "Technical data". Important: If you have loosened the screws on the broke boss, secure them again afterwards using a suitable thread coolant such as thread lacquer, for example.
Position of the brake lever
WARNING Risk of Inju
If the brake lever is in the wrong position, I can load to accidents which may result in injuries. • The brake lever (12n, 12h) should under no circumstances be able to be pressed down to the grip (23) before the brake pads (34) touch the brake discs (27). Otherwise full braking power cannot be applied. Consult a specialist retailer immediately if this occurs. • When braking, your wrist should be positioned in a straight line with your forearm; adjust the brake lever accordingly if necessary. Depending on body size this may result in a different brake lever angle.
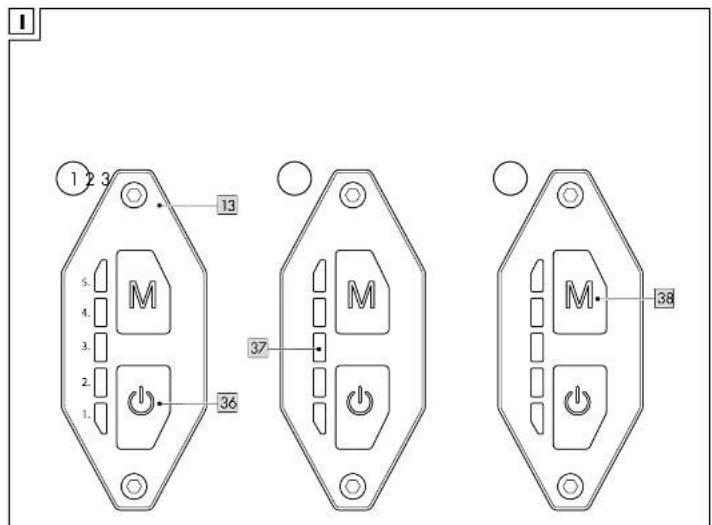
Operating the display (fig. 1)
• The display [13] shows the status of the rechargeable battery and the assistance level of the motor (24).
• The EPAC switches off completely after 5 minutes if it is not used.
- After 5 seconds the display changes from indicating the "Assistance level" back to showing the "Rechargeable battery status" again if no button is pressed.
Switching the motor on/off - Switch the EPAC on by pressing the "on/off" button (36). Press the button again to switch the EPAC off (fig. 1.1).
Rechargeable battery status
After switching on the motor for rechargerable battery status is indicated by 5 white IUDs (37) (fig. 1, 2).
5 LEDs - rechargeable battery status 100%
4 LEDs - rechargeable battery status 80%
3 LEDs - rechargeable battery status 60%
2 LEDs - rechargeable battery status 40%
1 LED - rechargeable battery status 20%*
*When the rechargeable battery status is very low, the last LED begins to light up orange. Charge the rechargeable battery.
Error messages
The LEDs (37) in the display light up red in various combinations to indicate possible errors with the product or when riding. You can consult a brief overview of possible problems and how to solve them in the table "Error messages on the display". For troubleshooting you can also consult the FAQs.
Note: Note that the LEDs are numbered from bottom (1.) to top (5.).
Motor assistance
- Press the button M (38) to switch from showing "Rachargamthe battery volux" to "Assistance level" (fig. 1, 3). The LEDs (37) on the display light up blue.
- Press the M button again to scroll through the various assistance levels.
Note: The product begins in Assistance level 0 (lackary setting) and scrolls up as far as Level 5 by repeated pressing of the M button. The system then switches back to Level 0 and then back up again. - Assistance level 0:
No LED lights up. The motor does not offer any assistance.
• Assistance level 1-5:
LED local assistance
5 LEDs maximum assistance
Note: Note that the maximum range of the rechargeable battery is about 70km. However, this is always dependent on the outside conditions such as weather effects and terrain conditions, as well as on the duration and loading of the motor assistance and can vary accordingly.
Add-on components and accessories
WARNING Risk of inju
Riding with luggage changes the usual way the product handles and can lead to falls.
- Secure any accompanying luggage against lining upwards or shifting from size to size. - Familiarize yourself with the changed handling characteristics of the product; these include an increase in the breaking distance.
- Make adjustments in your riding style.
You can use the product with external add-on components. When doing so, always comply with the manufacturer specifications.
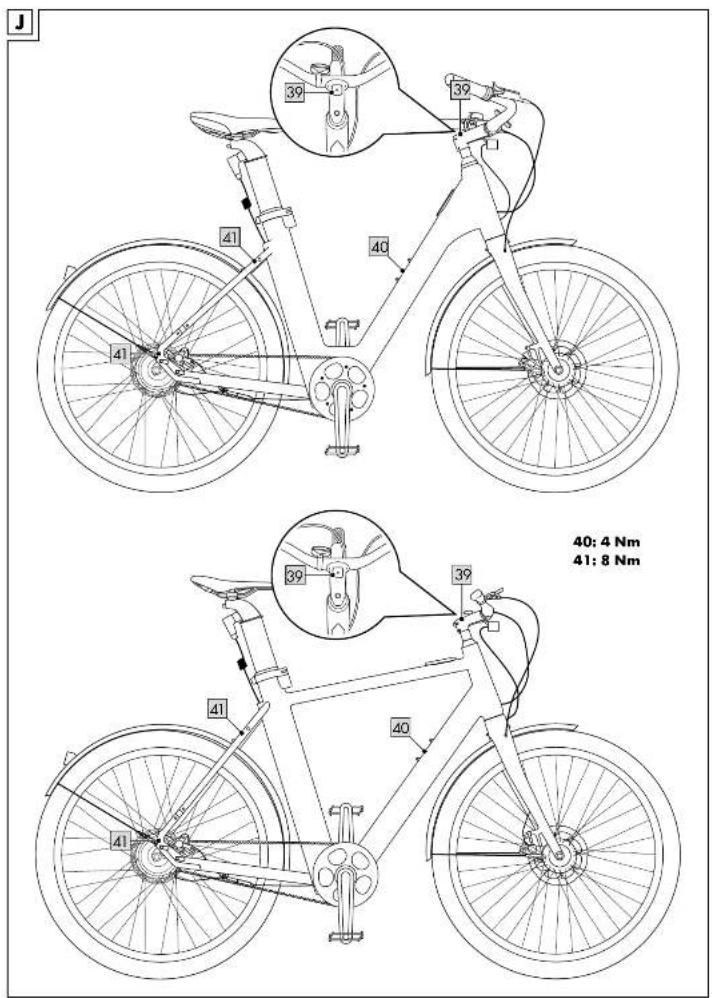
Mobile phone holder (fig. J) You can purchase a mobile phone holder at your specialist retailer's.
Important: Only mobile phone holders of the brand "SP Connect TM", "Stem Mount Square" are suitable. Remove the covering [39] on the handbars.
- Mount the mobile phone holder at the position on the covering (39) as shown in fig. 1. Mount the mobile phone holder in accordance with manufacturer specifications.
Bottle holder (fig. J)
A suitable bottle holder (not supplied) can be attached to the frame (7) by means of the two screws (40)
- Loosen the screws in the frame.
- Mount the bottle holder in accordance with
the manufacturer's instructions. 3. Tighten the screws securely again. All queries are given in the section "Technical data".
Luggage rack (Abb. J)
Important: A luggage rock is not included in delivery but it can be bought as an add-on at a specialist retailer.
Please obtain information at a specialist retailer about a model appropriate to your requirements. The maximum permissible load is 20kg.
- DESCRINIC (I)II screws (441).
- Install the luggage rack in accordance with the manufacturer's specifications.
- Tighten the screws securely again.
Important: Closseve the current torque (8Nm). The total permissible weight of 120kg may not be exceeded when luggage is loaded in addition.
Make sure also that luggage does not cover up the rear light.
Child seat
Important: The EPAC is not permined/suitable for use with a child seat.
Bike trailer
Important: The EPAC is not permitted/suitable for use with a bike trailer.
Maintenance
- You must be absolutely sure to remove the rechargeable battery during maintenance work.
- Perform repairs, maintenance, and adjustment work on your bike yourself only if you have the knowledge and the tools required! In the event of any doubt leave all work to a specialist workshop or to our service provider. You can obtain relevant information from the customer service department at Delta-Sport Handelskontor GmbH.
- Keep in mind that because of their technical design the drive components produce a slight increase in resistance and make a faint noise as your role. Increased resistance when idling and a slight noise during the ride are not an immediate sign of some technical defect but are caused instead by the setup of the drive components. Should the resistance on the noise increase during the ride, this can be a sign of defective maintenance.
- Because of the extra power introduced by the drive components and the product's greater weight, all components are subject to increased wear. Shorter maintenance intervals than those of traditional bicycles must there be observed. Poorly maintained or worn components can lead to accidents or falls and then to injuries as a further consequence. Be absolutely sure to remove the rechargeable battery prior to repairs and maintenance work. Otherwise there is a considerable risk of injury since the system might start up because of mechanical functions. Make sure that no cables are linked, pinched, or damaged by pagged edges when working on repairs and maintenance. Damaged cables can bring a danger to life due to electric shock.
- Do not open the power unit yourself. The power unit may be repaired only by qualified specialist personnel and using only original replacement parts.
- For repair and replacement purposes use only original components as well as original drive
• Lubricate the lack every 6 months with a special oil tie lock.
- Clean the plug terminals occasionally and grease from lightly.
Inspection interval
- Before each ride inspect all screw connections and moving and heavily stressed parts of the product.
- Have the EPAC inspected at least once annually. It is absolutely essential to have this done by a specialist dealer who will inspect the belt (26) for wear and check the belt disc (35).
• A detailed inspection is recommended on a recurring basis either every 2,000km or every 100 hours of operation, or after one year (whichever comes first).
- Take your product to the specialist retailer for complete and thorough maintenance. - The product is designed for a service life of or latest 25,000km.
Wear parts
Note that you can reorder a great number of wear parts and accessory parts at the following address: https://lds-service.com
Wear parts are parts of the product subject to a certain amount of wear due to their function and thus are not covered by the warranty.
• Note: Lighting systems [25, 17] and reflectors must be checked before every trip. Defective light sources must be replaced immediately.
- LED headlights (25) and LED rear lights (17) are designed in such a way that the individual light source unit cannot be replaced.
This means that it is necessary to replace the whole LED headlight and/or LED rear light.
- Rechargeable batteries slowly lose capacity over time so that as they get older the range of the pedlocis is reduced. The two-year warranty is valid from the date of purchase or up to 500 charge cycles, whichever occurs earlier. The batteries are designed to retain up to 70% of their original capacity for this length of time.
- Brake pads (34, fig. K) are subject to wear due to their function. Change the brake pads no later than after 5,000km irrespective of the degree of wear. You can detect wear if you hear metallic sounds or if there is a reduction in braking power. Brake pad thickness should be at least 2.5mm. Replacement of brake pads may be necessary at shorter intervals when riding in mountainous terrain since the pads are stressed to be significantly greater degree. A regular inspection before each trip is therefore absolutely essential.
• The degree of wear of the belt (26, fig. L) depends on upkeep, maintenance and mileage. The durability of the individual components of the belt system is heavily dependent on outside influences and environmental conditions. The life expectancy of a belt system used in a humid environment is always less than when it is used on dry roads. You will recognise heavy wear, for example, if the belt skips on the belt disc (35) or if the teeth of the belt disc are visibly worn.
Importants: Have the belt replaced if there is any damage from serious outside impacts. For example, if a stone, a ring or an item of clothing is picked up by the belt and is pulled in between belt and belt dist. An impact like this may lead to damage to the sensitive carbon fibers inside the belt even if there is no discernible external damage. A previously damaged belt or a possibly damaged belt dist. must in all cases be replaced by a special dealer because when riding in drive mode it may suddenly break, which in turn can lead to accidents and injuries. Important: To remove dirt simply clean the belt with water and a mild detergent. Never clean with abrasive detergents.
Important: Use only original replacement parts. You can reorder the parts at: http://www.pctostrans.de
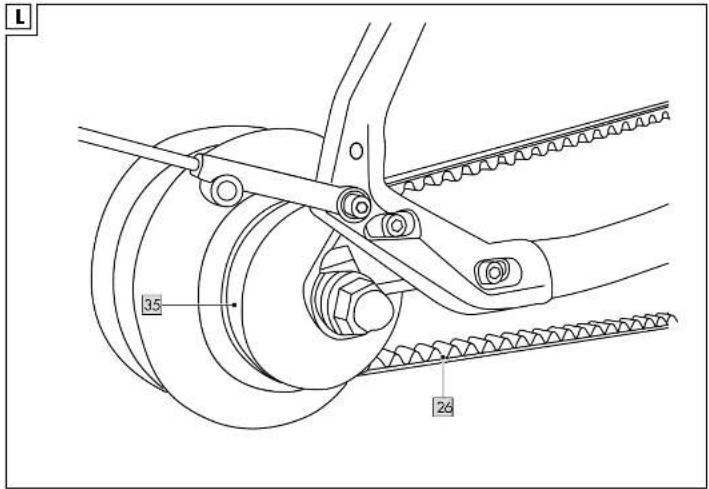
Important: Bell [26] and ball discs [35, fig. 1] are coordinated.
- Brake discs (22)
Ruplana worn brake discs. You will detect the wear because of a reduction in braking power. The disc thickness may not be less than 1.4mm. Check the disc thickness at regular intervals.
• Tyres (20) and inner tubes are subject to relatively heavy wear, which is greatly influenced by the user. The service life of a tyre is shortened considerably by braking hard, which leads to wheel locking.
• In order to permit early detection of damage to the wheel rims (21) clean from regularly since cracks, etc. may be covered up by dirt.
Punctures
Inside every bicycle tyre there is an inner tube. With a puncture proceed as follows:
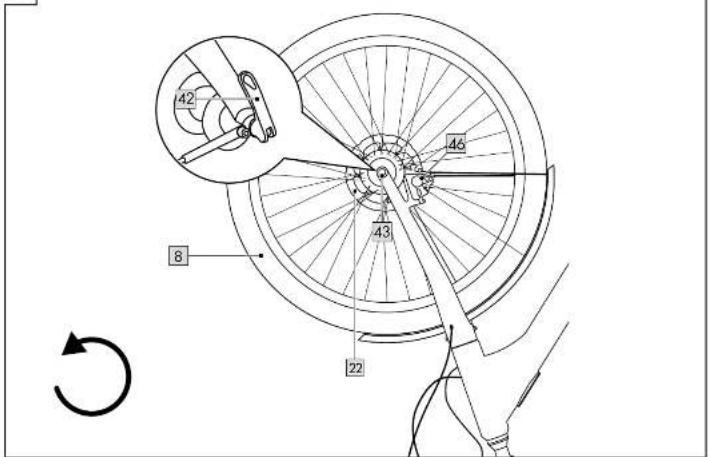
Disassembling the front wheel (fig. M)
-
Disengage the quick-release lever (11) on the front wheel. (8)
-
Loosen the opposite nut (43) on the quick release and remove the front wheel.
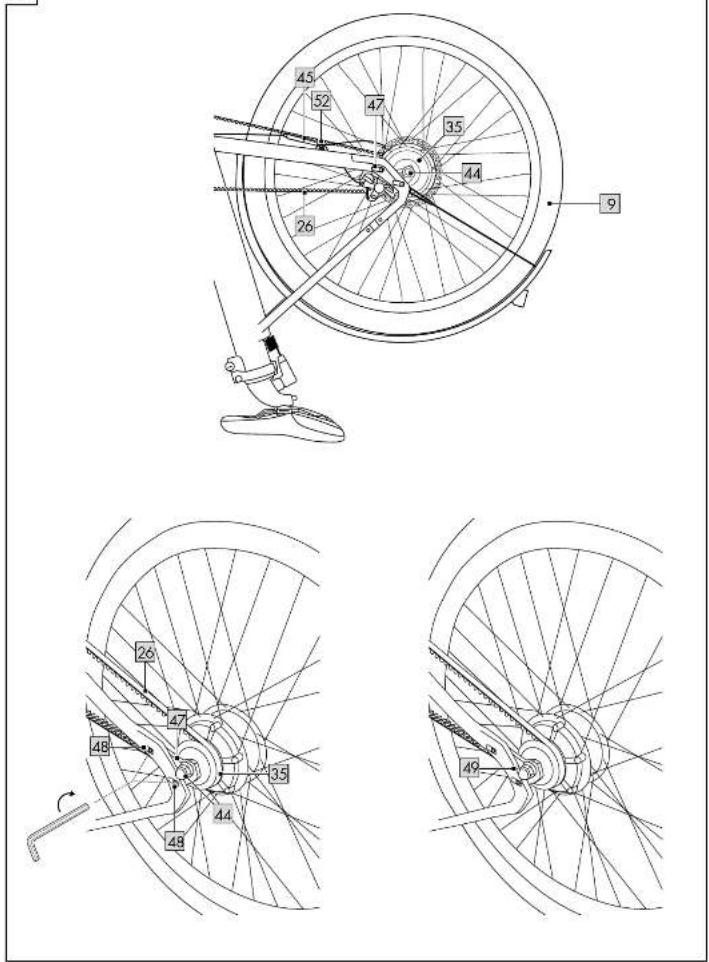
Disassembling the rear wheel (fig. N)
- Remove the flats (4) or other sides of the wheelwheel axle with a 19mm spanner (not supplied). Important: Observe the correct torques. All torques are given in the section "Technical data".
-
Disconnect the plug (45).
-
Remove the reusable mounting clip (S2) with the aid of a screwdriver (not included in delivery).
A. Remove the rear wheel (9) and take the belt (26) off the belt disc (35).
Repairing the inner tube
- Squeezs the air out of the inner tube.
- Laoan the bicyclic tyr (20) on one side from the rim (21) with a tyr level and remove the defective inner tube.
- Inflate the new or repaired inner tube a little and places it inside the tyr.
Note: When inflating make sure that the inner tube does not get caught between tync and rim flange. Notes: Do not apply the brake with the wheels disassembled and do not use a transportation lock since such would cause the brake shoes to close. 4. Guide the valve through the valve hole in the rim.
- Pull the tyre over both sides of the rim and tighten the union nut.
Assembling the front wheel (fig. M) 1. Put the front wheel (8) back on.
-
Make sure that the brake disc (22) is seated correctly in the brake caliper (46).
-
Turn the nut (43) of the quick release to produce sufficient proof
-
Close the quick-release lever (42). Note: When closed, the quick-release lever should be against the fork shaft.
Assembling the rear wheel (fig. O)
-
Lay the belt (26) back on the belt disc (35) and put in the belt tensioners (47). Put the nuts (44) back onto the axle but do not tighten them just yet.
-
Adjust the belt (see section "Adjusting/tensioning the belt").
-
Tighten the nuts (44) securely. Important: Observe the correct torques. All torques are given in the section "Technical data".
-
Connect the plug (45).
-
Use the mounting clip (52) to secure the cable of the plug connection.
Adjusting/tensioning the belt (fig. O)
-
Looten the two screws (46) of the belt tensioners (47), on the left end on the right respectively.
-
Tension the belt tensioner by turning the screws (49) clockwise on both sides with a suitable Allen key.
Important: Be sure to make the same number of rotations on both sides.
- Check the belt tension by pressing lightly with your finger on the belt (26). Tighten the screws on the belt tensioners (48).
Important: Observe the correct torques. All torques are given in the section "Technical data".
Storage, cleaning
Store the product in a dry and dust-free location away from direct sunlight. Remove the rechargeable battery when not in use. The product should be cleaned every 100 to 150km or immediately each time after being used on a muddy or salty surface. Use a lightly moistened cloth to clean the product and avoid contact with water. IMPORTANT! Never clean the product with harsh cleaning agents. Never use high-pressure cleaners or steam jets to clean the product. The strong water jet might damage the electrical components and the delicate positioning of the other components.
Transport
- When transporting the rechargeable battery comply with any applicable regulations regarding hazardous materials.
- Use only suitable bicycle carriers (near or near carriers) to transport the EPAC on the car. It is essential that you remove the rechargeable battery before transporting the product on or in the car.
Disposal
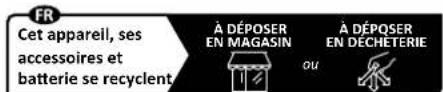
The accompanying symbol indicates that this device complies with Directive 2012/19/EU. This
not dispose of this device along with basic household waste at the end of its useful life and instead must hand it in to specifically designated collection sites, valuable substance collection stations, any net disposal facilities.
Look after the environment and dispose of waste properly. Batteries may not be disposed of with household waste. They may contain toxic heavy metals and are subject to hazardous waste treatment. The chemical symbols of the heavy metals are as follows: Cd = cadmium, Hg = mercury, Pb = lead. Dispose of used batteries or a municipal collection site.
For further information about disposal of the product no longer needed, contact your local council. Dispase of the product and the packaging in an
environmentally friendly manner. Store the packaging materials (foil bags, for example) out of the reach of children.
Note the label on the packaging materials when separating waste, as these are labelled with abbreviations [a] and numbers [b] with the following meanings:
1-7: plastics / 20-22: paper and cardboard / 80-98: composite materials. The product and the packaging materials can be recycled, dispose of them separately for better treatment of waste.
The Triman logo only applies to France.
Notes on the guarantee and service handling
The product was produced with great care and under continuous quality control. DELTA-SPORT HANDELSKONTOR GmbH grants private end customers a five-year guarantee from the date of purchase (guarantee period) in accordance with the following provisions. The warranty applies
only to defects in the materials and workmanship of the frame. The guarantee does not cover parts subject to normal wear and tear that are thus considered wear parts (e.g. batteries, balls, brake pads, brake discs, sprocket, tyres, handles) or fragile parts such as switches, rechargeable batteries, or parts made of glass. The statutory warranty of two years applies here.
Claims under this guarantee are excluded if the product has been used incorrectly, improperly, or contrary to the intended purpose, or if the provisions in the instructions for use were not observed, unless the end customer proves that a material or manufacturing defect exists that was not caused by one of the aforementioned circumstances.
Claims under the guarantee can only be made within the guarantee period by presenting the original sales receipt. Please therefore keep the original sales receipt. The guarantee period is not extended by any repairs carried out under the guarantees, under statutory guarantees, or as a gesture of goodwill. This also applies to replaced and repaired parts.
If you wish to make a claim please first contact the service hallina mentioned below or contact us by email. If there is a guarantee case, then the product will be repaired or replaced free of charge to you or the purchase price will be refunded, depending on our choice.
Important: Be sure to keep the sales packaging in case you should wish to return the product (warranty or guarantee).
There are no other warranty-based rights. Your legal rights, in particular warranty claims against the respective seller, are not limited by this warranty. The legal warranty refers to the bicycle. Consequently this is not covered by any other warranty.
IAN: 413886_2204 IAN: 413889_2204
GB Service Great Britain Tel.: 0800 404 7657 E-Mail: deltasport@lidl.co.uk
Error messages on the display
Note the counting method for the LEDs from bottom to top.
| LED display Error code Description Remedy | ||
| LED 1 lights up red 21 Overcurrent Restart motor system after 2 minutes. | Should the error persist please contact [Customer] Service | |
| LED 3 lights up red 23 Motor hall wire fault 'please contact' [Customer] Service | ||
| LED 2 and LED 3 light up red 25 Undervoltage Restart motor system after 2 minutes. | Should the error persist please contact [Customer] Service | |
| LED 1, LED 2 and LED 3 light up red 26 Torque sensor error Restart motor system after 2 minutes. | Should the error persist please contact [Customer] Service | |
| LED 4 lights up red | 27 | Controller overloads |
| LED 5 lights up red 28 Display controller has lost commu-nation | rication | Restart motor system after 2 minutes. Should the error persist please contact [Customer] Service |
FAQ
| Question | Answer |
| Functional limitation | |
| The midguard drags. What can I do? | Use the block, rotatable mountings on the midguard to adjust the length of the midguard. |
| The pedelec doesn't start. What can I do? | Check the charging status of the battery. Check that the cialates are connected properly. |
| The pedelec gets empty very quickly. What can I do? | In cold weather the battery and motor power are unable to fully take effect. So on cold winter's days don't worry about the range being more limited. This is due to the cold and is normal with lithium-ion rechargeable batteries. At warmer temperatures your pedeles will return to its full power capacity. |
| The handlebars shake. What can I do? | Notice makes sure that the Allen key sensors are firmly seated, as described in the chapter "Handlobar assembly". Readjust the handlebar screw if the steering head bearing is loose. |
| Spare parts | |
| Where can I get a new toothed drive-ballet? | Contact our service partner at https://lbservice.com/ |
| Where can I get a new battery? | Contact our service partner at https://lbservice.com/ |
| I've lost my key. What can I do? | Contact our service partner at https://lbs-service.com/ |
| General questions | |
| How far can I go on a pedelec? | Generally spocking, you can go as fast on a pedelec as your muscle power allows. The motor assists up to a speed of 25km/h. Adjust the speed to each different situation at you ride. |
| What weight is the pedelec designed for? | Observe the maximum total load of 120kg including your own weight plus luggage. |
| How and for how long do I charge the battery? | The battery can easily be removed for charging. To do this follow the instructions as described in the chapter "Rechargeable battery and rechargeable battery charger". Be sure to keep the connection dry and free from dirt and keep it away from metallic dust or metal objects. The pedelec battery should be charged indoors, always at above 5°C and in a dry location. The charger should not be stored outdoors. Do not leave the charger permanently connected. It takes approximately 2.5 hours for the battery to be fully charged again. The lighting system is charged immediately at the same time because it is fed via the battery. The Chit charger stops the charging process automatically when the battery is full. There is no danger of overcharging the battery if you forget to unplug. The battery management system also proceeds if from undercharging but don't forget to charge the pedelec every five to six weeks when you are not using it. |
| How can I take care of battery maintenance? | If you don't use the pedelec regularly, you must charge the battery every 5 to 6 weeks. If not the cells might get damaged. The battery is best stored at a capacity of 40-60%. Store the pedeles and/or the battery in a dry location, especially in winter, it doesn't have to be in a specially heated room but nonetheless we recommend not storing it in locations with a temperature of less than 5°C Direct sunlight should also be avoided. Charging should be done basically in a dry and not hot cold environment but always at above at least 5°C. The charger is best kept inside the house. Moreover. In cold weather the battery and motor power are unable to perform to full effect. So on cold winter's days don't worry about the range being more limited. This is due to the cold and is normal with lithium-ion rechargeable batteries. In summer the pedeles will recover its full performance capabilities. |
| The position of the sand is not optional. What can I do? | The dimensions of handlubbers and stem are standard in the truck. Components can be exchanged but consider the following: Raising the handlubbers or stem does not automatically ensure more comfort but often results in less flexible, unrobable handlumber control. Enquire about this at a bike dealer. They can possibly exchanged stem and handlebars for you in order to set the position that bad suits you. |
| What must I watch out far in terms of upkoop and maintenance of the brakes? | At care and maintenance work on the brakes should be done only by our service partner or a professional bike workshop to avoid any kind of hazards. Brakes that are improperly maintained or installed can lead to accidents and injuries. |
| What kind of child trailer can I attach to the pedals? Attaching a child trailer to our pedals is not permitted. | |
| Can I use the pedals without electrical assistance? | If you feel like pedalling unassisted, just slip the drive system or ride in assistance level 0 to use the pedals in a fully traditional manner. |
| Where can I find the frame number? The frame number can be found under the pedal bearing. | |
| My toothed drive belt crests. What can I do? The belt can cause noise when ever a runs heavily against the llarge on the belt discs. This can be caused by misalignment of the belt discs, misalignment of the wheel, or drive wear caused by damaged components. But the permanent solution is still to correct the alignment or to replace the damaged components. Another possible noise source is a loose front belt disc. Applying thread locking fluid can eliminate the problem. Noise sometimes can occur when riding in a distilled environment. This noise is in no way any indication of a problem with your pedals. In most cases all you have to do to get rid of the noise is rinse off belt and belt dist after your ride. If the noise continues to occur, there is a very simple solution spray the belt down with water and wait until it is dry. Then supply a thin layer of dry silicon spray on the toothed side of the belt. Rapidly drying silicon dries immediately, has the effect of repelling sand, and has no effect on the durability of the belt. | |
| When should the bally/drive be replaced? Although you can expect your belt is lost for a fairly long time, regular inspections and regular replacement are recommended. The belt discs should be clearles for damage such as bending or cracks. Check the belt for the following: broken-off or missing teeth, cracks at the base of the teeth, ragged kerosal cords, mishapain and worn teeth. | |
| Do I have to be careful about which detergent I use to clean my toothed drive belt/pedecels? | One characteristic of the carbon drive belt is its very good chemical resistance. Contact with cleaning solutions from cooping and rinsing should not cause any damage. However, longer tooaking of the belt is not recommended. |
Declaration of Conformity

DELTA-SPORT
DELTA-SPORT HANDELSKONITOR (GHBH) | Worganspo-6 | 22387 Hamburg | Germany
DELTA-SPORT HANSIELSKONTOR GWBH
Wriegodcampa 6 25307 Handlow
Sanamay
+转增:01273130
info@dfy.(be-aptot.com)
UK Declaration of Conformity
W
declare that this Declaration of Conformity is issued under sole responsibility of the manufacturer.
IAN
413888
Model no.
UB-12391
Product
Urban e-bike - low entry
The aforementioned products meet the requirements of the following directives and standards:
Directive / Requirement
Harmonised standards/Technical specification
EMV 2014/30/EU
DIN EN 15194:2018
LVD 2014/35/EU
EN 55014-1:2017; EN 55014-2:2015; EN 61000 3-2:2014; EN 61000-3-3:2013
Machinery Directive 2006/42/EC
EN 60335-1:2012 + A11:2014
RoHS 2011/65/EU
| Hamburg,03.11.2022 | BENJAMIN STROVE,Quality Manager | |||||
| Place, Date | Name, Position | |||||
| Gesellschafts | Standminderung | Firm (Inksatz) | SRR | MKT (Lfd) | ||
| Seita Sitzinger | Russinger-Holding | 52 Bank AG | 1000 05/06 14 19:50 | 0500 2000 2010 02/03 1144:50 | 1200 04 19 19:50 | |
| Philip Rau | 1982 2022 | 2010 05/06 14 19:50 | 0500 2000 2010 02/03 1144:50 | 1982 04 19 19:50 | ||
| 147 No. 327 540 9991 | Rout 18 | 1000 05/06 02/03 14 | 0500 2000 2010 02/03 1144:50 | 1982 04 19 19:50 | ||
| 64 No. 307 114 502-1 | 800 19 17 40 52:5 | 0500 2000 2010 02/03 1144:50 | 1982 04 19 19:50 | |||
| HAMBURG | SHANGHAI | HOCHI MINHCITY | CHICAGO | ISTANBUL | ||
Declaration of Conformity

DELTA-SPORT
DELTA-SPORT HANDELSKONTOUR GMBH | VITAGNORPH 4 | 22397 Hamburg : Germany
DELTA-SPORT HANGELSKONITOR GHBH
Wrigenkamp S
22397 Hamburg
Germany
+49.55-60 527.318 0
info@delbeaport.com
UK Declaration of Conformity
declare that this Declaration of Conformity is issued under sole responsibility of the manufacturer.
IAN 413889
Model no. UB-12380
Product Urban e-bike - diamond frame
The aforementioned products meet the requirements of the following directives and standards:
Directive / Requirement
Harmonised standards/Technical specification
DIN EN 151942018
EN 55014-1:2017; EN 55014-2:2015; EN 61000 3-2:2014; EN 61000-3-3:2013
EN 60335-1:2012 + A11:2014
EMV 2014/30/EU
LVD 2014/35/EU
Machinery Directive 2006/42/EC
RoHS 2011/65/EU

HEETA SPORT
(1) This process requires a feedback in the case of this
附件说明:
V6个为6,目前长城新阳股份
电话:027168311
Bedveränderung
112 Bank AG
[Non-Text]
(No fill-in-the-blank)
Mintera i Acc. emnati
(1) 信息传递
表决结果:9票
(四)转换份额
Benjamin Struve,
Quality Manager
Name, Position
(54)
04268 03988 04005 02266 01644 853
(1) 2007年1月1日
0346.2669 0007-8560 0347 16
0427 3000 0001 51 St 7681 01
68071(88)
请勿召开
(二)利润分配
95A2013X8
HAMBURG
SHANGHAI
HOCHI MINHCITY
CHICAGO
ISTAMBUL


- Inhaltsverzeichnis
- Table des matières
- GB
- Données techniques
- Technische gegevens
- Scope of delivery/Parts list (fig. A)
- Technical data
- Symbols and signal words used
- Intended use
- Description EPAC/pedelec
- Legal requirements
- Safety instructions
- Danger to life!
- Risk of injury to children!
- Risk of injury!
- Risk of burns!
- Dangers from taking risks when riding!
- Assembly
- Assembling the handlebar/stem combination(fig. B)
- Pedal assembly (figs. C/D)
- Adjusting the saddle post with integrated rechargeable battery (fig. E)
- WARNING Risk of injury
- Adjusting the saddle (fig. F)
- Rechargeable battery and rechargeable battery charger
- WARNING
- Risk of explosion!
- Charging the rechargeable battery
- Charging the rechargeable battery on the EPAC (fig. G)
- Charging the rechargeable battery externally
- Disconnecting the rechargeable battery (fig. H)
- Installing the rechargeable battery (fig. H)
- Tips for using the rechargeable battery
- Rechargeable battery storage conditions
- Before your first ride
- Before each ride
- Check tyre pressure
- Check brakes
- Inspect wheel rims
- Tips for riding safely
- Braking
- WARNING Risk of burns!
- Adjusting the brakes
- Position of the brake lever
- WARNING Risk of Inju
- Operating the display (fig. 1)
- Rechargeable battery status
- Error messages
- Motor assistance
- Add-on components and accessories
- Bottle holder (fig. J)
- Luggage rack (Abb. J)
- Child seat
- Bike trailer
- Maintenance
- Inspection interval
- Wear parts
- - Brake discs (22)
- Punctures
- Disassembling the front wheel (fig. M)
- Disassembling the rear wheel (fig. N)
- Repairing the inner tube
- Assembling the front wheel (fig. M) 1. Put the front wheel (8) back on.
- Assembling the rear wheel (fig. O)
- Adjusting/tensioning the belt (fig. O)
- Storage, cleaning
- Transport
- Disposal
- Notes on the guarantee and service handling
- Declaration of Conformity
- UK Declaration of Conformity
Brand : CRIVIT
Model : Urban E-Bike X
Category : Bicycle