TB10 - Toaster Duronic - Free user manual and instructions
Find the device manual for free TB10 Duronic in PDF.
| Product Type | Electric Wide-Slot Toaster |
| Brand | Duronic |
| Model | TB10 |
| Dimensions (W x D x H) | 37.5 x 15 x 20 cm |
| Weight | Approximately 1.5 kg |
| Body Material | Stainless Steel |
| Power | 850 - 1000 W |
| Input Voltage | 220-240 V ~ 50/60 Hz |
| Number of Slots | 2 extra-wide slots |
| Functions | Toasting, Reheat, Defrost, Cancel |
| Browning Level Adjustment | 6 levels (1 to 6) |
| Switches | Reheat, Defrost, Cancel (on/off) |
| Indicator Light | Yes (on Cancel switch) |
| Viewing Window | Yes, glass |
| Inner Glass Panel | Removable and washable |
| Crumb Tray | Removable, easy to empty |
| Power Cord Length | Approximately 0.8 m |
| Cord Storage | Yes, under the base |
| Cleaning | Exterior: damp cloth; crumb tray and inner glass panel washable with soapy water |
| Warranty | 1 year |
| Usage | Household |
Frequently Asked Questions - TB10 Duronic
User questions about TB10 Duronic
0 question about this device. Answer the ones you know or ask your own.
Ask a new question about this device
Download the instructions for your Toaster in PDF format for free! Find your manual TB10 - Duronic and take your electronic device back in hand. On this page are published all the documents necessary for the use of your device. TB10 by Duronic.
USER MANUAL TB10 Duronic
Creative Consumer Products
natural_image
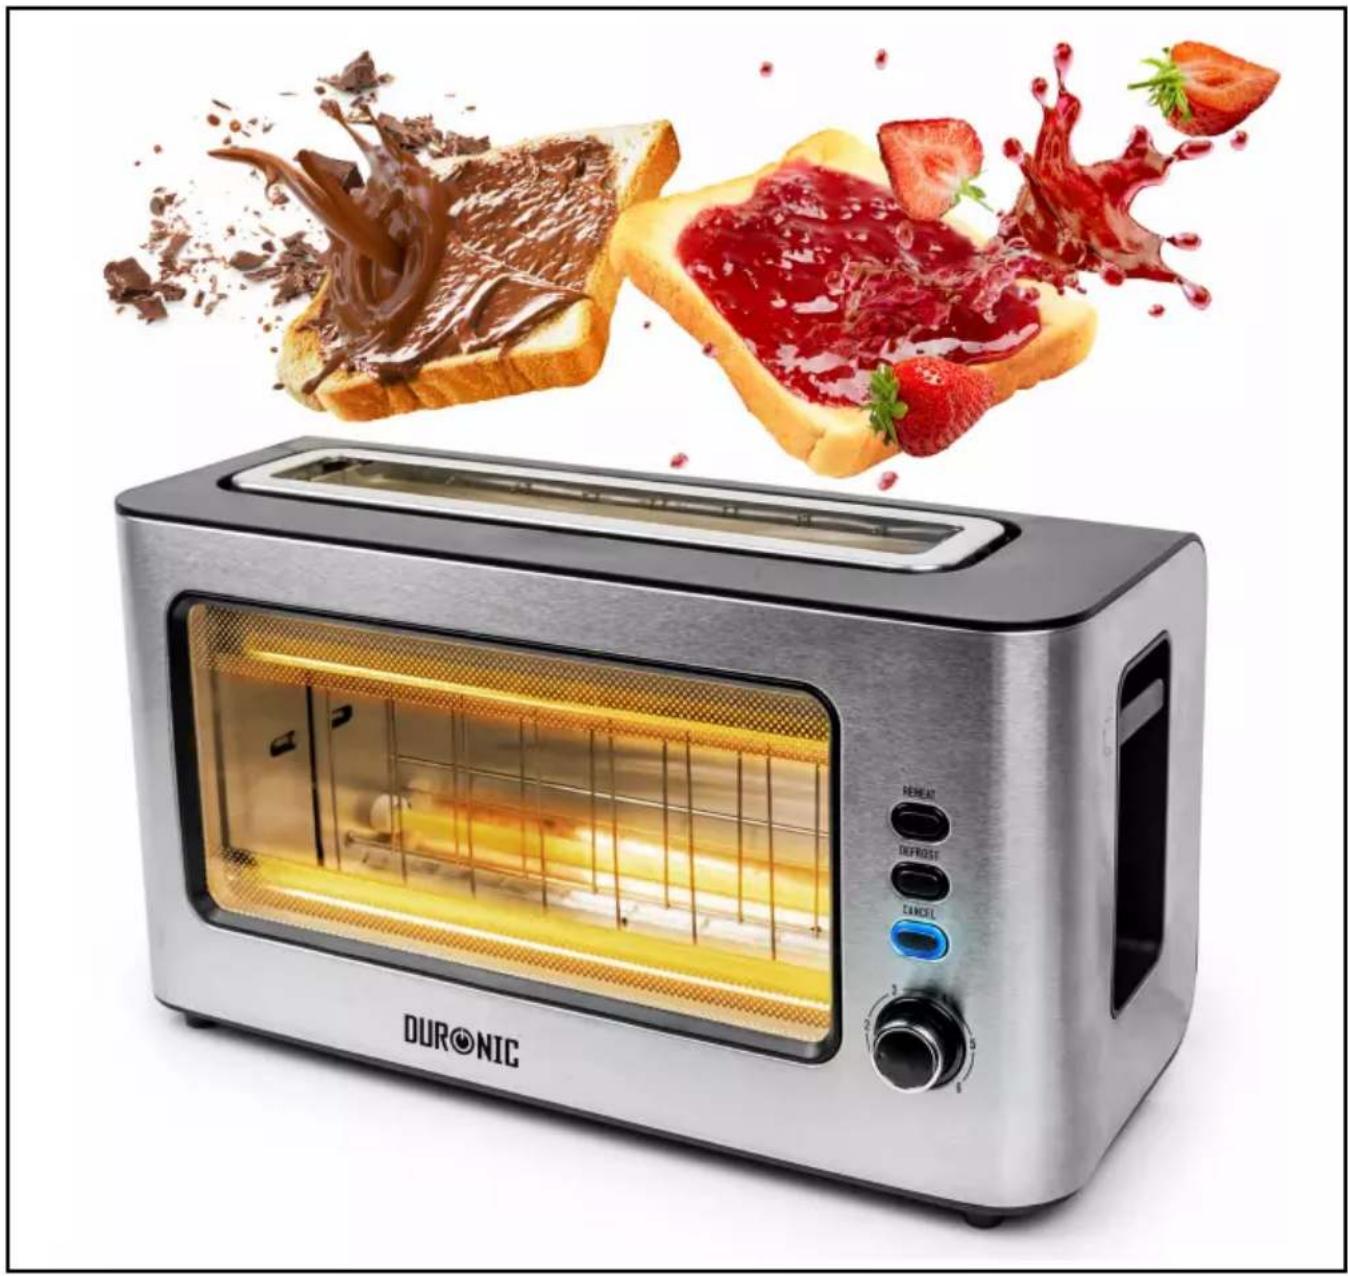
DURONIC 2008 toaster with chocolate and strawberry toppings, no visible text or symbols on the main image.TB10
Toaster
PLEASE READ ALL THE INSTRUCTIONS BEFORE USE

duronic.com

duronic

@duronicmedia

Duronic

@duronicmedia
DURONIC
Contents
English Manual 5
Features and Specifications
| Model Number Dimensions Power Voltage | |||
| TB10 37.5x15x20cm 850-1000W | 220-240V50-60Hz | ||
Components

text_image
Technical diagram of a toaster oven with numbered parts and internal components labeled in English- Toasting slot
- Lever
- Reheat button
- Defrost button
- Cancel button
-
Toasting level dial
-
Glass window
- Inner glass panel
- Glass panel latch
- Crumb tray
- Power cable
- Cable tidy
DURONIC
Safety Information
PLEASE READ THIS MANUAL CAREFULLY AND RETAIN FOR FUTURE REFERENCE
- This appliance is for indoor/household use only. Do not use outdoors.
- This appliance is not designed for commercial or industrial use; it is for household use only.
- This appliance is not intended for use by persons (including children) with reduced physical, sensory or mental capabilities, or lack of experience and knowledge unless they have been given supervision or instruction concerning the use of the appliance by a person responsible for their safety.
- Children should be closely supervised at all times to ensure that they do not play with the appliance.
- Do not operate this appliance if the power cable or plug is damaged. If either is damaged, return it to Duronic for service or repair by a professional technician.
- Never try to replace the parts and repair the unit by yourself. Do not modify the appliance in any way that is not described in the instructions for use. The machine contains live parts. Repairs may only be carried out by Duronic, using original spare parts and accessories.
- If an extension lead/cable is needed to reach the appliance to a mains power socket that is too far away out of reach of the machine's accompanying cable, please ensure that:
- the marked electrical rating of the extension lead is at least as great as the electrical rating of the appliance.
- the extension lead is of the grounded type.
- no other appliance is plugged into the same extension lead.
- the extension cable is safely positioned to avoid it being pulled on by children or animals or being tripped over.
DURONIC
Safety Information (continued)
• Always operate the appliance on a dry, smooth, even and stable surface. Do not place the toaster on or next to a hot surface.
- Position the toaster and its power cable to the rear of the work surface, well out of reach of children.
- Do not use the toaster near or below curtains or any other flammable materials.
- Disconnect the mains plug from the power socket if you are going to be absent for long periods.
- Never disconnect the plug by pulling on the power cable.
- Unplug from the mains plug outlet when not in use and before cleaning.
- This appliance is not intended to be operated using an external timer or separate remote-control system.
- Do not let the power cable hang over the edge of the table or counter, or touch hot surfaces.
- Do not use the appliance for anything other than toasting bread.
- Do not operate the toaster with wet hands.
- Do not operate the toaster if any of the parts or components are wet or damp.
- To clean, wipe the machine body with a well-wrung wet cloth. Do not submerge it in water or other liquids.
- Do not leave the toaster unattended whilst in use.
- Do not operate the toaster without the crumb tray or without the inner glass panel.
- Do not operate the toaster when it is empty (when there is no bread inside), except on first use.

CAUTION - FIRE HAZARD:
The crumb tray should be cleaned regularly. Do not allow breadcrumbs to accumulate in the bottom of the toaster as this can become a fire hazard if left.
Introduction
The TB10 is an electric toaster with a unique glass viewing window that allows you to watch your toast being cooked.
The body has a contemporary stainless-steel finish that suits almost any kitchen worktop. In addition to this, this model has an extra-wide toasting slot to allow you to toast larger slices that do not fit in the average-size toasters.
Before First Use
- Remove all of the packaging materials. Check that there are no parts missing.
- Clean the outside of the toaster body by wiping it with a wet well-wrung sponge or cloth.
Operating Instructions
On First Use
There may be a slight remnant of manufacturing residue or oil in the toaster heating element, which may emit an odour when the toaster is used for the first time. This is normal and will disappear after a few minutes of use.
When using the toaster for the first time, we suggest following the below steps under the heading 'How to Use', except without bread. Then let the toaster cool down.
After this you may begin to use the toaster to toast bread.
DURONIC
How to Use
- Position the toaster on a kitchen worktop towards the rear of the surface ensuring that nothing is above it.
- Unwind the Power Cable(11) to the required length and plug it in.
- Use the Toasting Level Dial(6) to set your level of preference between 1 and 6. For a medium golden brown colour, select level 3-4.
- Place the food to be toasted into the Toasting Slot(1).
- Press down the Lever(2) until it locks in place. The Cancel Button(5) will illuminate.
- Toasting ends when the food being toasted is pop up. The LED on the Cancel Button will go off.
- Your toasted food will pop up automatically. To raise it higher simply lift the lever.
Note:
- Toasting can be interrupted at any time by pressing the Cancel Button.
• The Lever will not stay down unless the toaster is plugged in.
Tips
- If you are going to toast only one slice of bread, set the toasting level lower than you would normally use for two slices.
- The lever can be lifted manually after popping up so that smaller items can be easily removed from the Toasting Slot.
Reheating Cold Bread or Toast
If you have toast that has popped up already but since gone cold, you can pop it back in the toaster to be reheated.
-
Press the Lever down until it locks in place. The Cancel button will illuminate.
-
Press the Reheat Button(3). The Reheat button will illuminate.
-
Press the Lever down until it locks in place. The Cancel button will illuminate.
- Press the Reheat Button(3). The Reheat button will illuminate.
DURONIC
How to Use (continued)
Toasting Frozen Bread
- Select your normal degree of toasting.
- Insert the frozen bread into the Toasting Slot.
- Press down the Lever until it locks in place. The Cancel button will illuminate.
- Press the Defrost Button(4). The Defrost button will illuminate.

CAUTION:
- Ensure all protective wrappings are removed prior to toasting.
- If the toaster starts to smoke whilst in use, press the Cancel button to stop toasting immediately.
- Do not toast foods with runny ingredients such as butter, jam etc.
- If any food gets trapped or jammed in the slots, unplug the toaster first before attempting to remove it.
• To achieve the same level of toasting on several batches of bread, wait a minimum of 30 seconds between each toasting time. This will allow the toaster to brown each set of toasts evenly.
Crumbs
During use crumbs will collect in the base of the toaster. Letting them build up can cause a fire hazard so it is important to remove them frequently.
To clean out the crumbs simply:
- Switch off the toaster
- Slide out the Crumb Tray(10) from underneath the toaster
- Empty the crumbs into a bin and wipe the Crumb Tray with a damp cloth.
- Dry the Crumb Tray thoroughly before sliding it back into the base of the toaster.
DURONIC
Cleaning and Maintenance
It is essential to keep your toaster clean so that you can enjoy the best results every time you use it.
Switch off, unplug and allow the toaster to cool down before cleaning.
Cleaning the Main Body
To clean the toaster, wipe the machine body with a well-wrung damp cloth. Dry with a dry cloth.
Cleaning the Crumb Tray
Pull out crumb tray at the bottom of the toaster and empty it. If the toaster is used frequently, accumulated bread crumbs should be removed at least once a week. Make sure the crumb tray is completely closed before using the toaster again.
Cleaning the Glass Panel
The Inner Glass Panel(8) may require occasional cleaning.
- Disconnect the toaster from the plug socket and let it cool down completely.
- Lay the toaster on its back.
- Slide the Glass Panel Latch(9) to the "OPEN" position to unlock and slide out the Inner Glass Panel from the bottom of the toaster.
- Wash Glass Panel(8) in warm soapy water, rinse and dry thoroughly.
- Slide the Glass Panel back into the bottom of the toaster and slide the Latch to the "LOCK" position to secure it back in place.
Note: the toaster will not operate if the Inner Glass Panel is not fitted and locked in correctly.
The Heating Tubes
The heating tubes should not be touched or wiped or cleaned in any way as this will damage them. If any crumbs get lodged around them, gently shake the toaster and the crumbs should drop into the Crumb Tray.
DURONIC
Warranty
1 Year Guarantee from Shine-Mart Ltd, Trademark owners of Duronic Products. NOTE: THESE STATEMENTS DO NOT AFFECT YOUR STATUTORY RIGHTS AS A CONSUMER
This product has been manufactured under the strictest or quality control procedures, and using the highest quality of materials, to ensure excellent performance and reliability. It will give very good and long lasting service, provided it is properly used and maintained. The product is guaranteed for 1 years from the date of original purchase. If any defect arises due to a faulty materials or poor workmanship, the faulty product must be returned to the original place of purchase. Refund or replacement is at the discretion of that company.
Duronic Products are offered with a 1 year guarantee under the following conditions:
- The product must be returned to the retailer with original proof of purchase.
- The product must be installed and used in accordance with the instructions contained in this operating manual.
- It must be used only for domestic purposes.
- It does not cover wear and tear, malicious damage, misuse, neglect, inexpert repairs or consumable parts.
- Shine-Mart Ltd has no responsibilities for accidental or consequential loss or damage.
- Shine-Mart Ltd are not liable to carry out any type of servicing work, under the guarantee
- Valid in the UK only

This product is fitted with CE:1363 plug and fuse Imported by Shine-Mart Ltd, RM3 8SB

Information on waste Disposal for Consumers of Electrical & Electronic Equipment.
This mark on a product and/or accompanying documents indicates that when it is to be disposed of, it must be treated as Waste Electrical & Electronic Equipment, (WEEE).
Any WEEE marked products must not be mixed with general household waste, but kept separate for the treatment, recovery and recycling of the materials used.
For proper treatment, recovery and recycling; please take all WEEE marked waste to your Local Authority Civic waste site, where it will be accepted free of charge.
If customers dispose of Waste Electrical & Electronic Equipment correctly, they will be helping to save valuable resources and preventing any potential negative effects upon human health and the environment, of any hazardous materials that the waste may contain.
Follow Us