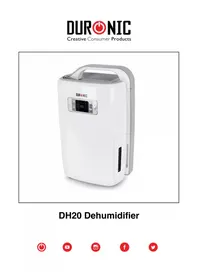
DH06 - Dehumidifier Duronic - Free user manual and instructions
Find the device manual for free DH06 Duronic in PDF.
| Product Type | Dehumidifier |
| Brand | Duronic |
| Model | DH06 |
| Dimensions (L x W x H) | 21.5 x 14.5 x 14.5 cm |
| Weight | 1 kg |
| Noise level | 32 dB(A) |
| Rated power | 18 W |
| Supply voltage | 220-240 V, 50-60 Hz |
| Energy consumption | 23 W |
| Power cable length | 180 cm |
| Dehumidification capacity | 0.24 L/24h |
| Water tank capacity | 0.8 L |
| Suitable area | 5 to 10 m² |
| Airflow | 11.5 m³/h |
| Refrigerant type | Peltier |
| Operating range | 0 °C to 40 °C |
| Main functions | Auto shut-off when tank full, overflow protection |
| Maintenance and cleaning | Clean the tank with hot water and mild detergent; dry before reassembly |
| Safety | Do not use near water; do not cover openings; do not repair yourself |
| Spare parts | Water tank, power adapter |
| Repairability | Send to Duronic for repair |
| General information | Indoor use, ideal for bedroom, kitchen, garage, caravan |
Frequently Asked Questions - DH06 Duronic
User questions about DH06 Duronic
0 question about this device. Answer the ones you know or ask your own.
Ask a new question about this device
Download the instructions for your Dehumidifier in PDF format for free! Find your manual DH06 - Duronic and take your electronic device back in hand. On this page are published all the documents necessary for the use of your device. DH06 by Duronic.
USER MANUAL DH06 Duronic
Creative Consumer Products
natural_image
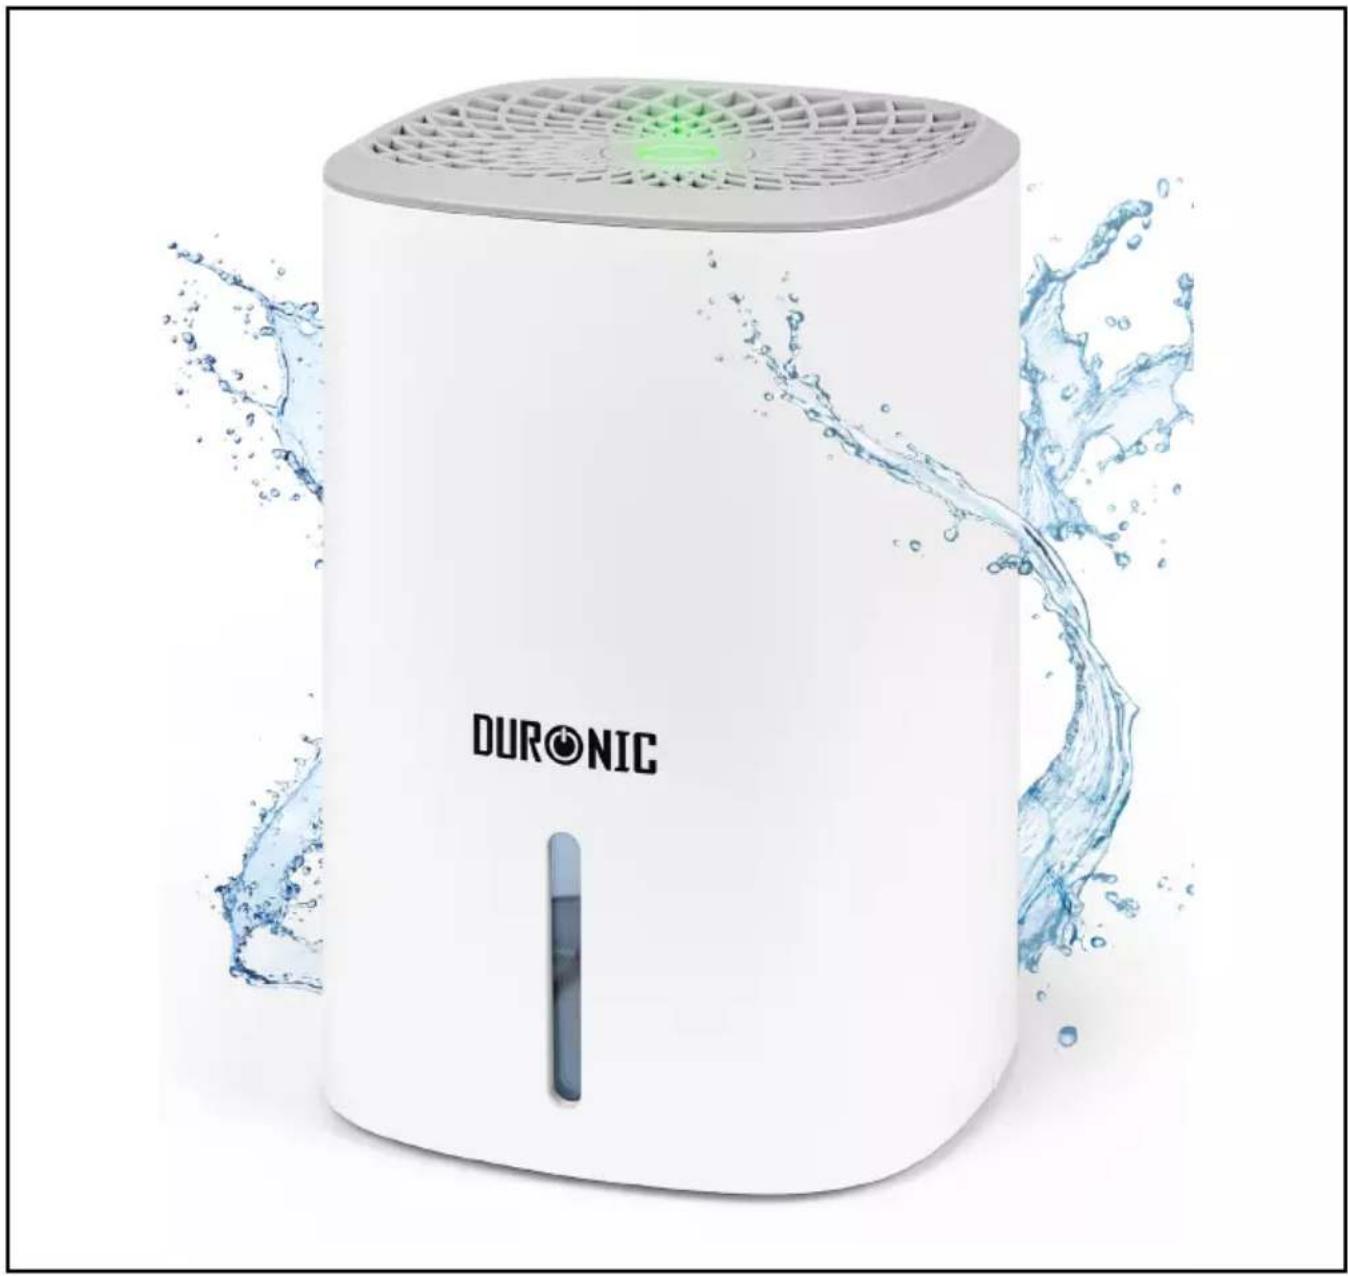
White DURONIC water purifier with water splash effect (no text or symbols on device)DH06 Dehumidifier
PLEASE READ ALL THE INSTRUCTIONS BEFORE USE

duronic.com

duronic

@duronicmedia

Duronic

@duronicmedia
Contents
English Manual 3
Features and Specifications
| Size Noise Level Weight Cable Power Voltage | |||||
| 21.5x14.5x14.5cm8.5x5.7x5.7in | 32dB(A) 1kg | 180cm71in | 18W | 220-240V50-60Hz | |
| Dehumidifying Performance | Water Tank Capacity | Suitable for Room size | Air Flow Rate | Refrigerant Type | Energy Consumption | Operating Range |
| 0.24L/24 hours | 0.8L 5-10m | ^2 | 11.5m3/h | Peltier 23W 0-40°C |
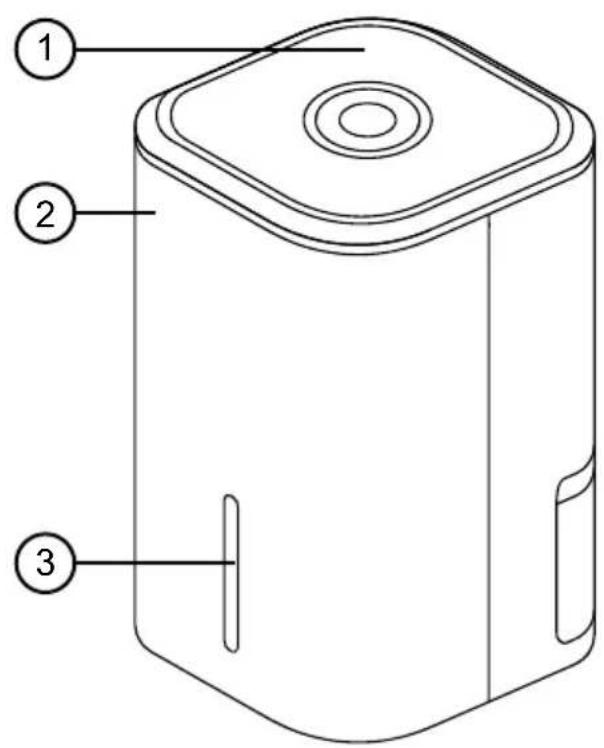
Components
text_image
Technical diagram of a device with numbered parts labeled 1, 2, and 3
text_image
Technical diagram of a device with numbered parts labeled 4 through 8, including a battery and internal components.- Top air vent
- Main unit
- Water gauge
-
Power switch
-
Power adapter port
- Power adapter
- Back air vent
- Water tank
DURONIC
Safety Information
PLEASE READ THIS MANUAL CAREFULLY AND RETAIN FOR FUTURE REFERENCE
- This appliance is for indoor/household use only. Do not use outdoors.
- This appliance is not intended for use by persons (including children) with reduced physical, sensory or mental capabilities, or lack of experience and knowledge, unless they have been given supervision or instruction concerning use of the appliance by a person responsible for their safety.
- Children should be closely supervised at all times to ensure that they do not play with the appliance.

Do not operate this appliance if the power cable or plug is damaged. If either is damaged, return it to Duronic for service or repair by professional technician.
- Never try to replace the parts and repair the unit by yourself.
- Never open and repair the machine yourself. Do not modify the machine in any way that is not described in the instructions for use. The machine contains live parts. Repairs may only be carried out by Duronic, using original spare parts and accessories.
• Always operate the appliance on a dry, smooth, even and stable surface. Do not place the unit on a hot surface. - Disconnect the mains plug from the power socket if you are going to be absent for long periods.
- Make sure that the appliance and its mains cable are not located close to hot surfaces.
- To reduce the risk of electric shock, never operate this product near water, with wet hands, spill liquid on the appliance or submerge it in water or any other liquid.
- Do not use the dehumidifier near gas or other inflammable materials (such as benzene, paint thinner, sprays, etc.)
DURONIC
Safety Information (Continued)
- Do not place the appliance on or near a hot gas or on a heated oven.
- Do not put any extension leads or portable power supplies near or behind the appliance.
- Do not use any accessories which are not recommended by Duronic.
- Do not insert any foreign or electrical objects into the appliance.
- Do not store explosive substances such as aerosol cans with a flammable propellant in or next to this appliance.
- There may be trace of odour during the first few minutes of initial use. This is normal and will quickly disappear.
- Do not place the appliance against furniture, upholstery, a wall, or other appliances.
- Do not cover the appliance or restrict the air flow of the inlet or exhaust vents whilst in use.
- Do not cover, obstruct or push objects into the vents and opening of the appliance as this may cause an electric shock, fire or damage the appliance.
- Do not operate the appliance with wet hands.
- Do not use this appliance near water or in the immediate surroundings of a bath, shower or a swimming pool. Never place the appliance where it may fall into a bathtub or other water container.
- Do not allow water or other liquids to run into the interior of the appliance, as this could create a fire and/or electrical hazard.
- Do not use mechanical devices to accelerate the appliances defrosting process. Do not operate the appliance with the water tank removed.
DURONIC
Introduction
The DH06 is a compact dehumidifier suitable for use in and around the home. It can collect up to 240ml per day and has a water tank can hold up to 800ml.
The overflow protection feature protects the appliance from overfilling itself; so when the water tank is full, the machine will stop collecting water and switch itself off.
It's highly energy-efficient and effective at preventing and removing damp and mould. It is suitable for use all around the home from the bedroom to the kitchen, as well in other areas prone to damp too such as caravans, garages, utility rooms and more.
Before First Use
- Before first use, remove all packaging and set aside.
-
Using a dry cloth, wipe clean the main unit and water tank.
-
Place the dehumidifier on a flat, dry surface and located close to an electrical mains socket.
Cleaning and Maintenance
- Before cleaning, switch off and unplug the machine. Remove any water from the tank.
- Clean the water tank with warm tap water and mild detergent (e.g. washing up liquid). Note: Do not use boiling water to clean the water tank.
- Ensure to remove any scale or deposits that have formed inside the water tank.
- Dry the outside of the water tank.
- Wipe all surfaces dry before placing the water tank back into the appliance.
If you do not plan on using the dehumidifier for a long period of time, allow the tank to air dry both inside and outside before storing it away.
DURONIC
How to Use
- Plug the power cable into the mains socket and switch on.
- Slide the water tank into the dehumidifier, ensuring it has clicked firmly into place.
- To turn on the dehumidifier, press the power button. The appliance will beep once.
- To turn off the dehumidifier, press the power button again.
Overflow Protection:
- When the water tank is full, the dehumidifier will automatically turn off.
- Empty and replace the water tank according to the instructions below.
- Restart the dehumidifier and use as normal.
Emptying the Water Tank:
- Press the power button to turn off the dehumidifier and leave it to stand for a 1-2 minutes to allow the final drips of water to drop into the tank.
- Pull out the water tank from the back of the appliance.
- Empty the water from the tank.
- Dry the tank with a cloth and then place it back into the dehumidifier. Ensure that it is pushed properly in place, it should click into place securely.

When not in use, always empty the water tank, clean and dry the dehumidifier to prevent mould build up.
Troubleshooting
| Problem Probable Cause Solution | ||
| The dehumidifier is not collecting water or does not work. | The doors or windows in the room where the appliance is in use are open. | Close all windows and doors. |
| The air vents are blocked. | Close all windows and doors.Remove any blockages. | |
| The humidity in the room is increasing. | Turn off any appliances that may be creating steam. | |
| The temperature is too low. | Ensure the temperature indoors is not lower than 8°C/47°F. | |
| The water tank is full. Empty the tank. | ||
| The dehumidifier is not turning on. | The power has been cut off. | Check to ensure the power adapter is correctly connected and the wall socket is plugged in and turned on. |
| The water tank is in the wrong position. | Remove and replace the water tank, positioning it correctly. | |
| Water is leaking. | The unit is not placed on a flat stable surface. | Place the unit on a flat and stable surface. |
| Outlet air is warm. | Heat exchanging process. This is normal. | |
| Water noise. | Refrigerating fluid is flowing. | This is normal. |
text_image
Technical diagram of a device with numbered parts labeled 1, 2, and 3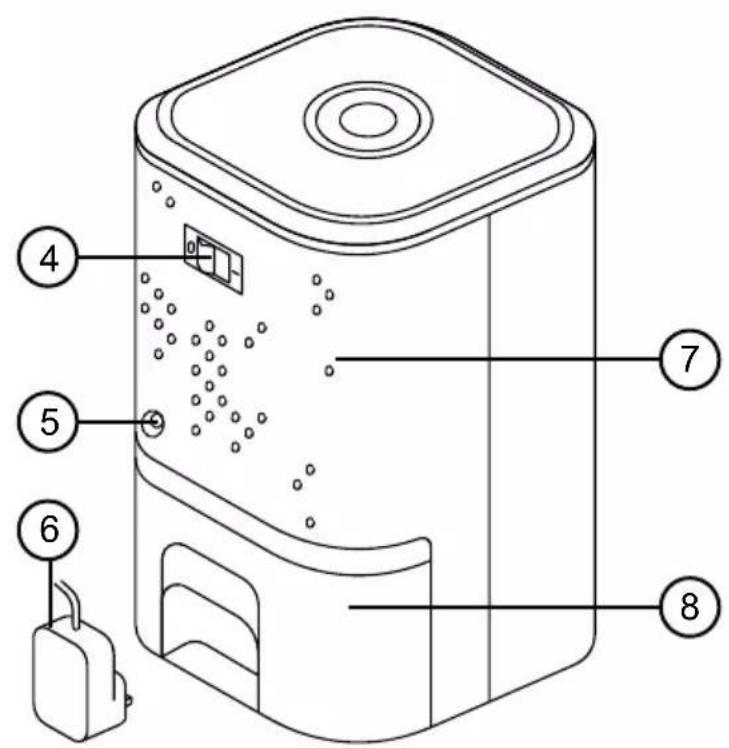
text_image
Technical diagram of a device with numbered parts labeled 4, 5, 6, 7, and 8 pointing to internal components.Protection anti-débordement:
text_image
Technical diagram of a device with numbered parts labeled 1, 2, and 3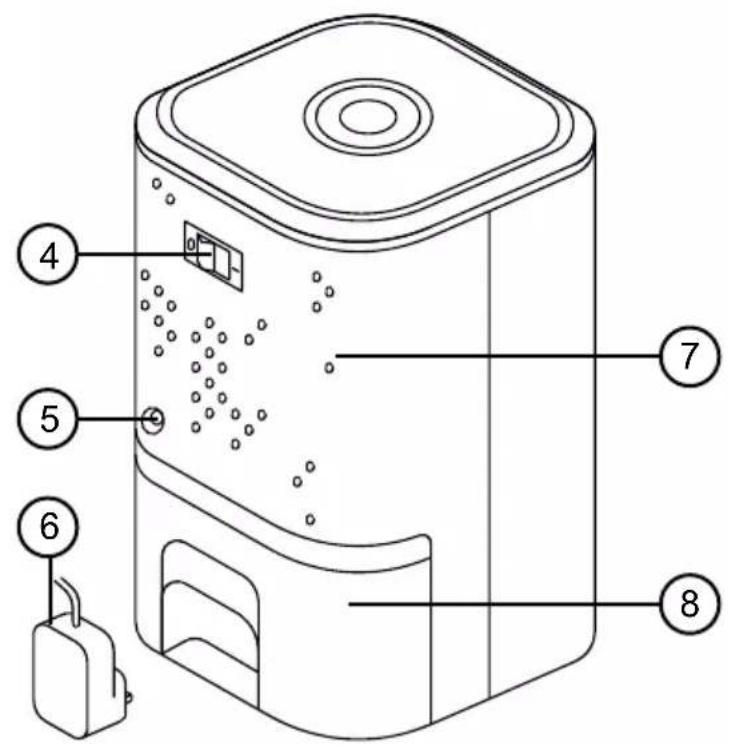
text_image
Technical diagram of a device with numbered parts labeled 4 through 8, including a hanging bag and internal components.text_image
Technical diagram of a device with numbered parts labeled 1, 2, and 3
text_image
Technical diagram of a device with numbered parts labeled 4, 5, 6, 7, and 8 pointing to internal components.text_image
Technical diagram of a device with numbered parts labeled 1, 2, and 3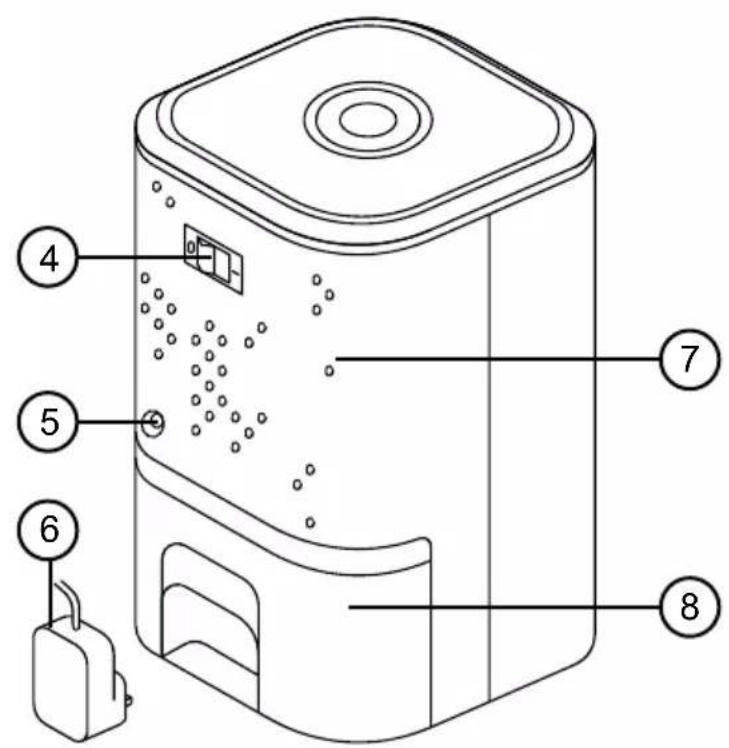
text_image
Technical diagram of a device with numbered parts labeled 4, 5, 6, 7, and 8 pointing to internal components.text_image
Technical diagram of a device with numbered parts labeled 1, 2, and 3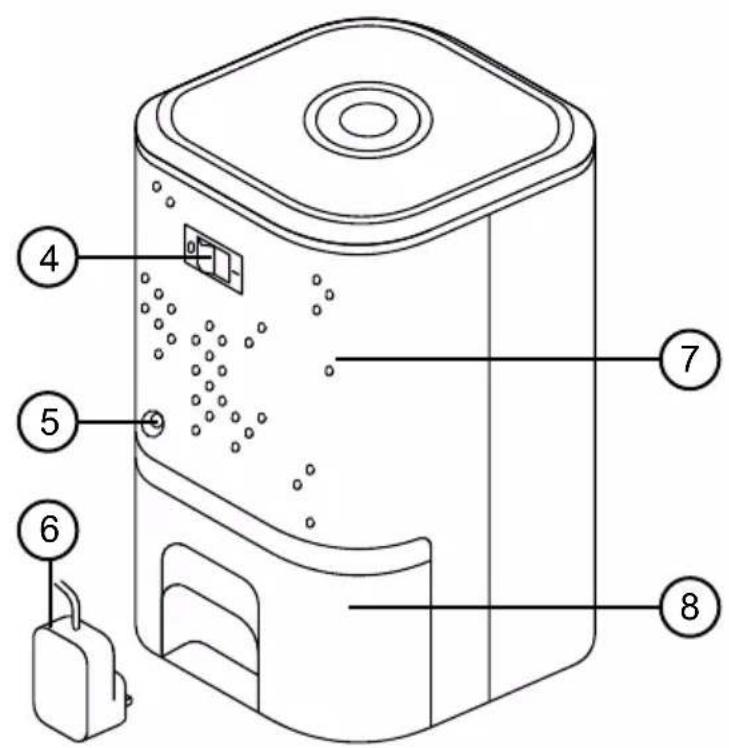
text_image
Technical diagram of a device with numbered parts labeled 4, 5, 6, 7, and 8 pointing to internal components.Safety Information (Continued)
text_image
Technical diagram of a device with numbered parts labeled 1, 2, and 3
text_image
Technical diagram of a device with numbered parts labeled 4, 5, 6, 7, and 8 pointing to internal components.text_image
Technical diagram of a device with numbered parts labeled 1, 2, and 3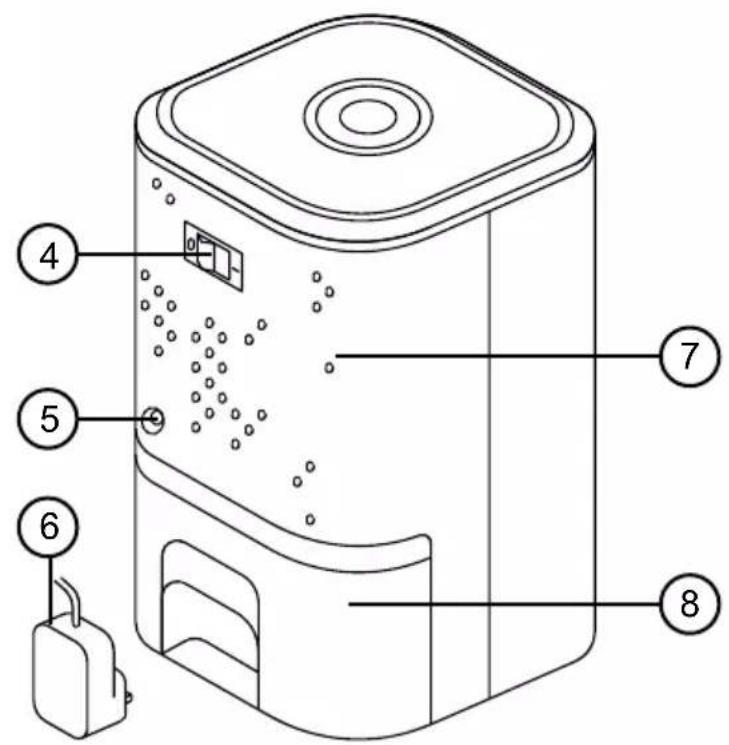
text_image
Technical diagram of a device with numbered parts labeled 4, 5, 6, 7, and 8 pointing to internal components.text_image
Technical diagram of a device with numbered parts labeled 1, 2, and 3
text_image
Technical diagram of a device with numbered parts labeled 4, 5, 6, 7, and 8 pointing to internal components.Information for consumers on the disposal of Waste Electrical & Electronic Equipment (WEEE).
This mark on a product and/or accompanying documents indicates that when it is to be disposed of, it must be treated as Waste Electrical & Electronic Equipment, (WEEE).
Any WEEE marked products must not be mixed with general household waste, but kept separate for the treatment, recovery and recycling of the materials used. For proper treatment, recovery and recycling; please take all WEEE marked waste to your Local Authority Civic waste site, where it will be accepted free of charge.
If customers dispose of Waste Electrical & Electronic Equipment correctly, they will be helping to save valuable resources and preventing any potential negative effects upon human health and the environment, of any hazardous materials that the waste may contain.

Information for consumers on the disposal of Waste Electrical & Electronic Equipment (WEEE).