FP301 - Mechanical chipper Duronic - Free user manual and instructions
Find the device manual for free FP301 Duronic in PDF.
| Product type | Mechanical grinder / Multifunction food processor |
| Brand | Duronic |
| Model | FP301 |
| Power supply | 220-240 V, 50/60 Hz |
| Main functions | Chopping, slicing, grating, citrus juicing, ice cream preparation |
| Number of speeds | 1 (spring switch, continuous activation) |
| Maximum continuous usage time | 3 minutes, then 3 minutes rest |
| Material | Plastic and metal (stainless steel blades) |
| Included accessories | Thick slicing cone (blue) and thin slicing cone (green), thick chopping cone (red) and thin chopping cone (orange), grating cone (yellow), main pusher, frozen fruit pusher, main chute, frozen fruit chute, drive screw, extractor, citrus reamer, juice collection bowl, container with lid |
| Cleaning | Removable parts dishwasher safe (except motor block) |
| Safety | Spring switch prevents accidental ignition; recommended stop after 3 min to avoid overheating |
| Warranty | 1 year (Shine-Mart Ltd) |
| Maintenance | Clean the motor block with a damp cloth; accessories in dishwasher |
| Intended use | Domestic: cutting, chopping, grating vegetables/fruits, citrus juicing, ice preparation |
Frequently Asked Questions - FP301 Duronic
User questions about FP301 Duronic
0 question about this device. Answer the ones you know or ask your own.
Ask a new question about this device
Download the instructions for your Mechanical chipper in PDF format for free! Find your manual FP301 - Duronic and take your electronic device back in hand. On this page are published all the documents necessary for the use of your device. FP301 by Duronic.
USER MANUAL FP301 Duronic
Creative Consumer Products
natural_image
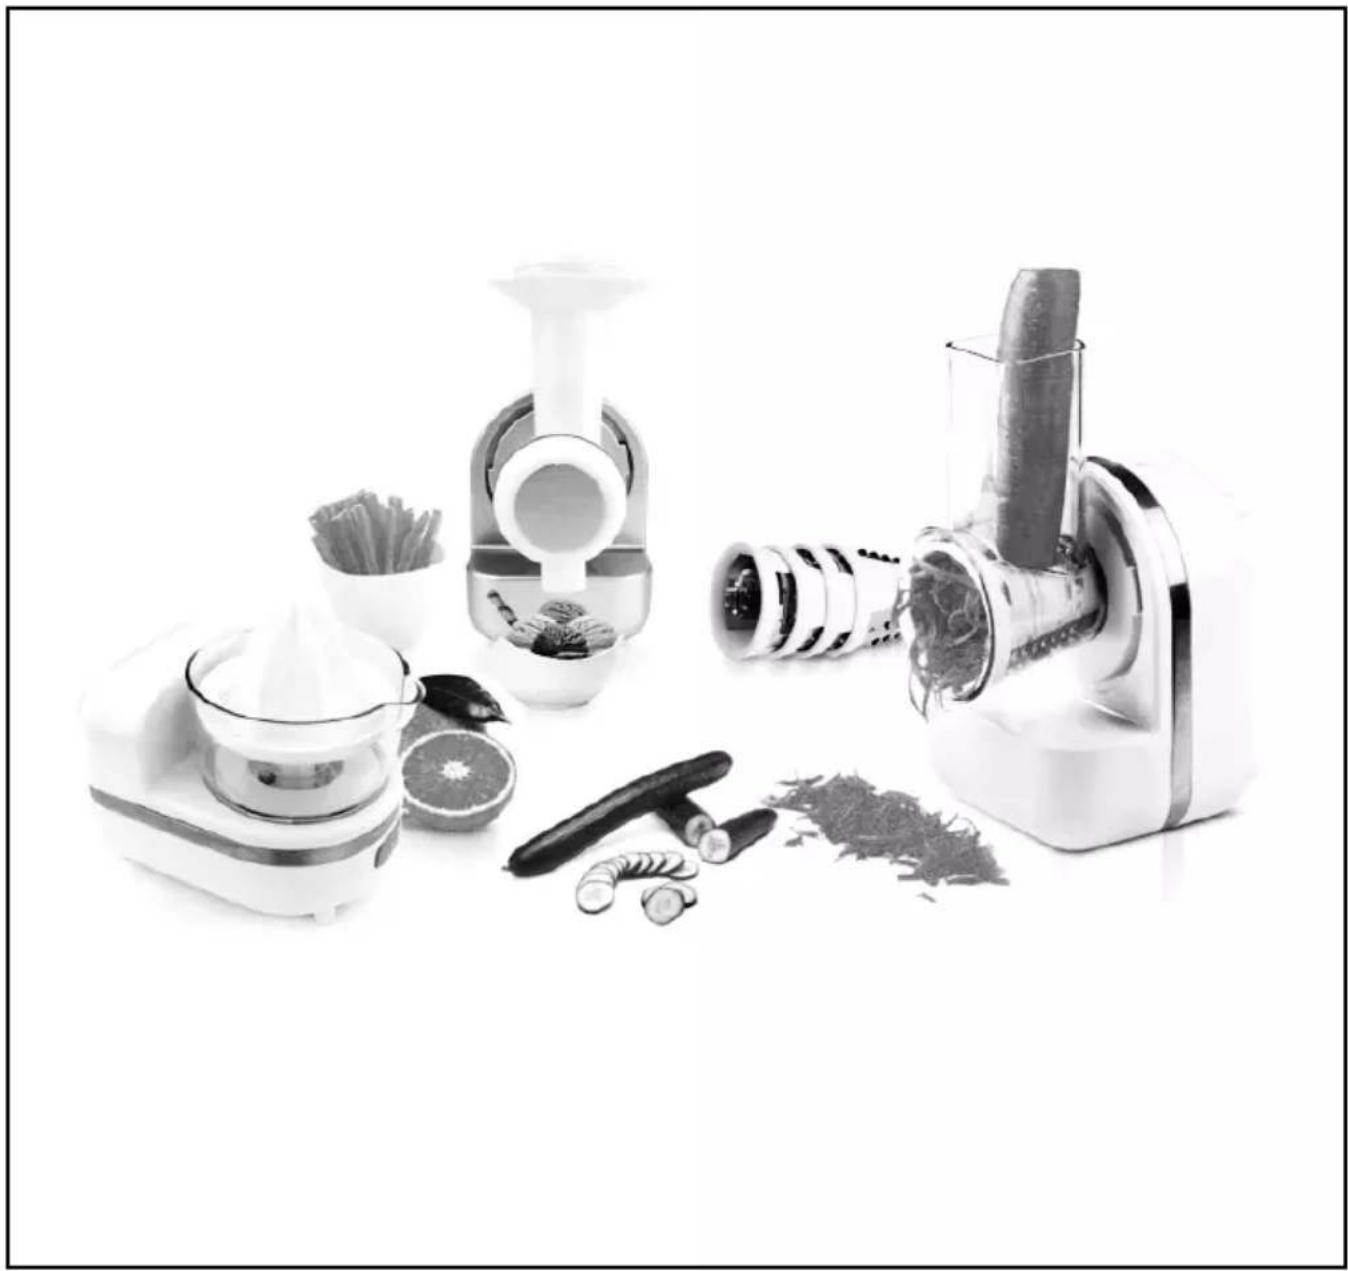
Black-and-white photo of a modern manual brush tool with various kitchen utensils and food items, no visible text or symbols.FP301 3-in-1 Food Processor
PLEASE READ ALL THE INSTRUCTIONS BEFORE USE

duronic.com

duronic

@duronicmedia

Duronic

@duronicmedia
DURONIC
DURONIC
Contents
English Manual 5
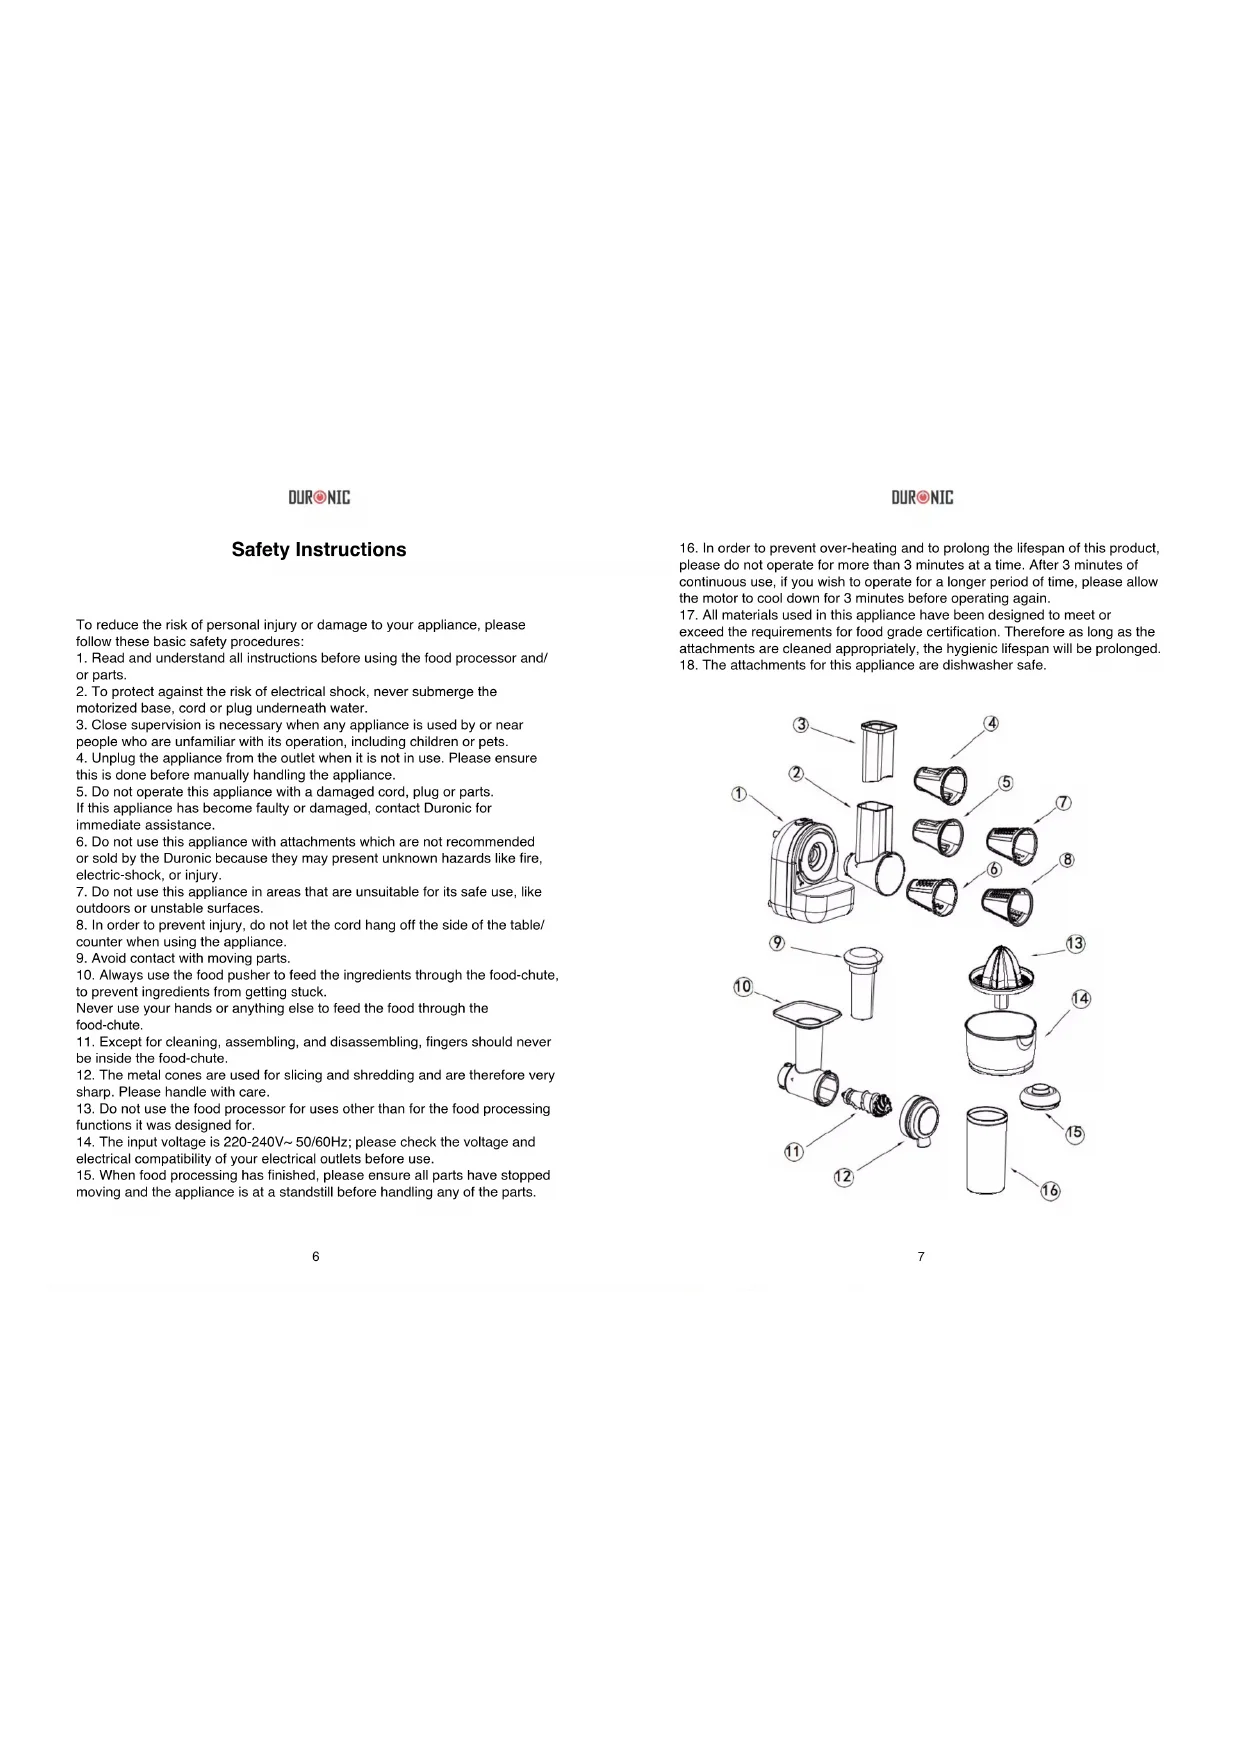
To reduce the risk of personal injury or damage to your appliance, please follow these basic safety procedures:
-
Read and understand all instructions before using the food processor and/or parts.
-
To protect against the risk of electrical shock, never submerge the motorized base, cord or plug underneath water.
-
Close supervision is necessary when any appliance is used by or near people who are unfamiliar with its operation, including children or pets.
-
Unplug the appliance from the outlet when it is not in use. Please ensure this is done before manually handling the appliance.
-
Do not operate this appliance with a damaged cord, plug or parts. If this appliance has become faulty or damaged, contact Duronic for immediate assistance.
-
Do not use this appliance with attachments which are not recommended or sold by the Duronic because they may present unknown hazards like fire, electric-shock, or injury.
-
Do not use this appliance in areas that are unsuitable for its safe use, like outdoors or unstable surfaces.
-
In order to prevent injury, do not let the cord hang off the side of the table/counter when using the appliance.
-
Avoid contact with moving parts.
-
Always use the food pusher to feed the ingredients through the food-chute, to prevent ingredients from getting stuck.
Never use your hands or anything else to feed the food through the food-chute.
-
Except for cleaning, assembling, and disassembling, fingers should never be inside the food-chute.
-
The metal cones are used for slicing and shredding and are therefore very sharp. Please handle with care.
-
Do not use the food processor for uses other than for the food processing functions it was designed for.
-
The input voltage is 220-240V\~50/60Hz; please check the voltage and electrical compatibility of your electrical outlets before use.
-
When food processing has finished, please ensure all parts have stopped moving and the appliance is at a standstill before handling any of the parts.
DURONIC
-
In order to prevent over-heating and to prolong the lifespan of this product, please do not operate for more than 3 minutes at a time. After 3 minutes of continuous use, if you wish to operate for a longer period of time, please allow the motor to cool down for 3 minutes before operating again.
-
All materials used in this appliance have been designed to meet or exceed the requirements for food grade certification. Therefore as long as the attachments are cleaned appropriately, the hygienic lifespan will be prolonged.
- The attachments for this appliance are dishwasher safe.
text_image
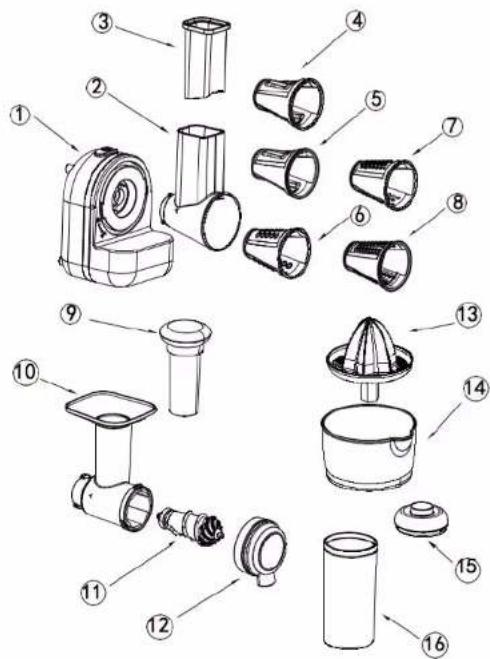
Exploded view diagram of a cleaning or cleaning device with numbered parts for identificationDURONIC
Components
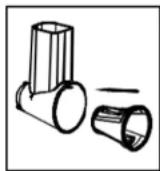
1 - Motor base
2 - Main food-feed chute
3 - Pusher for slicer chute
4 - Cone for thick slicing
5 - Cone for thin slicing
6 - Cone for large shredding
7 - Cone for small shredding
8 - Cone for grating
9 - Frozen fruit pusher
10 - Frozen fruit chute
11 - Auger
12 - Extrusion shaper/spout
13 - Citrus juice cone
14 - Citrus juice bowl
15 - Cap/lid for storage container
16 - Cone storage container
Details concerning parts and functions:
- Switch – The on/off switch is spring-loaded to prevent unintentional accidents, and must be held down in the "on" position for continuous operation.
- Main Food-chute – The main chute is designed to work in conjunction with the pusher to guide proper sizes of food into the processing cones at the correct angle. It also functions as a guide for the smaller size chute, intended to further limit the size of food pieces.
- Food-pusher for slicer chute— This piece functions as a primary food-pusher to help processing the ingredients inserted into the chute.
- Cone for thick slicing – This blue cone is designed to make consistent 2-3mm slices of most uncooked vegetables, and some reasonably firm fruits.
- Cone for thin slicing - This green cone is designed to make consistent slices less than 1-2mm of most uncooked vegetables, and some firm fruits.
- Cone for thick shredding – This red cone cuts in two directions simultaneously so that thickness and width are consistent.
- Cone for thin shredding – This orange cone cuts in two directions simultaneously so that thickness and width are consistent.
- Cone for grating – This yellow cone grates hard vegetables and reduces fruit to pulp. It also processes soft or cooked vegetables/fruits to a mashed consistency.
- Frozen fruit pusher – This pusher applies pressure to the frozen fruit within the chute.
- Frozen fruit chute - This chute confines the fruit and aligns it to the auger.
DURONIC
- Auger – The auger crushes the frozen fruit and pushes it through the extruder/shaper
- Extrusion/shaper spout – The delivery spout forms the extruded pattern of the crushed frozen fruit.
- Citrus juicer cone – The cone which is attached to a straining basin are the working elements of the citrus juicer, extracting and straining the juice from each unpeeled citrus fruit, cut-in-half, with the exposed fruit held firmly against the up-ended cone until juice extraction is complete.
- Citrus juicer bowl – Receptacle for strained juice
- Cap/lid for storage container
- Cone storage container
Slicer/ Shredder/ Grater
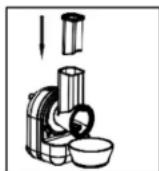
- Insert the electrical plug into a convenient outlet. Switch – The on/off switch is spring-loaded to prevent unintentional "accidents", and must be held down in the "on" position for continuous operation.
- Slicers/shredders/grater – push the desired attachment firmly into the open end of the lower plastic chute-body, and rotate to the right until it locks into position.
- Chute - mount the Chute into the motor housing by lining up the black locking tabs, and turning the body to the right until it is firmly in the upright position.
- Place an appropriately sized bowl under the wide expulsion end of the attachment. Feed food pieces into the Chute and push down with the pusher to compress the food, and force it against the rotating attachment.
DURONIC
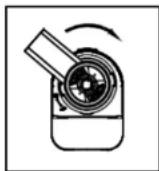
Frozen Fruit Dessert Maker
The frozen fruit attachments are able to create a wide variety of frozen desserts made with frozen fruit, including your own recipes, which may include combinations of fruit, ice cream, frozen yogurt, or frozen juice. All ingredients used in the with the frozen fruit attachments must be frozen for 6-12 hours and removed from the freezer and allowed to thaw until they are soft enough for the auger to crush, usually about 10-15 minutes at room temperature (thaw time may vary due to difference in freezers and thawing conditions). Cut the ingredients into pieces small enough to fit in the Chute, and follow the instructions.

natural_image
Three-step diagram showing a hairdryer with mechanical components and a cleaning tool (no text or labels)- Insert the electrical plug into a convenient outlet.
Switch – The on/off switch is spring-loaded to prevent unintentional "accidents", and must be held down in the "on" position for continuous operation. - Attach the chute and chute body to the motor coupling within the motor base housing, and turn the motor base housing on its side so that the chute mouth is in the upright position.
- Insert the auger, and rotate until the spline of the auger is fixed to the motor drive gear.
- Lock the plastic Extruder/shaper ring onto the chute body, aligning the locking clips and rotating to the right until locked into place.
- Place the slightly thawed frozen fruit into the mouth of the Chute, and compress the fruit in the Chute against the auger with the plastic pusher. 6. The auger will further compress and crush the frozen fruit, and push it through the plastic extruder shaper into the dish or cup of your choice.
DURONIC
Citrus Juicer
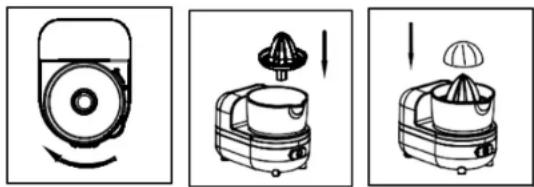
- Insert the electrical plug into a convenient mains outlet.
Switch - The on/off switch is spring-loaded to prevent unintentional
"accidents", and must be held down in the "on" position for continuous operation. - Attach the citrus juice catchment bowl to the motor base housing by inserting the locking tabs in the indentations on the motor base housing and rotate the bowl to the right, with the open end of the bowl facing up.
- Attach the juicing component to the motor gear extended through the juice catchment bowl.
- Press and hold the on button to start and sustain the turning function of the juicer head.
- Cut the unpeeled citrus fruit in half, and hold the flat exposed fruit firmly against the rounded end of the exposed juicer head.
- When using the citrus juicer, press the fruit against the juicer head and change the angle of the half cut citrus fruit from time to time for maximum juice.
- The strainer at the bottom of the juicer head will retain the seeds and fruit pulp, and the juice will drip down from the spout into the containment bowl.
Cleaning
Never submerge the motor and its housing in water or other liquids. To clean, use a damp cloth, and dry it thereafter with a dry cloth. All other parts and attachments may be cleaned with a soft brush. The attachments are also dishwasher safe, but any part that has an attached metal component should NEVER be placed in a microwave for sterilization.
DURONIC
DURONIC
Warranty
1 Year Guarantee from Shine-Mart Ltd, Trademark owners of Duronic Products. NOTE: THESE STATEMENTS DO NOT AFFECT YOUR STATUTORY RIGHTS AS A CONSUMER
This product has been manufactured under the strictest or quality control procedures, and using the highest quality of materials, to ensure excellent performance and reliability. It will give very good and long lasting service, provided it is properly used and maintained. The product is guaranteed for 1 year from the date of original purchase. If any defect arises due to a faulty materials or poor workmanship, the faulty product must be returned to the original place of purchase. Refund or replacement is at the discretion of that company.
Duronic Products are offered with a 1 year guarantee under the following conditions: 1. The product must be returned to the retailer with original proof of purchase.
2. The product must be installed and used in accordance with the instructions contained in this operating manual.
3. It must be used only for domestic purposes.
4. It does not cover wear and tear, malicious damage, misuse, neglect, inexpert repairs or consumable parts.
5. Shine-Mart Ltd has no responsibilities for accidental or consequential loss or damage.
6. Shine-Mart Ltd are not liable to carry out any type of servicing work, under the guarantee
7. Valid in the UK only

This product is fitted with CE:1363 plug and fuse Imported by Shine-Mart Ltd, RM3 8SB

Information on waste Disposal for Consumers of
Electrical & Electronic Equipment. This mark on a product and/or accompanying documents indicates that when it is to be disposed of, it must be treated as Waste Electrical & Electronic Equipment, (WEEE).
Any WEEE marked products must not be mixed with general household waste, but kept separate for the treatment, recovery and recycling of the materials used. For proper treatment, recovery and recycling; please take all WEEE marked waste to your Local Authority Civic waste site, where it will be aggregated free of charge.
If customers dispose of Waste Electrical & Electronic Equipment correctly, they will be helping to save valuable resources and preventing any potential negative effects upon human health and the environment, of any hazardous materials that the waste may contain.
Follow Us

duronic.com

duronic

@duronicmedia

Duronic

@duronicmedia
DURONIC
DURONIC
text_image
Exploded view diagram of a cleaning or cleaning device with numbered parts for identificationDURONIC
Composants
1 - Base