BFH21 - Heating Duronic - Free user manual and instructions
Find the device manual for free BFH21 Duronic in PDF.

| Product Type | Electric Fan Heater |
| Brand | Duronic |
| Model | BFH21 |
| Power Supply | 220-240V, 50-60Hz |
| Nominal Power | 2000 W (full power) / 1000 W (reduced power) |
| Protection Class | II |
| Protection Rating | IP24 |
| Main Functions | Timer, open window detection, child safety, remote control, preprogrammed modes (P1 to P5), customizable mode (UP) |
| Temperature Range | 5°C to 35°C |
| Cleaning and Maintenance | Unplug and let cool. Vacuum the ventilation grilles, clean the exterior with a damp cloth then a dry cloth. Do not immerse. |
| Safety | Automatic shut-off in case of open window, child safety, overheating protection (not explicitly mentioned but integrated) |
| Warranty | 1 year (Shine-Mart Ltd) |
| Included Accessories | Remote control, user manual |
Frequently Asked Questions - BFH21 Duronic
User questions about BFH21 Duronic
0 question about this device. Answer the ones you know or ask your own.
Ask a new question about this device
Download the instructions for your Heating in PDF format for free! Find your manual BFH21 - Duronic and take your electronic device back in hand. On this page are published all the documents necessary for the use of your device. BFH21 by Duronic.
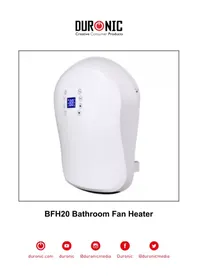
USER MANUAL BFH21 Duronic
Creative Consumer Products
BFH21 Bathroom Fan Heater

duronic.com

duronic

@duronicmedia

Duronic

@duronicmedia
DURONIC
DURONIC
Contents
English Manual 4
- This appliance is for indoor/household use only. Do not use outdoors.
- This appliance is not designed for commercial or industrial use; it is for household use only.
- Make sure the voltage is the same as that indicated on the rating plate of the appliance.
- This appliance is not intended for use by persons (including children) with reduced physical, sensory or mental capabilities, or lack of experience and knowledge, unless they have been given supervision or instruction concerning use of the appliance by a person responsible for their safety.
• Children should be closely supervised at all times to ensure that they do not play with the appliance.
- Only use the heater out of the reach of children because the unit may get very hot.
- If either the appliance or power cable are damaged, return it to Duronic for service or repair by professional technician.
- Never try to replace the parts and repair the unit by yourself.
- Never open and repair the machine yourself. Do not modify the machine in any way that is not described in the instructions for use.
- The machine contains live parts. Repairs may only be carried out by Duronic, using original spare parts and accessories.
• Always operate the appliance on a dry, smooth, even and stable surface.
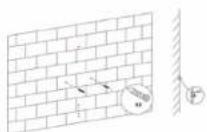
- Do not place the unit on a damaged wall or a wall covered in damp/mould.
- Do not operate the machine or handle the plug with wet hands.
- Do not immerse in water or other liquids.
- Cleaning should be done as per instructions in this manual.
- Do not insert or allow any foreign object to enter any intake or outlet opening, as this may cause an electric shock, fire or damage to the appliance.
- Keep the appliance and cable away from sources of heat, sharp objects or anything that might cause damage. The heater must not be located immediately below a plug socket. In order to avoid overheating, do not cover the heater.
- Do not use this heater in the immediate surroundings of a bath, a shower or a swimming pool.
- Ensure the appliance is always switched off before connecting it to the mains power supply.
- Switch off the power supply and unplug the appliance whenever it is not in use, before cleaning it or carrying out any maintenance.
- To disconnect the appliance, switch it "OFF", and then remove the plug from the socket. Do not pull the cable to unplug it.
- Do not operate in areas where petrol, paint or other flammable liquids are used or stored.
• To prevent a possible fire hazard, do not block the air intakes or the outlet in any way.
English Manual
DURONIC
Safety Instructions (Continued)
- Do not touch the hot surfaces.
• Always ensure that your hands are dry before operating or adjusting any switch on the product or touching the plug and socket.
• Do not leave this appliance unattended when it is in use. - The most common cause of overheating is deposits of dust or fluff in the appliance. Ensure these deposits are removed regularly by disconnecting the appliance and then vacuum cleaning the air vents and grills.
- Do not place the heater on a carpet or put the cable under a carpet.
- Place the cable in such a way that it is not in any high traffic area to avoid it being tripped over or stood on.
- Do not put the heater away until it has cooled down completely. Store the heater in cool dry location when not in use.
- This product is only suitable for well insulated spaces or occasional use.
- Some parts of this product can become very hot and cause burns. Particular attention has to be given where children and vulnerable people are present.

If the machine is operated with a defective or damaged mains cable, there is a potential danger of fatal electric shock. Never use a machine which is damaged or has a damaged mains cable.

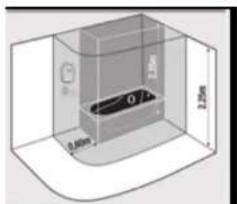
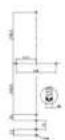
In order to avoid a hazard for very young children, this heater should be installed so that the lowest part of it is 120cm above the floor.
Technical Specifications
| Model BFH21 | |
| Rated Voltage 220 | -240V |
| Rated Frequency 50-60Hz | |
| Rated Power 2000W | |
| Protective Class II | |
| IP Code IP24 | |
DURONIC
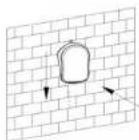
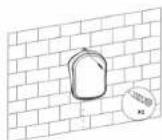
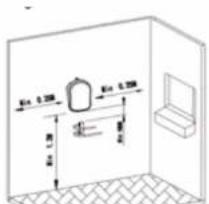
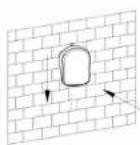
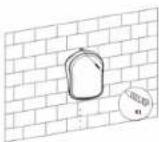
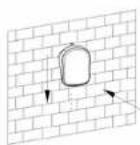
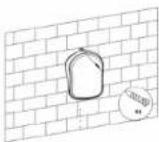
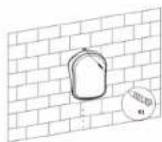
Installation

This heater should be installed in accordance with the British IET BS 7671 Regulations.
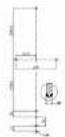
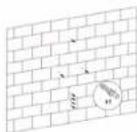
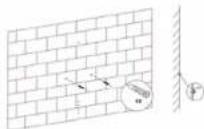
As a general guideline, please see the below diagrams which illustrate how and where to install the heater safely.
Step 1 Step 2
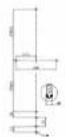
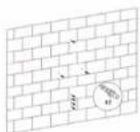
Step 3
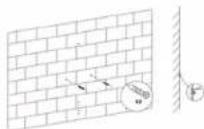
Step 4 Step 5
DURONIC
Operation
Connecting the Power
The main power ON/OFF (0/1) switch is located on the back of the heater.
To connect the power supply to the heater, push this switch to the ON (I) position.
There is a "D" sound and the screen will display in full for 3 seconds,
then heater enters into standby mode.
If you wish to disconnect the power supply,
push ON/OFF (0/1) button again and switch to OFF (0).
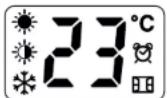
Reading the Digital Display
| Referred to in manual | Meaning | |
| Full Sun Icon Working at full power = 2000W | ||
| Half sun Icon Working at low power = 1000W | ||
| Snowflake Icon Anti-Frost Function | ||
| Window Icon Window open detection function | ||
| Timer Icon Reverse timer function | ||
| [] | Child Lock Icon Child lock function | |
| d1 | D1 Day 1/ Monday | |
| d2 | D2 Day 2/ Tuesday | |
| d3 | D3 Day 3/ Wednesday | |
| d4 | D4 Day 4/ Thursday | |
| d5 | D5 Day 5/ Friday | |
| d6 | D6 Day 6/ Saturday | |
| d7 | D7 Day 7/ Sunday | |
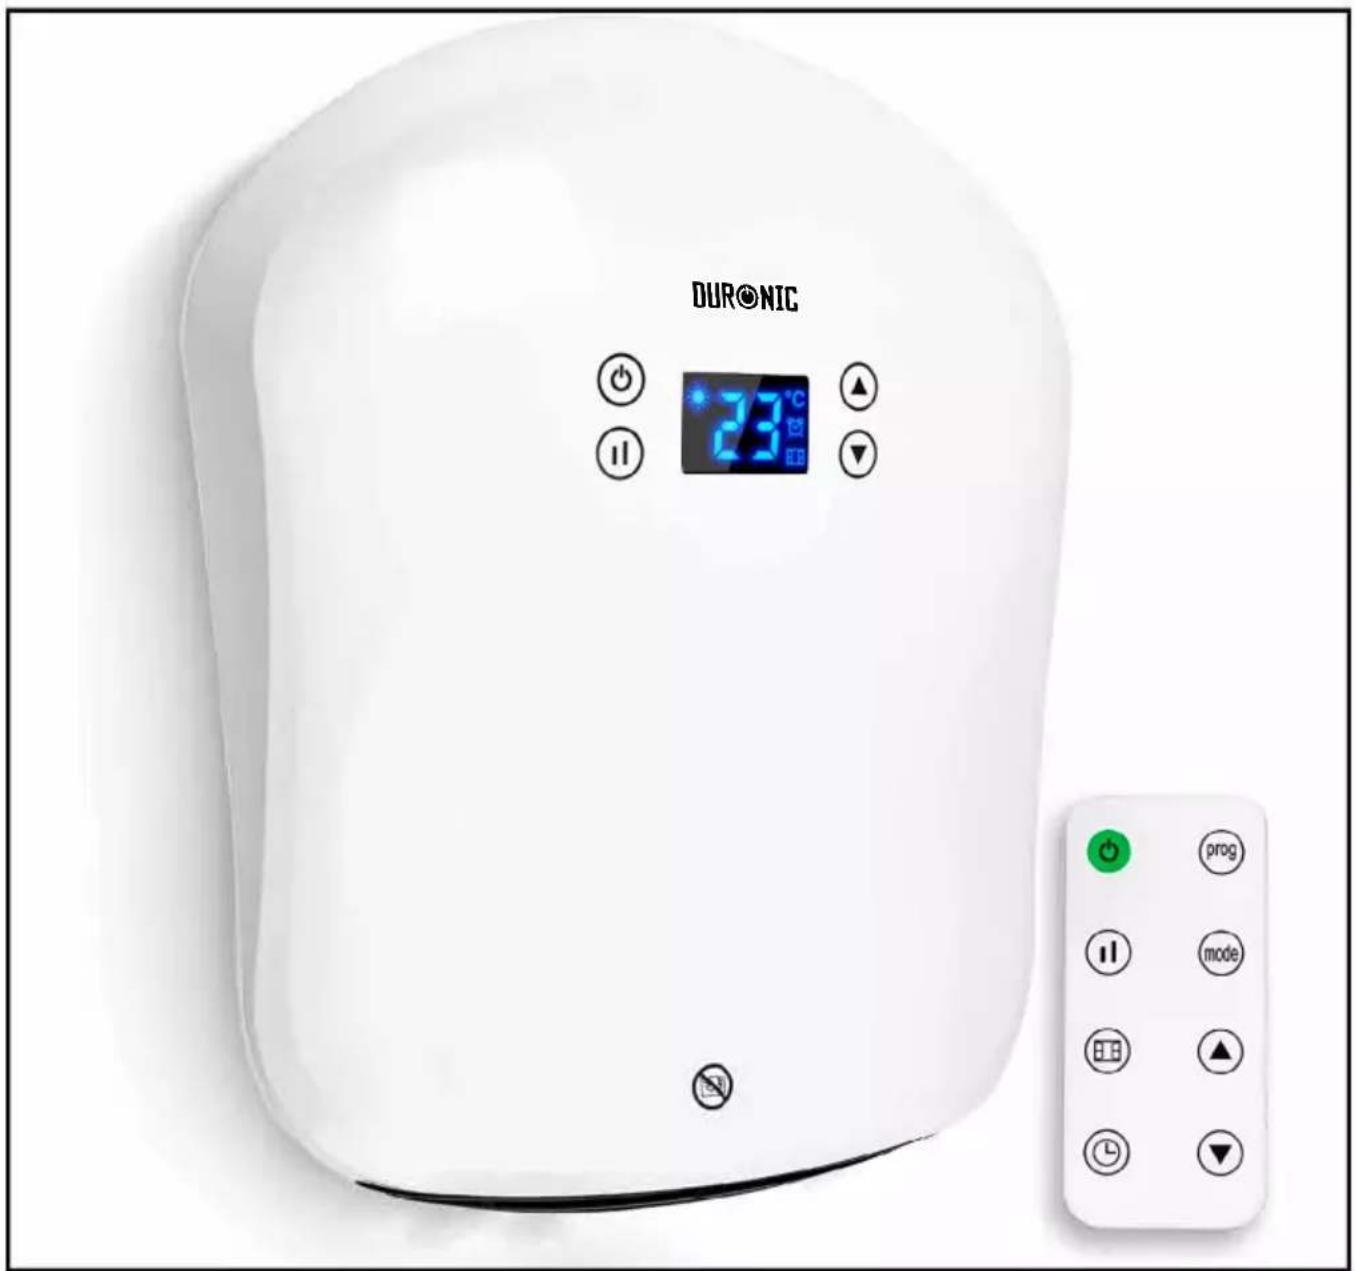
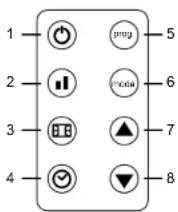
Remote Control Buttons
- On/Standby
- Power Setting
- Window open detection button
- Timer button
- Program
- Mode button
- Up-arrow button
- Down-arrow button
Battery: 1 x CR2025 3V
DURONIC
Control Panel Buttons
| Buttons | Referred to in manual as |
| On/ standby button | |
| Power setting button | |
| Up-arrow button | |
| Down-arrow button |
Setting up the heater
1. Turning the Heater On and Off
To switch on the fan heater, press the on/standby buttononce.
t will immediately power on and you will hear it running, and it will start to blow out warm air.
OFF: To switch the heater off again, press the same on/standby button to put it into standby mode.
2. Set the current day and time
Set the day of the week
a) Switch the heater on.
b) Long-press the timer button for 3 seconds.
c) The screen will first display d1 and start to flash.
d) Press the up-arrow or down-arrow to set the day of the week it currently is from d1, d2, d3, d4, d5, d6, d7.
e) After selecting the day, press the timer button once to confirm.
Set the clock
f) Next, the heater enters into the time/clock setting.
A numbered digit flashes on the screen.
g) Set the hour: Press the up-arrow button or down-arrow button to set the current correct hour among 00-23 in the cycle.
h) When you have chosen the hour, press the timer button once to confirm.
i) Set the minutes: Press the up-arrow button or down-arrow button to set the current correct minutes from 0-59.
j) Press the timer button once to confirm.
k) Finally, when both the hour and minutes have been set, press the timer button once to confirm and save the settings.
After setting the time, allow the digital screen to return back to the standard screen.
To check if the current day and time is set currently, press the timer button once; the screen will automatically show the information in this order: Day, Hour, Minutes in turns within 1 second of each other, then, the screen will switch back to the ambient temperature display.
DURONIC
3. Setting the power level
Changing from full power to low power (2000W to 1000W):
a) Switch on the heater.
b) The screen will display the full sun icon which means it is on full-power mode and will work at 2000W.
c) To change the power level to half-power, press the power setting button once.
This will change from the full sun icon (2000W) to the half sun icon (1000W).
d) Do nothing more and after a few seconds it will automatically save the setting for you.
e) To switch it back to full-power, follow the same steps.
4. Setting the temperature
Straight after setting the power level, set the temperature.
a) Press the up-arrow button or down-arrow button to customise the temperature setting.
b) Select a temperature between 5°C and 35°C.
As soon as you land on the number you wish to select, do nothing more and after 5 seconds
it will automatically save the setting for you.
5. Selecting a pre set mode
To help you manage the heat in your home, there are 6 different modes to choose from.
Each have a pre-set pattern to program the heater to go on and off throughout the day.
• P1, P2, P3, P4, P5 are the factory default programs that have already been set for you. Each
follows a different pattern to accommodate for a range of preferences.
Please see the chart below for more information on this.
- UP is the program that you can customise to set a working period/mode to suit your requirements.
Pre-Set Modes
| Per Week Program Mode | Anti frost | Comfort Anti frost | Comfort Anti frost | Comfort Anti frost | Comfort Anti frost | Best suited for |
| Days (1-7) P1 00:00- | 24.00 | Consistent all-day comfort, for everyday use continuously. | ||||
| Days (1-5) P2 00:00- | 06:30 | 06:30-08:30 | 17:00-22:30 | 22:30-24.00 | Ideal for family who work on weekdays and at home on weekends. | |
| Days (6-7) P2 00:00- | 07:30 | 07:30-10:00 | 10:00-12:00 | 14:00-17:00 | 17:00-22:30 | 22:30-24:00 |
| Days (1-5) P3 00:00- | 06:00 | 06:00-17:00 | 17:00-24.00 | Ideal for in an office where it is occupied during weekdays and empty on the weekend. | ||
| Days (8-7) P3 00:00- | 24:00 | |||||
| Days (1-7) P4 00:00- | 06:00 | 06:00-22:00 | 22:00-24.00 | Ideal for a commercial place where it is occupied all day. | ||
| Days (1-7) P5 00:00- | 24:00 | Constant anti-frost. Ideal for family who go out for a long time. |
DURONIC
* *Anti-frost: default mode to keep the room at a temperature of at least 5 to prevent frost.
* *Comfort: this setting is customised by the user when they set up their heater.
To select a mode
- Switch on the heater.
- Press the mode button to select a pre-set mode from P1, P2, P3, P4, P5, UP in cycle.
6. Timer setting
This is an option to set a countdown timer to switch off the heater after a certain amount of time. For instance, if you set it for 2 hours it will stay on for this time and then switch off into standby mode automatically.
Set the Timer
a) Press the mode button and select P1.
b) Press the timer button quickly two times. The timer icon will flash on the screen.
c) Press the up-arrow button or down-arrow button to select an amount of time you would like the heater to be on for. You can choose from 1-24 hours.
d) Stop on the number you want to select and do nothing else. After 5 seconds it will automatically save the setting.
The timer icon will stop flashing and appliance will then start a countdown to turn the heater off.
Cancel the Timer: If you want to cancel the timer setting, press the timer button twice quickly again. The timer icon will disappear from the screen to confirm that it has been cancelled.
7. Setting the customised Program (UP)
You can set your own customised program for the heater to come on and off at specific times throughout the day. In the UP mode you can set one, two or three periods of time per day for the heater to go on and off (in comfort mode). Remember, 'comfort mode' is the power/temperature that you set at the beginning. It can be changed by following the steps in section no.3.
a) Switch the heater on.
b) Press the mode button and select the UP mode.
c) Press the program button.
d) The screen will display d1 to begin setting for the first day of the week.
You can start here or select a different day to program if you wish to skip this day.
e) On your chosen day, press the up-arrow button or down-arrow button once to set the times for the 1st working period for this day; the screen will display d1 and the full sun icon will flash.
f) Press the up-arrow button or down-arrow button once again to select the start time.
g) Select an hour (between 0 to 23) when you would like the heater to switch on. When you
have the correct hour selected, press the timer button to confirm.
h) The screen will then prompt you to set a finish time.
DURONIC
i) Press the up-arrow button or down-arrow button to select an hour and press the timer button to confirm.
The heater will automatically enter into the 2nd working period setting for you to set or change if you wish to. The screen will display 2 and the full sun icon will flash.
Using the method mentioned above, you may set the 2nd and the 3rd working periods.
j) Any gaps in the times you have set will automatically become "anti-frost mode" (which is similar to a standby mode)
k) If you do not want to set more than one working period, simply press the timer button to save your setting.
I) Continue to press the timer button to confirm every setting you make on each day.
m) When the d1 has been set, it will automatically turn to d2. In the same way, you can set times for d1, d2, d3, d4, d5, d6 and d7.
n) Long press the program button for 3 seconds to check the UP mode settings.
To Check the UP Settings
- Press the program button to check each day's setting. Press the timer button to choose which day among d1 to d7. When left untouched for more than 2 minutes, the screen will quit the program mode and change back to the main screen again.
- Press the timer button at first instead of the up-arrow button or down-arrow button, you can skip the steps to keep the appliance in anti-frost mode.
- While the heater is working during comfort mode, you can change the power setting by pressing the power setting button to switch between the full sun icon (2000W) and the half sun icon (1000W).
8. Child Lock Function
For added safety there is a child lock function to prevent any settings being altered while the heater is on.
To Add the Child Lock
Long press the up-arrow button and down-arrow button simultaneously at the same time for 3 seconds to activate the child lock function. The digital screen will show [ ] to confirm that the child lock is activated. While child lock is in place, no buttons can be used.
To Remove the Child Lock
To remove the child lock, long press the up-arrow button and down-arrow button simultaneously at the same time for 3 seconds again.
DURONIC
9. Windown Open Detection Function
How does the Window Open Detection Function work?
When the heater senses that the room temperature has dropped 5^ C or more over 30 minutes, the heater will assume that there is a window open and will stop heating up. This is to preserve energy and prevent the heater working constantly to heat a room that cannot be heated. When it detects a window is open, the window icon will stop flashing and instead stay illuminated to remind the user to close the window/door. After closing the window/door,
Using the Window Open Detection
When the heater is switched on, press the window open detection button once to activate window open detection and the window icon will flash on the screen. To cancel this function, press the window open detection button again to cancel the setting and the window icon will disappear.
10. Reverting to the Default Setting
To reset the heater settings to their factory default settings:
- Disconnect power
- Press and hold the down-arrow button
- Reconnect to power
• The heater will then recover to the default settings
Cleaning and Maintenance
-
Always disconnect the appliance and let it cool down completely before carrying out any maintenance.
-
Use a vacuum cleaner to remove dust on the inlet and outlet surfaces.
-
Clean the outside of the heater with a damp (well wrung) cloth and then dry it with a dry cloth
-
Never immerse the heater in water, nor let water drip into or onto the heater.
Storing
-
Always disconnect the heater and allow it to cool down completely before storing.
-
Always give the heater a clean to remove dust and
other deposits before you put it away in storage
-
If you plan to not use the heater for a long period of time, put the heater and the instruction manual back into the original box/packaging and store in a dry, well ventilated place.
-
Do not place any heavy items on top of the box during storage as this may damage the heater.
DURONIC
DURONIC
Warranty
1 Year Guarantee from Shine-mart Ltd, Trademark owners of Duronic Products. NOTE: THESE STATEMENTS DO NOT AFFECT YOUR STATUTORY RIGHTS AS A CONSUMER
This product has been manufactured under the strictest or quality control procedures, and using the highest quality of materials, to ensure excellent performance and reliability. It will give very good and long lasting service, provided it is properly used and maintained. The product is guaranteed for 1 years from the date of original purchase. If any defect arises due to a faulty materials or poor workmanship, the faulty product must be returned to the original place of purchase. Refund or replacement is at the discretion of that company.
Duronic Products are offered with a 1 year guarantee under the following conditions:
- The product must be returned to the retailer with original proof of purchase.
- The product must be installed and used in accordance with the instructions
contained in this operating manual. - It must be used only for domestic purposes.
- It does not cover wear and tear, malicious damage, misuse, neglect,
inexpert repairs or consumable parts. - Shine-Mart Ltd has no responsibilities for accidental or consequential loss or damage.
- Shine-Mart Ltd are not liable to carry out any type of servicing work,
under the guarantee - Valid in the UK only
Imported by Shine-Mart Ltd, RM3 8SB

Information on waste Disposal for Consumers of
Electrical & Electronic Equipment
This mark on a product and/or accompanying documents indicates that when it
is to be disposed of, it must be treated as Waste
Electrical & Electronic Equipment (WEEE)
Any WEEE marked products must not be mixed with general household waste.
but kept separate for the treatment, recovery and recycling of the materials used.
For proper treatment, recovery and recycling; please take all WEEE marked
waste to your Local Authority Civic waste site.
where it will be accepted free of charge.
If customers dispose of Waste Electrical & Electronic Equipment correctly, they
will be helping to save valuable resources and preventing any potential negative
effects upon human health and the environment, of any hazardous materials that
the waste may contain.
DURONIC
natural_image
3D diagram of a transparent enclosure with internal components and dimension labels (no readable text or symbols)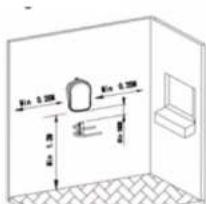
natural_image
3D diagram of a rectangular container with internal components and dimension labels (no readable text or symbols)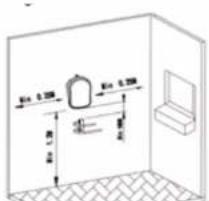
Schrill 1 Schritt 2
Schritt 3
Schritt 4 Schritt 5
DURONIC
Bedienung
natural_image
3D diagram of a transparent enclosure with internal components and dimension labels (no readable text or symbols)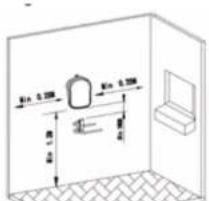

4^ passo 5^ passp

DURONIC
Funzionamento
natural_image
3D diagram of a transparent enclosure with internal components and dimension labels (no readable text or symbols)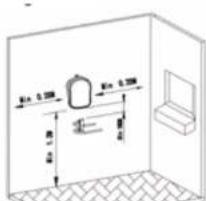
Krok 1 Krak 2
Krok 3

Krok 4 Krok 5