DAS240BAHWDB - Air Conditioning DANBY - Free user manual and instructions
Find the device manual for free DAS240BAHWDB DANBY in PDF.
| Product Type | Reversible air conditioning (cooling and heating mode) |
| Brand | Danby |
| Model | DAS240BAHWDB |
| Main functions | Cooling, heating, dehumidification, ventilation, auto mode |
| Operating modes | Auto, Cool, Heat, Dry, Fan |
| Special functions | Turbo, Sleep, Timer (ON/OFF), Swing, Direct, Cold air prevention, Auto restart |
| Ambient temperature range (Cool) | 17 °C to 32 °C (63 °F to 90 °F) |
| Ambient temperature range (Heat) | 0 °C to 30 °C (32 °F to 86 °F) |
| Ambient temperature range (Dry) | 10 °C to 32 °C (50 °F to 90 °F) |
| Outdoor temperature range (Cool) | 0 °C to 50 °C (32 °F to 122 °F) |
| Outdoor temperature range (Heat) | -15 °C to 30 °C (5 °F to 86 °F) |
| Outdoor temperature range (Dry) | 0 °C to 50 °C (32 °F to 122 °F) |
| Temperature setting | 17 °C to 30 °C (62 °F to 86 °F) in increments of 1 °C/°F |
| Fan speeds | Auto, Low, Medium, High |
| Remote control type | Wireless, model RG57B/BGEU1, AAA batteries (2x) |
| LED display | Yes, with mode indicators and error code |
| Air filter | Washable main filter + fresh air filter |
| Maintenance and cleaning | Clean filter every 2 weeks or 240 h; exterior with a soft dry cloth |
| Safety | Grounding required, 3-minute anti-restart protection, refrigerant leak detection (code EC) |
| Spare parts and repairability | Service by qualified HVAC technician; parts under 5-year warranty |
| Warranty | 5-year limited on parts (residential or light commercial) |
| General information | Manual available in FR/EN/ES; Danby support: 1-800-263-2629 |
Frequently Asked Questions - DAS240BAHWDB DANBY
User questions about DAS240BAHWDB DANBY
0 question about this device. Answer the ones you know or ask your own.
Ask a new question about this device
Download the instructions for your Air Conditioning in PDF format for free! Find your manual DAS240BAHWDB - DANBY and take your electronic device back in hand. On this page are published all the documents necessary for the use of your device. DAS240BAHWDB by DANBY.
USER MANUAL DAS240BAHWDB DANBY
Do the right thing.*
DAS090BAHWDB
DAS120BAHWDB
DAS180BAHWDB
DAS180DBAHWDB
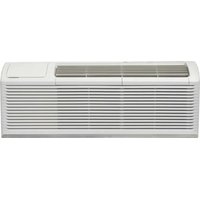
DAS240BAHWDB
SPLIT AIR CONDITIONER
Owner's Use and Care Guide 1 - 12
CLIMATISEUR DIVISÉ
FOR ANY QUESTIONS OR CONCERNS REGARDING INSTALLATION OR SERVICING OF THIS APPLIANCE, PLEASE CONTACT THE DEALER OR BUILDER WHO SOLD THE APPLIANCE.
***NOUS RECOMMANDONS FORTEMENT L'UTILISATION D'UN TECHNICIEN CVC PROFESSIONNEL POUR INSTALLER CET APPAREIL. ***
POUR TOUTE QUESTION OU PRÉOCCUPATION CONCERNANT L'INSTALLATION OU L'ENTRETIEN DE CET APPAREIL, VEUILLEZ CONTACTER LE REVENDEUR OU LE CONSTRUCTEUR QUI A VENDU L'APPAREIL.
**RECOMENDAMOS ENFÁTICAMENTE EL USO DE UN TÉCNICO HVAC PROFESIONAL PARA INSTALAR ESTE APARATO.***
Danby Products Limited, Guelph, Ontario, Canada N1H 6Z9
Danby Products Inc. Findlay, Ohio, U.S.A. 45840
www.Danby.com

*Trademark of Danby Products
* Marque de commerce de Danby Products
* Marca comerciales de Danby Products
2023.10.19
Printed in China
Imprimé en Chine
Impreso en China

Important Safety Information READ AND FOLLOW ALL SAFETY INSTRUCTIONS
SAFETY REQUIREMENTS
To avoid installation or operation difficulties, read these instructions before first use of the product.
- Use this appliance only for its intended use, as described in this manual.
- Never allow children to operate, play with, or crawl inside the appliance.
- Never clean appliance parts with flammable fluids. The fumes can create a fire hazard or explosion.
- Do not store or use flammable vapors or liquids in the vicinity of this or any other appliance. The fumes can create a fire hazard or explosion.
- Do not use this product near water, e.g. in a wet basement, laundry room or near a sink.
- Do not cover or block any openings on the appliance.
- This appliance should be serviced only by a qualified HVAC technician. Contact the dealer at the location where the appliance was purchased for information on servicing the appliance.
- Disposal of this appliance should be in accordance with federal and local regulations.
- This appliance is not intended for use by persons (including children) whose physical, sensory or mental capabilities may be different or reduced, or who lack experience or knowledge, unless such persons receive supervision or training to operate the appliance by a person responsible for their safety.
- Do not climb onto or place objects on top of the outdoor appliance.
- Do not operate this appliance with wet hands as this can cause electric shock.
- Do not insert fingers or other objects into the air inlet or outlet as the fan rotates at very high speed and can cause serious injury or damage.
- Do not allow the appliance to operate for long periods of time with doors or windows open or if the humidity is very high.
GROUNDING INSTRUCTIONS
This appliance must be grounded. In the event of an electrical short circuit, grounding reduces the risk of electric shock by providing an escape wire for the electric current. The serial rating plate indicates the voltage and frequency the appliance is designed for.
WARNING - Improper use of the grounding plug can result in a risk of electric shock. Consult a qualified electrician or service technician if the grounding instructions are not completely understood, or if doubt exists as to whether the appliance is properly grounded.
OPERATING INSTRUCTIONS
FEATURES
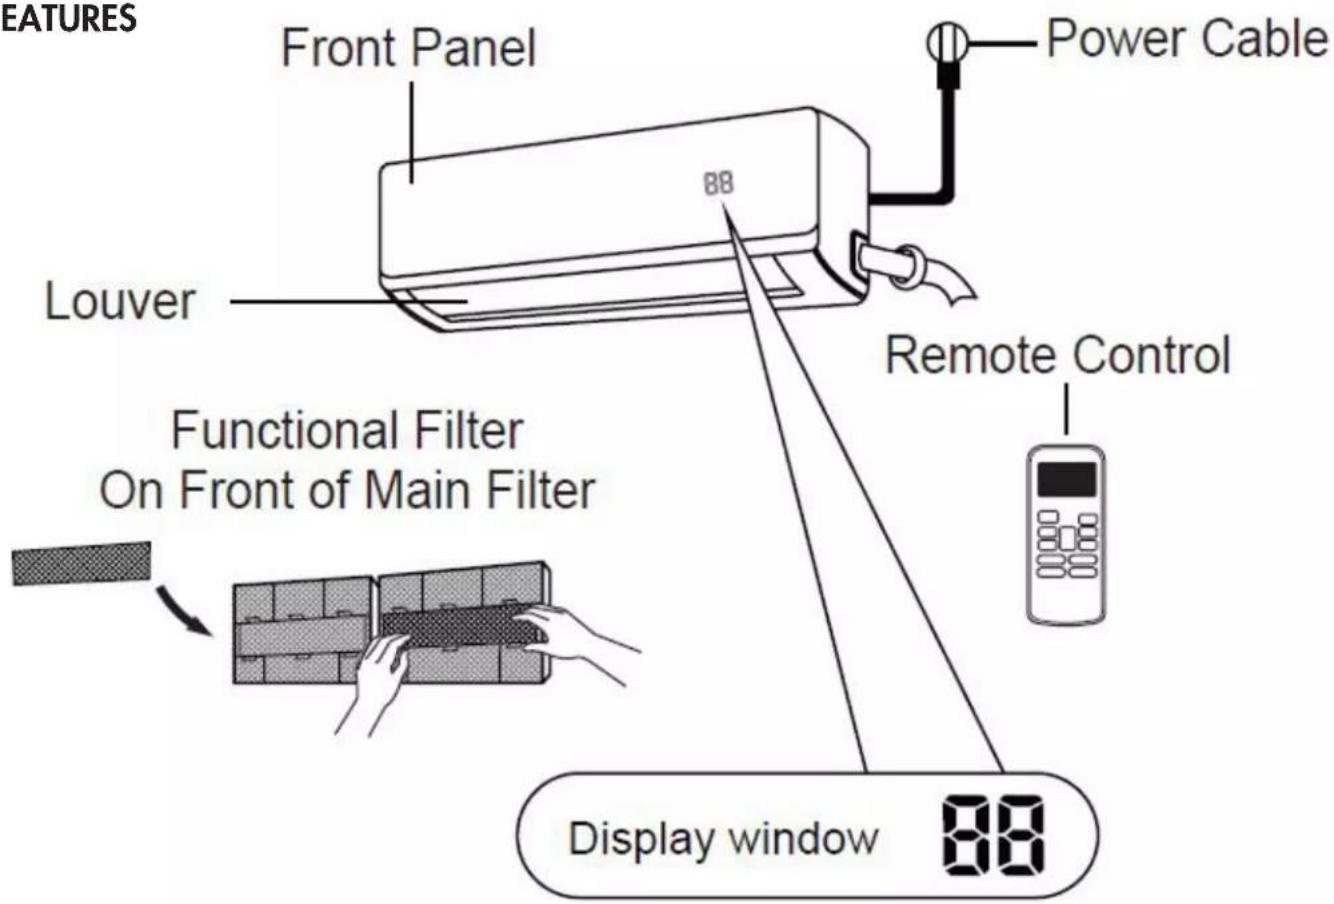
text_image
EATURES Front Panel Power Cable Louver 88 Remote Control Functional Filter On Front of Main Filter Display window 88DISPLAY CODE MEANINGS

will display for 3 seconds when:
- TIMER ON is set
• SWING, TURBO or SLEEP features are turned on

will display for 3 seconds when:
- TIMER OFF is set
- SWING, TURBO or SLEEP features are turned off

will display when anti-cold air feature is turned on

will display when the appliance is defrosting
• In fan mode, the appliance will display the room temperature
• In other modes, the appliance will display the temperature setting
OPERATING INSTRUCTIONS
Optimal performance for the COOL, HEAT and DRY modes can be achieved in the following temperature ranges. When the air conditioner is used outside of these temperature ranges, certain safety protection features will activate and cause the appliance to perform less efficiently.
To optimize the performance of the appliance:
- Keep doors and windows closed
- Do not block air inlets or outlets
• Regularly inspect and clean all air filters - Limit energy usage by using the timer function
Note: When the outside temperature is below 0^ C ( 32^ F), keep the appliance plugged in at all times to ensure smooth ongoing performance.
| COOL mode HEAT mode DRY mode | |||
| Room temperature | 17°C - 32°C(63°F - 90°F) | 0°C - 30°C(32°F - 86°F) | 10°C - 32°C(50°F - 90°F) |
| Outdoor temperature | 0°C - 50°C(32°F - 122°F) | -15°C - 30°C(5°F - 86°F) | 0°C - 50°C(32°F - 122°F) |
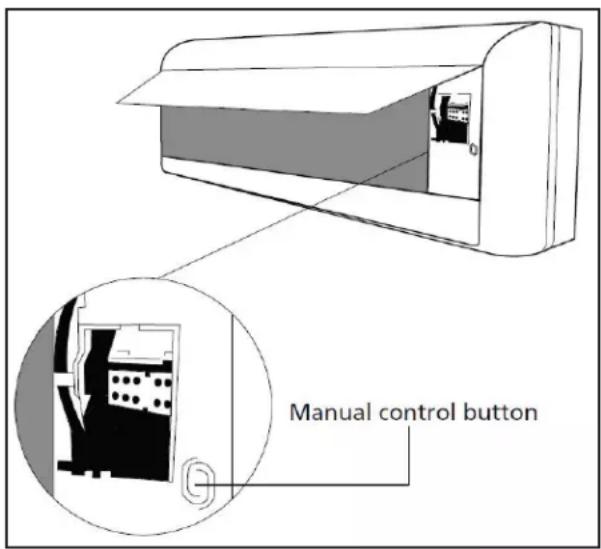
OPERATION WITHOUT THE REMOTE CONTROL
Operational functioning can be access through the remote control. In the event that the remote control fails to work, the appliance can be operated manually with the manual control button located on the indoor appliance. Note that manual operation is not an efficient long-term solution and that operating the appliance with the remote control is recommended.
The appliance must be turned off before manual operation. To operate the appliance manually:
- Open the front panel of the indoor appliance.
- The manual control button is located on the right side hand side of the appliance.
- Press the manual control button one time to activate forced AUTO mode.
- Press the manual control button a second time to activate forced COOL mode.
- Press the manual control button a third time to turn the appliance off.
- Ensure the front panel is closed when finished.
text_image
Manual control buttonNote: The manual button is intended for testing purposes and emergency operation only. Do not use this function unless absolutely necessary. To restore regular operation, use the remote control to activate the appliance.
OPERATING INSTRUCTIONS
- The air conditioner will not operate if curtains, doors or other materials block the signal from the remote control to the indoor appliance.
- Do not expose the remote control to water, direct sunlight or excessive heat.
- Do not allow direct sunlight to fall on the infrared receiver on the indoor appliance as this can impede the signal from the remote control.
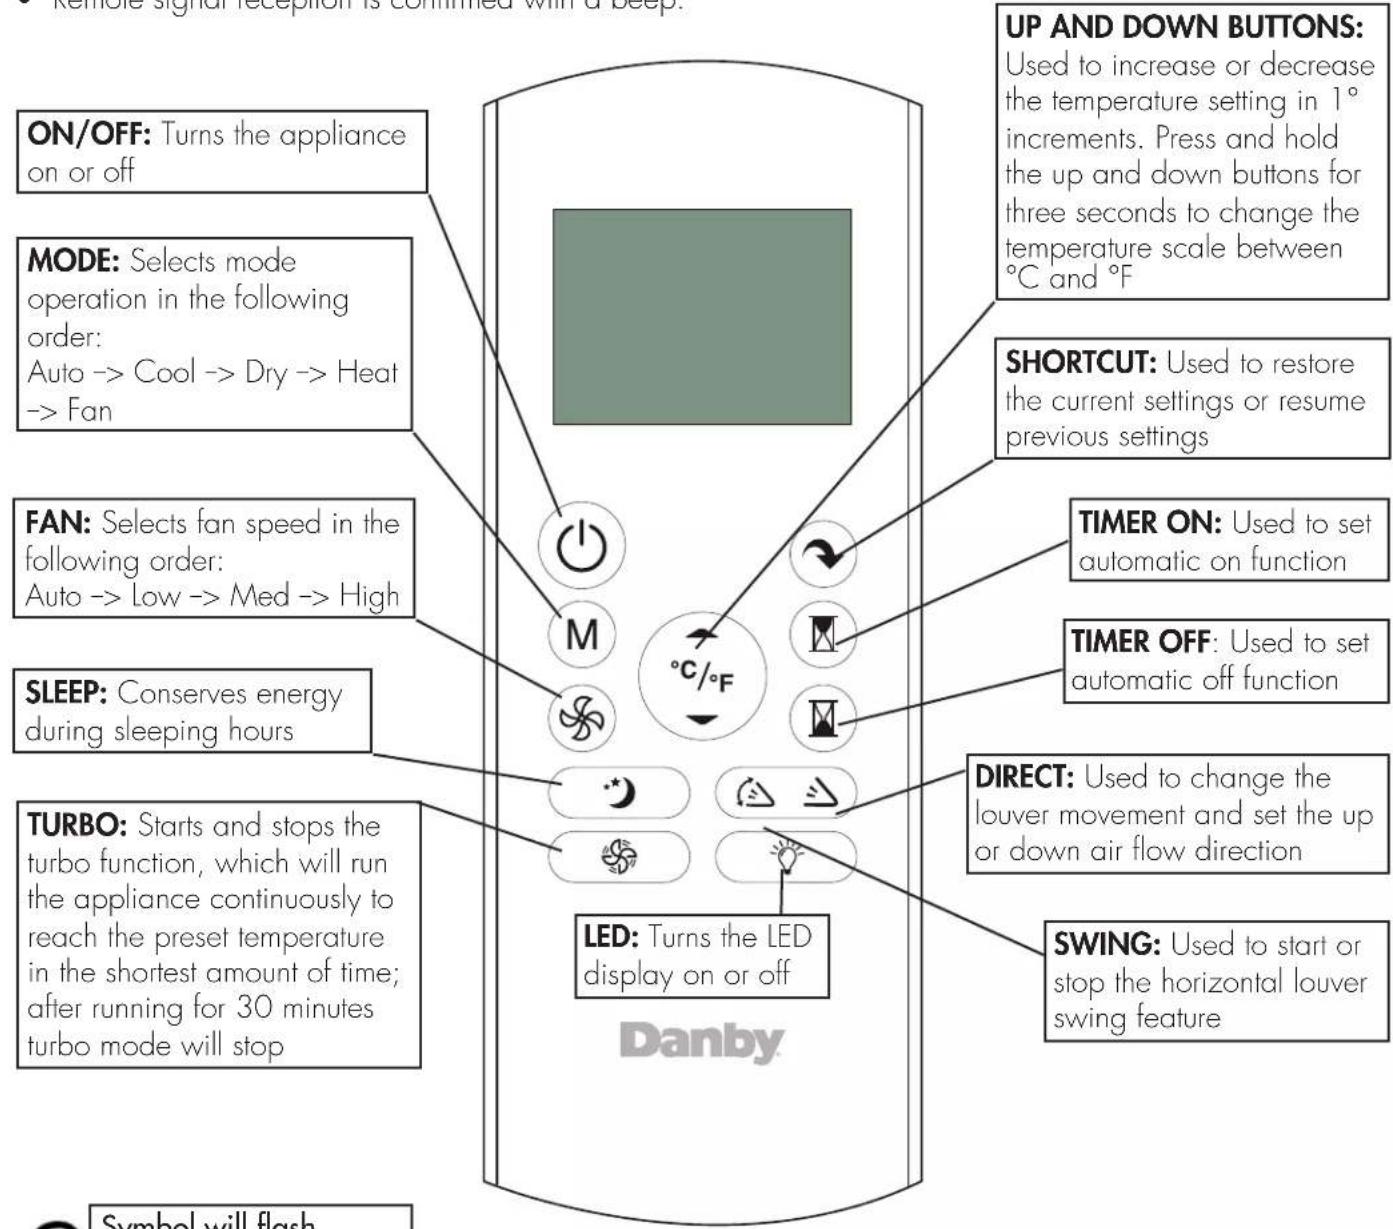
• Remote signal reception is confirmed with a beep.
text_image
Remote signal reception is confirmed with a beep. ON/OFF: Turns the appliance on or off MODE: Selects mode operation in the following order: Auto -> Cool -> Dry -> Heat -> Fan FAN: Selects fan speed in the following order: Auto -> Low -> Med -> High SLEEP: Conserves energy during sleeping hours TURBO: Starts and stops the turbo function, which will run the appliance continuously to reach the preset temperature in the shortest amount of time; after running for 30 minutes turbo mode will stop UP AND DOWN BUTTONS: Used to increase or decrease the temperature setting in 1° increments. Press and hold the up and down buttons for three seconds to change the temperature scale between °C and °F SHORTCUT: Used to restore the current settings or resume previous settings TIMER ON: Used to set automatic on function TIMER OFF: Used to set automatic off function DIRECT: Used to change the lower movement and set the up or down air flow direction SWING: Used to start or stop the horizontal louver swing feature LED: Turns the LED display on or off Danby Symbol will flash
Symbol will flash to indicate that the appliance has received the signal from the remote control.
| Remote Control Specifications | |
| Model RG57B/BGEU1 | |
| Rated Voltage 3.0V (dry batteries R03/LR03x2) | |
| Signal Receiving Range 8m (26 feet) | |
| Environment -5°C to 60°C (23°F to 140°F) | |
OPERATING INSTRUCTIONS
OPERATING MODES
AUTO mode
- Press the MODE button to select AUTO mode.
- The appliance will automatically select cooling, or fan only operation depending on what temperature has been set and the ambient room temperature.
DRY (dehumidifying) mode
- Press the MODE button to select the DRY mode.
- The fan speed cannot be adjusted in this mode. The fan operates at LOW speed.
- Keep windows and doors closed for the best dehumidifying effect.
- Condensed water will automatically drain through the drain hose.
Note: The fan speed cannot be adjusted in AUTO and DRY mode.
COOL mode / HEAT mode / FAN operation
- Press the MODE button to select the desired mode; COOL, HEAT or FAN.
- Press the UP or DOWN buttons to select your desired room temperature. The temperature can be set within a range of 17°C - 30°C (62°F - 86°F).
- Press the FAN button to choose the fan speed: Auto, Low, Med or High.
SHORTCUT function (only available on remote):
• Used to save a favourite setting
- Set the unit to the temperature and fan speed that you would like to set as a favourite
- Press and hold the SHORTCUT button for 2 seconds
- Press the SHORTCUT button at any point in future to return to the favourite setting
- If no favourite is set, pressing the SHORTCUT button will cause the unit to run in AUTO mode at 26°C (79°F), with fan speed set to AUTO
Anti-Cold Air Feature
- The fan speed and the louver angle adjust according to the ambient temperature. The manual control button and remote control cannot adjust fan speed or louver angle in this setting.
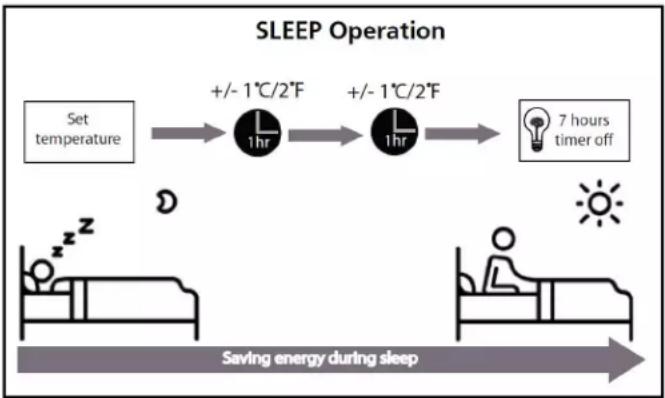
SLEEP function
- The SLEEP function is used to decrease energy use during sleeping hours. This function can only be activated by pressing the SLEEP button on the remote control.
- When in COOL mode, the temperature will increase by 1°C (2°F) in the first hour and will increase an additional 1°C (2°F) in the second hour. The appliance will then hold this new temperature for 5 hours. At the end of the SLEEP cycle, the appliance will resume normal operation.
- When in HEAT mode, the temperature will decrease by 1°C (2°F) in the first hour and will decrease an additional 1°C (2°F) in the second hour. The appliance will then hold this new temperature for 5 hours. At the end of the SLEEP cycle, the appliance will resume normal operation.
Note: The sleep feature is not available in FAN and DRY mode.
flowchart
graph LR
    A["Set temperature"] --> B["+/- 1°C/2°F"]
    B --> C["+/- 1°C/2°F"]
    C --> D["7 hours timer off"]
    D --> E["Saving energy during sleep"]
AUTOMATIC FEATURES
Auto-Restart
If the appliance loses power, it will automatically restart with the previous settings once power is restored.
Louver Angle Memory
When turning on the appliance, the louver will automatically resume the previous angle setting.
Refrigerant Leakage Detection
The indoor appliance will automatically display "EC" when it detects a refrigerant leakage and the appliance will shut off.
OPERATING INSTRUCTIONS
TIMER OPERATION
To set the Auto-off timer:
- Ensure the appliance is turned on
- Press the TIMER OFF button and the Timer Off indicator will illuminate
- Press the TIMER OFF button to select the desired amount of hours before the appliance turns off
To set the Auto-on timer:
- Ensure the appliance is turned on
- Press the TIMER ON button and the Timer On indicator will illuminate
- Press the TIMER ON button to select the desired amount of hours before the appliance turns on
Notes:
- The TIMER ON and TIMER OFF buttons will increase the time in 0.5 hour increments up to 10 hours and then in 1 hour increments up to 24 hours
- The display will revert back to showing the previous temperature setting if the appliance does not receive a signal within a 5 second period during programming
- Turning the appliance on or off at any time or adjusting the timer setting to 0.0 hours will cancel the TIMER settings
Using the TIMER ON and TIMER OFF feature at the same time
The appliance can be set to turn on and run for a set period of time and then turn off again by using the TIMER ON and TIMER OFF features at the same time. Keep in mind that the hours displayed on the appliance refer to the number of hours that will pass from the current time before the action is taken.
For example:
- First, set the Auto-off timer
- Ensure the appliance is turned on
- Press the TIMER OFF button and the Timer Off indicator light will illuminate
- Press the TIMER OFF button to select the desired amount of hours before the appliance turns off
- Press the TIMER ON button within 5 seconds and the Timer On indicator light will illuminate
- Press the TIMER ON button to select the amount of hours before the appliance turns back on
Note: If the TIMER OFF function and the SLEEP function are used at the same time, the appliance will only implement the setting whose duration is shorter.
If the TIMER OFF function is set for less than seven hours, the TIMER OFF will turn the appliance off before the SLEEP function can complete its cycle.
If the TIMER OFF function is set for more than seven hours, the SLEEP function will turn the appliance off before the TIMER OFF can complete its cycle.
OPERATING INSTRUCTIONS
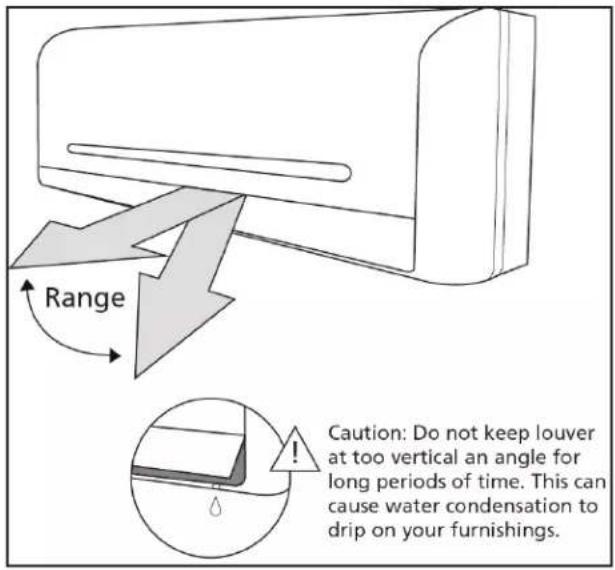
SETTING VERTICAL ANGLE OF AIR FLOW
While the appliance is on, use the SWING/DIRECT button to set the vertical angle of the air flow.
- Press the SWING/DIRECT button once to activate the louver. Each press of the button will adjust the louver by 6°.
- To make the louver swing up and down continuously, press and hold the SWING/DIRECT button for 3 seconds. Press it again to stop the continuous swing.
text_image
Range Caution: Do not keep louver at too vertical an angle for long periods of time. This can cause water condensation to drip on your furnishings.SETTING HORIZONTAL ANGLE OF AIR FLOW
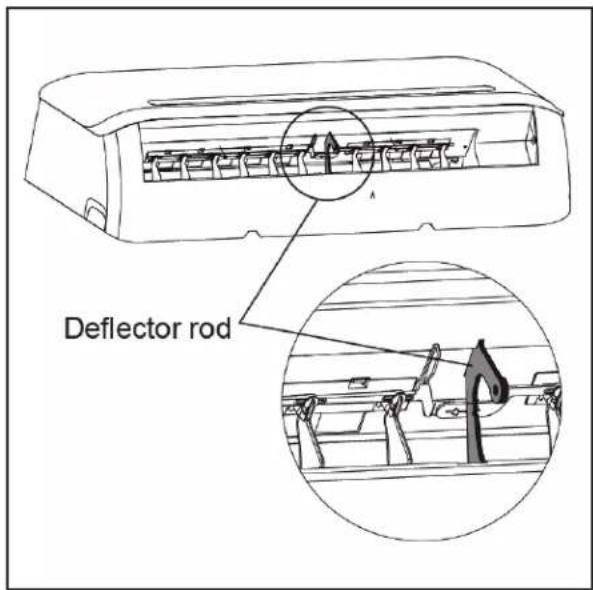
The horizontal angle of the air flow must be set manually. Grip the deflector rod and manually adjust it to the preferred direction.
text_image
Deflector rodNOTE ON LOUVER ANGLES
When using COOL or DRY mode, do not set the louver at an extreme vertical angle for a long period of time. Water can condense on the louver blade which can then drip on the floor or furnishings.
When using COOL or HEAT mode, do not set the louver at an extreme vertical angle for a long period of time. This can cause reduced performance due to restricted air flow.
Do not force the louver to move or adjust the louver by hand. This will cause the louver to be out of sync and it will not function correctly. If this occurs, turn off the appliance and unplug it for a few seconds and then restart the appliance. This will reset the louver position.
CAUTION
Do not put fingers in or near the blower and suction side of the appliance. The high-speed fan inside the appliance can cause serious harm or injury.
OPERATING INSTRUCTIONS
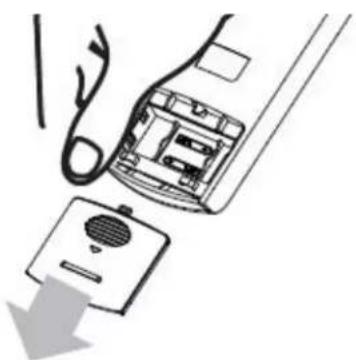
REPLACING THE REMOTE BATTERIES
The appliance comes with two AAA batteries. Place the batteries in the remote control before use.
- Slide the back cover from the remote downward to expose the battery compartment.
- Insert the batteries, ensure to match the (+) and (-) symbols on the ends of the batteries with the symbols inside the battery compartment.
-
Slide the battery cover back into place.
-
Do not mix old and new batteries or batteries of different types.
- Do not leave the batteries in the remote control if it is not going to be used for more than 2 months.
- Do not dispose of batteries as unsorted municipal waste. Collection of such waste separately for special treatment is necessary.
Note: Removing the batteries from the remote will erase all previous programming. After inserting new batteries, the settings on the appliance must be reprogrammed.
natural_image
Diagram showing a hand inserting a device into a device with a cable, no text or symbols present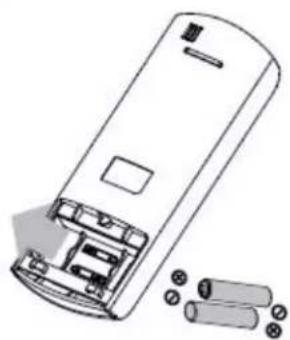
natural_image
Line drawing of a cylindrical device with internal components and external batteries (no text or symbols)
This equipment has been tested and found to comply with the limits for a Class B digital device, pursuant to Part 15 of the FCC Rules. These limits are designed to provide reasonable protection against harmful interference in a residential installation. This equipment generates, uses and can radiate radio frequency energy and, if not installed and used in accordance with the instructions, may cause harmful interference to radio communications. However, there is no guarantee that interference will not occur in a particular installation. If this equipment does cause harmful interference to radio or television reception, which can be determined by turning the equipment off and on, the user is encouraged to try to correct the interference by one or more of the following measures:
- Reorient or relocate the receiving antenna
- Increase the separation between the equipment and receiver
- Connect the equipment into an outlet on a circuit different from that to which the receiver is connected
- Consult the dealer or an experienced radio/TV technician for help
Changes or modifications not approved by the party responsible for FCC compliance could void the user's authority to operate the equipment. This appliance complies with Part 15 of the FCC Rules and Industry Canada's license-exempt RSS.
Operation is subject to the following conditions:
- This device may not cause harmful interference.
- This device must accept any interference received, including interference that may cause undesired operation.
This device complies with Canadian CAN ICES-3 (B) / NMB-3 (B)
CARE & MAINTENANCE
CLEANING THE INDOOR APPLIANCE
Note: Always turn off the air conditioner and disconnect the power source before cleaning the appliance or removing the filter.
- Use a soft, dry cloth to clean the outside of the appliance. If the appliance is especially dirty, use a cloth soaked in warm water to clean the outside of the appliance.
- Do not use water to clean the inside of the appliance as this can destroy the insulation and cause electric shock.
- Do not use chemicals or chemically treated cloths to clean the appliance.
- Do not use benzene, paint thinner or other solvents to clean the appliance. They can cause the plastic surface to crack or deform.
- Do not use water hotter than 40°C (104°F) to clean the front panel. This can cause the panel to deform or become discoloured.
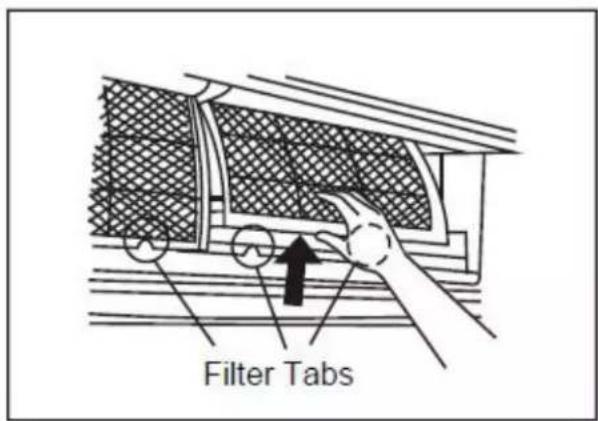
CLEANING THE AIR FILTER
A clogged air filter can reduce the efficiency of the air conditioner. It is advisable to clean the air filter every two weeks or after 240 hours of operation, whichever comes first. When removing the filter, do not touch any metal parts inside the appliance as the sharp metal edges can cause injury.
- Lift the front panel of the indoor appliance.
- Grip the tab on the end of the filter, lift it up and pull it outwards to remove it from the appliance.
- If the filter has a small air freshening filter, unclip if from the larger filter. Clean the air freshening filter with a soft brush or hand-held vacuum cleaner.
- Clean the large filter with warm, soapy water. Use mild detergent.
- Rinse the filter with clean water. Ensure all soap is removed from the filter and shake off excess water.
- Dry the filter in a cool, dry place. Do not expose the filter to direct sunlight as this can warp or shrink the filter.
- When the filter is dry, replace the air freshening filter and then slide the larger filter back into the appliance.
- Close the front panel of the indoor appliance.
Note: Do not touch the air freshening (plasma) filter for at least 10 minutes after turning off the appliance to allow it to cool.
text_image
Filter Tabs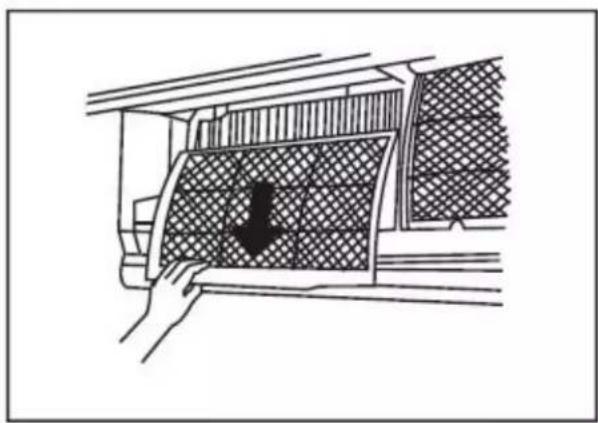
natural_image
Diagram showing a hand pressing down a car air vent with a downward arrow (no text or symbols)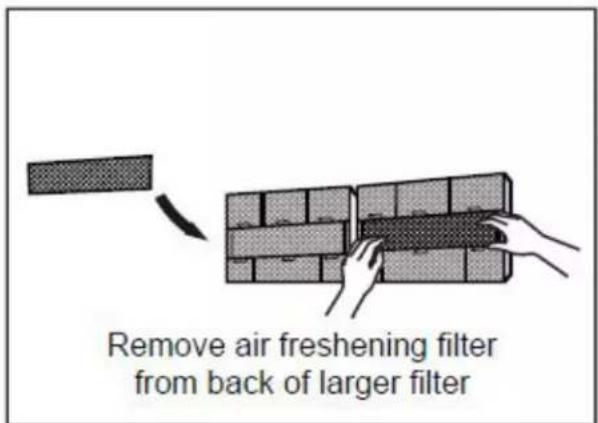
text_image
Remove air freshening filter from back of larger filter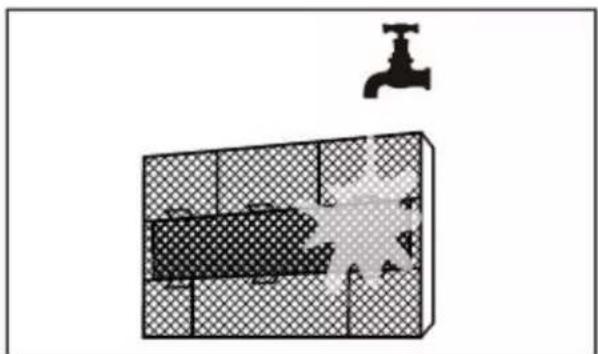
natural_image
Diagram showing a water tank with a faucet above it, no text or symbols presentCARE & MAINTENANCE
MAINTENANCE - LONG PERIODS OF NON USE
If the air conditioner will not be used for a long period of time, complete the following:
- Turn on the FAN function until the appliance is completely dry.
- Turn off the appliance and disconnect the power.
- Clean and replace all filters.
- Remove the batteries from the remote control.
MAINTENANCE - PRE-SEASON INSPECTION
After a long period of non-use or before a period of frequent use, complete the following:
- Check for damaged wires.
- Clean all filters.
- Check for leaks.
- Replace the remote control batteries.
- Ensure nothing is blocking air inlets and outlets. Ensure nothing is in the way of the infrared remote receiver.
MAINTENANCE AND CLEANING OF THE OUTDOOR APPLIANCE
Any cleaning, maintenance or repairs of the outdoor appliance must be completed by a licensed HVAC technician. Contact the dealer who sold the appliance for information on maintenance or repairs to the outdoor appliance.
DISPOSAL
Check for local regulatory compliance regarding the approved and safe disposal of this appliance.
ERROR CODES
If an error code appears in the display window, the appliance may stop operation as a safety feature. Wait approximately 10 minutes as the error may resolve itself. If the error code persists, disconnect the power to the appliance, wait approximately 5 minutes and then restore power to the appliance.
If the error persists after the power cycle, contact the sales center where the appliance was purchased for information on servicing the appliance.
TROUBLESHOOTING
Danby consumer care: 1-800-263-2629
Hours of operation:
Monday to Thursday 8:30 am - 6:00 pm Eastern Standard Time
Friday 8:30 am - 4:00 pm Eastern Standard Time
Information in this manual is subject to change without notice.
PROBLEM POSSIBLE CAUSE
| The appliance does not start when pressing on/off button | ·The appliance has a protection feature that prevents it from being turned back on for 3 minutes after being turned off to avoid overloading·Room temperature is lower than the set temperature. (Cooling mode)·Room temperature is higher than the set temperature (Heat mode)·Power failure·A fuse is burned out·Remote control batteries have burned out |
| The appliance changes from COOL or HEAT to FAN mode automatically | ·The appliance may change mode to prevent frost from forming on the internal coils·The set temperature has been reached, at which point the compressor is turned off. The appliance will continue operating when the room temperature fluctuates from the set temperature |
| The indoor or outdoor appliance are emitting white mist | ·In humid regions, a large temperature difference between the room temperature and the set temperature can cause white mist·When the appliance restarts in HEAT mode after defrosting, white mist may be emitted due to moisture generated from the defrosting process |
| The indoor or outdoor appliance are making noise | ·A rushing air sound may occur when the louver resets its position·A squeaking sound may occur after running the appliance in HEAT mode due to the expansion and contraction of internal plastic parts·A low hissing sound during operation is normal; this is caused by refrigerant gas flowing through the appliance |
| Dust is emitted from the appliance | ·The appliance may accumulate dust on the internal components during long periods of non-use, which will be emitted when the appliance is turned on |
| The appliance emits a bad odor | ·The appliance may absorb odors from the surrounding environment, (cooking smells, animal smells, cigarette smells, etc.) which will be emitted during operation·The filter has become clogged and should be cleaned |
| The fan of the outdoor appliance does not operate | ·During operation, the fan speed on the outdoor appliance is controlled to optimize product efficiency |
| Operation is erratic, unpredictable, or appliance is unresponsive | ·Interference from cell phone towers and remote boosters may cause the appliance to malfunction. To reset the appliance: disconnect the power then reconnect and press the power button to restart operation |
| Poor cooling or heating performance | ·Temperature setting is higher or lower than the ambient room temperature·The outdoor temperature is extremely high or low·The air filter is clogged·The air inlet or outlet is blocked·Doors and windows are open·Low refrigerant due to leak or long-term use·The heat exchanger is dirty |
| The appliance starts and stops frequently | ·There is too much or too little refrigerant in the system·Incompressible gas or moisture has entered the system·The voltage is too high or too low·The compressor is malfunctioning |
5 YEAR LIMITED APPLIANCE WARRANTY
This quality product is warranted to be free from manufacturer's defects in material and workmanship, provided that the unit is used under the normal operating conditions intended by the manufacturer.
This warranty is available only to the person to whom the unit was originally sold by Danby Products Limited (Canada) or Danby Products Inc. (U.S.A.) (hereafter "Danby") or by an authorized distributor of Danby, and is non-transferable.
TERMS OF WARRANTY
This product is warranted for residential or light commercial use.
Plastic parts, are warranted for thirty (30) days only from purchase date, with no extensions provided
First 5 years
During the first five (5) years, from the date of purchase by the original purchaser, any functional parts of this product found to be defective, will be provided by the manufacturer at warrantor's option, at no charge to the ORIGINAL purchaser.
EXCLUSIONS
Save as herein provided, by Danby, there are no other warranties, conditions, representations or guarantees, express or implied, made or intended by Danby or its authorized distributors and all other warranties, conditions, representations or guarantees, including any warranties, conditions, representations or guarantees under any Sale of Goods Act or like legislation or statute is hereby expressly excluded. Save as herein provided, Danby shall not be responsible for any damages to persons or property, including the unit itself, howsoever caused or any consequential damages arising from the malfunction of the unit and by the purchase of the unit, the purchaser does hereby agree to indemnify and hold harmless Danby from any claim for damages to persons or property caused by the unit.
GENERAL PROVISIONS
This Warranty does not cover the following:
1) Labor or other costs incurred for diagnosing, repairing, removing, installing, servicing or handling of either defective parts, replacement parts or new units.
2) Power Failure.
3) Damage in transit or when moving the appliance.
4) Improper power supply such as low voltage, defective house wiring or inadequate fuses.
5) Accident, alteration, abuse or misuse of the appliance such as inadequate air circulation in the room or abnormal operating conditions (extremely high or low room or exterior temperature).
6) Failure, damage or repairs due to faulty installation, misapplication, abuse, improper servicing, unauthorized alteration or improper operation.
7) Fire, water damage, theft, war, riot, hostility, acts of God.
8) Parts required for normal maintenance.
9) Damage or repairs to property due to faulty installation, misapplication, abuse, improper servicing, unauthorized alteration or improper operation. Including but not limited to improper installation on drainage hose.
10) In the event a replacement part is necessary they will be warranted for the remaining period of the original warranty period.
11) Transportation after installation.
12) Environmental or temperature conditions that would affect performance of the unit as a whole or parts as per manufacture guidelines.
Proof of purchase date will be required for warranty claims; please retain bills of sale.

natural_image
Diagram showing a hand inserting a device into a device with a cable, no text or symbols present
natural_image
Line drawing of a remote control casing with battery pack and external components (no text or symbols)
natural_image
Diagram showing a hand pressing down a car's air vent with a downward arrow (no text or symbols)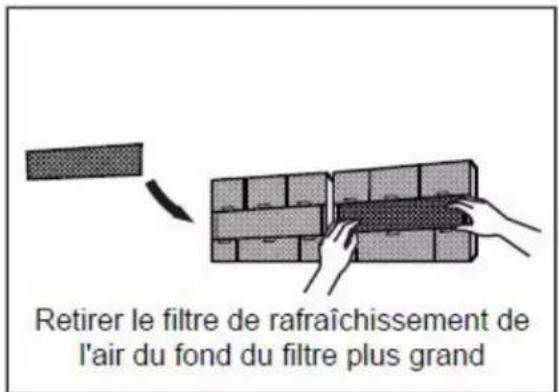
natural_image
Diagram showing a water tank with a faucet above it, no text or symbols presentPROBLÈME CAUSE POSSIBLE
natural_image
Diagram showing a hand inserting a device into a device with a cable, no text or symbols present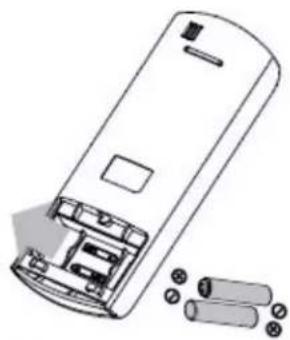
natural_image
Diagram of a remote control casing with battery and cylindrical components (no text or symbols)
natural_image
Diagram of a car interior showing a hand opening a vehicle's window with a mesh pattern (no text or symbols)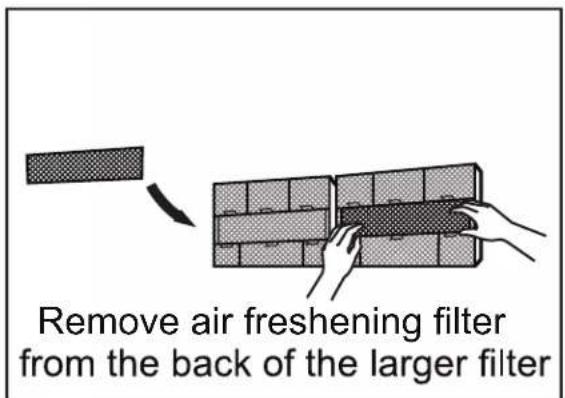
text_image
Remove air freshening filter from the back of the larger filter
natural_image
Diagram of a bathroom sink with a faucet and patterned tile (no text or symbols)Danby Products Limited, Guelph, ON, Canada N1H 6Z9 Danby Products Inc., Findlay, Ohio, USA 45840
*Trademarks of Danby Products Limited and/or its subsidiaries
* Marques de commerce de Danby Products Limited et / ou de ses filiales
* Marcas comerciales de Danby Products Limited y / o sus subsidiarias