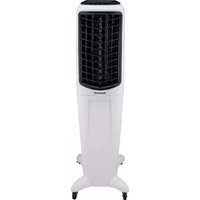
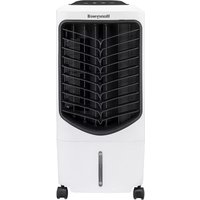
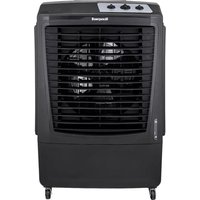
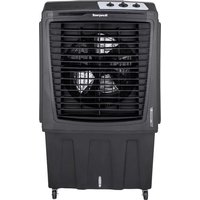
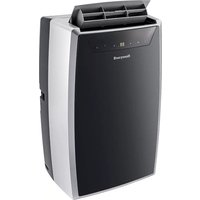
HM2CESAWK8 - Portable air conditioner HONEYWELL - Free user manual and instructions
Find the device manual for free HM2CESAWK8 HONEYWELL in PDF.
| Product Type | Portable Air Conditioner |
| Brand | Honeywell |
| Model | HM2CESAWK8 |
| Refrigerant | R290 / R32 (flammable) |
| Operating Modes | Cooling, dehumidification, ventilation, heating* |
| Control | Touch control panel and remote control |
| Timer | Yes (auto start and stop) |
| Oscillation | Yes (via remote control) |
| Air Filter | Washable, cleaning recommended every 2 weeks |
| Installation Kit | Window bracket, exhaust hose (diameter 15 cm, length 25-150 cm), adapter |
| Drain Type | Manual (bottom plug) and continuous (hose) in dehumidification mode |
| Safety | Auto shut-off if tank full; compressor restart delay (3 min) |
| Storage | Away from light, cool and dry place |
| Maintenance | Clean filter, drain water at end of season |
| Power Supply | Mains (see rating label) |
Frequently Asked Questions - HM2CESAWK8 HONEYWELL
User questions about HM2CESAWK8 HONEYWELL
0 question about this device. Answer the ones you know or ask your own.
Ask a new question about this device
Download the instructions for your Portable air conditioner in PDF format for free! Find your manual HM2CESAWK8 - HONEYWELL and take your electronic device back in hand. On this page are published all the documents necessary for the use of your device. HM2CESAWK8 by HONEYWELL.
USER MANUAL HM2CESAWK8 HONEYWELL
Read and save these instructions before use
Assistance Au Client:
^ Canada Customer Support service available for models sold in Canada only.
READ AND SAVE THESE INSTRUCTIONS
IMPORTANT SAFETY INSTRUCTIONS. READ CAREFULLY AND KEEP FOR FUTURE REFERENCE. IN CASE THERE IS ANY INCONSISTENCY OR CONFLICT BETWEEN THE ENGLISH VERSION AND ANY OTHER LANGUAGE VERSION OF THE CONTENT OF THIS MATERIAL, THE ENGLISH VERSION SHALL PREVAIL.
WARNING:
- DO NOT operate the unit with a damaged plug or loose wall outlet. If the supply cord is damaged, it must be replaced by the manufacturer, its service agent or similarly qualified persons in order to avoid a hazard.
DO NOT cover the air intake and exhaust when in use.
DO NOT place objects on or sit on the unit. - Always turn off and unplug the unit when cleaning or servicing.
DO NOT use the appliance if it is damaged. - If service is needed contact an authorized service agent.
- Unplug the unit when stored or not in use.
- DO NOT pull or carry the appliance by the power cord.
- DO NOT pinch the power cord in the door and DO NOT pull it along edges or sharp corners.
DO NOT run the power cord under carpeting and rugs. -
Use caution to prevent tripping on cord.
DO NOT use the device in the following cases: -
Near a fire source
- In areas where gasoline, paint or other flammable goods are stored
- In an area where the water can be projected
DO NOT touch the plug or the device with wet hands.
- Basic safety precautions should always be followed when using electrical appliances.
- This appliance has been manufactured for use in domestic environments and should not be used for other purposes.
- Only use the installation kit provided to install this unit. DO NOT attempt to extend the hose or install this unit using other methods other than that shown in this manual. Improper installation will void any existing warranties.
DO NOT use an extension cord with this unit. - This appliance can be used by children aged from 8 years and above, and persons with reduced physical, sensory or mental capabilities or lack of experience and knowledge if they have been given supervision or instruction concerning use of the appliance in a safe way and understand the hazards involved. Children shall not play with the appliance. Cleaning and user maintenance shall not be made by children without supervision.
- Never insert your fingers or rods into the air outlet. Take special care to warn children of these dangers.
- The manufacturer is not liable for injury caused to persons or property damage due to non-compliance with maintenance instructions and improper use of the appliance.
- The appliance shall be installed in accordance with national wiring regulations.
- The appliance is not to be used by persons (including children) with reduced physical, sensory or mental capabilities, or lack of experience and knowledge, unless they have been given supervision or instruction.
- Children should be supervised to ensure that they do not play with the appliance.
- Electrical equipment and installations regulated by national legislation must be followed.
- The appliance should be transported upright or on its side.
- DO NOT turn on the appliance for at least one hour before starting it.
-
It is essential that the appliance is connected to an efficient ground connection checked by a qualified electrician.
-
Stagnation of possible leaks of refrigerant gas in unventilated rooms could lead to fire or an explosion hazard should the refrigerant come in contact with electric heaters, stoves or other sources of ignition.
- Use care when storing the appliance to prevent mechanical faults.
- Only persons authorized by an accredited agency certifying their competence to handle refrigerants in compliance with sector legislation should work on refrigerant circuits.
- DO NOT use means to accelerate the defrosting process or to clean, other than those recommended by the manufacturer.
- Flammable substances or pressurized containers (eg. aerosol cans) should be kept a minimum of 50cms away from heat or fire.
- Use only implements recommended by the manufacturer for defrosting or cleaning.
- DO NOT operate your air conditioner in a wet room such as a bathroom or laundry room.
- This appliance should be used in a room that allows for good ventilation between the unit and any walls/furniture or other objects. The room size should correspond to the room area as specified for operation by the manufacturer and the appliance should be well kept to prevent mechanical damage.
- A warning to keep ventilation openings clear of obstruction.
- Do not pierce or burn the refrigerants.
- Be aware that refrigerants may not contain an odor.
-
Do not modify this appliance in any way to avoid danger.
-
All working procedure that affects safety means shall only be carried by competent persons.
- This appliance is not intended for use by persons (including children) with reduced physical, sensory or mental capabilities, or lack of experience and knowledge, unless they have been given supervision or instruction concerning use of the appliance by a person responsible for their safety. Children should be supervised to ensure that they do not play with the appliance.
| SYMBOL NOTE EXPLANATION | ||
| R290 | WARNING | This symbol shows that this appliance uses a flammable refrigerant. If the refrigerant is leaked and exposed to an external ignition source, there is a risk of fire. |
| R32 | ||
| A2L | ||
| CAUTION | This symbol shows that the operation manual should be read carefully. | |
| CAUTION | This symbol shows that a service personnel should be handling this equipment with reference to the installation manual. | |
| CAUTION | This symbol shows that information is available such as the operating manual or installation manual. | |
Additional warnings for appliances with R290/R32 refrigerant gas.
-
Read the instruction carefully before using the appliance.
-
R290/R32 refrigerant gas complies with UL60335-2-40/UL60335-1.
-
This appliance contains a certain number of grams (see rating label at the back of the unit) of R290/R32 refrigerant gas. The maximum refrigerant charge amount is not greater than R290 0.304kg / R32 1.84 kg based on UL60335-2-40.
-
When defrosting or cleaning, do not use any method other than those recommended by the manufacturer.
-
Do not place the appliance in a room with continuous sources of ignition (e.g. open flame, operating gas appliance or working electrical heater).
-
Do not pierce and do not burn.
-
Do not perforate any part of the refrigerant circuit.
-
Refrigerant gas may be odorless.
-
The appliance must be installed, used and stored in an area that is greater than R290 gas: 15m^2 ; R32 gas: 4m^2 .
-
Accumulation of possible refrigerant leaks in an unventilated room could lead to fire or explosion should the refrigerant come in contact with electric heaters, stoves or other sources of ignition.
-
The appliance must be stored in a way to prevent mechanical damage and in a well-vented area.
-
Only individuals authorized by an accredited organization certifying their competence to handle refrigerants in compliance with industry legislation should work on the refrigerant circuit.
Servicing shall be performed only as recommended by the manufacturer.
- All working procedure that affects safety means shall only be carried by competent persons.

Repair must be performed based on the recommendations from the manufacturer. Maintenance and repair that requires the assistance of other qualified personnel must be performed under the supervision of specialists in the use of flammable refrigerants.
Transportation, marking and storage for units.
- Transport of equipment containing flammable refrigerants. Compliance with the transport regulations.
- Marking of equipment using signs. Compliance with local regulations.
- Disposal of equipment using flammable refrigerants. Compliance with national regulations.
- Storage of equipment/appliances. The storage of equipment should be in accordance with the manufacturer's instructions.
- Storage of packed (unsold) equipment. Storage package protection should be constructed such that mechanical damage to the equipment inside the package will not cause a leak of the refrigerant charge. The maximum number of pieces of equipment permitted to be stored together will be determined by local regulations.
This marking indicates that this product should not be disposed with other household throughout the US. To prevent possible harm to the environment or human health from uncontrolled waste disposal, recycle it responsibly to promote the sustainable reuse of material resources. To return your used device, please use the return and collection systems or contact the retailer where the product was purchased. They can take this product for environmental safe recycling.
Congratulations on your purchase of this Honeywell Portable Air Conditioner.
Regarding the information pertaining to the installation, handling, servicing, cleaning and disposal of the appliance, please refer to the below paragraph of the manual.
USER TIPS
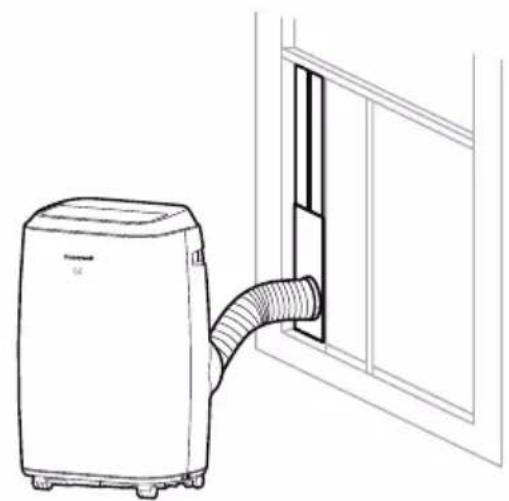
Portable Air Conditioners are ideal for spot cooling. The compressor, condenser and evaporator are housed in a compact unit. The air is dehumidified and cooled while a flexible hose sends heat outside. The Portable Air Conditioner includes a window venting kit.
No permanent installation is needed. The unit is easy to move from room to room and offers a truly flexible air conditioning solution.
Auto Evaporation System - The unit automatically evaporates the condensate through the hose. There is no need to empty the drainage tank except in humid conditions. Read and follow the instructions carefully.
To ensure optimal efficiency of the product, keep doors and windows closed when it is used as an air conditioner or dehumidifier. If the product is being used with the fan function only, an open window could improve air circulation.

Cooling and Dehumidifying Operation
Fan Operation
Important:
Before installing the unit, place it UPRIGHT for 1 hour before use to allow the refrigerant to stabilize. Air outlet automatically opens when the unit is turned on, and automatically closes when the unit is turned off. Manually adjust the air vent located at the top of the unit to adjust the direction of air flow.
- Follow installation instructions to set up the unit.
Plug the unit into a properly grounded circuit. DO NOT plug into an extension cord.
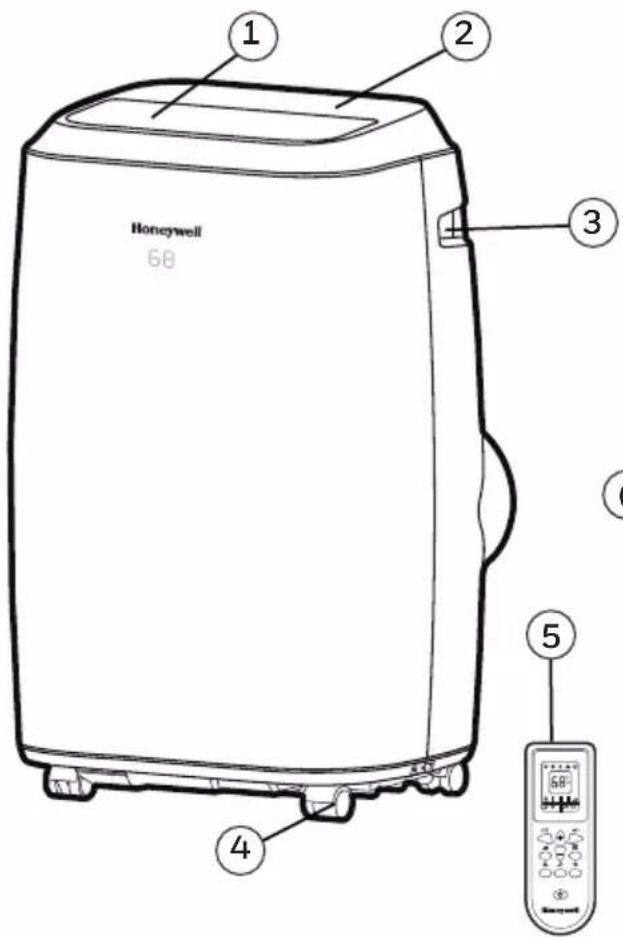
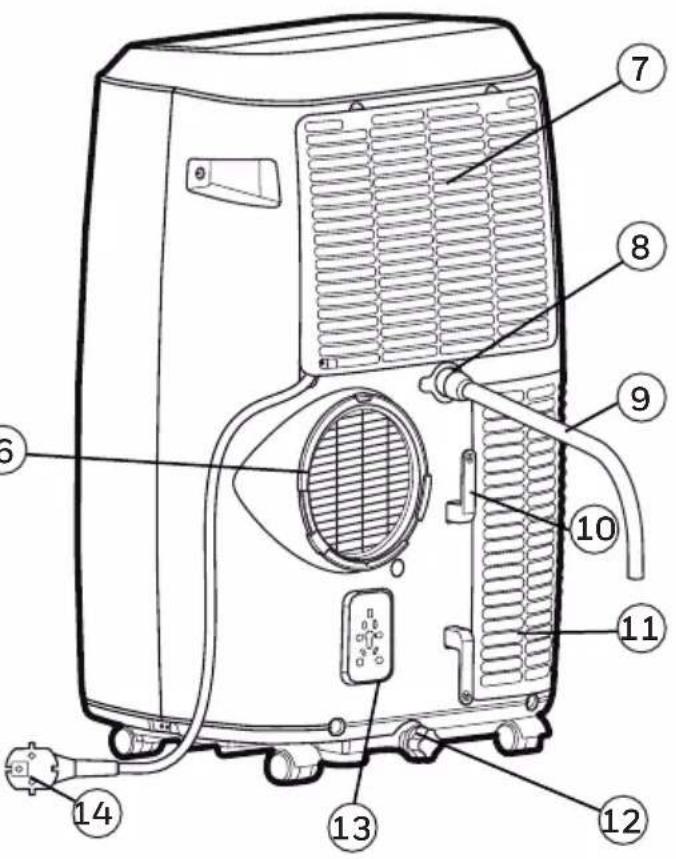
1) Louver 8) Upper Rubber Drain Plug
(Dehumidifying Mode)
2) Control panel 9) Drain Tube
(For Continuous Drain)
3) Handle 10) Power Cord Winder
(4) Casters 11) Lower Dust Filter
5) Remote Control 12) Lower Rubber Drain Plug
(Air Conditioning / Heating Mode*)
6) Hose Connector 13) Storage Plug for Power Cord
7) Upper Dust Filter 14) Power Supply Cord
*Applicable for models with Heating feature only.
It is important that the installation instructions below are followed for successful installation of this Portable Air Conditioner. Please call Customer Support if you have any difficulties or queries regarding these installation procedures.
① 23
O
O
(4)
x1 x1
(5)
x1
(6)
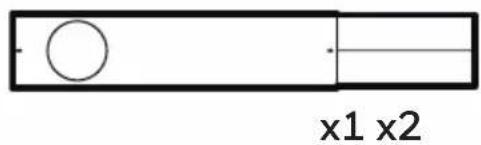
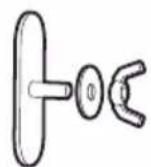
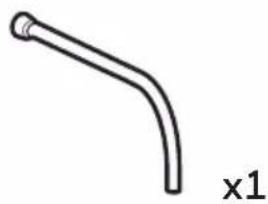
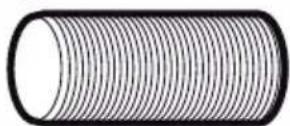
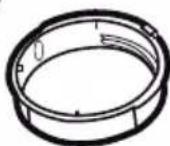
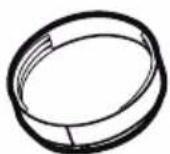
Installation Kit:
- Window Bracket Kit (1 Set) 4. Exhaust Hose (1 Piece)
- Butterfly Screws (2 Piece) 5. Window Bracket Panel Adapter (1 Piece)
- Drain Tube (Dehumidifier Mode) (1 Piece) 6. Exhaust Hose Connector (1 Piece)
Installation Steps:
- Exhaust Hose Connector, Exhaust Hose and window bracket panel adapter are pre-assembled inside the package.
Hose:
Length: 9.8" to 59" (25cm to 150cm)
Window Bracket Kit:
Part A:
Min. Length 19.9" (50.5cm)

Part B:
Min. Length 19.9" (50.5cm)


Part A + B:
Min. Length 28.9" (73.3cm)
Max.Length 38.2" (97.0cm)
Horizontal Sliding Window Vertical Sliding Window
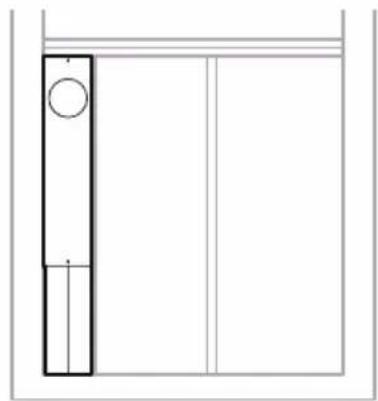
This window kit is designed to fit most standard sliding windows. If your window is outside of the size parameters as outlined above, the window bracket can be cut shorter to fit by bringing it to a nearby hardware store.
Note: After setting the window bracket to the size of your window, please remove it from the window and follow the instructions below.
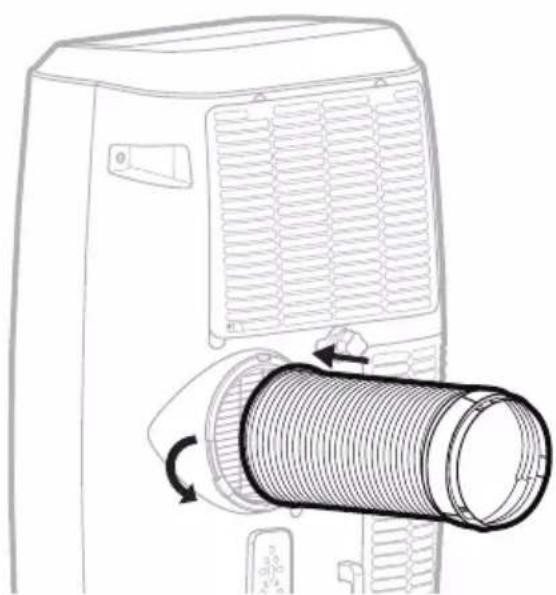
- Connect the hose to the rear exhaust outlet on the back of the unit. Slide-in the hose connector then rotate clockwise until it is locked in place.
Hose:
Dia.5.9" (15cm)
Length: 9.8" to 59" (25cm to 150cm)
- Connect the window bracket to the window bracket panel adapter. Ensure that all connections are tight and installed properly.

- Connect the window bracket to the window.

Horizontal Sliding Window Vertical Sliding Window
- The Portable Air Conditioner is now ready to use.
IMPORTANT:
Do not replace or lengthen the hose as this could cause the unit to malfunction.
The length of the hose is scientifically determined by the specifications and airflow of the air conditioner. Extending the hose beyond the specified dimensions can cause heat to collect or flow back into the air conditioner causing the unit to malfunction.
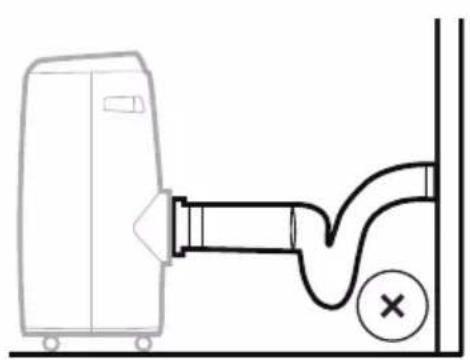
Not Recommended Recommended
WARNING: Any warranties included with this product will be voided if an extra extension hose is added to the originally provided installation kit or if the installation is performed differently than the manufacturer's instructions, without proper consultation. Please contact Customer Support for help with installation procedures if needed.
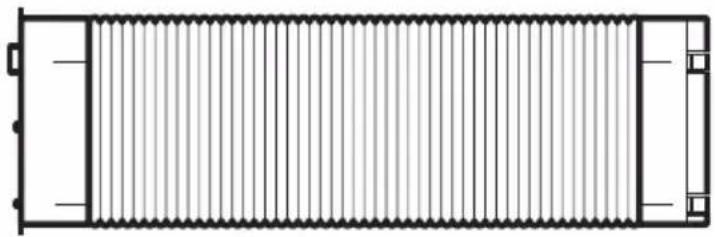
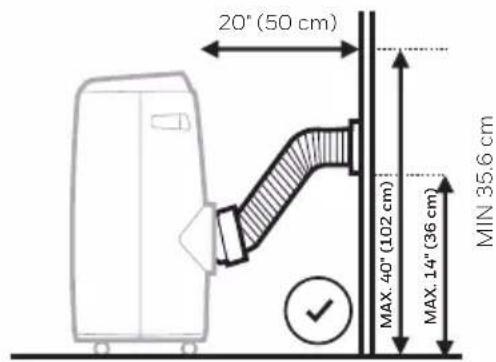
- The supplied hose has a diameter of 5.9'' (15 cm) and can be extended from 9.8" to 59" (25cm to 150cm).
- Do not bend (to the extent shown above) the hose. A bent hose will block exhaust air and cause the unit to malfunction or shut-off.
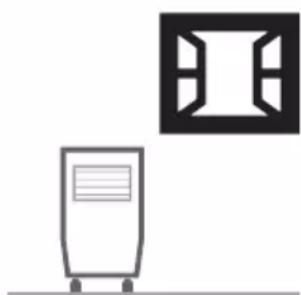
- Make sure the back of the unit is at least 20^ (50 cm) away from the wall. Do not place the unit in front of curtains or drapes as this could obstruct the airflow.
CONTROL PANEL
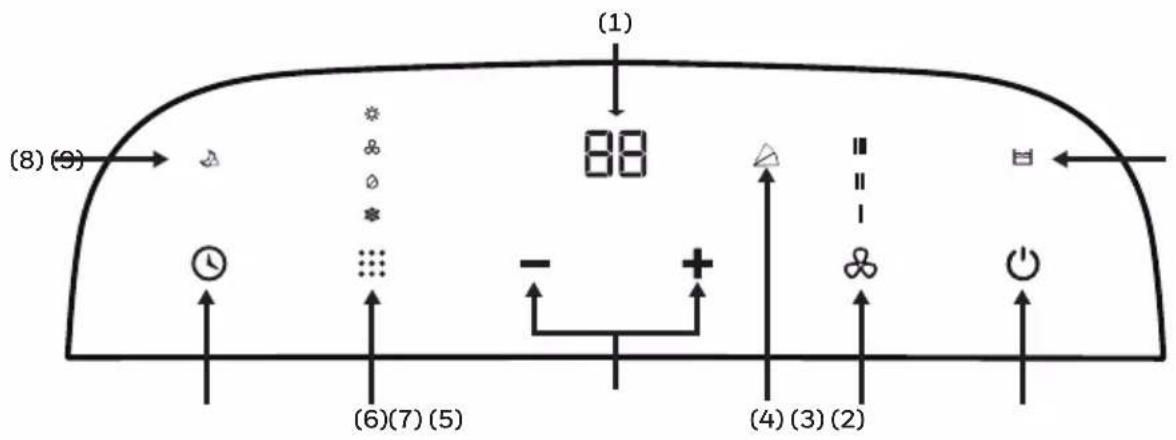
1) Display screen 6) Mode Control
2) Power Control 7) Timer Control
3) Fan Speed Control 8) Sleep Control Indicator Light
4) Swing Control Indicator Light 9) Water Full Light
5) Timer / Temperature Set Controls
FUNCTION BUTTONS
POWERCONTROL
Press to turn ON/OFF the unit. The air vent will automatically swing open when the unit is turned ON and automatically close when the unit is turned OFF.
RESTART DELAY
If the unit turns OFF while operating in COOLING / DEHUMIDIFYING / HEATING modes, there will be an approx. 3-minute delay to restart the air conditioner in COOLING / DEHUMIDIFYING / HEATING modes. This is a safety feature and added to help protect and extend the life of the compressor. After 3 minutes, you will be able to turn ON the unit as usual.
FAN SPEED CONTROL
3 settings: High, Medium, and Low.
Note: Fan Speed cannot be adjusted in Sleep Mode and Dehumidifying Mode.
*Applicable for models with Heating feature only.
FUNCTION BUTTONS (CONTINUED)
MODE CONTROL
Settings: Air Conditioning, Dehumidifying, Fan, Heating*.
The corresponding indicator light will illuminate to indicate the current mode setting.
Air Conditioning Mode (COOL)

Adjust fan speed and air temperature to suit your desired comfort level.
Temperature setting range is 61^ - 88^ (16^ - 31^)
- Dehumidifying Mode (DRY)

Air is dehumidified as it passes through the unit, without being in full cooling mode.
The fan speed is preset as LOW speed and can NOT be adjusted.
Note: If the unit will be used mainly as a dehumidifier, do not connect the exhaust hose.
Continuous drainage is then necessary (refer to Continuous Draining for Dehumidifier Mode).
IMPORTANT: The Dehumidifier Mode is used to support moisture reduction but should not be expected to dehumidify to the same degree as a standard dehumidifier only appliance. The built-in dehumidifier automatically adjusts dehumidification based on ambient room temperatures. It is not possible to adjust to a desired humidity percentage. The front display only shows the current and desired temperatures. It does not show humidity levels.
- Fan Mode

For air circulation without air conditioner cooling.
Heating Mode* 01

When heating mode is selected the indicator light will shine. Heating is activated when the ambient temperature is between 44^ - 81^ (7^ - 27^) . In this mode, the desired temperature can be set between 61^ - 88^ (16^ - 31^) .
Note: The exhaust hoses must vent outside the room when using heating mode.
IMPORTANT: The Heat pump draws moisture from the air which then condenses into the internal water tank. The unit will pause operation when the tank is full and will restart when the tank has been emptied. It is recommended to use the Heating Mode in a room with 50% humidity or lower. Avoid operating moisture-producing products or appliances such as a humidifier or a kettle when using the unit in Heating Mode. See the "Draining Water Condensation in Heat Mode" section for more information on draining the water tank.
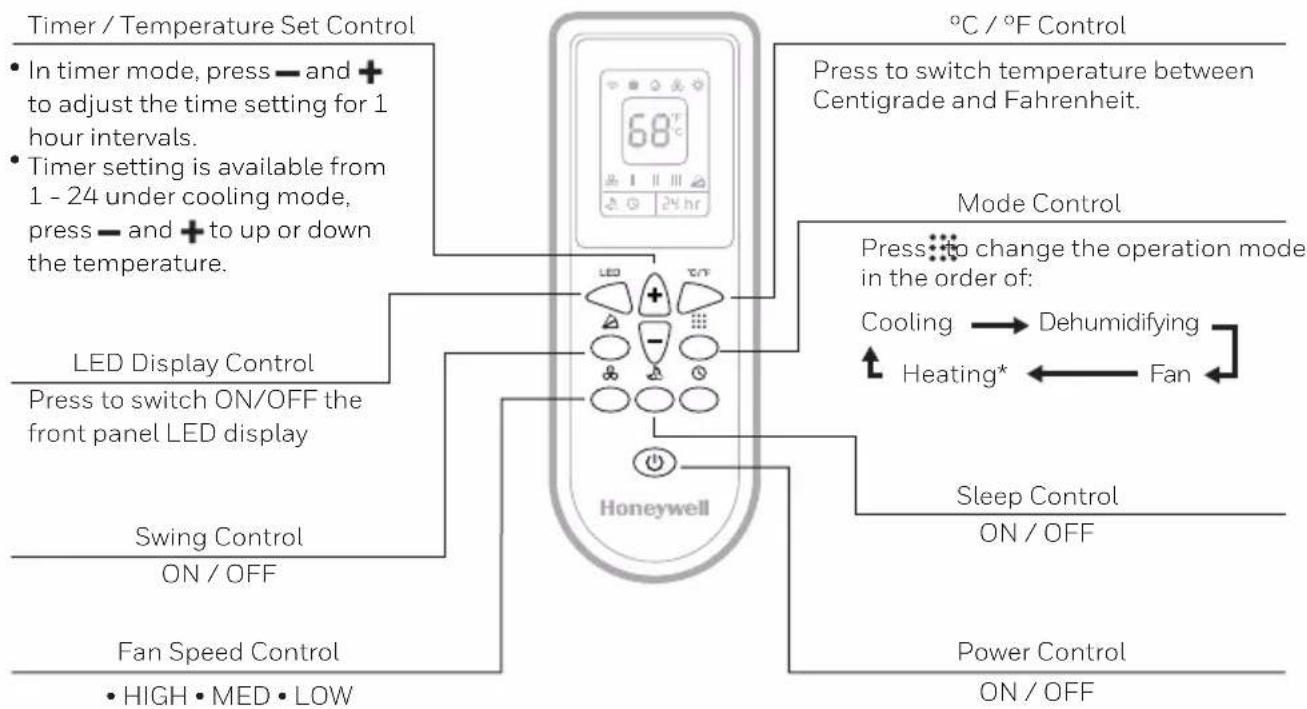
TIMER / TEMPERATURE SET CONTROLS
The - and + buttons can be used to adjust and set your desired temperature in Cooling or
Heating * modes. They can also be used to set the Timer (see "Timer Control" below).
Note: Temperature cannot be adjusted in Fan and Dehumidify modes.
*Applicable for models with Heating feature only.
FUNCTION BUTTONS (CONTINUED)
SLEEP MODE
Sleep Mode is for energy-saving comfort during the night. When Sleep Mode is ON in Air
Conditioning Cooling Mode, the fan will automatically stay on LOW Speed and the set temperature will increase by 2^ ( 1^ ) on the first hour. It will increase another 2^ ( 1^ ) on the second hour, and remain at this temperature for the rest of the night, until Sleep Mode is deactivated.
When Sleep Mode is ON in Heating Mode*, the fan will automatically stay on LOW speed and the set temperature will reduce by 2^ ( 1^ ) on the first hour. It will reduce another 2^ ( 1^ ) on the second hour, and remain at this temperature for the rest of the night, until Sleep Mode is deactivated.
*Applicable for models with Heating feature only.
TIMER CONTROL
While the unit is turned on, press the timer button then press the - or + to select the number of hours you would like the unit to continue to run. Then press timer button again to confirm, The unit will turn off automatically.
AUTO TURN OFF:
While unit is running, press the - or + button to select the number of hours you want the unit to run in air conditioning mode.
AUTO TURN ON:
When unit is in a standby mode, then press the - or + button to select the number of hours until you want the unit to automatically start running.
SWING CONTROL
Press button on the remote control to activate automatic oscillation of louvers. the indicator light will be illuminated on the control panel. Press button again to stop swing when louvers reached a desired angle.
WATER FULL LIGHT
Condensation may accumulate in the unit.
If the internal tank becomes full, the Water Full Light will illuminated. After 5 minutes, an "E2" / "E4" Error Code will be displayed on the screen to indicate that the tank is full. The unit will not operate until the tank has been drained (refer to the "Water Condensation Drainage" section).
ADDITIONAL FEATURES:
AUTOMATIC DEFROST FEATURE
Sometimes when the unit is operating in cooling mode in lower room temperatures (e.g. lower than 60^ ), the internal cooling coils may become too cold and sometimes frost may develop on the cooling coils. When this happens, the unit will automatically pause operation and defrost the cooling coils to protect the unit. The air conditioner will restart automatically when the system has defrosted and returns to standard operational temperatures.
REMOTE CONTROL
All key functions can be accessed from the remote control.
Note:
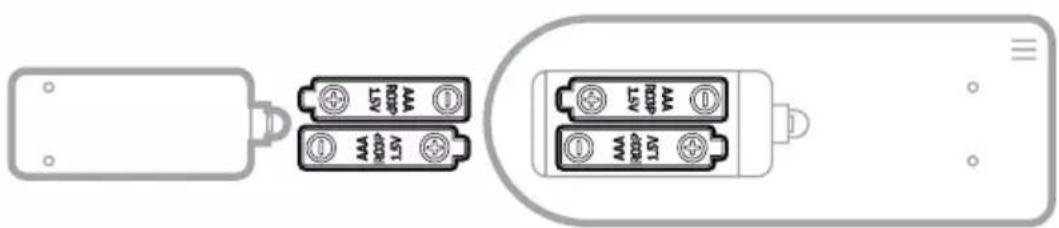
- Battery Installation: Remove the cover on the back of the remote control and insert two AAA batteries with + and - pointing in the proper direction according to the polarity markings.
Caution:
- Use only two AAA or IEC R03 1.5V batteries.
- Remove the batteries if the remote control is not in use for a month or longer.
- All batteries should be replaced at the same time, do not mix with old batteries.
- Do not mix alkaline, standard (carbon-zinc) or rechargeable (nickel-cadmium) batteries.
- Properly dispose of used batteries.
*Applicable for models with Heating feature only.
Appliance Maintenance:
- Turn off the appliance before disconnecting the power supply.
- Only clean the appliance with a soft dry cloth.
Dust Filter Maintenance:
The dust filter is to be cleaned every two weeks to maintain air cooling efficiency. Please follow the below instructions for cleaning the dust filters:
- Switch off and unplug the Portable Air Conditioner from the electrical outlet.
- Remove the Upper Filter/ Grill, unscrew the Lower Filter/ Grill and carefully remove.
- Gently wash using water and/ or diluted liquid dishwashing detergent. Rinse thoroughly and gently shake excess water from the filters. Make sure the filters are dry before reinstalling.
Note: You may use a vacuum cleaner to remove dust.
- Replace the Upper Grill onto the unit, and reinstall the Lower Grill with the screw.
WARNING: DO NOT power or operate the Portable Air Conditioner when cleaning or when the Dust Filter is removed from the unit, or if there is a loose-fitting Dust Filter. DO NOT attempt to handle or touch any of the parts or wiring inside the Rear Grill after the Dust Filter has been removed from the unit. Doing so can cause serious injury or electrical shock.
End of Season Storage and Maintenance:
If the appliance will not be used for a long time, follow these steps:
- Be sure to drain the left-over water condensation. Remove the lower drain plug and use a drain pan to collect the water (make sure to replace the deain plug cap when finished).
- To dry excess moisture, run the unit in Fan only mode for 30 minutes before storing.
- Turn off and unplug the Portable Air Conditioner from the power supply.
- Remove the dust filter and clean with water. Dry the dust filter and then reinstall.
-
Disconnecting the Window Installation Kit:
-
Remove the Hose from the unit by rotating anti-clockwise then pulling away.
- Remove the Window Bracket. Window Bracket Panel Adapter and Hose Connector.
- It is recommended to store the Window Kit parts in a bag together with the Remote Control and placing them together with the Portable Air Conditioner unit.
-
If needed, you can clean the Window Kit with a damp cloth and water before storing. Make sure all parts of the Window Kit are dry before storage.
-
Cover the Portable Air Conditioner with a cloth/ plastic bag before storage, to protect from dust and scratches collecting on the surface of the unit.
- It is recommended to coil the power cord before storing to ensure the cord is protected from bents and creases.
- Store the Portable Air Conditioner in a cool, dry place, away from direct sunlight.
When there is excess water condensation inside the unit, the air conditioner stops running and shows a warning light (the WATER FULL indicator illuminates with a red light). This indicates that the water condensation needs to be drained using the following procedures:
Manual Draining in Cooling, Dehumidifying Modes
Water may need to be drained in high humidity areas.
- Unplug the unit from power source.
- Place a drain pan under the lower rubber drain plug. See diagram.
- Remove the drain plug cap.
- Water will drain out and collect in the shallow pan.
- After the water is drained, replace the drain plug cap.
- You can now turn on the unit.
Continuous Draining in Dehumidifier Mode
While using the unit in dehumidifier mode, continuous drainage is recommended.
- Unplug the unit from power source.
- Remove the upper drain plug cap.
Some residual water may spill so please have a pan to collect the water.
- Connect the drain tube to the upper drain plug.
See diagram. - The water can be continuously drained through the drain tube into a floor drain or bucket.
- Replace the drain plug cap.
- You can now turn on the unit.
IMPORTANT: It is NOT recommended to connect the drain hose for continuous drainage while the unit is switched ON in air conditioning cooling mode. Doing so will reduce the cooling efficiency of the Portable Air Conditioner. Only drain the water condensation when the unit is switched off. Continuous drainage is only suitable when the unit is set up in Dehumidifier mode.
The water cannot be drained using the continuous drain option in heating* mode. In Heating mode, the internal water tank collects condensation faster and may require more frequent emptying of the tank in more humid rooms. It is recommended to use the heating mode in a room with 50% humidity or lower. Avoid operating moisture-creating products or appliances such as a humidifier or a kettle when using the unit in heating mode.
*Applicable for models with Heating feature only.
The following troubleshooting guide addresses the most common problems. If problems persist, call customer support. Unplug and disconnect the appliance from the power source before attempting to troubleshoot.
| PROBLEM POSSIBLE CAUSE SOLUTION | ||
| The air conditioning unit does not start | No electricity. Check for power. | |
| Batteries in the remote control need to be replaced. | Change remote control batteries. | |
| The power cord is not properly plugged in. | Remove and reconnect the power cord. | |
| Runs a short while only | The thermostat temperature setting is too close to room temperature. | Lower the set temperature. |
| Air outlet is blocked. Make sure the hose is properly connected. | ||
| There are tight bends in the air hose. | Connect hose as per instructions on page 3. | |
| In Heating Mode*,the unit keeps switching off frequently | The room is too humid. Water Tank needs to be emptied. | In heating mode, the heat pump condenses moisture from the air into the internal water tank. In more humid rooms, it will collect faster and need to be emptied out more frequently. It is recommended to use the heating mode in 50% humidity or less. Switch off any appliances such as a humidifier or kettle to avoid extra moisture build up in the room when operating in heating mode. |
*Applicable for models with Heating feature only.
| PROBLEM POSSIBLE CAUSE SOLUTION | ||
| Runs but not cooling | A door or window is open. | Make sure the window or door is closed. |
| The dust filter is dirty. Clean the dust filter. | ||
| The hose is detached. | Reinstall hose properly (refer to Installation section). | |
| Temperature setting is too high. | Reduce temperature setting. | |
| Air outlet or intake is blocked. | Remove blockage. | |
| Room exceeds recommended size. | Move unit to smaller room. | |
| Large size or number of windows are decreasing cooling effectiveness. | Cover windows with curtains or blinds. | |
| Will not run and WATER FULL indicator illuminates | Excess water condensation inside the tank. | Drain the water (refer to Water Condensation Drainage). |
| Heater* is not switching ON. | Heating function not activated yet. The ambient temperature is too high. | Check that the Heating function has been activated. will be illuminated when the Heater is switched ON. |
| Heating is activated when the ambient temperature is below 44°F -81°F (7°C-27°C). | Switch on the Heating function when the ambient temperature reaches below 44°F -81°F (7°C-27°C). | |
*Applicable for models with Heating feature only.
| ERROR CODE POSSIBLE CAUSES SUGGESTED REMEDIES | ||
| “E0” Room temperature sensor failed | Replace room temperature sensor (the unit can also work without replacement.) Please contact the Customer Service Center. | |
| “E1” Condenser temperature sensor failed | Replace condenser temperature sensor. Please contact the Customer Service Center.(Applicable for models with Heating feature only.) | |
| “E2” Water tank full when cooling | Remove Lower Rubber Drain Plug and empty the water. Please contact the Customer Service Center. | |
| “E3” Evaporator temperature sensor failed | Replace evaporator temperature sensor. Please contact the Customer Service Center. | |
| “E4” Water tank full when heating | Remove Lower Rubber Drain Plug and empty the water. Please contact the Customer Service Center. | |
LISEZ ET CONSERVEZ CES INSTRUCTIONS
IMPORTANT INSTRUCTIONS DE SECURITE. LIRE ATTENTIVEMENT ET CONSERVER POUR S'Y RÉFÉRER ULTÉRIEUREMENT. EN CAS D'INCOHERENCE OU DE CONFLIT ENTRE LA VERSION ANGLAISE ET TOUTE AUTRE VERSION LINGUISTIQUE DU CONTENU DE CE DOCUMENT, LA VERSION ANGLAISE PRÉVAUDRA.
MISE EN GARDE:
Congratulations on your purchase of this Honeywell Portable Air Conditioner.
Regarding the information pertaining to the installation, handling, servicing, cleaning and disposal of the appliance, please refer to the below paragraph of the manual.
CONSEILS D'UTILISATION
Horizontal Sliding Window Vertical Sliding Window

Appliance Maintenance:
International Inc. Honeywell International Inc. no representa
© 2021 JMATEK Limited. All rights reserved.
The Honeywell Trademark is used under license.
from Honeywell International Inc.
Honeywell International Inc. makes no
representations or warranties with respect to this product.
This product is manufactured by Airtek Int'l Corp., Ltd.