
UltraMax Pro FC20 - Vacuum Cleaner HONEYWELL - Free user manual and instructions
Find the device manual for free UltraMax Pro FC20 HONEYWELL in PDF.
| Brand | Honeywell |
| Model | UltraMax Pro FC20 |
| Product type | Cordless floor scrubber |
| Power supply | 28.8 V / 3,000 mAh lithium-ion battery; 100-240 V ~ 50/60 Hz power adapter |
| Rated power | 300 W |
| Clean water tank capacity | 0.8 L |
| Dirty water tank capacity | 0.7 L |
| Charging time | 3 to 4 hours |
| Operating modes | Auto (adaptive based on dust density) and Max (maximum power) |
| Main functions | Water spray, brush roller self-cleaning, brush roller air drying, multilingual voice messages (5 languages), dust density indicator (blue/red light band) |
| Compatible floor types | Indoor hard floors: tile, marble, granite, jointless wood, waxed floor, rubber |
| Box contents | Main body, metal handle, charging base, high-capacity battery, charger, 2 scrubbing rollers, 2 filters, triangular screwdriver, long cleaning brush, short brush with blade, multi-surface cleaning solution, manual |
| Spare parts and accessories | Brush roller (ref. King-clean), battery (model T-DC60-SAM), charger (model ZD024M342100US), filters, cleaning solution |
| Safety | Automatic shut-off if dirty water tank is full, battery low, roller blocked or air duct obstructed; overvoltage and overcurrent protection; household use only |
| Maintenance and cleaning | Clean the dirty water tank after each use; wash the brush roller and filter regularly; air drying recommended before reassembly |
| Warranty | 2-year limited (USA only) |
| Operating/storage temperature | Between 5 °C and 38 °C |
| Estimated weight | Approximately 5 kg (not officially specified) |
| Customer service | 1 800 281-1378 or info@ttl-corp.com |
Frequently Asked Questions - UltraMax Pro FC20 HONEYWELL
User questions about UltraMax Pro FC20 HONEYWELL
0 question about this device. Answer the ones you know or ask your own.
Ask a new question about this device
Download the instructions for your Vacuum Cleaner in PDF format for free! Find your manual UltraMax Pro FC20 - HONEYWELL and take your electronic device back in hand. On this page are published all the documents necessary for the use of your device. UltraMax Pro FC20 by HONEYWELL.
USER MANUAL UltraMax Pro FC20 HONEYWELL
Cordless Floor Cleaner
User Manual
Read and save these instructions before use

natural_image
Line drawing of a vacuum cleaner with handle and base (no text or symbols)Model number
FC20 ULTAMAX PRO
If you have any questions about the operation of this product, please call us toll-free at 1-800-281-1378 or email us at info@ttl-corp.com.
IMPORTANT SAFETY INSTRUCTIONS
READ ALL INSTRUCTIONS BEFORE USING YOUR APPLIANCE.
When using an electrical appliance, basic precautions should be observed, including the following:
WARNING
TO REDUCE THE RISK OF FIRE, ELECTRIC SHOCK OR INJURY:
- This appliance has been designed for household use only, and not for commercial or rental services.
- This appliance must only be used in accordance with these instructions. The manufacturer will not be held responsible for any damage caused by improper or misuse of the appliance.
- The appliance is only to be used with the power supply unit provided with the appliance.
- If the battery pack needs to be replaced, please only use authorized Honeywell brand battery packs. Please Email: info@ttl-corp.com.
- Check that the voltage marked on the rating label matches your residence voltage.
- To remove battery, please make sure appliance is turned off and disconnected from the charger.
- The battery is to be disposed of safely.
- Keep hair, loose clothing, fingers, and all parts of body away from openings and moving parts.
- Turn OFF all controls before plugging or unplugging charger.
- Use extra care when cleaning on stairs.
- DO NOT use appliance in an enclosed space filled with vapors given off by oil-based paint, paint thinner, some moth-proofing substances, flammable dust, or other explosive or toxic vapors.
-
Always Turn OFF this appliance before connecting or disconnecting the motorized roller nozzle or any other tool or attachment.
-
DO NOT incinerate the appliance even if it severely damaged. The batteries can explode in a fire.
- DO NOT pick up anything that is burning or smoking, such as cigarettes, matches or hot ashes.
- Turn OFF all controls, including the power switch and disconnect charger from electrical outlet, and remove the battery before making any adjustments, performing maintenance, troubleshooting, changing accessories or storing appliance. Such preventative safety measures reduce the risk of starting the appliance accidentally, damage or injury.
- Risk of injury from moving parts. Brush may start unexpectedly. Turn OFF before cleaning or servicing.
- DO NOT switch the appliance on if it can be detected that it is not operating correctly or if it has suffered any type of damage.
- DO NOT attempt to repair this product yourself.
- DO NOT use with a damaged main power cable or plug. If the main power cable is damaged it must be replaced by manufacturer, its service agent or similarly qualified person in order to avoid a hazard.
- Any type of repair work other than that stated in “Cleaning & Maintenance” must be done by a manufacturer service technician or an authorized repair center.
IMPORTANT SAFETY INSTRUCTIONS
(CONTINUED)
- This appliance is not intended for use by persons (including children) with reduced physical, sensory or mental capabilities, or lack of experience and knowledge, unless they have been given supervision or instruction concerning use of the appliance by a person responsible for their safety. Keep children and pets away from the appliance. Children should be supervised to ensure that they do not play with the appliance.
Caution for Operation & Vacuuming
- Empty the appliance after each use. Keep it free of dust, lint, hair, or anything that reduces airflow. Please store carefully.
- DO NOT allow to be used as a toy. Close attention is necessary when used by or near children or pets.
- DO NOT use for any purpose other than described in this user manual. Use only manufacturer's recommended attachments and/or replacement parts.
- DO NOT use appliance that is damaged or modified. Damaged or modified batteries may exhibit unpredictable behavior resulting in fire, explosion or risk of injury.
- DO NOT expose battery pack or appliance to fire or excessive temperature. Exposure to fire or temperature above 130°C/265°F may cause explosion.
- Have servicing performed by a qualified repair person using only identical replacement parts. This will ensure that the safety of the product is maintained.
- DO NOT modify or attempt to repair the appliance except as indicated in
the instructions for use or care.
- Follow all charging instructions and do not charge the appliance outside of the temperature range specified in the instructions. Charging improperly or at temperatures outside of the specified range may damage the battery and increase the risk of fire. Once fully charged, please fully disconnect from charger cable.
- DO NOT use wet hands when handling the appliance or plug.
- Turn off and unplug the machine before checking for blockages. Always keep the openings clear and prevent dust or dirt from blocking the air passage.
- NEVER use the appliance without the filter or dust cup in place.
- DO NOT dismantle the appliance while the motor is still operating.
- DO NOT touch the rotating parts of power brush when in operation.
- DO NOT use with damaged cord or plug. If appliance is not working as it should, has been dropped, damaged, left outdoors, or dropped into water, return it to a service center.
- NEVER leave the appliance unattended while it is running.
- DO NOT unplug charger by pulling on cord. Unplug the charger by grasping the charger plug, not the cord.
- DO NOT use floor cleaner to pick up flammable materials such as gasoline, kerosene, lighter fluid, etc.
- DO NOT use floor cleaner to pick up toxic materials such as detergent, bleach, ammonia, solvents, acids, or flammable liquids. etc.
IMPORTANT SAFETY INSTRUCTIONS
(CONTINUED)
- DO NOT use floor cleaner to pick up sharp or hard objects such as broken glass, nails, screws, coins, etc.
- DO NOT use floor cleaner to pick up cement, gypsum powder, wall powder and other powder or small particles, or large objects that may cause vacuum blockage and motor burn out.
- DO NOT use floor cleaner to pick up anything that may still be burning such as cigarette butts or ash/cinders.
- Keep the plastic film away from children to avoid danger of suffocation.
- DO NOT rinse the roller brush and floor brush assembly separately after the roller brush is removed.
- DO NOT leave appliance when plugged in. Unplug from outlet when not in use or before servicing.
- DO NOT drag the cable or move the product by the cable, nor use the cable as a handle
- Use indoor only during charging and cleaning mode.
Caution for Li-ion batteries
- This product includes rechargeable Li-ion batteries. DO NOT disassemble, short circuit, apply heat, drop or strike the batteries, as they can cause electric shock or explode.
- If the battery is used incorrectly, liquid may leak out of the battery. AVOID touching the liquid. In the event of accidental contact, rinse the affected area with water. If the liquid comes into contact with the eyes, seek medical assistance. If battery liquid leaks, it can irritate or burn the skin.
- Recharge appliance only with the charger specified below in this
manual. A charger that is suitable for one type of battery pack may create a risk of fire when used with another battery pack.
- For use only with Kingclean model T-DC60-SAM battery and E-TEK charger model ZD024M342100US.
- DO NOT incinerate the appliance even if it is severely damaged. The batteries can explode in a fire.
- Keep batteries out of reach of children.
- The battery must be removed from the appliance before it is scrapped.
- When battery pack is not in use, keep it away from other metal objects, like paper clips, coins, keys, nails, screws, or other small metal objects, that can make a connection from one terminal to another. Shorting the battery terminals together may cause burns or a fire.
- Do not use a battery pack or appliance that is damaged or modified. Damaged or modified batteries may exhibit unpredictable behavior resulting in fire, explosion or risk of injury.
Transportation information
- The Li-ion batteries in the appliance are subject to the requirements of dangerous goods legislation. The batteries can be transported by the user by road without any further requirements. In the event that they are shipped by a third party (e.g. transported by air or freight carrier), special requirements regarding packaging and identification must be met. In this case, a dangerous goods expert must be consulted when preparing the goods for dispatch.
IMPORTANT SAFETY INSTRUCTIONS
(CONTINUED)
Disposal information
- The appliance, batteries, accessories and packaging should be recycled in an environmentally responsible manner.
- DO NOT dispose of the appliance or the batteries along with your normal household waste.
Packaging
- The packaging is designed to protect the appliance from being damaged in transit. Dispose of packaging that is no longer required at an appropriate recycling point.
- Please dispose of all packing material in a safe and environmentally friendly manner.
Old appliance
- Old appliances often still contain valuable materials. You should therefore take appliances that have reached the end of their service life to your dealer or a recycling center so that they can be recycled.
- Ask your dealer or your local council about current disposal methods.
- This product can be applied on hard floors in the indoor environment, including waxed floors, rubber floors, marble floors, granite floors, seamless wood floors, solid wood floors and various ceramic tiles. If the surface is uneven, the best results may not be achieved.
- When the machine does not start, please do not shake or bump the machine up and down to prevent dirty water from flowing into the motor; when the machine is started, please
do not lift or carry the machine up and down, nor tilt the machine to one side nor lay it flat on the floor to prevent dirty water from flowing into the motor.
- Always clean out the dirty water tank after each use to keep the machine performing well.
- Do not use the machine if the dirty water tank and the clean water tank are not installed properly.
- After using the machine, clean the dirty water tank, the suction nozzle, then air duct before storing in a cool, dry place.
Notes on Cleaning Solution
1) If a large amount of cleaning solution enters the motor, this may affect the performance of the appliance.
2) Please follow the instructions on the user guide (the ratio of the cleaning solution to the water is 1:40, about a 2.5 bottle cap of cleaning solution) to prepare the cleaning solution. It is recommended to use the cleaning solution produced by the company and the manufacturer approved by the company, and it must not contain acid, alkali solution or substances harmful to the environment.
3) The cleaning solution should be kept in a well-ventilated place to avoid sunlight and in a place where children can't reach. If the cleaning solution accidentally gets into the eyes, it should be rinsed thoroughly with clean water
IMPORTANT SAFETY INSTRUCTIONS
(CONTINUED)
immediately. In case of accidental ingestion, seek medical attention immediately.
4) When disposing waste from dirty water tank and the cleaning solution from clean water tank, please follow current environmental protection requirements for proper disposal.
WARNING
This product contains Lithium-Ion rechargeable batteries. DO NOT mix Lithium-Ion batteries with general household waste. According to Federal and State regulations, removal and proper disposal of Lithium-Ion batteries is required. For specific battery disposal instructions please contact Call2Recycle at 877-723-1297 or visit www.call2recycle.org.
SAVE THESE INSTRUCTIONS
THIS MODEL IS FOR HOUSEHOLD USE ONLY. COMMERCIAL USE OF THE PRODUCT VOIDS THE MANUFACTURER'S WARRANTY.
THANK YOU
Thank you for purchasing a Honeywell Cordless Floor Cleaner. This User Manual is intended to provide you with important information needed to set up, operate, maintain, use safely, and troubleshoot this product.
GETTING TO KNOW YOUR CORDLESS FLOOR CLEANER
Included in Box
Open the box, take out the protective materials, and take out the product & all accessories included.
Keep the outer packaging for future transportation and maintenance.
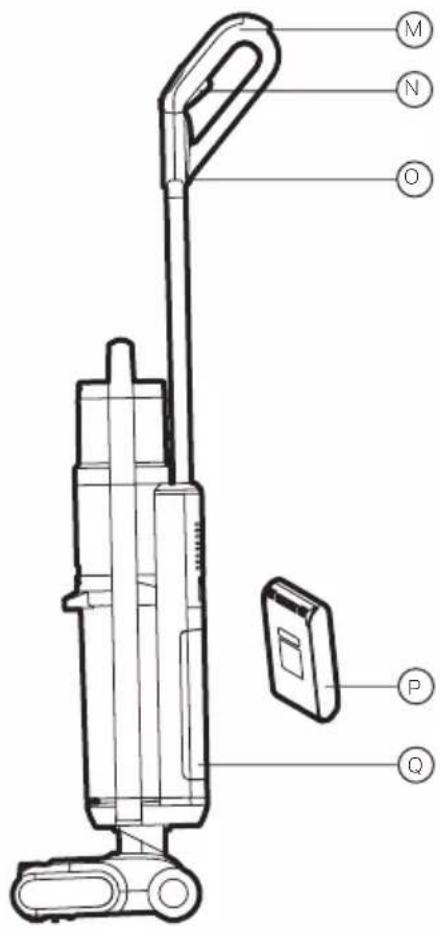
Name of each part
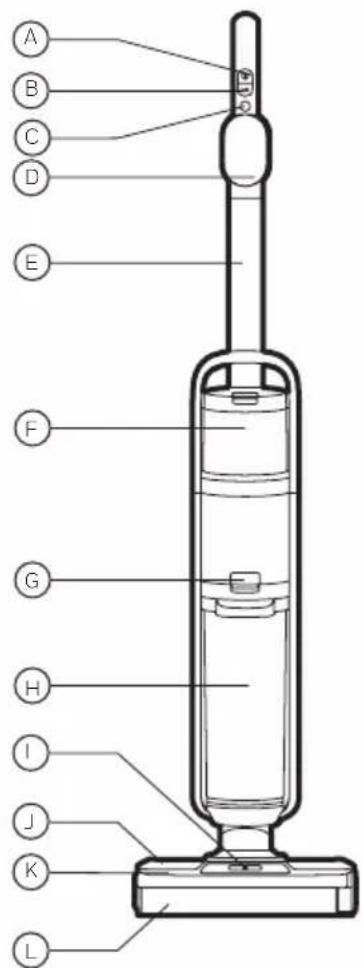
A. Switch Button
B. Mode Button
C. Self-Cleaning Button
D. Display
E. Metal Handle
F. Clean Water Tank
G. Dirty Water Tank Release Button
H. Dirty Water Tank
I. Water Spray
J. Brushroll Cover
K. Brushroll Window
L. Brushroll
M. Handle Assembly
N. Water Spray Button
O. Mute / Language Switch Button
P. Battery Pack
Q. Battery Pack Cover
GETTING TO KNOW YOUR CORDLESS FLOOR CLEANER

natural_image
Simple line drawing of a spray bottle with a circular logo containing the letter 'W' (no text or symbols on the bottle itself)
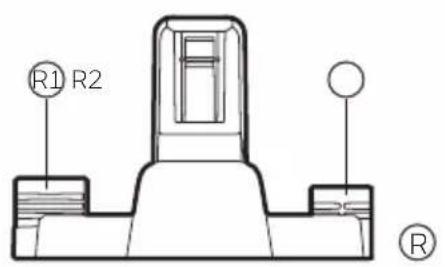
R. Charging Base
R1. Accessory Storage 1
R2. Accessory Storage 2
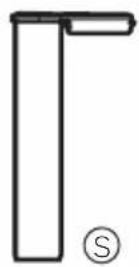
S. Power Scrub Roller
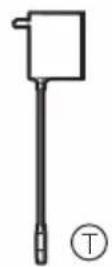
T. Charger
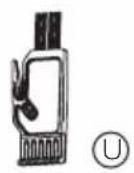
U. Short Cleaning Brush with Cutter
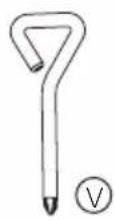
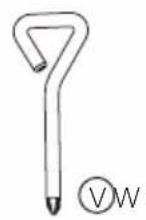
V. Triangle Screwdriver
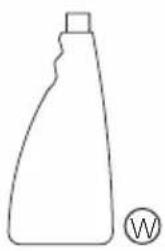
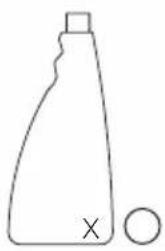
W. Multi Surface Cleaning Solution
X. Long Cleaning Brush
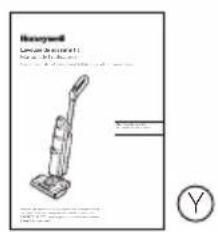
Y. User Manual
Packing List
Main Body X1
Metal Handle X1
Charge Base X1
High-Capacity Battery Pack X1
Charger X1
Easy-Change Power Scrub Rollers X2
Filter X2
Triangle Screwdriver X1
Long Cleaning Brush X1
Short Cleaning Brush with Cutter X1
Multi-Surface Cleaning Solution X2
Accessory Storage 1 X1
Accessory Storage 2 X1
User Manual X1
GETTING STARTED
Product Assembly
Insert the metal handle into the main body as shown on (Fig.1). Once you hear a "click", then the handle should be properly installed.
To remove the handle, insert the triangle screwdriver into the handle release hole and pull the handle upwards as shown on (Fig.2).
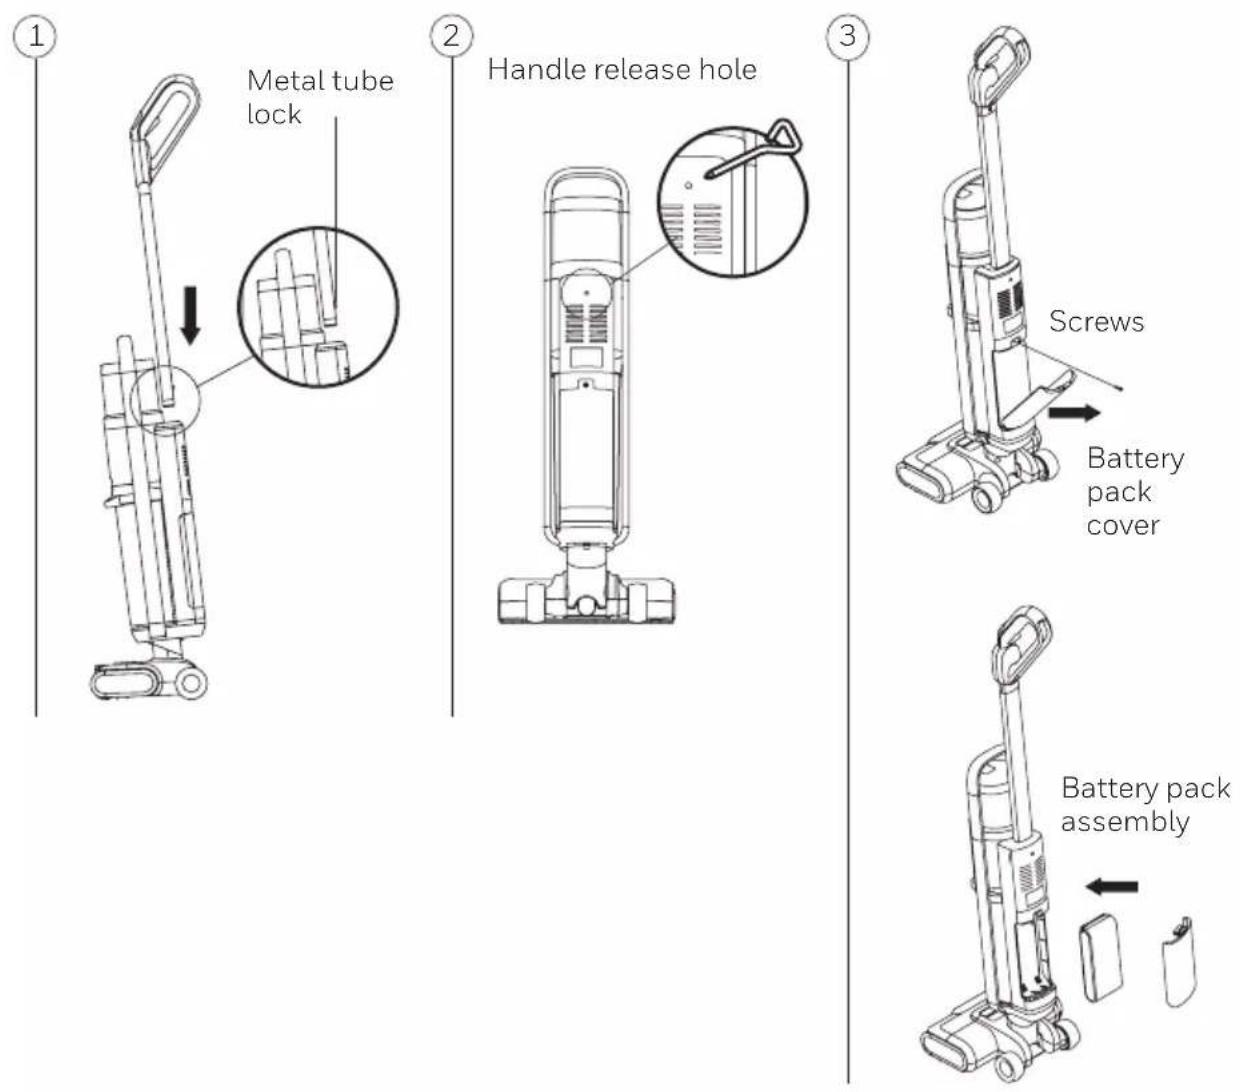
Battery Pack Installation
Remove the battery pack cover plate by using the provided triangle screwdriver Insert the battery pack into the slot and replace the battery pack cover (Fig.3). Note: The battery pack does not need to be taken out unless it needs replacement.
GETTING STARTED (CONTINUED)
Charge Base and Accessory Storage Assembly
Place the accessory holder 1 and 2 in the direction of the arrow on (Fig.4) and push them against the charging base. You will hear a “click” once they are installed properly.
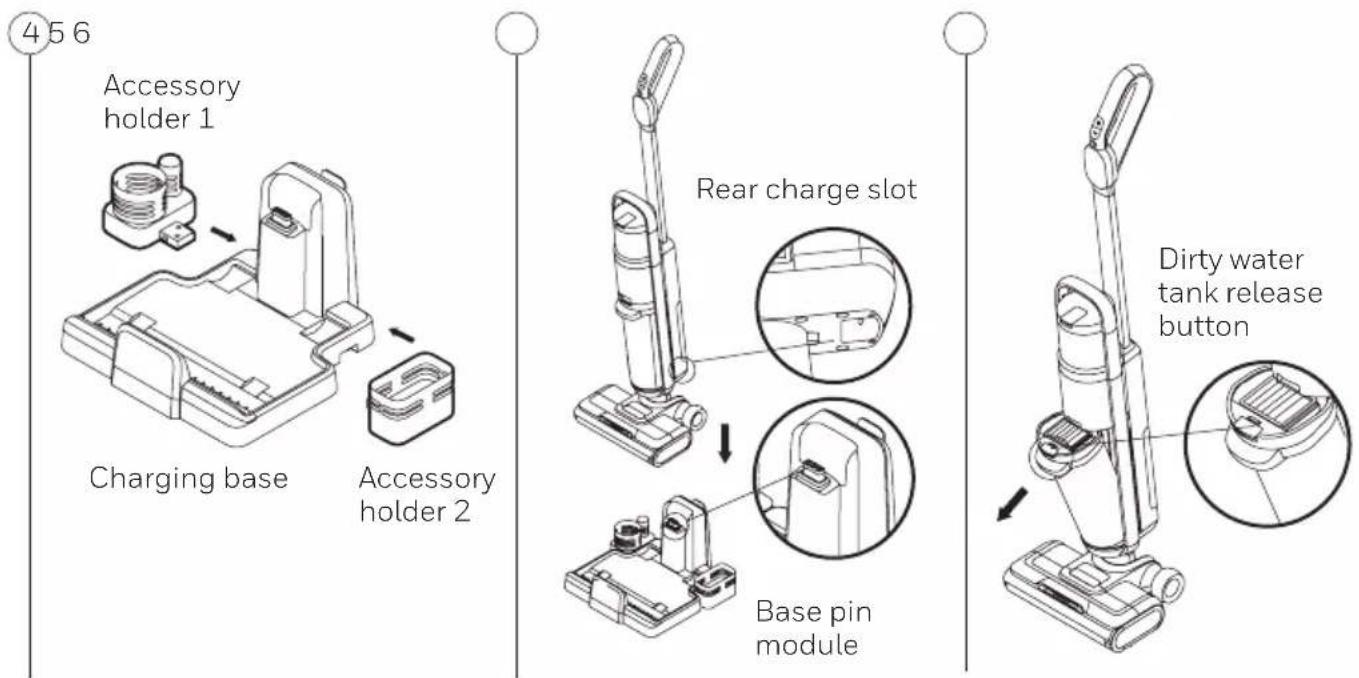
Placing the Machine in to The Charge Base
Placing the machine into the charge ensuring it seats properly on the base pin module as shown on (Fig.5). When using the product, pick up the machine by holding the handle and lifting it up out of the charge base.
Installation and Removal of Dirty Water Tank
To remove the dirty water tank, hold the machine, hold the dirty water tank handle with the other hand, and then press the dirty water tank release button with your thumb to remove the dirty water tank; to install the dirty water tank, first you should insert the bottom of the dirty water tank into the machine body, and then press the dirty water tank until a click is heard in the body, at this moment, it means the installation is successful. (Fig.6)
GETTING STARTED (CONTINUED)
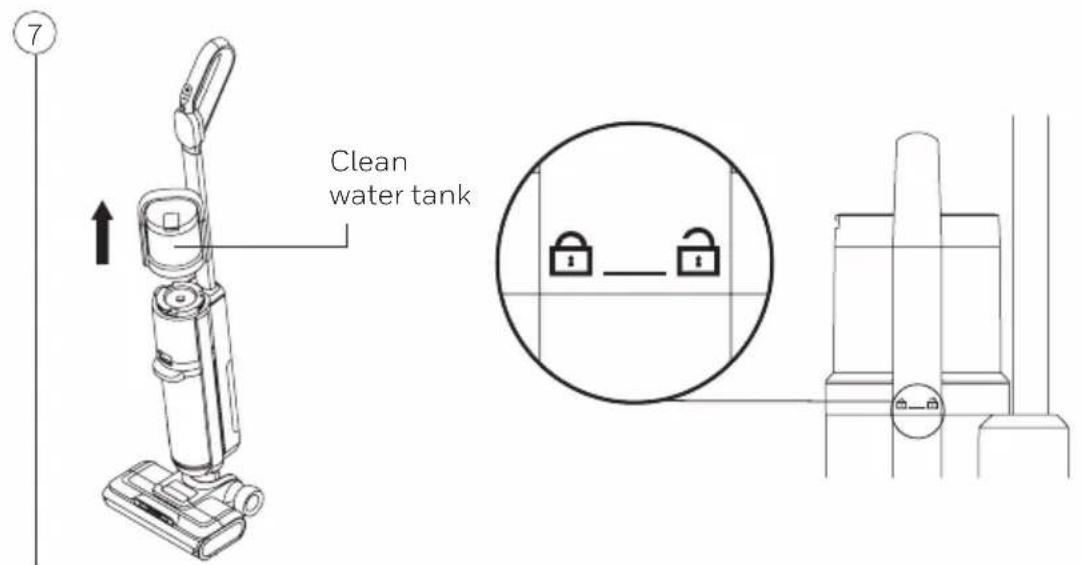
To remove the clean water tank, support the machine with one hand, hold the clean water tank handle with the other hand and turn it counter-clockwise in the unlock position. Lift up the clean water tank.
To install the clean water tank, place it back in the unlock position and twist clockwise to locked position. (Fig.7)
Roller Brush Removal and Installation
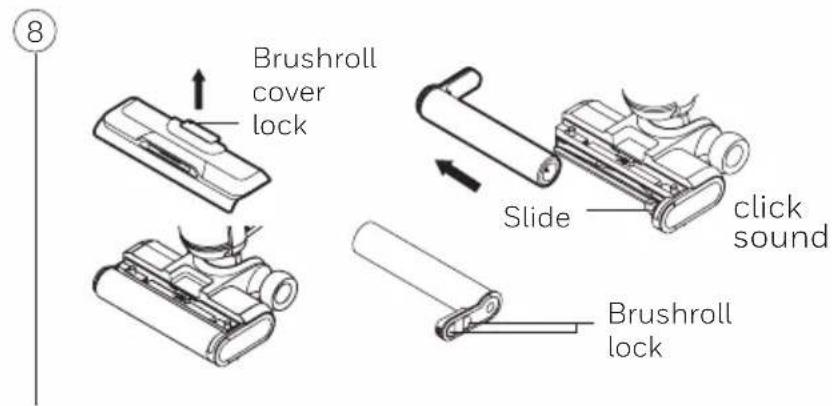
- Remove the cover plate by gently pulling up the brushroll cover lock.
- Remove the roller brush lock toward the middle and pull out the roller brush. To reinstall, insert the left side of the roller brush into the slide until you hear a click. Reinstall the cover plate by placing it on top of the roller brush and press firmly until you hear a click. (Fig.8)
GETTING STARTED (CONTINUED)
Use the Product
Note: Please ensure that the machine is charged before using the product.
If not, please charge it in time and use it after fully charged.
Display Screen
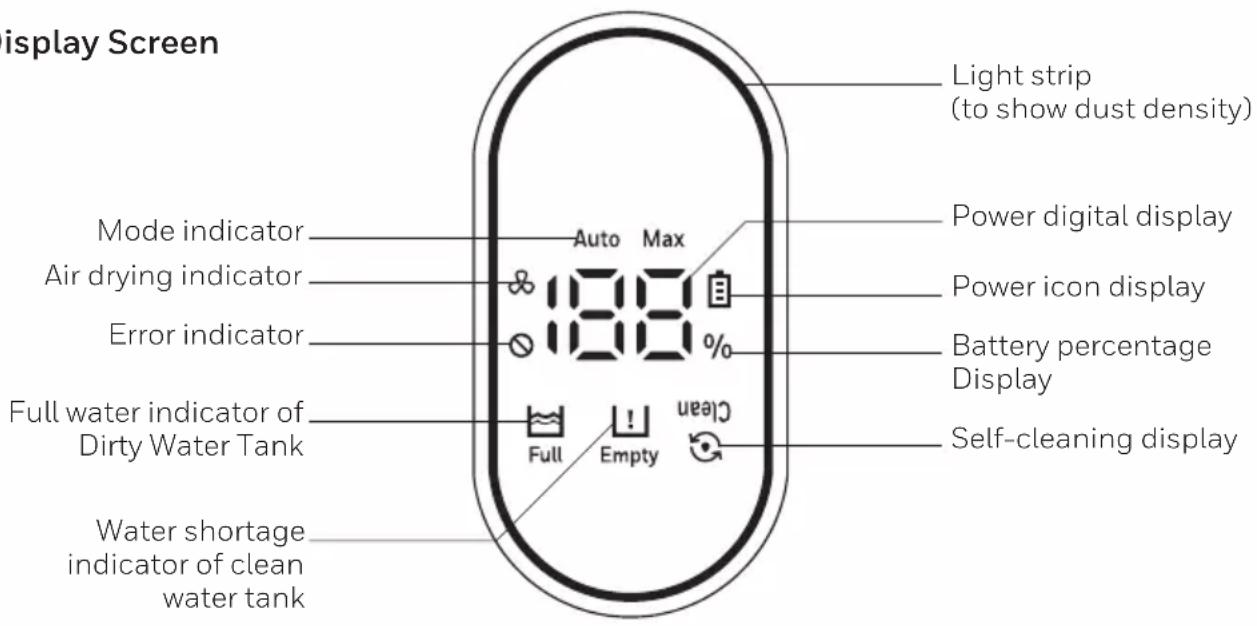
- Light Strip: When you turn on the machine, it will start in auto mode (the machine will automatically adjust the suction mode depending on the density of dust). Blue light strip means minimal dust density. Red light strip means heavier dust density.
While charging, it will show a blue light strip.
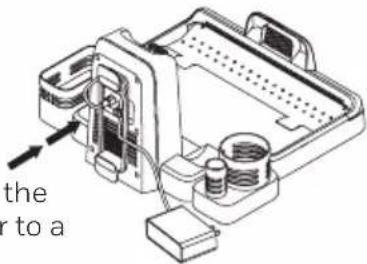
- Mode Indicator: There are 2 suction modes, auto mode and max mode. Auto mode is the default when you turn on the machine.
- Air-drying indicator & indicates when the brush roll is being air-dried when placed on the charging base for self-cleaning.
- Error indicator ☑It will flash to prompt in case of errors such as full water tank, water shortage of clean water tank, insufficient power or roller brush blockage.
- Dirty Water Tank Full Indicator 📋: when the dirty water reaches the maximum level, this icon will flash and a voice prompt will remind the user to clean out the dirty water tank. *Note: when using the product, you may hear a reminder to clean out the dirty water tank if the water splashes onto the sensor. The machine will stop automatically.
- Water shortage indicator of clean water tank: When the water in the clean water tank is empty, the water shortage icon “!” flashes, reminding the user to add clean water.
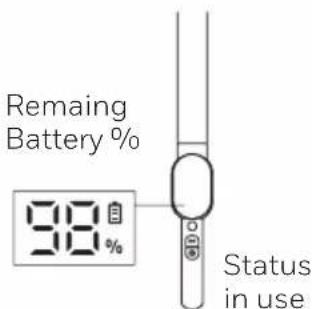
- Power digital display: display the real-time power level.
- Power icon display power warning light.(When the power is lower than 20%, the icon turns red to indicate charging, and in other cases it is a cool white light)
- Self-cleaning display: When the machine enters the self-cleaning mode, the self-cleaning icon “flashes to remind the user that the machine is self-cleaning.
OPERATION
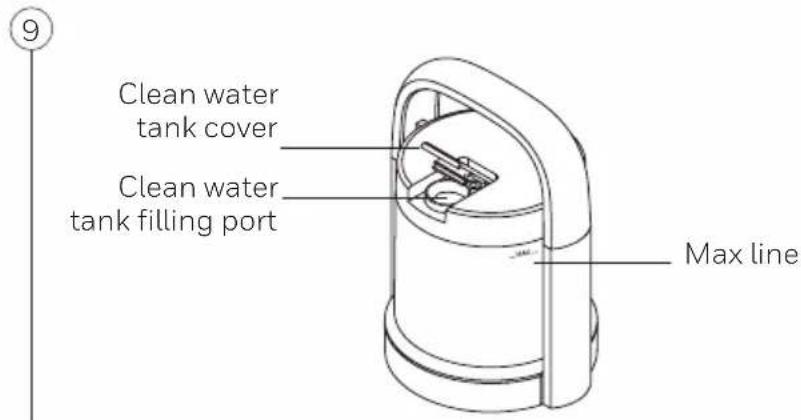
Fill the Clean Water Tank
- Hold the handle of the tank and rotate counterclockwise to remove the tank.
- Open the cover of the clean water tank, and pour clean water to the maximum water level.
- Close the cover to ensure that it is tight, and then put the clean water tank back into the machine.
-
Hold the handle of the tank and rotate downward clockwise (lock) until you hear a click for proper installation.
-
Water temperature requirement: below 104°F / 40°C.
-
Cleaning Solution: Only use the provided cleaning solution. Using a cleaning solution other than what was provided may damage the machine. Pour 2.5 bottle cap of the cleaning solution and add clean water until the maximum water line (ratio of 1:40).
Using the Machine
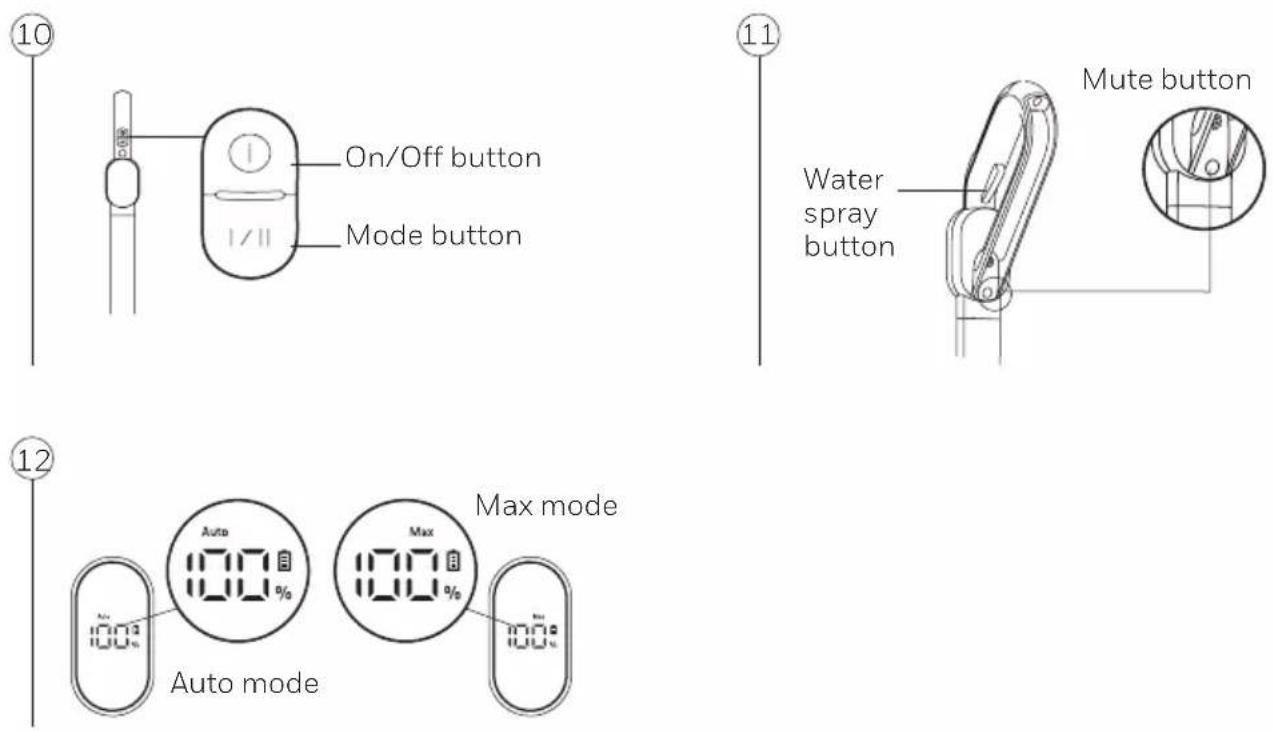
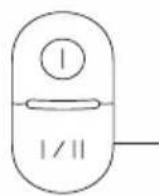
1 The On/Off button is located on the top of the handle. Press once to turn on the machine, auto mode will be the default mode. Press the mode button to switch to Max mode. Press the On/Off Button again to turn off the machine. (Fig.10)
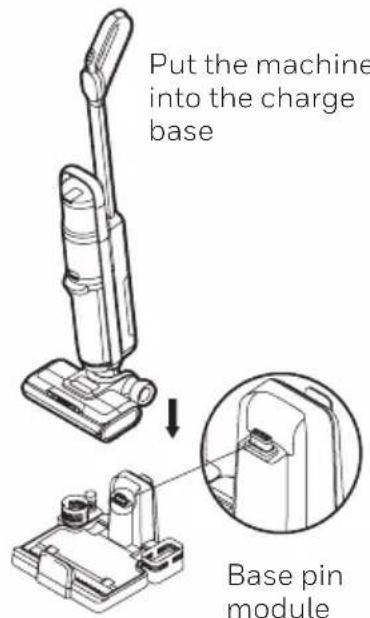
2. When using the machine, press and hold the water spray button to spray water on the floor. Release the button to stop spraying. (Fig.11)
3. When the machine is power on or charging, press the mute button to stop the voice prompt, and press the mute button again to resume the voice prompt. When the voice function is on, you can switch the language by pressing mute button for 3 seconds and switch among 5 language voices, in a sequence of English, German, Italian, French, and Spanish. (Fig.11)
OPERATION (CONTINUED)
- When the machine is power on, put it upright and the brush motor stops working immediately, while suction motor works at higher power for 3 more seconds before it stops.
Note:
- The water spray button cannot be used together with the On/Off button or the mode button simultaneously.
- It is recommended to use the Max mode to work in heavily polluted environments or when there are many water spots. (Fig.12)
- When the dirty water tank is full, the full water indicator of Dirty water tank on the display screen will flash to give an alarm prompt, and the machine motor will stop working immediately.
- After using the machine, always put it back on the charge base to prevent the product from falling over.
- When clean water tank is in shortage of water, the display screen shows "☐" to remind user to fill in clean water tank.
- No matter whether it is powered on or not, please do not wash the floor brush assembly with water to prevent water from entering the motor, water pump, circuit board and other electrical components in the floor brush, otherwise it may result in damage.
- Do not use the product to suck foaming liquid, nor put high-foaming cleaning solution into clean water for use.
OPERATION (CONTINUED)
Charging the Machine
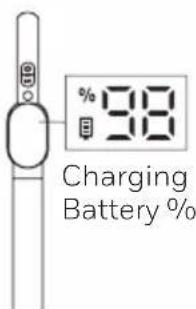
Put the machine into the charge base, connect one end of the adapter to the charge base, and plug in the adapter to a socket.
When charging, the display screen shows the battery percentage and light strip in blue is turning. When it is fully charged, the display screen shows 100% power and the light strip will remain blue. When put on the charge base while voice function is on, there will be voice prompts for each steps accordingly.
Ensure to place the charging base in an area close to the wall or a corner to prevent tripping over it.
Note:
- If the product will not be used for a long time, charge it every 3 months to maintain the battery life.
- Do not keep the charger plugged in when the product is fully charged. Put away the charger for safe keeping.
- When the machine is used for the first time, the capacity of the battery pack of the machine may not be full. Please charge the battery fully before use.
- The battery percentage showed on the display when charging is in a opposite direction when using. (Fig.13)
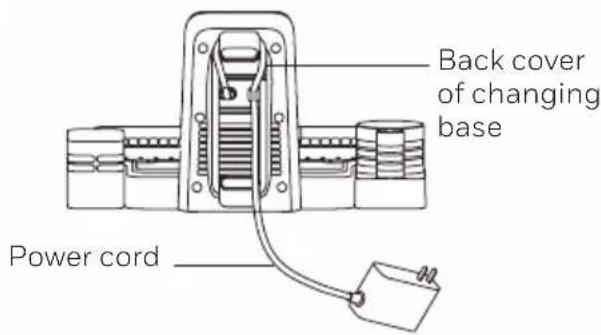
- There is space for power cord at back side of the charging base, to avoid power cord to be placed on the floor. (Fig.14)
plug in the adapter to a socket
⑬14
Charging status
OPERATION (CONTINUED)
⑮16
Remain 1/2 water in the clean water tank
Pour out the dirty water in the Dirty Water Tank

Air dry indicator

Air Dry Mode for Brushroll
- You can manually turn on air-dry mode while the machine is charging. If using the Self-Cleaning Mode, the machine will automatically turn on the Air-Dry mode after each Self Cleaning.
- To manually turn on air dry mode you need to press Mode button while it is charging. After you turn on the air dry mode, there is voice prompt saying "start drying brushroll" and the display shows a fan icon. (Fig.16)
- Air dry function lasts for 4 hours.
- Air dry mode does not have memory: When it is interrupted, it will restart next time again with a 4 hour process. It does not have a memory for it being turned on: when you turn on air dry function, but remove it from charging base and put it into charging base again, the air dry mode is turned off.
Always Empty the Dirty Water Tank Before Using Self-Cleaning Mode.
Place the machine on the charge base, insert the adapter into the socket, keep at least 1/2 of the water in the clean water tank, press the self-cleaning button and the self-cleaning icon on the display screen will flash.
If the voice function is on, the voice will say: start self-cleaning, make sure there is enough water in water tank. Press any of the On/Off button or mode button or self-cleaning button to stop self-cleaning, and just return to charging mode or air dry mode. (Fig.15)
- Please clean the dirty water water tank before and after the self-cleaning mode.
- If the dirty water tank is full, the product will not start the self clean mode.
- Make sure there is more than 25% battery for self-cleaning function.
CLEANING & MAINTENANCE
Full Dirty Water Tank Reminder
When the product is at use or at self-cleaning mode, once it detects that the dirty water tank is full, the machine will stop, and the voice prompt gives reminder. Please clean the dirty water tank accordingly.
Roller Brush Stuck Reminder
When the machine is working or in the cleaning mode, if the roller brush is stuck, it will cause the machine to stop, and send a voice reminder-"the roller brush is stuck, please clean the roller brush". At this time, please take out the roller brush, clean the foreign objects or entangled hairs stuck in the roller brush, and then return to work.
Refer to page 19 for floor brush assembly cleaning instructions.
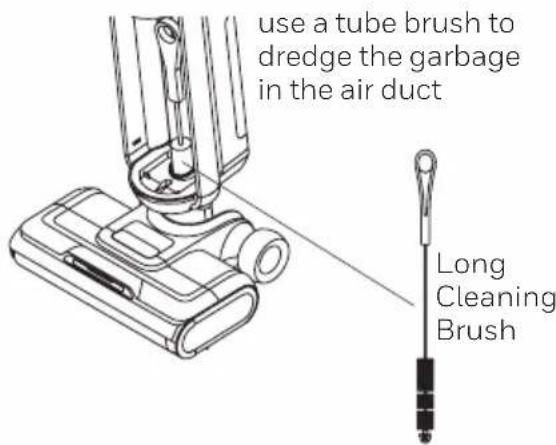
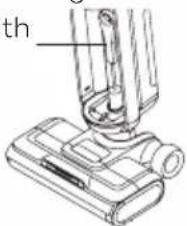
Air Duct Block Reminder
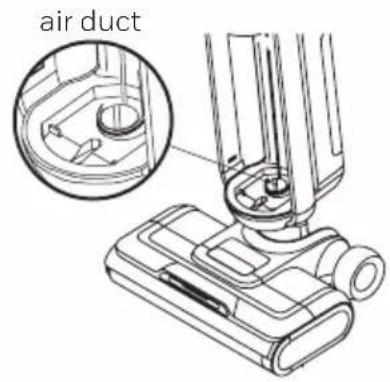
When the machine is working or in the cleaning mode, if the air duct is blocked, it will send a voice prompt-please clean the roller brush, elbow and air duct. Please clean the air duct in the floor brush assembly and the air duct on the dirty water tank.
Air duct cleaning method: remove the dirty water tank, take out the upper cover of the dirty water tank and the filter assembly, clean the parts of the dirty water tank and assemble the dirty water tank, use a tube brush to dredge the garbage in the air duct of the floor brush assembly, and then put the dirty water tank back in the machine. (Fig.17)
17
CLEANING & MAINTENANCE (CONTINUED)
Battery Capacity Reminder
When the machine is working, if you hear the voice prompt- "battery power is low", stop using the machine and charge it.
The machine will shut down if the battery is totally discharged.
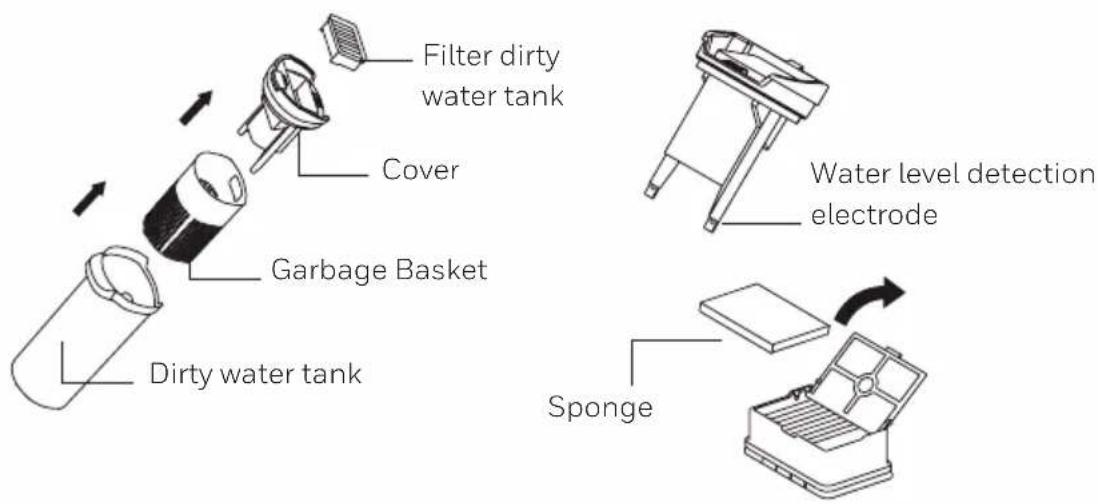
Dirty Water Tank Cleaning
When the water level electrode of the dirty water tank detects that the water is full, the full water indicator on the machine display screen will flash continuously, and the machine will stop working, reminding the user to clean the dirty water tank as soon as possible. Take out the upper cover of the dirty water tank, pour out the dirty water and garbage in the dirty water tank and garbage basket, and rinse the dirty water tank and garbage basket with clean water. If the surface of the filter sponge and the filter assembly is covered with dirt, they can also be washed with water. After rinsing, the above parts need to be dried, and then put back into the machine. If you find that there are stubborn stains on the inner wall of the dirty water tank and garbage basket, please clean it directly with a tube brush. (Fig.18)
Note: 1. It is recommended to clean the dirty water tank after each use.
- If the water level detection electrode is dirty, it can be cleaned with a rag or rinsed with clean water and then wiped with a rag.
18
CLEANING & MAINTENANCE (CONTINUED)
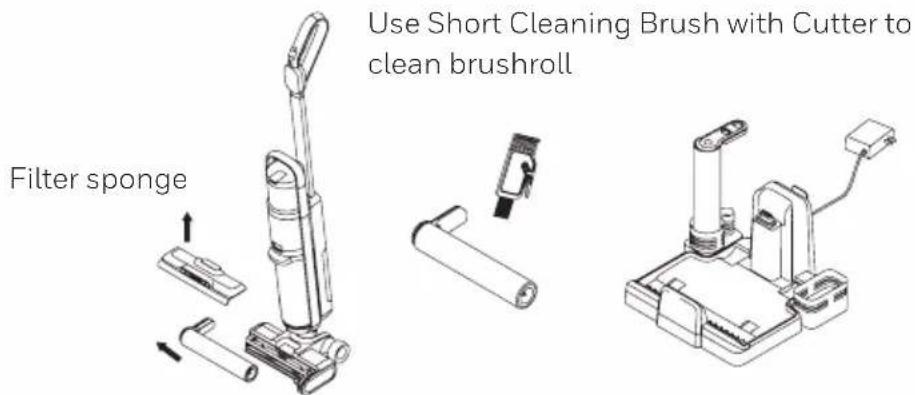
Floor brush assembly cleaning
Use your fingers to buckle the roller brush cover lock and push it upwards, take out the roller brush cover assembly, pinch the two roller brush locks in the middle, take out the roller brush assembly, use dry cloth to clean the empty roller position. Use a small brush to clean the foreign matter wrapped around the roller brush. Clean, wash the roller brush and the roller brush cover in clean water. After cleaning is complete, assemble the brush and the cover in place.
Note: 1. If it is not to be used immediately, please air dry the dirty water tank body, the upper cover of the dirty water tank, the filter sponge, the filter assembly, the garbage basket, the roller brush body and the roller brush cover plate assembly in a ventilated place before re-installing them into the machine.
- The roller brush can also be placed in the accessory holder to dry.
19
20
Long Cleaning
Brush with
Bristles
Charging base
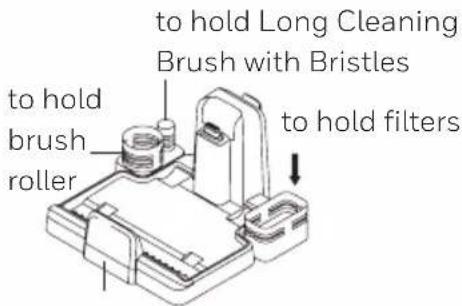
CLEANING & MAINTENANCE (CONTINUED)
Daily Maintenance and Storage
- After each use, it is recommended to clean the dirty water tank, the upper cover of the dirty water tank, the garbage basket, the filter assembly, the filter sponge, the roller brush body and the roller brush cover plate assembly for the next use. After the accumulative use time of the filter element reaches 30-50 hours (depending on the use of the filter element), it is recommended to purchase and replace the filter element at the designated location, so as not to affect the performance of the machine.
- After usage place the machine on the charge base to ensure that the product can stand upright reliably and reduce damage to the machine due to accidental touch and dumping. When connecting to AC power supply, it starts to charge the machine.
- When packing and storing, if you need to disassemble the battery pack parts, please remove the battery pack cover, hold the battery pack and pull it out to take out the battery pack.
- When the machine won't be used for a long time, please put the machine in a cool and dry place, rather than in direct sunlight or humid environment.
5 When the air duct is blocked, please take out the roller brush assembly, the roller brush cover plate assembly and the dirty water tank assembly, and insert a tube brush into the air inlet at the junction of the body and the dirty water tank and then poke down to remove the garbage blocking the air duct. -
There is accessory storage 1 and accessory storage 2 on the charge base that can be used to store accessories. The large cylinder on accessory storage 1 can hold the brush roller, and the small cylinder can hold the long cleaning brush with bristles. Accessory storage 2 can hold the filters.
-
Store the appliance indoors. Do not expose the appliance to outdoor weather conditions, moisture, rain, snow or heat. Do not use or store in temperatures below 41^ F ( 5^ C) or above 100^ F ( 38^ C). Ensure that the appliance is stored in room temperature before operating.
- DO NOT IMMERSE THE MOTOR HOUSING, MAIN POWER CABLE OR ADAPTER IN WATER OR ANY OTHER LIQUIDS.
- DO NOT leave the appliance close to heat sources such as ovens, heaters and radiators nor allow the cord to come into contact with hot surfaces.
- Clean the appliance only with a dry cloth. DO NOT use any lubricants, cleaning agents, polishes or air fresheners on any part of the appliance.
TROUBLE SHOOTING
Before contacting customer support please check the following:
| PROBLEM POSSIBLE REASON SOLUTION | ||
| Machine doesn't work | The product is not powered-on or the power level is low | Charge the machine |
| The On/Off button is not pressed or other switches are pressed simultaneously | Separately press the On/Off button again | |
| Severe entanglement of the roller brush body | Clean the roller brush body | |
| The dirty water tank is full Clean the dirty water tank | ||
| The battery pack is not installed in place | Re-install the battery pack | |
| Press On/Off button in upright state | After tilting the machine, the roller brush can work | |
| Reduced suction | The dirty water tank has reached the Max line | Empty out and clean the dirty water tank |
| Window and dirty water tank are not installed in place | Re-install | |
| The roller brush body is entangled with hair | Clean the roller brush body | |
| Dirty filter Clean the filter | ||
| Low battery Charge the machine | ||
| Abnormal sound of the machine | Blocked suction port | Clean foreign objects in the suction port |
| The dirty water in the dirty water tank has reached the MAX line | Clean the dirty water tank | |
| The floor brush doesn't spray water | Water shortage in the clean water tank | Add water to the clean water tank |
| The spray button is not pressed | Press the water spray switch | |
TROUBLE SHOOTING
| PROBLEM POSSIBLE REASON SOLUTION | ||
| The floor brush doesn’t spray water (continued) | The clean water tank is not assembled in place | Reinstall the clean water tank in place |
| The clean water tank is filled with dirty water, blocking the waterway | Remember that the clean water tank cannot be filled with dirty water | |
| Water spray at the air outlet | The filter sponge and assembly are not dried after cleaning and use | It needs to be cleaned and dried before use |
| The water in the dirty water tank has exceeded the MAX line | Take out the dirty water tank, pour out the dirty water and use it | |
| During use, the machine shakes or strongly hits a wall | Take out the dirty water tank, pour out the dirty water and use it | |
| No filter sponge or sponge component are installed | Install filter sponge or sponge assembly | |
| Dirt on the water level electrode results in the failure | Wipe it after cleaning | |
| No voice of the machine | Press the mute button Press the mute button again | |
Note: If there are other faults (when below code showed on screen), special tools must be used, thus you must go to the designated repair point for repair or replacement or please contact the official after-sales customer service for guidance.
Error Code
| F1 F2 F4 F5 | |||
| Connection error between battery and unit | Charger base overvoltage | Charger base overcurrent | Motor secondary overcurrent |
| F6 F7 F9 | |||
| Motor primary overcurrent | Serial communication error | Discharge overtemperature |
PRODUCT SPECIFICATIONS
| Model FC20 ULTAMAX PRO | |
| Adaptor | ZD024M342100US |
| Input 100-240V~50/60Hz | 0.8A |
| Output 34.2V 1000mA | |
| Rated voltage 28.8V | |
| Rated power 300W | |
| Battery capacity 3000mAh | |
| Clean water tank volume 0.8L | |
| Dirty water tank volume 0.7L | |
| Charging time 3~4h | |
ENVIRONMENTAL PROTECTION
This product contains batteries or recyclable electronic waste, and the rechargeable battery contains substances that may pollute the environment. When disposing of the product, please do not place it with general household garbage, and hand it to the electronic waste collection point designated by the state. This is conducive to environmental protection.
WARRANTY CARD
Read all the instructions before attempting to use this product.
LIMITED TWO YEAR WARRANTY
This warranty is applicable for the FC20 ULTAMAX PRO in the U.S.A. only. This warranty gives you specific legal rights and you may also have other rights which may vary from state to state. If you need additional instructions regarding this warranty or have questions regarding what it may cover, please contact TALENTONE TECHNOLOGY LTD Customer Support by E-mail, telephone, or regular mail as described below. Subject to the *EXCEPTIONS AND EXCLUSIONS identified below, upon receipt of the product TALENTONE TECHNOLOGY LTD will repair or replace (with new, refurbished, lightly used, or remanufactured components or products), at TALENTONE TECHNOLOGY LTD's option, free of charge from the date of purchase by the original purchaser, for two years any defective or malfunctioning part.
See information below on "If your TALENTONE TECHNOLOGY LTD product should require service."
This warranty applies to product used for personal, and not commercial or rental service. This warranty does not apply to damage caused by blockages, external sources such as power surges and transits, or routine maintenance components such as filters, fans, batteries, bags, belts, rollers, or brushes. Damage or malfunction caused by negligence, abuse, neglect, unauthorized repair or any other use not in accordance with the User Manual is not covered.
This product is manufactured according to specifications of the country of sale. Any warranties accompanied with this product is only valid in the country of purchase. Please read the user manual carefully before setting up or using this product.
TALENTONE TECHNOLOGY LTD is not liable for incidental or consequential damages of any nature associated with the use of this product. TALENTONE TECHNOLOGY LTD's liability will not exceed the purchase price of the product.
IF YOUR TALENTONE TECHNOLOGY LTD PRODUCT SHOULD REQUIRE SERVICE:
CUSTOMER SUPPORT (USA):
TALENTONE TECHNOLOGY LTD
6574 N. STATE ROAD 7, #112
COCONUT CREEK, FL 33073 USA
TEL: (800) 281-1378 (US & CANADA)
EMAIL: INFO@TTL-CORP.COM
When contacting our Customer Support, please have the information below along with the proof of purchase. All warranty requests must be accompanied by a proof of purchase, which is a copy of the original receipt.
Product information
Date of purchase: ....
Purchased from: ____
*EXCEPTIONS AND EXCLUSIONS FROM THE TERMS OF THE LIMITED WARRANTY THIS WARRANTY IS EXCLUSIVE AND IN LIEU OF ANY OTHER WARRANTIES EITHER ORAL OR WRITTEN. ANY IMPLIED WARRANTIES WHICH MAY ARISE BY OPERATION OF LAW, INCLUDING THE IMPLIED WARRANTIES OF MERCHANTABILITY AND FITNESS FOR A PARTICULAR PURPOSE, ARE LIMITED TO THE TWO YEAR DURATION FROM THE DATE OF PURCHASE AS DESCRIBED ABOVE.
Some states do not allow limitations on how long an implied warranty lasts, so the above limitation may not apply to you.
Made in China
The Honeywell Trademark is used under license from Honeywell International Inc. Honeywell International Inc. makes no representations or warranties with respect to this product. This product is manufactured by Talentone Technology Limited, 30/F, Office Tower 1, Enterprise Square 5, 38 Wang Chiu Road, Kowloon Bay, Kowloon, Hong Kong.
TALENTONE TECHNOLOGY LTD
6574 N. STATE ROAD 7, #112
COCONUT CREEK, FL 33073 USA
TEL: (800) 281-1378 (US & CANADA)
EMAIL: INFO@TTL-CORP.COM
Honeywell
natural_image
Line drawing of a vacuum cleaner with handle and base (no text or symbols)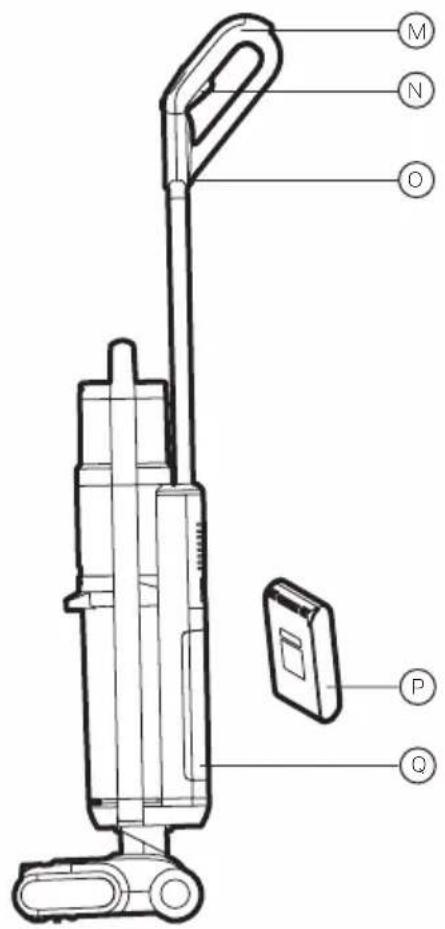
natural_image
Simple line drawing of a test tube with a label 'S' below it (no text or symbols on the tube itself)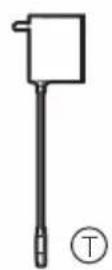
natural_image
Simple line drawing of a spray bottle with a cross mark and a circle beside it (no text or symbols)
R. Base de chargement
Base de chargement
CARACTÉRISTIQUES DU PRODUIT
TALENTONE TECHNOLOGY LTD
6574 N. STATE ROAD 7, #112
COCONUT CREEK, FL 33073 ÉTATS-UNIS
TÉL.: 800 281-1378 (ÉTATS-UNIS ET CANADA)
COURRIEL: INFO@TTL-CORP.COM
TALENTONE TECHNOLOGY LTD
6574 N. STATE ROAD 7, #112
COCONUT CREEK, FL 33073
ÉTATS-UNIS
TÉL.: 800 281-1378
(ÉTATS-UNIS ET CANADA)
COURRIEL: INFO@TTL-CORP.COM
Honeywell
natural_image
Line drawing of a vacuum cleaner with handle and base (no text or symbols)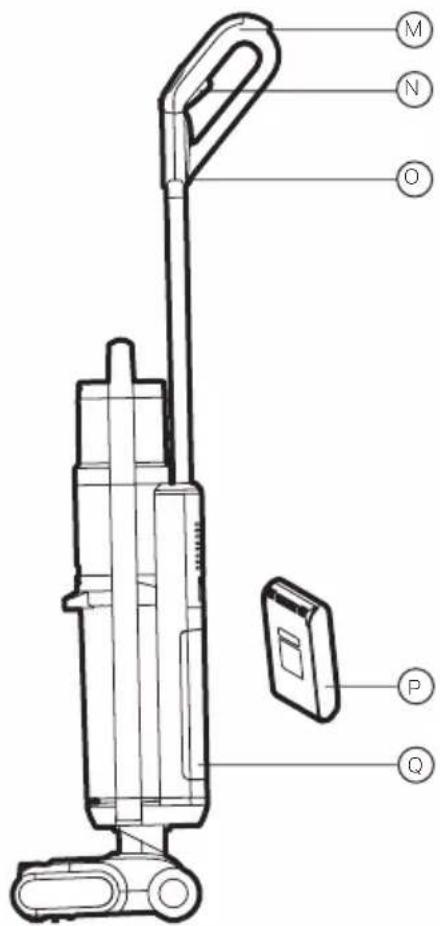
natural_image
Simple line drawing of a spray bottle and a circle (no text or symbols)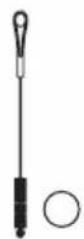
R. Base de carga
TALENTONE TECHNOLOGY LTD
6574 N. STATE ROAD 7, #112
COCONUT CREEK, FL 33073, USA
International Inc. Honeywell
International Inc. no
Technology Limited, 30/F,
Office Tower 1, Enterprise
Square 5, 38 Wang Chiu
Road, Kowloon Bay,
Kowloon, Hong Kong.
TALENTONE TECHNOLOGY LTD
6574 N. STATE ROAD 7, #112


- Cordless Floor Cleaner
- IMPORTANT SAFETY INSTRUCTIONS
- WARNING
- (CONTINUED)
- Caution for Operation & Vacuuming
- Caution for Li-ion batteries
- Transportation information
- Disposal information
- Packaging
- Old appliance
- Notes on Cleaning Solution
- SAVE THESE INSTRUCTIONS
- THANK YOU
- GETTING TO KNOW YOUR CORDLESS FLOOR CLEANER
- Included in Box
- Name of each part
- Packing List
- GETTING STARTED
- Product Assembly
- Battery Pack Installation
- GETTING STARTED (CONTINUED)
- Charge Base and Accessory Storage Assembly
- Placing the Machine in to The Charge Base
- Installation and Removal of Dirty Water Tank
- Roller Brush Removal and Installation
- Use the Product
- OPERATION
- Fill the Clean Water Tank
- Using the Machine
- OPERATION (CONTINUED)
- Note:
- Charging the Machine
- ⑬14
- ⑮16
- Air Dry Mode for Brushroll
- Always Empty the Dirty Water Tank Before Using Self-Cleaning Mode.
- CLEANING & MAINTENANCE
- Full Dirty Water Tank Reminder
- Roller Brush Stuck Reminder
- Air Duct Block Reminder
- CLEANING & MAINTENANCE (CONTINUED)
- Battery Capacity Reminder
- Dirty Water Tank Cleaning
- Floor brush assembly cleaning
- Daily Maintenance and Storage
- TROUBLE SHOOTING
- PRODUCT SPECIFICATIONS
- ENVIRONMENTAL PROTECTION
- WARRANTY CARD
- Read all the instructions before attempting to use this product.
- LIMITED TWO YEAR WARRANTY
- CUSTOMER SUPPORT (USA):
- Product information
- Honeywell
- CARACTÉRISTIQUES DU PRODUIT
Brand : HONEYWELL
Model : UltraMax Pro FC20
Category : Vacuum Cleaner