V-LOG - Camera OKA - Free user manual and instructions
Find the device manual for free V-LOG OKA in PDF.

| Product type | Digital camera |
| Brand | OKA |
| Model | V-LOG |
| Maximum photo resolution | 48 MP (8000×6000) |
| Maximum video resolution | 4K at 60 fps |
| Digital zoom | 16× |
| Screen | 3.0 inch IPS |
| Battery | Lithium-ion 3.7 V / 1300 mAh |
| External storage | microSD card up to 128 GB (class 10 minimum) |
| File formats | JPEG (photo), MP4 (video) |
| White balance | Manual, sunny, cloudy, incandescent, fluorescent |
| ISO sensitivity | 100 – 6400 (manual) |
| Exposure compensation | ±3 EV in steps of 1 EV |
| Connection | USB Type-C |
| Available languages | French, English, German, Spanish, Italian, Portuguese, Japanese, Dutch, Chinese (simplified and traditional) |
| Shooting modes | Normal photo, burst, auto, self-timer; normal video, slow motion, loop, timelapse |
| Flash | Built-in, modes: auto, forced, off (not available in video) |
| Maintenance | Clean the lens with a soft cloth; store in a dry place below 30 °C; fully discharge the battery before long-term storage; recharge every 3 months. |
| Safety | Protect the device from drops, shocks and vibrations; only insert SD cards into the slot. |
| Power supply | Charge via USB (5 V / 1-2 A power adapter included) |
Frequently Asked Questions - V-LOG OKA
User questions about V-LOG OKA
0 question about this device. Answer the ones you know or ask your own.
Ask a new question about this device
Download the instructions for your Camera in PDF format for free! Find your manual V-LOG - OKA and take your electronic device back in hand. On this page are published all the documents necessary for the use of your device. V-LOG by OKA.
USER MANUAL V-LOG OKA
natural_image
Line drawing of a digital camera with circular lens and textured screen (no text or symbols)USER GUIDE | MANUAL DEL USUARIO | BEDIENUNGSANLEITUNG MANUEL D' UTILISATION | MANUALE UTENTE | NÁVOD NA POUŽITIE | NÁVOD K POUŽITÍ
Table of Contents | Tabla de Contenido | Inhaltsverzeichnis | Table des Matières | catalogo | Obsah | katalog |
English
Get to Know Your Camera......2
How to Use Your Camera......3
Buttons and Functions......6
Technical Specification......15
FAQ....16
Camera Maintenances......16
Other Notes......17
Español
- Get to know your camera
- First Use
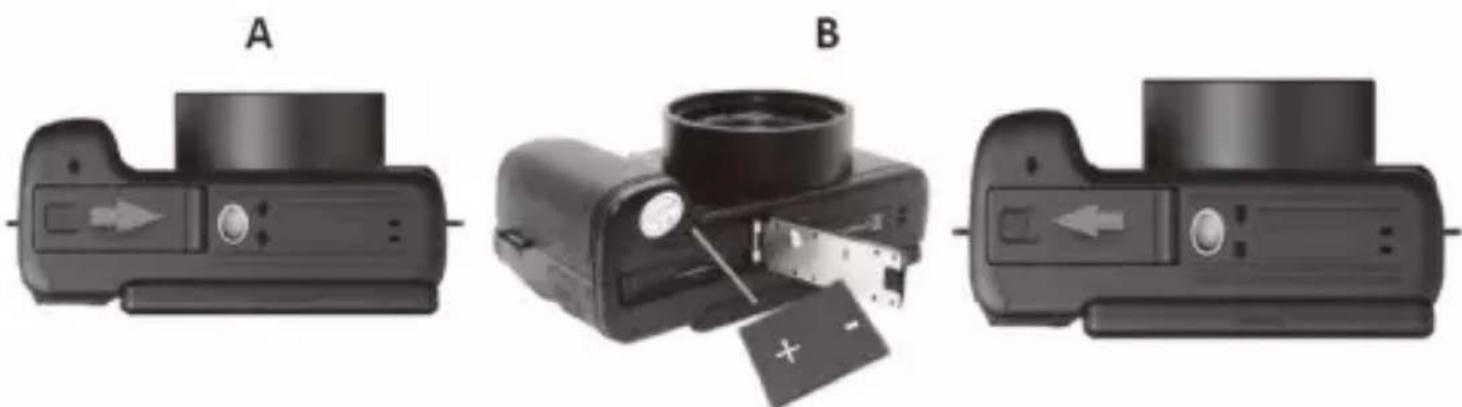
2.1 To Open the Battery Door
Unlock the battery door by sliding the battery door notch away from the opening. Use a fingernail or other pointy object when sliding the latch to get a better grip.

natural_image
Close-up of a black digital camera with a right-pointing arrow indicator (no text or symbols)2.2 Installing the Battery
Insert the lithium-ion battery into the battery compartment with the metal contacts facing the inside of the camera. The battery can only be inserted one way.
natural_image
Three-panel diagram showing a camera module with labeled parts (A, B) and directional arrows indicating movement or assembly (no text or symbols beyond labels)2.3 Installing the Memory Card
Insert the includedMicro SD memory card torecord andstore your videos and photos. When the battery is low, media stored on the memory card will not be erased.
Please insert the SD memory card by following the steps below:
1.Open the battery door by following the diagram above.
2. Insert the memory card. Ensure that the metal contacts are inserted first.
Push the memory card down until you hear an audible click.
The memory card can only be inserted in one way.Do not force the card in if it will not go in smoothly.
-
Close the batterydoor by pushing it down and sliding the lockback into place.
-
To remove the memory card, simply push in and the card will eject back out.

NOTE:
- Please format the memory card before using the camera (Caution, this will erase all data on the card).
- Do not remove or insert the memory card when recording. It may damage the card or cause dataloss.
- Memory card rating must be Class 10 or above.
NOTE: After closing the battery door, make sure that the door is closed securely and the lock engaged.
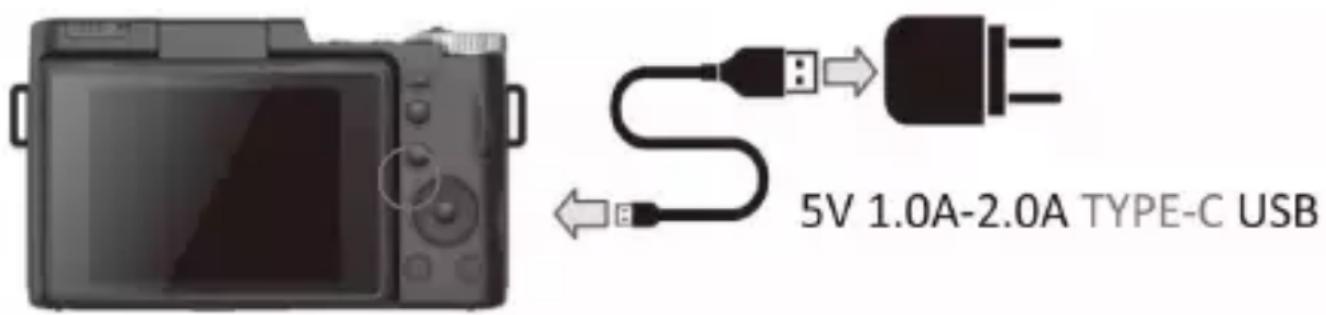
2.4 Charging the Battery
Connect your camerato the included AC adaptor with the USB cable provided for charging. Insert the small end of the USB plug into the camera's portunder the battery door, and the larger end in to the included AC adaptor. While charging the LED indicator light will light up solid red, when finished charging the light will turn off.
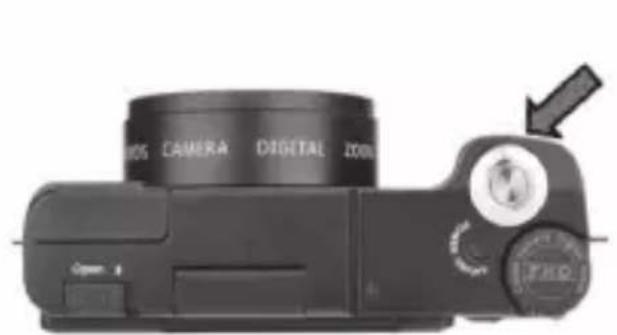
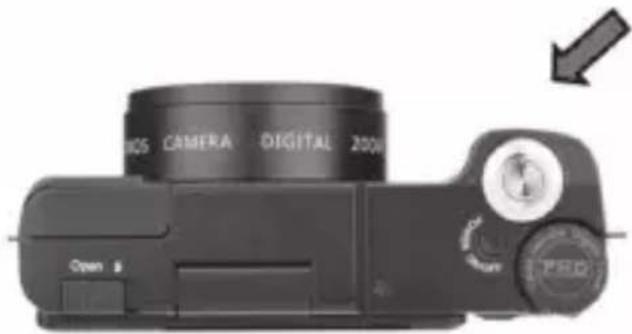
Powering the Camera On/Off
a) Press and hold the POWER button for 3 seconds to power the camera on. To power the camera off, press the POWER button again.
b) If the camera's battery is low, a "Low Power" message will display on the screen and it will automatically shut down within a few seconds to prevent memory corruption or loss.
Formatting Your Camera
c) Power on camera, in Photo 📷 or Video Mode 🙏,
press MENU Button to main menu press the upper ⏻ and down 🔒, button to switch to the System Settings menu press the right ⚙️ button, and then press the ▶ key to select the format submenu.
d) Press Down Button 📋 to "Format", press M/OK Button to enter, choose "OK". Press the left 😊 or right ▶ Button to choose "Yes (or No)", 📋 press M/OK Button to confirm formatting.
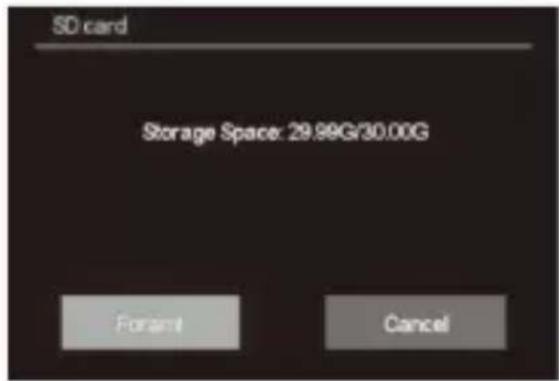
Notes: Formatting will delete all pictures stored on the SD card. If you do not want to delete pictures, please either download them to your computer or use a fresh card.
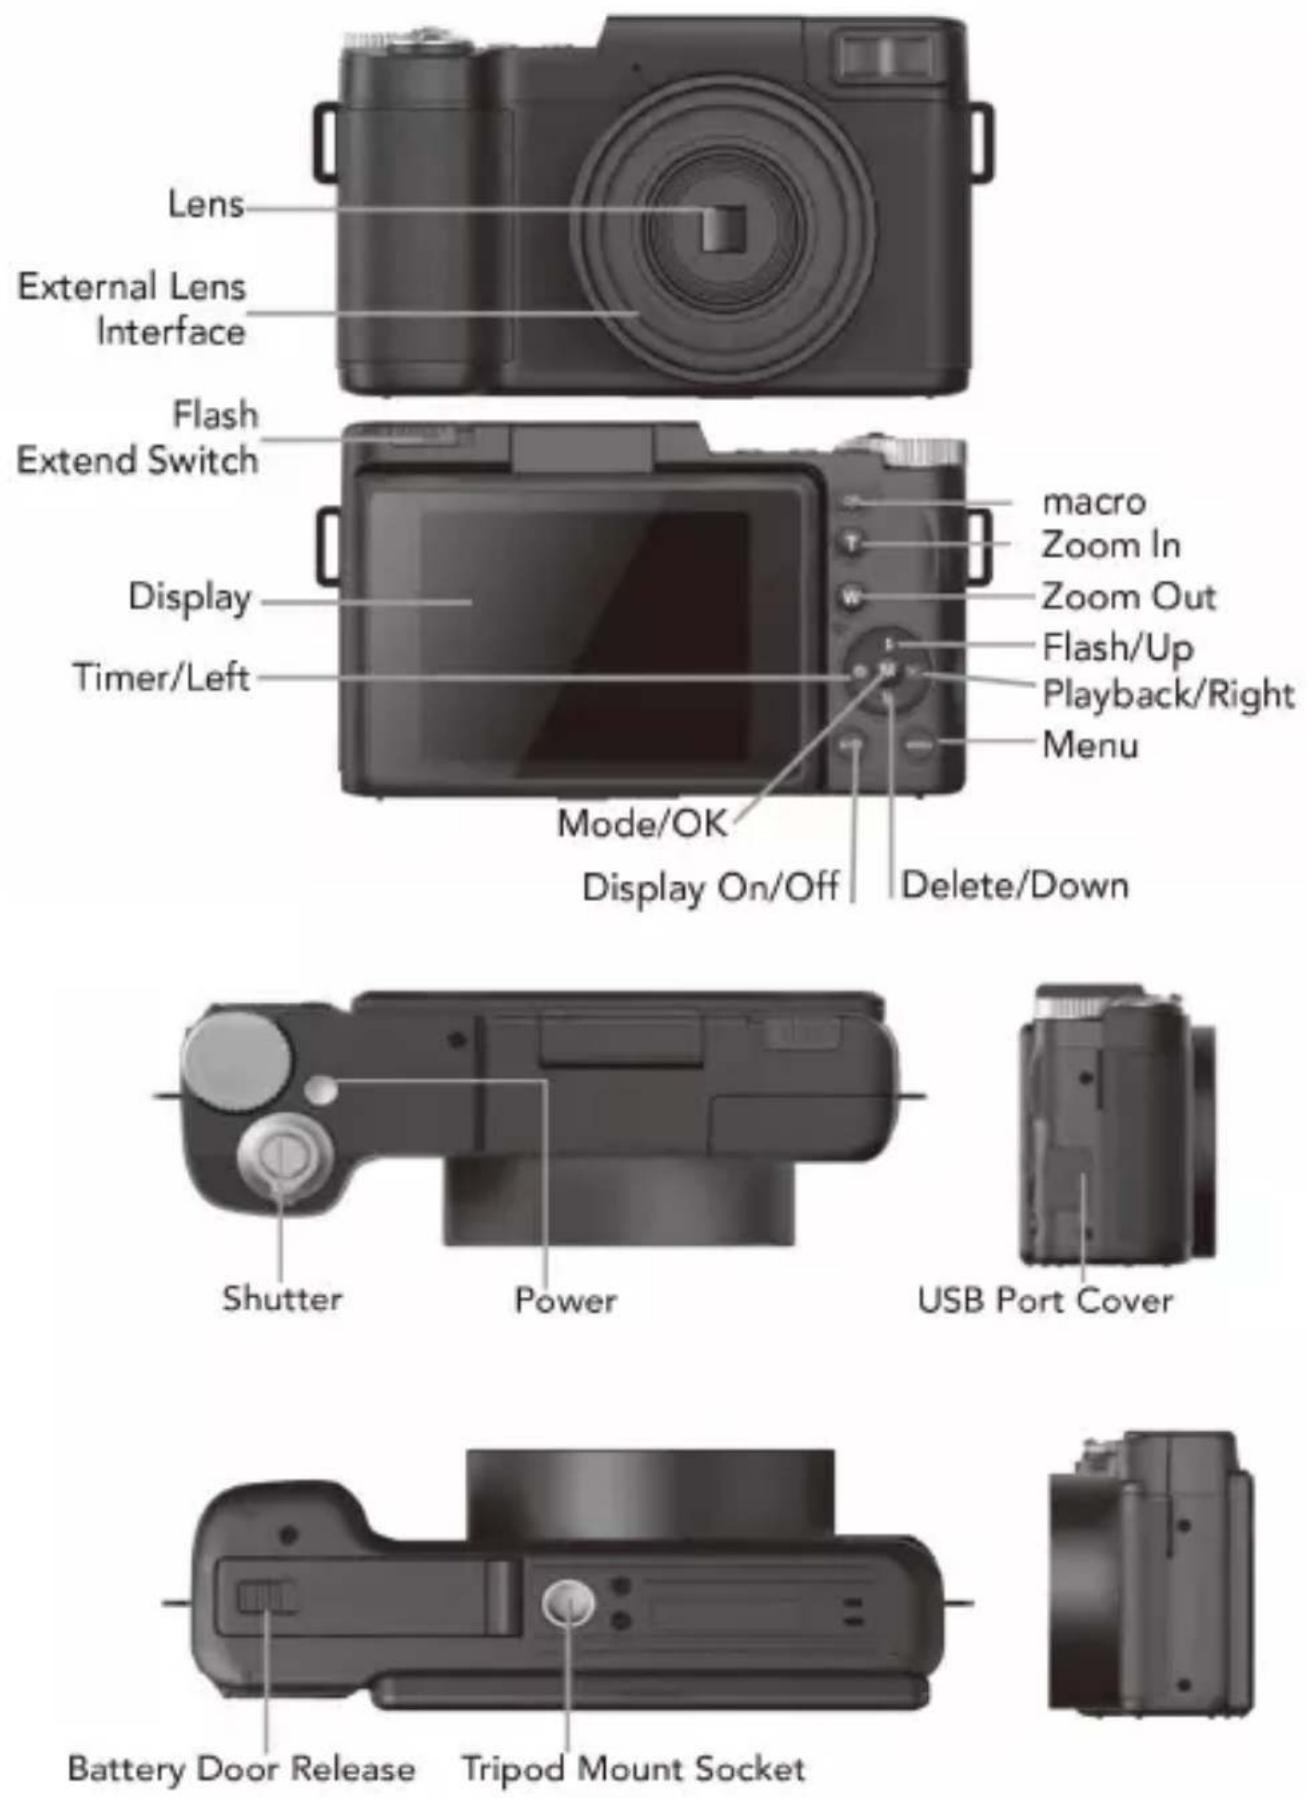
Buttons and Functions
Photo Capture Button (Photo Mode)
Power on camera, camera default is Photo Mode. In Photo Mode, move T/W digital Zoom Slider to zoom in and out. Press Photo Capture Button to capture image.
natural_image
Close-up of a DSLR camera with no visible text or symbols on the body, indicating part of the lens (no readable text beyond branding)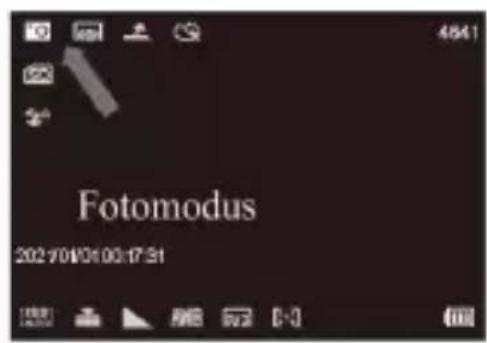
Video Capture Button (Video Mode)
In Photo Mode, press Video Capture Button to Video Mode. Press the button again to start video capturing and press it again to complete video capture. Record video: during video recording, move T/W digital Zoom Slider to zoom in and out.
natural_image
Close-up of a black DSLR camera with lens and control knob (no visible text or symbols)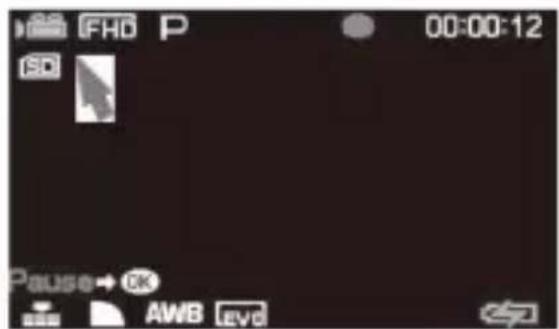
Playback Button (Playback Mode)
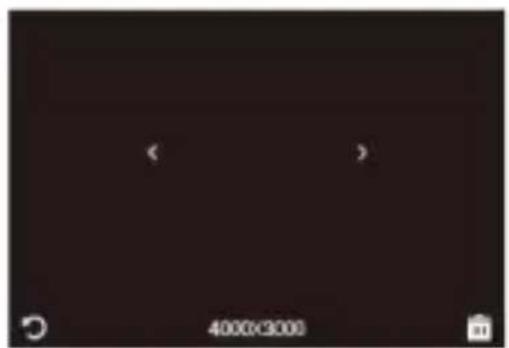
In Photo Mode 📷 or Video Mode 🔔, press Playback Button ▶ can direct to Playback Mode. Press the button again to exit. When review a video, press M Capture Button to start playback. Press the M/OK button video, press to pause/continue video playback.

Delete Button
In Photo, Video or Playback Mode, press Delete Button to quick delete image / video. Press Up or Down Button to select Yes/No. Press M Button to confirm selection.


natural_image
Dark image with faint white symbols and a timestamp label at bottom (no readable text or symbols)
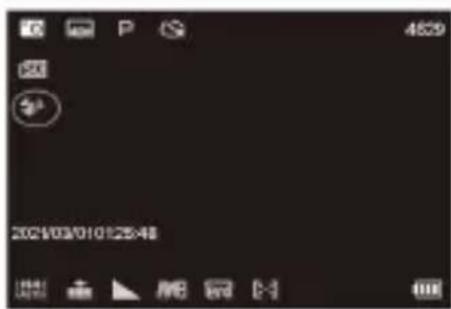
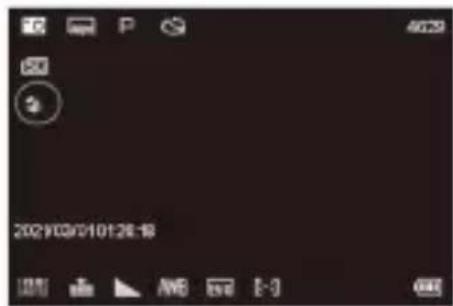
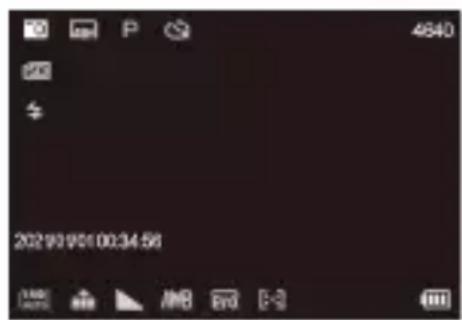
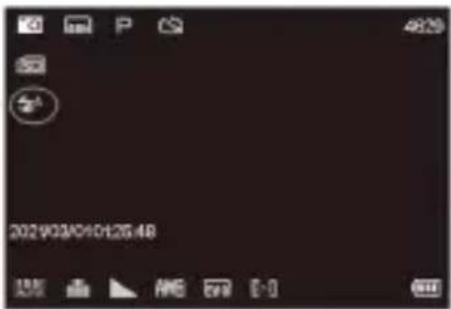
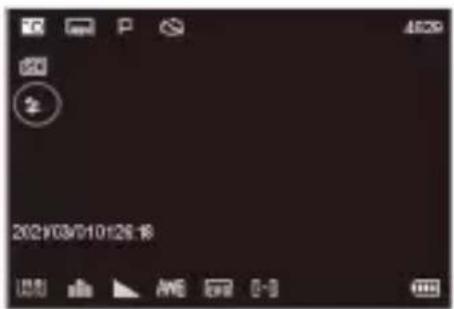
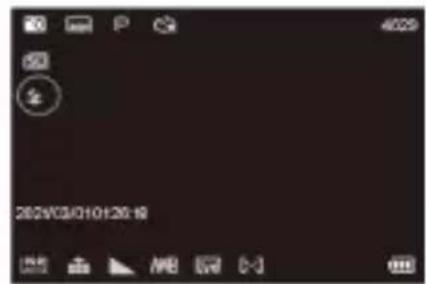
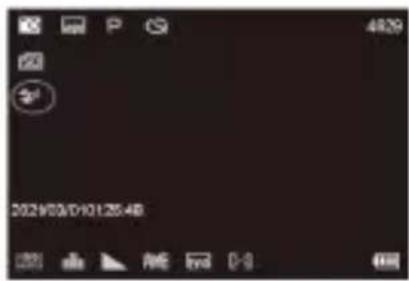
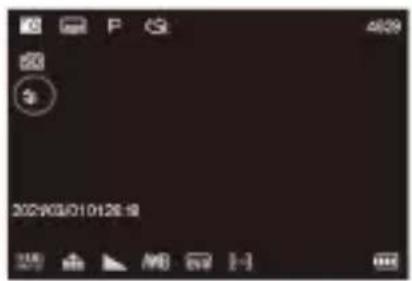
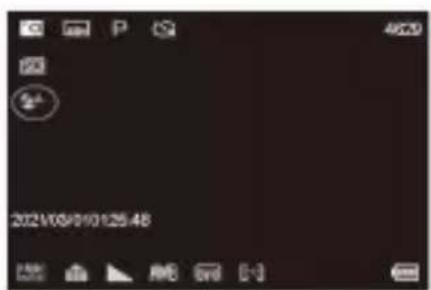
- Shooting mode
The meaning of the icons shown on the LCD screen in each mode can be found below.
In the photo or video mode, press the M/OK button to enter the shooting mode selection, press the left and right buttons to select normal normal Rec/ Slowly Rec/ Loop Rec/ Time Rec/ Normal Pic/ Auto pic/ Continue Pic/
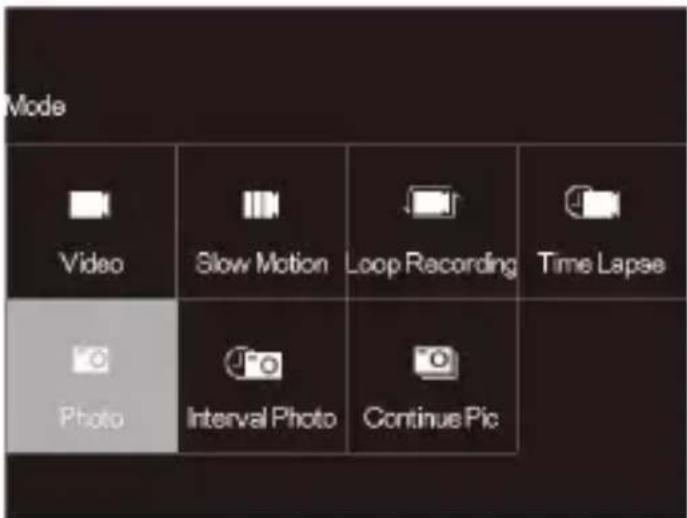
Slow photography: After opening the slow photography and starting to record, you can record the slow motion camera effect; the shooting size and rate can be set in the menu; respectively, 1080P4X, 1080P2X, 720P8X, 720P4X.
Loop recording: open loop recording, and start the cycle can record video after video, each video time can be set menu were 2min 3min 5min.
Time-lapse video: turn on time-lapse video (interval video: take one frame every 0.5 seconds and compose a video, the interval time can be set in the menu, the interval time is 0.5S 1S 2S 5S 10S 30S 60S, the default is 0.5 seconds) and start recording Can record time-lapse interval video.
Automatically take pictures: Turn on automatic taking pictures (interval taking pictures) and press the camera button to start taking pictures. The camera will automatically take a picture at an interval, and then press the camera button again to end the automatic picture.
The interval time can be set in the menu respectively: 3S, 5S, 10S(even when the picture pixel automatic limitation, no more than 24 M)。
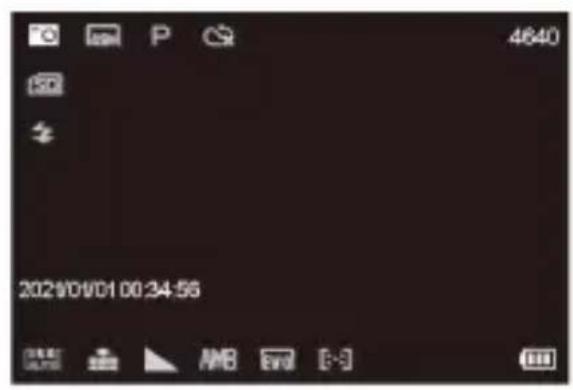
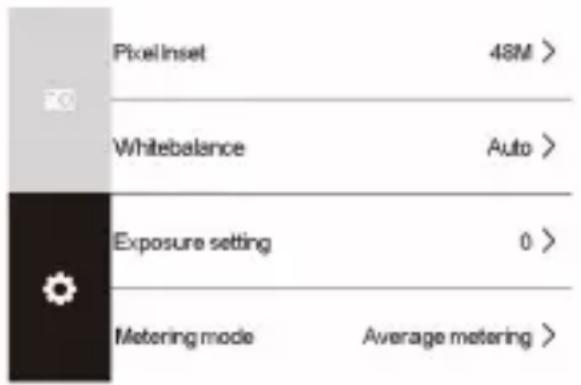
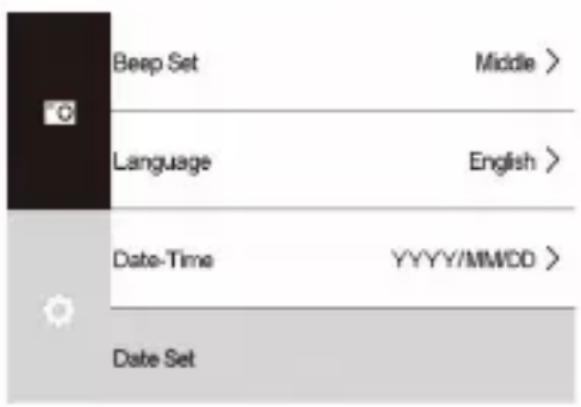
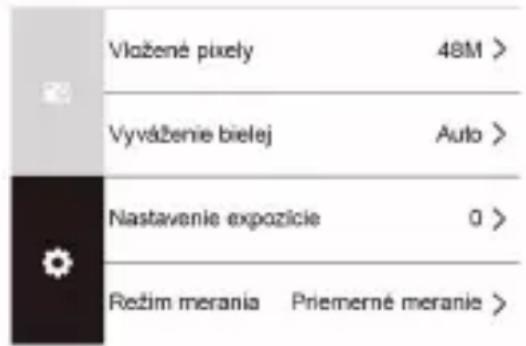
- MENU Menu Button (Menu Settings)
in photo 📷 and video mode 📄, press MENU key to
enter the menu interface, press the top and down button to switch the shooting menu or set menu, press right key to enter the sub-menu, press top / down key to select the required sub-menu, press upper / and down press upper and down key to choose the desired options, press M/OK key to confirm and return to the previous menu. Press MENU to exit the menu.
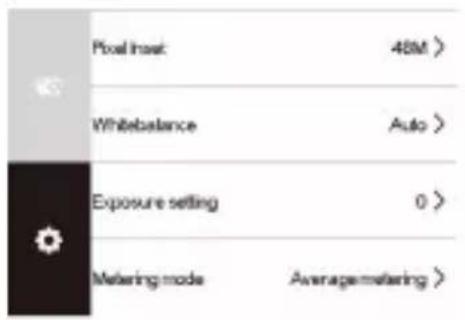
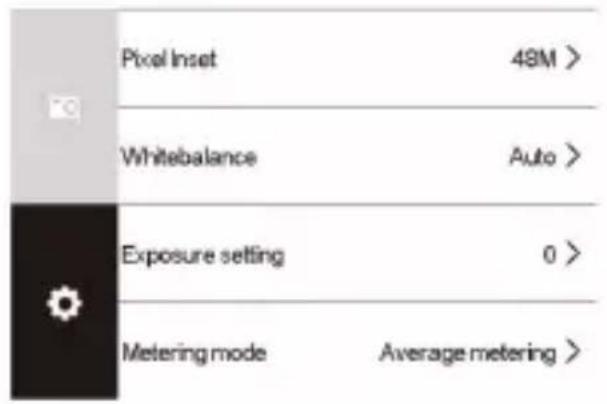
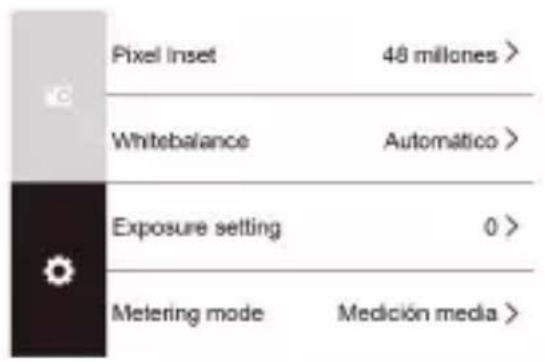
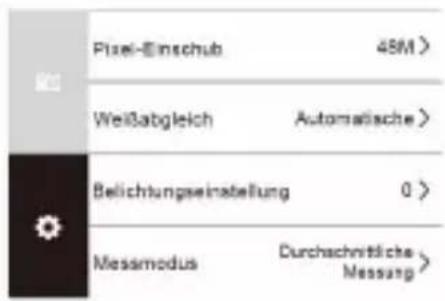
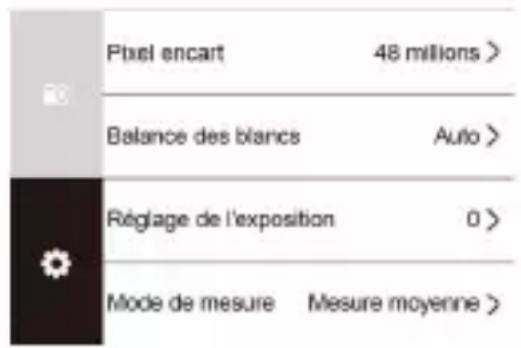
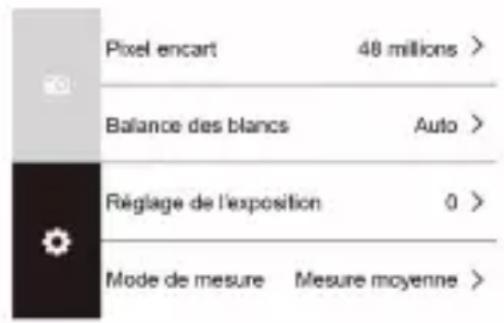
(Photo or camera sub-menu is successively: pixel setting /video resolution, white balance, exposure setting, metering mode, sharpness, flash, light sensitivity, time watermark)
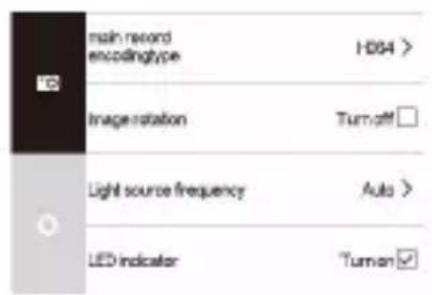
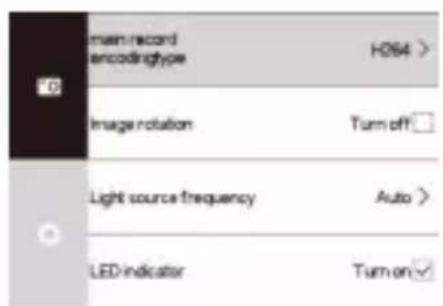
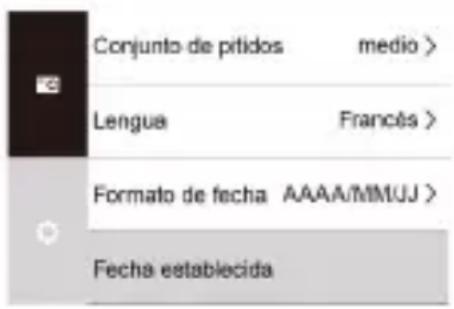
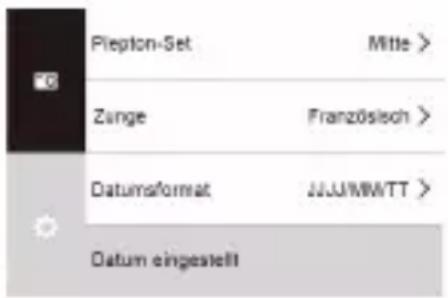
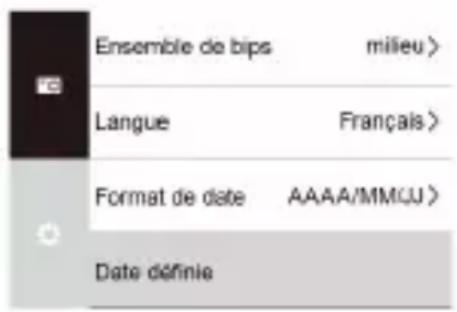
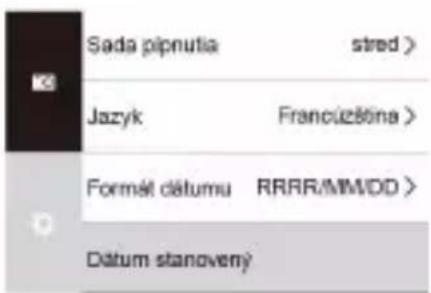
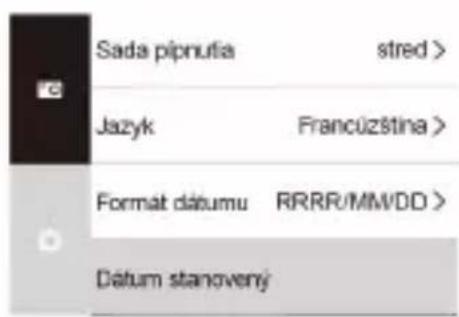
(Setup menu is: main video coding type, video rotation, light source frequency, LED indicator, automatic screens saver, timing shutdown, prompt setting, language, period format, date setting, formatting, equipment information, restore factory settings)
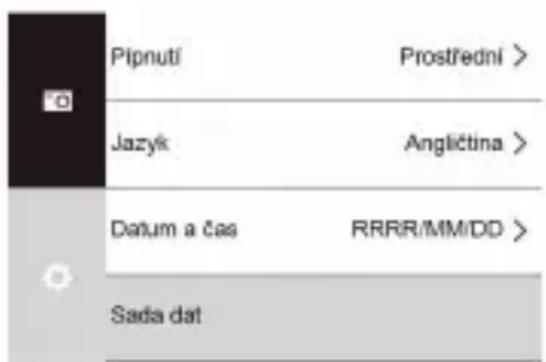
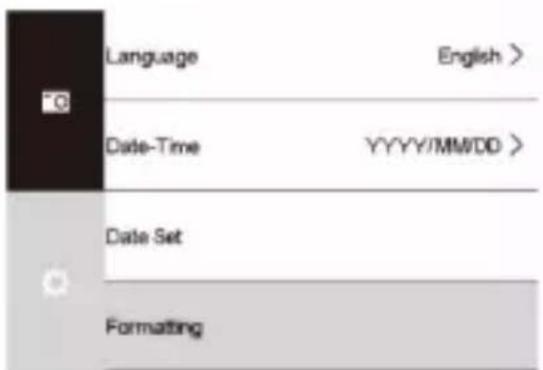
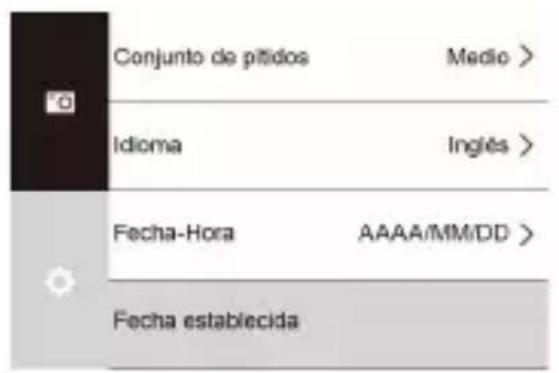
4.1 Language
This function allows you to set the camera's interface language.
- In Photo Mode press the MENU button.
- Select the gear icon on the bottom of the left side of the screen using the UP or DOWN buttons.
- Press the RIGHT button to enter the setup menu.
- Select 'Language' using the UP or DOWN buttons and press the MODE/OK button to enter the 'Language' menu.
- Press the UP or DOWN buttons to navigate the menu, and press the MODE/OK button to confirm your selected language.
- Press the MENU button to exit the settings menu without making a selection.
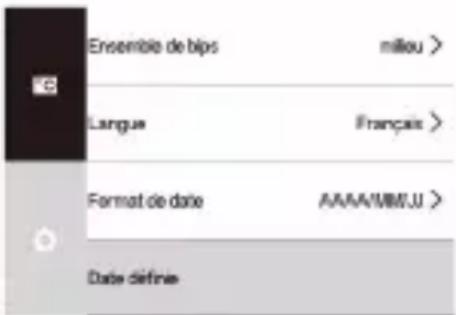
This function allows you to set the current Date and Time on your recorded video clips and captured photos.
- In Photo Mode press the MENU button.
- Select the gear icon on the bottom of the left side of the screen using the UP or DOWN buttons.
- Press the RIGHT button to enter the setup menu.
- Select 'Date Format' using the UP or DOWN buttons and press the MODE/OK button to enter the 'Date
Format' menu.
- Press the UP or DOWN buttons to navigate the menu, and press the MODE/OK button to confirm your selected option (YYYY/MM/DD, MM/DD/YYYY, DD-MM-YYYY).
- Press the MENU button to exit the settings menu without making a Selection.
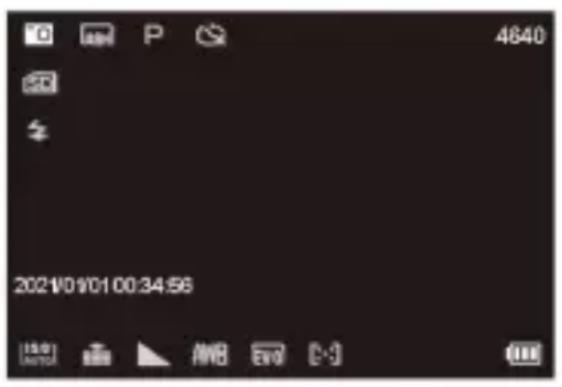
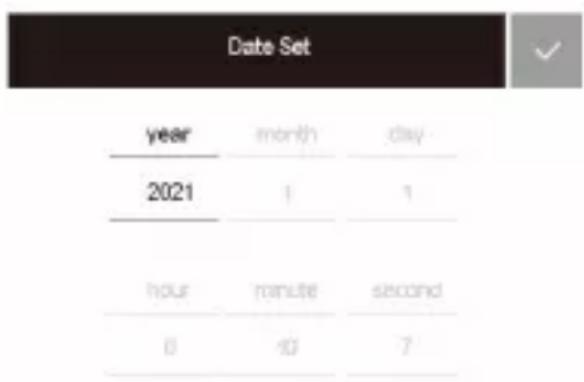
Notes: If there is no date and time for the photos or videos taken, please find the "time watermark" in the menu settings of taking photos and videos and press the M/OK button to select on or off.

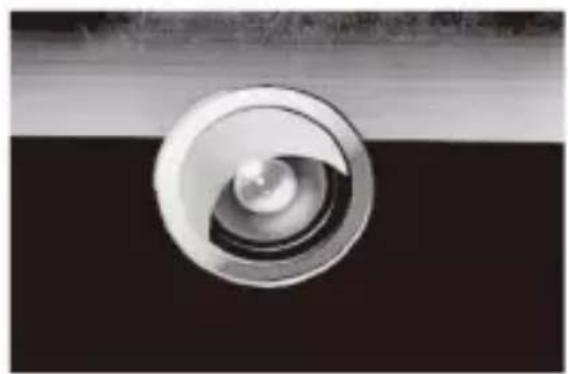
Flashlight Button
In Photo Mode 🔒, press Up ⏻ Button to switch back and forth between "Flash On" "Flash Off" "Auto Flash".
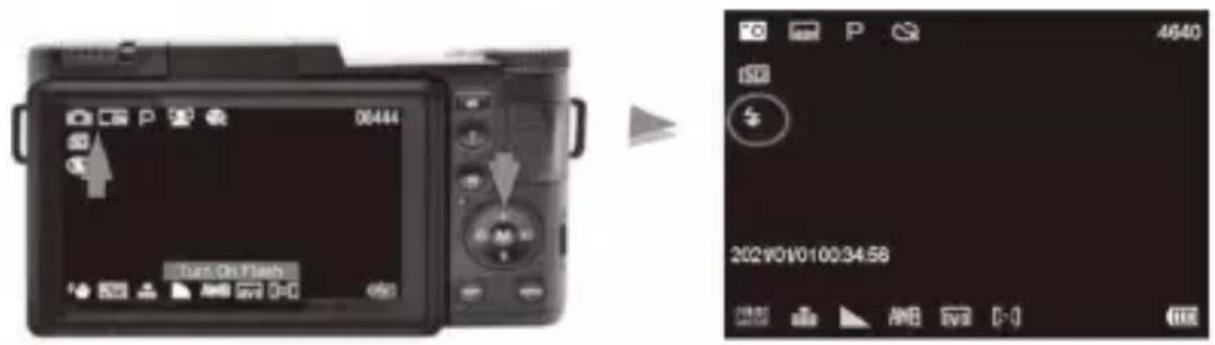
Flash On : ⚠ When taking photo, always flash.
Flash Off: No flash when taking photos.
Auto Flash : ⬆ according to environment around, flash automatically.
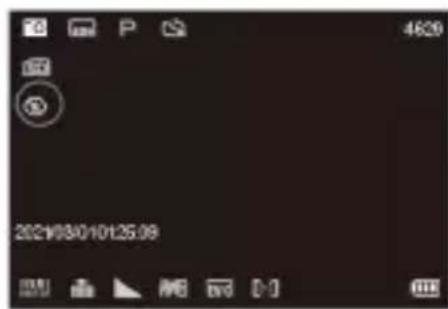
Note: Before using thef lash, manually dial the flash devicetoward the Photographed object. The flash does not work in video mode.
- Camera and Computer Connection
After reconnecting the computer and the camera with a USB cable, the "Charging Mode" /"MassStorageMode"/"PCCamera" options appear on the screen, press the upand down keys toselect, andpress the M/OK key toconfirm the selection.
1.MSDC(Storage): Select MSDC, find related drive in computer to review photos and videos.
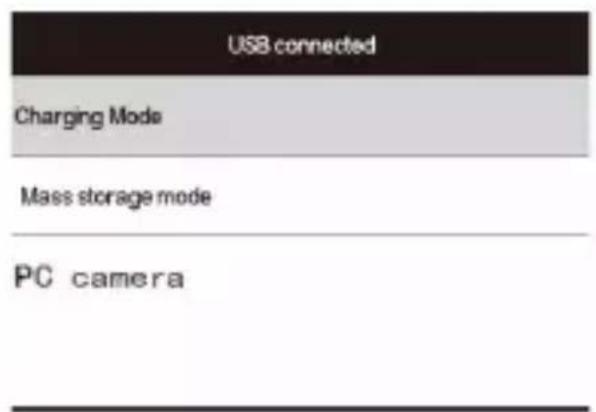
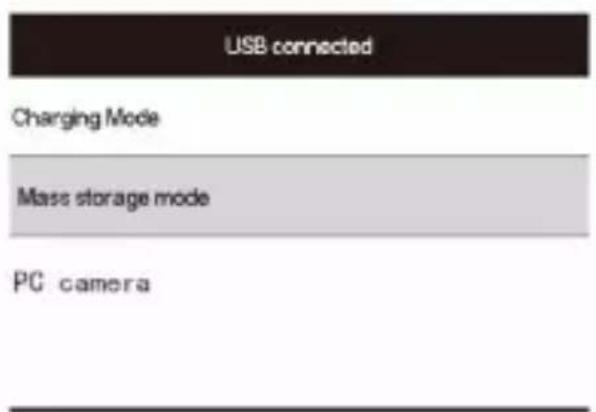
2.PC camera: Choose PC Camera on display, press M/OK Button toselect. The camera could become a PC camera.

natural_image
Close-up of a metallic spiral component against a dark background (no text or symbols visible)Notes: If PC camera can not be found in computer, please open Skype or other similar application to test if the PC camera is available to use.
-
Using an external microphone: The camera only supports the external microphone that comes with the factory. If the purchased camera is equipped with a microphone, insert the battery into the microphone according to the correct positive and negative poles and turn on the microphone switch, the indicator light will be on. Then plug the microphone into the headset port of the camera's external microphone, and start recording with the external microphone used for recording.
-
Technical Parameters
| Image resolution | 2M(4000*3000), 18M(4896×3672), 24M(5664*4248), 30M(6336*4752), 40M(7296*5472), 48M(8000*6000). |
| Video resolution | 4K/60FPS,4K/30FPS,2.7K/30FPS,1080P/120FPS,1080P/60FPS,1080P/30FPS,720P/60FPS,720P/30FPS. |
| Storage medium | The maximum support is 128G SD card, and the card speed is above Class10. |
| File format | JPEG、MP4 |
| Method of shooting | Multi-Snapshot, Self Timer (2S ,5s,10S); |
| Digital zoom | 16 × |
| White balance | Automatic, sunny, cloudy, incandescent light, fluorescent. |
| Exposure control | Exposure values (+ 3, + 2, + 1,0, -1, -2, -3) |
| Sensor luminosity | Automatic, 100, 200, 400, 800, 1600, 3200, 6400 |
| Computer connection | Type-C USB |
| TFT display | 3.0 IPS |
| Power management | 3.7v lithium battery |
| OSD language | English, Simplified Chinese, Traditional Chinese, Spanish, French, German, Italian,Portuguese, Japanese,Nederlands |
| Battery Capacity | 1300mAh |
FAQ
Q1. Why there is "Card Error" on display when inserting SD card in camera? How to solve?
A: Please try to format card in the camera. If cannot format, or the card is still forced to be formatted. There maybe a problem with the card. Please change a card, which speed is Class 6 or above.
Q2. Is the flashlight available to use in Video Mode?
A: No, flashlight cannot be used during video recording.
Q3. Does the camera support external Microphone?
A: YES.
Q4. Does the camera has WiFi, the photos can be transmitted to iPad?
A: No, the camera no WiFi function.
Q5. How to transmit photos and videos to the computer?
A: After connecting the camera to the computer with an USB cable, there will "MSDC" and "PC Camera" shown on the display.
Choose "MSDC" and press Mode Button to select.
Camera Maintenance
If camera is not to be used for a long time, please take out the battery and put them in dust-free and dry
environment which temperature is less than 30°C .
In order to make sure long battery life, please make sure battery fully discharged before storage.
Please make sure the battery is charged and discharged at least one time every 3 months.
If there is dust or dirt on lens or display, please use clean and soft lens cleaning cloth to wipe it softly.
Camera is precise instrument, please prevent it from falling, knocking shaking etc.
Other Notes
Please do not insert other objects into camera's card slot except the SD card.
When camera is powered on for just few seconds, the image on display maybe not stable. It is normal, not camera failure.
Due to the optical performance of the lens, color dispersion may occur at the edge of the image. It is normal, not camera failure.
The memory card will get hot after using for a long time. It is normal, not camera failure.
The camera's screen heats up after using the camera for a long time. It is normal, not camera failure. The camera do not have auto focus function. To get the best picture, it is suggested to take a photo two meters away from the object.
natural_image
Close-up of a black digital camera with a white directional arrow and control buttons (no text or symbols visible)natural_image
Three black camera modules labeled A, B, and C showing internal components and movement (no text or symbols)natural_image
Close-up of a black digital camera with a visible internal component and a small card inserted (no text or symbols)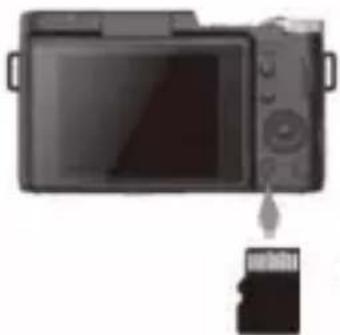
natural_image
Diagram showing a digital camera with an attached card, no text or symbols present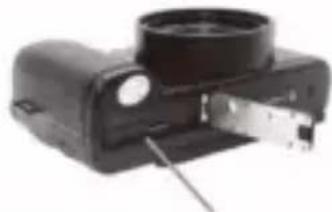
natural_image
Close-up of a black electronic device with a circular lens and metallic connector (no visible text or symbols)natural_image
Close-up of a black DSLR camera with lens and control knob (no visible text or symbols)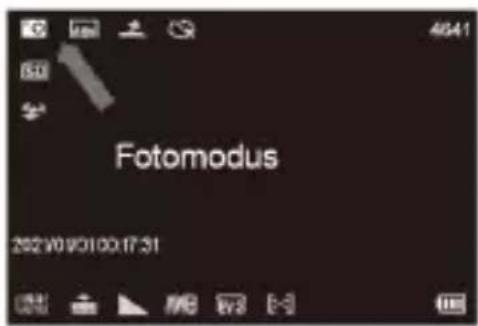

natural_image
Close-up of a black DSLR camera with control knobs and a circular lens, no visible text or symbols on the device body.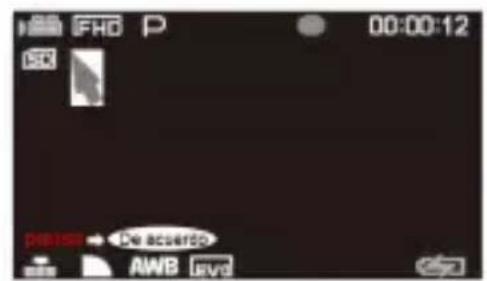
Wiedergabetaste (Wiedergabemodus)
natural_image
Dark image with faint white symbols and a small circular icon at the bottom (no readable text or symbols)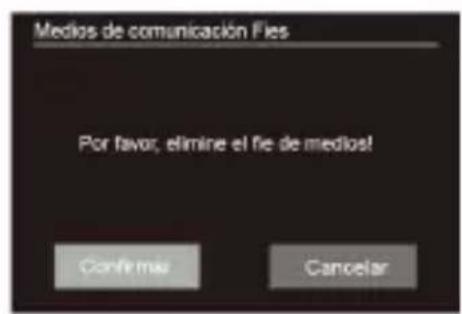
natural_image
Close-up of a metallic circular component with concentric rings, mounted on a dark surface (no text or symbols visible)natural_image
Top-down view of a black digital camera with an arrow indicating left button (no text or symbols visible)natural_image
Close-up of a black DSLR camera with a white directional arrow indicator (no text or symbols)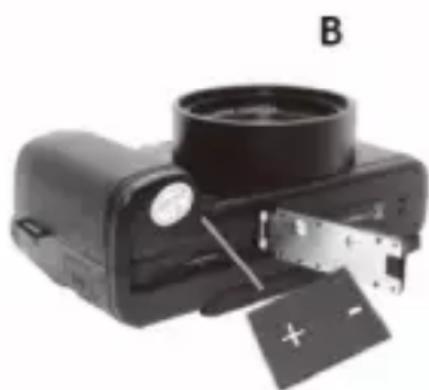
natural_image
Black camera with a circular lens and attached electronic device labeled B (no visible text or symbols on the device itself)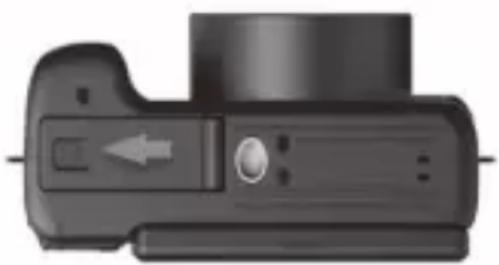
natural_image
Close-up of a black digital camera with a left-pointing arrow indicator (no text or symbols)- Please format the memory card before using the camera (Caution, this will erase all data on the card).
- Do not remove or insert the memory card when recording. It may damage the card or cause dataloss.
· Memory card rating must be Class 10 or above.
NOTE: After closing the battery door, make sure that the door is
natural_image
Close-up of a black DSLR camera with control knob and lens (no visible text or symbols)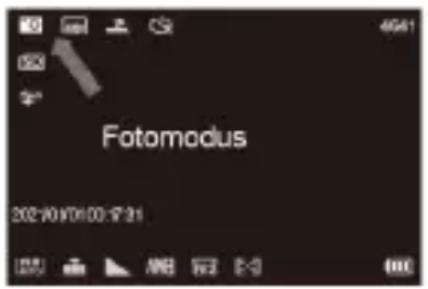

natural_image
Close-up of a black DSLR camera with control knob and adjustment knob, no visible text or symbols on body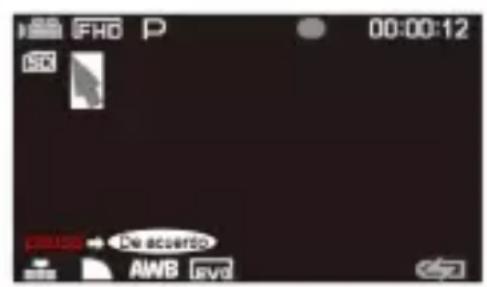
Wiedergabetaste (Wiedergabemodus)
natural_image
Dark background with faint white symbols and a numeric value '4000/0000' at the bottom (no readable text or data)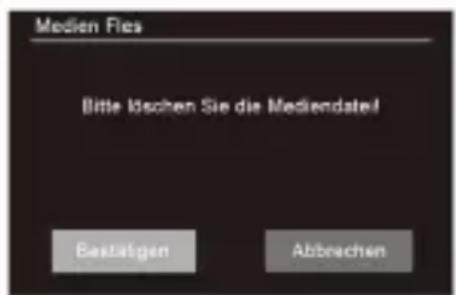
natural_image
Close-up of a circular mechanical component with concentric rings, mounted on a dark surface (no visible text or symbols)natural_image
Top-down view of a black digital camera with a white arrow pointing to the left side (no text or symbols visible)natural_image
Three sequential images (A, B, and C) showing a camera module with adjustment arrows and a plus button, no text or symbols present.natural_image
Close-up of a black digital camera with a small attached card showing the same internal components (no text or symbols visible)
natural_image
Illustration of a digital camera with an attached card showing the internal components (no text or symbols)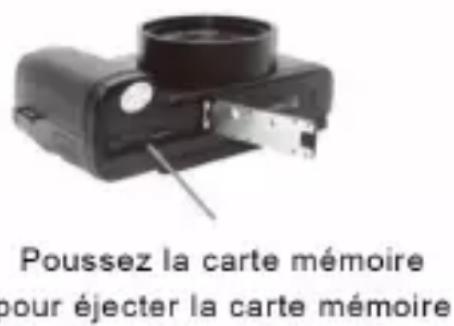
natural_image
Close-up of a black DSLR camera with control knob and adjustment knob (no visible text or symbols)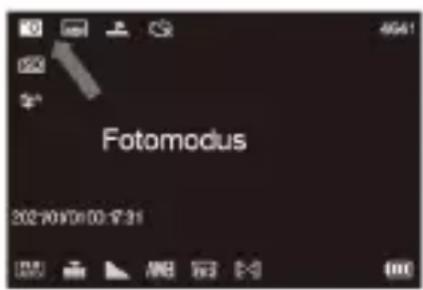

natural_image
Close-up of a black DSLR camera with visible lens and control knob (no text or symbols on body)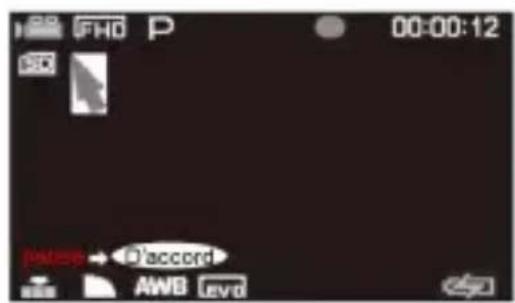

Bouton Lecture (mode lecture)
natural_image
Dark background with faint white symbols and a numeric display at bottom (no readable text or numbers)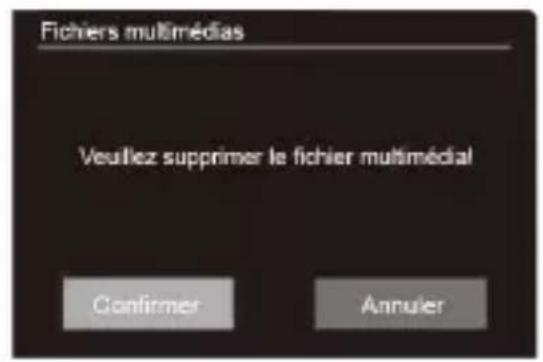
natural_image
Close-up of a metallic circular component with concentric rings, mounted on a dark surface (no text or symbols visible)natural_image
Close-up of a black digital camera with a white arrow indicator and control buttons (no text or symbols visible)natural_image
Three black camera modules labeled A, B, and C showing internal components and movement (no text or symbols)natural_image
Close-up of a black DSLR camera with digital lens and control knob (no visible text or symbols)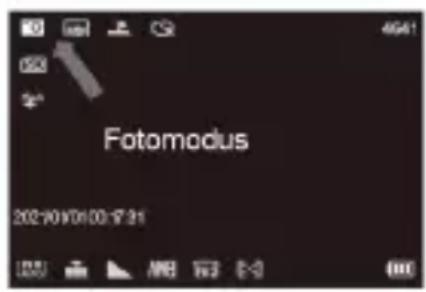

natural_image
Close-up of a black DSLR camera with control knob and arrow indicator (no text or symbols on body)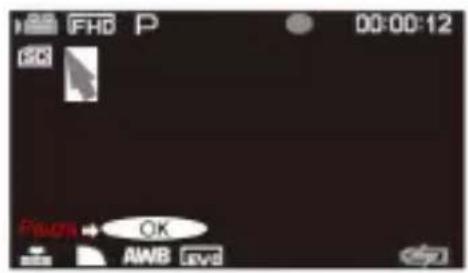
natural_image
Dark image with faint white symbols and a timestamp label at bottom (no readable text or symbols in main area)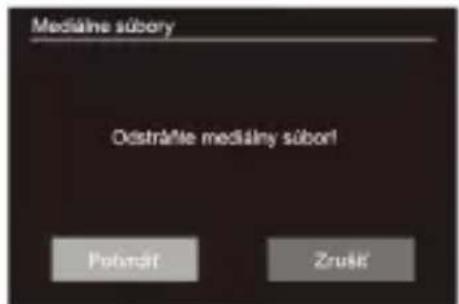
natural_image
Close-up of a circular mechanical component with concentric rings, mounted on a dark surface (no text or symbols visible)natural_image
Close-up of a black digital camera with an arrow indicator (no text or symbols visible)natural_image
Three sequential images (A, B, and C) showing a camera module being opened into a device, with no visible text or symbols.natural_image
Close-up of a black camera module with a small attached card showing the same image (no text or symbols visible)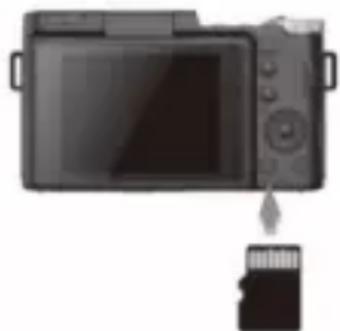
natural_image
Diagram showing a digital camera with an attached card, no text or symbols present
POZNÁMKA:
natural_image
Close-up of a black DSLR camera with digital lens and control knob (no visible text or symbols)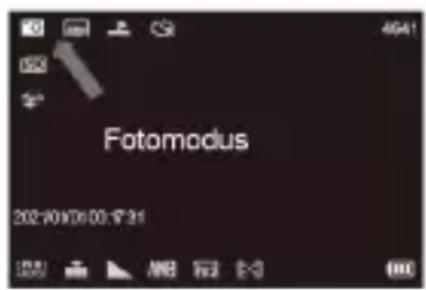

natural_image
Dark background with faint white symbols and a timestamp label (4000:3000) at bottom left corner

natural_image
Close-up of a metallic spiral button on a black background (no text or symbols visible)natural_image
Top-down view of a black digital camera with a white arrow indicator (no text or symbols)2.2 Vložte baterii
natural_image
Three sequential images (A, B, and C) showing a camera module being opened into a device, with no visible text or symbols.natural_image
Close-up of a black DSLR camera with visible lens and control buttons (no text or symbols on body)
natural_image
Close-up of a black DSLR camera with lens and control knob (no visible text or symbols)

natural_image
Dark image with faint white symbols and a timestamp label (4000x3000) at bottom left, no readable text or data content.
![0 P Q 4640 2021/01/01 00:34:58 USB DVD [~]](/content/2026/04/657044/images/85f525ecb5dd407725385c42e0def393c49629c0aff68057a5960b42c22b532f.jpg)