ES 82w SKILL 2 - Scooter EMG - Free user manual and instructions
Find the device manual for free ES 82w SKILL 2 EMG in PDF.

| Product type | Foldable electric scooter |
| Brand | EMG |
| Model | ES 82w SKILL 2 |
| Weight | Approx. 11 kg |
| Maximum load | 120 kg (rider + luggage) |
| Battery | Lithium 36 V / 5 Ah |
| Range | Approx. 18 km (depending on conditions) |
| Charging time | Approximately 4 hours |
| Motor | 350 W |
| Speeds | 3 modes: ECO (6 km/h), Drive (20 km/h), Sport (25 km/h, private use) |
| Max slope | 15% |
| Brakes | Front drum brake + rear electronic brake |
| Wheels | 8 inches, honeycomb (puncture-proof) |
| Lighting | Front and rear LED lights, turn signals |
| Display | Integrated color screen (speed, battery, mode) |
| Suspension | Front shock absorber |
| Protection rating | IPX4 (splash-resistant) |
| Airborne noise | <70 dB(A) |
| Charger input | Input: 100-240 V~, 50/60 Hz; Output: 42 V / 1.5 A |
| Cleaning | Damp cloth (water or suitable solution), do not use alcohol or benzene |
| Warranty | 2 years for consumers (per legislation), battery: 6 months |
| Customer service | Trevi S.p.a. (Italy) - Tel: +39 0541 694839 |
Frequently Asked Questions - ES 82w SKILL 2 EMG
User questions about ES 82w SKILL 2 EMG
0 question about this device. Answer the ones you know or ask your own.
Ask a new question about this device
Download the instructions for your Scooter in PDF format for free! Find your manual ES 82w SKILL 2 - EMG and take your electronic device back in hand. On this page are published all the documents necessary for the use of your device. ES 82w SKILL 2 by EMG.
USER MANUAL ES 82w SKILL 2 EMG
VELOCIPTOR
es 82w SKILL 2

natural_image
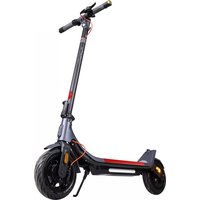
Black electric scooter with extended wheels and a mounted sensor on top (no visible text or symbols)manuale utente
user guide
MANUEL DE L'UTILISATEUR
EMG®
electric moving green
natural_image
Simple black-and-white icon of a helmet and helmet silhouette (no text or symbols)natural_image
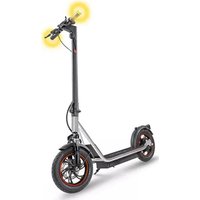
Side view of a black electric scooter with green wheels and a red arrow indicating motion (no text or symbols)natural_image
Close-up of a black mechanical component with a green circular detail and mounting holes (no visible text or symbols)PRiMO UTiLiZZo
natural_image
Electric scooter with two wheels and a green arrow indicating motion direction (no text or symbols on the vehicle itself)
natural_image
Two unrelated electronic devices: a black charging plug and a black electric scooter with red head and green sensor, shown without any text or symbols.Autonomia
natural_image
Symbol of a trash bin crossed with no text or numbers, representing waste sorting or discharge (no text present)
natural_image
Symbol of a trash bin crossed with no text or numbers, representing waste sorting or disposal (no text present)VELOCIPTOR
es 82w SKILL 2
Thank you for purchasing the electric scooter
VELOCIPTOR ES 82W SKILL 2
Please read the manual before using the product, and
keep it in a safe place for future reference.
pictograms

natural_image
Simple black-and-white icon of a helmet and bucket inside a circle (no text or symbols)Obligation to wear a protective helmet

Read the instructions before use
Translation of the original notice
user guide

index
Note on the user guide 21
Charger specification 21
Warnings 22
General description 25
First use 26
Open and fold the scooter 27
How to recharge the battery 28
Autonomy 29
Display and commands 30
How to use the scooter 31
Technical specifications 31
Information to users of household appliances 32
Warranty 33
Note on user guide
This manual provides the user a description of the characteristics and operation.
The use of the vehicle is the sole responsibility of the driver who, after reading and understanding this manual, and after asking the seller and/or the manufacturer for any clarifications deemed necessary, considers himself suitable from a psychological and physical point of view to the use of the vehicle.
The manufacturer declines any responsibility for damages of any kind and entity caused to people or things as a result of using the vehicle.
The manufacturer reserves the right to make changes to the manual and the product without prior notice.
Charger specification
• Manufacturer: Shenzhen Xin Heng Tyco Electronics Co., Ltd.
• Model: XHK-916-42015
- Input voltage and frequency: 100-240V \~ 50/60Hz 2A max
- Output voltage and current: 42V 1.5A
• Output power: 63W
• Average active yield: 87.03%
• Power absorbed in the no-load condition: 0.47W
- Before use, read the instructions in this manual.
- No repairable parts inside.
- Do not expose this product to rain or moisture.
- For internal use only.
- Disconnect the power supply in the event of an anomaly in the battery charging or overheating or rupture.
- Use only the power supply supplied as standard.
- Securely close the charging port cover of the scooter to protect the connector from water and dust.
- The external flex cable of this transformer cannot be replaced; if the cable is damaged, the charger must be scrapped and replaced with one new of the same model.
warnings
• Take the time to learn the basics of driving practice and gain experience to avoid serious accidents that can occur in the first periods of use.
- Contact the seller to be directed to an appropriate driving training organization.
- Avoid high traffic areas or congested areas.
- City traffic involves crossing many obstacles such as sidewalks or steps. It is recommended to avoid jumping over obstacles. It is important to anticipate and adapt the trajectory and speed before crossing these obstacles. It is also recommended to stop and get off the vehicle when these obstacles become dangerous due to their shape, height or the risk of skidding they present.
- In any case, anticipate your trajectory and your speed in compliance with the highway code, the type of pavement and the obstacles present.
- Make your presence known when you approach a pedestrian or cyclist, when you are not seen or heard.
• Cross the pedestrian walkways by walking.
- Park the scooter only on a flat and non-slippery surface using the special stand. Do not park the scooter on surfaces with an inclination greater than 6^ . Parking uphill or downhill involves the risk of loss of stability and falling or overturning.
- Either way, take care of yourself and others.
- Do not modify the vehicle from its original use.
• This vehicle is not intended for acrobatic use.
- Attention, the brake disc can overheat during use. Do not touch after use.
- Regularly check the tightness of the various bolted elements, especially the wheel pins, folding system, steering and brakes.
- Like any mechanical component, the vehicle is subject to severe stress and wear. Different materials and components can react differently to wear or fatigue. If the expected life of a component is exceeded, it can suddenly break and risk injuring the user. Cracks, scratches, and discoloration in high-stress areas indicate that the component has exceeded its life and needs to be replaced.
- Eliminates sharp edges caused by use.
- Do not modify or transform the vehicle.
- Avoid obstacles, smooth surfaces, snow, ice and rough surfaces.
- Avoid irregular objects that can clutter the road surface such as branches, garbage, stones, pebbles or other.
- Prolonged use of the vehicle or on uneven surfaces could lead to numerous body vibrations that could trigger certain pains; use the scooter in a reasonable way to limit these risks.
- Avoid tight spaces or spaces with obstacles.
- Do not drive on slippery roads in rain or high humidity.
- Do not drive the scooter on steep slopes which could affect the stability of the vehicle.
- Any load attached to the handlebar will affect the stability of the vehicle.
- It is forbidden to use accessories or additional elements not approved by the manufacturer.
- There is no minimum and maximum height limit for the use of the scooter.
- When using the scooter, wear appropriate shoes and clothing, as well as all necessary protective items: helmet, knee pads, elbow pads and other protective gear.
- Attention: on wet roads or with high humidity the braking distance increases, adapt the speed accordingly. It is therefore very important to adapt your driving style and speed and leave an adequate safety distance with pedestrians or other means of transport.
- It is necessary to evaluate the surface you are traveling on (flat, clean, dry, flat, wet, dirty, uneven) and adapt your driving style and speed to ensure a safe distance from pedestrians or other means of transport.
- Restrict driving in poorly lit areas, in the dark or at night. In this case, always use the lighting devices on the vehicle and use clothing equipped with high visibility devices.
- In the event of an accident, stay where you are and wait for help.
- Do not lend your scooter to people who are unfamiliar with the device.
- This device can be used by persons over the age of 14 as well as by persons with reduced physical, sensory or mental abilities, if they are adequately supervised by an adult and if they have been given instructions regarding the safe use of the device and if possible risks were understood; Cleaning and maintenance of the scooter should only be done by a properly trained adult.
- It is also necessary to wear shoes when handling the scooter (maintenance, assembly, repair, etc.).
• This item is not a toy.
- Use only the power supply supplied as standard.
- During use, tightly close the cover of the scooter's charging socket to protect the connector from water and dust.
- The external flex cable of the charger cannot be replaced; if the cable is damaged, the battery charger must be scrapped and replaced with one of the same type.
- Minors using the scooter must always be supervised by an adult.
- Do not ride the scooter with more than one person on the footrest as this could cause you to lose control of the vehicle.
- Do not use the scooter in situations that could be dangerous to your safety and that of the people around you.
- Do not use the vehicle under the influence of alcohol, drugs or psychotropic substances that can alter your emotional state, your sensory abilities and the control of your movements.

- Always wear appropriate clothing that does not restrict movement, as well as flat shoes (preferably sneakers with a non-slip rubber surface) that provide the necessary grip and stability.
- As with any means of transport, the use of the scooter can cause injuries to the user or to the people around, as a result of accidental falls or collisions. It is therefore necessary to always wear protective equipment (such as bicycle helmet, knee pads, elbow pads) and be very careful not to cause damage to people and things.
- The scooter should not be used in standing water, puddles or adverse weather conditions (such as rain, snow or hail). Use the scooter in dry environments to avoid damage to the motor and electrical circuits.
- Do not attempt to disassemble the product or its parts. Any repairs must be carried out by authorized personnel according to the warranty conditions.
- Disconnect the power supply before cleaning the scooter. For cleaning, use a cloth slightly moistened with water or a solution suitable for cleaning these devices. Do not use alcohol or benzene. After cleaning, dry immediately with a soft cloth.
- Before using the scooter, the handlebar must be installed on the main frame of the vehicle.
- Periodically check that all screws are well tightened, that there are no loose bolts or screws on the handlebar and mechanical parts, that the brake is properly adjusted and that the front / rear lights work correctly.
- The user must be able to use his arms and hands freely and always hold the handlebar with both hands.
- At all times, the user must be able to look freely in front of him, on both sides, and freely perform the necessary maneuvers.
- the driver must wear the reflective vest or the high visibility harness from half an hour after sunset, throughout the period of darkness and during the day, if the weather conditions require lighting.
- It is forbidden to transport other people, objects or animals, or to tow vehicles, transport animals and be towed by another vehicle.
- The scooter must not be equipped with a seat for the user because it is designed to be used standing up.
- The scooter is equipped with a bell for all beeps.
- Only adults or people over the age of 14 can ride the scooter.
- Do not press the accelerator when walking next to the device.
The manufacturer declines all responsibility for damage to persons or property occurring as a result of using the product.
General description

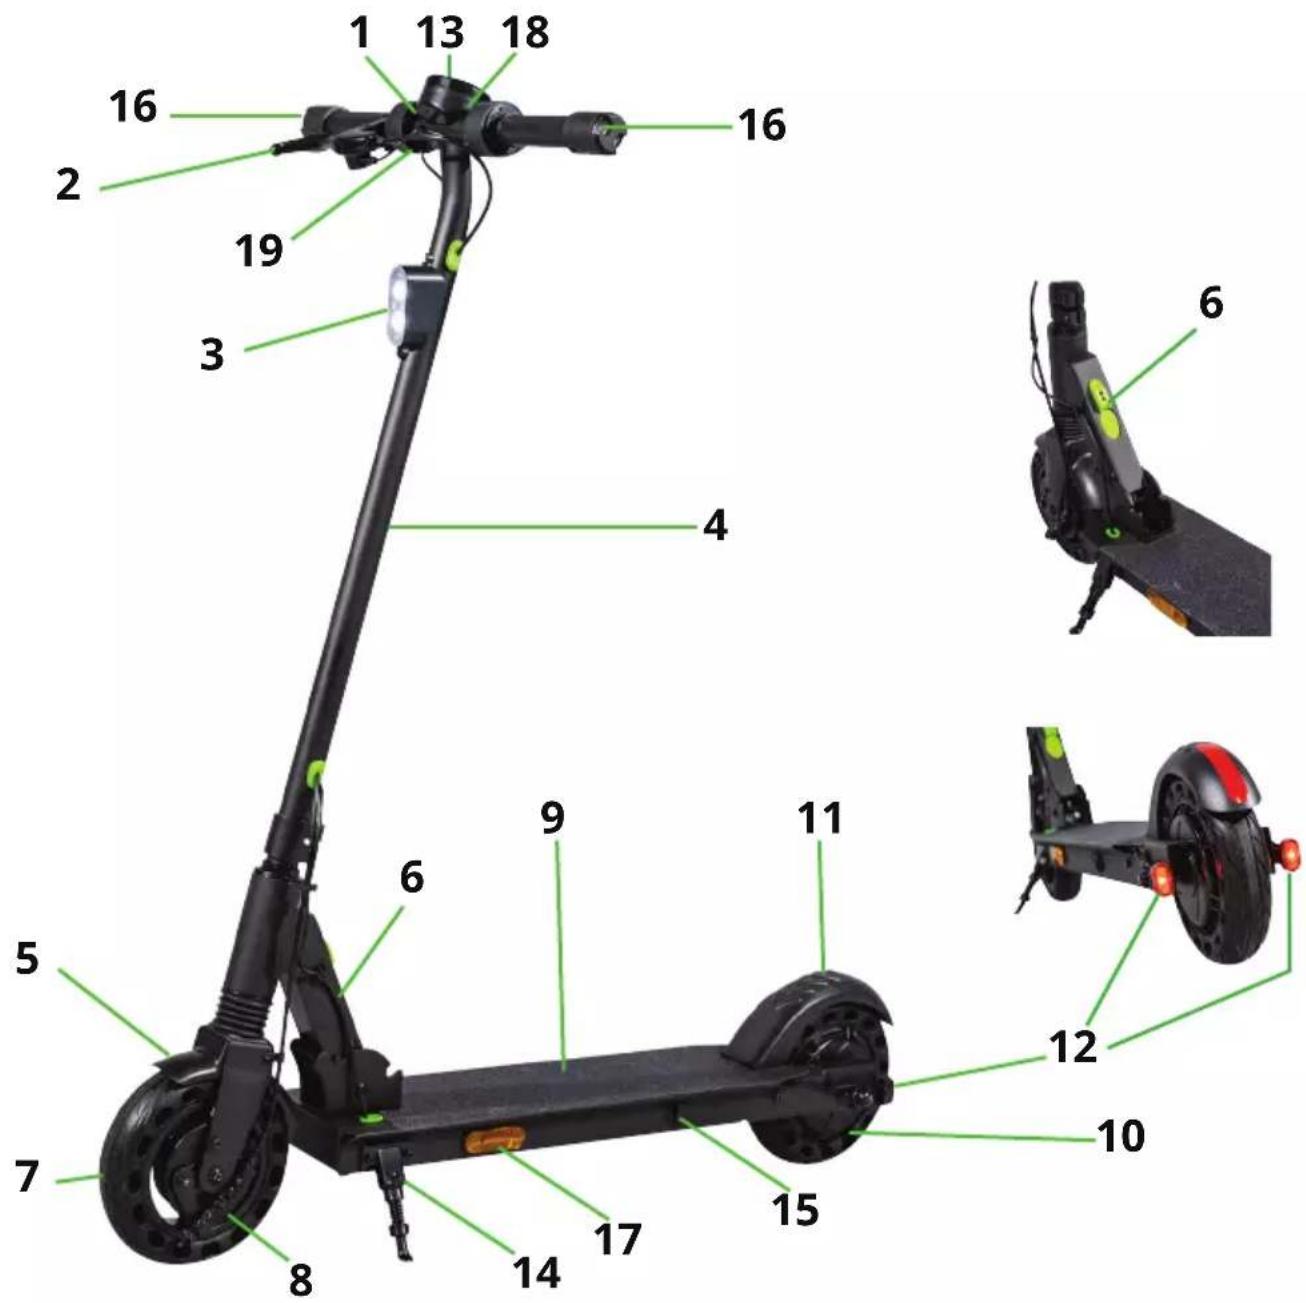
- Handlebar
- Check the drum brake
- Front light
- Handlebar column
- Front fender
- Safety hook and mechanism locking
- Front wheel
- Drum brake
- Footboard
-
Rear wheel with motor
-
Rear fender
- Rear lights
- Display
- Stand
- Charging socket
- Direction lights
- Lateral reflector
- Bell
- Front reflector
Assembly and fixing before use
Before using the VELOCIPTOR ES 82W, some installations and adjustments need to be made.
First, unpack the vehicle:
- Insert the handlebar stem into the front wheel stem;

natural_image
Side view of a black electric scooter with green wheels and a red arrow indicating motion (no text or symbols)-
Move the front wheel straight ahead and keep it locked;
-
Straighten and adjust the handlebar referring to the front wheel, once the correct position has been found, tighten the two screws (one on each side) on the lower collar;

natural_image
Close-up of a black mechanical component with a green circular feature and mounting holes (no visible text or symbols)FIRST USE
Assembly and fixing of the front brake lever and installation of the grips
Before using the VELOCIPTOR ES 82W, some installations and adjustments need to be made. First, unpack the vehicle chassis:
- Insert the ring with the front brake lever into the right side of the handlebar support, adjust the angle according to your height and riding style; tighten the ring to the handlebar support by tightening the fixing screw;
- Install the horn (bell) on the left side of the handlebar holder and tighten it by tightening the fixing screw;
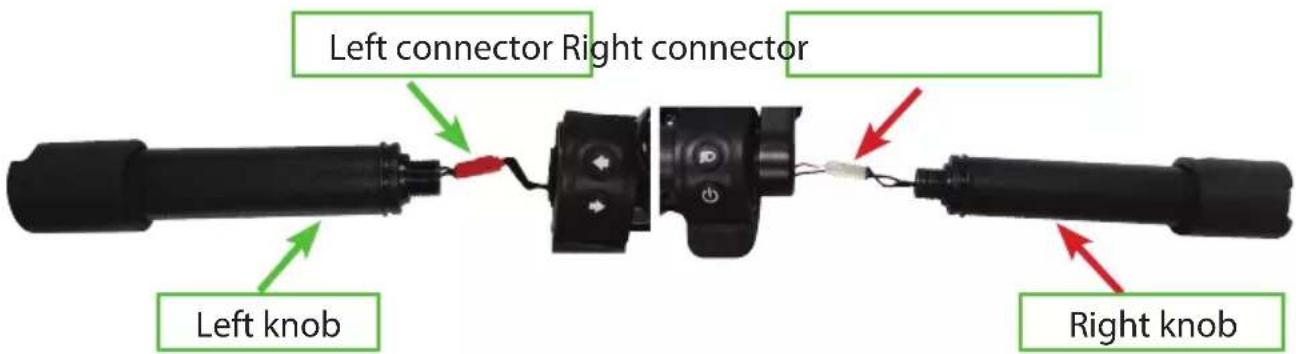
- Assemble the handlebar grips to the main frame of the vehicle. Connect the grip connector to the handlebar support connector taking care to respect the colors and insertion direction of both connectors (white to white and red to red). Insert the threaded part of the first knob (right or left) into the respective hole on the sides of the frame. Then, while holding the main frame, screw it clockwise (see pictures below) until the threaded part of the knob is fully seated on the handlebar mount;
- Install the front reflector between the display and the accelerator control, adjust its angle and tighten the fixing screws;
- Check all components carefully to make sure the steering is installed correctly and that all connecting parts are secure and in good working order.


FIRST USE
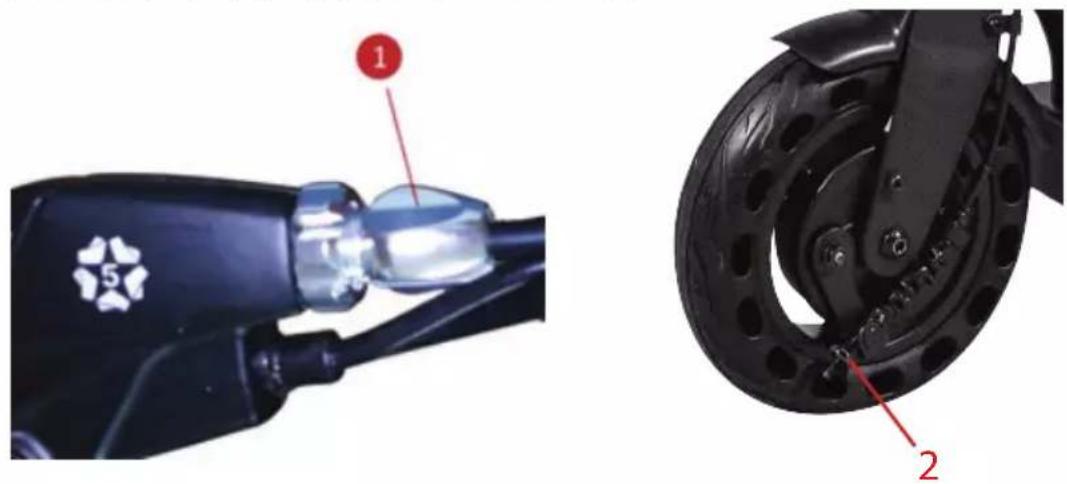
Drum brake
The drum brake is adjusted at the factory, but it is advisable to check it before first use.
a / the braking intensity is adjusted by the screw on the brake lever (1) or by the brake mechanism (2) located on the front wheel.
OPEN AND FOLD THE SCOOTER
Folding the scooter
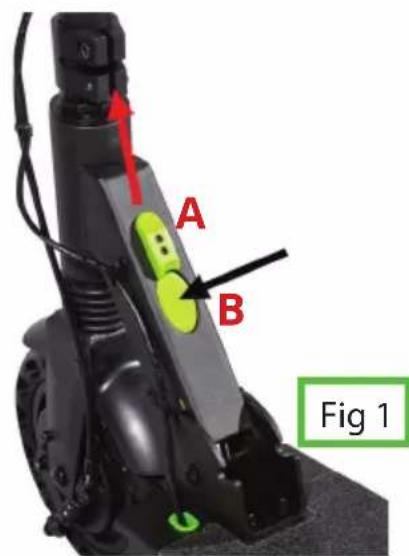
- Move the safety lock A upwards (located on the lower part of the handlebar support tube and colored green) as indicated by the red arrow in Fig 1, then simultaneously press button B downwards as indicated by the arrow black in Fig 1;
- Accompany the handlebar tube towards the rear wheel until you hear the coupling click, see Fig 2;
- You can now transport the scooter by gripping the handlebar support tube.

natural_image
Black electric scooter with two wheels and a green arrow indicating motion, labeled 'Fig 2' (no text on the vehicle itself)OPEN AND FOLD THE SCOOTER
Opening the scooter
- With the scooter closed as in Fig 2, release the handlebar by moving the safety lock A upwards (located on the lower part of the handlebar support tube and green in colour) as indicated by the red arrow in Fig 1, then, simultaneously, press key B downwards as indicated by the black arrow in Fig 1;
- Bring the handlebar tube to a vertical position, taking care to keep the platform still and giving a strong and decisive blow in the final part of the stroke so that the mechanisms lock perfectly;
ATTENTION: if at the end of the operation button B should remain partially pressed, it would mean that the mechanisms are not perfectly tightened therefore, it will be necessary to repeat the steps of point 1, to release the handlebar again, and then those of point 2, increasing the force of the blow in the final part of the race. Always check that button B always returns to its end of travel and NEVER stays pressed, even lightly.
- The scooter will be correctly opened when you hear the click of the handlebar tube and button B has fully completed its stroke.
HOW TO RECHARGE THE BATTERY
Before first use, charge the battery to 100% capacity.
To make sure you reach your destination, we recommend fully charging the battery at the latest when the display only shows two bars
Note: The battery must be charged every 30 days, even if the scooter is not used; if the battery is not charged regularly, it will lose efficiency until it is completely discharged; in this case, we will not be able to recognize the guarantee on the product.
Charging procedure
- Open the charging socket protective cap located on the side of the scooter and connect the charging plug of the charger, paying attention to the direction of insertion;
- Connect the charger to the wall socket at 220V ∼;
- The charging process is in progress with red charger LED light. The charging process is completed when the charger LED turns green: the battery is charged to 100% capacity;
- Disconnect the charger from the wall socket and then the charging socket from the e-scooter;

HOW TO RECHARGE THE BATTERY
- Carefully close the charger connector with the protective cap.
Always charge the battery in a dry and ventilated environment. Never cover the charger during charging process, otherwise it may be damaged. The charger is for indoor use only.

natural_image
Two unrelated electronic devices: a charging plug and a scooter with red LED lights, both shown without any text or symbols.AUTONOMY
The maximum distance that can be traveled with a single battery charge is approximately 18km. However, this value must be considered indicative since it can be influenced by numerous factors.
Among the factors that can most affect battery life are the following:
- Transported weight: other conditions being equal, a greater transported weight will lead to a reduction in the battery autonomy.
- Surface: flat and sliding surfaces are less wasteful for the battery compared to uneven terrain, with slopes or that present substantial friction.
- Speed and driving style: a pace with frequent acceleration and bra-king will discharge the battery faster than a regular and uniform pace.
- Correct use and maintenance of the battery: a correct management of the charge and discharge cycles of the battery (see paragraph "How to recharge the battery") will help to keep the full efficiency of the battery longer and delay its natural decay.
• Environmental conditions: the presence of wind or use at low temperatures lead to a reduction in battery life.
Display AND COMMANDS

- Battery level LED indicators.
- Lights On indicator.
- Numerical speed indicator.
- Turn light indicator.
- Selected speed level indicator.
- Metric unit for distance.
- Graphical speed indicator.
-
Electronic brake.
-
Accelerator
- On/off key.
- Checking the drum brake.
- Lights On/Off button.
- Display.
- Turn light buttons.
- Bell.
- Front reflector.
Turning On and Off
To turn the scooter on and off, hold down the button (10) for about two seconds.
Select the Speed level
The scooter has three speed levels.
To change the speed level, with the scooter on, briefly press the button (10):
- In ECO mode (6 km/h), the "S" indicator on the display is off;
- In Drive mode (20 km/h), the "S" indicator (5) appears on a white background;
- In Sport mode (25 km/h), the "S" indicator (5) appears on a red background
Display AND COMMANDS
Turn on the front and rear LED light
Press the button (12) to turn on/off the LED lights.
Note: The front LED is white while the rear LED is solid red. Pull the drum brake lever (11) or push down the electronic brake control (8) to flash the LED rear light.
Scooter settings and settings
It is possible to modify some parameters of the scooter to activate/deactivate some functions:
| Value | Default set | Note | |
| P0 | 0 | Not editable | |
| P1 | 0 | Km/h o MPH | 0 Km/h1 Mph |
| P2 | 0 | Cruise control | 0 Off1 On |
| P3 | 0 | Kick start | 0 without push1 with push |
| P4 | 8 | Not editable | |
| P5 | 36 | Not editable |
- P1 allows you to select the speed measurement unit (Km/h p MPH)
- P2 allows you to activate or deactivate the cruise control (maintenance of constant speed until you act on the accelerator or brakes)
- P3 allows you to activate or deactivate the Kick start (starting with or without muscle push)
- To enter the settings, press the arrow keys for a few seconds
- To select the various P press the power button, to change the value press the light button.
- To exit the settings, press the arrow keys for a few seconds
HOW TO USE THE SCOOTER
Turn on the scooter by pressing the power button.
Get on the scooter and make sure that the kickstand is in the closed position; operate the accelerator lever gently to start the electric motor.
To brake, release the accelerator to activate the engine brake, or, for more sudden braking, use the drum brake lever and also act on the electric brake control.
TECHNICAL SPECIFICATIONS

■ Steel and aluminum frame with a maximum capacity of 120kg (passenger + luggage)
Foldable
■ 8 inch honeycomb wheels
■ Motor power 350W
■ 3 speed levels: ECO 6 Km/h, Drive 20 Km/h, Sport 25 Km/h (usable only in private spaces)
■ 36V---5Ah lithium battery rechargeable in about 4 hours
■ Integrated color display
■ Front drum brake + rear electronic brake
■ Front and rear LED lights
■ Front shock absorber
■ Directional turn light
■ Practical side stand
■ Maximum gradient: 15% (subject to change based on rider weight, battery charge level and road conditions)
■ Degree of protection: IPX4
■ Airborne Noise: <70dB(A)
■ Weight about 11Kg
■ Power supply included 100-240V \~ 50/60Hz / Output 42V—1.5A
natural_image
Symbol of a trash bin crossed with no text or numbers, representing waste sorting or disposal (no text present)
Precautions for correct disposal of the product.
The symbol shown on the equipment indicates that waste must be disposed of in “separate collection” and so the product must not be disposed of together with urban waste.
The user must take the product to special "separate waste
collection centres" provided by local government, or deliver it to the retailer against the purchase of a new product.
Separate collection of waste and subsequent treatment, recycling and disposal operations promotes the production of equipment with
recycled materials and limits negative effects on the environment and on health caused by improper handling of waste.
Illegal disposal of the product leads to the enforcement of administrative penalties.
natural_image
Symbol of a trash bin crossed with no text or numbers, representing waste sorting or disposal (no text present)The product works with batteries that fall under the European directive 2013/56/EC and that cannot be disposed of with
normal household waste. Please inform yourself about the
local directives regarding the separate collection of batteries: a correct disposal allows to avoid negative consequences for the environment and health.
TECHNICAL ASSISTANCE
Product technical assistance is guaranteed by:
Trevi S.p.a. Technical assistance
Via Raibano 40, 47853 Coriano (Rimini) Italia
Tel.: +39 0541 694839 | Web: www.emgmobility.it
CE
warranty
- The warranty comes into force on the date of the tax document and covers manufacturing defects and consequent failures that arose during the warranty period.
- In the event of a device failure, the buyer can ask for assistance contact the retailer where you purchased the product or:
Trevi S.p.a. Technical Assistance, Via Raibano 40, 47853 Coriano (Rimini) Italy - Tel.: +39 0541 694839 | Web: www.emgmobility.it
- In order for the warranty to be valid, the buyer must present a valid proof of purchase of the product for which he intends to request assistance (invoice or sales receipt in which an identification code and product description are expressly indicated), together with this warranty certificate.
- The external parts of the appliance, components and accessories purchased separately, parts and components which by their nature are subject to wear and tear, decay, and therefore require periodic maintenance and/or replacement (for example cables) are not covered by the warranty. power supply, power supplies/battery charger, batteries, wheels, cases, etc ...).
The guarantee does not cover direct and indirect damages, suffered by the user or by third parties, deriving from knocks and falls (even accidental), misuse by the user, use in an unsuitable environment, other components, atmospheric agents, sudden changes in tension, fires. The warranty does not cover those marginal aesthetic defects that have a negligible effect on the value or functionality of the product. Except as otherwise prescribed in other parts of this certificate, the warranty automatically lapses in the following cases:
a) if the serial number of the device is removed, modified or made unrecognizable;
b) in the event of tampering, alteration, replacement, repair, attempted repair,
disassembly (even partial) of the product carried out by unauthorized personnel;
c) in case of tampering or other violation of the integrity of the warranty seals placed on the product;
d) in the event of use that does not comply with current legislation <applicable to the product covered by the warranty.
The recognition of direct and indirect damages of any kind to persons and things deriving directly or indirectly from one or more causes of exclusion mentioned in this paragraph is also excluded.
warranty
- The mere authorization to send the product to the service center does not imply that the defect has been recognized as covered by the warranty with consequent free repair of the product. The product must be shipped in the original packaging, or in another suitable packaging, and in any case inserted in a protective packaging that is suitable for shipment by courier or postal service. Until delivery to the service center, the goods travel at the sender's risk. The warranty does not cover any damage that may have occurred during transport to the service center. The service center reserves the right to check the validity conditions of the guarantee upon receipt of the product. For requests for warranty assistance which, following verification by authorized service personnel, should prove to be unfounded due to the absence of real defects or due to the absence of defects covered by the guarantee, all costs incurred for the repair will be charged to the customer, the verification and controls on defect-free units covered by warranty. The customer will also be charged for all transportation costs.
- If parts or components under warranty are replaced, the parts removed and replaced will become the property of the service center. In the event that the repair is not physically possible, or is excessively expensive in relation to the value of the product, this can be replaced with a product with equivalent or superior technical characteristics.
- The manufacturer is not responsible for any damage or loss resulting from the failure to use a product for repair, or for any damage or loss resulting from the malfunction of the product or some of its parts.
- The period of validity of the battery warranty (if any) is 6 months from purchase.
- The period of validity of the guarantee for consumers, that is, those who buy for purposes unrelated to one's professional or business activity, it is governed by Legislative Decree 2 February 2002, n.24. - articles 1519-bis and following of the Italian Civil Code - (2 years from delivery under legal conditions). For buyers who purchase with a VAT number for purposes related to their professional activity, the legal guarantees referred to in articles 1490 and following of the Civil Code will apply (1 year from delivery under the conditions of the law).

VELOCIPTOR
es 82w SKILL 2
natural_image
Simple black-and-white icon of a helmet and bucket inside a circle (no text or symbols)Obligation to wear a protective helmet

Read the instructions before use
natural_image
Side view of a black electric scooter with green wheels and a red arrow indicating motion (no text or symbols)natural_image
Close-up of a black mechanical component with a green circular feature and mounting holes (no visible text or symbols)PREMIÈRE UTILISATION
natural_image
Close-up of a scooter's head and wheel assembly, showing internal components and part numbers (no text or symbols on the main objects)OUVRIR ET PLIER LA TROTTINETTE
natural_image
Black electric scooter with green arrow indicating a component, labeled Fig 2 (no text or symbols on the device itself)OUVRIR ET PLIER LA TROTTINETTE
natural_image
Two unrelated electronic devices: a black charging plug and a black electric scooter with red head lights, both shown without any text or symbols.AUTONOMIE DE LA TROTTINETTE
natural_image
Symbol of a trash bin crossed with no text or numbers, representing waste sorting or restriction (no text present)