
1000 Series DST1040 - Iron PHILIPS - Free user manual and instructions
Find the device manual for free 1000 Series DST1040 PHILIPS in PDF.
| Product Type | Iron |
| Brand | Philips |
| Model | 1000 Series DST1040 |
| Power Supply | 220-240 V, 50-60 Hz |
| Power | 2400 W (approx.) |
| Water Tank Capacity | Approx. 300 ml |
| Soleplate | Stainless steel |
| Functions | Steam ironing, dry ironing, spray, horizontal and vertical shot of steam, Calc-Clean function, ECO setting |
| Temperature Setting | Thermostat with positions Synthetic, Silk, Cotton, Linen |
| Recommended Water Type | Tap water; for hard water, mix half tap water and half demineralized water |
| Maintenance | Clean the soleplate with a damp cloth; use the Calc-Clean function monthly |
| Safety | Do not use chemical or abrasive products; do not clean under the tap |
| Cord Length | Cord wrap around the heel |
| Weight | Approx. 1.2 kg |
| Repairability Index | Not provided by the manufacturer |
Frequently Asked Questions - 1000 Series DST1040 PHILIPS
User questions about 1000 Series DST1040 PHILIPS
0 question about this device. Answer the ones you know or ask your own.
Ask a new question about this device
Download the instructions for your Iron in PDF format for free! Find your manual 1000 Series DST1040 - PHILIPS and take your electronic device back in hand. On this page are published all the documents necessary for the use of your device. 1000 Series DST1040 by PHILIPS.
USER MANUAL 1000 Series DST1040 PHILIPS
natural_image
Exterior view of a Philips 1000 Series air iron (no text or symbols on body)Using the appliance 5
Preparing for use 5
Filling the water tank 5
Setting the temperature 7
Using the appliance 7
Ironing with steam 9
No Steam/ Dry ironing 10
Water spray 10
Horizontal steam boost 10
Vertical steam boost 11
Cleaning and maintenance 12
Calc-Clean 13
Storage 15
Introduction
Congratulations on your purchase and welcome to Philips! To fully benefit from the support that Philips offers, register your product at www.home/id. Read this user manual, the important information leaflet, and the quick start guide carefully before you use the appliance. Save them for future reference.
Product overview

text_image
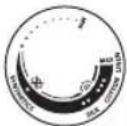
DST1010 DST1020 DST1030 DST1040 DST1050 *DST1030/20 DST1040/30 ① ② ③ ④ ⑤ ⑥ ⑦ ⑧ MAX1 Steam selector
2 Steam boost button
3 Water spray
4 Power cord
5 Cord winding
6 Indicator light
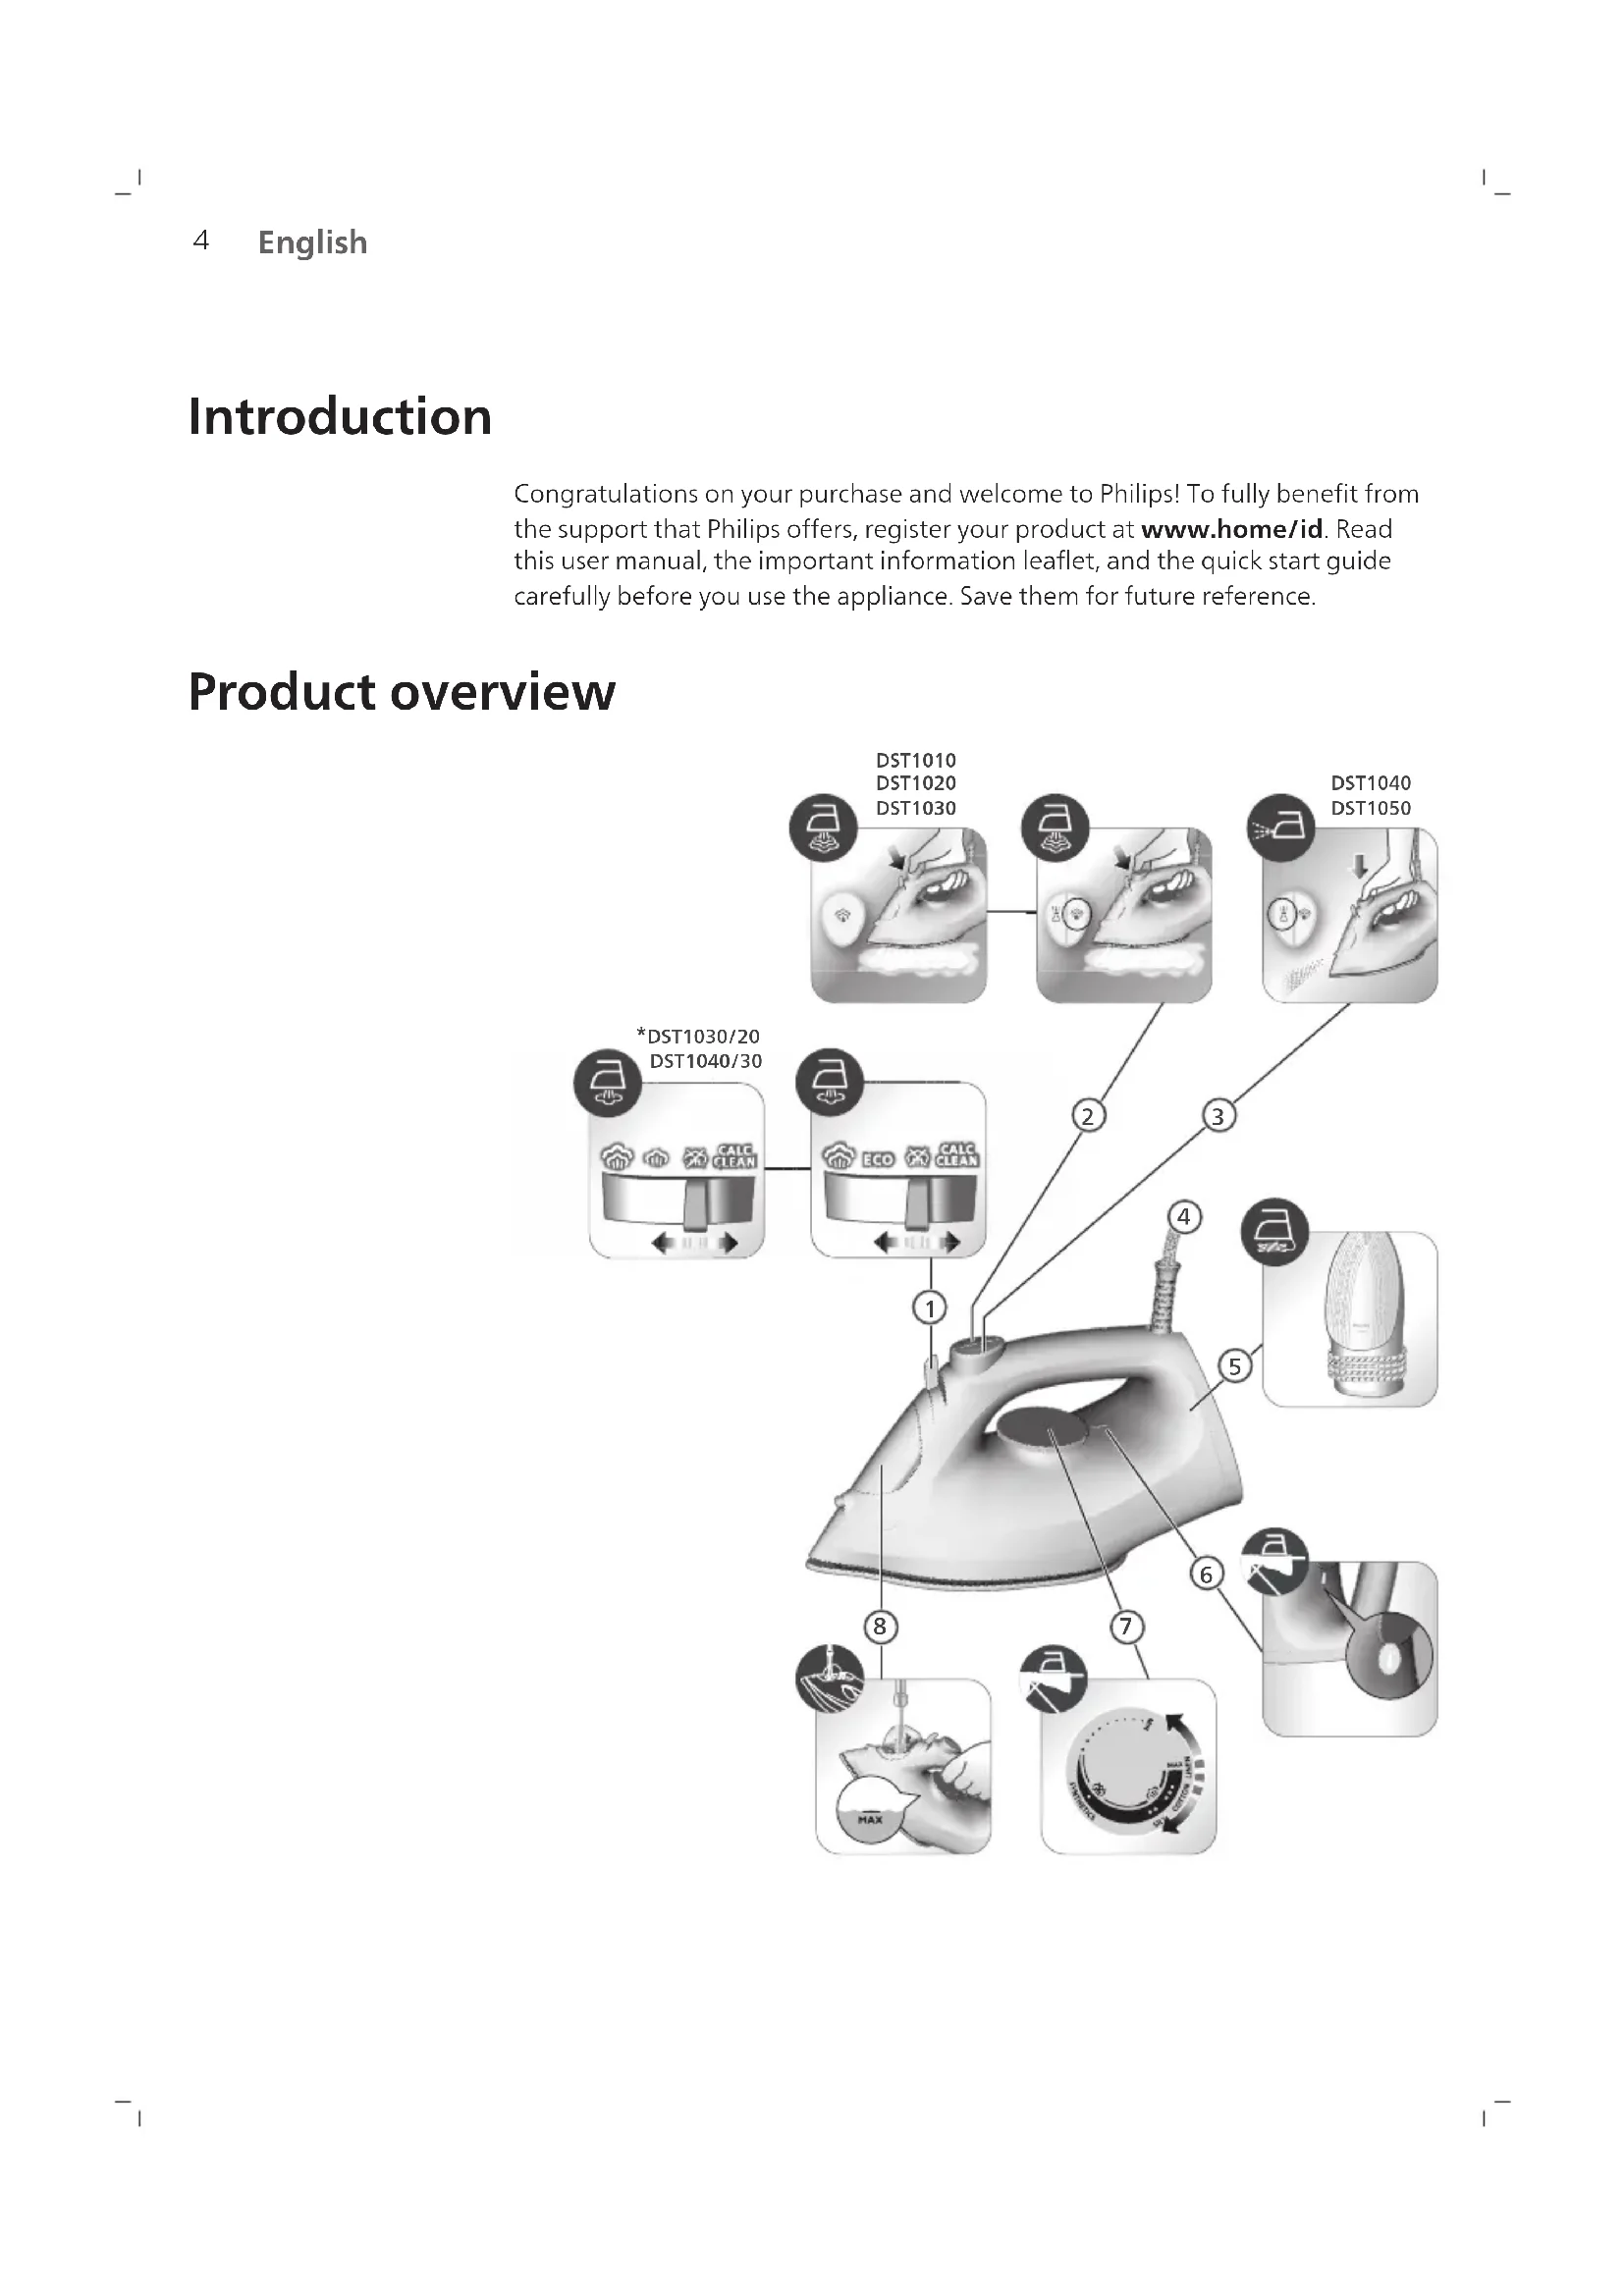
7 Temperature dial
8 Water tank lid
Using the appliance
Preparing for use
Note: The iron may give off some steam when you use it for the first time. This stops after a short while.
Type of water to use
The appliance is suitable to be used with tap water. However, if you live in an area with hard water, we recommend that you mix an equal amount of tap water with distilled or demineralized water. This will prevent fast scale build up and prolong the lifetime of the appliance.
Do not add perfume, water from the tumble dryer, vinegar, starch, descaling agents, ironing aids, chemically descaled water or other chemicals, as they may cause water spitting, brown staining or damage to your appliance.
Filling the water tank
1 Do not plug in the iron.

natural_image
Illustration of a steam iron with a warning symbol (no text or labels)2 Ensure the iron is cooled down.

natural_image
3D rendered image of a steam iron with a checkmark indicating selection (no text or symbols)6 English

natural_image
Illustration of a steam iron being cut with a magnified inset showing internal components (no text or symbols)3 Slide the steam selector to the right to select no steam mode (dry ironing)

natural_image
Illustration of a hand pressing down on a piece of iron, showing the process (no text or symbols)4 Flip open the water tank lid.

text_image
MAX5 Fill the water tank up to the MAX indication in the water tank. Do not add any additives like perfume, fragrances, soap or vinegar.

natural_image
Medical illustration of a hand performing a CT scan on a patient's shoulder (no text or labels visible)6 Close the water tank lid firmly.
Setting the temperature
 |  | |
| MAXLINEN | ||
| ●●●COTTON | ||
| ●●SILK | */ ECO | |
| ●SYNTHETICS |

natural_image
Illustration of a hand using a power iron to clean or steam (no text or symbols)ECO setting ECO cloud setting : Minimum constant steam is delivered continuously for garments with less creases. This setting also saves energy.

natural_image
Illustration of a hand ironing an iron with a cloud icon above (no text or symbols)Two steam clouds More constant steam is delivered continuously for tough creases.
Using the appliance
Smoke can be visible during the first use, and it is normal. This ceases after a short while.
8 English

text_image
i i1 Check the garment label to ensure that the fabric is ironable.

text_image
MAX 200000000000000000000000000000000000000000000000000000000000000000000000000000000000000000000000000002 Set the temperature dial to the required ironing temperature by turning it to the appropriate temperature indication.

natural_image
Illustration of two iron iron holders with a screw and a pencil, marked with a black X (no text or symbols)3 Allow the iron to rest on its heel.

natural_image
Illustration of a steam iron with a cord and plug, no text or symbols present4 Insert the plug into an earthed socket and allow the iron rest on its heel. If using an extension plug, ensure that the power rating of the extension plug is suitable for the iron.

natural_image
Illustration of a mechanical component with an hourglass symbol (no text or labels)5 Wait for the iron to heat up. The indicator light will turn steady while it is heating up.

natural_image
Close-up of a mechanical component with a checkmark and a circular detail (no text or symbols)6 Once the indicator light is off, the iron is ready for use. The indicator light will turn steady on from time to time during ironing.
Ironing with steam

text_image
ECO ECOSteam can be used at the ECO setting ECO cloud setting and in clouds setting

text_image
Cronamics MMA GILN COWNS1 Turn the temperature dial to the appropriate setting: silk, cotton, or linen, based on the type of fabric you will be ironing on. Steam will not be available on the synthetic setting. This will lead to water spitting if used.

natural_image
Illustration of a person using a steam iron on a bed (no text or symbols visible)2 Steam will be released during ironing.
No Steam/ Dry ironing

natural_image
Illustration of a steam iron being heated by a coiled wire, with a magnified inset showing the iron inside (no text or symbols)1 Set steam setting to no steam setting

natural_image
Illustration of a person using a power iron on a bed (no text or symbols visible)2 After a short while, steam will cease during ironing.
Water spray

natural_image
Illustration of a hand performing a medical or therapeutic procedure on skin, with a downward arrow indicating pressure or action (no text or symbols present)1 Press and release the water spray button at the top of the handle. Water should be sprayed out of the nozzle.
Horizontal steam boost
1 Steam boost is available at the cotton and linen settings.

text_image
X SMA V ETR SMA COTC
natural_image
Illustration of a hand using a steam iron to clean or brush the power (no text or symbols visible)2 Press and release the steam boost button for a powerful boost of steam to remove stubborn creases.
Vertical steam boost
1 Steam boost is available at the cotton and linen settings.

text_image
X SIX MAX LOW COT √ STATISTICS SEA
natural_image
Illustration of a hand holding a jacket with a checkmark, against a hanger background (no text or symbols)2 Press and release the steam boost button in the vertical position to remove creases from hanging garments using the steam boost. Holding down the steam boost button at the vertical position will not deliver constant steam.

natural_image
Illustration of a hand cleaning a car with a brush (no text or symbols)3 Pull and stretch your garment while applying steam boost to remove stubborn creases.

text_image
Diagram illustrating a hand washing clothes with a warning symbol and crossed-out hand gesture4 Do not use your bare hand as a supporting surface when you iron.
12 English

natural_image
Illustration of a person holding a bottle with a cross mark, no text or symbols present5 Do not position the iron towards yourself/ another person.
Cleaning and maintenance

text_image
Diagram showing a hair iron with an inset image of a carbon dioxide (CO2) solution, illustrating environmental impact.1 Switch the steam setting to no steam mode (dry ironing) on the steam selector.

text_image
Diagram showing a hair iron with a close-up of its electrical socket, marked with X and ✓ symbols indicating electrical hazard or inspection.2 Ensure the iron is not plugged in.

text_image
Diagram showing a iron (£) with temperature symbols and checkmark indicators, indicating heating or cooling conditions.3 Ensure the iron has cooled down.

natural_image
Illustration of a hand cleaning a seed pod with a checkmark indicating inspection (no text or symbols present)4 Wipe flakes and other deposit off the soleplate with a damp cloth.

text_image
Warning symbol and product image showing a bottle, paintbrush, and plastic object with an exclamation markNote: To keep the soleplate smooth, avoid hard contact with metal objects. Never use a scouring pad, vinegar or other chemicals to clean the soleplate.

natural_image
Illustration of a hand washing a sink with a water tap and warning symbols (no text or labels)5 Do not wash/ clean the iron under running water.
Calc-Clean

text_image
3 4 5 6 6 10 11 12 12 13 6 17 18 19 19 20 23 24 25 25 26 27 0 31Tip: The Calc Clean function can be used at any time. If you live in an area with hard water, use the function more frequently.
1 It is recommended to descale your iron after every month of use to prolong its lifetime, or when brown stains/water is observed.

text_image
Diagram showing a hairdryer with an inset magnified view highlighting the 'ECO' and 'CLU' features.2 Make sure the iron is unplugged and the steam setting is set to no steam mode (dry ironing)
14 English

text_image
MAX3 Fill the water tank to the MAX indication.

text_image
SHILBHINAS NILK COTTON LUCAN MAX4 Set the temperature dial to MAX.

natural_image
Illustration of a steam iron with a cable, showing internal components and a hook (no text or symbols)5 Plug the iron into the mains and switch on the mains if needed.

natural_image
Illustration of a mechanical component with an hourglass symbol (no text or labels)6 The indicator light will light up, indicating the iron is heating up.

natural_image
Close-up of a mechanical component with a checkmark and a circular detail (no text or symbols)7 Wait for indicator light to go out.
8 Unplug the iron.

natural_image
Illustration of a wall socket connected to a plug with a black arrow indicating direction (no text or symbols)
text_image
CALC CLEAN9 Hold the iron over the sink in the horizontal position and shake the iron. Steam, hot water and calc particles will be released from the soleplate. Continue to shake the iron until all the water has been emptied from the water tank.

natural_image
Illustration of a steam iron with a magnified inset showing the ear and cord (no text or symbols)10 Plug in the iron and let the iron heat up to dry the soleplate. This takes about 2 minutes. You may see water spitting out from the steam vents, this is normal as excess water is being dispelled.

natural_image
Illustration of a bottle with decorative patterns and rotating arrows (no text or symbols)11 Let the iron cool down and wind the cord around the heel of the iron.
Storage

text_image
Diagram showing a steam iron being cut with an inset image of a component labeled 'ECO' and 'CLN'1 Slide the steam selector to select no steam mode (dry ironing)
English

natural_image
Illustration of a wall socket connected to a plug with a black arrow indicating direction (no text or symbols)2 Unplug the iron.

text_image
Diagram illustrating temperature measurement with a iron, thermometer, and hourglass icon3 Let the iron cool down.

natural_image
Hand washing a shower in a kitchen sink (no text or symbols visible)4 Pour any remaining water out of the water tank.

natural_image
Illustration of a bottle with internal structure and curved arrows indicating rotation (no text or symbols)5 Wind the power cord around the main body of the iron.
Mündəricat
Giriş 18
Məhsul icmali 18
Cihazdan istifada 19
natural_image
Illustration of a steam iron with a hanging hook and a black X mark (no text or symbols)Azərbaycanca

natural_image
Illustration of a steam iron with a checkmark indicating a defect or repair (no text or symbols present)text_image
Diagram showing a 3D printer with an inset highlighting the 'ECO' and 'CIX' components, likely illustrating a safety or manufacturing process.natural_image
Illustration of a hand pressing down on a piece of iron, showing the process (no text or symbols)natural_image
Medical illustration of a surgical procedure on a bone (no text or labels)natural_image
Illustration of a hand using a power iron to clean or steam (no text or symbols)natural_image
Illustration of a hand ironing an iron with a small icon in the corner (no text or symbols)text_image
MAX 200mm 100mm 50mm 30mmnatural_image
Illustration of two iron iron holders with a screw and a pencil, marked with a black X (no text or symbols)natural_image
Illustration of a steam iron with a cord and plug, no text or symbols presentnatural_image
Illustration of a mechanical component with an hourglass symbol (no text or labels)natural_image
Close-up of a mechanical component with a checkmark and a circular detail (no text or symbols)text_image
COWNSICS MAAS GILS COTIVInatural_image
Illustration of a person using a steam iron to press down a bed (no text or symbols visible)natural_image
Illustration of a steam iron being heated by a coiled wire, with a magnified inset showing the iron inside (no text or symbols)natural_image
Illustration of a person using a power iron on a surface (no text or symbols visible)natural_image
Illustration of a hand performing a medical or therapeutic procedure on skin, with a downward arrow indicating pressure or action (no text or symbols present)natural_image
Illustration of a hand using a power iron to clean or brush the power (no text or symbols visible)natural_image
Illustration of a hand holding a jacket with a checkmark and arrow, against a hanger background (no text or symbols)natural_image
Illustration of a hand cleaning a car with a brush (no text or symbols)text_image
Illustration showing a person washing clothes with a hand gesture and a 'X' symbol, accompanied by a 'No' symbol.natural_image
Illustration of a person holding a bottle with a cross mark, no text or symbols presenttext_image
Diagram showing a hair iron with an inset image of a small object labeled 'ECO' and 'CLT', likely illustrating environmental or material inspection.text_image
Diagram showing an iron (£) with a plug and a switch, accompanied by a crossed-out electrical socket symbol.natural_image
Illustration of a hand cleaning a leaf with a checkmark indicating inspection (no text or symbols present)text_image
Warning symbol and product image showing a bottle, paintbrush, and plastic object with an exclamation marknatural_image
Illustration of a hand washing a sink with a water tap and warning symbols (no text or labels)text_image
Diagram showing a hairdryer with an inset magnified view highlighting the 'ECO' and 'CLU' features.text_image
SHILBHINAS NILK COTTON LUCAN MAXnatural_image
Illustration of a steam iron with a plug, showing internal components and wiring (no text or symbols)natural_image
Illustration of a mechanical component with an hourglass symbol (no text or labels)natural_image
Close-up of a mechanical component with a checkmark and a circular detail (no text or symbols)natural_image
Illustration of a wall socket connected to a plug with a downward arrow indicating compression (no text or symbols)text_image
CALC CLEANnatural_image
Illustration of a steam iron with a magnified inset showing the ear and neck (no text or symbols)natural_image
3D rendering of a white bottle with decorative swirl pattern and rotating arrows (no text or symbols)text_image
Diagram showing a steam iron being cut with an arrow and magnified detail, labeled with 'ECO' and 'CLN'natural_image
Illustration of a wall socket connected to a plug with a black arrow indicating direction (no text or symbols)text_image
Diagram illustrating temperature measurement using an iron, showing thermometer and hourglass icons with labels.natural_image
Hand washing a shower in a kitchen sink (no text or symbols visible)natural_image
Illustration of a bottle with internal structure and curved arrows indicating rotation (no text or symbols)natural_image
Illustration of a steam iron with a hanging hook and a black X mark (no text or symbols)34 Bahasa Indonesia

natural_image
Illustration of a steam iron with a checkmark indicating a detail (no text or symbols present)text_image
Diagram showing a hair iron with an inset magnified view highlighting 'ECO' and 'CIX' features.natural_image
Illustration of a hand pressing down on a piece of iron on a surface (no text or symbols)natural_image
Medical illustration of a surgical procedure on a bone (no text or labels)natural_image
Illustration of a hand using an iron to clean or restore (no text or symbols)natural_image
Illustration of a hand ironing an iron with a circular icon showing a roof symbol (no text or symbols present)natural_image
Illustration of two iron iron holders with a screw and a pencil, marked with a black X (no text or symbols)natural_image
Illustration of a steam iron with a power cord and electrical outlet (no text or symbols)natural_image
Illustration of a mechanical component with an hourglass symbol (no text or labels)natural_image
Close-up of a mechanical component with a checkmark and circular detail (no text or symbols)text_image
COWNSICS GULS COTIVISnatural_image
Illustration of a person using a steam iron to press down a blanket (no text or symbols visible)2 Uap akan keluar saat menyetrika.
natural_image
Illustration of a steam iron being heated, with a magnified inset showing the iron inside (no text or symbols)natural_image
Illustration of a person using a steam iron on a bed (no text or symbols visible)natural_image
Illustration of a hand performing a medical or therapeutic procedure on skin, with a downward arrow indicating pressure or action (no text or symbols present)text_image
X SMA MART COTCH
natural_image
Illustration of a hand using a power iron to clean or brush the power (no text or symbols visible)natural_image
Illustration of a hand holding a jacket with a checkmark and arrow, against a hanger background (no text or symbols)natural_image
Illustration of a hand cleaning a car with a brush (no text or symbols)text_image
Illustration showing a person washing clothes with a hand gesture and a 'X' symbol, accompanied by a 'No' sign.natural_image
Illustration of a person holding a fire extinguisher with a cross mark, no text or symbols present5 Jangan arahkan setrika menghadap Anda atau orang lain.
natural_image
Illustration of a steam iron being cut with an inset showing internal components (ECO, CLU) and a close-up view of the iron plug.text_image
Illustration of an iron (£) with a warning symbol indicating disapproval or rejection, accompanied by a magnified inset showing a plug and plug plug.text_image
Diagram showing a iron (£) with thermometer symbols and checkmark, indicating temperature measurement or inspection.natural_image
Illustration of a hand cleaning a leaf with a checkmark indicating inspection (no text or symbols present)text_image
Warning symbol and product image showing a bottle, paintbrush, and plastic object with an exclamation marknatural_image
Illustration of a hand washing a sink with a water tap and warning symbols (no text or labels)natural_image
3D illustration of a hairdryer with an inset showing a cross-section of a tube (no text or symbols)natural_image
Illustration of a steam iron with a power cord and plug, no text or symbols present5 Colokkan steker setrika ke stopkontak dan pastikan setrika teraliri listrik.

natural_image
Illustration of a hand holding a water droplet and a circular icon with an hourglass symbol (no text or labels)natural_image
Close-up of a mechanical component with a checkmark and a circular detail (no text or symbols)7 Tunggu hingga lampu indikator padam.
natural_image
Illustration of a wall socket connected to a plug with a black arrow indicating direction (no text or symbols)
text_image
CALC CLEANnatural_image
Illustration of a steam iron with a magnified inset showing the ear and cord (no text or symbols)natural_image
Illustration of a bottle with decorative patterns and rotating arrows (no text or symbols)11 Biarkan setrika mendingin dan gulung kabel di sekeliling kaki setrika.
Penyimpanan

text_image
Diagram showing a hair iron being heated, with an inset magnified view highlighting the 'ECO' component.natural_image
Illustration of a wall socket connected to a plug with a black arrow indicating direction (no text or symbols)
text_image
Diagram illustrating temperature measurement with a iron, thermometer, and hourglass icon3 Biarkan setrika mendingin.

natural_image
Hand cleaning a tiled surface with a curved pipe (no text or symbols visible)natural_image
Diagram of a bottle with internal structure and rotating arrows indicating rotation (no text or symbols)5 Gulung kabel listrik di sekeliling bodi setrika.
PHILIPS
Setrika Uap
DST1030; 220V, 400W, 50-60Hz
DST1040; 220V, 800W, 50-60Hz
natural_image
Illustration of a steam iron with a power cord and a cross mark, no text or symbols presentnatural_image
3D rendered image of a steam iron with a checkmark indicating a detail (no text or symbols present)
text_image
Diagram showing a 3D printer with an inset highlighting the 'ECO' and 'CIX' components, likely illustrating a safety or cleaning concept.natural_image
Illustration of a hand pressing down on a piece of iron, showing the process (no text or symbols)natural_image
Medical illustration of a surgical procedure on a bone (no text or labels)natural_image
Illustration of a hand using a power iron to clean or steam (no text or symbols)natural_image
Illustration of a hand using an iron to clean or steam (no text or symbols)text_image
Zin Control Unitnatural_image
Illustration of two iron iron holders with a screw and a pencil, marked with a black X (no text or symbols)natural_image
Illustration of a steam iron with a cord and plug, no text or symbols presentnatural_image
Illustration of a mechanical component with an hourglass icon and a droplet, no text or symbols present.natural_image
Close-up of a mechanical component with a checkmark icon (no text or symbols)text_image
Cronamics MAG Control 82% 82%natural_image
Illustration of a person using a steam iron on a bed (no text or symbols visible)2 Stim akan dilepaskan semasa penyeterikaan.
Tiada Stim/Penyeterikaan kering

natural_image
Illustration of a steam iron being heated by a coiled wire, with a magnified inset showing the iron inside (no text or symbols)natural_image
Illustration of a person using a steam iron on a bed (no text or symbols visible)2 Selepas seketika, stim akan berhenti semasa proses penyeterikaan.
Penyembur air

natural_image
Illustration of a hand pressing down on a surface with a downward arrow indicating pressure or movement (no text or symbols present)natural_image
Illustration of a hand using a power iron to clean or brush the power (no text or symbols visible)natural_image
Illustration of a hand holding a jacket with a checkmark and arrow, against a hanger background (no text or symbols)natural_image
Illustration of a hand holding a small object with arrows indicating movement or force (no text or symbols present)text_image
Diagram illustrating a hand holding a bag with a 'X' symbol and a smoke effect, likely depicting a safety or hygiene concept.natural_image
Illustration of a person holding a hand holding a spray can with a cross mark (no text or symbols)text_image
Diagram showing a hair iron with an inset magnified view highlighting the 'ECO' component.text_image
Diagram showing an iron (£) with a warning symbol indicating disapproval of using a power plug, marked with X and ✓ symbols.text_image
Diagram showing a steam iron with thermometer symbols and checkmark indicators, likely illustrating a thermal measurement or inspection process.natural_image
Illustration of a hand cleaning a seed pod with a checkmark indicating inspection (no text or symbols present)text_image
Warning symbol and product image showing a bottle, paintbrush, and plastic object with an exclamation marknatural_image
Illustration of a hand washing a sink with a water tap and warning symbols (no text or labels)text_image
Diagram showing a hairdryer with an inset magnified view highlighting the 'ECO' and 'CLU' features.text_image
SHILBHINAS NILK COTTON LUCAN MAXnatural_image
Illustration of a steam iron with a cord and plug, no text or symbols presentnatural_image
Illustration of a hand holding a droplet and a circular icon with an hourglass symbol (no text or labels)natural_image
Close-up of a mechanical component with a checkmark and circular detail (no text or symbols)natural_image
Illustration of a wall socket connected to a power plug with a downward arrow indicating disassembly (no text or symbols)
text_image
CALC CLEANnatural_image
Illustration of a steam iron with a magnified inset showing the hook being inserted (no text or symbols)natural_image
Illustration of a bottle with decorative patterns and rotating arrows (no text or symbols)11 Biarkan seterika menyejuk dan lilitkan kord di sekeliling tumit seterika.
Penyimpanan

text_image
Diagram showing a steam iron being cut with an inset image of a component labeled 'ECO' and 'CLN'natural_image
Illustration of a wall socket connected to a plug with a black arrow indicating direction (no text or symbols)text_image
Diagram illustrating temperature measurement using an iron, showing thermometer and hourglass icons with labels.natural_image
Hand washing a shower in a kitchen sink (no text or symbols visible)natural_image
Illustration of a glass bottle with internal structure and rotating arrow, no text or symbols presentObsah
Úvod 61
Přehled výrobku 61
natural_image
Illustration of a steam iron with a hanging hook and a black X mark (no text or symbols)
natural_image
Illustration of a steam iron with a checkmark indicating a defect or repair (no text or symbols present)text_image
Diagram showing a 3D printer with an inset highlighting the 'ECO' and 'CIX' components, likely illustrating a safety or manufacturing process.natural_image
Illustration of a hand pressing down on a piece of iron (no text or symbols visible)natural_image
Medical illustration of a surgical procedure on a bone (no text or labels)natural_image
Illustration of a hand using an iron on a surface, with a circular logo containing the word 'ECO' (no text or symbols on the diagram itself)natural_image
Illustration of a hand ironing an iron, with a circular icon showing a roof symbol (no text or symbols present)natural_image
Illustration of two iron iron holders with a screw and a pencil, marked with a black X (no text or symbols)natural_image
Illustration of a steam iron with a cord and plug, no text or symbols presentnatural_image
Illustration of a mechanical component with an hourglass symbol (no text or labels)natural_image
Close-up of a mechanical component with a checkmark icon (no text or symbols)natural_image
Illustration of a person using a steam iron on a bed (no text or symbols visible)natural_image
Illustration of a steam iron being heated, with a magnified inset showing the iron inside (no text or symbols)natural_image
Illustration of a person using a power iron on a bed (no text or symbols visible)natural_image
Illustration of a hand performing a medical or therapeutic procedure on skin, with a downward arrow indicating pressure or action (no text or symbols present)text_image
X MIN SRA COT MAX V
natural_image
Illustration of a hand using a steam iron to clean or brush the power (no text or symbols visible)text_image
X SIX MAX LOW COT √ STATISTICS SEA
natural_image
Illustration of a hand holding a jacket with a checkmark, against a hanger background (no text or symbols)natural_image
Illustration of a hand cleaning a car with a brush (no text or symbols)text_image
Diagram illustrating a hand washing clothes with a warning symbol and crossed-out hand gesturenatural_image
Illustration of a person holding a hand holding a spray can with a cross mark (no text or symbols)5 Nemiřte žehličkou na sebe ani jinou osobu.
Čištění a údržba

text_image
Diagram showing a hair iron with an inset magnified view highlighting the carbon dioxide (ECO) component.text_image
Diagram showing an iron (£) with a warning symbol indicating disapproval of using a power plug, marked with X and ✓ symbols.text_image
Diagram showing a iron (£) with thermometer symbols and checkmark, indicating temperature measurement or inspection.natural_image
Illustration of a hand cleaning a leaf with a checkmark indicating inspection (no text or symbols present)text_image
Warning symbol and product image showing a bottle, a paintbrush, and a light bulb with a warning signnatural_image
Illustration of a hand washing a sink with a water tap and warning symbols (no text or labels)natural_image
Illustration of a steam iron with a magnified inset showing internal components (no text or symbols)text_image
SHILBHINAS NILK COTTON LUCAN MAXnatural_image
Illustration of a steam iron with a cord and plug, no text or symbols presentnatural_image
Illustration of a hand holding a droplet and a circular icon with an hourglass symbol (no text or labels)natural_image
Close-up of a mechanical component with a checkmark and a circular detail (no text or symbols)natural_image
Illustration of a wall socket connected to a plug with a black arrow indicating direction (no text or symbols)8 Žehličku odpojte.

text_image
CALC CLEANnatural_image
Illustration of a steam iron with a magnified inset showing the tip and tail (no text or symbols)natural_image
3D rendering of a cylindrical object with textured surface and curved arrows indicating rotation (no text or symbols)text_image
Diagram showing a 3D printer with an arrow pointing to a component labeled 'ECO' and 'CLN', likely illustrating a process or assembly.natural_image
Illustration of a wall socket connected to a plug with a black arrow indicating direction (no text or symbols)2 Žehličku odpojte.

text_image
Diagram illustrating temperature change with iron iron, thermometer, and hourglass symbolsnatural_image
Hand cleaning a kitchen surface with a curved tool, no visible text or symbolsnatural_image
Illustration of a glass bottle with internal structure and rotating arrow, no text or symbols presentnatural_image
Illustration of a steam iron with a warning symbol (no text or labels)natural_image
3D rendered image of a steam iron with a checkmark indicating inspection or repair (no text or symbols)
natural_image
Illustration of a steam iron being adjusted for size, with a magnified inset showing the internal structure (no text or symbols)natural_image
Illustration of a hand pressing down on a wooden iron (no text or symbols)4 Åbn läget til vandtanken.

text_image
MAXnatural_image
Illustration of a hand holding a small object above a curved surface (no text or symbols)natural_image
Illustration of a hand using a steam iron to clean (no text or symbols)natural_image
Illustration of a hand ironing an iron with a small icon in the corner (no text or symbols)natural_image
Illustration of two iron iron holders with a screw and a pencil, marked with a black X (no text or symbols)natural_image
Illustration of a steam iron with a cord and plug, no text or symbols presentnatural_image
Illustration of a mechanical component with an hourglass symbol (no text or labels)natural_image
Close-up of a mechanical component with a checkmark icon (no text or symbols)text_image
Swimming MSS Control 10% 20%natural_image
Illustration of a person using a iron on a bed (no text or symbols visible)2 Dampen bliver frigivet under strygning.
natural_image
Illustration of a steam iron being heated by a coiled wire, with a magnified inset showing the iron inside (no text or symbols)natural_image
Illustration of a person using a power iron on a bed (no text or symbols visible)natural_image
Illustration of a hand pressing down on a medical device with a downward arrow indicating motion (no text or symbols)natural_image
Illustration of a hand using a steam iron to clean or brush the power (no text or symbols visible)text_image
X SIX MAX LOW COT √ STATISTICS SEA
natural_image
Illustration of a hand holding a jacket with a checkmark, against a hanger background (no text or symbols)natural_image
Illustration of a hand cleaning a car with a brush (no text or symbols)text_image
Diagram illustrating a hand washing clothes with a warning symbol and crossed-out hand gesturenatural_image
Illustration of a person holding a hand holding a spray can with a cross mark (no text or symbols)natural_image
Illustration of a hair iron being held by a plastic bag, with an inset showing the same part (ECO and CL) and a close-up of the lid (no text or symbols on the main subject)text_image
Diagram showing an iron (£) with a warning symbol indicating disapproval of using a power plug, marked with X and ✓ symbols.text_image
Diagram showing a iron (£) with thermometer symbols and checkmark, indicating temperature measurement or inspection.natural_image
Illustration of a hand cleaning a seed pod with a checkmark indicating inspection (no text or symbols present)text_image
Warning symbol and product image showing a bottle, paintbrush, and plastic object with an exclamation marknatural_image
Illustration of a hand washing a sink with a water tap and warning symbols (no text or labels)text_image
Diagram showing a hairdryer with an inset magnified view highlighting the 'ECO' and 'CLU' features.text_image
SHILBHINAS NILK COTTON LUCAN MAXnatural_image
Illustration of a steam iron with a cord and plug, no text or symbols presentnatural_image
Illustration of a hand holding a water droplet and a circular icon with an hourglass symbol (no text or labels)6 Indikatorlyset lyser for at angive, at strygejernet varmer op.

natural_image
Close-up of a mechanical component with a checkmark and a circular detail (no text or symbols)natural_image
Illustration of a wall socket connected to a plug with a downward arrow indicating compression (no text or symbols)text_image
CALC CLEANnatural_image
Illustration of a steam iron with a magnified inset showing the ear and neck (no text or symbols)natural_image
3D rendering of a white bottle with decorative swirl pattern and rotating arrows (no text or symbols)text_image
Diagram showing a steam iron being cut with an arrow and magnified detail, labeled with 'ECO' and 'CLN'natural_image
Illustration of a wall socket connected to a plug with a magnified view (no text or symbols)text_image
Diagram illustrating temperature change with iron iron, thermometer, and hourglass symbolsnatural_image
Hand cleaning a kitchen surface with a curved tool, no visible text or symbolsnatural_image
Illustration of a glass bottle with internal structure and rotating arrow, no text or symbols presentnatural_image
Illustration of a steam iron with a hanging switch and a cross mark (no text or symbols)
natural_image
Illustration of a steam iron with a checkmark indicating a defect or repair (no text or symbols present)text_image
Diagram showing a 3D printer with an inset highlighting the 'ECO' and 'CIX' components, likely illustrating a safety or manufacturing process.natural_image
Illustration of a hand pressing down on a piece of iron, showing the process (no text or symbols)natural_image
Medical illustration of a hand performing a procedure on a bone (no text or labels)natural_image
Illustration of a hand using an iron to clean or steam, with a circular logo containing the word 'ECO' (no text on the iron itself)natural_image
Illustration of a hand ironing an iron, with a circular icon showing a roof symbol (no text or symbols present)text_image
Zin Control Unitnatural_image
Illustration of two ironing machines with a cross mark indicating a specific part (no text or symbols present)natural_image
Illustration of a steam iron with a cord and plug, no text or symbols presentnatural_image
Illustration of a mechanical component with an hourglass icon and a droplet, no text or symbols present.natural_image
Close-up of a mechanical component with a checkmark icon (no text or symbols)text_image
Catalysts MAA GILN GILNnatural_image
Illustration of a person using a steam iron on a bed (no text or symbols visible)text_image
Diagram showing a steam iron being heated by a device, with an inset illustrating the heating process.natural_image
Illustration of a person using a power iron on a bed (no text or symbols visible)natural_image
Illustration of a hand performing a medical or therapeutic procedure on a patient's abdomen, with a downward arrow indicating pressure (no text or symbols present)text_image
X SMA V COT
natural_image
Illustration of a hand using a steam iron to clean or brush the power (no text or symbols visible)natural_image
Illustration of a hand holding a jacket with a checkmark, against a hanger background (no text or symbols)natural_image
Illustration of a hand cleaning a car with a brush (no text or symbols)text_image
Diagram illustrating a hand washing clothes with a warning symbol and crossed-out hand gesturenatural_image
Illustration of a person holding a hand holding a spray can with a cross mark (no text or symbols)text_image
Diagram showing a hairdryer with an inset magnified view highlighting the 'ECO' component.text_image
Illustration of an iron (£) with a warning symbol indicating disrepair or repair, accompanied by a magnified cross and checkmark.text_image
Diagram showing a iron (£) with thermometer symbols and checkmark indicators, likely illustrating a temperature measurement or inspection process.natural_image
Illustration of a hand cleaning a leaf with a checkmark indicating inspection (no text or symbols present)text_image
Warning symbol and product image showing a bottle, paintbrush, and light bulb next to a warning sign with an exclamation mark.natural_image
Illustration of a hand washing a sink with a water tap and warning symbols (no text or labels)natural_image
Illustration of a steam iron with an inset showing a close-up of its internal structure (no text or symbols)text_image
SHILBHINAS NILK COTTON LUCAN MAXnatural_image
Illustration of a steam iron with a cord and plug, no text or symbols presentnatural_image
Illustration of a hand holding a water droplet and a circular icon with an hourglass symbol (no text or labels)natural_image
Close-up of a mechanical component with a checkmark and a circular detail (no text or symbols)natural_image
Illustration of a wall socket connected to a plug with a black arrow indicating direction (no text or symbols)text_image
CALC CLEANnatural_image
Illustration of a steam iron with a magnified inset showing the ear and cord (no text or symbols)natural_image
Illustration of a bottle with decorative patterns and rotating arrows (no text or symbols)text_image
Diagram showing a steam iron being cut with an arrow and magnified detail, labeled with 'ECO' and 'CLN'natural_image
Illustration of a wall socket connected to a plug with a magnified view (no text or symbols)text_image
Diagram illustrating temperature change with iron iron, thermometer, and hourglass symbolsnatural_image
Hand cleaning a kitchen surface with a curved tool, no visible text or symbolsnatural_image
Illustration of a glass bottle with internal structure and rotating arrow, no text or symbols presentnatural_image
Illustration of a steam iron with a warning symbol (no text or labels)natural_image
Illustration of a steam iron with a checkmark indicating a detail (no text or symbols present)
natural_image
Illustration of an iron (£) being cut with a magnified inset showing internal components (no text or symbols)3 Libistage auruvalijat paremale, et valida aururežiim (kuiv triikimine)

natural_image
Illustration of a hand pressing down on a wooden iron (no text or symbols)4 Keerake veepaagi kaas lahti.

text_image
MAXnatural_image
Medical illustration of a hand holding a metallic object on a surgical instrument (no text or symbols visible)natural_image
Illustration of a hand using an iron to clean or steam, with a circular logo containing 'ECO' and a cloud icon (no text on the iron itself)natural_image
Illustration of a hand using an iron to clean or steam (no text or symbols)text_image
Zin Control Unitnatural_image
Illustration of two ironing machines with a cross mark indicating a specific part (no text or symbols present)natural_image
Illustration of a steam iron with a cord and plug, no text or symbols presentnatural_image
Illustration of a mechanical component with an hourglass symbol (no text or labels)natural_image
Close-up of a mechanical component with a checkmark icon (no text or symbols)natural_image
Illustration of a person using a steam iron on a bed (no text or symbols visible)natural_image
Illustration of a steam iron being heated by a coiled wire, with a magnified inset showing the iron inside (no text or symbols)1 Seadistage auru seadistus ilma auruta seadistusele

natural_image
Illustration of a person using a steam iron on a bed (no text or symbols visible)natural_image
Illustration of a hand pressing down on a surface with a downward arrow indicating pressure or movement (no text or symbols present)text_image
X SMA V GRA COTCY SMA V
natural_image
Illustration of a hand using a steam iron to clean or brush the power (no text or symbols visible)text_image
X SIX MAX LOW COT √ STATISTICS SEA
natural_image
Illustration of a hand holding a jacket with a checkmark, against a hanger background (no text or symbols)natural_image
Illustration of a hand cleaning a car with a brush (no text or symbols)text_image
Diagram illustrating a hand washing clothes with a warning symbol and crossed-out hand gesturenatural_image
Illustration of a person holding a hand holding a spray can with a cross mark (no text or symbols)natural_image
Illustration of a steam iron with a magnified inset showing internal components (ECO, CL) and a tool (no text or symbols)1 Lülitage auruvalijal auru seadistus auruvabale režiimile (kuivtriikimine) .

natural_image
Illustration of a steam iron with a magnified inset showing a plug and cable (no text or symbols)text_image
Diagram showing a steam iron with thermometer symbols and checkmark indicating inspection or verification statusnatural_image
Illustration of a hand cleaning a leaf with a checkmark indicating inspection (no text or symbols present)text_image
Warning symbol and product image showing a bottle, a paintbrush, and a light bulb with a warning signnatural_image
Illustration of a hand washing a sink with a water tap and warning symbols (no text or labels)natural_image
Illustration of a steam iron being cut with a magnified inset showing internal components (no text or symbols)text_image
SHILBHINAS NILK COTTON LUCAN MAX4 Seadke temperatuuri ketasregulaator MAX-asendisse.

natural_image
Illustration of a steam iron with a cord and plug, no text or symbols presentnatural_image
Illustration of a hand holding a water droplet and a circular icon with an hourglass symbol (no text or labels)natural_image
Close-up of a mechanical component with a checkmark and circular detail (no text or symbols)natural_image
Illustration of a wall socket connected to a plug with a downward arrow indicating compression (no text or symbols)text_image
CALC CLEANnatural_image
Illustration of a steam iron with a magnified inset showing the ear and neck (no text or symbols)natural_image
3D rendering of a white bottle with decorative swirl pattern and rotating arrows (no text or symbols)text_image
Diagram showing a steam iron being cut with an arrow and magnified detail, labeled with 'ECO' and 'CLN'natural_image
Illustration of a wall socket connected to a power plug with a magnified view (no text or symbols)text_image
Diagram illustrating temperature change with iron iron, thermometer, and hourglass symbols3 Laske seadmel jahtuda.

natural_image
Hand cleaning a kitchen surface with a curved tool, no visible text or symbolsnatural_image
Illustration of a glass bottle with internal structure and rotating arrow, no text or symbols presentnatural_image
Illustration of a steam iron with a warning symbol (no text or labels)natural_image
3D rendered image of a steam iron with a checkmark indicating selection (no text or symbols)
natural_image
Illustration of a steam iron being processed with a magnified inset showing internal components (no text or symbols)natural_image
Illustration of a hand pressing down on a metal iron (no text or symbols visible)natural_image
Medical illustration of a hand holding a small object on a surgical instrument (no text or symbols visible)natural_image
Illustration of a hand using a power iron to clean or steam (no text or symbols)natural_image
Illustration of a hand ironing an iron with a circular icon showing a roof symbol (no text or symbols present)natural_image
Illustration of two iron iron holders with a screw and a pencil, marked with a black X (no text or symbols)natural_image
Illustration of a steam iron with a cord and plug, no text or symbols presentnatural_image
Illustration of a mechanical component with an hourglass icon and a droplet, no text or symbols present.natural_image
Close-up of a mechanical component with a checkmark indicator (no text or symbols present)text_image
COWMINGS MAA COFFY X ✓natural_image
Illustration of a person using a steam iron to press down a surface (no text or symbols visible)natural_image
Illustration of a steam iron being heated by a coiled wire, with a magnified inset showing the iron inside (no text or symbols)natural_image
Illustration of a person using a power iron on a bed (no text or symbols visible)natural_image
Illustration of a hand performing a medical or therapeutic procedure on a patient's abdomen, with a downward arrow indicating pressure (no text or symbols present)text_image
X SMA COTCHY VEspañol

natural_image
Illustration of a hand using a steam iron to clean or brush the power (no text or symbols visible)text_image
X SIX MAX LOW COT √ STATISTICS SEA
natural_image
Illustration of a hand holding a jacket with a checkmark, against a hanger background (no text or symbols)natural_image
Illustration of a hand cleaning a car with a brush (no text or symbols)text_image
Diagram illustrating a hand washing clothes with a warning symbol and crossed-out hand gesturenatural_image
Illustration of a person holding a hand holding a spray can with a cross mark (no text or symbols)text_image
Diagram showing a hair iron being adjusted to a component with an inset highlighting the 'ECO' and 'CLT' features.text_image
Diagram showing an iron (£) with a magnified view of its electrical socket connected to a plug, marked with X and ✓ symbols.text_image
Diagram showing a steam iron with thermometer symbols and checkmark indicators, likely illustrating a thermal measurement or inspection process.natural_image
Illustration of a hand cleaning a leaf with a checkmark indicating inspection (no text or symbols present)text_image
Warning symbol and product image showing a bottle, paintbrush, and plastic object with an exclamation marknatural_image
Illustration of a hand washing a sink with a water tap and warning symbols (no text or labels)text_image
Diagram showing a hairdryer with an inset magnified view highlighting the 'ECO' and 'CLU' features.natural_image
Illustration of a steam iron with a cord and plug, no text or symbols presentnatural_image
Illustration of a hand holding a water droplet and a circular icon with an hourglass symbol (no text or labels)natural_image
Close-up of a mechanical component with a checkmark and a magnified circular detail (no text or symbols)natural_image
Illustration of a wall socket connected to a plug with a downward arrow indicating compression (no text or symbols)8 Desenchufe la plancha

text_image
CALC CLEANnatural_image
Illustration of a steam iron with a magnified inset showing the ear and neck (no text or symbols)natural_image
3D rendering of a white bottle with decorative swirl pattern and rotating arrows (no text or symbols)text_image
Diagram showing a steam iron being cut with an arrow and magnified detail, labeled with 'ECO' and 'CLN'natural_image
Illustration of a wall socket connected to a plug with a black arrow indicating direction (no text or symbols)2 Desenchufe la plancha

text_image
Diagram illustrating temperature measurement with a iron, thermometer, and hourglass iconnatural_image
Hand cleaning a tiled surface with a curved pipe (no text or symbols visible)natural_image
Diagram of a bottle with internal structure and rotating arrows indicating rotation (no text or symbols)natural_image
Illustration of a steam iron with a hanging hook and a black X mark (no text or symbols)
natural_image
3D illustration of a steam iron with a checkmark indicating a detail (no text or symbols present)natural_image
Illustration of a hair iron being held with an inset showing a close-up of the tip and a warning symbol (ECO, CIA) (no text or labels present)natural_image
Illustration of a hand pressing down on a piece of iron, showing the process (no text or symbols)natural_image
Medical illustration of a surgical procedure on a bone (no text or labels)natural_image
Illustration of a hand using a power iron to clean or store (no text or symbols)natural_image
Illustration of a hand ironing an iron with a circular icon showing a roof symbol (no text or symbols present)text_image
MAX 200mm 100mm 50mm 30mmnatural_image
Illustration of two iron iron holders with a screw and a pencil, marked with a black X (no text or symbols)natural_image
Illustration of a steam iron with a cord and plug, no text or symbols presentnatural_image
Illustration of a mechanical component with an hourglass icon and a droplet, no text or symbols present.natural_image
Close-up of a mechanical component with a checkmark icon (no text or symbols)natural_image
Illustration of a person using a steam iron on a bed (no text or symbols visible)natural_image
Illustration of a steam iron being heated by a coiled wire, with a magnified inset showing the iron inside (no text or symbols)natural_image
Person using a steam iron on a bed (no text or symbols visible)natural_image
Illustration of a hand pressing down on a textured surface with a downward arrow indicating motion (no text or symbols)natural_image
Illustration of a hand using a steam iron to clean or brush the power (no text or symbols visible)natural_image
Illustration of a hand holding a jacket with a checkmark, against a hanger background (no text or symbols)natural_image
Illustration of a hand cleaning a car with a brush (no text or symbols)text_image
Diagram illustrating a hand washing clothes with a warning symbol and crossed-out hand gesturenatural_image
Illustration of a person holding a bottle with a cross mark, no text or symbols presenttext_image
Diagram showing a hair iron with an inset magnified view highlighting the 'ECO' component.natural_image
Illustration of a hair iron with a magnified inset showing a socket and switch (no text or symbols)text_image
Diagram showing a steam iron with temperature symbols and checkmark indicators, likely illustrating a thermal measurement or inspection process.natural_image
Illustration of a hand cleaning a leaf with a checkmark indicating inspection (no text or symbols present)text_image
Warning symbol and product image showing a bottle, paintbrush, and plastic object with an exclamation marknatural_image
Illustration of a hand washing a sink with a water tap and warning symbols (no text or labels)natural_image
Illustration of a steam iron being cut with a magnified inset showing internal components (no text or symbols)text_image
SHILBHINAS NILK COTTON LUCAN MAXnatural_image
Illustration of a steam iron with a plug inserted, showing internal components (no text or symbols)natural_image
Illustration of a hand holding a water droplet and a circular icon with an hourglass symbol (no text or labels)natural_image
Close-up of a mechanical component with a checkmark and circular detail (no text or symbols)natural_image
Illustration of a wall socket connected to a plug with a black arrow indicating direction (no text or symbols)text_image
CALC CLEANnatural_image
Illustration of a steam iron with a magnified inset showing the ear and cord (no text or symbols)natural_image
Illustration of a bottle with decorative patterns and rotating arrows (no text or symbols)text_image
Diagram showing a steam iron being heated, with an inset magnified view highlighting the heating mechanism.natural_image
Illustration of a wall socket connected to a power plug with a magnified view (no text or symbols)text_image
Diagram illustrating temperature change with iron iron, thermometer, and hourglass symbolsnatural_image
Hand washing a shower in a kitchen sink (no text or symbols visible)natural_image
Illustration of a glass bottle with internal structure and rotating arrow, no text or symbols presentnatural_image
Illustration of a steam iron with a hanging hook and a black X mark (no text or symbols)
natural_image
3D illustration of a steam iron with a checkmark indicating a detail (no text or symbols present)2 Provjerite je li se glačalo ohladilo.

text_image
Diagram showing a 3D printer with an inset highlighting the 'ECO' and 'CIX' components, likely illustrating a safety or manufacturing process.natural_image
Illustration of a hand pressing down on a mechanical component (no text or symbols visible)4 Otvorite poklopac spremnika za vodu.

text_image
MAX5 Napunite spremnik za vodu do oznake MAX u spremniku za vodu. Nemojte dodavati parfeme, mirise, sapun ni ocat.

natural_image
Medical illustration of a surgical instrument on a patient's head (no text or labels)6 Čvrsto zatvorite poklopac spremnika za vodu.
Postavljanje temperature
| | |
| MAXLAN | ||
| PAMUK | ||
| SVILA | */ ECO | |
| SINTETIKA |

natural_image
Illustration of a hand using a power iron to clean or store (no text or symbols)natural_image
Illustration of a hand ironing an iron with a circular icon showing a roof symbol (no text or symbols present)Dva oblaka pare aveća dosljedna količina pare kontinuirano se ispušta radi uklanjanja tvrdokornih nabora.
Uporaba aparata
natural_image
Illustration of two iron iron holders with a screw and a pencil, marked with a black X (no text or symbols)3 Glačalo postavite u uspravan položaj.

natural_image
Illustration of a steam iron with a cord and plug, no text or symbols present4 Utikač umetnite u uzemljenu utičnicu i postavite glačalo u uspravan položaj. Ako upotrebljavate produžni kabel, provjerite odgovaraju li njegove specifikacije glačalu.

natural_image
Illustration of a mechanical component with an hourglass symbol (no text or labels)natural_image
Close-up of a mechanical component with a checkmark icon (no text or symbols)text_image
Cronamics MMA GILS Ceramics1 Regulator temperature okrenite na odgovarajuću postavku: svila, pamuk ili lan, ovisno o tome koju ćete tkaninu glačati. Para neće biti dostupna na postavci za sintetičke materijale. Ako se upotrebljava ta postavka, voda će se izbacivati.

natural_image
Illustration of a person using a steam iron to press down a surface (no text or symbols visible)natural_image
Illustration of a steam iron being heated by a coiled wire, with a magnified inset showing the iron inside (no text or symbols)1 Postavite postavku pare na glačanje bez pare

natural_image
Illustration of a person using a power iron on a bed (no text or symbols visible)natural_image
Illustration of a hand pressing down on a textured surface with a downward arrow indicating motion (no text or symbols)1 Pritisnite i otpustite gumb za raspršivanje vode na gornjem dijelu drške. Iz mlaznice bi se trebala raspršivati voda.
natural_image
Illustration of a hand using a steam iron to clean or brush the power (no text or symbols visible)2 Pritisnite i otpustite gumb za dodatnu količinu pare koja će ukloniti tvrdokorne nabore.
natural_image
Illustration of a hand holding a jacket with a checkmark, against a hanger background (no text or symbols)2 Pritisnite i otpustite gumb za dodatnu količinu pare u okomitom položaju kako biste parom uklonili nabore s odjeće koja visi. Stalnim držanjem gumba za dodatnu količinu pare u okomitom položaju neće izlaziti konstantna para.

natural_image
Illustration of a hand cleaning a car with a brush (no text or symbols)text_image
Diagram illustrating a hand washing clothes with a warning symbol and crossed-out hand gesture4 Nemojte golom šakom podržavati odjevni predmet prilikom glačanja.

natural_image
Illustration of a person holding a bottle with a cross mark, no text or symbols presenttext_image
Diagram showing a hair iron with an inset image of a carbon dioxide (CO2) component, likely illustrating environmental impact or chemical reaction.1 Postavku pare okrenite u način rada bez pare (suho glačanje) gumbu za odabir pare.

text_image
Diagram showing a hair iron with a plug and a checkmark indicating disassembly or repair, accompanied by a magnified cross symbol.text_image
Diagram showing a iron (£) with temperature symbols and checkmark indicators, likely illustrating a thermal measurement or inspection process.3 Provjerite je li se glačalo ohladilo.

natural_image
Illustration of a hand cleaning a seed pod with a checkmark indicating inspection (no text or symbols present)text_image
Warning symbol and product image showing a bottle, paintbrush, and plastic object with an exclamation marknatural_image
Illustration of a hand washing a sink with a water tap and warning symbols (no text or labels)text_image
Diagram showing a hairdryer with an inset magnified view highlighting the 'ECO' and 'CLU' features.2 Provjerite je li aparat iskopčan i je li postavka pare postavljena na način rada bez pare (suho glačanje)

text_image
MAX3 Napunite spremnik za vodu do oznake MAX.

text_image
SHILBHINAS NILK COTTON LUCAN MAX4 Postavite regulator temperature na MAX.

natural_image
Illustration of a steam iron with a cord and plug, no text or symbols present5 Ukopčajte glačalo u napajanje i uključite napajanje ako je potrebno.

natural_image
Illustration of a hand holding a water droplet and a circular icon with an hourglass symbol (no text or labels)6 Indikator će početi svijetliti, naznačujući da se glačalo zagrijava.

natural_image
Close-up of a mechanical component with a checkmark and circular detail (no text or symbols)7 Pričekajte da indikator prestane svijetliti.

natural_image
Illustration of a wall socket connected to a plug with a black arrow indicating direction (no text or symbols)text_image
CALC CLEAN9 Držite glačalo iznad sudopera u vodoravnom položaju i protresite ga. Iz grijaće ploče izaći će para, vruća voda i komadići kamenca. Nastavite tresti glačalo dok ne iscuri sva voda iz spremnika.

natural_image
Illustration of a steam iron with a magnified inset showing the ear and cord (no text or symbols)10 Ukopčajte glačalo i ostavite ga da se zagrije kako bi se grijaća ploča osušila. To će potrajati otprilike 2 minute. Iz otvora za paru možda će izlaziti voda, ali to je normalno jer se prazni višak vode.

natural_image
Illustration of a bottle with decorative patterns and rotating arrows (no text or symbols)text_image
Diagram showing a steam iron being cut with an inset image of a component labeled 'ECO' and 'CLN'natural_image
Illustration of a wall socket connected to a power plug with a magnified view (no text or symbols)text_image
Diagram illustrating temperature measurement using an iron, showing thermometer and hourglass icons with labels.3 Pustite glačalo da se ohladi.

natural_image
Hand washing a shower in a kitchen sink (no text or symbols visible)4 Ispraznite ostatak vode iz spremnika za vodu.

natural_image
Illustration of a glass bottle with internal structure and rotating arrow, no text or symbols presentnatural_image
Illustration of a steam iron with a power cord and a cross mark, no text or symbols present
natural_image
3D illustration of a steam iron with a checkmark indicating a detail (no text or symbols present)text_image
Diagram showing a 3D printer with an inset highlighting 'ECO' and 'CIX' components, likely illustrating eco-friendly air purification or cleaning process.natural_image
Illustration of a hand pressing down on a small object on an iron (no text or symbols visible)natural_image
Medical illustration of a surgical procedure on a bone (no text or labels)natural_image
Illustration of a hand using an iron on a steam, with a circular logo containing 'ECO' and a cloud icon above (no text or symbols on the diagram itself)natural_image
Illustration of a hand ironing an iron with a circular icon showing a roof symbol (no text or symbols present)natural_image
Illustration of two iron iron holders with a screw and a pencil, marked with a black X (no text or symbols)natural_image
Illustration of a steam iron with a cord and plug, no text or symbols presentnatural_image
Illustration of a mechanical component with an hourglass symbol (no text or labels)natural_image
Close-up of a mechanical component with a checkmark icon (no text or symbols)natural_image
Illustration of a person using a steam iron to press down a surface (no text or symbols visible)natural_image
Illustration of a steam iron being heated, with a magnified inset showing the iron inside (no text or symbols)natural_image
Illustration of a person using a steam iron on a bed (no text or symbols visible)natural_image
Illustration of a hand pressing down on a textured surface with a downward arrow indicating motion (no text or symbols)text_image
X SILK COTCH EQUITY MAX √
natural_image
Illustration of a hand using a steam iron to clean or brush the power (no text or symbols visible)natural_image
Illustration of a hand holding a jacket with a checkmark, against a hanger background (no text or symbols)natural_image
Illustration of a hand cleaning a car with a brush (no text or symbols)text_image
Diagram illustrating a hand washing clothes with a warning symbol and crossed-out hand gesturenatural_image
Illustration of a person holding a hand holding a spray can with a cross mark (no text or symbols)text_image
Diagram showing a hair iron being adjusted to a circular component with 'ECO' and 'CLT' labels, indicating environmental impact.text_image
Diagram showing an iron (£) with a warning symbol indicating disassembly or repair, accompanied by a magnified inset showing a plug and cable.text_image
Diagram showing a iron (£) with thermometer symbols and checkmark, indicating temperature measurement or inspection.natural_image
Illustration of a hand cleaning a leaf with a checkmark indicating inspection (no text or symbols present)text_image
Warning symbol and product image showing a bottle, paintbrush, and light bulb next to a warning sign with an exclamation mark.natural_image
Illustration of a hand washing a sink with a water tap and warning symbols (no text or labels)text_image
Diagram showing a steam iron with an inset magnified view of its internal components labeled ECO and CLA.text_image
SHILBHINAS NILK COTTON LUCAN MAXnatural_image
Illustration of a steam iron with a cord and plug, no text or symbols presentnatural_image
Illustration of a hand holding a water droplet and a circular icon with an hourglass symbol (no text or labels)natural_image
Close-up of a mechanical component with a checkmark and a circular detail (no text or symbols)natural_image
Illustration of a wall socket connected to a plug with a black arrow indicating direction (no text or symbols)text_image
CALC CLEANnatural_image
Illustration of a steam iron with a magnified inset showing the ear and cord (no text or symbols)natural_image
Illustration of a bottle with decorative patterns and rotating arrows (no text or symbols)text_image
Diagram showing a steam iron being heated, with an inset magnified view highlighting the heating process.natural_image
Illustration of a wall socket connected to a power plug with a magnified view (no text or symbols)text_image
Diagram illustrating temperature change with iron iron, thermometer, and hourglass symbolsnatural_image
Hand washing a shower in a kitchen sink (no text or symbols visible)natural_image
Illustration of a glass bottle with internal structure and rotating arrow, no text or symbols presentnatural_image
Illustration of a steam iron with a warning symbol (no text or labels)natural_image
3D rendered image of a steam iron with a checkmark indicating inspection or repair (no text or symbols)
natural_image
Illustration of an iron (£) being held by a power tool, with a magnified inset showing the cutting edge detail (no text or symbols present)natural_image
Illustration of a hand pressing down on a wooden iron (no text or symbols)natural_image
Medical illustration of a hand performing a CT scan on a bone (no text or labels)natural_image
Illustration of a hand using an iron on a surface, with a circular logo containing 'ECO' and a cloud icon above (no text or symbols on the iron itself)natural_image
Illustration of a hand ironing an iron with a circular icon showing a house symbol (no text or symbols present)natural_image
Illustration of two iron iron holders with a screw and a pencil, marked with a black X (no text or symbols)natural_image
Illustration of a steam iron with a power cord and plug, no text or symbols presentnatural_image
Illustration of a mechanical component with an hourglass symbol (no text or labels)natural_image
Close-up of a mechanical component with a checkmark icon (no text or symbols)text_image
COWMINGS GULB COWM MAA OKnatural_image
Illustration of a person using a steam iron on a bed (no text or symbols visible)natural_image
Illustration of a steam iron being heated by a coiled wire, with a magnified inset showing the iron inside (no text or symbols)natural_image
Illustration of a person using a power iron on a surface (no text or symbols visible)natural_image
Illustration of a hand pressing down on a surface with a downward arrow indicating pressure or movement (no text or symbols present)natural_image
Illustration of a hand using a steam iron to clean or brush the power (no text or symbols visible)natural_image
Illustration of a hand holding a jacket with a checkmark, against a hanger background (no text or symbols)natural_image
Illustration of a hand cleaning a car with a brush (no text or symbols)text_image
Diagram illustrating a hand washing clothes with a warning symbol and crossed-out hand gesturenatural_image
Illustration of a person holding a hand holding a spray can with a cross mark (no text or symbols)text_image
Diagram showing a hair iron with an inset magnified view highlighting the 'ECO' component.text_image
Diagram showing a hair iron with a warning symbol indicating disassembly or repair, accompanied by a magnified cross and checkmark.2 Pärliecinieties, ka gludeklis nav pievienots elektrotiklam.

text_image
°C × °C ✓3 Pärliecinieties, ka gludeklis ir atdzisis.

natural_image
Illustration of a hand cleaning a leaf with a checkmark indicating inspection (no text or symbols present)text_image
Warning symbol and product image showing a bottle, a paintbrush, and a light bulb with a warning signnatural_image
Illustration of a hand washing a sink with a water tap and warning symbols (no text or labels)natural_image
Illustration of a hair iron being held, with a magnified inset showing internal components (no text or symbols)text_image
SHILBHINAS NILK COTTON LUCAN MAXnatural_image
Illustration of a steam iron with a cord and plug, no text or symbols presentnatural_image
Illustration of a hand holding a water droplet and a circular icon with an hourglass symbol (no text or labels)6 ledegsies indikatora lampiņa, norādot, ka gludeklis uzkarst.

natural_image
Close-up of a mechanical component with a checkmark and a circular detail (no text or symbols)natural_image
Illustration of a wall socket connected to a plug with a black arrow indicating direction (no text or symbols)8 Atvienojiet gludekla kontaktdakšu.

text_image
CALC CLEANnatural_image
Illustration of a steam iron with a magnified inset showing the ear and cord (no text or symbols)natural_image
3D rendering of a white bottle with decorative swirl pattern and rotating arrows (no text or symbols)text_image
Diagram showing a steam iron being cut with an arrow and magnified detail, labeled with 'ECO' and 'CLN'natural_image
Illustration of a wall socket connected to a power plug with a magnified view (no text or symbols)2 Atvienojiet gludekla kontaktdakšu.

text_image
Diagram illustrating temperature change with iron iron, thermometer, and hourglass symbols3 Laujiet gludeklim atdzist.

natural_image
Hand washing a shower in a kitchen sink (no text or symbols visible)4 Izlejiet no ūdens tvertnes atlikušo ūdeni.

natural_image
Illustration of a glass bottle with internal structure and rotating arrow, no text or symbols presentnatural_image
Illustration of a steam iron with a hanging hook and a black X mark (no text or symbols)
natural_image
Illustration of a steam iron with a checkmark indicating a specific part (no text or symbols present)natural_image
Illustration of a hairdryer with an inset showing a magnified view of the tip and base (no text or symbols)natural_image
Illustration of a hand pressing down on a piece of iron (no text or symbols visible)4 Atidarykite vandens bakelio dangtj.

text_image
MAXnatural_image
Medical illustration of a surgical procedure on a bone (no text or labels)natural_image
Illustration of a hand using a power iron to clean material, with an 'ECO' logo in the corner (no text on the diagram itself)natural_image
Illustration of a hand ironing an iron with a circular icon showing a roof symbol (no text or symbols present)natural_image
Illustration of two iron burners with a screw and a pencil, showing different angles (no text or symbols)natural_image
Illustration of a steam iron with a cord and plug, no text or symbols presentnatural_image
Illustration of a mechanical component with an hourglass symbol (no text or labels)natural_image
Close-up of a mechanical component with a checkmark icon (no text or symbols)text_image
Cronamics MMA G2.5 Cottonnatural_image
Illustration of a person using a steam iron to press down a bed (no text or symbols visible)natural_image
Illustration of a steam iron being heated, with a magnified inset showing the iron inside (no text or symbols)natural_image
Illustration of a person using a power iron on a bed (no text or symbols visible)natural_image
Illustration of a hand pressing down on a textured surface with a downward arrow indicating motion (no text or symbols)text_image
X SMA MATH COTCH V
natural_image
Illustration of a hand using a steam iron to clean or brush the power (no text or symbols visible)natural_image
Illustration of a hand holding a jacket with a checkmark, against a hanger background (no text or symbols)natural_image
Illustration of a hand cleaning a car with a brush and directional arrows indicating action (no text or symbols)text_image
Diagram illustrating a hand washing clothes with a warning symbol and crossed-out hand gesture4 Lygindami nelaikykite plikomis rankomis.

natural_image
Illustration of a person holding a hand holding a spray can with a cross mark (no text or symbols)natural_image
Illustration of a hair iron being held by a plastic bag, with an inset showing the same part (no text or symbols present)text_image
Diagram showing a hair iron with a magnified view of the electrical socket, indicating disassembly or disassembly process.text_image
°C × °C ✓natural_image
Illustration of a hand cleaning a seed pod with a checkmark indicating inspection (no text or symbols present)text_image
Warning symbol and product image showing a bottle, paintbrush, and plastic object with an exclamation marknatural_image
Illustration of a hand washing a sink with a water tap and warning symbols (no text or labels)natural_image
Illustration of a steam iron being cut with a magnified inset showing internal components (no text or symbols)text_image
SHILBHINAS NILK COTTON LUCAN MAXnatural_image
Illustration of a steam iron with a cord and plug, no text or symbols presentnatural_image
Illustration of a hand holding a water droplet and a circular icon with an hourglass symbol (no text or labels)natural_image
Close-up of a mechanical component with a checkmark and circular detail (no text or symbols)natural_image
Illustration of a wall socket connected to a plug with a black arrow indicating direction (no text or symbols)text_image
CALC CLEANnatural_image
Illustration of a steam iron with a magnified inset showing the ear and cord (no text or symbols)natural_image
3D rendering of a white bottle with decorative swirl pattern and rotating arrows (no text or symbols)text_image
Diagram showing a steam iron being cut with an arrow and magnified detail, labeled with 'ECO' and 'CLN'natural_image
Illustration of a wall socket connected to a plug with a black arrow indicating direction (no text or symbols)text_image
Diagram illustrating temperature measurement with a iron, thermometer, and hourglass iconnatural_image
Hand cleaning a tiled surface with a curved pipe (no text or symbols visible)natural_image
Diagram of a bottle with internal structure and rotating arrows indicating rotation (no text or symbols)natural_image
Illustration of a steam iron with a hanging hook and a black X mark (no text or symbols)
natural_image
Illustration of a steam iron with a checkmark indicating a defect or repair (no text or symbols present)text_image
Diagram showing a 3D printer with an inset highlighting the 'ECO' and 'CIX' regions, likely illustrating environmental safety or diagnostic concept.natural_image
Illustration of a hand pressing down on a piece of iron (no text or symbols visible)natural_image
Medical illustration of a surgical procedure on a bone (no text or labels)natural_image
Illustration of a hand using an iron to clean or steam, with a circular logo containing the word 'ECO' (no text on the iron itself)natural_image
Illustration of a hand ironing an iron, with a circular icon containing a leaf symbol (no text or symbols present)text_image
Zin Control Unitnatural_image
Illustration of two iron iron holders with a screw and a pencil, marked with a black X (no text or symbols)natural_image
Illustration of a steam iron with a cord and plug, no text or symbols presentnatural_image
Illustration of a mechanical component with an hourglass symbol (no text or labels)natural_image
Close-up of a mechanical component with a checkmark icon (no text or symbols)text_image
Cronamics MMA MMA MMA MMAnatural_image
Illustration of a person using a steam iron to press down a surface (no text or symbols visible)natural_image
Illustration of a steam iron being heated, with a magnified inset showing the iron inside (no text or symbols)natural_image
Illustration of a person using a power iron on a bed (no text or symbols visible)natural_image
Illustration of a hand performing a medical or therapeutic procedure on skin, with a downward arrow indicating pressure or action (no text or symbols present)text_image
X MIN MAX SELL COCON V208 Magyar

natural_image
Illustration of a hand using a steam iron to clean or brush the power (no text or symbols visible)text_image
X SIX MAX LOW COT √ STATISTICS SEA
natural_image
Illustration of a hand holding a jacket with a checkmark, against a hanger background (no text or symbols)natural_image
Illustration of a hand cleaning a car with a brush (no text or symbols)text_image
Diagram illustrating a hand washing clothes with a warning symbol and crossed-out hand gesturenatural_image
Illustration of a person holding a hand holding a spray can with a cross mark (no text or symbols)natural_image
Illustration of a steam iron being cut with a magnified inset showing internal components (ECO, CLA) and a plug inserted into it.text_image
Illustration of a hair iron with a magnified view showing a plug and a checkmark, indicating inspection or repair status.text_image
Diagram showing a iron (£) with thermometer symbols and checkmark, indicating temperature measurement or inspection.natural_image
Illustration of a hand cleaning a seed pod with a checkmark (no text or symbols)text_image
Warning symbol and product image showing a bottle, paintbrush, and plastic object with an exclamation marknatural_image
Illustration of a hand washing a sink with a water tap and warning symbols (no text or labels)natural_image
Illustration of a hair iron being adjusted for size, with a magnified inset showing the cutting edge detail (no text or symbols)text_image
SHILBHINAS NILK COTTON LUCAN MAXnatural_image
Illustration of a steam iron with a cord and plug, no text or symbols presentnatural_image
Illustration of a hand holding a water droplet and a circular icon with an hourglass symbol (no text or labels)natural_image
Close-up of a mechanical component with a checkmark and circular detail (no text or symbols)natural_image
Illustration of a wall socket connected to a plug with a downward arrow (no text or symbols)text_image
CALC CLEANnatural_image
Illustration of a steam iron with a magnified inset showing the ear and neck (no text or symbols)natural_image
3D rendering of a white bottle with decorative swirl pattern and rotating arrows (no text or symbols)text_image
Diagram showing a steam iron being cut with an arrow and magnified detail, labeled with 'ECO' and 'CLN'natural_image
Illustration of a wall socket connected to a plug with a black arrow indicating direction (no text or symbols)text_image
Diagram illustrating temperature measurement with a iron, thermometer, and hourglass iconnatural_image
Hand cleaning a tiled surface with a curved pipe (no text or symbols visible)natural_image
Diagram of a bottle with internal structure and rotating arrows indicating rotation (no text or symbols)natural_image
Illustration of a steam iron with a warning symbol (no text or labels)natural_image
3D rendered image of a steam iron with a checkmark indicating inspection or repair (no text or symbols)
natural_image
Illustration of a steam iron with a magnified inset showing internal components (no text or symbols)natural_image
Illustration of a hand pressing down on a wooden iron (no text or symbols)natural_image
Medical illustration of a hand performing a CT scan on a patient's shoulder (no text or labels)natural_image
Illustration of a hand using a power iron to clean (no text or symbols)natural_image
Illustration of a hand ironing an iron with a circular icon showing a roof symbol (no text or symbols present)natural_image
Illustration of two iron iron holders with a screw and a pencil, marked with a black X (no text or symbols)natural_image
Illustration of a steam iron with a cord and plug, no text or symbols presentnatural_image
Illustration of a mechanical component with an hourglass symbol (no text or labels)natural_image
Close-up of a mechanical component with a checkmark and circular detail (no text or symbols)natural_image
Illustration of a person using a steam iron on a bed (no text or symbols visible)natural_image
Illustration of a steam iron being heated, with a magnified inset showing the iron inside (no text or symbols)natural_image
Illustration of a person using a power iron on a bed (no text or symbols visible)natural_image
Illustration of a hand pressing down on a surface with a downward arrow indicating pressure or force (no text or symbols present)text_image
X SMA MATH COTCH V222 Nederlands

natural_image
Illustration of a hand using a steam iron to clean or brush the power (no text or symbols visible)natural_image
Illustration of a hand holding a jacket with a checkmark, against a hanger background (no text or symbols)natural_image
Illustration of a hand cleaning a car with a brush (no text or symbols)text_image
Diagram illustrating a hand washing clothes with a warning symbol and crossed-out hand gesturenatural_image
Illustration of a person holding a bottle with a cross mark, no text or symbols presenttext_image
Diagram showing a hair iron with an inset image of a carbon dioxide (CO2) component, likely illustrating environmental impact or chemical reaction.natural_image
Illustration of a hair iron with a close-up of its electrical socket (no text or symbols)text_image
Diagram showing a steam iron with temperature symbols and checkmark indicators, likely illustrating a thermal measurement or inspection process.natural_image
Illustration of a hand cleaning a seed pod with a checkmark indicating inspection (no text or symbols present)text_image
Warning symbol and product image showing a bottle, paintbrush, and plastic object with an exclamation marknatural_image
Illustration of a hand washing a sink with a water tap and warning symbols (no text or labels)text_image
Diagram showing a hairdryer with an inset magnified view highlighting the 'ECO' and 'CLU' features.text_image
SHILBHINAS NILK COTTON LUCAN MAXnatural_image
Illustration of a steam iron with a cord and plug, no text or symbols presentnatural_image
Illustration of a hand holding a water droplet and a circular icon with an hourglass symbol (no text or labels)natural_image
Close-up of a mechanical component with a checkmark and circular detail (no text or symbols)natural_image
Illustration of a wall socket connected to a plug with a black arrow indicating direction (no text or symbols)text_image
CALC CLEANnatural_image
Illustration of a steam iron with a magnified inset showing the tip and tail (no text or symbols)natural_image
3D rendering of a cylindrical object with textured surface and curved arrows indicating rotation (no text or symbols)text_image
Diagram showing a 3D printer with an arrow pointing to a component labeled 'ECO' and 'CLN', likely illustrating a process or assembly.natural_image
Illustration of a wall socket connected to a power plug with a magnified view (no text or symbols)text_image
Diagram illustrating temperature change with iron iron, thermometer, and hourglass symbolsnatural_image
Hand washing a shower in a kitchen sink (no text or symbols visible)natural_image
Illustration of a glass bottle with internal structure and rotating arrow, no text or symbols presentnatural_image
Illustration of a steam iron with a warning symbol (no text or labels)natural_image
3D rendered image of a steam iron with a checkmark indicating selection (no text or symbols)
natural_image
Illustration of a steam iron being cut with a magnified inset showing internal components (no text or symbols)natural_image
Illustration of a hand pressing down on a wooden iron (no text or symbols)natural_image
Illustration of a hand holding a small object above a curved surface (no text or symbols)natural_image
Illustration of a hand using a power iron to clean or steam (no text or symbols)ECO-innstilling ECO-sky-innstilling : Minimum konstant damp tilføres kontinuerlig for plagg med lite skrukker. Denne innstillingen sparer også energi.

natural_image
Illustration of a hand using an iron on a surface, with a circular icon containing a microphone symbol (no text or symbols present)natural_image
Illustration of two iron iron holders with a screw and a pencil, marked with a black X (no text or symbols)natural_image
Illustration of a steam iron with a cord and plug, no text or symbols presentnatural_image
Illustration of a mechanical component with an hourglass icon and a droplet, no text or symbols present.natural_image
Close-up of a mechanical component with a checkmark icon (no text or symbols)6 Når indikatorlyset er av, er strykejernet klar til bruk. Indikatorlyset lyser opp iblant under stryking.
Stryke med damp

text_image
ECO ECOtext_image
Circuitry MAX MIN MAX MINnatural_image
Illustration of a person using a steam iron on a bed (no text or symbols visible)2 Damp slippes ut under stryking.
natural_image
Illustration of a steam iron being heated by a coiled wire, with a magnified inset showing the iron inside (no text or symbols)natural_image
Illustration of a person using a power iron on a bed (no text or symbols visible)2 Etter en liten stund stopper dampen mens du stryker.
Vanntåke

natural_image
Illustration of a hand pressing down on a surface with a downward arrow indicating pressure or force (no text or symbols present)text_image
X SMA V COWA V236 Norsk

natural_image
Illustration of a hand using a steam iron to clean or brush the power (no text or symbols visible)text_image
X SIX MAX LOW COT √ STATISTICS SEA
natural_image
Illustration of a hand holding a jacket with a checkmark, against a hanger background (no text or symbols)natural_image
Illustration of a hand cleaning a car with a brush and directional arrows indicating action (no text or symbols)text_image
Diagram illustrating a hand washing clothes with a warning symbol and crossed-out hand gesturenatural_image
Illustration of a person holding a hand holding a spray can with a cross mark (no text or symbols)text_image
Diagram showing a hairdryer with an inset magnified view highlighting the 'ECO' component.text_image
Diagram showing a hair iron with a close-up of its electrical socket, marked with X and ✓ symbols indicating correct and incorrect states.text_image
°C × °C ✓natural_image
Illustration of a hand cleaning a seed pod with a checkmark (no text or symbols)text_image
Warning symbol and product image showing a bottle, paintbrush, and plastic object with an exclamation marknatural_image
Illustration of a hand washing a sink with a water tap and warning symbols (no text or labels)natural_image
Illustration of a hair iron being adjusted to a surface, with a magnified inset showing the cutting edge (no text or symbols)text_image
SHILBHINAS NILK COTTON LUCAN MAXnatural_image
Illustration of a steam iron with a cord and plug, no text or symbols presentnatural_image
Illustration of a hand holding a water droplet and a circular icon with an hourglass symbol (no text or labels)natural_image
Close-up of a mechanical component with a checkmark and circular detail (no text or symbols)natural_image
Illustration of a wall socket connected to a plug with a black arrow indicating direction (no text or symbols)text_image
CALC CLEANnatural_image
Illustration of a steam iron with a magnified inset showing the tip and tail (no text or symbols)natural_image
3D rendering of a cylindrical object with textured surface and curved arrows indicating rotation (no text or symbols)text_image
Diagram showing a steam iron being cut with an inset image of a component labeled 'ECO' and 'CLN'natural_image
Illustration of a wall socket connected to a plug with a black arrow indicating direction (no text or symbols)text_image
Diagram illustrating temperature change with iron iron, thermometer, and hourglass symbolsnatural_image
Hand washing a shower in a kitchen sink (no text or symbols visible)natural_image
Illustration of a bottle with internal structure and curved arrows indicating rotation (no text or symbols)natural_image
Illustration of a steam iron with a hanging hook and a black X mark (no text or symbols)
natural_image
Illustration of a steam iron with a checkmark indicating a defect or repair (no text or symbols present)2 Dazmol soviganiga amin bo'ling.

text_image
Diagram showing a 3D printer with an inset highlighting the 'ECO' and 'CIX' components, likely illustrating a mechanical or environmental inspection.3 Bug'siz rejimini (quruq dazmollash) tanlash uchun bug' tanlagichni o'ngga suring

natural_image
Illustration of a hand pressing down on a piece of iron, showing the process (no text or symbols)4 Suv baki qopqog'ini chertib oching.

text_image
MAX5 Suv bakini undagi MAX belgisigacha to'ldiring. Atir, hid taratuvchi vosita, sovun yoki sirkaga o'xshash qo'shimchalarni qo'shmang.

natural_image
Medical illustration of a surgical procedure on a bone (no text or labels)6 Suv baki qopqog'ini mahkam yoping.
Haroratni sozlash
 | 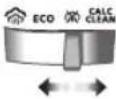 | |
| MAXZIG'IRDAN TO'QILGAN MATO | ||
| ●●●PAXTA | ||
| ●●IPAK | */ ECO | |
| ●SINTETIKA |

natural_image
Illustration of a hand using an iron to clean or steam, with a circular logo containing the word 'ECO' (no text on the iron itself)natural_image
Illustration of a hand ironing an iron, with a circular icon showing a roof symbol (no text or symbols present)Ikki oqimli bug' bulutlari 'Qattiq burmalar uchun yanada o'zgarmas bug' muntazam ta'minlab turiladi.
Jihozdan foydalanish
text_image
Diagram of a rotary dial with labeled segments and control buttons, showing measurement ranges and function callouts.2 Harorat murvatini mos harorat belgisiga burash orqali uni kerakli dazmollash haroratiga o'rnating.

natural_image
Illustration of two iron iron holders with a screw and a pencil, marked with a black X (no text or symbols)3 Dazmolni tayanchiga tushiring.

natural_image
Illustration of a steam iron with a power cord and electrical outlet (no text or symbols)4 Shtekerni yerlantirilgan rozetkaga kiriting va dazmolni o'z tirgagiga qo'yib turing. Agar siz uzaytirgichdan foydalanayotgan bo'lsangiz, uning elektr tok ko'rsatkichi dazmolga mos kelishiga amin bo'ling.

natural_image
Illustration of a mechanical component with an hourglass symbol (no text or labels)natural_image
Close-up of a mechanical component with a checkmark icon (no text or symbols)text_image
COWNSICS MAAS GILS COWTH1 Harorat ko'rsatkichini mos sozlamalarga belgilang: dazmollashni istagan matoyingiz turiga qarab ipak, paxta yoki surp. Bug' sintetika sozlamasida mavjud emas. Agar bir funksiya ishlatilsa, suv sachratiladi.

natural_image
Person using a steam iron on a bed (no text or symbols visible)2 Dazmollash vaqtida bug' chiqariladi.
Bug'siz/Quruq dazmollash

natural_image
Illustration of a steam iron being heated by a coiled wire, with a magnified inset showing the iron plug (no text or symbols present)1 Bug' sozlamasini bug'siz rejimga o'rnating

natural_image
Illustration of a person using a power iron on a bed (no text or symbols visible)natural_image
Illustration of a hand pressing down on a surface with a downward arrow indicating motion (no text or symbols)1 Tutqich yuqorisidagi suv purkash tugmasini bosing va qo'yib yuboring. Suv soplodan chiqarilishi kerak.
Bug'ning horizontal chiqarilishi
1 Bug' chiqarish funksiyasi paxta va surp sozlamalari uchun mavjud.

text_image
X SMEK MIN SSK COTCH250 O'zbek

natural_image
Illustration of a hand using a steam iron to clean or brush the power (no text or symbols visible)2 Qattiq burmalarni ketkazish uchun kuchli bug' chiqaradigan bug'ni kuchaytirish tugmasini bosing va qo'yib yuboring.
Bug'ning vertikal chiqarilishi
1 Bug' chiqarish funksiyasi paxta va surp sozlamalari uchun mavjud.

text_image
X SIX MAX LOW COT √ STATISTICS SEA
natural_image
Illustration of a hand holding a jacket with a checkmark, against a hanger background (no text or symbols)2 Osiq turgan kiyim-kechakdagi burmalarni bug' bilan bartaraf qilish uchun bug' chiqarish tugmasini vertikal holatda bosing va qo'yib yuboring. Vertikal holatda bug' chiqarish tugmasini bosib turish doimiy bug' bilan ta'minlamaydi.

natural_image
Illustration of a hand cleaning a car with a brush (no text or symbols)text_image
Diagram illustrating a hand washing clothes with a warning symbol and crossed-out hand gesturenatural_image
Illustration of a person holding a hand holding a spray can with a cross mark (no text or symbols)text_image
Diagram showing a hair iron with an inset magnified view highlighting the 'ECO' component.1 Bug' sozlamasini tanlagichdan "bug'siz" (quruq dazmollash) rejimiga o'rnating.


text_image
Illustration of an iron (£) with a warning symbol indicating disassembly or repair, accompanied by a magnified inset showing a plug and plug plug.2 Dazmol tarmoqqa ulanmaganiga amin bo'ling.

text_image
Diagram showing a iron on a surface with temperature symbols and checkmark indicators3 Dazmol soviganiga amin bo'ling.

natural_image
Illustration of a hand cleaning a leaf-shaped object with a checkmark indicating inspection (no text or symbols present)4 Dazmol plitasidagi parchalar va har qanday qoldiqlarni nam mato bilan artib tozalang.
252 O'zbek

text_image
Warning symbol and product image showing a bottle, a paintbrush, and a light bulb with a warning signEslatma: Dazmol plitasi silliq bo'lishini ta'minlash uchun metall obyektlarga tekkizmang. Idish yuvish matosi, sirka yoki boshqa kimyoviy moddalardan dazmol plitasini tozalash uchun foydalanmang.

natural_image
Illustration of a hand washing a sink with a water tap and warning symbols (no text or labels)5 Dazmolni vodoprovod suvi ostida yuvmang/tozalamang.
Cho'kmadan tozalash

text_image
3 4 5 6 6 10 11 12 12 13 6 17 18 19 19 20 23 24 25 25 26 27 0 31natural_image
Illustration of a steam iron being heated by a magnified inset showing internal components (no text or symbols)2 Dazmol tarmoqdan uzilgani va bug' sozlamasi bug'siz rejimiga (quruq dazmollash) qo'yilganiga amin bo'ling

text_image
MAX3 Suv bakini MAX belgisigacha to'ldiring.

text_image
SILBHINAS NIM SILK COTTON LUMEN MAX4 Harorat murvatini MAXga o'rnating.

natural_image
Illustration of a steam iron with a cord and plug, no text or symbols present5 Dazmolni elektr tarmog'iga ulang va, agar zarur bo'lsa, tarmoqni yoqing.

natural_image
Illustration of a hand holding a water droplet and a circular icon with an hourglass symbol (no text or labels)6 Indikator chirog'i yonib, dazmol isiyotganligini ko'rsatib turadi.

natural_image
Close-up of a mechanical component with a checkmark and a magnified circular detail (no text or symbols)7 Indikator chirog'i o'chishini kuting.
254 O'zbek

natural_image
Illustration of a wall socket connected to a plug with a black arrow indicating direction (no text or symbols)8 Dazmolni rozetkadan uzing.

text_image
CALC CLEAN9 Dazmolni rakovina ustida horizontal ushlang va uni silkiting. Bug', issiq suv va cho'kma zarralari dazmol ostidan chiqib ketadi. Suv butunlay dazmolning suv sig'imidan chiqib ketgunicha uni silkitavering.

natural_image
Illustration of a steam iron with a magnified inset showing the tip and tail (no text or symbols)10 Dazmolni rozetkaga ulang va uning osti qurishi uchun dazmolning isishini kuting. Bu taxminan 2 daqiga vaqt oladi. Suv bug' tarmoqlaridan sachrayotganligini ko'rishingiz mumkin bo'ladi va bu normal vaziyat deb qaraladi, chunki ortiqcha suv chiqarilib yuborilmoqda.

natural_image
3D rendering of a cylindrical object with textured surface and curved arrows indicating rotation (no text or symbols)11 Dazmol sovushiga imkon bering va uning ostki plitasi gardishiga shnurni o'rang.
Saqlash

text_image
Diagram showing a steam iron being cut with an arrow and magnified detail, labeled with 'ECO' and 'CLN'1 Bug'siz rejimni (quruq dazmollashni) tanlash uchun bug' tanlagichni suring

natural_image
Illustration of a wall socket connected to a plug with a magnified view (no text or symbols)2 Dazmolni rozetkadan uzing.

text_image
Diagram illustrating temperature measurement using an iron, showing thermometer and hourglass icons with labels.3 Dazmol sovishini kuting.

natural_image
Hand washing a shower in a kitchen sink (no text or symbols visible)natural_image
Illustration of a glass bottle with internal structure and rotating arrow, no text or symbols present5 Quvvat shnurini dazmolning asosiy korpusi atrofiga o'rang.
Spis treści
Wstep 257
Opis produktu 257
natural_image
Illustration of a steam iron with a hanging hook and a black X mark (no text or symbols)
natural_image
Illustration of a steam iron with a checkmark indicating a defect or repair (no text or symbols present)natural_image
Illustration of a hair iron with an inset showing a magnified view of a small object (no text or symbols present)natural_image
Illustration of a hand pressing down on a piece of iron (no text or symbols visible)natural_image
Medical illustration of a hand performing a procedure on a bone (no text or labels)natural_image
Illustration of a hand using a power iron to clean or wear (no text or symbols)natural_image
Illustration of a hand using an iron on a surface, with a circular icon containing a leaf symbol (no text or symbols present)text_image
Zin Control Unitnatural_image
Illustration of two iron hangers with a cross mark indicating a specific part, no text or symbols present.natural_image
Illustration of a steam iron with a cord and plug, no text or symbols presentnatural_image
Illustration of a mechanical component with an hourglass icon and a droplet, no text or symbols present.natural_image
Close-up of a mechanical component with a checkmark icon (no text or symbols)natural_image
Illustration of a person using a iron on a bed (no text or symbols visible)natural_image
Illustration of a steam iron being heated, with a magnified inset showing internal components (no text or symbols)natural_image
Illustration of a person using a power iron on a bed (no text or symbols visible)natural_image
Illustration of a hand pressing down on a medical device with a downward arrow indicating motion (no text or symbols)text_image
X SMA V COTCH V264 Polski

natural_image
Illustration of a hand using a steam iron to clean or brush the power (no text or symbols visible)text_image
X MIN MAX SELL CREDIT SALAD
natural_image
Illustration of a hand holding a jacket with a checkmark, against a hanger background (no text or symbols)natural_image
Illustration of a hand cleaning a car with a brush (no text or symbols)text_image
Diagram illustrating a hand washing clothes with a warning symbol and crossed-out hand gesturenatural_image
Illustration of a person holding a hand holding a spray can with a cross mark (no text or symbols)natural_image
Illustration of a steam iron being cut with an inset showing internal components (ECO, CLU) and a close-up view of the iron plug.text_image
Diagram showing iron iron with a switch and a magnified view of the switch, indicating no text or symbols.text_image
Illustration showing a steam iron with thermometer symbols and checkmark, indicating temperature measurement or inspection.natural_image
Illustration of a hand cleaning a seed pod with a checkmark indicating the correct part (no text or symbols present)text_image
Warning symbol and product image showing a bottle, paintbrush, and light bulb next to a warning sign with an exclamation mark.natural_image
Illustration of a hand washing a sink with a water tap and warning symbols (no text or labels)natural_image
Illustration of a steam iron with an inset showing a magnified view of its internal structure (no text or symbols)text_image
SHILBHINAS NILK COTTON LUCAN MAXnatural_image
Illustration of a steam iron with a cord and plug, no text or symbols presentnatural_image
Illustration of a hand holding a water droplet and a circular icon with an hourglass symbol (no text or labels)natural_image
Close-up of a mechanical component with a checkmark and circular detail (no text or symbols)natural_image
Illustration of a wall socket connected to a plug with a black arrow indicating direction (no text or symbols)8 Odłącz żelazko.

text_image
CALC CLEANnatural_image
Illustration of a steam iron with a magnified inset showing the tip and tail (no text or symbols)natural_image
3D rendering of a cylindrical object with textured surface and curved arrows indicating rotation (no text or symbols)text_image
Diagram showing a steam iron being cut with an arrow and magnified detail, labeled with 'ECO' and 'CLN'natural_image
Illustration of a wall socket connected to a plug with a black arrow indicating direction (no text or symbols)2 Odłącz żelazko.

text_image
Diagram illustrating temperature measurement with a iron, thermometer, and hourglass iconnatural_image
Close-up of a hand cleaning a tiled wall surface with a curved pipe (no text or symbols visible)natural_image
Illustration of a bottle-shaped container with rotating arrows indicating flow or movement (no text or symbols)natural_image
Illustration of a steam iron with a hanging hook and a black X mark (no text or symbols)
natural_image
Illustration of a steam iron with a checkmark indicating a specific part (no text or symbols present)natural_image
Illustration of a hair iron with an inset showing a magnified view of a small object (no text or symbols present)natural_image
Illustration of a hand pressing down on a piece of iron, showing the process (no text or symbols)natural_image
Medical illustration of a hand performing a procedure on a bone (no text or labels)natural_image
Illustration of a hand using a power iron to clean or store (no text or symbols)natural_image
Illustration of a hand ironing an iron with a small icon in the corner (no text or symbols)text_image
Zin Control Unitnatural_image
Illustration of two iron hangers with a cross mark indicating a specific part, no text or symbols present.natural_image
Illustration of a steam iron with a cord and plug, no text or symbols presentnatural_image
Illustration of a mechanical component with an hourglass icon and a droplet, no text or symbols present.natural_image
Close-up of a mechanical component with a checkmark icon (no text or symbols)natural_image
Person using a steam iron on a bed (no text or symbols visible)natural_image
Illustration of a steam iron being heated, with a magnified inset showing the heating mechanism (no text or symbols)natural_image
Illustration of a person using a power iron on a bed (no text or symbols visible)natural_image
Illustration of a hand pressing down on a surface with a downward arrow indicating pressure or force (no text or symbols)natural_image
Illustration of a hand using a steam iron to clean or brush the power (no text or symbols visible)text_image
X MIN MAX SELL CREDIT SALAD
natural_image
Illustration of a hand holding a jacket with a checkmark, against a hanger background (no text or symbols)natural_image
Illustration of a hand cleaning a car with a brush (no text or symbols)text_image
Diagram illustrating a hand washing clothes with a warning symbol and crossed-out hand gesturenatural_image
Illustration of a person holding a bottle with a cross mark, no text or symbols presenttext_image
Diagram showing a hair iron with an inset close-up highlighting the carbon dioxide (ECO) component.natural_image
Illustration of an iron (£) with a close-up of its electrical socket (no text or symbols)text_image
Diagram showing a iron on a surface with temperature indicators and checkmark symbols, likely illustrating a thermal measurement or inspection process.natural_image
Illustration of a hand cleaning a leaf with a checkmark indicating inspection (no text or symbols present)4 Limpe partículas e outros resíduos da base com um pano húmido.
Português

text_image
Warning symbol and product image showing a bottle, paintbrush, and plastic object with an exclamation marknatural_image
Illustration of a hand washing a sink with a water tap and warning symbols (no text or labels)natural_image
Illustration of a steam iron being cut with a magnified inset showing internal components (no text or symbols)text_image
SHILBHINAS NILK COTTON LUCAN MAXnatural_image
Illustration of a steam iron with a cord and plug, no text or symbols presentnatural_image
Illustration of a hand holding a water droplet and a circular icon with an hourglass symbol (no text or labels)natural_image
Close-up of a mechanical component with a checkmark and a circular detail (no text or symbols)natural_image
Illustration of a wall socket connected to a plug with a black arrow indicating direction (no text or symbols)text_image
CALC CLEANnatural_image
Illustration of a steam iron with a magnified inset showing the tip and tail (no text or symbols)natural_image
3D rendering of a cylindrical object with textured surface and curved arrows indicating rotation (no text or symbols)text_image
Diagram showing a steam iron being cut with an arrow and magnified detail, labeled with 'ECO' and 'CLN'natural_image
Illustration of a wall socket connected to a plug with a black arrow indicating direction (no text or symbols)text_image
Diagram illustrating temperature change with iron iron, thermometer, and hourglass symbolsnatural_image
Hand washing a shower in a kitchen sink (no text or symbols visible)natural_image
Illustration of a glass bottle with internal structure and rotating arrow, no text or symbols presentnatural_image
Illustration of a steam iron with a hanging hook and a black X mark (no text or symbols)
natural_image
3D illustration of a steam iron with a checkmark indicating a detail (no text or symbols present)text_image
Diagram showing a 3D printer with an inset highlighting the 'ECO' and 'CIX' components, likely illustrating a safety or manufacturing process.natural_image
Illustration of a hand pressing down on a mechanical component (no text or symbols visible)natural_image
Medical illustration of a surgical instrument on a bone (no text or labels)natural_image
Illustration of a hand using a power iron to clean or store (no text or symbols)natural_image
Illustration of a hand ironing an iron with a circular icon showing a roof symbol (no text or symbols present)natural_image
Illustration of two iron iron holders with a screw and a pencil, marked with a black X (no text or symbols)natural_image
Illustration of a steam iron with a power cord and plug, no text or symbols presentnatural_image
Illustration of a mechanical component with an hourglass symbol (no text or labels)natural_image
Close-up of a mechanical component with a checkmark icon (no text or symbols)text_image
Diagram showing four circular insets with icons and labels 'ECO' and a horizontal line, likely representing a system or process flow.text_image
MAX MIN COWNSICS ZEN MIN COWNSICSnatural_image
Illustration of a person using a iron on a bed (no text or symbols visible)natural_image
Illustration of a steam iron being heated, with a magnified inset showing the iron inside (no text or symbols)natural_image
Illustration of a person using a steam iron on a bed (no text or symbols visible)natural_image
Illustration of a hand pressing down on a surface with a downward arrow indicating pressure or movement (no text or symbols present)text_image
X Emissions MIN CO2 V SILKnatural_image
Illustration of a hand using a steam iron to clean or brush the power (no text or symbols visible)natural_image
Illustration of a hand holding a jacket with a checkmark, against a hanger background (no text or symbols)natural_image
Illustration of a hand cleaning a car with a brush and directional arrows indicating action (no text or symbols)text_image
Diagram illustrating a hand washing clothes with a warning symbol and crossed-out hand gesturenatural_image
Illustration of a person holding a hand holding a spray can with a cross mark (no text or symbols)natural_image
Illustration of a hair iron being held by a tool, with an inset showing a close-up of the tip and a warning symbol (no text or labels present)1 Altere o ajuste de vapor para o modo sem vapor (passar a seco) no seletor de vapor.

text_image
Diagram showing a hair iron with a switch and a magnified view of the electrical socket, indicating no text or symbols.text_image
°C × °C ✓natural_image
Illustration of a hand cleaning a seed pod with a checkmark indicating inspection (no text or symbols present)text_image
Warning symbol and product image showing a bottle, a paintbrush, and a light bulb with a warning signnatural_image
Illustration of a hand washing a sink with a water tap and warning symbols (no text or labels)natural_image
Illustration of a steam iron with a magnified inset showing a cut-out section (no text or symbols)natural_image
Illustration of a steam iron with a cord and plug, no text or symbols present5 Conecte o ferro à tomada e ligue a energia, se necessário.

natural_image
Illustration of a hand holding a water droplet and a circular icon with an hourglass symbol (no text or labels)natural_image
Close-up of a mechanical component with a checkmark and a magnified circular detail (no text or symbols)natural_image
Illustration of a wall socket connected to a plug with a black arrow indicating direction (no text or symbols)
text_image
CALC CLEANnatural_image
Illustration of a steam iron with a magnified inset showing the hook being inserted (no text or symbols)natural_image
Illustration of a bottle with decorative patterns and rotating arrows (no text or symbols)natural_image
Illustration of a steam iron being placed with a magnified inset showing internal components (no text or symbols)natural_image
Illustration of a wall socket connected to a plug with a black arrow indicating direction (no text or symbols)text_image
Diagram illustrating temperature measurement using an iron, showing thermometer and hourglass icons with labels.natural_image
Hand washing a shower in a kitchen sink (no text or symbols visible)natural_image
Illustration of a bottle with internal structure and curved arrows indicating rotation (no text or symbols)298 Română
Cuprins
Introducere 299
natural_image
Illustration of a steam iron with a warning symbol (no text or labels)natural_image
3D rendered image of a steam iron with a checkmark indicating inspection or repair (no text or symbols)
natural_image
Illustration of a steam iron being held by a tool, with an inset showing a close-up of the iron (no text or symbols present)natural_image
Illustration of a hand pressing down on a piece of iron, showing the process (no text or symbols)natural_image
Medical illustration of a hand holding a small object on a surgical instrument (no text or symbols visible)natural_image
Illustration of a hand using a power iron to clean material, with an 'ECO' logo in the corner (no text on the diagram itself)natural_image
Illustration of a hand using an iron to clean or steam (no text or symbols)natural_image
Illustration of two iron iron holders with a screw and a pencil, marked with a black X (no text or symbols)natural_image
Illustration of a steam iron with a cord and plug, no text or symbols presentnatural_image
Illustration of a mechanical component with an hourglass icon and a droplet, no text or symbols present.natural_image
Close-up of a mechanical component with a checkmark icon (no text or symbols)text_image
Swimming Controlnatural_image
Illustration of a person using a steam iron on a bed (no text or symbols visible)natural_image
Illustration of a steam iron being heated, with a magnified inset showing the iron inside (no text or symbols)natural_image
Illustration of a person using a power iron on a surface (no text or symbols visible)natural_image
Illustration of a hand pressing down on a medical device (no text or symbols visible)text_image
X SXTM MIN QTY SIX V306 Română

natural_image
Illustration of a hand using a steam iron to clean or brush the power (no text or symbols visible)text_image
X SIX MAX LOW COT √ STATISTICS SEA
natural_image
Illustration of a hand holding a jacket with a checkmark, against a hanger background (no text or symbols)natural_image
Illustration of a hand cleaning a car with a brush (no text or symbols)text_image
Diagram illustrating a hand washing clothes with a warning symbol and crossed-out hand gesturenatural_image
Illustration of a person holding a hand holding a spray can with a cross mark (no text or symbols)text_image
Diagram showing a hair iron with an inset magnified view highlighting the carbon dioxide (ECO) and carbon chain (CFH) components.text_image
Diagram showing a hair iron with a magnified view of the electrical socket, marked with X and ✓ symbols indicating inspection or repair status.text_image
°C × °C ✓natural_image
Illustration of a hand cleaning a leaf with a checkmark indicating inspection (no text or symbols present)text_image
Warning symbol and product image showing a bottle, paintbrush, and plastic object with an exclamation marknatural_image
Illustration of a hand washing a sink with a water tap and warning symbols (no text or labels)natural_image
Illustration of a steam iron being cut with a magnified inset showing internal components (no text or symbols)text_image
SHILBHINAS NILK COTTON LUCAN MAXnatural_image
Illustration of a steam iron with a cord and plug, no text or symbols presentnatural_image
Illustration of a hand holding a water droplet and a circular icon with an hourglass symbol (no text or labels)natural_image
Close-up of a mechanical component with a checkmark and circular detail (no text or symbols)natural_image
Illustration of a wall socket connected to a plug with a downward arrow indicating compression (no text or symbols)text_image
CALC CLEANnatural_image
Illustration of a steam iron with a magnified inset showing the ear and neck (no text or symbols)natural_image
3D rendering of a white bottle with decorative swirl pattern and rotating arrows (no text or symbols)text_image
Diagram showing a steam iron being cut with an arrow and magnified detail, labeled with 'ECO' and 'CLN'natural_image
Illustration of a wall socket connected to a power plug with a magnified view (no text or symbols)text_image
Diagram illustrating temperature measurement using an iron, showing thermometer and hourglass icons with labels.natural_image
Hand washing a shower in a kitchen sink (no text or symbols visible)natural_image
Illustration of a glass bottle with internal structure and rotating arrow, no text or symbols presentnatural_image
Illustration of a steam iron with a warning symbol (no text or labels)natural_image
3D rendered image of a steam iron with a checkmark indicating selection (no text or symbols)
natural_image
Illustration of a steam iron with a magnified inset showing internal components (no text or symbols)natural_image
Illustration of a hand pressing down on a wooden iron (no text or symbols)natural_image
Medical illustration of a hand performing a CT scan on a bone (no text or labels)natural_image
Illustration of a hand using an iron to clean or steam (no text or symbols)natural_image
Illustration of a hand using an iron to clean or steam (no text or symbols)natural_image
Illustration of two iron iron holders with a screw and a pencil, marked with a black X (no text or symbols)natural_image
Illustration of a steam iron with a power cord and electrical outlet (no text or symbols)natural_image
Illustration of a mechanical component with an hourglass symbol (no text or labels)natural_image
Close-up of a mechanical component with a checkmark icon (no text or symbols)natural_image
Illustration of a person using a steam iron to press down a surface (no text or symbols visible)natural_image
Illustration of a steam iron being heated, with a magnified inset showing the iron inside (no text or symbols)natural_image
Illustration of a person using a power iron on a bed (no text or symbols visible)natural_image
Illustration of a hand pressing down on a surface with a downward arrow indicating pressure or force (no text or symbols present)text_image
X SMA V COTCY V320 Shqip

natural_image
Illustration of a hand using a steam iron to clean or brush the power (no text or symbols visible)text_image
X SIX MAX LOW COT √ STATISTICS SEA
natural_image
Illustration of a hand holding a jacket with a checkmark, against a hanger background (no text or symbols)natural_image
Illustration of a hand cleaning a car with a brush and directional arrows indicating action (no text or symbols)text_image
Diagram illustrating a hand washing clothes with a warning symbol and crossed-out hand gesturenatural_image
Illustration of a person holding a hand holding a spray can with a cross mark (no text or symbols)5 Mos e poziciononi hekurin drejt vetes/dikujt tjetër.
text_image
Diagram showing a hair iron with an inset magnified view highlighting the carbon footprint (ECO) and carbon content (Cl⁻)text_image
Diagram showing a iron (£) with a switch and a plug, accompanied by a cross and check symbols indicating electrical or mechanical testing.text_image
Diagram showing a iron on a surface with temperature symbols and checkmark indicators, likely illustrating a thermal measurement or inspection process.natural_image
Illustration of a hand cleaning a leaf with a checkmark indicating inspection (no text or symbols present)text_image
Warning symbol and product image showing a bottle, a paintbrush, and a light bulb with a warning signnatural_image
Illustration of a hand washing a sink with a water tap and warning symbols (no text or labels)text_image
Diagram showing a hair iron with an inset image of a component labeled 'eco' and 'clu', indicating eco-friendly material.text_image
SHILBHINAS NILK COTTON LUCAN MAXnatural_image
Illustration of a steam iron with a plug, showing internal components and wiring (no text or symbols)natural_image
Illustration of a mechanical component with an hourglass symbol (no text or labels)natural_image
Close-up of a mechanical component with a checkmark and a circular detail (no text or symbols)natural_image
Illustration of a wall socket connected to a power plug with a downward arrow indicating disassembly (no text or symbols)8 Hiqni hekurin nga priza.

text_image
CALC CLEANnatural_image
Illustration of a steam iron with a magnified inset showing the hook being inserted (no text or symbols)natural_image
Illustration of a bottle with decorative patterns and rotating arrows (no text or symbols)natural_image
Illustration of a steam iron being placed with a magnified inset showing internal components (no text or symbols)natural_image
Illustration of a wall socket connected to a plug with a black arrow indicating direction (no text or symbols)2 Hiqni hekurin nga priza.

text_image
Diagram illustrating temperature measurement with a iron, thermometer, and hourglass iconnatural_image
Hand cleaning a tiled surface with a curved pipe (no text or symbols visible)4 Derdheni ujin e mbetur nga depozita e ujit.

natural_image
Illustration of a bottle with internal structure and rotating arrows indicating rotation (no text or symbols)natural_image
Illustration of a iron (£) with a warning symbol (no text or labels)natural_image
3D rendered image of a steam iron with a checkmark indicating inspection or repair (no text or symbols)
natural_image
Illustration of a steam iron with a magnified inset showing internal components (no text or symbols)3 Potisnite izbirnik za nastavitev pare v desno, da izberete način brez pare (suho likanje)

natural_image
Illustration of a hand pressing down on a wooden iron (no text or symbols visible)natural_image
Medical illustration of a hand holding a small object on a surgical instrument (no text or symbols visible)6 Trdno zaprite pokrov posode za vodo.
Nastavitev temperature
| | |
| MAX (Največ)LINEN (Lan) | ||
| ●●●COTTON (Bombaž) | ||
| ●●SILK (Svila) | */ ECO | |
| ●SYNTHETICS (Sintetika) |

natural_image
Illustration of a hand using an iron on a surface, with a circular logo containing the word 'ECO' (no text or symbols on the diagram itself)natural_image
Illustration of a hand ironing an iron, with a circular icon containing a roof symbol (no text or symbols present)Dva oblačka pare 📂neprekinjeno dovajanje večje količine pare za trdovratne gube.
Uporaba aparata
natural_image
Illustration of two iron iron holders with a screw and a pencil, marked with a black X (no text or symbols)3 Likalnik postavite na ploščati zadnji del.

natural_image
Illustration of a steam iron with a cord and plug, no text or symbols presentnatural_image
Illustration of a mechanical component with an hourglass symbol (no text or labels)5 Počakajte, da se likalnik segreje. Med segrevanjem bo neprekinjeno svetil indikator.
332 Slovenščina

natural_image
Close-up of a mechanical component with a checkmark icon (no text or symbols)text_image
MAX MAX 92 COCONEX MAX COCONEX1 Gumb za temperaturo nastavite na ustrezno nastavitev: svilo, bombaž ali lan, odvisno od vrte tkanine, ki jo boste likali. Para ne bo na voljo pri nastavitvi za sintetiko. V tem primeru bo uhajala voda.

natural_image
Illustration of a person using a iron on a bed (no text or symbols visible)natural_image
Illustration of a steam iron being heated by a coiled wire, with a magnified inset showing the iron inside (no text or symbols)1 Paro nastavite na nastavitev brez pare

natural_image
Illustration of a person using a power iron on a bed (no text or symbols visible)2 Kmalu se bo med uporabo nehala sproščati para.
Pršenje vode

natural_image
Illustration of a hand pressing down on a textured surface with a downward arrow indicating motion (no text or symbols)natural_image
Illustration of a hand using a steam iron to clean or brush the power (no text or symbols visible)natural_image
Illustration of a hand holding a jacket with a checkmark, against a hanger background (no text or symbols)natural_image
Illustration of a hand cleaning a car with a brush (no text or symbols)text_image
Diagram illustrating a hand washing clothes with a warning symbol and crossed-out hand gesturenatural_image
Illustration of a person holding a hand holding a spray can with a cross mark (no text or symbols)5 Likalnika ne usmerjajte vase ali v drugo osebo.
text_image
Diagram showing a hair iron being adjusted to a component with an inset highlighting the 'ECO' and 'CLT' features.1 Z izbirnikom za nastavitev pare preklopite na način brez pare (suho likanje)

text_image
Diagram showing an iron (£) with a warning symbol indicating disapproval of using a power plug, accompanied by a crossed-out electrical plug icon.2 Prepričajte se, da likalnik ni priključen v električno omrežje.

text_image
Diagram showing a iron iron with thermometer symbols and checkmark indicators, likely illustrating a thermal measurement or inspection process.natural_image
Illustration of a hand cleaning a leaf with a checkmark indicating inspection (no text or symbols present)text_image
Warning symbol and product image showing a bottle, paintbrush, and plastic object with an exclamation marknatural_image
Illustration of a hand washing a sink with a water tap and warning symbols (no text or labels)text_image
Diagram showing a hairdryer with an inset magnified view highlighting the 'ECO' and 'CLU' features.2 Prepričajte se, da je likalnik izključen iz električnega omrežja in nastavitev pare nastavljena na način brez pare (suho likanje)

text_image
MAX3 Posodo za vodo napolnite do oznake MAX.

text_image
SHILBHINAS NILK COTTON LUCAN MAX4 Temperaturni regulator nastavite na MAX.

natural_image
Illustration of a steam iron with a cord and plug, no text or symbols present5 Likalnik priključite v električno omrežje in po potrebi vklopite električno omrežje.

natural_image
Illustration of a hand holding a water droplet and a circular icon with an hourglass symbol (no text or labels)natural_image
Close-up of a mechanical component with a checkmark and a circular detail (no text or symbols)7 Počakajte, da se indikator izklopi.
338 Slovenščina

natural_image
Illustration of a wall socket connected to a plug with a black arrow indicating direction (no text or symbols)text_image
CALC CLEANnatural_image
Illustration of a steam iron with a magnified inset showing the ear and neck (no text or symbols)natural_image
3D rendering of a white bottle with decorative swirl pattern and rotating arrows (no text or symbols)11 Počakajte, da se likalnik ohladi, in navijte kabel okoli pete likalnika.
Shranjevanje

text_image
Diagram showing a steam iron being cut with an arrow and magnified detail, labeled with 'ECO' and 'CLN'1 Potisnite izbirnik za nastavitev pare tako, da izberete način brez pare (suho likanje)

natural_image
Illustration of a wall socket connected to a plug with a black arrow indicating direction (no text or symbols)text_image
Diagram illustrating temperature measurement with a iron, thermometer, and hourglass icon3 Pustite likalnik, da se ohladi.

natural_image
Hand cleaning a tiled surface with a curved pipe (no text or symbols visible)4 Iz posode za vodo izlijte preostalo vodo.

natural_image
Diagram of a bottle with internal structure and rotating arrows indicating rotation (no text or symbols)natural_image
Illustration of a steam iron with a hanging hook and a black X mark (no text or symbols)
natural_image
Illustration of a steam iron with a checkmark indicating a defect or repair (no text or symbols present)natural_image
Illustration of a hair iron with an inset showing a magnified view of a small object (no text or symbols present)natural_image
Illustration of a hand pressing down on a piece of iron (no text or symbols visible)natural_image
Medical illustration of a surgical procedure on a bone (no text or labels)6 Veko zásobníka na vodu pevne zatvorte.
Nastavenie teploty
| | |
| MAXLINEN | ||
| ●●●COTTON | ||
| ●●SILK | */ ECO | |
| ●SYNTHETICS |

natural_image
Illustration of a hand using an iron to clean or steam, with a 'ECO' logo in the corner (no text on the iron itself)natural_image
Illustration of a hand using an iron on a surface, with a circular icon containing a cloud symbol (no text or symbols present)text_image
Diagram of a rotary dial with labeled segments and control buttons, showing measurement ranges and function callouts.natural_image
Illustration of two iron iron holders with a screw and a pencil, marked with a black X (no text or symbols)3 Počas nečinnosti postavte žehličku na pätu.

natural_image
Illustration of a steam iron with a cord and plug, no text or symbols presentnatural_image
Illustration of a mechanical component with an hourglass symbol (no text or labels)natural_image
Close-up of a mechanical component with a checkmark icon (no text or symbols)text_image
Climatic Oval MAX 0.2 0.5 0.75 0.9natural_image
Illustration of a person using a iron on a bed (no text or symbols visible)natural_image
Illustration of a steam iron being heated by a coiled wire, with a magnified inset showing the iron inside (no text or symbols)1 Naparovanie nastavte na možnost žehlenia bez naparovania

natural_image
Illustration of a person using a power iron on a surface (no text or symbols visible)natural_image
Illustration of a hand pressing down on a surface with a downward arrow indicating pressure or movement (no text or symbols present)1 Stlačte a uvolnite tlačidlo kropenia vodoužv hornej časti rukoväti. Z hubice by mala striekat voda.
Vodorovný parný ráz
text_image
X SMA MART COCON VSlovensky

natural_image
Illustration of a hand using a steam iron to clean or brush the power (no text or symbols visible)text_image
X MIN SIOK V
natural_image
Illustration of a hand holding a jacket with a checkmark, against a hanger background (no text or symbols)natural_image
Illustration of a hand cleaning a car with a brush (no text or symbols)text_image
Diagram illustrating a hand washing clothes with a warning symbol and crossed-out hand gesturenatural_image
Illustration of a person holding a hand holding a spray can with a cross mark (no text or symbols)5 Žehličku nesmerujte na seba/inú osobu.
Čistenie a údržba

text_image
Diagram showing a hair iron being adjusted to a component with an inset highlighting the 'ECO' and 'CLT' features.1 Prepnite nastavenie naparovania do režimu bez naparovania (suché žehlenie) na regulátore pary.

text_image
Diagram showing an iron (£) with a magnified view of its electrical socket, indicating disassembly or disassembly process.text_image
Diagram showing a iron on a surface with temperature symbols and checkmark indicators, likely illustrating a thermal measurement or inspection process.natural_image
Illustration of a hand cleaning a leaf with a checkmark indicating inspection (no text or symbols present)4 Navlhčenou tkaninou utrite šupiny a iné usadeniny zo žehliacej plochy.
Slovensky

text_image
Warning symbol and product image showing a bottle, paintbrush, and plastic object with an exclamation marknatural_image
Illustration of a hand washing a sink with a water tap and warning symbols (no text or labels)natural_image
Illustration of a hair iron with a magnified inset showing internal components (no text or symbols)2 Uistite sa, že je žehlička odpojená zo siete a naparovanie je nastavené na režim bez naparovania (suché žehlenie)

text_image
MAXtext_image
SHILBHINAS NILK COTTON LUCAN MAXnatural_image
Illustration of a steam iron with a cord and plug, no text or symbols presentnatural_image
Illustration of a hand holding a water droplet and a circular icon with an hourglass symbol (no text or labels)natural_image
Close-up of a mechanical component with a checkmark and a circular detail (no text or symbols)natural_image
Illustration of a wall socket connected to a plug with a magnified cable, showing a directional arrow (no text or symbols)8 Žehličku odpojte zo siete.

text_image
CALC CLEANnatural_image
Illustration of a steam iron with a magnified inset showing the hook being inserted (no text or symbols)natural_image
Illustration of a bottle with decorative patterns and rotating arrows (no text or symbols)natural_image
Illustration of a steam iron being placed with a magnified inset showing internal components (no text or symbols)natural_image
Illustration of a wall socket connected to a plug with a black arrow indicating direction (no text or symbols)2 Žehličku odpojte zo siete.

text_image
Diagram illustrating temperature measurement using an iron, showing thermometer and hourglass icons with labels.natural_image
Hand washing a shower in a kitchen sink (no text or symbols visible)natural_image
Illustration of a glass bottle with internal structure and rotating arrow, no text or symbols presentnatural_image
Illustration of a steam iron with a hanging hook and a black X mark (no text or symbols)
natural_image
Illustration of a steam iron with a checkmark indicating a defect or repair (no text or symbols present)2 Uverite se da se pegla ohladila.

natural_image
Illustration of a hair iron with an inset showing a magnified view of a small object (no text or symbols present)3 Pomerite birač postavke pare udesno da biste izabrali režim bez pare (suvo peglanje)

natural_image
Illustration of a hand pressing down on a piece of iron (no text or symbols visible)natural_image
Medical illustration of a surgical procedure on a bone (no text or labels)6 Čvrsto zatvorite poklopac rezervoara za vodu.
Podešavanje temperature
| | |
| MAKSLAN | ||
| ●●●PAMUK | ||
| ●●SVILA | */ ECO | |
| ●SINTETIKA |

natural_image
Illustration of a hand using an iron on a surface, with a circular logo containing 'ECO' and a cloud icon above (no text or symbols on the iron itself)natural_image
Illustration of a hand ironing an iron with a circular icon showing a roof symbol (no text or symbols present)Dva oblaka pare 📂lzastopno se primenjuje veća količina pare, za tvrdokorne nabore.
Upotreba aparata
Tokom prve upotrebe možda ćete videti dim, to je normalna pojava. To će ubrzo nestati.

text_image
i itext_image
Diagram of a rotary dial with labeled segments and control buttons, showing measurement ranges and function callouts.2 Podesite regulator temperature okrećući ga prema odgovarajućoj oznaci za temperaturu.

natural_image
Illustration of two iron iron holders with a screw and a pencil, marked with a black X (no text or symbols)3 Postavite peglu u uspravan položaj.

natural_image
Illustration of a steam iron with a power cord and plug, no text or symbols present4 Uključite utikač u uzemljenu utičnicu i ostavite peglu da stoji na postolju. Ako koristite produžni kabl, postarajte se da nominalna snaga produžnog kabla odgovara pegli.

natural_image
Illustration of a mechanical component with an hourglass symbol (no text or labels)natural_image
Close-up of a mechanical component with a checkmark icon (no text or symbols)text_image
Cronamics MMA MMA MMA MMA1 Okrenite regulator temperature na odgovarajuću postavku: svila, pamuk ili lan, u zavisnosti od vrste tkanine koju peglate. Para neće biti dostupna na postavci za sintetiku. To će dovesti do prskanja vode ako se koristi.

natural_image
Illustration of a person using a steam iron to press down a blanket (no text or symbols visible)natural_image
Illustration of a steam iron being heated by a coiled wire, with a magnified inset showing the iron inside (no text or symbols)1 Podesite regulator pare na režim bez pare

natural_image
Illustration of a person using a power iron on a surface (no text or symbols visible)2 Nakon kratkog vremena para će prestati da izlazi tokom peglanja.
Prskalica

natural_image
Illustration of a hand performing a medical or therapeutic procedure on skin, with a downward arrow indicating pressure or action (no text or symbols present)1 Pritisnite i otpustite dugme za prskanje vode na vrhu drške. Voda bi trebalo da prska iz mlaznice.
Horizontalni mlaz pare
1 Dodatna količina pare je dostupna na postavkama za pamuk i lan.

text_image
X MIN CO2 V SILK SME362 Srpski

natural_image
Illustration of a hand using a steam iron to clean or brush the power (no text or symbols visible)2 Pritisnite i otpustite dugme za mlaz pare da biste dobili snažan mlaz pare i uklonili veće nabore.
Vertikalna dodatna količina pare
1 Dodatna količina pare je dostupna na postavkama za pamuk i lan.

text_image
X MAX MIN STATISTICS SILK CONTROL
natural_image
Illustration of a hand holding a jacket with a checkmark, against a hanger background (no text or symbols)2 Pritisnite i otpustite dugme za mlaz pare dok je pegla u vertikalnom položaju da biste uklonili nabore sa odeće koja visi koristeći dodatnu količinu pare. Držanje dugmeta za dodatnu količinu pare dok je pegla u vertikalnom položaju neće ispuštati neprekidnu paru.

natural_image
Illustration of a hand cleaning a car with a brush (no text or symbols)3 Razvucite odevni predmet dok primenjujete dodatnu količinu pare da biste uklonili uporne nabore.

text_image
Diagram illustrating a hand washing clothes with a warning symbol and crossed-out hand gesturenatural_image
Illustration of a person holding a hand holding a spray can with a cross mark (no text or symbols)natural_image
Illustration of a hair iron being held by a tool, with an inset showing a close-up of the tip and a warning symbol (ECO, CL) (no text or labels present)1 Podesite regulator pare na režim bez pare (suvo peglanje) .

text_image
Diagram showing a 3D printer with a switch and a magnified view of the electrical socket, indicating no text or symbols.text_image
°C × °C ✓3 Uverite se da se pegla ohladila.

natural_image
Illustration of a hand cleaning a leaf with a checkmark indicating inspection (no text or symbols present)4 Vlažnom krpom obrišite ljuspice i druge naslage sa grejne ploče.
364 Srpski

text_image
Warning symbol and product image showing a bottle, a paintbrush, and a light bulb with a warning signnatural_image
Illustration of a hand washing a sink with a water tap and warning symbols (no text or labels)natural_image
Illustration of a steam iron with a magnified inset showing internal components (no text or symbols)text_image
SHILBHINAS NILK COTTON LUCAN MAX4 Podesite regulator temperature na MAX.

natural_image
Illustration of a steam iron with a cord and plug, no text or symbols present5 Uključite peglu na električnu mrežu i uključite napajanje ako je potrebno.

natural_image
Illustration of a hand holding a water droplet and a circular icon with an hourglass symbol (no text or labels)natural_image
Close-up of a mechanical component with a checkmark and a circular detail (no text or symbols)natural_image
Illustration of a wall socket connected to a plug with a downward arrow indicating compression (no text or symbols)8 Isključite peglu iz zidne utičnice.

text_image
CALC CLEAN9 Držite peglu iznad sudopere u horizontalnom položaju i protresite je. Para, vruća voda i čestice kamenca će izlaziti iz grejne ploče. Nastavite da tresete peglu dok ne izade sva voda iz rezervoara.

natural_image
Illustration of a steam iron with a magnified inset showing the ear and neck (no text or symbols)10 Priključite peglu na električnu mrežu i ostavite je da se zagreje kako bi se grejna ploča osušila. Ovo traje oko 2 minuta. Možda ćete videti kako voda prska iz otvora za paru; to je normalno jer se višak vode izbacuje.

natural_image
3D rendering of a white bottle with decorative swirl pattern and rotating arrows (no text or symbols)11 Ostavite peglu da se ohladi i namotajte kabl oko postolja pegle.
Odlaganje

text_image
Diagram showing a steam iron being cut with an inset image of a component labeled 'ECO' and 'CLN'1 Pomerite regulator pare da biste izabrali režim bez pare (suvo peglanje)

natural_image
Illustration of a wall socket connected to a plug with a black arrow indicating direction (no text or symbols)2 Isključite peglu iz zidne utičnice.

text_image
Diagram illustrating temperature measurement with a iron, thermometer, and hourglass icon3 Ostavite peglu da se ohladi.

natural_image
Hand cleaning a tiled surface with a curved pipe (no text or symbols visible)4 Prospite preostalu vodu iz rezervoara za vodu.

natural_image
Illustration of a bottle with internal structure and rotating arrows indicating rotation (no text or symbols)5 Namotajte kabl za napajanje oko glavnog kućišta pegle.
Sisältö
Johdanto 369
natural_image
Illustration of a steam iron with a hanging hook and a black X mark (no text or symbols)
natural_image
Illustration of a steam iron with a checkmark indicating a defect or repair (no text or symbols present)text_image
Diagram showing a 3D printer with an inset highlighting the 'ECO' and 'CIX' components, likely illustrating a safety or manufacturing process.natural_image
Illustration of a hand pressing down on a mechanical component (no text or symbols visible)natural_image
Medical illustration of a surgical procedure on a bone (no text or labels)natural_image
Illustration of a hand using a power iron to clean or wear (no text or symbols)natural_image
Illustration of a hand ironing an iron with a small icon in the corner (no text or symbols)text_image
Zin Control Unitnatural_image
Illustration of a pair of iron burners with a cross mark indicating a specific part (no text or symbols present)natural_image
Illustration of a steam iron with a cord and plug, no text or symbols presentnatural_image
Illustration of a mechanical component with an hourglass icon and a droplet, no text or symbols present.natural_image
Close-up of a mechanical component with a checkmark icon (no text or symbols)natural_image
Illustration of a person using a iron on a bed (no text or symbols visible)text_image
Diagram illustrating a chemical reaction or process involving an iron on a surface, with a magnified inset showing the step and condition labels.natural_image
Person using a steam iron on a bed (no text or symbols visible)natural_image
Illustration of a hand pressing down on a textured surface with a downward arrow indicating motion (no text or symbols)natural_image
Illustration of a hand using a steam iron to clean or brush the power (no text or symbols visible)text_image
X MIN SIOK V
natural_image
Illustration of a hand holding a jacket with a checkmark, against a hanger background (no text or symbols)natural_image
Illustration of a hand cleaning a car with a brush (no text or symbols)text_image
Diagram illustrating a hand washing clothes with a warning symbol and crossed-out hand gesturenatural_image
Illustration of a person holding a hand holding a spray can with a cross mark (no text or symbols)text_image
Diagram showing a hair iron with an inset magnified view highlighting the carbon dioxide (ECO) component.text_image
Diagram showing an iron (£) with a warning symbol indicating disapproval of the electrical plug, marked with X and ✓ symbols.text_image
°C × °C ✓natural_image
Illustration of a hand cleaning a seed pod with a checkmark indicating inspection (no text or symbols present)text_image
Warning symbol and product image showing a bottle, paintbrush, and plastic object with an exclamation marknatural_image
Illustration of a hand washing a sink with a water tap and warning symbols (no text or labels)natural_image
Illustration of a hairdryer with an inset showing a magnified view of the tip and base (no text or symbols)natural_image
Illustration of a steam iron with a cord and plug, no text or symbols presentnatural_image
Illustration of a hand holding a water droplet and a circular icon with an hourglass symbol (no text or labels)natural_image
Close-up of a mechanical component with a checkmark and circular detail (no text or symbols)natural_image
Illustration of a wall socket connected to a plug with a downward arrow indicating compression (no text or symbols)8 Irrota silitysraudan pistoke pistorasiasta.

text_image
CALC CLEANnatural_image
Illustration of a steam iron with a magnified inset showing the ear and neck (no text or symbols)natural_image
3D rendering of a white bottle with decorative swirl pattern and rotating arrows (no text or symbols)text_image
Diagram showing a steam iron being cut with an arrow and magnified detail, labeled with 'ECO' and 'CLN'natural_image
Illustration of a wall socket connected to a plug with a black arrow indicating direction (no text or symbols)2 Irrota silitysraudan pistoke pistorasiasta.

text_image
Diagram illustrating temperature change with iron iron, thermometer, and hourglass symbolsnatural_image
Hand washing a shower in a kitchen sink (no text or symbols visible)natural_image
Illustration of a glass bottle with internal structure and rotating arrow, no text or symbols presentnatural_image
Illustration of a steam iron with a warning symbol (no text or labels)natural_image
3D rendered image of a steam iron with a checkmark indicating inspection or repair (no text or symbols)
natural_image
Illustration of a steam iron with a magnified inset showing internal components (no text or symbols)natural_image
Illustration of a hand pressing down on a wooden iron (no text or symbols)natural_image
Illustration of a hand holding a small object above a curved surface (no text or symbols)natural_image
Illustration of a hand using a steam iron to clean or store (no text or symbols)natural_image
Illustration of a hand ironing an iron with a circular icon showing a roof symbol (no text or symbols present)natural_image
Illustration of two iron iron holders with a screw and a pencil, marked with a black X (no text or symbols)natural_image
Illustration of a steam iron with a cord and plug, no text or symbols presentnatural_image
Illustration of a mechanical component with an hourglass symbol (no text or labels)natural_image
Close-up of a mechanical component with a checkmark icon (no text or symbols)natural_image
Person using a steam iron on a bed (no text or symbols visible)2 Ånga avges under strykningen.
natural_image
Illustration of a steam iron being heated by a coiled wire, with a magnified inset showing the iron inside (no text or symbols)natural_image
Illustration of a person using a power iron on a surface (no text or symbols visible)natural_image
Illustration of a hand pressing down on a textured surface with a downward arrow indicating motion (no text or symbols)natural_image
Illustration of a hand using a steam iron to clean or brush the power (no text or symbols visible)natural_image
Illustration of a hand holding a jacket with a checkmark, against a hanger background (no text or symbols)natural_image
Illustration of a hand cleaning a car with a brush and directional arrows indicating action (no text or symbols)text_image
Diagram illustrating a hand washing clothes with a warning symbol and crossed-out hand gesturenatural_image
Illustration of a person holding a hand holding a spray can with a cross mark (no text or symbols)text_image
Diagram showing a hair iron with an inset magnified view highlighting the carbon dioxide (ECO) component.natural_image
Illustration of a steam iron with a magnified inset showing a plug and plug connector (no text or symbols)text_image
Diagram showing a iron (£) with thermometer symbols and checkmark, indicating temperature measurement or inspection.natural_image
Illustration of a hand cleaning a leaf with a checkmark indicating the correct removal (no text or symbols present)text_image
Warning symbol and product image showing a bottle, a paintbrush, and a light bulb with a warning signnatural_image
Illustration of a hand washing a sink with a water tap and warning symbols (no text or labels)natural_image
Illustration of a hair iron being held, with an inset showing a magnified view of the handle (no text or symbols present)text_image
SHILBHINAS NILK COTTON LUCAN MAXnatural_image
Illustration of a steam iron with a cord and plug, no text or symbols presentnatural_image
Illustration of a hand holding a water droplet and a circular icon with an hourglass symbol (no text or labels)natural_image
Close-up of a mechanical component with a checkmark and circular detail (no text or symbols)natural_image
Illustration of a wall socket connected to a plug with a downward arrow indicating compression (no text or symbols)8 Koppla ur strykjärnet.

text_image
CALC CLEANnatural_image
Illustration of a steam iron with a magnified inset showing the ear and neck (no text or symbols)natural_image
3D rendering of a white bottle with decorative swirl pattern and rotating arrows (no text or symbols)text_image
Diagram showing a steam iron being cut with an arrow and magnified detail, labeled with 'ECO' and 'CLN'natural_image
Illustration of a wall socket connected to a plug with a magnified view (no text or symbols)2 Koppla ur strykjärnet.

text_image
Diagram illustrating temperature change with iron iron, thermometer, and hourglass symbolsnatural_image
Hand washing a shower in a kitchen sink (no text or symbols visible)natural_image
Illustration of a glass bottle with internal structure and rotating arrow, no text or symbols presentnatural_image
Illustration of a steam iron with a warning symbol (no text or labels)natural_image
3D rendered image of a steam iron with a checkmark indicating selection (no text or symbols)
natural_image
Illustration of a steam iron with a magnified inset showing internal components (no text or symbols)natural_image
Illustration of a hand pressing down on a piece of iron (no text or symbols visible)natural_image
Illustration of a hand holding a small object on a surface, possibly a tool or device (no text or symbols visible)natural_image
Illustration of a hand using an iron to clean or steam (no text or symbols)natural_image
Illustration of a hand ironing an iron with a circular icon showing a roof symbol (no text or symbols present)text_image
Zin Control Unitnatural_image
Illustration of two iron iron holders with a screw and a pencil, marked with a black X (no text or symbols)natural_image
Illustration of a steam iron with a cord and plug, no text or symbols presentnatural_image
Illustration of a mechanical component with an hourglass icon and a droplet, no text or symbols present.natural_image
Close-up of a mechanical component with a checkmark indicator (no text or symbols present)text_image
Cyaninics MMA MMA MMA COTINICnatural_image
Illustration of a person using a steam iron on a bed (no text or symbols visible)natural_image
Illustration of a steam iron being heated by a coiled wire, with a magnified inset showing the iron inside (no text or symbols)natural_image
Illustration of a person using a power iron on a bed (no text or symbols visible)natural_image
Illustration of a hand pressing down on a medical device with a downward arrow indicating motion (no text or symbols present)text_image
X SIA MIN COTCH √404 Tiếng Việt

natural_image
Illustration of a hand using a steam iron to clean or brush the power (no text or symbols visible)text_image
X SIX MAX LOW COT √ STATISTICS SEA
natural_image
Illustration of a hand holding a jacket with a checkmark, against a hanger background (no text or symbols)natural_image
Illustration of a hand cleaning a car with a brush (no text or symbols)text_image
Diagram illustrating a hand washing clothes with a warning symbol and crossed-out hand gesturenatural_image
Illustration of a person holding a hand holding a spray can with a cross mark (no text or symbols)natural_image
Illustration of a hair iron being held by a tool, with an inset showing a close-up of the tool (no text or symbols present)natural_image
Illustration of a hair iron with a magnified inset showing a plug and cable (no text or symbols)text_image
Diagram showing a iron (£) with thermometer symbols and checkmark, indicating temperature measurement or inspection.natural_image
Illustration of a hand cleaning a leaf with a checkmark indicating inspection (no text or symbols present)text_image
Warning symbol and product image showing a bottle, paintbrush, and plastic object with an exclamation marknatural_image
Illustration of a hand washing a sink with a water tap and warning symbols (no text or labels)natural_image
Illustration of a hair iron being adjusted to a surface, with a magnified inset showing the cutting edge (no text or symbols)natural_image
Illustration of a steam iron with a power cord (no text or symbols)natural_image
Illustration of a hand holding a water droplet and a circular icon with an hourglass symbol (no text or labels)natural_image
Close-up of a mechanical component with a checkmark and circular detail (no text or symbols)7 Đội đèn báo tất.
408 Tiếng Việt

natural_image
Illustration of a wall socket connected to a power plug with a downward arrow indicating disassembly (no text or symbols)text_image
CALC CLEANnatural_image
Illustration of a steam iron with a magnified inset showing the hook being inserted (no text or symbols)natural_image
Illustration of a bottle with decorative patterns and rotating arrows (no text or symbols)text_image
Diagram showing a steam iron being cut with an arrow and magnified detail, labeled with 'ECO' and 'CLN'natural_image
Illustration of a wall socket connected to a plug with a magnified view (no text or symbols)3 Đế bàn ủi nguội.

text_image
Diagram illustrating temperature change with iron iron, thermometer, and hourglass symbolsnatural_image
Hand washing a shower in a kitchen sink, no text or symbols visiblenatural_image
Illustration of a glass bottle with internal structure and rotating arrow, no text or symbols presentİçerik
Giriş 411
natural_image
Illustration of a steam iron with a hanging hook and a black X mark (no text or symbols)
natural_image
3D illustration of a steam iron with a checkmark indicating a detail (no text or symbols present)text_image
Diagram showing a 3D printer with an inset highlighting the 'ECO' and 'CIX' components, likely illustrating a safety or manufacturing process.natural_image
Illustration of a hand pressing down on a piece of iron, showing the process (no text or symbols)natural_image
Medical illustration of a hand performing a CT scan on a bone structure (no text or labels)natural_image
Illustration of a hand using an iron to clean or steam, with a circular logo containing the word 'ECO' (no text on the iron itself)natural_image
Illustration of a hand ironing an iron with a circular icon above (no text or symbols)natural_image
Illustration of two iron iron holders with a screw and a pencil, marked with a black X (no text or symbols)natural_image
Illustration of a steam iron with a power cord and plug, no text or symbols presentnatural_image
Illustration of a mechanical component with an hourglass symbol (no text or labels)natural_image
Close-up of a mechanical component with a checkmark icon (no text or symbols)text_image
SWIMINGS MAA COWNS GLA ✓natural_image
Illustration of a person using a steam iron on a bed (no text or symbols visible)natural_image
Illustration of a steam iron being heated by a coiled wire, with a magnified inset showing the iron inside (no text or symbols)natural_image
Person using a power iron on a bed (no text or symbols visible)natural_image
Illustration of a hand pressing down on a surface with a downward arrow indicating pressure or force (no text or symbols present)text_image
X SXTM MIN QTY SIX V
natural_image
Illustration of a hand using a steam iron to clean or brush the power (no text or symbols visible)natural_image
Illustration of a hand holding a jacket with a checkmark, against a hanger background (no text or symbols)natural_image
Illustration of a hand cleaning a car with a brush (no text or symbols)text_image
Diagram illustrating a hand washing clothes with a warning symbol and crossed-out hand gesturenatural_image
Illustration of a person holding a hand holding a spray can with a cross mark (no text or symbols)natural_image
Illustration of a hair iron being held by a tool, with an inset showing a close-up of the tip and a magnified view of the tool (no text or symbols present)text_image
Diagram showing an iron (£) with a switch and a magnified inset indicating a plug or socket, marked with X and ✓ symbols.text_image
Diagram showing a iron (£) with thermometer symbols and checkmark, indicating inspection or verification status.natural_image
Illustration of a hand cleaning a leaf-shaped object with a checkmark (no text or symbols)text_image
Warning symbol and product image showing a bottle, paintbrush, and plastic object with an exclamation marknatural_image
Illustration of a hand washing a sink with a water tap and warning symbols (no text or labels)natural_image
Illustration of a hair iron being adjusted for size, with a magnified inset showing the cutting edge detail (no text or symbols)text_image
SHILBHINAS NILK COTTON LUCAN MAXnatural_image
Illustration of a steam iron with a cord and plug, no text or symbols presentnatural_image
Illustration of a hand holding a water droplet and a circular icon with an hourglass symbol (no text or labels)natural_image
Close-up of a mechanical component with a checkmark and a circular detail (no text or symbols)natural_image
Illustration of a wall socket connected to a power plug with a downward arrow indicating disassembly (no text or symbols)text_image
CALC CLEANnatural_image
Illustration of a steam iron with a magnified inset showing the hook being inserted (no text or symbols)natural_image
3D rendering of a bottle with decorative patterns and rotating arrows (no text or symbols)text_image
Diagram showing a steam iron being placed with an inset highlighting the 'ECO' component, likely illustrating eco-friendly material usage.natural_image
Illustration of a wall socket connected to a plug with a black arrow indicating direction (no text or symbols)text_image
Diagram illustrating temperature measurement using an iron, showing thermometer and hourglass icons with labels.natural_image
Hand washing a shower in a kitchen sink (no text or symbols visible)natural_image
Illustration of a bottle with internal structure and curved arrows indicating rotation (no text or symbols)natural_image
Illustration of a steam iron with a warning symbol (no text or labels)
natural_image
3D illustration of a steam iron with a checkmark indicating a defect or repair (no text or symbols present)text_image
Diagram showing a 3D printer with an inset highlighting the 'ECO' and 'CIA' components, likely illustrating eco-friendly air quality inspection.natural_image
Illustration of a hand pressing down on a piece of iron (no text or symbols visible)natural_image
Medical illustration of a hand holding a small object on a metallic surface (no text or symbols)natural_image
Illustration of a hand using a power iron to clean or wear (no text or symbols)natural_image
Illustration of a hand ironing an iron with a circular icon showing a roof symbol (no text or symbols present)text_image
Zin Control Unitnatural_image
Illustration of two iron iron holders with a screw and a pencil, marked with a black X (no text or symbols)3 Ütügiň öz ökjesinde durmagyna maý beriň.

natural_image
Illustration of a steam iron with a cord and plug, no text or symbols presentnatural_image
Illustration of a mechanical component with an hourglass icon and a droplet, no text or symbols present.natural_image
Close-up of a mechanical component with a checkmark icon (no text or symbols)natural_image
Illustration of a person using a steam iron on a bed (no text or symbols visible)2 Ütük edilýän wagty bug goýberiler.
text_image
Diagram showing a steam iron being heated by a device, with an inset illustrating the process of heating.1 Bug sazlamasyny bugsuz sazlamasyna nüzün.

natural_image
Person using a steam iron on a bed (no text or symbols visible)2 Biraz wagtdan soň ütüklenýärkä bug çykmasy kesiler.
Suw pürkme

natural_image
Illustration of a hand pressing down on a surface with a downward arrow indicating motion (no text or symbols)1 Tutawajyň depedindäki suw pürkme düwmesinißbasyp goýberiň. Forsunkadan suw pürkülýän bolmaly.
text_image
X SME SILK COTRY432 Türkmençe

natural_image
Illustration of a hand using a steam iron to clean or brush the power (no text or symbols visible)2 Aýrylmasy kyn ýygyrtlary aýrymak maksady bilen güýçli bug bermek üçin güýçli bug beriş düwmesine basyp goýberiň.
text_image
X SIX MAX LOW COT √ STATISTICS SEA
natural_image
Illustration of a hand holding a jacket with a checkmark, against a hanger background (no text or symbols)natural_image
Illustration of a hand cleaning a car with a brush (no text or symbols)text_image
Diagram illustrating a hand washing clothes with a warning symbol and crossed-out hand gesture4 Bugy ulanyan wagtyñyz yakaňaç eliňizi söýget tekizligi hökmünde ulanmaň.

natural_image
Illustration of a person holding a hand holding a spray can with a cross mark (no text or symbols)5 Enjamy özüñize/başga birine yakyn yerleşdirmän.
Arassalamak we abatlamak

text_image
Diagram showing a hair iron with an inset magnified view highlighting the 'ECO' and 'CLT' features.text_image
Diagram showing a iron iron with a magnified inset indicating a switch or socket, marked with X and ✓ symbols.text_image
Illustration showing a steam iron with thermometer symbols and checkmark indicators, suggesting a warning or inspection.3 Ütügiň sowandygyna göz ÿetiriň.

natural_image
Illustration of a hand cleaning a leaf with a checkmark indicating inspection (no text or symbols present)text_image
Warning symbol and product image showing a bottle, a paintbrush, and a light bulb with a warning signnatural_image
Illustration of a hand washing a sink with a water tap and warning symbols (no text or labels)5 Ütügi krandan akyan suwda yuwmaň / arassalamaň.
Calc-Clean

text_image
3 4 5 6 6 10 11 12 12 13 6 17 18 19 19 20 23 24 25 25 26 27 0 31Maslahat: Çökündileri aýrymak funksiyasyny islendik wagt ulanyp bolýar. Yaşayan sebitinizdäki suw talh bolsa, funksiyany has yygy ulanyň.
1 Ütügiğ hyzmat ömrüni uzatmak üçin ony her aý ulananyňyzdan soň onuň çökündilerini aýrymak maslahat berilýär, yogsam goňur tegmiller/suw galdyrar.

natural_image
Illustration of a hair iron being held, with an inset showing a magnified view of the handle (no text or symbols present)2 Ütügiğ tokdan aýrylandygyna we bug sazlamasynyň bugsuz (gurulygyna ütüklemek) üertibine sazlanandygyna göz yetiriň.

text_image
MAXnatural_image
Illustration of a steam iron with a power cord (no text or symbols)natural_image
Illustration of a hand holding a water droplet and a circular icon with an hourglass symbol (no text or labels)natural_image
Close-up of a mechanical component with a checkmark and circular detail (no text or symbols)natural_image
Illustration of a wall socket connected to a plug with a downward arrow indicating compression (no text or symbols)
text_image
CALC CLEAN9 Ütügi nowajygyň üstünde keseligine saklaň we ütügi silkelään. Dabanyndan bug, gyzgyn suw we çökündi bölejikleri çykar. Suw gabyndaky suwuň hemmesi gutaríança ütügi silkelemäge dowam ediň.

natural_image
Illustration of a steam iron with a magnified inset showing the tip and tail (no text or symbols)natural_image
3D rendering of a cylindrical object with textured surface and curved arrows indicating rotation (no text or symbols)11 Ütügiğ sowamagyna maý beriň we kabelini ütügiğ paşmagynyň daşyna saraň.
Ammarda saklamak

text_image
Diagram showing a steam iron being cut with an inset image of a component labeled 'ECO' and 'CLN'natural_image
Illustration of a wall socket connected to a plug with a black arrow indicating direction (no text or symbols)2 Ütügi tokdan ayryň.

text_image
Diagram illustrating temperature change with iron iron, thermometer, and hourglass symbols3 Ütügiň sowamagyna maý beriň.

natural_image
Hand washing a shower in a kitchen sink, no text or symbols visible4 Suw gabynda galan suwy dökün.

natural_image
Illustration of a glass bottle with internal structure and rotating arrow, no text or symbols present5 Elektrik kabelini ütügiğ esasy korpusynyğ daşyna sarağ.
natural_image
Illustration of a steam iron with a hanging hook and a black X mark (no text or symbols)
natural_image
Illustration of a steam iron with a checkmark indicating a defect or repair (no text or symbols present)text_image
Diagram showing a 3D printer with an inset highlighting the 'ECO' and 'CIX' components, likely illustrating a safety or manufacturing process.natural_image
Illustration of a hand pressing down on a piece of iron (no text or symbols visible)natural_image
Medical illustration of a hand performing a CT scan on a bone (no text or labels)natural_image
Illustration of a hand ironing an iron with a 'ECO' logo in the corner (no text or symbols on the diagram itself)natural_image
Illustration of a hand using an iron to clean or steam (no text or symbols)text_image
Zin Control Unitnatural_image
Illustration of two iron iron holders with a screw and a pencil, marked with a black X (no text or symbols)natural_image
Illustration of a steam iron with a cord and plug, no text or symbols presentnatural_image
Illustration of a mechanical component with an hourglass icon and a droplet, no text or symbols present.natural_image
Close-up of a mechanical component with a checkmark icon (no text or symbols)natural_image
Illustration of a person using a steam iron to press down a surface (no text or symbols visible)natural_image
Illustration of a steam iron being heated by a coiled wire, with a magnified inset showing the iron inside (no text or symbols)natural_image
Illustration of a person using a power iron on a surface (no text or symbols visible)natural_image
Illustration of a hand pressing down on a surface with a downward arrow indicating motion (no text or symbols)text_image
X S MIN MAX CO2 MIN V S T S446 Ελληνικά

natural_image
Illustration of a hand using a steam iron to clean or brush the power (no text or symbols visible)text_image
X SIX MAX LOW COT √ STATISTICS SEA
natural_image
Illustration of a hand holding a jacket with a checkmark, against a hanger background (no text or symbols)natural_image
Illustration of a hand cleaning a car with a brush (no text or symbols)text_image
Diagram illustrating a hand washing clothes with a warning symbol and crossed-out hand gesturenatural_image
Illustration of a person holding a hand holding a spray can with a cross mark (no text or symbols)text_image
Diagram showing a hairdryer with an inset magnified view highlighting the 'ECO' component.text_image
Diagram showing an iron (£) with a plug and a switch, accompanied by a warning symbol indicating disapproval or rejection.text_image
Diagram showing a iron (£) with thermometer symbols and checkmark, indicating inspection or verification status.natural_image
Illustration of a hand cleaning a seed pod with a checkmark indicating the correct part (no text or symbols present)text_image
Warning symbol and product image showing a bottle, sandbar, and light bulb with an exclamation marknatural_image
Illustration of a hand washing a sink with a water tap and warning symbols (no text or labels)natural_image
Illustration of a steam iron with a magnified inset showing internal components (no text or symbols)text_image
SHILBHINAS NILK COTTON LUCAN MAXnatural_image
Illustration of a steam iron with a cord and plug, no text or symbols presentnatural_image
Illustration of a hand holding a water droplet and a circular icon with an hourglass symbol (no text or labels)natural_image
Close-up of a mechanical component with a checkmark and a circular detail (no text or symbols)natural_image
Illustration of a wall socket connected to a plug with a downward arrow indicating compression (no text or symbols)text_image
CALC CLEANnatural_image
Illustration of a steam iron with a magnified inset showing the ear and neck (no text or symbols)natural_image
3D rendering of a white bottle with decorative swirl pattern and rotating arrows (no text or symbols)text_image
Diagram showing a steam iron being cut with an arrow and magnified detail, labeled with 'ECO' and 'CLN'natural_image
Illustration of a wall socket connected to a power plug with a magnified view (no text or symbols)text_image
Diagram illustrating temperature change with iron iron, thermometer, and hourglass symbolsnatural_image
Hand washing a shower in a kitchen sink (no text or symbols visible)natural_image
Illustration of a glass bottle with internal structure and rotating arrow, no text or symbols presentnatural_image
Illustration of a steam iron with a hanging hook and a black X mark (no text or symbols)
natural_image
3D rendered image of a steam iron with a checkmark indicating a detail (no text or symbols present)text_image
Diagram showing a 3D printer with an inset highlighting 'ECO' and 'CLA' features, likely illustrating environmental safety or repair process.natural_image
Illustration of a hand pressing down on a piece of iron, showing the process (no text or symbols)natural_image
Medical illustration of a hand performing a procedure on a bone structure (no text or labels)natural_image
Illustration of a hand using an iron on a surface, with a circular logo containing 'ECO' and a cloud icon above (no text or symbols on the iron itself)natural_image
Illustration of a hand ironing an iron with a circular icon showing a roof symbol (no text or symbols present)natural_image
Illustration of two iron iron holders with a screw and a pencil, marked with a black X (no text or symbols)natural_image
Illustration of a steam iron with a cord and plug, no text or symbols presentnatural_image
Illustration of a mechanical component with an hourglass icon and a droplet, no text or symbols present.natural_image
Close-up of a mechanical component with a checkmark icon (no text or symbols)text_image
Process Control Error MAA MAA MAA MAA MAA MAA MAAnatural_image
Illustration of a person using a power iron to press down a surface (no text or symbols visible)natural_image
Illustration of a steam iron being heated by a coiled wire, with a magnified inset showing the iron inside (no text or symbols)natural_image
Illustration of a person using a power iron on a bed (no text or symbols visible)natural_image
Illustration of a hand pressing down on a textured surface with a downward arrow indicating motion (no text or symbols)text_image
X MIN SILEA COTCH V
natural_image
Illustration of a hand using a steam iron to clean or brush the power (no text or symbols visible)natural_image
Illustration of a hand holding a jacket with a checkmark, against a hanger background (no text or symbols)natural_image
Illustration of a hand cleaning a car with a brush (no text or symbols)text_image
Diagram illustrating a hand washing clothes with a warning symbol and crossed-out hand gesturenatural_image
Illustration of a person holding a hand holding a spray can with a cross mark (no text or symbols)text_image
Diagram showing a hairdryer with an inset magnified view highlighting the 'ECO' component.natural_image
Illustration of an iron (£) with a warning symbol (no text or labels)text_image
Diagram showing a iron (£) with thermometer symbols and checkmark, indicating temperature measurement or inspection.natural_image
Illustration of a hand cleaning a seed pod with a checkmark indicating inspection (no text or symbols present)text_image
Warning symbol and product image showing a bottle, paintbrush, and plastic bulb with an exclamation marknatural_image
Illustration of a hand washing a sink with a water tap and warning symbols (no text or labels)natural_image
Illustration of a steam iron with a magnified inset showing internal components (no text or symbols)natural_image
Illustration of a steam iron with a cord and plug, no text or symbols presentnatural_image
Illustration of a hand holding a water droplet and a circular icon with an hourglass symbol (no text or labels)natural_image
Close-up of a mechanical component with a checkmark and circular detail (no text or symbols)natural_image
Illustration of a wall socket connected to a plug with a black arrow indicating direction (no text or symbols)text_image
CALC CLEANnatural_image
Illustration of a steam iron with a magnified inset showing the tip and tail (no text or symbols)natural_image
3D rendering of a cylindrical object with textured surface and curved arrows indicating rotation (no text or symbols)text_image
Diagram showing a steam iron being cut with an arrow and magnified detail, labeled with 'ECO' and 'CLN'natural_image
Illustration of a wall socket connected to a plug with a black arrow indicating direction (no text or symbols)text_image
Diagram illustrating temperature change with iron iron and hourglass symbolsnatural_image
Hand cleaning a tiled surface with a curved pipe (no text or symbols visible)natural_image
Diagram of a bottle with internal structure and rotating arrows indicating rotation (no text or symbols)natural_image
Illustration of a steam iron with a power cord and a cross mark (no text or symbols)
natural_image
Illustration of a steam iron with a checkmark indicating a defect or repair (no text or symbols present)text_image
Diagram showing a 3D printer with an inset highlighting the 'ECO' and 'CIX' components, likely illustrating a safety or manufacturing process.natural_image
Illustration of a hand pressing down on a mechanical component (no text or symbols visible)natural_image
Medical illustration of a surgical instrument on a bone (no text or labels)natural_image
Illustration of a hand using an iron to clean or store (no text or symbols)natural_image
Illustration of a hand using an iron on a surface, with a circular icon containing a cloud symbol (no text or symbols present)text_image
Zin Control Unitnatural_image
Illustration of two ironing machines with a cross mark indicating a specific part (no text or symbols present)natural_image
Illustration of a steam iron with a cord and plug, no text or symbols presentnatural_image
Illustration of a mechanical component with an hourglass icon and a droplet, no text or symbols present.natural_image
Close-up of a mechanical component with a checkmark icon (no text or symbols)text_image
COWNSICS MAX 32 GULN COWNSnatural_image
Person using a steam iron on a bed (no text or symbols visible)text_image
Diagram illustrating a chemical reaction or process involving an iron on a surface, with a magnified inset showing the step of the reaction.natural_image
Illustration of a person using a power iron on a bed (no text or symbols visible)natural_image
Illustration of a hand pressing down on a surface with a downward arrow indicating pressure or force (no text or symbols present)text_image
X S MIN QTY S V S T MAX QTY
natural_image
Illustration of a hand using a steam iron to clean or brush the power (no text or symbols visible)natural_image
Illustration of a hand holding a jacket with a checkmark, against a hanger background (no text or symbols)natural_image
Illustration of a hand cleaning a car with a brush (no text or symbols)text_image
Diagram illustrating a hand washing clothes with a warning symbol and crossed-out hand gesturenatural_image
Illustration of a person holding a hand holding a spray can with a cross mark (no text or symbols)text_image
Diagram showing a hair iron with an inset magnified view highlighting the 'ECO' component.text_image
Diagram showing a hair iron with a magnified view of the electrical socket, marked with X and ✓ symbols indicating inspection or dislocation.text_image
Diagram showing a iron on a surface with temperature symbols and checkmark indicatorsnatural_image
Illustration of a hand cleaning a leafy object with a checkmark (no text or symbols)text_image
Warning symbol and product image showing a bottle, paintbrush, and light bulb with a warning signnatural_image
Illustration of a hand washing a sink with a water tap and warning symbols (no text or labels)natural_image
Illustration of a steam iron with a magnified inset showing internal components (no text or symbols)natural_image
Illustration of a steam iron with a cord and plug, no text or symbols presentnatural_image
Illustration of a hand holding a water droplet and a circular icon with an hourglass symbol (no text or labels)natural_image
Close-up of a mechanical component with a checkmark and circular detail (no text or symbols)natural_image
Illustration of a wall socket connected to a plug with a black arrow indicating direction (no text or symbols)8 Утукту розеткадан суурунуз.

text_image
CALC CLEANnatural_image
Illustration of a steam iron with a magnified inset showing the ear and cord (no text or symbols)natural_image
3D rendering of a white bottle with decorative swirl pattern and rotating arrows (no text or symbols)text_image
Diagram showing a steam iron being cut with an inset image of a component labeled 'ECO' and 'CLN'natural_image
Illustration of a wall socket connected to a plug with a black arrow indicating direction (no text or symbols)2 Утукту розеткадан суурунуз.

text_image
Diagram illustrating temperature change with iron iron and hourglass symbols3 Утукту толук муздатыңыз.

natural_image
Hand cleaning a kitchen surface with a curved tool, no visible text or symbolsnatural_image
Illustration of a glass bottle with internal structure and rotating arrow, no text or symbols presentnatural_image
Illustration of a steam iron with a hanging hook and a cross mark (no text or symbols)
natural_image
3D illustration of a steam iron with a checkmark indicating a detail (no text or symbols present)text_image
Diagram showing a 3D printer with an inset highlighting the 'ECO' and 'CIX' components, likely illustrating a safety or manufacturing process.natural_image
Illustration of a hand pressing down on a piece of iron (no text or symbols visible)natural_image
Medical illustration of a hand performing a CT scan on a bone structure (no text or labels)natural_image
Illustration of a hand using a power iron to clean or store (no text or symbols)natural_image
Illustration of a hand using an iron to clean or steam (no text or symbols)natural_image
Illustration of two iron iron holders with a screw and a pencil, marked with a black X (no text or symbols)natural_image
Illustration of a steam iron with a cord and plug, no text or symbols presentnatural_image
Illustration of a mechanical component with an hourglass icon and a droplet, no text or symbols present.natural_image
Close-up of a mechanical component with a checkmark icon (no text or symbols)natural_image
Illustration of a person using a iron on a bed (no text or symbols visible)natural_image
Illustration of a steam iron being heated by a coiled wire, with a magnified inset showing the iron inside (no text or symbols)natural_image
Illustration of a person using a iron on a bed (no text or symbols visible)natural_image
Illustration of a hand pressing down on a surface with a downward arrow indicating pressure or force (no text or symbols present)natural_image
Illustration of a hand using a steam iron to clean or brush the power (no text or symbols visible)natural_image
Illustration of a hand holding a jacket with a checkmark, against a hanger background (no text or symbols)natural_image
Illustration of a hand cleaning a car with a brush (no text or symbols)text_image
Diagram illustrating a hand washing clothes with a warning symbol and crossed-out hand gesturenatural_image
Illustration of a person holding a hand holding a spray can with a cross mark (no text or symbols)text_image
Diagram showing a hair iron with an inset magnified view highlighting the 'ECO' component.text_image
Diagram showing an iron (£) with a warning symbol indicating disapproval of the electrical plug, marked with X and ✓ symbols.text_image
°C × °C ✓natural_image
Illustration of a hand cleaning a leaf with a checkmark indicating the correct removal (no text or symbols present)text_image
Warning symbol and product image showing a bottle, paintbrush, and light bulb next to a warning sign with an exclamation mark.natural_image
Illustration of a hand washing a sink with a water tap and warning symbols (no text or labels)natural_image
Illustration of a steam iron being cut with a magnified inset showing internal components (no text or symbols)natural_image
Illustration of a steam iron with a cord and plug, no text or symbols presentnatural_image
Illustration of a hand holding a water droplet and a circular icon with an hourglass symbol (no text or labels)natural_image
Close-up of a mechanical component with a checkmark and circular detail (no text or symbols)natural_image
Illustration of a wall socket connected to a plug with a downward arrow indicating compression (no text or symbols)text_image
CALC CLEANnatural_image
Illustration of a steam iron with a magnified inset showing the ear and neck (no text or symbols)natural_image
3D rendering of a white bottle with decorative swirl pattern and rotating arrows (no text or symbols)text_image
Diagram showing a steam iron being cut with an arrow and magnified detail, labeled with 'ECO' and 'CLN'natural_image
Illustration of a wall socket connected to a plug with a black arrow indicating direction (no text or symbols)text_image
Diagram illustrating temperature change with iron iron, thermometer, and hourglass symbolsnatural_image
Hand washing a shower in a kitchen sink (no text or symbols visible)natural_image
Illustration of a glass bottle with internal structure and rotating arrow, no text or symbols presentnatural_image
Illustration of a steam iron with a power cord and a cross mark (no text or symbols)
natural_image
3D illustration of a steam iron with a checkmark indicating a detail (no text or symbols present)text_image
Diagram showing a 3D printer with an inset highlighting 'ECO' and 'CLA' features, likely illustrating environmental safety or eco-friendly design.natural_image
Illustration of a hand pressing down on a piece of iron, showing the process (no text or symbols)natural_image
Medical illustration of a surgical instrument on a patient's head (no text or labels)natural_image
Illustration of a hand using a power iron to clean (no text or symbols)natural_image
Illustration of a hand ironing an iron with a circular icon showing a roof symbol (no text or symbols present)text_image
Zin Control Unitnatural_image
Illustration of two ironing machines with a cross mark indicating a specific part (no text or symbols present)natural_image
Illustration of a steam iron with a cord and plug, no text or symbols presentnatural_image
Illustration of a mechanical component with an hourglass icon and a droplet, no text or symbols present.natural_image
Close-up of a mechanical component with a checkmark icon (no text or symbols)text_image
Cronamics MMA MMA MMA MMAnatural_image
Illustration of a person using a steam iron to press down a surface (no text or symbols visible)natural_image
Illustration of a steam iron being heated by a coiled wire, with a magnified inset showing the iron inside (no text or symbols)natural_image
Illustration of a person using a power iron on a bed (no text or symbols visible)natural_image
Illustration of a hand performing a medical or therapeutic procedure on skin, with a downward arrow indicating pressure or reduction (no text or symbols present)natural_image
Illustration of a hand using a steam iron to clean or brush the power (no text or symbols visible)text_image
X MIN SIOK V
natural_image
Illustration of a hand holding a jacket with a checkmark, against a hanger background (no text or symbols)natural_image
Illustration of a hand cleaning a car with a brush (no text or symbols)text_image
Diagram illustrating a hand washing clothes with a warning symbol and crossed-out hand gesturenatural_image
Illustration of a person holding a hand holding a spray can with a cross mark (no text or symbols)text_image
Diagram showing a hairdryer with an inset magnified view highlighting the 'ECO' component.text_image
Diagram showing an iron (£) with a warning symbol indicating disapproval of using a power plug, accompanied by a crossed-out electrical plug icon.text_image
Diagram showing a steam iron with thermometer symbols and checkmark indicators, likely illustrating a thermal measurement or inspection process.natural_image
Illustration of a hand cleaning a leaf with a checkmark indicating inspection (no text or symbols present)text_image
Warning symbol and product image showing a bottle, paintbrush, and light bulb next to a warning sign with an exclamation mark.natural_image
Illustration of a hand washing a sink with a water tap and warning symbols (no text or labels)text_image
Diagram showing a hair iron with an inset magnified view highlighting 'eco' and 'clu' features.natural_image
Illustration of a steam iron with a cord and plug, no text or symbols presentnatural_image
Illustration of a hand holding a water droplet and a circular icon with an hourglass symbol (no text or labels)natural_image
Close-up of a mechanical component with a checkmark and circular detail (no text or symbols)natural_image
Illustration of a wall socket connected to a power plug with a downward arrow indicating disassembly (no text or symbols)text_image
CALC CLEANnatural_image
Illustration of a steam iron with a magnified inset showing the hook being inserted (no text or symbols)natural_image
Illustration of a bottle with decorative patterns and rotating arrows (no text or symbols)text_image
Diagram showing a steam iron being placed with an inset highlighting the 'ECO' component, likely illustrating eco-friendly material usage.natural_image
Illustration of a wall socket connected to a power plug with a magnified view (no text or symbols)text_image
Diagram illustrating temperature change with iron iron, thermometer, and hourglass symbolsnatural_image
Hand cleaning a kitchen surface with a curved tool, no visible text or symbolsnatural_image
Illustration of a glass bottle with internal structure and rotating arrow, no text or symbols presentnatural_image
Illustration of a steam iron with a power cord and a cross mark, no text or symbols present
natural_image
3D illustration of a steam iron with a checkmark indicating a detail (no text or symbols present)text_image
Diagram showing a 3D printer with an inset highlighting the 'ECO' and 'CIX' components, likely illustrating a safety or cleaning concept.natural_image
Illustration of a hand pressing down on a piece of iron, showing the process (no text or symbols)natural_image
Medical illustration of a surgical procedure on a bone (no text or labels)natural_image
Illustration of a hand using an iron on a surface, with a circular logo containing 'ECO' and a cloud icon above (no text or symbols on the main image)natural_image
Illustration of a hand ironing an iron with a small icon in the corner (no text or symbols)natural_image
Illustration of two iron iron holders with a screw and a pencil, marked with a black X (no text or symbols)natural_image
Illustration of a steam iron with a cord and plug, no text or symbols presentnatural_image
Illustration of a mechanical component with an hourglass icon and a droplet, no text or symbols present.natural_image
Close-up of a mechanical component with a checkmark icon (no text or symbols)text_image
COWNSICS GULB COWNS1 Чадвали хароратро ба танзимоти мувофик, тоб дихед: абрешим, пахта ё катон, вобаста ба намуди матоње, ки шумо дарзмол мекунед. Буғ дар танзимоти синтетики дастрас нест. Ин дар сурати истифода бурдан ба пошидани об оварда мерасонад.

natural_image
Illustration of a person using a steam iron on a bed (no text or symbols visible)2 Буғ хангоми дарзмолкуні бароварда мешавад.
Буғ нест/Дарзмолкунии хушк

natural_image
Illustration of a steam iron being heated, with a magnified inset showing the iron wire (no text or symbols present)1 Танзимоти буғро ба танзимоти бе буғ муқаррар кунед

natural_image
Illustration of a person using a steam iron on a bed (no text or symbols visible)natural_image
Illustration of a hand performing a medical or therapeutic procedure on skin, with a downward arrow indicating pressure or action (no text or symbols present)1 Тугмаи пошидани оброёдар болои даста пахш кунед ва рахо кунед. Об бояд аз сопло пошида шавад.
text_image
X SMA V COTY V
natural_image
Illustration of a hand using a steam iron to clean or brush the power (no text or symbols visible)natural_image
Illustration of a hand holding a jacket with a checkmark, against a hanger background (no text or symbols)natural_image
Illustration of a hand cleaning a car with a brush (no text or symbols)3 Хангоми истифода бурдани таквияти буг барои хамвор кардани катхои мустахкам либоси худро кашед ва дароз кунед.

text_image
Diagram illustrating a hand washing clothes with a warning symbol and crossed-out hand gesturenatural_image
Illustration of a person holding a hand holding a spray can with a cross mark (no text or symbols)5 Дарзмолро ба худ/шахси дигар равона накунед.
Тозакунй ва нигохдорй

text_image
Diagram showing a hair iron with an inset magnified view highlighting the carbon dioxide (ECO) component.natural_image
Illustration of an iron (£) with a magnified inset showing a plug and plug connector (no text or symbols)text_image
Diagram showing a steam iron with thermometer symbols and checkmark indicators, likely illustrating a thermal measurement or inspection process.natural_image
Illustration of a hand cleaning a seed pod with a checkmark indicating inspection (no text or symbols present)text_image
Warning symbol and product image showing a bottle, sandbar, and light bulb with an exclamation markШарх: Барои хамвор нигох доштани сатхи поёни тахта, нагузоред, ки он бо ашёхои металли тамос гирад. Барои тоза кардани зери поя исфанчхои абразиві, сирко ва дигар маводи кимиёвиро истифода набаред.

natural_image
Illustration of a hand washing a sink with a water tap and warning symbols (no text or labels)5 Дарзмол ро дар зери оби равон шустан/тоза кардан мумкин нест.
Calc-Clean

text_image
3 4 5 6 6 10 11 12 12 13 6 17 18 19 19 20 23 24 25 25 26 27 0 31natural_image
Illustration of a steam iron with a magnified inset showing internal components (no text or symbols)text_image
SHILBHINAS NILK COTTON LUCAN MAXnatural_image
Illustration of a steam iron with a cord and plug, no text or symbols presentnatural_image
Illustration of a hand holding a water droplet and a circular icon with an hourglass symbol (no text or labels)natural_image
Close-up of a mechanical component with a checkmark and circular detail (no text or symbols)natural_image
Illustration of a wall socket connected to a plug with a downward arrow indicating compression (no text or symbols)text_image
CALC CLEANnatural_image
Illustration of a steam iron with a magnified inset showing the ear and neck (no text or symbols)natural_image
3D rendering of a white bottle with decorative swirl pattern and rotating arrows (no text or symbols)text_image
Diagram showing a steam iron being cut with an arrow and magnified detail, labeled with 'ECO' and 'CLN'1 Калиди бустро лажонед, то холати бустро хомуш кунед (дарзмолкунии хушк)

natural_image
Illustration of a wall socket connected to a plug with a black arrow indicating direction (no text or symbols)text_image
Diagram illustrating temperature measurement with a iron, thermometer, and hourglass iconnatural_image
Hand cleaning a tiled surface with a curved pipe (no text or symbols visible)4 Оби бокимондаро аз зарфи об резед.

natural_image
Diagram of a bottle with internal structure and rotating arrows indicating rotation (no text or symbols)5 Сими баркро дар атрофи корпуси асосии дарзмол тоб дихед.
522 Українська
Зміст
Вступ 523
Огляд виробу 523
natural_image
Illustration of a steam iron with a power cord and a cross mark, no text or symbols present
natural_image
3D illustration of a steam iron with a checkmark indicating a detail (no text or symbols present)text_image
Diagram showing a 3D printer with an inset highlighting the 'ECO' and 'CIX' components, likely illustrating a safety or manufacturing process.natural_image
Illustration of a hand pressing down on a piece of iron, showing the process (no text or symbols)natural_image
Medical illustration of a surgical procedure on a bone (no text or labels)natural_image
Illustration of a hand using an iron on a surface, with a circular logo containing 'ECO' and a cloud icon (no text or symbols on the main image)natural_image
Illustration of a hand ironing an iron with a small icon in the corner (no text or symbols)natural_image
Illustration of two iron iron holders with a screw and a pencil, marked with a black X (no text or symbols)natural_image
Illustration of a steam iron with a cord and plug, no text or symbols presentnatural_image
Illustration of a mechanical component with an hourglass symbol (no text or labels)natural_image
Close-up of a mechanical component with a checkmark icon (no text or symbols)text_image
MAX CONTENTS SEA COTCH 100%natural_image
Illustration of a person using a steam iron on a bed (no text or symbols visible)natural_image
Illustration of a steam iron being heated by a coiled wire, with a magnified inset showing the iron inside (no text or symbols)natural_image
Illustration of a person using a power iron on a surface (no text or symbols visible)natural_image
Illustration of a hand pressing down on a textured surface with a downward arrow indicating motion (no text or symbols)text_image
X SMEATINGS SMA MAX COTATO
natural_image
Illustration of a hand using a steam iron to clean or brush the power (no text or symbols visible)text_image
X MIN SIOK V
natural_image
Illustration of a hand holding a jacket with a checkmark, against a hanger background (no text or symbols)natural_image
Illustration of a hand cleaning a car with a brush (no text or symbols)text_image
Diagram illustrating a hand washing clothes with a warning symbol and crossed-out hand gesturenatural_image
Illustration of a person holding a hand holding a spray can with a cross mark (no text or symbols)natural_image
Illustration of a hair iron being held by a tool, with an inset showing a close-up of the tip and a magnified view of the tool (no text or symbols present)text_image
Diagram showing iron iron with a switch and a magnified view of the switch, indicating disassembly or repair process.text_image
Diagram showing a steam iron with thermometer symbols and checkmark indicators, likely illustrating a thermal measurement or inspection process.natural_image
Illustration of a hand cleaning a leaf with a checkmark indicating inspection (no text or symbols present)text_image
Warning symbol and product image showing a bottle, paintbrush, and light bulb next to a warning sign with an exclamation mark.natural_image
Illustration of a hand washing a sink with a water tap and warning symbols (no text or labels)text_image
Diagram showing a hair iron with an inset magnified view highlighting 'eco' and 'clu' features.natural_image
Illustration of a steam iron with a cord and plug, no text or symbols presentnatural_image
Illustration of a hand holding a water droplet and a circular icon with an hourglass symbol (no text or labels)natural_image
Close-up of a mechanical component with a checkmark and a circular detail (no text or symbols)natural_image
Illustration of a wall socket connected to a plug with a black arrow indicating direction (no text or symbols)text_image
CALC CLEANnatural_image
Illustration of a steam iron with a magnified inset showing the ear and cord (no text or symbols)natural_image
3D rendering of a white bottle with decorative swirl pattern and rotating arrows (no text or symbols)text_image
Diagram showing a steam iron being cut with an arrow and magnified detail, labeled 'ECO' and 'CLN'natural_image
Illustration of a wall socket connected to a power plug with a magnified view (no text or symbols)text_image
Diagram illustrating temperature change with iron iron, thermometer, and hourglass symbolsnatural_image
Hand washing a shower in a kitchen sink, no text or symbols visiblenatural_image
Illustration of a glass bottle with internal structure and rotating arrow, no text or symbols presentnatural_image
Illustration of a steam iron with a power cord and a cross mark, no text or symbols present
natural_image
3D illustration of a steam iron with a checkmark indicating a detail (no text or symbols present)natural_image
Illustration of a hair iron being cut with an inset showing a magnified view of the tip (no text or symbols)natural_image
Illustration of a hand pressing down on a piece of iron (no text or symbols visible)natural_image
Medical illustration of a hand performing a procedure on a bone structure (no text or labels)natural_image
Illustration of a hand using a power iron to clean or store (no text or symbols)natural_image
Illustration of a hand ironing an iron with a circular icon showing a roof symbol (no text or symbols present)text_image
Diagram of a rotary dial with labeled components and a speech bubble indicating the functionnatural_image
Illustration of two iron hangers with a cross mark indicating a specific part, no text or symbols present.natural_image
Illustration of a steam iron with a cord and plug, no text or symbols presentnatural_image
Illustration of a mechanical component with an hourglass icon and a droplet, no text or symbols present.natural_image
Close-up of a mechanical component with a checkmark icon (no text or symbols)text_image
MMA GSA COWA GSA COWAnatural_image
Illustration of a person using a steam iron to press down a surface (no text or symbols visible)text_image
Diagram showing a steam iron being heated by a device, with an inset illustrating the heating process.natural_image
Illustration of a person using a power iron on a bed (no text or symbols visible)natural_image
Illustration of a hand pressing down on a surface with a downward arrow indicating motion (no text or symbols)text_image
X MIN CO2 SILK STIMMETHICS MAX ✓
natural_image
Illustration of a hand using a steam iron to clean or brush the power (no text or symbols visible)natural_image
Illustration of a hand holding a jacket with a checkmark, against a hanger background (no text or symbols)natural_image
Illustration of a hand cleaning a car with a brush (no text or symbols)text_image
Diagram illustrating a hand washing clothes with a warning symbol and crossed-out hand gesturenatural_image
Illustration of a person holding a hand holding a spray can with a cross mark (no text or symbols)natural_image
Illustration of a hair iron being held by a tool, with an inset showing a close-up of the tip and a magnified view of the tool (no text or symbols present)text_image
Diagram showing an iron (£) with a warning symbol indicating disapproval of using a plug, alongside a magnified view of the plug.text_image
Illustration showing an iron (£) with thermometer symbols and a checkmark indicating cooling condition.natural_image
Illustration of a hand cleaning a seed pod with a checkmark indicating inspection (no text or symbols)text_image
Warning symbol and product image showing a bottle, paintbrush, and light bulb next to a warning sign with an exclamation mark.natural_image
Illustration of a hand washing a sink with a water tap and warning symbols (no text or labels)text_image
Diagram showing a hair iron with an inset magnified view highlighting 'eco' and 'clu' features.text_image
SHILBHINAS NILK COTTON LUCAN MAXnatural_image
Illustration of a steam iron with a cord and plug, no text or symbols presentnatural_image
Illustration of a hand holding a water droplet and a circular icon with an hourglass symbol (no text or labels)natural_image
Close-up of a mechanical component with a checkmark and a circular detail (no text or symbols)natural_image
Illustration of a wall socket connected to a plug with a black arrow indicating direction (no text or symbols)text_image
CALC CLEANnatural_image
Illustration of a steam iron with a magnified inset showing the ear and toe (no text or symbols)natural_image
Illustration of a bottle with decorative patterns and rotating arrows (no text or symbols)text_image
Diagram showing a steam iron being cut with an arrow and magnified detail, labeled 'ECO' and 'CLN'natural_image
Illustration of a wall socket connected to a power plug with a magnified view (no text or symbols)text_image
Diagram illustrating temperature change with iron iron, thermometer, and hourglass symbolsnatural_image
Hand washing a shower in a kitchen sink with a tiled wall background (no text or symbols visible)natural_image
Illustration of a glass bottle with internal structure and rotating arrow, no text or symbols presentUwnwuph punhwunin punipawqn

text_image
DST1010 DST1020 DST1030 DST1040 DST1050 *DST1030/20 DST1040/30 ECO CALC ECA CLEAN ① ② ③ ④ ⑤ ⑥ ⑦ ⑧ MAX1 9n1nn2ni uwwunwlywnwnu wu ndtshuh puiunnipajwu lynawu
2 Νιδτη αηηη2πι υηύωμί ληάωμί
3 2nh gnnwghn
4 Uünigüwü lwn
5 Lwnh hughy
6 9nighsh lnju
7 Ωπύμωυνήσιμή χωηρωύης
8 2nh unwnwjh ywhwnhz
Uwnph oqunwqnndniún
Lwhwwwnwnwnni
L2niú. Unnniú uunwghu wùquú oqunwqnδtju hùwnwulnn ξ ηhnp pwùwynipajwúp qnlnn2h wnàwylqh: Φωπά dwùwüwly wùg wjù utpnwūnuύ ξ:
hùn unuwgh gniŋ wtaup 5 oqunwqnɒtɪ
Uwnpn hwnúwn t δnnwlyh gnnu oqunwqnδύwù hwníwn: Uwljujù, tātā nniρ wwnniú típ wjǔwhuh unwnwópniú, nnntn gnh lyn2nniəjwi ùwnhǎwùn pwnàn t, hunphninn tūp unwihu δnnwlyh gnnn hwnzúti jænpwð ywiú ntúhútnwihqwugluð gnh htun hwnlwwwn puìuwyniəjwiúp: ʔω lywùh ùwnylwóph lyninwlyníuń ù lytŋlywnwgùh uwnph ljuwùpn:
Uh wultlwqntp odwùtihp, zhpwngh gnn, pwgwhu, oulu, tuunlqwodph úwpnúwù, wnnnlýuwù odwùnwly úhnguttn, phúhwlywù úhnguttnny úwpnúwò gnn lyuú phúhwlywù wjl üjníatn, pwùh nn ηnpùp lyuunn tǔ wnwgwutli qnh gujuntn, 2wqwùwwlywqnýu pòtn lyuú yüwutl ðtn uwnpn:
Ωnh hughyh lgünwùn
1 Uh úhwgntp wnnnilyn:

natural_image
Illustration of a steam iron with a power cord and a cross mark, no text or symbols present
natural_image
Illustration of a steam iron with a checkmark indicating a detail (no text or symbols present)2 3wúnqutp, nn wnnnilyn uwnzul:

text_image
Diagram showing a hair iron being cut with an inset highlighting the eco-friendly option (ECO, 0.1).3 Unwug qninn2ni wnnnlquwu ntchuh puunntini hwuwn (znn wnnnlnui) qninn2ni uwwnwlywnwnpuwu ntchuh puunnnyajwu lynawlyn patptp ntwih wg

natural_image
Illustration of a hand pressing down on a piece of iron (no text or symbols visible)4 Cngtlnl pwgtp qnh hughyh ywwwnhyn:

text_image
MAX5 2nh hughyn lgntap uhùzì zhghugh ynu u2u wǒ MAX u2wqhōn: Uh wultwqngtap nnut hwultwǔjniè, hǔwuhhp tǔ oǎwǔtihpn, pninwultunhsūtqn, oǎwnn lyuú pugwhun:

natural_image
Medical illustration of a surgical instrument on a bone (no text or labels)6 Uünin yhuylap qnh unwnwjh ywhwnhzn:
hùwǒu lǐnqǎwǔnntǐ gātnúwūunhǎwùn
 | | |
| MAXЧННС | ||
| ●●●FUUFU4 | ||
| ●●UTSUPU | */ ECO | |
| ●UHJATSH4 qNROQUOPUTR |

natural_image
Illustration of a hand using a power iron to clean or store (no text or symbols)ECO ntādhū' ECOwúwùh ntādhū' . 9mnn2ni uúwquqnju puàuwùh wùnúnútg uwwnwlywnwnpniú phz dwiptn niǔbign hwaqniunù wnnnilytjni hwúwn: Uju ntādhūn tuuì huìwyniú t hītyunnwututnqhwiù:

natural_image
Illustration of a hand ironing an iron with steam rising (no text or symbols)9nnn2ni tnjlni wuw 9nnn2ni wultih 2wn puwwlh wununutg 5wnwylwnwnniu ndulwn wnnnlhlnn dwlptn hwnatgutni hwuiwn:
Uwnph oqunwqnndniun
Unwghù hú y oqunwqnδúwù dwiúwùwú lwwnn l δnihu wwnwguwù, u ηw unnúwù l: 4wnǎ dwiúwùwú wǔg ηw wǔgūniú l:

text_image
i i X1 Unniqtp hwqniuinh ynwjh whwwnyln` hwunqultini hwuwn, np qnndylwopn ywntijh 5 wnnnilyti:

text_image
Zin Control Unitnatural_image
Illustration of a pair of iron burners with a cross mark indicating a specific part (no text or symbols present)3 ∅nyl unultip, nn wnnnilyn uh qhnpn unwpwuuw' nǔtlnu wju yquqāwδ uḥǎwlyniu' hn nnuwwlyh uŋw:

natural_image
Illustration of a steam iron with a cord and plug, no text or symbols present4 Uhwqntp hunngn hnnwuguwu qwnnwuhg u wnpnilyn nntip hn nnutuwuh ynw: tnlywnwguwu lwn oqnwnqnndtju, hwunqutp, nn tnlywnwguwu lwnh hqnpniyajniun hwuwwwwnuwuhuwuh wnpnilyh:

natural_image
Illustration of a hand holding a water droplet and a circular icon with an hourglass symbol (no text or labels)5 Uwwuup, shuì uwnnìyīn unwpuùw: Snighsh injùn lq2wnniùwlyh yuwniù ywnuǐl unwpuwúwù nǔwugpníú;

natural_image
Close-up of a mechanical component with a checkmark icon (no text or symbols)6 Unnniyn wwnnwnwn 5 oqnwnqnnduwu, bnp gnighzh injun uwnniw 5: Snighzh injun dwuwuwly wn dwuwuwly ywjniu uhwnniw 5 wnnniyuwu dwuwuwly:
Unnnlnniu qnlnn2ni uhongnu

text_image
ECO ECO9n1nn2hù yuunnì 5 oqunwqnnòutī ECO ECO wúwǔ h u 2 wúwǔ h ntidhuìutínnu:


natural_image
Illustration of a person using a steam iron to press down a blanket (no text or symbols visible)2 Unnnilyu wu dwuwuwq qnnn2h ywnawlyuh:
Unwug qnlnn2nl/ʒnn wnnnilyniu

natural_image
Illustration of a steam iron being heated, with a magnified inset showing the iron wire (no text or symbols present)1 9n1nn2ni ywnqwwynnniun npap wnwug qn1nn2ni wpnnluyuwu ndchuh ynw

natural_image
Illustration of a person using a iron on a bed (no text or symbols visible)2 4wnǎ dzuíwùwú wǔg' wpnǐnǐbìhu qnǐnnzhù lŋwnwnh:
2nh gnnwghn

natural_image
Illustration of a hand performing a medical or therapeutic procedure on a patient's abdomen, with a downward arrow indicating pressure (no text or symbols present)1 Utnútp u puq jænntip ʒnh gnnwghnn ʒpnuwlyh ubnhù úwuniú: ʒninn wɪtunp ʒ nninu gnnh wnnniqh pəhlyhg:
3nphqnùwlywù nħnpniú niđtn qnlnn2ni uħniú
1 Nidtn qnnn2ni uyniun hwwuutjh t «pwupwlyw» u «qn12t» qnndylwoputinh wnnniyuwu ndchutpnu:

text_image
X MIN SULK V MAX SULK
natural_image
Illustration of a hand using a steam iron to clean or brush the power (no text or symbols visible)2 Nidtn qinn2hnu hunnp dwiptnn hwnatgutni hwuwn utnutp u pwg panntp qinn2ni uŋuwu lynawlyn:
text_image
X MIN SIOK V
natural_image
Illustration of a hand holding a jacket with a checkmark, against a hanger background (no text or symbols)2 Utnútp lu puq pannp nidtn qnnn2ni únuwù lynówyn ninnwhuwjwg nhnpniu' nidtn qnnn2hnu lywhylwð hwaqniunh ðwiptpn hwnatgútni hwuün: Nidtn qnnn2ni únuwù lynówyn ninnwhuwjwg nhnpnu wuhtn qnnn2ni wùnúnhwù uwwnwlywnwnpniú zh wwwwhnuiú:

natural_image
Illustration of a hand cleaning a car with a brush and directional arrows indicating action (no text or symbols)3 lunnn dwiptnn nidtn qninn2ni únúwù lynǎwlynú hwnpátgǔtǐhu' pw2tǐnú àqtp àtn huqniuunn:

text_image
Diagram illustrating a hand washing clothes with a warning symbol and crossed-out hand gesture4 Unnnlytju atn utny atnp nwwtu htuuwu uwytntu uh oqnwnqnotp:

natural_image
Illustration of a person holding a hand holding a spray can with a cross mark (no text or symbols)5 Uh wuhtp uwnpn atn ywu du ty ninh2h ynw:
Uwpnniú u unthuúhlywlywú uwwuuwnyniú

natural_image
Illustration of a hair iron being held by a tool, with an inset showing the same tool (ECO) and a close-up view of the tool's tip.1 qnnnn2ni wugwnhsh ynw qnnnn2ni ndzhún nhtip qnnwug qnnnn2ni» (snn wnnnnlynuì) gnighsh ynw:

text_image
Diagram showing a hair iron with a magnified view of the electrical socket, marked with X and ✓ symbols indicating inspection or testing status.2 3wúnqúp, nn wnnnln úhwgluwó zhùh ywnnwlyhg:

text_image
Diagram showing a iron iron with cooling effect and thermometer symbols, indicating temperature range and checkmark status3 3wunqutp, nn wunnilyn uwnztl:

natural_image
Illustration of a hand cleaning a seed pod with a checkmark indicating the correct part (no text or symbols present)4 bunlu2nnuwnnlyh unlyh hwnlwdhg htnwgntp uwnlwdpn u wjl uwwgnnutn:

text_image
Warning symbol and product image showing a bottle, paintbrush, and bullet with an exclamation markL2niú. Unnniunn úwlytptun hwnp wuwhtni hwuwn hunphnnn 5 unpniu huniwwyhtl útunwnwlywù wnwnlywutph htun lyn2n 2yhniúhg: Unnniuh unwlyh hwnylwóh úwpnuwù hwuwn tnptp úh oqnwnqnòtp útunwnwlywù wwnpnynnul uwntiúq, pwgwhu lywiú wjl phúhwlywù újniétn:

natural_image
Illustration of a hand washing a sink with a water tap and warning symbols (no text or labels)5 Uwnpn uħ iħwgtp/uħwpntp hnunn qnh unwyl:
Calc-Clean distinguudop unppnnu
funphnnn. Calc Clean 'uunluwoph uwpnuwù qnpòwnnyjān lywnn l oqnuwqnδuŋti gwùlyugwud wuhh: bpta wynnniú tīp wjuwuhuh unwnwópnui, nnuntin gnh ynzunnijwù wuanhǎwùn pwnàn l, wju qnpòwnnyjān wultih hwǎwhu oqnuwqnδtɪp:

text_image
3 4 5 6 6 10 11 12 12 13 6 17 18 19 19 20 23 24 25 25 26 27 0 311 lonnhnnn t unpniu wnnniyn tuunlwaoputhg uwpntjlnnpwugynin wuhu oqnwnqnndniuhg htunn' npw ljuwupn tnlywnwgutini hwiwn ywu 2wqwuwlywqnuju potph/zh wnwzwguwu dwuwuuyl:

natural_image
Illustration of an electric iron being held by a tool, with a magnified inset showing internal components (ECO and CLU) without any text or symbols.2 3wùnqutp, nn wnnniúu wùgwnuúwò jhùh qwnnwúhg, u qnnn2ni ywnqwulnpnniún nnyuò jhùh wzuwùg qnnn2ni wpnniúyuwi ruǎchúh (snn wpnniúniú) ynu

text_image
MAX3 2nh hughyn igntip uhuLu MAX u2wqhón:

text_image
SHILBHINAS NILK COTTON LUCAN MAXnatural_image
Illustration of a steam iron with a cord and attached electrical outlet (no text or symbols)5 Unnniyn uhwqntp htywnwuwunwlywnwnuwi guughu lu wuhnwdt2unniajwi u ntiwpniu uhwqntp gwugn:

natural_image
Illustration of a mechanical component with an hourglass symbol (no text or labels)6 «Unnilyu wunwnwun» gnighsh inyun yulwuzh` gnyg unwnl, nn unnilyunwpwunl 5:

natural_image
Close-up of a mechanical component with a checkmark and a circular detail (no text or symbols)7 Uwwutp uh#u «Unnnlyuwu wwnnwun» gnighsh injuu wugwinuh:
562 Ruijtntu

natural_image
Illustration of a wall socket connected to a power plug with a downward arrow indicating disassembly (no text or symbols)8 Unnnilyu wugwuntp:

text_image
CALC CLEAN9 Unnniyn uwhtp iUwgwwnwuh ynw u qqniznntü pewwhwhuntip wju: Swap gninn l üwnuIwoph üwuUHlyutpn ypuwhyltü wnnniylh üwlytntuhg: CwnniUwlytp wnnniyn pewwhwhunti, ühüslu hughyhg wúpenno gninn nwnwnyuh:

natural_image
Illustration of a steam iron with a magnified inset showing the hook being inserted (no text or symbols)10 Uhwqntp uwnpn qwnnwlyhù l pnntp wju unwpwùw, npwbuqh wnnnilyh unwlh hwnnlwδn ynnuùw: ?nw hwúwn yquwhwǔguh ünn 2 pnwt: Guwnn tp untuùtì, jat hùswtu 5 gninn gwjnniú qnnn2ni wùgptnhg: Uw ünnúwl 5, puùh nn wultinnn gninn nninu 5 powihulniú:

natural_image
Illustration of a bottle with decorative patterns and rotating arrows (no text or symbols)text_image
Diagram showing a steam iron being placed with an inset highlighting the 'ECO' component, likely illustrating eco-friendly material usage.1 «Unwug qnnn2ni wpnnlquwu» ntchuh pwnntjni hwuwn (znp wnnnlnnu) uwhtgntp qnnn2ni uwwnwlpwnwnuwu ntchuh pwnnnjajwu lynawyn

natural_image
Illustration of a wall socket connected to a plug with a magnified view (no text or symbols)2 Unnnilyu wugwuntp:

text_image
Diagram illustrating temperature measurement using an iron, showing thermometer and hourglass icons with labels.natural_image
Hand washing a shower in a kitchen sink (no text or symbols visible)4 2nh hughyhg powhtp uuuwgwδ gninn:

natural_image
Illustration of a glass bottle with internal structure and rotating arrow, no text or symbols present5 3nuwuph lwnq chwawatp wnnnlyh 2ninqn:
สารบัญ
ข้อมูลเบื้องต้น 565
natural_image
Illustration of a steam iron with a power cord and a cross mark, no text or symbols presentnatural_image
3D rendered image of a hair iron with a checkmark indicating inspection (no text or symbols)natural_image
Illustration of a hair iron with an inset showing a small component labeled 'ECO' (no text or symbols on the main subject)natural_image
Illustration of a hand pressing down on a small object on a surface (no text or symbols visible)natural_image
Medical illustration of a hand performing a CT scan on a bone structure (no text or labels)natural_image
Illustration of a hand using an iron to clean (ECO) with a cloud icon above, no text or symbols on the diagram itself.natural_image
Illustration of a hand using an iron to clean or steam (no text or symbols)text_image
STRAWING COOKINGnatural_image
Illustration of two iron hangers with a cross mark indicating a defect or repair (no text or symbols present)natural_image
Illustration of a steam iron with a cable, showing internal components and a power outlet (no text or symbols)natural_image
Illustration of a mechanical component with an hourglass symbol (no text or labels)natural_image
Close-up of a mechanical component with a checkmark icon (no text or symbols)natural_image
Illustration of a person using a power iron on a bed (no text or symbols visible)text_image
Diagram showing a steam iron being heated by a device, with an inset highlighting the heating mechanism.natural_image
Illustration of a person using a power iron on a surface (no text or symbols visible)natural_image
Illustration of a hand pressing down on a surface with a downward arrow indicating motion (no text or symbols)natural_image
Illustration of a hand using a steam iron to clean or brush the power (no text or symbols visible)text_image
X MIN MAX MIN SINK CNTnatural_image
Illustration of a hand holding a hairdryer over a garment, with a checkmark indicating the hairdryer's tip (no text or symbols present)natural_image
Illustration of a hand pressing down on a car's seat, with arrows indicating force or pressure (no text or symbols)text_image
Illustration showing a person using a washing machine with hand gestures and a 'X' symbol, accompanied by a smokestack icon.natural_image
Illustration of a person holding a hand holding a spray can with a cross mark (no text or symbols)natural_image
Illustration of a hair iron being held by a tool, with an inset showing a close-up of the tool (no text or symbols present)text_image
Diagram showing an iron (£) with a switch and a magnified inset indicating the switch symbol.text_image
Diagram showing a steam iron with cooling symbols and checkmark indicators for temperature readings.natural_image
Illustration of a hand cleaning a seed pod with a checkmark indicating inspection (no text or symbols present)text_image
Warning symbol and illustration of a light bulb, indicating hazardous material or toxicity.natural_image
Illustration of a hand washing a sink with a water tap and warning symbols (no text or labels)natural_image
Illustration of a hairdryer with a magnified inset showing the internal structure (no text or symbols)natural_image
Illustration of a steam iron with a plug, showing internal components and wiring (no text or symbols)natural_image
Close-up of a mechanical component with an hourglass icon and a droplet, no visible text or symbolsnatural_image
Close-up of a mechanical component with a checkmark icon (no text or symbols)natural_image
Illustration of a wall socket connected to an electrical plug with a black arrow indicating direction (no text or symbols)8 ถอดปลักเตาร็ด

text_image
CALC CLEANnatural_image
Illustration of a steam iron with a magnified inset showing the tip and tail (no text or symbols)natural_image
3D rendering of a cylindrical object with internal curved structure and rotational arrows (no text or symbols)text_image
Diagram showing a steam iron being cut with an inset magnified view highlighting the 'ECO' component.natural_image
Illustration of a wall socket connected to a plug with a downward arrow (no text or symbols)2 ถอดปลักเตาร็ด

text_image
Diagram illustrating temperature measurement using an iron, showing thermometer and hourglass icons with temperature scale.natural_image
Close-up of a hand cleaning a tiled wall surface with a curved pipe (no text or symbols visible)natural_image
Diagram of a bottle-shaped container with internal structure and rotating arrows indicating rotation (no text or symbols)1 amplitude modulation of the frequency modulation.

natural_image
Illustration of a steam iron with a warning symbol (no text or labels)natural_image
Illustration of a steam iron with a checkmark indicating a defect or repair (no text or symbols present)
text_image
Diagram showing a 3D printer with an inset highlighting the 'ECO' and 'CIX' regions, likely illustrating environmental safety or diagnostic concept.natural_image
Illustration of a hand pressing down on a piece of iron, showing the process (no text or symbols)natural_image
Medical illustration of a surgical procedure on a bone (no text or labels)natural_image
Illustration of a hand using an iron to clean or steam, with a circular logo labeled 'ECO' in the corner (no text on the iron itself)ECO 3smsdʒfɔn ECO mhydmmz6n 3smsdʒfɔn : mhydmmz6n 3smsdʒfɔn mhydmmz6n 3smsdʒfɔn mhydmmz6n 3smsdʒfɔn mhydmmz6n 3smsdʒfɔn mhydmmz6n 3smsdʒfɔn mhydmmz6n 3smsdʒfɔn mhydmmz6n 3smsdʒfɔn mhyd mm20

natural_image
Illustration of a hand ironing an iron, with a circular icon showing a roof symbol (no text or symbols present)mfin mfinjmnlu mfinjdgmn nfggug nfbggbunghn mfinjmnlu dnbmqgdss bnuqn buzgjdnl gulsubmfgdms.
∂mδym∂nμm∂nδ 3s∂myg6gδs
Знмзгърн зудмыбгдөндүдүдүдүдүдүдүдүдүдүдүдүдүдүдүдүдүдүдүдүдүдүдүдүдүдүдүдүдүдүдүдүдүдүдүдүдүдүдүдүдүдүдүдүдүдүдүдүдүдүдү徳

text_image
i i ✓ Xtext_image
Zin Control Unitnatural_image
Illustration of two iron hangers with a cross mark indicating a specific part, no text or symbols present.natural_image
Illustration of a steam iron with a cord and plug, no text or symbols presentnatural_image
Illustration of a mechanical component with an hourglass icon and a droplet, no text or symbols present.natural_image
Close-up of a mechanical component with a checkmark icon (no text or symbols)text_image
Cronamics MMA COTTOOnatural_image
Illustration of a person using a steam iron on a bed (no text or symbols visible)text_image
Diagram showing a steam iron being heated by a device, with an inset illustrating the heating process.natural_image
Illustration of a person using a power iron on a surface (no text or symbols visible)natural_image
Illustration of a hand pressing down on a textured surface with a downward arrow indicating pressure or movement (no text or symbols)text_image
X S M N V S M N
natural_image
Illustration of a hand using a steam iron to clean or brush the power (no text or symbols visible)text_image
X MIN COCON SELL STATISTICS
natural_image
Illustration of a hand holding a jacket with a checkmark, against a hanger background (no text or symbols)natural_image
Illustration of a hand applying cotton to a car wheel, with arrows indicating direction (no text or symbols)text_image
Diagram illustrating a hand washing clothes with a warning symbol and crossed-out hand gesturenatural_image
Illustration of a person holding a bottle with a cross mark, no text or symbols presenttext_image
Diagram showing a hair iron with an inset magnified view highlighting the carbon dioxide (ECO) component.natural_image
Illustration of a steam iron with a magnified inset showing electrical socket (no text or symbols)text_image
Diagram showing a steam iron with thermometer symbols and checkmark indicators, likely illustrating a thermal measurement or inspection process.natural_image
Illustration of a hand cleaning a leaf with a checkmark indicating inspection (no text or symbols present)4 dnhnq6 dmsyngng on g66gngng on us ub3s usbnl b6gng on b3gmn b6fmnon.

text_image
Warning symbol and product image showing a bottle, paintbrush, and plastic bulb with an exclamation marknatural_image
Illustration of a hand washing a sink with a water tap and warning symbols (no text or labels)natural_image
Illustration of a steam iron with an inset showing a carbon dioxide (ECO) component, no text or symbols present.natural_image
Illustration of a steam iron with a cord and plug, no text or symbols presentnatural_image
Illustration of a hand holding a water droplet and a circular icon with an hourglass symbol (no text or labels)6 Soundgouds ndqnzsphmdu bsunfns, msy dnyonnogdu, hmda yom ybgmmgouds.

natural_image
Close-up of a mechanical component with a checkmark and circular detail (no text or symbols)natural_image
Illustration of a wall socket connected to a plug with a black arrow indicating direction (no text or symbols)text_image
CALC CLEANnatural_image
Illustration of a steam iron with a magnified inset showing the tip and tail (no text or symbols)natural_image
3D rendering of a cylindrical object with textured surface and curved arrows indicating rotation (no text or symbols)text_image
Diagram showing a steam iron being cut with an inset image of a component labeled 'ECO' and 'CLN'1 mfmgjmnlu mggndnlu guspudmzgmnn qssyygbgn 3sfnsdghmf8g "mfmgjmnlu gsmgjdg" (ddfmspmn qssyommgd)

natural_image
Illustration of a wall socket connected to a plug with a black arrow indicating direction (no text or symbols)text_image
Diagram illustrating temperature change with iron iron, thermometer, and hourglass symbolsnatural_image
Hand washing a shower in a kitchen sink (no text or symbols visible)4 6ymnu mg8g3y5m0s6 zuqssjngn qsmh6bnnn bysmn.

natural_image
Illustration of a bottle with internal structure and curved arrows indicating rotation (no text or symbols)5 ∂∂∂m∂b∂z∂g∂n ∂∂∂∂∂Φ∂m∂s∂g∂mn ∂∂∂m∂s∂y∂u.
目录
产品简介 595
产品概述 595
使用本产品 596
使用准备 596
给水箱注水 596
设置温度 598
使用本产品 598
蒸汽熨烫 600
无蒸汽/干熨 601
喷雾按钮 601
水平蒸汽束喷射 601
垂直蒸汽束喷射 602
清洁和保养 603
自动除垢功能 604
存储 606
产品简介
natural_image
Illustration of a steam iron with a warning symbol (no text or labels)1 确保熨斗电源插头已拔下。

natural_image
3D illustration of a steam iron with a checkmark indicating a detail (no text or symbols)2 确保熨斗自然冷却。

text_image
Diagram showing a 3D printer with an inset highlighting a component labeled 'ECO' and 'CLM'natural_image
Illustration of a hand pressing down on a wooden iron (no text or symbols)4 翻开水箱盖。

text_image
MAXnatural_image
Medical illustration of a surgical instrument on a bone (no text or labels)6 盖紧水箱盖。
设置温度
natural_image
Illustration of a hand using a steam iron to clean (no text or symbols)natural_image
Illustration of a hand using an iron on a surface, with a small icon in the top-left corner (no text or symbols)natural_image
Illustration of two iron hangers with a screwdriver and a cross mark indicating a defect or mark (no text or symbols present)3 将熨斗竖立放置。

natural_image
Illustration of a steam iron with a plug, showing internal components (no text or symbols)natural_image
Illustration of a mechanical component with an hourglass symbol (no text or labels)natural_image
Close-up of a mechanical component with a checkmark icon (no text or symbols)natural_image
Illustration of a person using a steam iron to press down a bed (no text or symbols visible)2 熨烫过程中将放出蒸汽。
无蒸汽/干熨

text_image
Diagram showing a steam iron being heated, with an inset illustrating the heating process and a magnified view of the iron electrode.1 将蒸汽模式设置为无蒸汽模式

natural_image
Illustration of a person using a iron on a bed (no text or symbols visible)2 片刻过后,熨烫过程中蒸汽将会消失。
喷雾按钮

natural_image
Illustration of a hand pressing down on a textured surface with a downward arrow indicating pressure or movement (no text or symbols)text_image
X MIN SIA COTRY LTR √natural_image
Illustration of a hand using a steam iron to clean or brush the power (no text or symbols visible)text_image
X SIX MAX LOW COT √ STATISTICS SEAnatural_image
Illustration of a hand holding a jacket with a checkmark, against a hanger background (no text or symbols)natural_image
Illustration of a hand cleaning a car with a brush (no text or symbols)text_image
Diagram illustrating a hand washing clothes with a warning symbol and crossed-out hand gesture4 熨烫时请不要用手作为支撑面。

natural_image
Illustration of a person holding a fire extinguisher with a cross mark, no text or symbols present5 切勿将熨斗朝向自己/他人。
清洁和保养

natural_image
Illustration of a hair iron with a magnified inset showing internal components (ECO, CLU) and a screwdriver (no text or symbols)text_image
Illustration of a hair iron with a magnified view showing a wall socket and a checkmark indicating inspection or repair.2 确保熨斗电源插头没有插上。

text_image
Diagram showing a iron (£) with thermometer symbols and checkmark indicators, likely illustrating a temperature measurement or inspection process.3 确保熨斗已冷却。

natural_image
Illustration of a hand cleaning a leaf with a checkmark indicating the correct removal (no text or symbols present)text_image
Warning symbol and product image showing a bottle, paintbrush, and plastic object with an exclamation marknatural_image
Illustration of a stainless steel faucet with warning symbols (in warning triangle and X) against a grid background, no text or labels present.5 请勿在自来水下清洗熨斗。
自动除垢功能

text_image
3 4 5 6 6 10 11 12 12 13 6 17 18 19 19 20 23 24 25 25 26 27 0 31natural_image
Illustration of a steam iron with an inset showing a cross-section of a container labeled 'ECO' and 'CLE', no text or symbols present.text_image
SHILBHINAS NILK COTTON LUCAN MAX4 将温度旋钮调至最高。

natural_image
Illustration of a steam iron with a cord and plug, no text or symbols presentnatural_image
Illustration of a hand holding a water droplet and a circular icon with an hourglass symbol (no text or labels)6 指示灯将亮起,这表示熨斗正在加热。

natural_image
Close-up of a mechanical component with a checkmark and a circular detail (no text or symbols)7 等待指示灯熄灭。
606 简体中文

natural_image
Illustration of a wall socket connected to a power plug with a downward arrow indicating disassembly (no text or symbols)8 拔下熨斗插头。

text_image
CALC CLEANnatural_image
Illustration of a steam iron with a magnified inset showing the hook being inserted (no text or symbols)natural_image
Illustration of a bottle with decorative patterns and rotating arrows (no text or symbols)natural_image
Illustration of a steam iron being placed with a magnified inset showing internal components (no text or symbols)natural_image
Illustration of a wall socket connected to a plug with a black arrow indicating direction (no text or symbols)2 拔下熨斗插头。

text_image
Diagram illustrating temperature measurement with a iron, thermometer, and hourglass icon3 让熨斗自然冷却。

natural_image
Hand cleaning a tiled surface with a curved pipe (no text or symbols visible)4 将水箱中剩余的水倒出。

natural_image
Diagram of a bottle with internal structure and rotating arrows indicating rotation (no text or symbols)5 将电源线缠绕在熨斗机身上。
608 繁體中文
内容
簡介 609
產品概覽 609
使用產品 610
使用前準備 610
加水至水箱内 610
設定溫度 612
使用產品 612
用蒸氣熨燙 614
無蒸氣/乾式熨燙 615
水噴霧 615
水平強力蒸氣 615
垂直強力蒸氣 616
清潔與維護 617
除鈣清洗 618
收納 620
簡介
natural_image
Illustration of a steam iron with a warning symbol (no text or labels)1 請勿將熨斗插上電源。

natural_image
3D illustration of a steam iron with a checkmark indicating inspection or repair (no text or symbols)2 請確認熨斗已經冷卻。

natural_image
Illustration of a steam iron with a magnified inset showing internal components (no text or symbols)natural_image
Illustration of a hand pressing down on a piece of iron, showing the process (no text or symbols)4 掀開水箱蓋。

text_image
MAXnatural_image
Medical illustration of a hand holding a small object on a surgical instrument (no text or symbols visible)6 確實蓋好水箱蓋。
612 繁體中文
設定溫度
| | |
| MAX (最大)LINEN (亞麻) | ||
| ●●●COTTON (棉) | ||
| ●●SILK (絲) | */ ECO | |
| ●SYNTHETICS (合成纖維) |

natural_image
Illustration of a hand ironing an iron with a 'ECO' logo (no text or symbols on the iron itself)natural_image
Illustration of a hand using an iron to clean or steam (no text or symbols)text_image
MAX 270mm MIN 350mmnatural_image
Illustration of two iron iron holders with a screw and a pencil, marked with a black X (no text or symbols)3 將熨斗直立放置。

natural_image
Illustration of a steam iron with a plug, showing electrical connections (no text or symbols)natural_image
Illustration of a mechanical component with an hourglass symbol (no text or labels)natural_image
Close-up of a mechanical component with a checkmark icon (no text or symbols)text_image
COWMINGS MAAS COTOW 82% 82%natural_image
Illustration of a person using a steam iron to press down a bed (no text or symbols visible)2 在熨燙期間將會釋放蒸氣。
無蒸氣/乾式熨燙

text_image
Diagram showing a steam iron being heated by a device, with an inset illustrating the process.1 將蒸氣設定調整為無蒸氣

natural_image
Illustration of a person using a power iron on a surface (no text or symbols visible)2 一段時間後,蒸氣會在熨燙期間停止。
水噴霧

natural_image
Illustration of a hand pressing down on a textured surface with a downward arrow indicating motion (no text or symbols)text_image
X SWEATINGS MAX SILK COTRYnatural_image
Illustration of a hand using a steam iron to clean or brush the power (no text or symbols visible)natural_image
Illustration of a hand holding a jacket with a checkmark, against a hanger background (no text or symbols)natural_image
Illustration of a hand applying a cotton or cotton swab to a car, with arrows indicating direction (no text or symbols)text_image
Diagram illustrating a hand washing clothes with a warning symbol and crossed-out hand gesturenatural_image
Illustration of a person holding a fire extinguisher with a cross mark, no text or symbols present5 請勿將熨斗朝向自己/他人。
清潔與維護

natural_image
Illustration of a hair iron being held by a tool, with an inset showing a close-up of the tip and a magnified view of the tool (no text or symbols present)text_image
Illustration of an iron (£) with a magnified inset showing a plug and a checkmark, indicating inspection or repair status.2 請確認熨斗未插電。

text_image
Illustration showing a steam iron with thermometer symbols and checkmark indicators, suggesting a warning or inspection.3 請確認熨斗已經冷卻。

natural_image
Illustration of a hand cleaning a seed pod with a checkmark indicating the correct part (no text or symbols present)text_image
Warning symbol and product image showing a bottle, paintbrush, and bullet with an exclamation marknatural_image
Illustration of a hand washing a kitchen sink with a water tap and warning symbols (no text or labels)5 請勿在流動的水中清洗/清潔熨斗。
除鈣清洗

text_image
3 4 5 6 6 10 11 12 12 13 6 17 18 19 19 20 23 24 25 25 26 27 0 31text_image
Diagram showing a 3D printer with an inset image of a device labeled 'ECO' and 'CLE', illustrating the process of carbon dioxide removal.natural_image
Illustration of a steam iron with a cord and plug, no text or symbols presentnatural_image
Illustration of a hand holding a water droplet and a circular icon with an hourglass symbol (no text or labels)6 指示燈會亮起,表示熨斗正在加熱。

natural_image
Close-up of a mechanical component with a checkmark and circular detail (no text or symbols)7 請等待指示燈熄滅。
620 繁體中文

natural_image
Illustration of a wall socket connected to a power plug with a downward arrow indicating disassembly (no text or symbols)8 拔下熨斗插頭。

text_image
CALC CLEANnatural_image
Illustration of a steam iron with a magnified inset showing the hook being inserted (no text or symbols)natural_image
Illustration of a bottle with decorative patterns and rotating arrows (no text or symbols)text_image
Diagram showing a steam iron being placed with an inset highlighting the 'ECO' component, likely illustrating eco-friendly material usage.natural_image
Illustration of a wall socket connected to a plug with a black arrow indicating direction (no text or symbols)
text_image
Diagram illustrating temperature measurement with a iron, thermometer, and hourglass icon3 讓熨斗冷卻。

natural_image
Hand washing a shower in a kitchen sink (no text or symbols visible)4 將水箱中剩餘的水倒空。

natural_image
Illustration of a bottle with internal structure and curved arrows indicating rotation (no text or symbols)5 將電線纏繞在熨斗主體。
목차
소개 623
제품 개요 623
제품 사용하기 624
사용 준비 624
물탱크 채우기 624
온도 설정 626
제품 사용하기 626
스팀 다림질 628
스팀 없음/건식 다림질 629
물 스프레이 629
수평 순간 스팀 629
수직 순간 스팀 630
청소 및 유지관리 631
석회질 세척 632
보관 634
소개
natural_image
Illustration of a steam iron with a warning symbol (no text or labels)natural_image
3D rendered image of a steam iron with a checkmark indicating inspection or repair (no text or symbols)
natural_image
Illustration of an electric iron (£) being held, with a magnified inset showing the internal structure (no text or symbols)natural_image
Illustration of a hand pressing down on a piece of iron, showing the process (no text or symbols)4 물탱크 뚜껑을 젖혀서 엽니다.

text_image
MAXnatural_image
Medical illustration of a hand holding a small object on a metallic surface (no text or symbols)6 물탱크 뚜껑을 꼭 닫으십시오.
온도 설정
natural_image
Illustration of a hand using an iron to clean or steam, with a circular logo containing 'ECO' and a cloud icon (no text on the iron itself)natural_image
Illustration of a hand ironing an iron with a circular icon showing a roof symbol (no text or symbols present)natural_image
Illustration of two iron hangers with a screwdriver and a cross mark indicating a defect or mark (no text or symbols present)3 다리미를 세워 듯니다.

natural_image
Illustration of a steam iron with a plug, showing electrical connections (no text or symbols)natural_image
Close-up of a mechanical component with an hourglass icon and a droplet, no visible text or symbolsnatural_image
Close-up of a mechanical component with a checkmark icon (no text or symbols)text_image
MAX MIN COTOW GAIN OKnatural_image
Person using a steam iron on a bed (no text or symbols visible)natural_image
Illustration of a steam iron being placed with a magnified inset showing internal components (no text or symbols)natural_image
Illustration of a person using a power iron on a bed (no text or symbols visible)natural_image
Illustration of a hand pressing down on a surface with a downward arrow indicating pressure or movement (no text or symbols present)text_image
X SME MAX SILK COTRY ✓natural_image
Illustration of a hand using a steam iron to clean or brush the power (no text or symbols visible)natural_image
Illustration of a hand holding a jacket with a checkmark, against a hanger background (no text or symbols)natural_image
Illustration of a hand pressing down on a car's seat, with arrows indicating force or pressure (no text or symbols)text_image
Diagram illustrating a hand washing clothes with a warning symbol and crossed-out hand gesturenatural_image
Illustration of a person holding a fire extinguisher with a cross mark, no text or symbols presentnatural_image
Illustration of a hair iron being held by a tool, with an inset showing a close-up of the tip and label 'ECO' (no text or symbols on main subject)text_image
Diagram showing a iron iron with a magnified view of its electrical socket, marked with X and ✓ symbols indicating inspection or disassembly.text_image
Illustration showing a steam iron with thermometer symbols and checkmark indicators, suggesting a warning or inspection.3 다리미가 식었는지 확인합니다.

natural_image
Illustration of a hand cleaning a seed pod with a checkmark indicating inspection (no text or symbols present)text_image
Warning symbol and illustration of a plastic bulb with a magnified view showing a spray bottle and a textured bulb.natural_image
Illustration of a hand washing a sink with a water tap and warning symbols (no text or labels)text_image
Diagram showing a hairdryer with an inset magnified view highlighting the 'ECO' and 'CLU' features.text_image
SHILBHINAS NILK COTTON LUCAN MAXnatural_image
Illustration of a steam iron with a cord and plug, no text or symbols presentnatural_image
Illustration of a hand holding a water droplet and a circular icon with an hourglass symbol (no text or labels)natural_image
Close-up of a mechanical component with a checkmark and circular detail (no text or symbols)natural_image
Illustration of a wall socket connected to a power plug with a downward arrow indicating disassembly (no text or symbols)8 다리미의 전원을 뽑으십시오.

text_image
CALC CLEANnatural_image
Illustration of a steam iron with a magnified inset showing the hook being inserted (no text or symbols)natural_image
3D rendering of a cylindrical object with curved internal structure, showing rotational arrows (no text or symbols)natural_image
Illustration of a steam iron with a magnified inset showing internal components (no text or symbols)natural_image
Illustration of a wall socket connected to a plug with a black arrow indicating direction (no text or symbols)
text_image
Diagram illustrating temperature measurement with a iron, thermometer, and hourglass icon3 다리미를 식혀주십시오.

natural_image
Hand cleaning a tiled surface with a curved pipe (no text or symbols visible)natural_image
Diagram of a bottle with internal structure and rotating arrows indicating rotation (no text or symbols)natural_image
Illustration of a steam iron with a warning symbol (no text or labels)مكواة قد بردت 2.

natural_image
Illustration of a steam iron with a checkmark indicating the iron piece (no text or symbols present)639 العربية

text_image
Diagram showing a 3D printer with an inset close-up of its internal structure labeled 'ECO' and 'CLA', likely illustrating a mechanical or electrical component.
natural_image
Illustration of a hand pressing down on a piece of iron, showing the process (no text or symbols)
text_image
MAX
natural_image
Medical illustration of a hand performing a CT scan on a patient's head (no text or labels visible)- (الكي الجاف)
طاء خزان المياه 4.
natural_image
Illustration of a hand using an iron to clean material, with a 'ECO' logo in the corner (no text on the diagram itself)natural_image
Illustration of a hand using a steam iron to clean or wear (no text or symbols)natural_image
Illustration of two iron hangers with a cross mark indicating a defect or repair (no text or symbols present)natural_image
Illustration of a steam iron with a cable, showing internal components and a separate outlet (no text or symbols)natural_image
Illustration of a hand holding a water droplet and a circular icon with an hourglass symbol (no text or labels).عملية الإحماء.
642 العربية

natural_image
Close-up of a mechanical component with a checkmark and a circular detail (no text or symbols)natural_image
Illustration of a person using a steam iron on a bed (no text or symbols visible)text_image
Diagram illustrating a chemical reaction or process involving an iron on a surface, with a magnified inset showing the step and structural change.
natural_image
Illustration of a person using a steam iron on a bed (no text or symbols visible)
natural_image
Illustration of a hand pressing down on a surface with a downward arrow indicating motion (no text or symbols)
text_image
X Solutions RILK COTCH UNT MAX ✓العربية 643
لا بخار/الكي الجاف
荣
natural_image
Illustration of a hand using an iron on a machine, with a downward arrow indicating motion (no text or symbols present)natural_image
Illustration of a hand holding a jacket with a checkmark and arrow, next to a garment hanging on a hanger (no text or symbols)
natural_image
Illustration of a hand applying a cotton swab to a garment, with arrows indicating force direction (no text or symbols)
text_image
Safety warning illustration showing hand protection symbols with a cross and smoke iconsملابس المعلقة 2
natural_image
Illustration of a person holding a bottle with a cross mark, no text or symbols presentالتنظيف والصيانة
[NO TEXT]
natural_image
Illustration of a hair iron with a magnified inset showing internal components (no text or symbols)- لة بمصدر|^ر طاقة

text_image
Diagram showing an iron iron with a close-up of its electrical socket, marked with X and ✓ symbols indicating inspection or validation.مكواة قد بردت 3.

text_image
Image showing an iron (£) with temperature and checkmark indicators, alongside a thermometer and 'X' symbol.عَة قماش رطبة 4.

natural_image
Illustration of a hand cleaning a seed pod with a checkmark indicating inspection (no text or symbols present)646 العربية

text_image
Warning symbol and product image showing a bottle, paintbrush, and tip with an exclamation marknatural_image
Illustration of a stainless steel faucet with warning symbols (no text or labels)م المياه الجارية.5.
Calc-Clean
natural_image
Illustration of a hairdryer with a magnified inset showing internal components (no text or symbols).
"الكي الجاف 2

text_image
MAX
text_image
SILKINIUS NON COTTON UAN MAIX SILKINIUS MAX
natural_image
Illustration of a steam iron with a plug inserted, showing internal components (no text or symbols)
natural_image
Illustration of a hand holding a water droplet and a circular icon with an hourglass symbol (no text or labels)
natural_image
Close-up of a mechanical component with a checkmark and magnified detail (no text or symbols)العربية 647
- (الحد الأقص) 3.
1 (الحد الأقصى) 4.
سر إذا لزم الأمر.
WOA QIDI 6.
ن ضوء المؤشر. 7.
648 العربية

natural_image
Illustration of a wall socket connected to a plug with an arrow indicating power flow (no text or symbols)- ن مصر الطاقة

text_image
CALC CLEANيئات Torres من 9
natural_image
Illustration of a steam iron with a magnified inset showing the ear and neck (no text or symbols)الي دقيقتين. قد 10
natural_image
Illustration of a stylized bottle with decorative patterns and rotating arrows (no text or symbols)لك حول قاعدتها 11.

natural_image
Illustration of a steam iron with a magnified inset showing internal components (no text or symbols)ال tangزين
[NO TEXT]
- "الكي الجاف
649 العربية
ن مصر الطاقة.

natural_image
Illustration of a wall socket connected to an electrical plug with a power cord (no text or symbols)
text_image
Diagram illustrating temperature measurement with an iron, thermometer, and hourglass symbols
natural_image
Close-up of a hand using a tool to clean or store floor tiles (no text or symbols visible)
natural_image
Illustration of a bottle with swirling patterns and a coiled cord, no text or symbols presentدَع المكواة تبرد.3.
أي مياه متبقية. 4.
لرئيسي للمكواة.5.
فهرست مطالب
natural_image
Illustration of a steam iron with a warning symbol (no text or labels)دنک شده باشد. 2.

natural_image
Illustration of a steam iron with a checkmark indicating the iron piece (no text or symbols present)653 فارسی

natural_image
Illustration of a steam iron being placed with a magnified inset showing the internal structure (no text or symbols)[Symbol]
( انتخاب شود 3.

natural_image
Illustration of a hand pressing down on a piece of iron (no text or symbols visible)ن آب را باز کنید.

text_image
MAX- خوشبوکننده
natural_image
Medical illustration of a hand holding a small object on a metallic surface (no text or symbols)را محكم بندید.6
تنظيم دما
natural_image
Illustration of a hand using an iron to clean material, with a 'ECO' logo in the corner (no text on the diagram itself)natural_image
Illustration of a hand using a steam iron to clean or wear a white surface, with a circular icon showing a roof symbol (no text or symbols present)natural_image
Illustration of a pair of ironing machines with a cross mark indicating the iron piece (no text or symbols present)إحت قرار دهید.

natural_image
Illustration of a steam iron with a plug inserted, showing internal components (no text or symbols)گیرد. در صورت 4

natural_image
Illustration of a hand holding a water droplet and a circular icon with an hourglass symbol (no text or labels)روشن می ماند.5.
656 قارسی

natural_image
Close-up of a mechanical component with a checkmark and a magnified circular detail (no text or symbols)س گاهی به طوره
ثابت روشن مى شود.
اتو کردن با بخار

text_image
ECO ECOnatural_image
Illustration of a person using a steam iron on a bed (no text or symbols visible)آزاد خواهد شد2
657 فارسی
اتوى خشک/بدون بخار
荣
- خار قرار دهید

text_image
Diagram illustrating a hair iron being heated by an electric shock, with magnified view showing the shock effect.
natural_image
Illustration of a person using a steam iron on a bed (no text or symbols visible)
natural_image
Illustration of a hand using an iron on a surface with a downward arrow indicating motion (no text or symbols)
text_image
X SYSTÈNCÈS MAX SILK CÔTLE U √، تمام مى شود.
اسپری آب
图
ازل اسپری شود 1
تقویت افقى بخار
ر دسترس است 1
658 قارسی

natural_image
Illustration of a hand using an iron on a machine, with a downward arrow indicating motion (no text or symbols present)ی سخت برطرف 2
شوند.
تقویت عمودی بخار
. ر دسترس است 1

text_image
X SINNATICA MAX SINN V
natural_image
Illustration of a hand holding a jacket with a checkmark and arrow, next to a garment hanging on a hanger (no text or symbols)
natural_image
Illustration of a hand applying a cotton swab to a garment, with arrows indicating force direction (no text or symbols)
text_image
Safety warning illustration showing hand protection symbols with a cross and smoke iconsnatural_image
Illustration of a person holding a bottle with a cross mark, no text or symbols present
natural_image
Illustration of a hair iron with a magnified inset showing internal components (no text or symbols)
text_image
Diagram showing a hair iron with an electrical socket and a checkmark indicating disassembly or repair.
text_image
Diagram showing an iron with temperature indicators and a checkmark indicating cancellation or rejection.
natural_image
Illustration of a hand cleaning a corn cob with a checkmark indicating inspection (no text or symbols)text_image
Warning symbol and product image showing a bottle, paintbrush, and tip with an exclamation marknatural_image
Illustration of a stainless steel faucet with warning symbols (no text or labels)وييد/تميز نكنید.5
رسوب زدایی
natural_image
Illustration of a hair iron with a magnified inset showing a close-up of the handle (no text or symbols present)
وی خشک) قرار 2
داشته باشد.
661 قارسی
- پر کنید MAX

text_image
MAX- قرار دهید MA

text_image
SILKINAS Non Silk Cotton U-EN MAXن را روشن کنید.5

natural_image
Illustration of a steam iron with a plug and cord, no text or symbols presentگرم شدن است.6.

natural_image
Illustration of a hand holding a water droplet and a circular icon with an hourglass symbol (no text or labels)و خاموش شود.

natural_image
Close-up of a mechanical component with a checkmark and magnified detail (no text or symbols)662 قارسی

natural_image
Illustration of a wall socket connected to a plug with a black arrow indicating direction (no text or symbols)را از برق بکشید. 8

text_image
CALC CLEANو نرات رسوب ازو
natural_image
Illustration of a steam iron with a magnified inset showing the ear and neck area (no text or symbols)ود 2 دقيقه طول 10
natural_image
Illustration of a bottle with decorative patterns and rotating arrows (no text or symbols)natural_image
Illustration of a steam iron with a magnified inset showing internal components (no text or symbols)نگلهداری
شک) قرار گیرد.1.
[NO TEXT]
663 قارسی
را از برق بکشید.

natural_image
Illustration of a wall socket connected to a plug with an arrow indicating direction (no text or symbols)
text_image
Diagram illustrating temperature change with an iron, thermometer, and hourglass symbols
natural_image
Hand cleaning a tiled surface with a curved pipe (no text or symbols visible)
natural_image
Illustration of a bottle with swirling patterns and a small object attached (no text or symbols)د اتو خنک شود.
ب بيرون بريزید.
٥ اتو جمع کنید.
PHILIPS and the Philips Shield Emblem are registered trademarks of Koninklijke Philips N.V. and are used under license.
This product has been manufactured by and is sold under the responsibility of Versuni Holding B.V., and Versuni Holding B.V. is the warrantor in relation to this product.
2025 © Versuni Holding B.V.
642001018300 (12/2025)
