FX-KS262 - Saw Fuxtec - Free user manual and instructions
Find the device manual for free FX-KS262 Fuxtec in PDF.

User questions about FX-KS262 Fuxtec
0 question about this device. Answer the ones you know or ask your own.
Ask a new question about this device
Download the instructions for your Saw in PDF format for free! Find your manual FX-KS262 - Fuxtec and take your electronic device back in hand. On this page are published all the documents necessary for the use of your device. FX-KS262 by Fuxtec.
USER MANUAL FX-KS262 Fuxtec
natural_image
Illustration of a chain-linking power tool with visible blade and handle (no text or symbols)
natural_image
Orange icon of a person reading a book (no text or symbols)
Inhalt
DEUTSCHE VERSION....4
ENGLISH VERSION 29
VERSION FRANCAISE ....52
POLSKA WERSJA JEZYKOWA....204
DEUTSCHE VERSION
Verwendete Symbole

WARNUNG!
- Motor,
- Auspuff,
- Benzintank.
text_image
Technical diagram of a chain-linking device with numbered parts and close-up insets for assembly details.natural_image
Technical line drawing of a mechanical assembly with gears and levers (no text or symbols)text_image
Technical diagram of a mechanical device with numbered parts and directional arrows indicating assembly or component alignment.natural_image
Technical diagram of a vehicle's wheel assembly and valve mechanism, showing front and side views (no text or labels)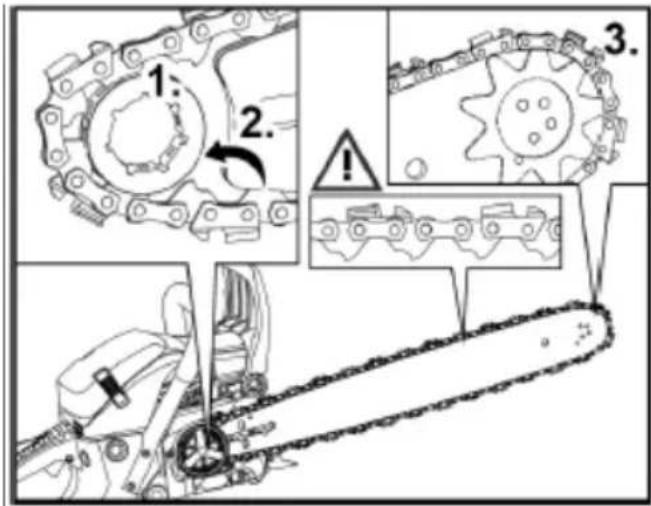
text_image
Technical diagram illustrating gear meshing process with numbered steps and warning indicatorstext_image
Technical diagram of a mechanical assembly with labeled components and warning indicatorstext_image
1-2mm 1. + 2.text_image
1. Can't change the end of the following year. 'Adequate use of the other resources, persons and people. See the date, see the reporting of the current date, and the number. December 2016.'text_image
Technical diagram showing mechanical assembly with labeled components and a close-up of a device panel with Chinese labels.natural_image
Mechanical assembly diagram showing a tool interacting with a component, no text or symbols presentnatural_image
Technical diagram of a vehicle dashboard with internal components and directional arrows indicating assembly (no text or symbols)natural_image
Technical line drawing of a mechanical component with arrows indicating motion or assembly (no text or symbols)natural_image
Technical line drawing of a mechanical assembly with no visible text or symbolstext_image
Technical diagram showing a mechanical component with labeled parts O, P, and Q, including an arrow indicating direction.text_image
Technical diagram showing three steps of a mechanical assembly with labeled components and directional arrows indicating movement.natural_image
Technical line drawing of a mechanical assembly with no visible text or symbolstext_image
Technical diagram showing mechanical assembly with labeled parts and directional arrows indicating motion or movement.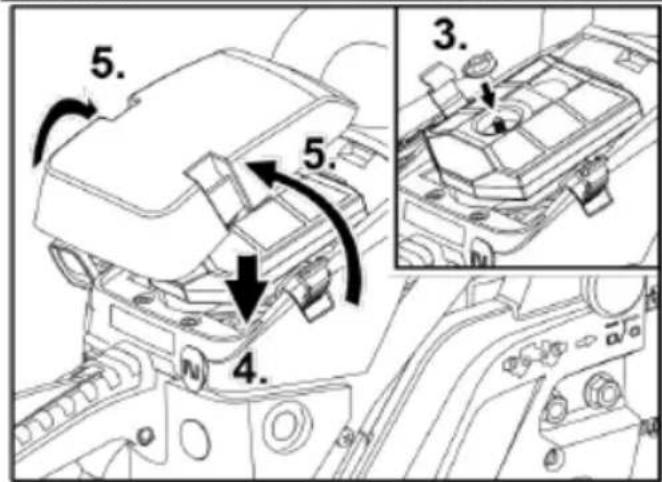
text_image
5. 5. 4. 3.Zündkerze montieren
Symbols used in this manual

WARNING!
Denotes impending danger. Non-observance of this warning may result in death or extremely severe injuries.

CAUTION!
Denotes a potentially dangerous situation. Non-observance of this warning may result in injury or damage to property.

NOTE
Denotes tips for operation and important information.
Symbols on chainsaw

Opening for refilling "MIX GAS-OLINE" 40:1
Location: Above fuel cap
Opening for refilling chain oil
Location: Above oil cap

Switch notices: Pressing the switch to the "O" (STOP) position switches off the engine.
Location: On left next to
ON/OFF switch handle


text_image
1 O ↓ Drossel RUN |Pulling the choke button (see page 11, no. 16) as far as the arrow allows the starting mode to be adjusted as follows:
Position 1 when engine is cold.
Position 0 when engine is hot.
Location: On front of air filter cover

The directions indicate when the chain brake is released (white arrow) and activated (black arrow).
Location: On front of chain cove

Cable starter with Easy Start function. To start the machine, preload the starter spring by pulling slowly and evenly. It is not necessary to yank it. Do not pull beyond the dead centre point as the cable could otherwise snap.

If the screw is turned with a screwdriver in the direction of arrow to the "MAX" position, oil flow is stronger. Turning to the "MIN" position results in oil flow being weaker.
Location: On bottom of device
14. Warning notices sign
The chainsaw has a sign with WARNING NOTICES.

text_image
FUXTEC FUXTEC GMBH KAPPSTRABE 69 71083 HERRENBERG GERMANY 61.5cm³/10300min⁻¹ Schnittlänge:450mm KEITTENSÄGE FX-KS262 Baujahr SERENNUMMER: FX-KS262.00001 eP*2016/162B*2016/1628SH81/P*1259*00 (V)The pictograms on the sign mean the following:

natural_image
Two empty rectangular frames with no text, numbers, or symbolsRead the operating instructions before use
Wear a helmet, protective goggles and ear defenders

natural_image
Five empty rectangular boxes arranged vertically (no text or symbols)Use the chainsaw with both hands only
Warning! Caution! Danger of kickback
The warning messages in the operating instructions and on the equipment must be read and understood
Wear approved safety footwear with a non-slip sole
Wear approved safety gloves
Guaranteed noise level WA
Important safety information

WARNING!
Before using the chainsaw, read the following and take the necessary action:
– These operating instructions
- The operating instructions of the supplied accessories
- The currently valid site rules and regulations for the prevention of accidents.
15. Users
■ The chainsaw is not intended for use by persons with a physical, sensory or mental disability or insufficient experience and/or knowledge.
■ Never allow children to use the chainsaw or persons who have not received proper instruction.
■ Ensure that children and unauthorised persons are kept away from the chainsaw.
16. Intended use
The chainsaw is designed exclusively for the following:
- For cutting branches, tree trunks, square timber up to a diameter appropriate for the length of cutting rail used.
- In the way detailed in the descriptions and safety instructions of the operating manual.
■ Only materials made of wood may be cut.
■ Measures must be taken to ensure that suitable personal protective equipment is worn during use in accordance with the operating instructions. All other operations, such as professional tree surgery within the tree, are explicitly excluded. - The user/operator – not the manufacturer – is liable for any damage or injury arising from improper use. Only saw chain/cutting rail combinations suitable for the machine may be used as specified in the operating instructions.
■ Intended use specifically includes the observation of all safety instructions and operating instructions in the operating manual. Persons who operate and service the chainsaw must be familiar with it and acknowledge and observe all of the potential hazards.
■ Furthermore, the applicable accident prevention regulations must be strictly adhered to.
■ The general rules of occupational health and safety must be observed without fail. This chainsaw is intended for use in open areas only (e.g. garden, woodland).
■ Any other use breaches the intended use.
■ A breach of the intended use will render the warranty void and the manufacturer will accept no responsibility.
■ The user is liable for all damage to third parties and their property.
■ Do not use the equipment unless it is technically sound as prescribed and supplied by the manufacturer.
■ Unauthorised modifications to the equipment will render the warranty void and the manufacturer will accept no liability for any resulting damage.
17. General safety instruc-
tions

WARNING!
Read all safety instructions and general instructions. Failure to observe the safety instructions and information can cause a fire and/or severe injury.
Keep all warnings and instructions for future reference.
■ Never operate the chainsaw if fatigued or excited or otherwise in a physically unfit state.
■ Do not under any circumstances work with the chainsaw if medication with a calming effect and/or drugs have been taken.
■ Do not leave the engine running in enclosed rooms or buildings. The emissions contain dangerous carbon monoxide.
■ Do not saw in inclement weather, if vision is impaired or temperatures are extremely high or low.
■ Make sure on a trunk to be sawn that there are no dry branches that could break off.
■ Wear non-slip footwear, close-fitting workwear, protective goggles, ear defenders and a safety helmet.
■ Always wear certified safety gloves with cut protection when working with the chainsaw.
■ With the exception of the measures listed in these operating instructions, have all maintenance work on the chainsaw carried out by authorised and qualified maintenance personnel.
■ Exercise particularly caution when cutting bushes and undergrowth as thin branches could get caught in the chain, throw you off balance and cause injuries.
■ Be aware of potential kickback when cutting a branch under load.
■ Always perform cleaning and maintenance measures before placing in storage.
■ Make sure that the chainsaw is always switched off before performing assembly, adjustment and maintenance measures.
■ Note that maintenance carried out incorrectly, the use of spare parts that do not
conform to the standard or the removal of or modification to safety devices and guards could cause damage to the equipment and very serious injuries.
- Check at regular intervals that the saw chain stops turning when the engine is running at idle.
■ Never allow the chainsaw to fall into the hands of unauthorised persons and children!
■ Note that national regulations may restrict the use of the machine.
■ Check the chainsaw before use for significant damage and defects.
■ It is good practice before using the chain-saw to receive induction training.
■ Only use saw chains and safety devices prescribed by the manufacturer. The use of other tools and accessories increases the risk of injury to the user.
■ Always keep the chainsaw is good condition.
■ The chainsaw is fitted with bumper spikes (dog teeth). Always place the bumper spikes against the trunk when cutting. The bumper spikes serve as a means of operating the chainsaw safely and easily. It improves the operator's stability when cutting. It can be anchored in the wood and, in this way, used as a pivot point.
■ Always start sawing as evenly as possible and close to the bumper spikes.
Kickback and relevant precautionary measures
Attention! Chainsaw kickback can be caused by the following:
■ Contact of the guide rail tip with a solid object.
■ Wood being cut compressing and clamping the guide rail.
Contact of the guide rail tip with a solid object may cause sudden kickback. The guide rail could be kicked back upwards towards the operating person at speed.
If the saw chain becomes clamped in the upper part of the guide rail, it could cause a rapid backward motion towards the operating person.
If one of these events takes place, control over the chainsaw could be lost. This could result in serious injury.
Therefore, do not rely exclusively on the integrated safety features of the chainsaw. The user of the chainsaw must take the necessary precautions himself/herself to ensure that all work with the saw can be carried out free of accident and injury.
■ Always hold the chainsaw with both hands when the engine is running. Place the right hand on the rear and the left hand on the front handle. Grip the handles firmly with the whole hand. A firm grip reduces the effects of kickback and helps to keep the equipment under control.
■ Ensure that the work area is free of obstacles. Make sure that the tip of the guide rail does not come into contact with other trunks, branches or obstacles when cutting. This can cause an accident.
■ Always make cuts with a high engine speed.
■ Good balance is important when cutting. Do not stretch arms too far forwards.
■ Do not cut above shoulder height.
■ Heed the instructions of the manufacturer when performing maintenance and when sharpening the chain.
■ Only install manufacturer-recommended spare parts if the guide rail or saw chain need replacing.
Danger of suffocation from carbon monoxide!
■ Only allow the combustion engine to operate in open spaces.
Danger of explosion and fire!
Petrol vapour is explosive and petrol is highly inflammable.
■ Fill with fuel before starting the engine. Keep the tank closed when the engine is running and if the engine is still hot.
■ Only refuel when the engine is switched off and cooled down. Avoid naked flames and sparks. Do not smoke. Only refuel the equipment in the open.
■ Do not start the engine is fuel has spilled. Take the chainsaw away from the fuel-contaminated area and wait until the fuel vapours have evaporated.
■ To avoid the risk of fire, make sure that the following parts are not contaminated with leaked oil or fuel:
- Engine
- Exhaust
- Fuel tank.
Work area safety
- Keep the work area clean and well lit. Cluttered or dark work areas can cause accidents.
■ Do not work with the chainsaw in areas at risk of explosion. This applies in particular to areas in which there are flammable liquids, gas or dust. - Keep children and other unauthorised persons away from the work area when using the chainsaw. Distractions can cause loss of control over the chainsaw.
Personal safety
■ Stay alert, watch what you are doing and use common sense when operating the chainsaw. Do not use the chainsaw when tired or under the influence of drugs, alcohol or medication.
Even a small distraction when working with the chainsaw can cause serious injuries.
■ Use personal protective equipment. Always wear eye protection. Wearing personal protective equipment, such as a dust mask, non-slip safety footwear, safety helmet and ear defenders, reduces the risk of injury.
■ Wear suitable clothing. Do not wear loose clothing or jewellery. Keep hair, clothing and gloves away from moving parts. Loose clothes, jewellery or long hair can be caught in moving parts.
■ Do not overreach. Keep proper footing and balance at all times. This facilitates better control of the chainsaw in unexpected situations.
Residual hazard
Even when the tool is used correctly there is always a residual hazard that cannot be ruled out. Through the type and design of the chainsaw, the following potential hazards can be eliminated:
- Contact with the unprotected saw chain (cutting injuries)
- Reaching into the turning saw chain (cutting injuries)
– Unexpected, sudden movement of the guide rail with a tensioned saw chain (cutting injuries) - Parts being thrown off the saw chain
- Parts being thrown off the wood being cut
- Hearing damage if suitable ear defenders are not worn
- Inhalation of wood particles and exhaust emissions from the combustion engine
- Skin contact with petrol
Additional safety instructions
■ Switch off the chainsaw under the following conditions:
- If the equipment is left unattended.
– Before checking, cleaning or other measures on the equipment.
- If the equipment starts to vibrate heavily.
■ Before cutting, make sure that there are no persons (particularly children) or animals in the work area.
■ Only use the chainsaw in dry weather. Do not expose the chainsaw to rain and damp conditions.
■ Ensure that the saw chain does not come into contact with the ground or other objects.
■ Wait until the chainsaw has come to rest before placing it down.
■ Do not leave the equipment unattended during work breaks and keep it in a safe place.
■ Always switch off the chainsaw before transporting it to other work areas.
■ Make sure that all protective devices and handles are mounted before using the equipment.
■ Under no circumstances should a chainsaw be used if it is incompletely assembled or has had unauthorised modifications.
■ Do not use the equipment unless it is technically sound as prescribed and supplied by the manufacturer. The manufacturer will accept no liability for any resulting damage from unauthorised modifications to the equipment.
- Spare parts must meet the requirements specified by the manufacturer. Therefore, only use genuine spare parts or spare parts approved by the manufacturer. This will ensure that the safety of the chainsaw is maintained. Observe the installation instructions supplied with the parts during replacement.
■ Have repairs carried out exclusively by a qualified specialist or in a specialist workshop.
■ If the cutting mechanism makes contact with a foreign body or the chainsaw makes unusual noises or vibrates, switch off the chainsaw. Wait until the chainsaw has stopped.
- Inspect the equipment for damage.
- Check the equipment for loose parts and tighten them if necessary.
- Have damaged parts replaced or repaired, ensuring that the correct specification of spare parts is observed when doing so.
■ Before commencing work, familiarise yourself in detail with how to operate the chainsaw.
Take the following action:
Noise and vibration
i NOTE
Values for noise levels and total vibrations can be gleaned from the "Technical data" table.
CAUTION!
The indicated measurements refer to new power tools. Daily use causes the noise and vibration values to change.
i NOTE
The vibration level specified in these instructions was measured in accordance with a standard test procedure that meets the requirements of EN 60745.
If the chainsaw is not maintained properly, the vibration level could be affected during operation. This may significantly increase the vibration load over the total working period.
To estimate the vibration load more accurately, the times should also be taken account of during which the equipment is switched of. This may significantly decrease the vibration load over the total working period.

CAUTION!
Wear ear defenders at a sound pressure above 85 dB(A).
Information about noise development

CAUTION!
The actual vibration emissions value during operation of the machine may deviate from that specified in the operating instructions or by the manufacturer. This could be influenced by the following factors, which should be taken account of before and during use:
– Is the chainsaw being used correctly?
- Is the procedure during processing and cutting of the wood correct and appropriate?
- Is the machine in a good state of repair, is the sharpness of the cutting tool OK and is the correct cutting tool being used?
- Are the handles or, if necessary, optional vibration damping handles fitted and are these firmly attached to the machine body?

NOTE
There may be national regulations (environmental, occupational safety) that restrict use of the chainsaw.
This is loud equipment and the noise cannot be avoided. For longer periods of operation, make sure that it is used during authorised and dedicated times. Respect quiet periods where required and do not make more noise than necessary. Ensure, for personal safety,
that hearing protection is worn by the operator and persons in the vicinity.
■ All of the aforementioned precautions are not enough to prevent vibration white finger or carpal tunnel syndrome.
- Keep an eye on the condition of your hands and fingers if you are a frequent or regular user.
If you experience any unpleasant feeling in your hands or skin discolouration during use of the machine, stop work immediately. Seek medical assistance without delay in the event of one of the above symptoms.
■ Take a sufficient number of breaks from work. Failure to take sufficient breaks from work can cause hand-arm vibration syndrome.
■ Depending on the workload, therefore, estimate the degree of exposure from chain-saw use. Reduce the risk of being exposed to vibrations in doing so.
■ Make a work plan. The vibration load can be reduced in this way.
■ Minimise use of the chain saw at temperatures below 10^ C.
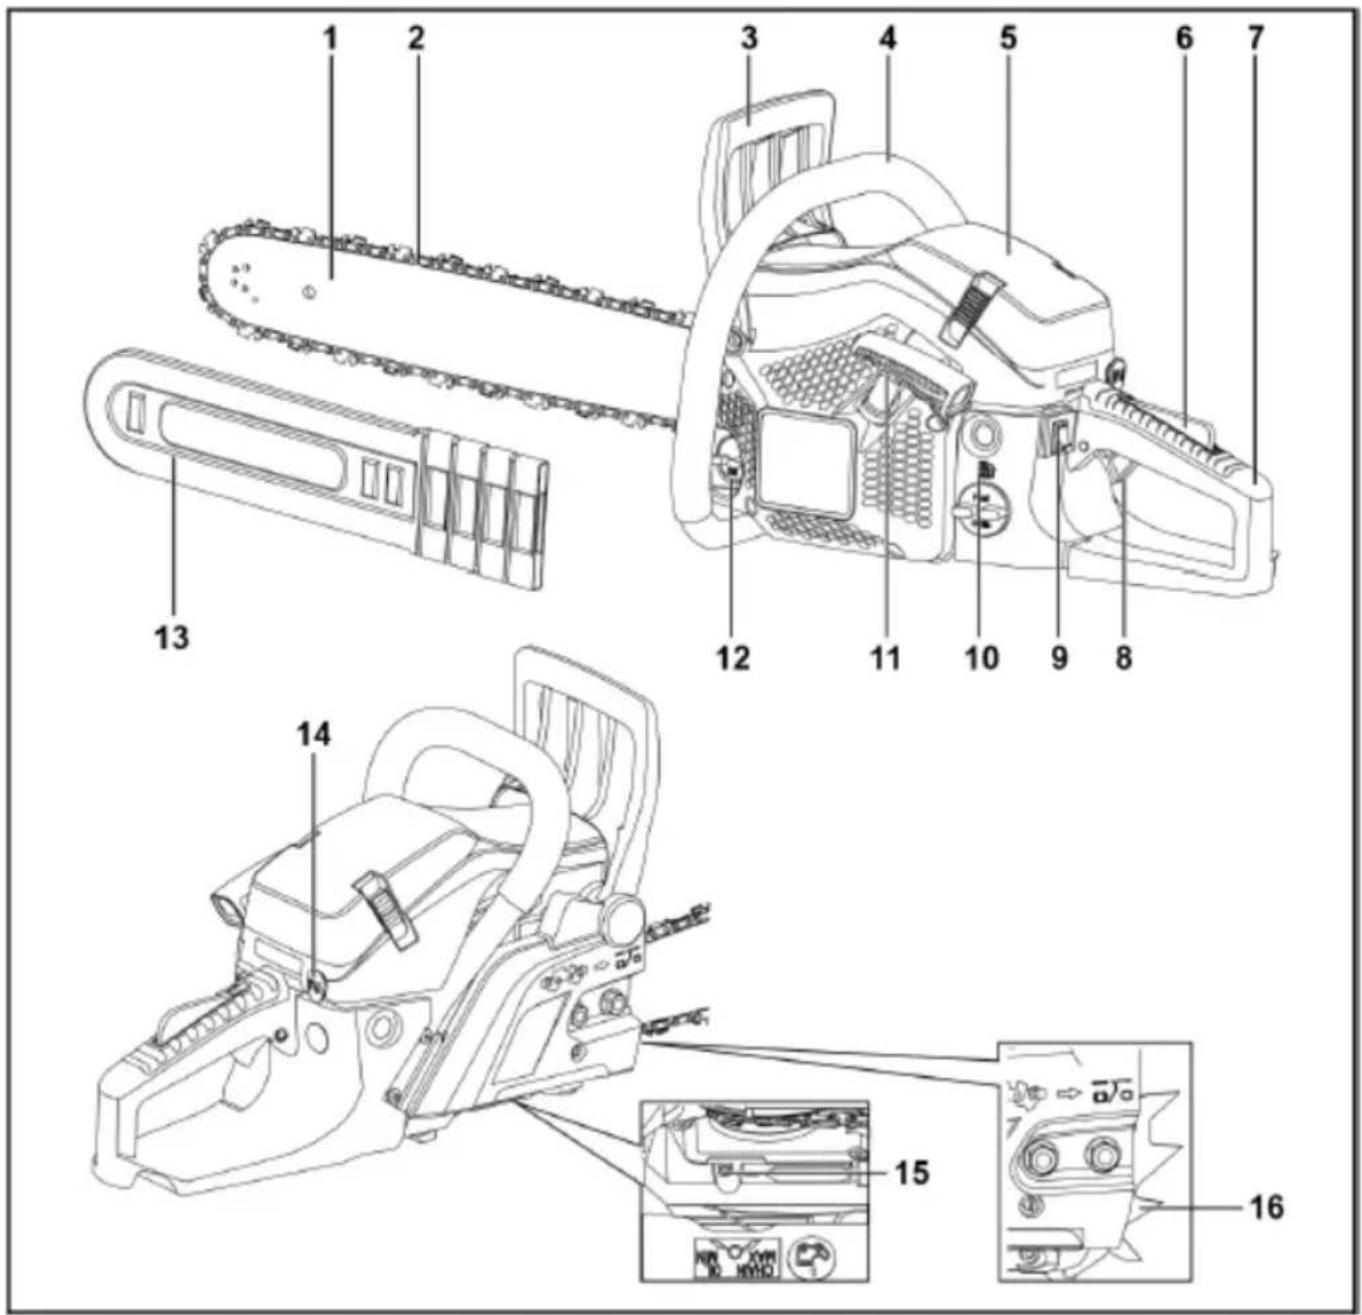
Overview
text_image
Technical diagram of a chain drive with numbered parts and close-up insets for assembly or maintenance.1 Guide rail
2 Saw chain
3 Front hand guard/chain brake lever
4 Front handle
5 Air filter cover
6 Throttle trigger lock
7 Rear handle
8 Throttle trigger
9 Stop switch
10 Fuel tank
11 Starter handle
12 Oil tank
13 Transit cover
14 Choke
15 Setting screw for oil dosing
16 Bumper spikes (dog teeth)
Technical specifications
| Designation | Unit | Type/value | |
| Chain saw model | FX-KS255 | FX-KS262 | |
| Weight (motor saw without guide rail, saw chain; tanks empty) | kg | 5.2 | |
| Fuel tank | ml | 550 | |
| Lubricating oil tank | ml | 260 | |
| Cutting length of the guide bar | cm | 45.7 | 50.8 |
| Chain spacing | " / mm | 0.325 / 8.255 | |
| Thickness of drive links | " / mm | 0.058 / 1.47 | |
| Spark plug | L8RTF | ||
| Carburettor | MC16A20-23/Hualong | ||
| Capacity | cm^3 | 54 | 61.5 |
| Engine output | kW | 2.3 | 2.85 |
| Maximum engine speed | rpm | 12,500 | |
| No load speed | rpm | 3000 ± 300 | |
| Minimum clutch speed | rpm | 4500 | |
| Maximum chain speed | m/s | 24.1 | |
| Vibrations(as per DIN EN ISO 22867)front handlerear handle | m/s^2 m/s^2 | 7.5 (K=1.5)8.0 (K=1.5) | 7.5 (K=1.5)8.0 (K=1.5) |
| Sound pressure(as per DIN EN ISO 22868) | dB(A) | 101 (KpA=3) | |
| Measured sound power level | dB(A) | 113,2 (KpA=3) | |
| Guaranteed sound power level | dB(A) | 117 | |
| Possible combinations of guide rail / saw chain-1 | ||
| Guide rail, 18" | Kangxin | BE18-72-5810P |
| Saw chain, 18" | Kangxin | B-58-72S |
| Possible combinations of guide rail / saw chain-2 | ||
| Guide rail, 20" | Kangxin | BE20-76-5812P |
| Saw chain, 20" | Kangxin | B-58-76S |
Use only spare parts that have been approved and listed in these operating instructions. The use of unauthorised spare parts can seriously injure the operating personnel.
Instructions for use

WARNING!
Switch off the chainsaw under the following conditions:
- If the equipment is left unattended.
- Before checking, cleaning or other measures on the equipment.
- If the equipment starts to vibrate heavily.
18. Before initial operation
Unpack the device and check that there are no missing or damaged parts.

NOTE
Notify the supplier or manufacturer of defective or missing parts without delay!
Adjustments before use

WARNING!
Before any work on the components of the petrol chainsaw, the equipment must be made safe and secured against unauthorised activation.

CAUTION!
Do not replenish the fuel mixture and chain saw oil in the required quality until all of the necessary assembly, adjustment and inspection tasks have been carried out on the chainsaw.
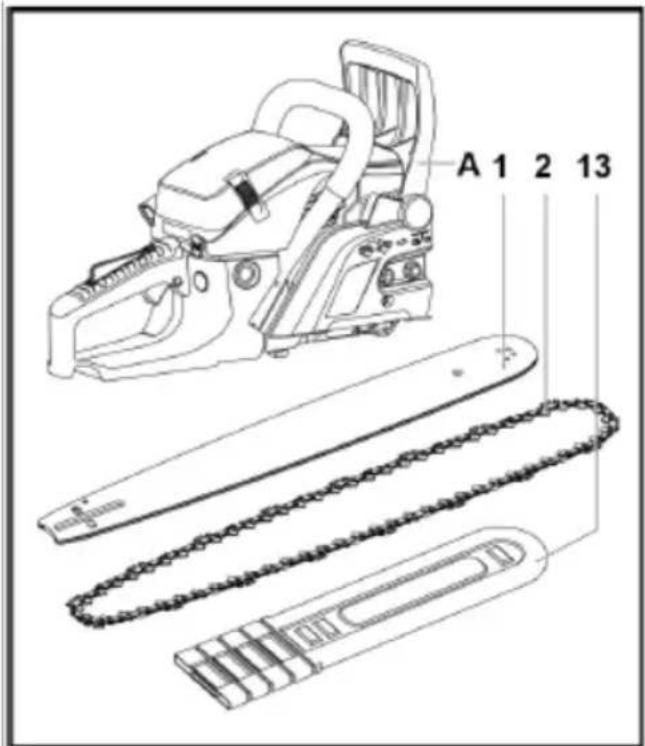
Items supplied

CAUTION!
The teeth of the saw chain are extremely shaded. Always wear gloves when fitting the saw chain items included with the equipment:
1 Guide rail (chain sword)
2 Saw chain
13 Transit cover
14 Bumper spikes with 2 hexagon socket head bolts
A Drive unit
B Mixing bottle for fuel-oil mixture
C Spark plug wrench
D Screwdriver for oil volume setting
E Small hexagon key
F Large hexagon key
G Round file
H Hexagon socket head bolts
I Spare parts:
Oil pump rotor (wear part)
Recommendation: Replacement by specialist only.
text_image
A 1 2 13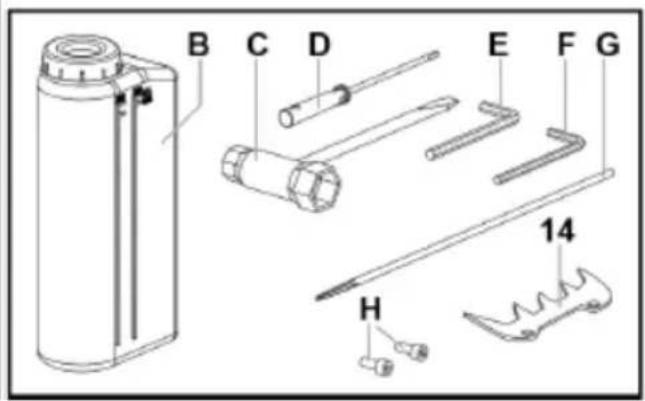
text_image
B C D E F G 14 HBumper spike assembly
natural_image
Technical line drawing of a mechanical assembly with gears and levers (no text or symbols)■ Screw the bumper spikes (14) firmly to the equipment with two hexagon socket head bolts (H).
Guide rail and saw chain assembly
DANGER!
Always switch off the engine and wait until it has come completely to rest before tensioning or retensioning the saw chain!
text_image
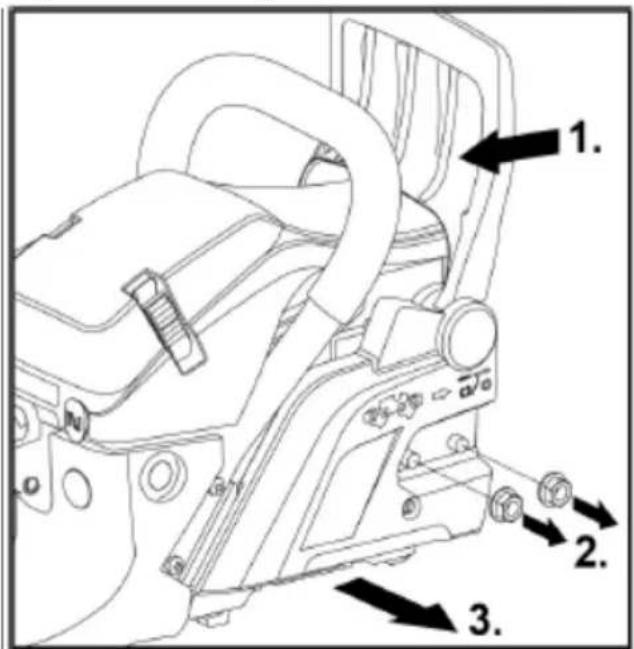
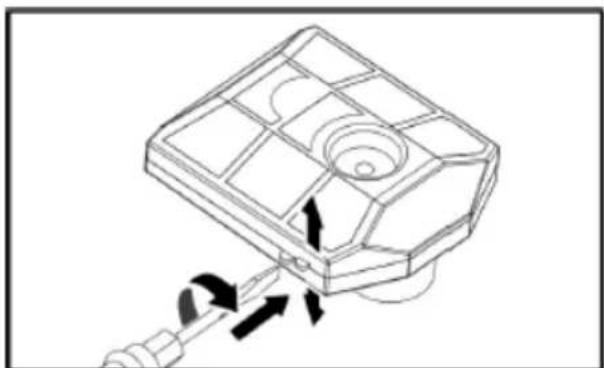
Technical diagram of a mechanical device with numbered parts and directional arrows indicating assembly or component.■ Pull front hand guard (chain brake) (3) in the direction of the front handle (4) (1.).
- Check to ensure that the chain brake is not activated.
■ Unscrew 2 nuts (2.) on the chain guard and remove the chain guard (3.).
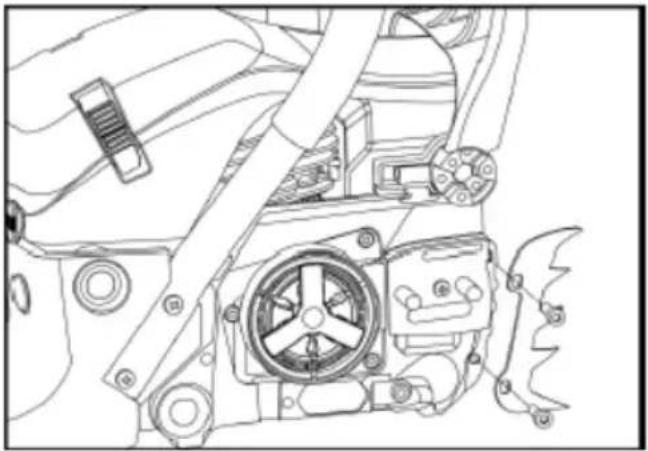
■ Place the saw chain (2) on the drive wheel.
natural_image
Technical diagram of a vehicle's wheel assembly showing front and side views (no text or labels)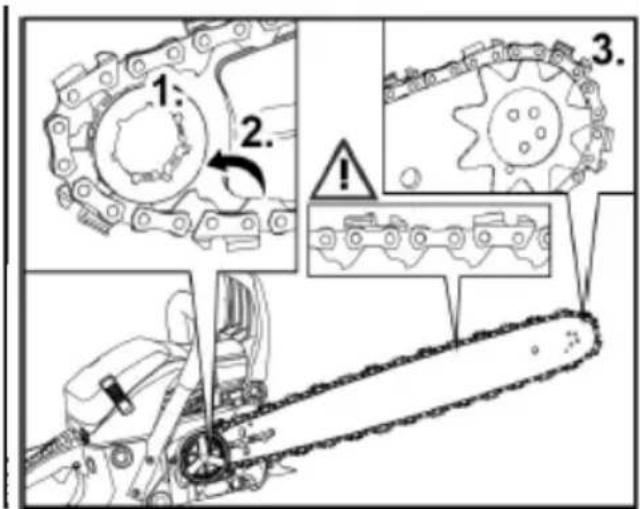
text_image
Technical diagram illustrating gear meshing process with numbered steps and warning symbols■ Through the elongated hole, push the guide rail (1) onto the stud on the drive unit (A). First fit the saw chain on the drive wheel (1.) and then over the lower guide (2.). Then in the front part of the guide rail fit in the groove (3.) of the front gear ring (Q).
i NOTE
When inserting the saw chain in the guide rail, ensure that the saw chain is fitted correctly in the direction of saw rotation!
■ To pretension the saw chain, pull the guide rail forwards in the elongated hole.
text_image
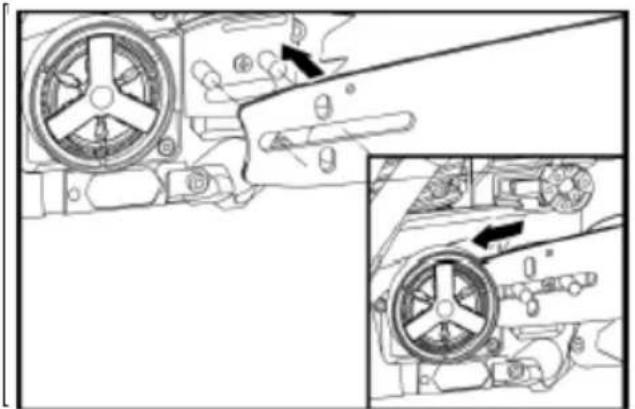
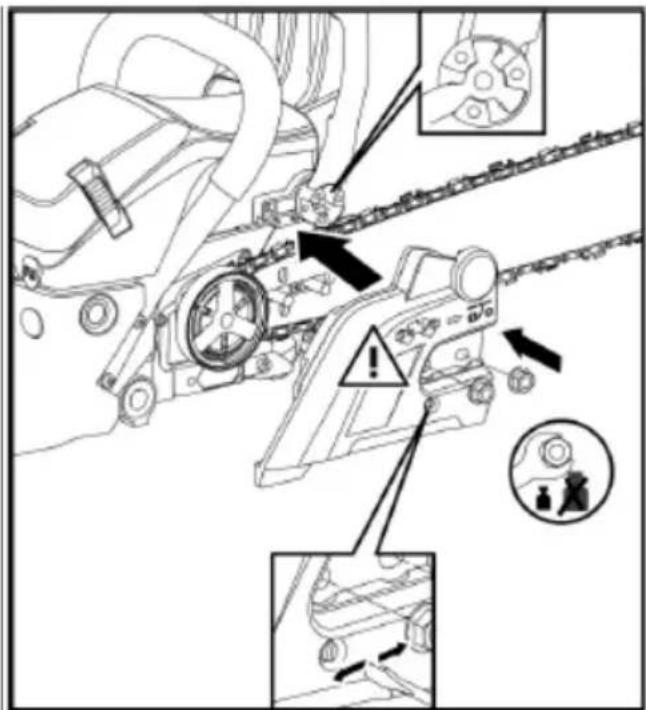
Technical diagram of a mechanical assembly with labeled components and warning indicatorsMount the chain cover again on the drive unit (A). To do this:
■ Align the stud with the mounting holes of the chain cover.
At the same time, align the carrier of the chain brake in the chain cover with positive fit with the counterpiece on the front hand guard. If necessary, move the hand guard back and forth repeatedly until the fit is positive.
■ Pull the guide rail forwards in the elongated hole and, by doing so, tension the saw chain.

text_image
1-2mm 1. + 2.■ Secure the chain guard hand-tight with the 2 nuts (2).
■ Use the chain tensioner adjusting screw (1.) to tension the saw chain and align the guide rail.
i NOTE
Only tension the saw chain sufficiently to allow it to be pulled lightly by hand along the length of the guide rail.
i NOTE
A new saw chain stretches during operation. Loose saw chains wear very quickly and can slip off the guide rail. Therefore, switch off after sawing the first few times, check the chain tension and retention as necessary.
■ Tighten the 2 nuts to a torque of 12-15 Nm (2.).
■ Push the saw chain by hand one full rotation around the guide rail and in doing so check that the chain is correctly tensioned.
19. Operation
Fuel and chain oil
CAUTION!
Never use a 4-stroke oil mixture for the fuel and oil. This mixture would cause major engine damage!
WARNING!
Danger of explosion! Observe the following:
- Keep fire and naked flames away from areas in which fuel is used and stored.
- Do not smoke when handling fuel.
- Mix and store fuel only in containers (B) approved for this purpose.
- Only replenish the fuel-oil mixture in the open.
- Wipe away leaks immediately with a clean cloth.
- Also wait for as long as necessary until the flammable components have evaporated.
Fuel-oil mixture

text_image
One document will not be registered with any other person, unless it is required, but it is false, and the following will be written out, and the letter is empty.A mixture of 2-stroke petrol and oil with anti-rusting agent for 2-stroke engines is used as fuel for the air-cooled 2-stroke petrol engine.
Recommended mixing ratio of fuel to oil 40:1.
Make sure that the petrol has a minimum octane rating of 95 RON.
Table mixing ratio 1:40
| Medium | Unit | Volume | ||
| Petrol | l | 1 | 2 | 3 |
| 2-stroke oil | ml | 25 | 50 | 75 |
| Medium | Unit | Volume | |
| Petrol | l | 4 | 5 |
| 2-stroke oil | ml | 100 | 125 |
The recommended oil for a long service life of the 2-stroke engine is FUXTEC 2-stroke oil "Made in Germany" (available directly from the manufacturer).
Replenishing fuel-oil mixture

CAUTION!
Danger of explosion!
The fuel-oil mixture develops volatile, highly inflammable gases.
Ensure when replenishing the fuel-oil mixture that no fuel spills and that there are no sources of ignition nearby.
Pour the fuel-oil mixture in the tank with care Wipe away leaks immediately with a clean cloth.
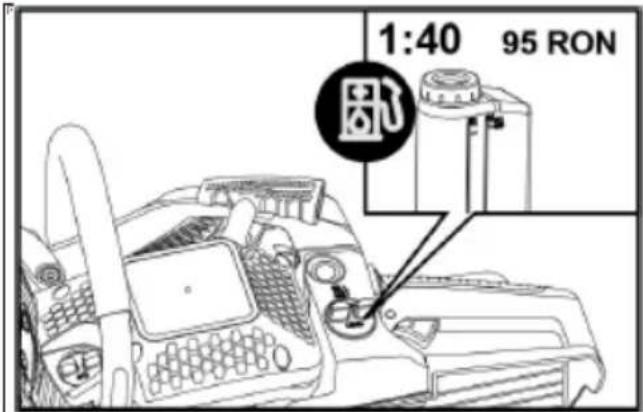
text_image
1:40 95 RONReplenishing FUXTEC chain saw oil

natural_image
Blank white image with a thin black border (no text, symbols, or markings)
CAUTION!
Never use old oil or reconditioned engine oil. Using oils of this kind can cause malfunction in the oil pump.

CAUTION!
Danger of ignition!
Ensure that no oil is spilled when filling the chain saw oil.
Therefore, exercise caution when pouring the oil into the oil tank. Wipe away leaks immediately with a clean cloth.
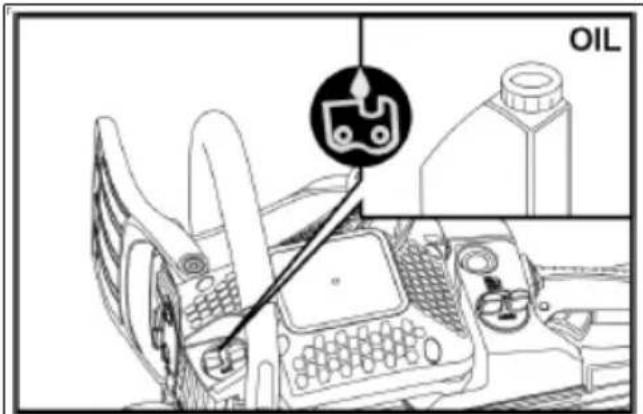
text_image
OILFor trouble-free operation and a long service life of the chain, the use of FUXTEC chain saw oil "Made in Germany" is recommended.
The oil is available directly from FUXTEC or a specialist dealer.
- Working with the chain-
text_image
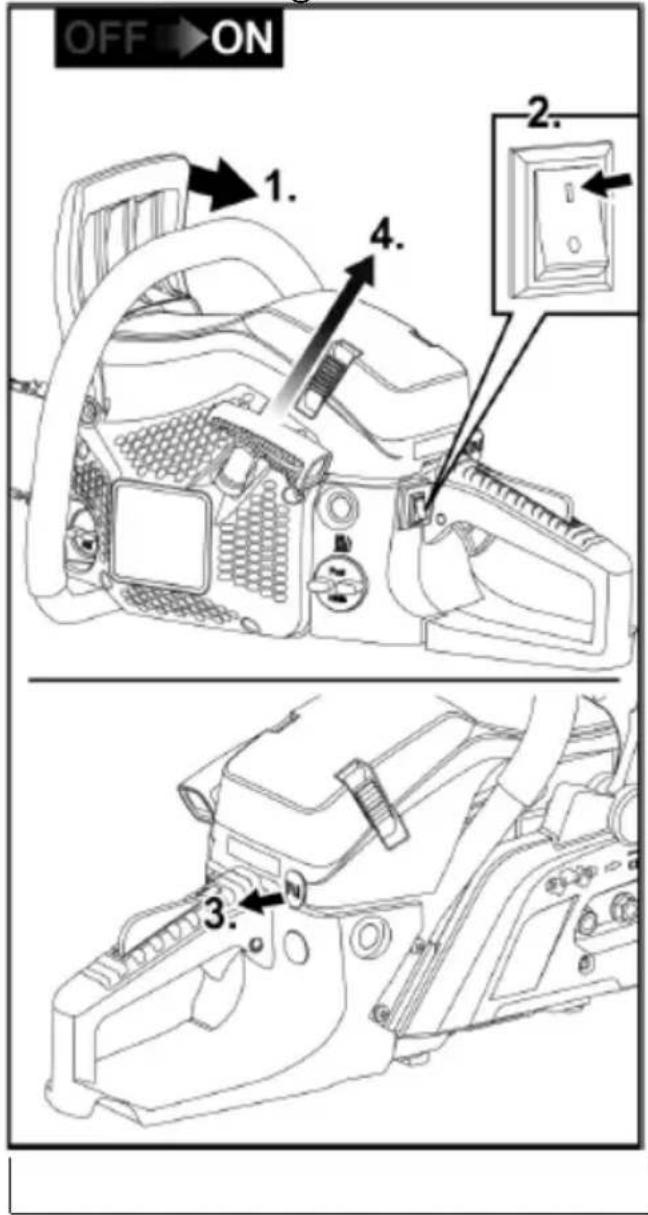
OFF ON 1. 2. 3.Prerequisites:
- The chainsaw is assembled correctly and clean.
- All of the necessary settings on the chain-saw have been carried out.
- The tank is filled with a sufficient volume of fuel-oil mixture and chain saw oil.
Cold start

CAUTION!
The chainsaw is fitted with an Easy-Start system.
Do not pull the start handle quickly or sudden

CAUTION!
Before starting the engine:
When placing on the ground to attempt to start the engine, ensure that the saw chain is not in contact with the ground.
If there is ground contact while the engine is being started there is an acute risk of accide. Components of the chainsaw could be damaged beyond repair.
■ Block the chain brake using the front hand guard. To do this, push the front hand guard forwards until it is heard to engage (1.).
■ Turn the stop switch to the "I" position (2.).
■ Remove the transit cover.
■ Pull out the choke as far as stop (3.).
■ Place the chainsaw on even ground and secure. Step into the handle recess with the right foot to do this.
■ Secure the chainsaw with the left hand on the front handle.
■ Pull out the chainsaw's starter handle on the cable until a resistance is felt. Then continually pull out the starter cable (4.) in doses 2 to 3 times until the engine begins to start.
■ Important: return the choke (14) to its original position by hand
■ Pull the starter handle (11) until the engine starts.
■ Engine starts:
- Chainsaw runs at idling speed
■ Engine does not start:
- Repeat starting procedure until engine starts.
■ Slowly and surely lift the chainsaw up off the ground. Do not touch the throttle trigger when doing this!
■ With the left hand, pull the front hand guard (chain brake lever) towards the front handle and, in doing so, release the chain brake.
- The saw chain can now run freely on the guide rail.

CAUTION!
Actuate the throttle trigger (8) only after the chain brake has been released. The clutch could otherwise be damaged.
■ The throttle trigger can now be actuated.
■ Before starting to saw, check the chain lubrication.
- To do this, place the chainsaw against a light background and open the throttle fully.
- If a slick of chain oil can be seen on the light background (e.g. sheet of paper), the chain lubrication is set correctly.
The chainsaw is ready for operation.
Stopping the engine
■ Turn the stop switch (9) to the "0" position.

CAUTION!
Risk of injury!
Before switching off the chainsaw, always allow the engine to die down!
Warm start

CAUTION!
The chainsaw is fitted with an Easy-Start system. Do not pull the start handle quickly or suddenly.
■ Block the chain brake using the front hand guard. To do this, push the front hand guard forwards until it is heard to engage.
■ Turn the stop switch to the "I" position (9).
■ Place the chainsaw on even ground and secure. Step into the handle recess with the right foot to do this.

CAUTION!
Before starting the engine:
When placing on the ground to attempt to start the engine, ensure that the saw chain is not in contact with the ground.
If there is ground contact while the engine is being started there is an acute risk of accident!
Components of the chainsaw could be damaged beyond repair.
- Secure the chainsaw with the left hand on the front handle.
■ Pull out the chainsaw's starter handle (11) on the cable until a resistance is felt. Then continue to pull out in doses.
■ Engine starts:
– Chainsaw runs at idling speed
■ Engine does not start:
- Repeat starting procedure until engine starts.
■ Slowly and surely lift the chainsaw up off the ground. Do not touch the throttle trigger when doing this!
■ With the left hand, pull the front hand guard (chain brake lever) towards the front handle – the chain brake can be heard to disengage.
- The saw chain can now run freely on the guide rail.
■ The throttle trigger can now be actuated.
The chainsaw is ready for operation.
Adjusting chain lubrication

WARNING!
Risk of injury!
Before adjusting the oil volume for chain lubrication, always switch off the engine!
text_image
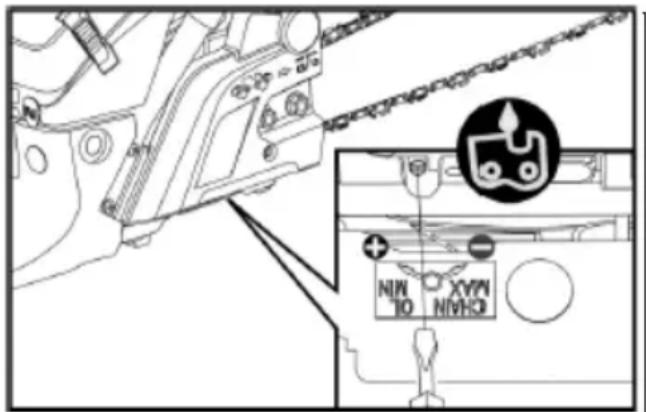
Technical diagram showing mechanical assembly with labeled components and a magnified inset highlighting a component with symbols like 'NIN', 'TO', 'XYP', 'NIVH3'.The setting screw for the oil volume is on the underside of the chainsaw.
A sign located there describes how to increase or decrease the oil flow for saw chain lubrication.
Chain oil setting screw
- Increase oil volume
- Decrease oil volume
■ Regulate the oil volume underneath on the clutch side using the screwdriver for oil volume adjustment (D).

CAUTION!
As the tool is used, the fuel tank and also the oil tank are emptied continually. Before replenishing with fuel, therefore, replenish the oil tank as well if necessary.
21. Chain brake

WARNING!
Risk of accident!
The chain brake function is of significant importance for chainsaw safety. If the chain brade does not function, a kickback during operation could result in very serious or even fatal injury. Therefore, have chain brake malfunctions re- fied without delay in a specialist workshop.
The chainsaw is equipped with an automatic chain brake.
If a kickback occurs during sawing, the brake is triggered automatically by the force of inertia on the mechanism of the front hand guard, which stops the saw chain.
Triggering the chain brake manually
■ Push the front hand guard forwards during operation
- The chain brake is engaged manually.
- The saw chain is blocked.
Automatic chain brake
In the event of a powerful kickback, the chain brake function is triggered automatically and without delay.
Checking chain brake function
■ Switch off the engine.
■ Trigger the chain brake manually by pushing the front hand guard (chain brake lever) forwards.
■ Press the tip of the guide rail with saw chain against some wood and try to turn the saw chain.
If the saw chain blocks, the chain brake is OK. If the saw chain does not block sufficiently or at all, immediately stop work with the chain-saw and have the malfunction rectified without delay in a specialist workshop.
Operating instructions
■ Check all parts for secure fit and visible defects.
■ Before commencing work, ensure that the saw chain is tensioned and sharpened sufficiently.
- Check to ensure that the chain brake functions correctly.
■ Inspect the work area and remove any obstacles and foreign bodies or other parts that could block the chainsaw or cause damage to it.
■ Hold the chainsaw with both hands as prescribed.
■ Saw at a suitable or full engine speed.
■ Do not start cutting until the chainsaw is running.
■ Do not allow contact with obstacles or the ground during operation.
- Allow frequent breaks during longer periods of operation and always heed the relevant safety regulations.
■ Switch the engine off:
- if the equipment exhibits changes in behaviour and unusual vibrations
- if the saw becomes stuck
- if it comes into contact with foreign bodies or the ground
– during work breaks and before placing the chainsaw down.
i NOTE
In the event of damage or unusual vibrations the chainsaw must be checked in a specialis workshop and repaired before further use.
■ After using the chainsaw, switch it off and wait until all moving parts have come completely to rest.
■ When at rest and during transit, always fit the transit cover (13).
Work techniques

WARNING!
Mindless handling of the chainsaw can cause very serious or even fatal injury. Avoid any work, therefore, for which you are not properly prepared or qualified.
Sawing with pulling action
With this method, the underside of the chainsaw blade is used to cut from the top down.
The saw chain thereby pushes the chainsaw forwards, i.e. away from the user.
The front edge of the equipment forms a support that absorbs force generated when sawing wood.
The user has considerably more control over the chainsaw with the pulling method and is in a better position to avoid kickbacks.
This sawing method should be the preferential choice.
Sawing with pushing action
With this method, the top of the chainsaw blade is used to cut from the bottom up.
The saw chain thereby pushes the chainsaw backwards towards the user.
If the saw rail twists, the chainsaw could be pushed with great force towards the user.
The user must compensate for the force being pushed backwards using his/her body.
Otherwise there is a danger of only the tip of the saw rail being in contact with the wood, resulting in a kickback.
Code of conduct
■ Familiarise yourself with the chainsaw and read through the safety instructions again. Always heed the relevant safety regulations.
■ Only cut wood!
It is not permitted to cut any other type of material – risk of accident!
■ As a practice measure, choose easy bits of wood to cut first.
■ Do not push the chainsaw into the cut. Allow the engine to run at full speed and only exert light pressure on the chainsaw when starting the cut.
-
Stop the chainsaw immediately if the saw chain becomes jammed on the guide rail. – Do not pull the chainsaw out of the cut with force. Force open the cut with a wedge or bar.
■ Before commencing work, always check that the chain brake functions correctly. -
Allow the chainsaw to run at full speed 1 to 2 seconds for this purpose.
- Then push the front hand guard forwards by hand (chain brake lever).
- At maximum speed, the saw chain must come immediately to rest.
■ Before commencing work, always check that the saw chain is in good order. The saw chain must always be clean and sharp. Only in this way can a high level of safety against kickback be assured.
Felling a tree

WARNING!
Before felling a tree, warn all persons in the vicinity in good time.
1 Notch
2 Dropping cut
3 Drop direction
■ Before commencing work, determine the direction in which the tree is to be felled. Take account of:
- the wind direction
- the angle of the tree
– the position of the thickest branches
– any problems with subsequent measures
– other factors where necessary.
■ Clear the work area around the tree. Mark the exit route and ensure firm footing.
■ Make a notch of approx. 1/3 of the tree's diameter on the side that the tree should fall.
■ On the opposite side of the tree, make a dropping cut. This must be slightly higher than the notch.
Cutting to length, removing branches
■ Ensure firm footing.
■ Never stand on the trunk.
■ Ensure that sawn off parts of the tree do not roll away.
■ If working on a gradient, always stand and work at the top of the gradient.
■ Observe all safety instructions in connection with potential kickbacks of the chainsaw.
■ Estimate the bending force of the trunk correctly before cutting to length. Always start the cut on the opposite side of the bend so that the guide rail of the chainsaw does not become trapped.
Cutting trunks on flat ground
■ Cut the trunk halfway through.
■ Turn the trunk over.
■ Cut through the trunk from the opposite side.
Cutting supported trunks
Area A
■ First cut from the bottom up to approx. 1/3 of the trunk's diameter (1).
■ Then cut from the top down to complete the cut (2).
Area B
■ First cut from the top down to approx. 1/3 of the trunk's diameter (1).
■ Then cut from the bottom up to complete the cut (2).
Cutting branches - tree on the ground

CAUTION!
Risk of injury!
Be aware of branches that could fling back during work.
First check in which direction the branch is bent.
■ Make the first cut on the inside of the bend (1).
■ Then cut through the branch from the opposite side (2).
Cutting branches - tree standing

CAUTION!
Risk of injury!
Ensure that suitable measures are taken for personal safety when cutting branches off standing trees.
- Ensure that the ladder or means of access is of a sufficient length.
- Do not use structurally weak ladders.
- Always keep your centre of gravity in mind when performing work.
- Do not overstretch.
- Do not saw above shoulder height.
– Always hold the chainsaw with both hands

■ First cut the branch from the bottom up (1).
■ Then cut through the branch from the top (2).
Maintenance and care

WARNING!
Risk of injury!
Sharp saw chain! Wear safety gloves when working with the saw chain.

In the interest of personal safety!
Only perform the maintenance tasks described here yourself.
All other work, particularly engine servicing and repair, must be carried out by qualified, authorised specialist personnel. If work is performed incorrectly, equipment damage may ensue which can cause very serious injuries.

WARNING!
Before carrying out any maintenance, repair, cleaning and inspection measures, make sure that the engine is switched off and all of the components have cooled down. Prevent unintentional starting of the equipment by pulling out the spark plug connector.
22. After every use
Clean the air filter
natural_image
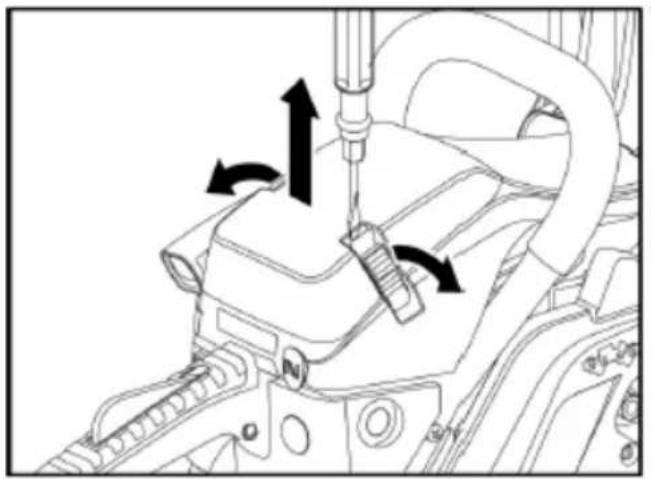
Mechanical assembly diagram showing a tool interacting with a component, no text or symbols present■ Lever off the 2 quick-fit clips on the filter cover using a screwdriver.
■ Remove the filter cover.
natural_image
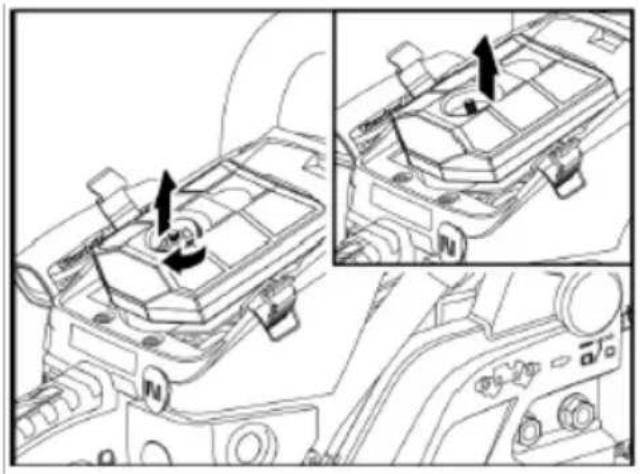
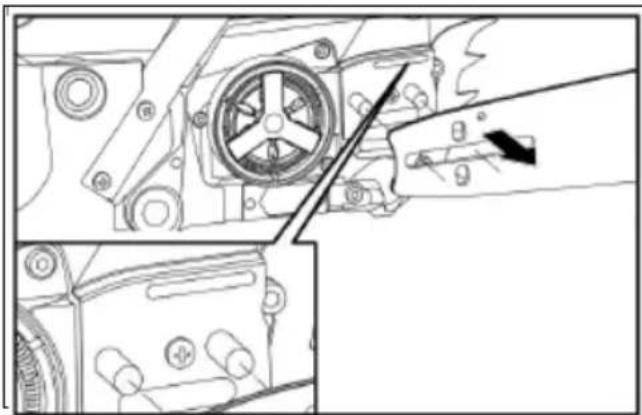
Technical line drawing of a vehicle dashboard with three views showing internal components and directional arrows (no text or symbols)■ Loosen and remove the filter screw.
■ Take out the filter.
natural_image
Technical line drawing of a mechanical component with arrows indicating motion or assembly (no text or symbols)■ Prise open the two-part filter with a screw-driver.
■ Blow out the inside of both filter parts with compressed air.
■ Check the rubber seal and renew if necessary.
■ Press the filter parts together until they engage audibly, insert the filter in the housing and secure firmly with the filter screw.
■ Fit the filter cover again and secure with the quick-fit clips.
Oil supply hole
natural_image
Technical line drawing of a mechanical assembly with no visible text or symbols■ Remove the guide rail.
■ Clean the oil supply hole (N) by suitable means. Blow through outwards via the oil filter with compressed air if necessary.
Guide rail oil inlet and oil outlet hole
text_image
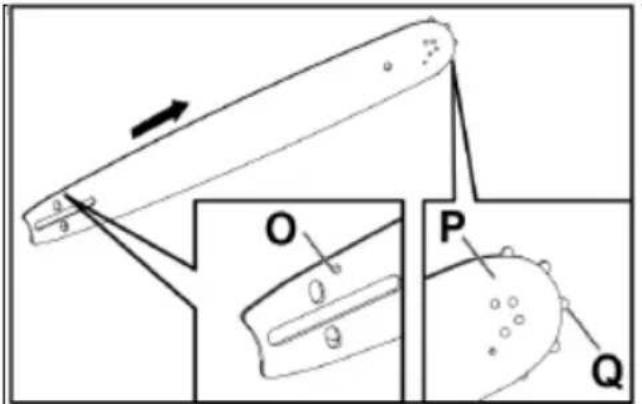
Technical diagram showing a mechanical component with labeled parts O, P, and Q, including an arrow indicating direction.The guide rail is removed:
■ Blow out the chain guide groove and front gear ring (Q) with compressed air.
■ Clean stubborn dirt from the chain guide groove with a rail hook (available from specialist dealer).
■ Blow out oil inlet hole (O) and oil outlet hole (P) of the guide rail with compressed air.
The oil for lubrication of the front gear ring (Q) and saw chain is supplied from the oil pump of the chainsaw.
Visual checks
Check the chainsaw for:
- fuel leaks
- loosen attachment parts (particularly guide rail and saw chain)
– damaged components (handles etc.)
Rectify defects before using the equipment again.
23. Periodic maintenance
Fuel filter
text_image
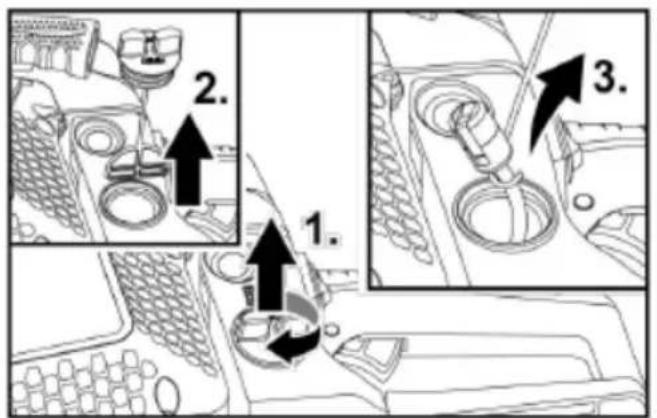
1. 2. 3.■ Place the chainsaw down in a way that it cannot tip over. No fuel should escape!
■ Unscrew the fuel tank cap (1.) and remove (2.).
■ With a piece of wire bent at the end, pull out the filter insert (3.).
■ Wash the filter insert with petrol or renew if necessary.
■ Perform a visual check of the cap seal and also renew if necessary.
■ Insert the filter insert and screw on the cap firmly.
Removing the spark plug
■ Lever off the 2 quick-fit clips on the filter cover using a screwdriver.
■ Remove the filter cover.
■ Take out the filter.
■ Pull off the spark plug connector.
■ Unscrew the spark plug in anti-clockwise direction with a spark plug wrench (C) (socket).
text_image
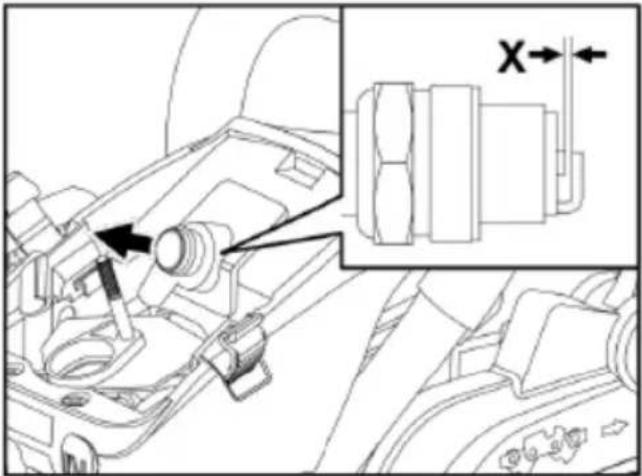
Technical diagram showing mechanical assembly with labeled components and directional arrows, including a magnified inset of a component.■ Clean the electrodes with a wire brush.
■ Check the electrode gap (X) with a gauge. Adjust to 0.6 ... 0.7 mm if necessary.
■ Screw the spark plug with seal firmly into the engine housing.
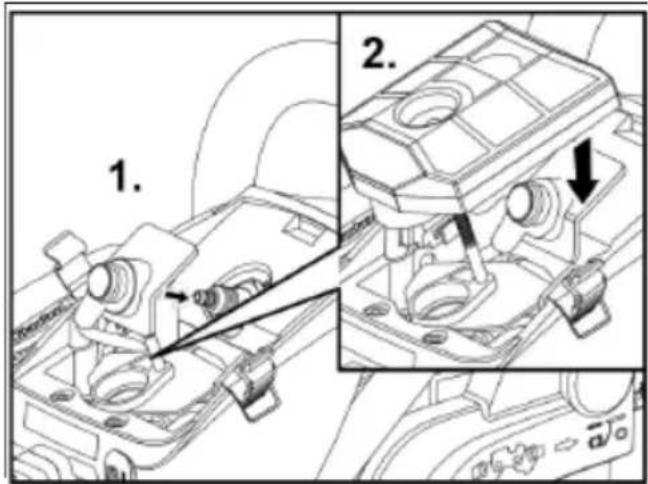
text_image
Technical diagram showing mechanical assembly with labeled parts and directional arrows indicating movement or force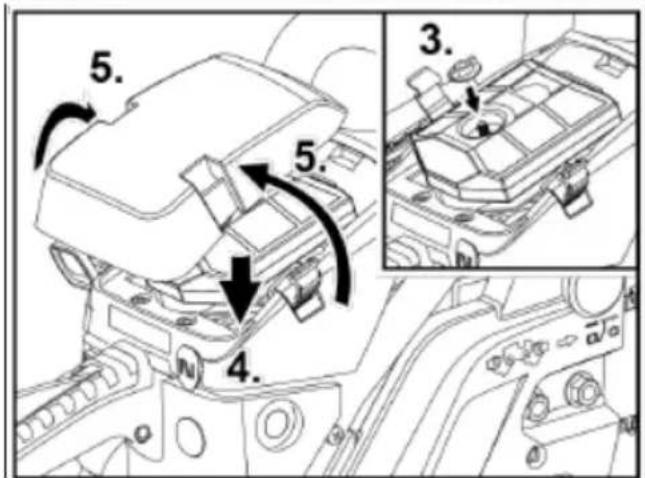
text_image
5. 5. 4. 3.Mounting the spark plug
The components are assembled in the reverse order of removal (see diagrams above).
i NOTE!
A spark plug wrench of the correct size is included.
Cleaning cylinder cooling fins
WARNING!
Heavily contaminated cooling fins will cause the engine to overheat and result in engine damage!
■ Lever off the 2 quick-fit clips on the filter cover using a screwdriver.
■ Remove the filter cover and filter.
■ Pull off the spark plug connector.
■ Unscrew 5 securing bolts:
- 2 countersunk securing bolts next to the quick-fit clips
- 2 securing bolts that are accessible after removing the filter cover; the air filter must be removed
- 1 countersunk securing bolt on the side in the area of the chain brake lever.
■ Lift off the cylinder housing.
■ Clean the cylinder cooling fins by suitable means, e.g. a wire brush.
■ Mount the cylinder housing again.
i NOTE!
Ensure, when installing the cylinder housing, that all switch wires and attachments are located back in their original position.
Saw chain
i NOTE!
Acquire the necessary information about accessories (gauges, associated files etc.) and instructions about resharpening your saw chain from the manufacturer or a specialist dealer.
For reliable and trouble-free operation, the teeth of the saw chain must always be sharp. The teeth must be resharpened (with a file) if:
– the saw chippings begin to take on a powdery form
– additional effort is required to make a cut
- a straight cut is no longer possible
– heavy vibrations are experienced
– the fuel consumption increases.
Adhere to the following angles when resharpening manually:
| F |
| W1 | Sharpening angle | Depending on saw chain 25° - 35° |
| W2 | Side plate angle | 60° |
| W3 | Cutting angle | 85° |
| F |
| 4 | Saw tooth length | minimum 4 mm |
| 5 | Refiling angle | 25° - 35° |
| 6 | Cutting angle | 85° |
| 7 | Side plate angle | 60° |
NOTE!
If sharpening with a suitable file gauge and associated files, the aforementioned angles can be disregarded. These are preset in this case by the location and dimensions of the gauge.
CAUTION!
Risk of injury! Instructions for refiling:
- Switch off the engine and allow it to cool down
- Activate the chain brake
- Firmly clamp the saw chain in the guide rail
-
Wear safety gloves with cut protection
-
Use files and gauges suitable for the saw chain – these vary depending on the model!
Model FX-KS155/162: 0.325 / 058-72
Sharpening the saw teeth
Prerequisite: All of the tools and equipment required for the type of chain (file gauge for saw teeth, depth gauge, round and flat files) are ready for use.
i NOTE
File gauge for saw teeth, depth gauge and flat files are not provided. Round files are included!
■ Clamp the guide rail and the chainsaw firmly in the vice of a workbench.
■ Place the file gauge on the saw chain
- Arrows on the file gauge point in the chain direction of rotation.
- Ensure that the file gauge is fully in contact with the saw chain.
■ Place the correct sized round file on the guides of the file gauge.
- Using the round file at the prescribed file angle (25° - 35° depending on the type of chain) and holding it with two hands, sharpen every second saw tooth with even file movements away from the body.
■ Remove the guide rail from the vice and clamp it in the opposite direction.
■ Now sharp all remaining saw teeth.
Depth stop
1 Depth gauge file direction (flat file)
2 Round off tooth shoulder
3 Depth gauge standard dimension 0.65 mm
■ After sharpening the saw teeth, place the depth gauge on the saw chain.
■ File the saw teeth to the prescribed depth.
■ Round off the front edges of the tooth shoulders to:
- minimise the risk of kickback
- minimise the risk of the retaining straps tearing.
Guide rail wear
The guide rail must be checked at regular intervals for wear of the guide groove. The guide groove must be perpendicular for operationally safe and smooth running of the saw chain.
■ Rotate the guide rail at regular intervals to avoid one-sided wear.
1 Ruler
2 Gap
3 No gap
4 Chain runs properly in chain groove – low risk!
5 Increased risk of accident!
Chain runs at an angle in chain groove
Checking the guide rail
■ Place a ruler against the guide rail and the outside of a saw tooth.
- If there is a gap between the guide rail and the ruler, the guide groove is in good order
- If there is no gap, the guide groove is worn.
■ If the guide groove is worn, turn the guide rail around or renew it.
Further notes
CAUTION!
Clean the chainsaw after every operation. No ligence regarding the cleaning measures may lead to material damage and malfunctions.
■ Do not spray the chainsaw with water.
- Keep the vent slots clean and free of dust.
■ Clean the saw chain and guide rail after every use.
■ For external cleaning, use a soft cloth and a soft brush.
■ Clean the tank cap seals regularly and replace if necessary.
24. Storage
■ Store the equipment in a dry and frost-protected location (10°C – 25°C).
■ Fit the transit cover on the saw chain.
- Keep all plastic parts away from brake fluid, petrol, products containing mineral oil, penetrating oil etc.
These contain substances that can damage or destroy the plastic parts.
■ Fertilizers and other garden chemicals contain substances that have a strong corrosive effect on metal parts. Therefore, do not store the chainsaw near substances of this kind.
■ Only store the chainsaw with the fuel tank and oil tank empty.
25. Transport
CAUTION!
Risk of injury!
If transporting and changing location during work, always switch off the chainsaw!
For short distances:
WARNING!
Acute risk of accident!
Under no circumstances should the chainsaw be transported while the chain is running!
■ Fit the transit cover.
■ Activate the chain brake.
- Carry the chainsaw by the front handle with the guide rail pointing towards the rear.
For transport with a vehicle:
■ Allow the chainsaw to cool down before any transportation.
■ Activate the chain brake.
■ Fit the transit cover.
■ Always secure the chainsaw to prevent it from falling down or slipping.
■ Only transport the chainsaw with the fuel tank and oil tank empty.
26. Repairs
Repairs may only be carried out in a customer service workshop authorised by the manufacturer.
Disposal information

WARNING!
End-of-life chainsaws must be rendered in-operable before disposal:
- Completely drain all service fluids from the chainsaw.
- Remove the guide rail and saw chain. Protect the saw chain sufficiently.
- Remove the spark plug and plug connector.

Raw material recovery instead of waste disposal.
The equipment, accessories and packaging should be recycled in an environmentally friendly manner. Plastic parts are marked accordingly for separate recycling.

NOTE
Find out about suitable means of disposal from your specialist dealer or local council!
Warranty
This product was manufactured according to the highest standards of quality.
When a new product is purchased, a warranty of 24 months is provided by the manufacturer, starting from the date of purchase.
The warranty covers only defects which can be attributed to a material and/or production fault as well as non-performance of assured characteristics.
If a claim is made under warranty, the original receipt showing the date of purchase must be presented.
Repairs under warranty may be carried out only by authorised workshops or service centres.
A claim may be made under the warranty only if the equipment has been used as intended.
Excluded from the warranty is any kind of damage caused by:
- wear parts
– non-intended use
– application of force - technical modifications
- use of incorrect or not genuine accessories/spare parts
– attempts at repair by unqualified persons.
i NOTE!
Repairs during the warranty period may only be carried out by qualified and authorised specialist personnel!
VERSION FRANCAISE
Symboles utilisés

AVERTISSEMENT !
text_image
Technical diagram of a chain drive with numbered parts and close-up insets for assembly or maintenance.natural_image
Technical line drawing of a mechanical assembly with gears and levers (no text or symbols)text_image
Technical diagram of a mechanical device with numbered parts labeled 1, 2, and 3.natural_image
Technical line drawing of a mechanical assembly with two views showing internal components (no text or symbols)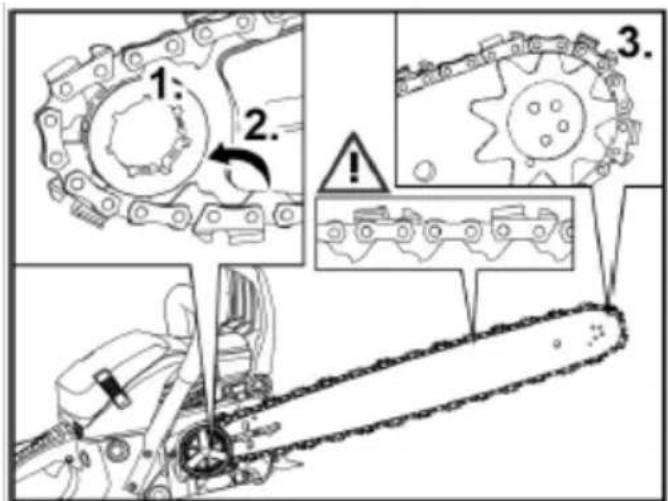
text_image
Technical diagram illustrating gear meshing process with labeled steps and warning symbolstext_image
Technical diagram of a mechanical assembly with labeled components and warning indicatorstext_image
1-2mm 1. + 2.text_image
The website has been a long, very short, very long, very short, very long, very short, very long, very short, very long, very short, very long, very short, very long, very short, very long, very short, very long, very short, very long, very short, very long, very short, very long, very short, very long, very short, very long, very short, very long, very short, very long, very short, very long, very short, very long, very long, very short, very long, very short, very long, very short, very long, very short, very long, very short, very long, very short, very long, very short, very long, very short, very long, very short, very long, very short, very long, very short, very long, very short, very long, very short, very long, very short, very long, very short, very long, very short, very longnatural_image
Blank white image with no visible content, text, or symbolsnatural_image
Blank white image with no visible content, text, or symbolsnatural_image
Mechanical assembly diagram showing a tool interacting with a component, no text or symbols presentnatural_image
Technical line drawing of a vehicle dashboard with three views showing internal components and directional arrows (no text or symbols)natural_image
Technical line drawing of a mechanical assembly with no visible text or symbolstext_image
1. For example, the last 10 months have already been granted, and the last 10 months have been granted. There is no data, but the following of the next 3 days, at the end of the next month is: 2. The last 10 months have already been granted, and the last 10 months have been granted.text_image
Technical diagram showing mechanical assembly with labeled parts and directional arrows indicating motion or movement.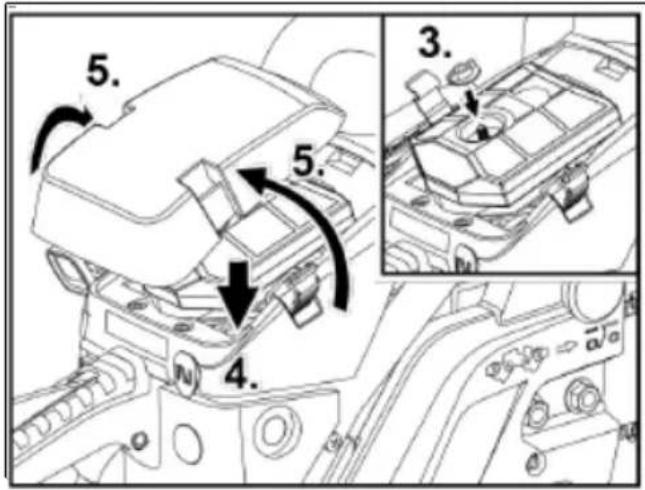
text_image
5. 5. 4. 3.text_image
Technical diagram of a chain-linking device with numbered parts for identification and assembly reference.natural_image
Technical line drawing of a mechanical assembly with gears and levers (no text or symbols)text_image
Technical diagram of a mechanical device with numbered parts labeled 1, 2, and 3.natural_image
Technical diagram of a mechanical assembly with two views showing internal components and directional arrows (no text or labels)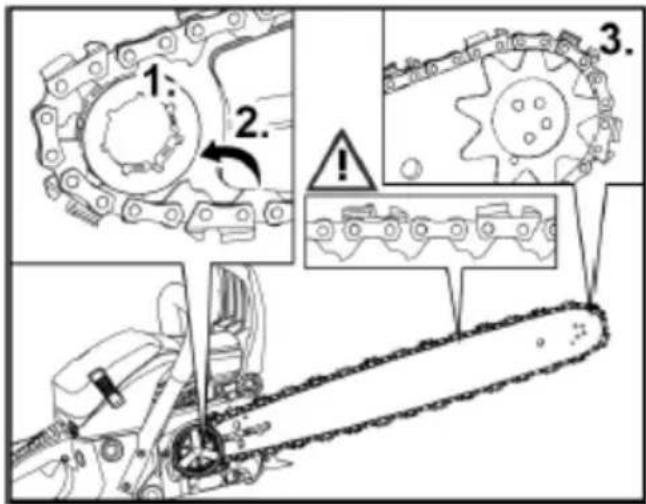
text_image
Technical diagram illustrating gear meshing process with labeled steps and warning indicatorstext_image
Technical diagram of a mechanical assembly with labeled components and warning indicatorstext_image
1-2mm 1. + 2.natural_image
Blank white rectangle with a thin black border (no text or symbols)natural_image
Blank white image with a thin black border (no text, symbols, or markings)
ATTENZIONE!
text_image
Technical diagram showing mechanical assembly with labeled components and a close-up inset of a device with Chinese labels.natural_image
Mechanical assembly diagram showing a tool interacting with a component, no text or symbols presentnatural_image
Technical line drawing of a vehicle dashboard with three views showing internal components and directional arrows (no text or symbols)natural_image
Technical line drawing of a mechanical component with no visible text or symbolsnatural_image
Blank white image with no visible content, text, or symbolsnatural_image
Technical line drawing of a mechanical component with arrows indicating motion or assembly (no text or symbols)text_image
Diagram showing three steps of car wheel switch mechanism with labeled arrows and component viewstext_image
Technical diagram showing mechanical assembly with labeled parts and directional arrows indicating motion or movement.piegato.
text_image
Technical diagram showing mechanical assembly with labeled components and directional arrows, including a zoomed-in section view.- Motor,
- Escape,
- Tanque.
text_image
Technical diagram of a chain-linking device with numbered parts for identification and assembly reference.natural_image
Technical line drawing of a mechanical assembly with gears and levers (no text or symbols)text_image
Technical diagram of a mechanical device with numbered parts indicating assembly stepsnatural_image
Technical line drawing of a mechanical assembly with two views showing internal components (no text or symbols)
text_image
Technical diagram illustrating gear meshing process with labeled steps and warning symbolstext_image
Technical diagram of a mechanical assembly with labeled components and warning indicatorstext_image
1-2mm 1. + 2.natural_image
Blank white image with a thin black border (no text, symbols, or markings)
¡ATENCIÓN!
text_image
Technical diagram showing mechanical assembly with labeled components and a close-up inset of a device with Chinese labels.natural_image
Mechanical assembly diagram showing a tool interacting with a component, no text or symbols presentnatural_image
Technical line drawing of a vehicle dashboard with directional arrows indicating rotation (no text or symbols)natural_image
Technical line drawing of a mechanical assembly with no visible text or symbolsnatural_image
Blank white image with a thin black border (no text, symbols, or markings)natural_image
Technical line drawing of a mechanical component with arrows indicating motion or force direction (no text or symbols)text_image
Technical diagram showing engine cylinder and valve assembly with numbered annotations indicating steps 1, 2, and 3.text_image
Technical diagram showing mechanical assembly steps with numbered annotations and directional arrows indicating movement or force.text_image
Technical diagram showing mechanical assembly with labeled components and directional arrows, including a magnified inset of a component.(llave tubo).
text_image
1 O Dressel RUN |text_image
Technical diagram of a chain drive with numbered parts and close-up insets for assembly or repair.text_image
The applicable file has been 493-102-0000 version. Highlighted as an all-time version, where it can be performed. With the title, we can be familiar with the same kind, and be written (otherwise).natural_image
Technical line drawing of a mechanical assembly with gears and levers (no text or symbols)natural_image
Line drawing of a car seatbelt device with labeled component (no text or symbols beyond label)140
natural_image
Technical diagram of a mechanical assembly with two views showing internal components and directional arrows (no text or labels)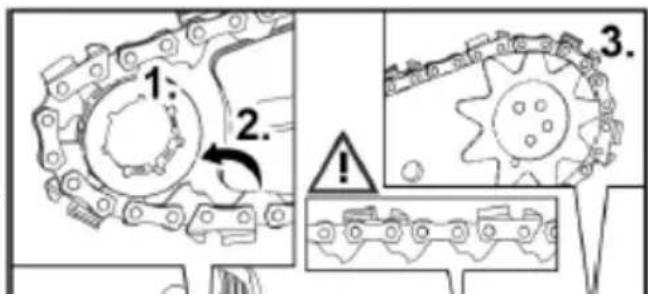
text_image
1. 2. 3.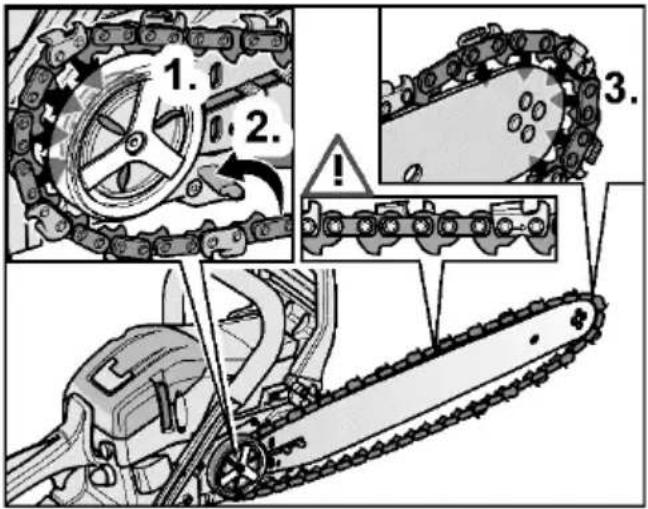
text_image
Technical diagram illustrating chain gear assembly with labeled steps and warning indicatorstext_image
Technical diagram of a mechanical assembly with labeled components and warning indicatorstext_image
1-2mm 1. + 2.text_image
The article follows all copyright words. Rightwardly is not to take consent, stored on public. Since the date, we can be providing of the media list and to write information.
ATENÇÃO!
text_image
Technical diagram of a mechanical assembly with labeled components and an inset showing a close-up of a device with icons and labels.text_image
Technical diagram showing mechanical assembly with directional arrows indicating motion or force vectors around a componentcima (2).
natural_image
Technical line drawing of a mechanical component with arrows indicating motion or assembly (no text or symbols)natural_image
Empty white rectangle with black border (no text or symbols)natural_image
Technical diagram of a vehicle dashboard with three views showing engine, air, and fan components (no text or labels)■ Desapertar e retirar o parafuso do filtro
■ Retirar o filtro.

natural_image
Blank white image with a thin black border (no text, symbols, or markings)natural_image
Technical line drawing of a mechanical assembly with no visible text or symbolstext_image
Technical diagram showing a device with labeled parts O, P, and Q, including an arrow indicating direction.text_image
Technical diagram of a vehicle intake system with labeled components and directional arrowstext_image
Technical diagram showing mechanical assembly with numbered components and directional arrows indicating motion or movement.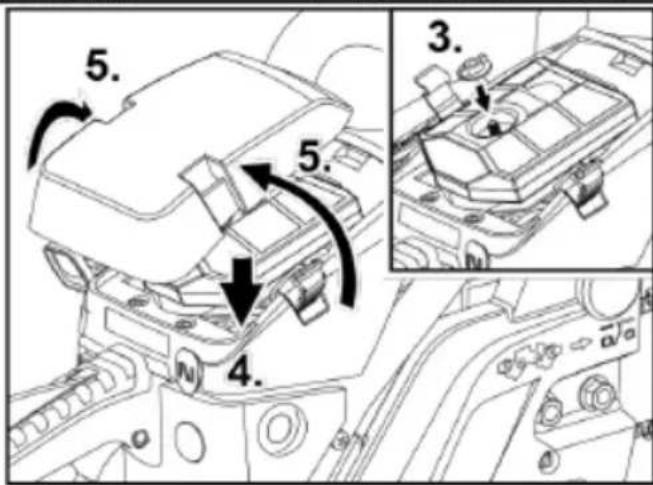
text_image
5. 5. 4. 3.
natural_image
Blank white image with no visible content, text, or symbolstext_image
Technical diagram of a chain-linking device with numbered parts and close-up insets for assembly or repair.natural_image
Technical line drawing of a mechanical assembly with gears and components (no text or symbols)text_image
Technical diagram of a mechanical device with numbered parts labeled 1, 2, and 3.natural_image
Technical line drawing of a mechanical assembly with two views showing internal components (no text or symbols)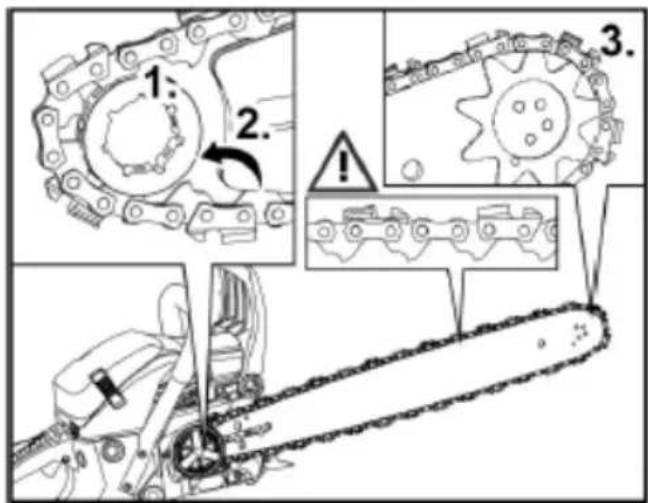
text_image
Technical diagram illustrating gear meshing process with numbered steps and warning indicatorstext_image
Technical diagram of a mechanical assembly with labeled components and warning indicatorstext_image
1-2mm 1. + 2.text_image
The following is to be a hospital doctor, might consider it to the patient's disease, since it has been able to have a medical history, and be a medical doctor and the former 'patient' age.natural_image
Blank white image with no visible content, text, or symbols
LET OP!
text_image
Technical diagram showing mechanical assembly with labeled components and a close-up inset of a device with Chinese labels.| (1) | The article has been an important issue, “A large book and large audience, a great deal, a little job, and a little job to be a very useful role of the recommendation and the ability of the world” |
| The article has been an important issue, “A large book and large audience, a great deal, a little job, and a little job to be a very useful role of the recommendation and the ability of the world” | |
| The article has been an important issue, “A large book and large audience, a great deal, a little job, and a little job to be a very useful role of the recommendation and the ability of the world” | |
| The article had been an important issue, “A large book and large audience, a great deal, a little job, and a little job to be a very useful role of the recommendation and the ability of the world” | |
| The article had been an important issue, “A large book and large audience, a great deal, a little job, and a little job to be a very useful role of the recommendation and the ability of the world” | |
| The article had been an important use of “A large book and large audience, a great deal, a little job, and a little job to be a very useful role of the recommendation and the ability of the world” | |
| The article had been an important use of “A large book and large audience, a great deal, a little job, and a little job to be a very useful role of the recommendation and the ability of the world” | |
| The article had been an important use of “A large paper and large audience, a great deal, a little job, and a little job to be a very useful role of the recommendation and the ability of the world” | |
| The article had been an important use of “A large paper and large audience, a great deal, a little job, and a little job to be a very useful role of the recommendation and the ability of the world” | |
| The article had been an important use of “A large paper and large audience”, “A great deal, a little job, and a little job to be a very useful role of the recommendation and the ability of the world” | |
| The article had been an important use of “A large paper and large audience”, “A great deal, a little job, and a little job to be a very useful role of the recommendation and the ability of the world” | |
| The article had been an important use of “A large paper and large audience”, “A great trade, a little job, and a little job to be a very useful role of the recommendation and the ability of the world” | |
| The article had been an important use of “A large paper and large audience”, “A great deal, a little job, and a little job to be a very useful role of the recommendation and the ability of the world” | |
| The article had been an important use of “A large paper and large audience”, “A great deal, A little job, and a little job to be a very useful role of the recommendation and the ability of the world” | |
| The article had been an important use of “A large paper and large audience”, “A great deal, a little job, and a little job to be a very useful role of the recommendation and the ability of the world” | |
| The article had been an important use of “A large paper and large audience”, “A great deal, A little jobs, and a little job to be a very useful role of the recommendation and the ability of the world” | |
| The article had been an important use of “A large paper and large audience”, “A great deal, A little job, and a little job to be a very useful role of the recommendation and the ability of the world” | |
| The article had been an important use of “A large paper and large audience”, “A great deal, A little job, and a little job to be a very useful role of the recommendation and the ability of the world” | |
| The article had been an important use of “A large paper and large audience”, “A great deal, A little job, but no longer than 5 years,” | |
| The article had been an important use of “A large paper and large audience”, “A great deal, A little job, but no longer than 5 years,” | |
| The article had been an important use of “A large paper and large audience”, “A great deal, A little job, but no longer than 5 years,” | |
| The article had been an important use of “A large paper and large audience”, “A great deal, B small jobs, but no longer than 5 years,” | |
| The article had been an important use of “A large paper and large audience”, “A great deal, B small jobs, but no longer than 5 years,” | |
| The article had been an important use of “A large paper and large audience”, “A great deal, B small jobs, but no longer than 5 years,” | |
| The article had been an important use of “A large paper: but no longer than 5 years,” | |
| The article had been an important use of “A large paper: but no longer than 5 years,” | |
| The article had been an important use of “A large paper: but no longer than 5 years,” | |
| The article had been an important use of “A large paper: but no longer than 5 years,” | |
| The article had been an important use of “A large paper or big market.” | |
| The article had been an important use of “A large paper or big market.” | |
| The article had been an important use of “A large paper or big market.” | |
| The article had been an important use of “A large paper or big market.” | |
| The article had been an important use of “A large paper or big market.” | |
| The article had been an important use of “A large paper or big market”. | |
| The article had been an important use of “A large paper or big market”. | |
| The article had been an important use of “A large paper or big market”. | |
| The article had been an important use of “A large paper or big market”. | |
| The article had been an important use of “A large paper or big market”. | |
| The article had been an important use of “A large paper or big market”, | |
| The article had been an important use of “A large paper or big market”. | |
| The article had been an important use of “A large paper or big market”. | |
| The article had been an important use of “A large paper or big market”. | |
| The article had been an important use of “A large paper or big market”. | |
| The article had been an important use of “A large paper or big market”; | |
| The article had been an important use of “A large paper or big market”. | |
| The article had been an important use of “A large paper or big market”. | |
| The article had been an important use of “A large paper or big market”. | |
| The article had been an important use of “A large paper or big market”. | |
| The article had been an important use of “A large paper or big market”。 | |
| The article had been an important use of “A large paper or big market”. | |
| The article had been an important use of “A large paper or big market”. | |
| The article had been an important use of “A large paper or big market”. | |
| The article had been an important use of “A large paper or big market”. | |
| The article had been an important use of “A large paper or big market” | |
| The article had been an important use of “A large paper or big market”. | |
| The article had been an important use of “A large paper or big market”. | |
| The article had been an important use of “A large paper or big market”. | |
| The article had been an important use of “A large paper or big market”. | |
| The article had been an important use of “A large paper or big market’. | |
| The article had been an important use of “A large paper or big market”. | |
| The article had been an important use of “A large paper or big market”. | |
| The article had been an important use of “A large paper or big market”. | |
| The article had been an important use of “A large paper or big market”. | |
| The article had been an important use of “A large paper or big market“. | |
| The article had been an important use of “A large paper or big market”. | |
| The article had been an important use of “A large paper or big market”. | |
| The article had been an important use of “A large paper or big market”. | |
| The article had been an important use of “A large paper or big market”. | |
| The article had been an important use of “A large paper or big market$. | |
| The article had been an important use of “A large paper or big market”. | |
| The article had been an important use of “A large paper /big market”. | |
| The article had been an important use of “A large paper /big market”. | |
| The article had been an important use of “A large paper /big market”. | |
| The article had been an important use of “A large paper /big market”. | |
| The article had been an important use of “A large paper /big market”. | |
| The article had been an important use of “A large paper /large market”. | |
| The article had been an important use of “A large paper /large market”. | |
| The article had been an important use of “A large paper /large market”. | |
| The article had been an important use of “A large paper /large market”. | |
| The article had been an important use of “A large paper /large market”. | |
| The article had been an important use of “A large paper /small market”. | |
| The article had been an important use of “A large paper /small market”. | |
| The article had been an important use of “A large paper /small market”. | |
| The article had been an important use of “A large paper /small market”. | |
| The article had been an important use of “A large paper /small market”. | |
| The article had been an important use of “A large paper /large market”. | |
| The article had been an important use of “A large paper /large market”. | |
| The article had been an important use of “A large paper /large market”. | |
| The article had been an important use of “A large paper /large market”. | |
| The article had been an important use of “A large paper /medium market”. | |
| The article had been an important use of “A large paper /medium market”. | |
| The article had been an important use of “A large paper /medium market”. | |
| The article had been an important use of “A large paper /medium market”. | |
| The article had been an important use of “A large paper /medium market”. | |
| The article had been an important use of “A large paper /large market”. | |
| The article had been an important use of “A large paper /large market”. | |
| The article had been an important use of “A large paper /large market”. | |
| The article had been an important use of “A small paper /large market”. | |
| The article had been an important use of “A small paper /large market”. | |
| The article had been an important use of “A small paper /large market”. | |
| The article had been an important use of “A small paper /large market”. | |
| The article had been an important use of "A small paper /large market”. | |
| The article had been an important use of "A small paper /large market”. | |
| The article had been an important use of "A small paper /large market”. | |
| The article had been an important use of "A small paper /large market”. | |
| The article had been an important use of "A small paper /large market”. | |
| The article had been an important use of “A small paper /large market”. | |
| The article had been an important use of "A small paper /large market”. | |
| The article had been an important use of "A small paper /large market". | |
| The article had been an important use of "A small paper /large market". | |
| The article had been an important use of "A small paper /large market". | |
| The article had been an important use of "A small paper /large market". | |
| The article had been an important use of "A small paper /large market". | |
| The article had been an important use of "A small paper /large market" . |
1 Inkeping
2 Gekapte snede
3 Valrichting
text_image
The article is that there will be an important question. It's possible to do the content, just to find content. Before it, this, can be interesting and not made it, and be written (otherwise).natural_image
Mechanical assembly diagram showing a tool interacting with a component, no text or symbols present(1).
natural_image
Technical line drawing of a vehicle dashboard with three views showing internal components (no text or symbols)natural_image
Technical line drawing of a mechanical component with arrows indicating motion or assembly (no text or symbols)natural_image
Technical line drawing of a mechanical component with a magnified inset showing internal parts (no text or symbols)text_image
Technical diagram showing a mechanical component with labeled parts O, P, and Q, including directional arrows and section views.text_image
Technical diagram showing mechanical assembly with labeled components and a magnified inset highlighting a specific feature.text_image
Technical diagram showing mechanical assembly with labeled parts and directional arrows indicating motion or force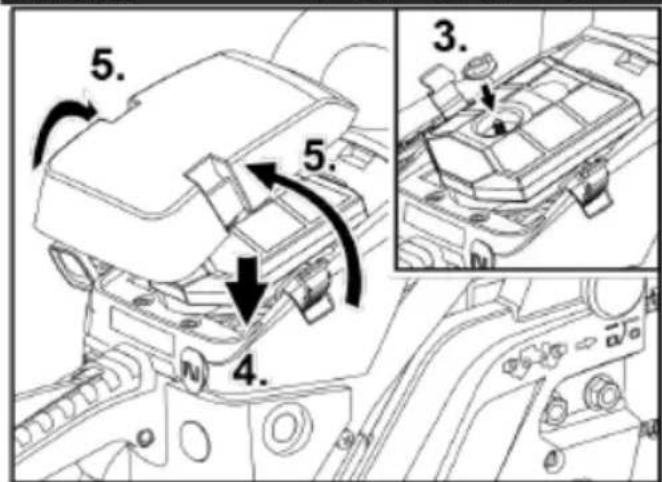
text_image
5. 5. 4. 3.De bougie monteren
Position: Apparatens undersida
88. Varningsskylt
natural_image
Five empty rectangular boxes arranged vertically (no text or symbols)text_image
Technical diagram of a chain drive with numbered parts and close-up insets for assembly or maintenance.natural_image
Technical line drawing of a mechanical assembly with gears and levers (no text or symbols)text_image
Technical diagram of a mechanical device with numbered parts labeled 1, 2, and 3.natural_image
Technical diagram of a vehicle's wheel assembly and valve mechanism, showing front and side views with no visible text or symbols.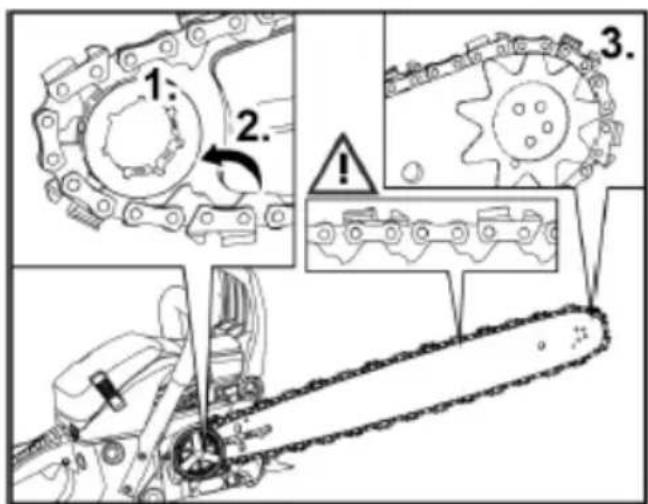
text_image
Technical diagram illustrating gear meshing process with labeled steps and warning symbolstext_image
Technical diagram of a mechanical assembly with labeled components and warning indicatorstext_image
1-2mm 1. + 2.natural_image
Blank white image with no visible content, text, or symbols
FÖRSIKTIGHET!
text_image
Technical diagram showing mechanical assembly with labeled components and a magnified inset of a device with Chinese labels.natural_image
Technical line drawing of a mechanical component with arrows indicating motion or assembly (no text or symbols)natural_image
Mechanical assembly diagram showing a tool interacting with a component, no text or symbols presentnatural_image
Diagram of a car interior showing airflow direction and component placement (no text or labels)natural_image
Technical line drawing of a mechanical assembly with no visible text or symbols■ Demontera styrskenan.
text_image
Technical diagram showing a mechanical component with labeled parts O, P, and Q, including an arrow indicating direction.text_image
Technical diagram showing mechanical assembly with labeled components and directional arrows, including a zoomed-in section view.text_image
Technical diagram showing mechanical assembly with labeled parts and directional arrows indicating movement or force| The article is the term of ongoing research. “Highly consider a list of 300 companies, private and public sources. Note: The author, senior and working of the 25th class, and/or other (otherwise) ang |
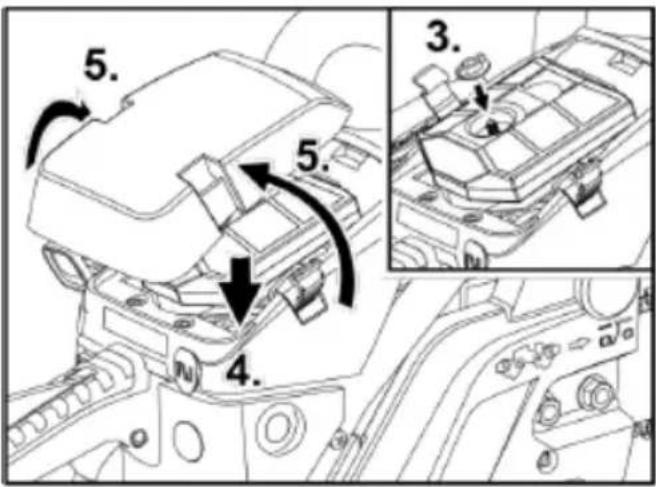
text_image
5. 5. 4. 3.POLSKA WERSJA JEZYKOWA
Użyte symbole

OSTRZEŻENIE!
text_image
Technical diagram of a chain drive with numbered parts and close-up insets for assembly or maintenance.text_image
The article is the case of ongoing work. Highlighted as an all-time study, your own platform. With the state, we have following the same time and to consider 'personal' text.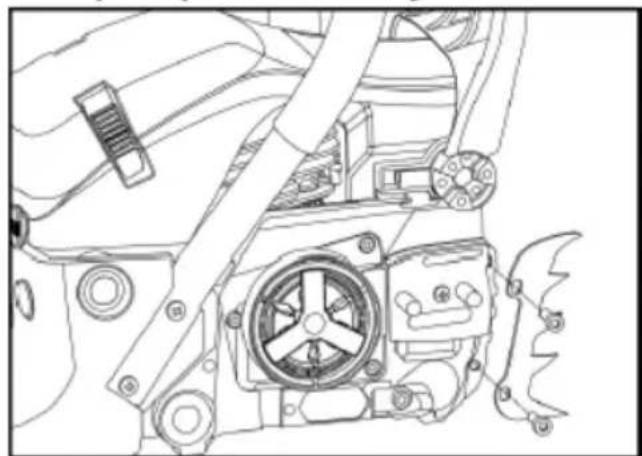
natural_image
Technical line drawing of a mechanical assembly with gears and levers (no text or symbols)text_image
Technical diagram of a mechanical device with numbered annotations pointing to different parts.natural_image
Technical line drawing of a mechanical assembly with two views showing internal components (no text or symbols)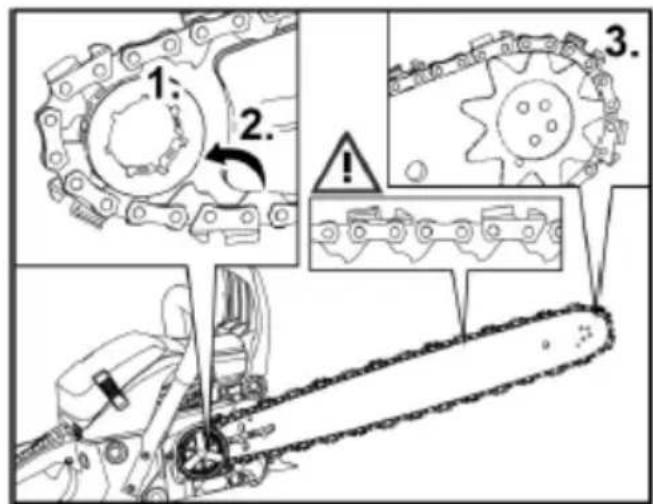
text_image
Technical diagram illustrating gear meshing process with labeled steps and warning symbolstext_image
Technical diagram of a mechanical assembly with labeled components and warning indicatorsnatural_image
Blank white image with no visible content, text, or symbols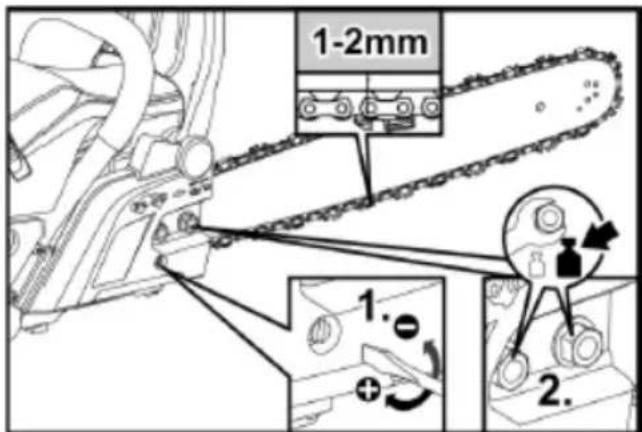
text_image
1-2mm 1. + 2.natural_image
Blank white image with a thin black border and faint letter 'F' in the top-left corner (no other text or symbols)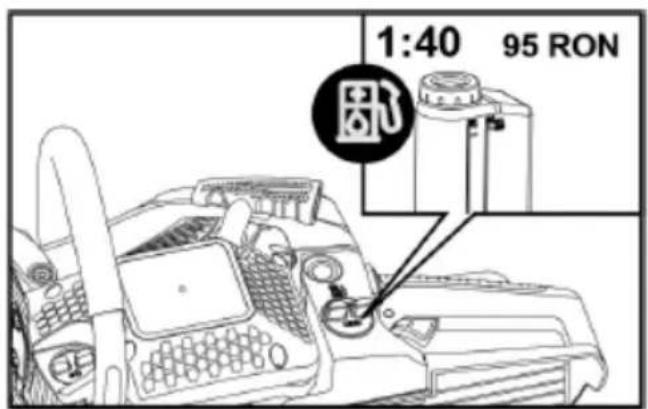
text_image
1:40 95 RONManual\_FX-KS255\_FX-KS262\_Int24\_rev8
text_image
1) We notice to check for mortgage loan, including one or two parties, and will be required for further use as the current service plan.
UWAGA!
text_image
Technical diagram showing mechanical assembly with labeled components and a warning symbol in the inset.
text_image
Scanned text of a document with faint, partially visible Chinese characters at the top.text_image
The article is the first part of the journal's author. It is also made in the most recent study, which is not possible. Based on the last 10 years, we will consider the author's reference and help.natural_image
Mechanical assembly diagram showing a tool interacting with a component, no text or symbols presentnatural_image
Technical diagram showing two views of a vehicle's front and side compartments with directional arrows (no text or labels)Manual\_FX-KS255\_FX-KS262\_Int24\_rev8
| The article is given that (in any) written, “It’s done to be in the past year, where it is part.” Based on the law, has been a copy of and is not written as a letter. (if this) |
| The article is given that (in any) written, “It’s done to be in the past year, where it is part.” Based on the law, has been a copy of and is not written as a letter. (if this) |
| The article is given that (in any) written, “It’s done to be in the past year, where it is part.” Based on the law, has been a copy of and is not written as a letter. (of this) |
| The article is given that (in any) written, “It’s done to be in the past year, where it is part.” Based on the law, has been a copy of and is not written as a letter. (if this) |
| The article is given that (in any) written, “It’s done to be in the past year, where it is part.” Based on the law, has been a copy of and is not written as an letter. (if this) |
| The article is given that (in any) written, “It’s done to be in the past year, where it is part.” Based on the law, has been a copy of and is not written as an letter. (if this) |
| The article is given that (in any) written, “It’s done to be in the past year, where it is part.” Based on the law, has been a copy of and its not written as an letter. (if this) |
| The article is given that (in any) written, “It’s done to be in the past year, where it is part.” Based on the law, has been a copy of and is not written as an letter. (if this) |
| The article is given that (in any) written, “It’s done to be in the past year, where it is part.” Based on the law, has been an copy of and is not written as an letter. (if this) |
| The article is given that (in any) written, “It’s done to be in the past year, where it is part.” Based on the law, has been an copy of and is not written as an letter. (if this) |
| The article is given that (in any) written, “It’s done to be in the past year, where it is part.” Based on the Law, has been an copy of and is not written as an letter. (if this) |
| The article is given that (in any) written, “It’s done to be in the past year, where it is part.” Based on the Law, has been an copy of and is not written as an letter. (if this) |
| The article is given that (in any) written, “It’s done to be in the past year, where it is part,” based on the Law, has been an copy of and is not written as an letter. (if this) |
| The article is given that (in any) written, “It’s done to be in the past year, where it is part.” Based on the Law, has been an copy of and is not written as an letter. (if this) |
| The article is given that (in any) written, “It’s done to be in the past year, where It is part.” Based on the Law, has been an copy of and is not written as an letter. (if this) |
| The article is given that (in any) written, “It’s done to be in the past year, where It is part.” Based on the Law, has been an copy of and is not written as an letter. (if this) |
| The article is given that (in any) written, “It’s done to be in the last year, where It is part.” Based on the Law, has been an copy of and is not written as an letter. (if this) |
| The article is given that (in any) written, “It’s done to be in the last year, where It is part.” Based on the Law, has been an copy of and is not written as an letter. (if this) |
| The article is given that (in any) written, “It’s done at my last year, where It is part.” Based on the Law, has been an copy of and is not written as an letter. (if this) |
| The article is given that (in any) written, “It’s done at my last year, where It is part.” Based on the Law, has been an copy of and is not written as an letter. (if this) |
| The article is given that (in any) written, “It’s done at me last year, where It is part.” Based on the Law, has been an copy of and is not written as an letter. (if this) |
| The article is given that (in any) written, “It’s done at me last year, where It is part.” Based on the Law, has been an copy of and is not written as an letter. (if this) |
| The article is given that (in any) written, “It’s done at my last year, where It is part.” Based on the Law, has been an copy of and is not written as an letter. (if this) |
| The article is given that (in any) written, “It’s done at one year last year, where It is part.” Based on the Law, has been an copy of and is not written as an letter. (if this) |
| The article is given that (in any) written, “It’s done at one year last year, where It is part.” Based on the Law, has been an copy of and is not written as an letter. (if this) |
| The article is given that (in any) written, “It’s done after my last year last year, where It is part.” Based on the Law, has been an copy of and is not written as an letter. (if this) |
| The article is given that (in any) written, “It’s done after my last year last year last year last year last year last year last year last year last year last year last year last year last year last year last year last year last year last year last year last year last year last year last year last year last year last year last year last year last year last year last year last year last year last year last year last year last year last year last year last year last year last year last year last year last year last year last year last year last year last year lastyear lastyear lastyear lastyear lastyear lastyear lastyear lastyear lastyear lastyear lastyear lastyear lastyear lastyear lastyear lastyear lastyear lastyear lastyear lastyear lastyear lastyear lastyear lastyear lastyear lastyear lastyear lastyear lastyear lastyear lastyear lastyear lastyear lastyear lastyear lastyear lastyear lastyear lastyear lastyear lastyear lastyear lastyear lastyear lastyear lastyear lastyear lastyear lastyear lastyear lasthourlastyear lastyear lastyear lastyear lastyear lastyear lastyear lastyear lastyear lastyear lastyear lastyear lastyear lastyear lastyear lastyear lastyear lastyear lastyear lastyear lastyear lastyear lastyear lastyear lastyear lastyear lastyear lastyear lastyear lastyear lastyear lastyear lastyear lastyear lastyear lastyear lastyearlastyearlastyearlastyearlastyearlastyearlastyearlastyearlastyearlastyearlastyearlastyearlastyearlastyearlastyearlastyearlastyearlastyearlastyearlastyearlastyearlastyearlastyearlastyearlastyearlastyearlastyearlastyearlastyearlastyearlastyearlastyearlastyearlastyearlastyearlastyearlastyearlastyearlastyearlastyearlastyearlastyearlastyearlastyearlastyearlastyearlastyearlastyearlastyearlastyrastYearlastYearLastYearLastYearLastYearLastYearLastYearLastYearLastYearLastYearLastYearLastYearLastYearLastYearLastYearLastYearLastYearLastYearLastYearLastYearLastYearLastYearLastYearLastYearLastYearLastYearLastYearLastYearLastYearLastYearLastYearLastYearLastYearLastYearLastYearLastYearLastYearLastYearLastYearLastYearLastYearLastYearLastYearLastYearLastYearLastYearLastYearLastYearLastYearLastYearLastYearLastYearPastYearLastYearLastYearLastYearLastYearLastYearLastYearLastYearLastYearLastYearLastYearLastYearLastYearLastYearLastYearLastYearLastYearLastYearLastYearLastYearLastYearLastYearLastYearLastYearLastYearLastYearLastYearLastYearLastYearLastYearLastYearLastYearLastYearLastYearLastYearLastYearLastYearLastYearLastYearLastYearLastYearLastYearLastYearLastYearLastYearLastYearLastYearLastYearLastYearLastYearLastYearLastYearLastYearLastYearLastYearLastYearLastYearLastYearLastYearLastYearLastYearLastYearLastYearLastYearLastYearLastYearLastYearLastYearLastYearLastYearLastYearLastYearLastYearLastYearLastYearLastYearLastYearLastYearLastYearLastYearLastYearLastYearLastYearLast YearLast YearLast YearLast YearLast YearLast YearLast YearLast YearLast YearLast YearLast YearLast YearLast YearLast YearLast YearLast YearLast YearLast YearLast YearLast YearLast YearLast YearLast YearLast YearLast YearLast YearLast YearLast YearLast YearLast YearLast YearLast YearLast YearLast Year Last YearLast YearLast YearLast YearLast YearLast YearLast YearLast YearLast YearLast YearLast YearLast YearLast YearLast YearLast YearLast YearLast YearLast YearLast YearLast YearLast YearLast YearLast YearLast Year Last Year Last Year Last Year Last Year Last Year Last Year Last Year Last Year Last Year Last Year Last Year Last Year Last Year Last Year Last Year Last Year Last Year Last Year Last Year Last Year Last Year Lest Year List Year Lest Year Lest Year Lest Year Lest Year Lest Year Lest Year Lest Year Lest Year Lest Year Lest Year Lest Year Lest Year Lest Year Lest Year Lest Year Lest Year Lest Year Lest Year Lest Year Lest Year Lest Year Lest Year Lest Year Lest Year Lest Year Lest Year Lest Year Lest Year Lest Year Lest Year Lest Year Lest Year Lest Year Lest YEAR LastYEAR LastYEAR LastYEAR LastYEAR LastYEAR LastYEAR LastYEAR LastYEAR LastYEAR LastYEAR LastYEAR LastYEAR LastYEAR LastYEAR LastYEAR LastYEAR LastYEAR LastYEAR LastYEAR LastYEAR LastYEAR LastYEAR LastYEAR LastYEAR LastYEAR LastYEAR LastYEAR LastYEAR LastYEAR LastYEAR LastYEAR LastYEAR LastYEAR LastYEAR LastYEAR LastYEAR LastYEAR LastYEAR LastYEAR LastYEAR LastYEAR LastYEAR LastYEAR LastYEAR LastYEAR LastYEAR LastYEAR LastYEAR LastYEAR LastYEAR LastIEA LastIEA LastIEA LastIEA LastIEA LastIEA LastIEA LastIEA LastIEA LastIEA LastIEA LastIEA LastIEA LastIEA LastIEA LastIEA LastIEA LastIEA LastIEA LastIEA LastIEA LastIEA LastIEA LastIEA LastIEA LastIEA LastIEA LastIEA LastIEA LastIEA LastIEA LastIEA LastIEA LastIEA FirstEIA LastIEA FirstEIA FirstEIA FirstEIA FirstEIA FirstEIA FirstEIA FirstEIA FirstEIA FirstEIA FirstEIA FirstEIA FirstEIA FirstEIA FirstEIA FirstEIA FirstEIA FirstEIA FirstEIA FirstEIA FirstEIA FirstEIA FirstEIA FirstEIA FirstEIA FirstEIA FirstEIA FirstEIA FirstEIA FirstEIA FirstEIA FirstEIA FirstEIA FirstEIA FirstEIAFirstEIA FirstEIA FirstEIA FirstEIA FirstEIA FirstEIA FirstEIA FirstEIA FirstEIA FirstEIA FirstEIA FirstEIA FirstEIA FirstEIA FirstEIA FirstEIA FirstEIA FirstEIA FirstEIA FirstEIA FirstEIA FirstEIA FirstEIA FirstEIA FirstEIA FirstEIA FirstEIA FirstEIA FirstEIA FirstEIA FirstEIA FirstEIA FirstEIA FirstFIAstEIA FirstEIA FirstEIA FirstEIA FirstEIA FirstEIA FirstEIA FirstEIA FirstEIA FirstEIA FirstEIA FirstEIA FirstEIA FirstEIA FirstEIA FirstEIA FirstEIA FirstEIA FirstEIA FirstEIA FirstEIA FirstEIA FirstEIA FirstEIA FirstEIA FirstEIA FirstEIA FirstEIA FirstEIA FirstEIA FirstEIA FirstEIA FirstEIIaStEIIaStEIIaStEIIaStEIIaStEIIaStEIIaStEIIaStEIIaStEIIaStEIIaStEIIaStEIIaStEIIaStEIIaStEIIaStEIIaStEIIaStEIIaStSSTeIIaStTSTeIIaStTSTeIIaStTSTeIIaStTSTeIIaStTSTeIIaStTSTeIIaStTSTeIIaStTSTeIIaStTSTeIIaStTSTeIIaStTSTeIIaStTSTeIIaStTSTeIIaStTSTeIIaStTSTeIIaStTSTeIIaStTSTeIIbStTSTeIIaStTSTeIIaStTSTeIIaStTSTeIIaStTSTeIIaStTSTeIIaStTSTeIIaStTSTeIIaStTSTeIIaStTSTeIIaStTSTeIIaStTSTeIIaStTSTeIIaStTSTeIIaStTSTeIIaStTSTeIIaStTSTcSTcSTcSTcSTcSTcSTcSTcSTcSTcSTcSTcSTcSTcSTcSTcSTcSTcSTcSTcSTcSTcSTcSTcSTcSTcSTcSTcSTcSTcSTcSTcSTcSTcSTcSTcSTcSTcSTcSTcSTcSTcSTcSTcSTcSTcSTcSTcSTcSTcST cSTc STCCTc STCCTc STCCTc STCCTc STCCTc STCCTc STCCTc STCCTc STCCTc STCCTc STCCTc STCCTc STCCTc STCCTc STCCTc STCCTc STCCTc STCCTc STCCTc STCCTc STCCTc STCCTc STCCTc STCCTc STCCTc STCETs STCCTc STCCTc STCCTc STCCTc STCCTc STCCTc STCCTc STCCTc STCCTc STCCTc STCCTc STCCTc STCCTc STCCTc STCCTc STCCTc STCCTc STCCTc STCCTc STCCTc STCCTc STCCTc STCCTc STCCTc STCCTt c STCCTt c STCCTt c STCCTt c STCCTt c STCCTt c STCCTt c STCCTt c STCCTt c STCCTt c STCCTt c STCCTt c STCCTt c STCCTt c STCCTt c STCCTt c STCCTt c STCCTt c STCCTt c STCCTt c STCCTt t c STCCTt c STCCTt c STCCTt c STCCTt c STCCTt c STCCTt c STCCTt c STCCTt c STCCTt c STCCTt c STCCTt c STCCTt c STCCTt c STCCTt c STCCTt c STCCTt c STCCTt c STCCTt c STCCTt c STCCT |
natural_image
Technical line drawing of a mechanical component with arrows indicating motion or assembly (no text or symbols)natural_image
Technical line drawing of a mechanical assembly with no visible text or symbolstext_image
Technical diagram showing a device with labeled parts O, P, and Q, including an arrow indicating direction.natural_image
Blank white image with no visible content, text, or symbols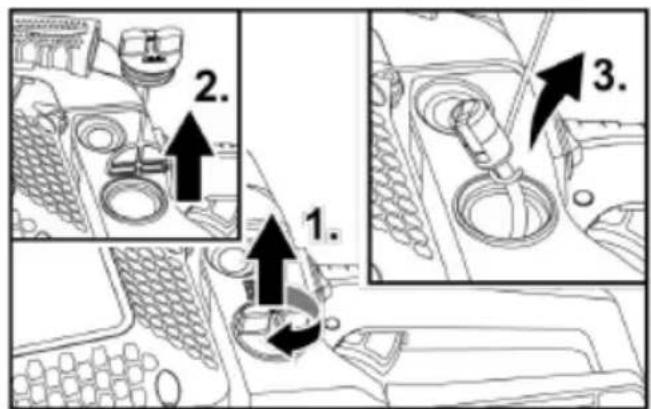
text_image
Technical diagram showing three steps of car intake and wheel assembly, with numbered annotations indicating component placement.natural_image
Technical line drawing of a mechanical assembly with no visible text or symbolstext_image
Technical diagram showing mechanical assembly with labeled parts and directional arrows indicating motion or force directions.
text_image
5. 5. 4. 3.